
yolov5——detect.py代码【注释、详解、使用教程】
yolov5——detect.py代码【注释、详解、使用教程】
根据目前的最新版本的yolov5代码做出注释和详解以及使用教程,对了目前已经是v6,不知道你看博客的时候是什么版本呢,总的来说越来越先进越来越完善,越来越适合无脑啊哈哈哈,没你说哈IIII
1. 函数parse_opt()
defparse_opt():"""
    weights: 训练的权重路径,可以使用自己训练的权重,也可以使用官网提供的权重
    默认官网的权重yolov5s.pt(yolov5n.pt/yolov5s.pt/yolov5m.pt/yolov5l.pt/yolov5x.pt/区别在于网络的宽度和深度以此增加)
    source: 测试数据,可以是图片/视频路径,也可以是'0'(电脑自带摄像头),也可以是rtsp等视频流, 默认data/images
    data: 配置数据文件路径, 包括image/label/classes等信息, 训练自己的文件, 需要作相应更改, 可以不用管
    如果设置了只显示个别类别即使用了--classes = 0 或二者1, 2, 3等, 则需要设置该文件,数字和类别相对应才能只检测某一个类
    imgsz: 网络输入图片大小, 默认的大小是640
    conf-thres: 置信度阈值, 默认为0.25
    iou-thres:  做nms的iou阈值, 默认为0.45
    max-det: 保留的最大检测框数量, 每张图片中检测目标的个数最多为1000类
    device: 设置设备CPU/CUDA, 可以不用设置
    view-img: 是否展示预测之后的图片/视频, 默认False, --view-img 电脑界面出现图片或者视频检测结果
    save-txt: 是否将预测的框坐标以txt文件形式保存, 默认False, 使用--save-txt 在路径runs/detect/exp*/labels/*.txt下生成每张图片预测的txt文件
    save-conf: 是否将置信度conf也保存到txt中, 默认False
    save-crop: 是否保存裁剪预测框图片, 默认为False, 使用--save-crop 在runs/detect/exp*/crop/剪切类别文件夹/ 路径下会保存每个接下来的目标
    nosave: 不保存图片、视频, 要保存图片,不设置--nosave 在runs/detect/exp*/会出现预测的结果
    classes: 设置只保留某一部分类别, 形如0或者0 2 3, 使用--classes = n, 则在路径runs/detect/exp*/下保存的图片为n所对应的类别, 此时需要设置data
    agnostic-nms: 进行NMS去除不同类别之间的框, 默认False
    augment: TTA测试时增强/多尺度预测
    visualize: 是否可视化网络层输出特征
    update: 如果为True,则对所有模型进行strip_optimizer操作,去除pt文件中的优化器等信息,默认为False
    project:保存测试日志的文件夹路径
    name:保存测试日志文件夹的名字, 所以最终是保存在project/name中
    exist_ok: 是否重新创建日志文件, False时重新创建文件
    line-thickness: 画框的线条粗细
    hide-labels: 可视化时隐藏预测类别
    hide-conf: 可视化时隐藏置信度
    half: 是否使用F16精度推理, 半进度提高检测速度
    dnn: 用OpenCV DNN预测
    """
    parser = argparse.ArgumentParser()
    parser.add_argument('--weights', nargs='+',type=str, default=ROOT /'yolov5s.pt',help='model path(s)')
    parser.add_argument('--source',type=str, default=ROOT /'data/images',help='file/dir/URL/glob, 0 for webcam')
    parser.add_argument('--data',type=str, default=ROOT /'data/coco128.yaml',help='(optional) dataset.yaml path')
    parser.add_argument('--imgsz','--img','--img-size', nargs='+',type=int, default=[640],help='inference size h,w')
    parser.add_argument('--conf-thres',type=float, default=0.25,help='confidence threshold')
    parser.add_argument('--iou-thres',type=float, default=0.45,help='NMS IoU threshold')
    parser.add_argument('--max-det',type=int, default=1000,help='maximum detections per image')
    parser.add_argument('--device', default='',help='cuda device, i.e. 0 or 0,1,2,3 or cpu')
    parser.add_argument('--view-img', action='store_true',help='show results')
    parser.add_argument('--save-txt', action='store_true',help='save results to *.txt')
    parser.add_argument('--save-conf', action='store_true',help='save confidences in --save-txt labels')
    parser.add_argument('--save-crop', action='store_true',help='save cropped prediction boxes')
    parser.add_argument('--nosave', action='store_true',help='do not save images/videos')
    parser.add_argument('--classes', nargs='+',type=int,help='filter by class: --classes 0, or --classes 0 2 3')
    parser.add_argument('--agnostic-nms', action='store_true',help='class-agnostic NMS')
    parser.add_argument('--augment', action='store_true',help='augmented inference')
    parser.add_argument('--visualize', action='store_true',help='visualize features')
    parser.add_argument('--update', action='store_true',help='update all models')
    parser.add_argument('--project', default=ROOT /'runs/detect',help='save results to project/name')
    parser.add_argument('--name', default='exp',help='save results to project/name')
    parser.add_argument('--exist-ok', action='store_true',help='existing project/name ok, do not increment')
    parser.add_argument('--line-thickness', default=3,type=int,help='bounding box thickness (pixels)')
    parser.add_argument('--hide-labels', default=False, action='store_true',help='hide labels')
    parser.add_argument('--hide-conf', default=False, action='store_true',help='hide confidences')
    parser.add_argument('--half', action='store_true',help='use FP16 half-precision inference')
    parser.add_argument('--dnn', action='store_true',help='use OpenCV DNN for ONNX inference')

    opt = parser.parse_args()# 扩充维度, 如果是一位就扩充一位
    opt.imgsz *=2iflen(opt.imgsz)==1else1# expand# 输出所有参数
    print_args(FILE.stem, opt)return opt
2. 函数main()
defmain(opt):# 检查环境/打印参数,主要是requrement.txt的包是否安装,用彩色显示设置的参数
    check_requirements(exclude=('tensorboard','thop'))# 执行run()函数
    run(**vars(opt))
3. 函数run()
3.1 run函数——传入参数
defrun(weights=ROOT /'yolov5s.pt',# model.pt path(s) # 权重文件地址 默认 weights/可以是自己的路径
        source=ROOT /'data/images',# file/dir/URL/glob, 0 for webcam 0 自带电脑摄像头, 默认data/images/
        data=ROOT /'data/coco128.yaml',# dataset.yaml path, data文件路径,包括类别/图片/标签等信息
        imgsz=(640,640),# inference size (height, width) 输入图片的大小 默认640*640
        conf_thres=0.25,# confidence threshold # object置信度阈值 默认0.25  用在nms中
        iou_thres=0.45,# NMS IOU threshold # 做nms的iou阈值 默认0.45   用在nms中
        max_det=1000,# maximum detections per image 每张图片最多的目标数量  用在nms中
        device='',# cuda device, i.e. 0 or 0,1,2,3 or cpu 设置代码执行的设备 cuda device, i.e. 0 or 0,1,2,3 or cpu
        view_img=False,# show results 是否展示预测之后的图片或视频 默认False
        save_txt=False,# save results to *.txt 是否将预测的框坐标以txt文件形式保存, 默认False, 使用--save-txt 在路径runs/detect/exp*/labels/*.txt下生成每张图片预测的txt文件
        save_conf=False,# save confidences in --save-txt labels 是否将置信度conf也保存到txt中, 默认False
        save_crop=False,# save cropped prediction boxes 是否保存裁剪预测框图片, 默认为False, 使用--save-crop 在runs/detect/exp*/crop/剪切类别文件夹/ 路径下会保存每个接下来的目标
        nosave=False,# do not save images/videos 不保存图片、视频, 要保存图片,不设置--nosave 在runs/detect/exp*/会出现预测的结果
        classes=None,# filter by class: --class 0, or --class 0 2 3 设置只保留某一部分类别, 形如0或者0 2 3, 使用--classes = n, 则在路径runs/detect/exp*/下保存的图片为n所对应的类别, 此时需要设置data
        agnostic_nms=False,# class-agnostic NMS 进行NMS去除不同类别之间的框, 默认False
        augment=False,# augmented inference TTA测试时增强/多尺度预测,可以提分
        visualize=False,# visualize features 是否可视化网络层输出特征
        update=False,# update all models 如果为True,则对所有模型进行strip_optimizer操作,去除pt文件中的优化器等信息,默认为False
        project=ROOT /'runs/detect',# save results to project/name 保存测试日志的文件夹路径
        name='exp',# save results to project/name 每次实验的名称
        exist_ok=False,# existing project/name ok, do not increment 是否重新创建日志文件, False时重新创建文件
        line_thickness=3,# bounding box thickness (pixels) 画框的线条粗细
        hide_labels=False,# hide labels 可视化时隐藏预测类别
        hide_conf=False,# hide confidences 可视化时隐藏置信度
        half=False,# use FP16 half-precision inference 是否使用F16精度推理, 半进度提高检测速度
        dnn=False,# use OpenCV DNN for ONNX inference 用OpenCV DNN预测):
3.2 run函数——初始化配置
################################################# 1. 初始化配置 ###################################################### 输入的路径变为字符串
    source =str(source)# 是否保存图片和txt文件
    save_img =not nosave andnot source.endswith('.txt')# save inference images# 判断文件是否是视频流# Path()提取文件名 例如:Path("./data/test_images/bus.jpg") Path.name->bus.jpg Path.parent->./data/test_images Path.suffix->.jpg
    is_file = Path(source).suffix[1:]in(IMG_FORMATS + VID_FORMATS)# 提取文件后缀名是否符合要求的文件,例如:是否格式是jpg, png, asf, avi等# .lower()转化成小写 .upper()转化成大写 .title()首字符转化成大写,其余为小写, .startswith('http://')返回True or Flase
    is_url = source.lower().startswith(('rtsp://','rtmp://','http://','https://'))# .isnumeric()是否是由数字组成,返回True or False
    webcam = source.isnumeric()or source.endswith('.txt')or(is_url andnot is_file)if is_url and is_file:# 返回文件
        source = check_file(source)# download# Directories# 预测路径是否存在,不存在新建,按照实验文件以此递增新建
    save_dir = increment_path(Path(project)/ name, exist_ok=exist_ok)# increment run(save_dir /'labels'if save_txt else save_dir).mkdir(parents=True, exist_ok=True)# make dir# Load model# 获取设备 CPU/CUDA
    device = select_device(device)# 检测编译框架PYTORCH/TENSORFLOW/TENSORRT
    model = DetectMultiBackend(weights, device=device, dnn=dnn, data=data)
    stride, names, pt, jit, onnx, engine = model.stride, model.names, model.pt, model.jit, model.onnx, model.engine
    # 确保输入图片的尺寸imgsz能整除stride=32 如果不能则调整为能被整除并返回
    imgsz = check_img_size(imgsz, s=stride)# check image size# Half# 如果不是CPU,使用半进度(图片半精度/模型半精度)
    half &=(pt or jit or onnx or engine)and device.type!='cpu'# FP16 supported on limited backends with CUDAif pt or jit:
        model.model.half()if half else model.model.float()# TENSORRT加速elif engine and model.trt_fp16_input != half:
        LOGGER.info('model '+('requires'if model.trt_fp16_input else'incompatible with')+' --half. Adjusting automatically.')
        half = model.trt_fp16_input
3.3 run函数——加载数据
################################################# 2. 加载数据 ###################################################### Dataloader 加载数据# 使用视频流或者页面if webcam:
        view_img = check_imshow()
        cudnn.benchmark =True# set True to speed up constant image size inference
        dataset = LoadStreams(source, img_size=imgsz, stride=stride, auto=pt)
        bs =len(dataset)# batch_sizeelse:# 直接从source文件下读取图片
        dataset = LoadImages(source, img_size=imgsz, stride=stride, auto=pt)
        bs =1# batch_size# 保存的路径
    vid_path, vid_writer =[None]* bs,[None]* bs
3.4 run函数——输入预测
    model.warmup(imgsz=(1if pt else bs,3,*imgsz), half=half)# warmup
    dt, seen =[0.0,0.0,0.0],0for path, im, im0s, vid_cap, s in dataset:
        t1 = time_sync()# 转化到GPU上
        im = torch.from_numpy(im).to(device)# 是否使用半精度
        im = im.half()if half else im.float()# uint8 to fp16/32
        im /=255# 0 - 255 to 0.0 - 1.0iflen(im.shape)==3:# 增加一个维度
            im = im[None]# expand for batch dim
        t2 = time_sync()
        dt[0]+= t2 - t1

        # Inference# 可是化文件路径
        visualize = increment_path(save_dir / Path(path).stem, mkdir=True)if visualize elseFalse"""
        pred.shape=(1, num_boxes, 5+num_class)
        h,w为传入网络图片的长和宽,注意dataset在检测时使用了矩形推理,所以这里h不一定等于w
        num_boxes = h/32 * w/32 + h/16 * w/16 + h/8 * w/8
        pred[..., 0:4]为预测框坐标=预测框坐标为xywh(中心点+宽长)格式
        pred[..., 4]为objectness置信度
        pred[..., 5:-1]为分类结果
        """
        pred = model(im, augment=augment, visualize=visualize)
        t3 = time_sync()# 预测的时间
        dt[1]+= t3 - t2
3.5 run函数——NMS
# NMS# 非极大值抑制"""
        pred: 网络的输出结果
        conf_thres:置信度阈值
        ou_thres:iou阈值
        classes: 是否只保留特定的类别
        agnostic_nms: 进行nms是否也去除不同类别之间的框
        max-det: 保留的最大检测框数量
        ---NMS, 预测框格式: xywh(中心点+长宽)-->xyxy(左上角右下角)
        pred是一个列表list[torch.tensor], 长度为batch_size
        每一个torch.tensor的shape为(num_boxes, 6), 内容为box + conf + cls
        """
        pred = non_max_suppression(pred, conf_thres, iou_thres, classes, agnostic_nms, max_det=max_det)# 预测+NMS的时间
        dt[2]+= time_sync()- t3
3.6 run函数——保存打印
# Process predictions# 对每张图片做处理for i, det inenumerate(pred):# per image
            seen +=1if webcam:# batch_size >= 1# 如果输入源是webcam则batch_size>=1 取出dataset中的一张图片
                p, im0, frame = path[i], im0s[i].copy(), dataset.count
                s += f'{i}: 'else:# 但是大部分我们一般都是从LoadImages流读取本都文件中的照片或者视频 所以batch_size=1# p: 当前图片/视频的绝对路径 如 F:\yolo_v5\yolov5-U\data\images\bus.jpg# s: 输出信息 初始为 ''# im0: 原始图片 letterbox + pad 之前的图片# frame: 视频流
                p, im0, frame = path, im0s.copy(),getattr(dataset,'frame',0)# 当前路径yolov5/data/images/
            p = Path(p)# to Path# 图片/视频的保存路径save_path 如 runs\\detect\\exp8\\bus.jpg
            save_path =str(save_dir / p.name)# im.jpg# 设置保存框坐标的txt文件路径,每张图片对应一个框坐标信息
            txt_path =str(save_dir /'labels'/ p.stem)+(''if dataset.mode =='image'else f'_{frame}')# im.txt# 设置打印图片的信息
            s +='%gx%g '% im.shape[2:]# print string
            gn = torch.tensor(im0.shape)[[1,0,1,0]]# normalization gain whwh# 保存截图
            imc = im0.copy()if save_crop else im0  # for save_crop
            annotator = Annotator(im0, line_width=line_thickness, example=str(names))iflen(det):# Rescale boxes from img_size to im0 size# 将预测信息映射到原图
                det[:,:4]= scale_coords(im.shape[2:], det[:,:4], im0.shape).round()# Print results# 打印检测到的类别数量for c in det[:,-1].unique():
                    n =(det[:,-1]== c).sum()# detections per class
                    s += f"{n} {names[int(c)]}{'s' * (n > 1)}, "# add to string# Write results# 保存结果: txt/图片画框/crop-imagefor*xyxy, conf, cls inreversed(det):# 将每个图片的预测信息分别存入save_dir/labels下的xxx.txt中 每行: class_id + score + xywhif save_txt:# Write to file
                        xywh =(xyxy2xywh(torch.tensor(xyxy).view(1,4))/ gn).view(-1).tolist()# normalized xywh
                        line =(cls,*xywh, conf)if save_conf else(cls,*xywh)# label formatwithopen(txt_path +'.txt','a')as f:
                            f.write(('%g '*len(line)).rstrip()% line +'\n')# # 在原图上画框 + 将预测到的目标剪切出来 保存成图片 保存在save_dir/crops下 在原图像画图或者保存结果if save_img or save_crop or view_img:# Add bbox to image
                        c =int(cls)# integer class
                        label =Noneif hide_labels else(names[c]if hide_conf else f'{names[c]} {conf:.2f}')
                        annotator.box_label(xyxy, label, color=colors(c,True))if save_crop:# 在原图上画框 + 将预测到的目标剪切出来 保存成图片 保存在save_dir/crops下
                            save_one_box(xyxy, imc,file=save_dir /'crops'/ names[c]/ f'{p.stem}.jpg', BGR=True)# Stream results
            im0 = annotator.result()# 显示图片if view_img:
                cv2.imshow(str(p), im0)
                cv2.waitKey(1)# 1 millisecond# Save results (image with detections)# 保存图片if save_img:if dataset.mode =='image':
                    cv2.imwrite(save_path, im0)else:# 'video' or 'stream'if vid_path[i]!= save_path:# new video
                        vid_path[i]= save_path
                        ifisinstance(vid_writer[i], cv2.VideoWriter):
                            vid_writer[i].release()# release previous video writerif vid_cap:# video
                            fps = vid_cap.get(cv2.CAP_PROP_FPS)
                            w =int(vid_cap.get(cv2.CAP_PROP_FRAME_WIDTH))
                            h =int(vid_cap.get(cv2.CAP_PROP_FRAME_HEIGHT))else:# stream
                            fps, w, h =30, im0.shape[1], im0.shape[0]
                        save_path =str(Path(save_path).with_suffix('.mp4'))# force *.mp4 suffix on results videos
                        vid_writer[i]= cv2.VideoWriter(save_path, cv2.VideoWriter_fourcc(*'mp4v'), fps,(w, h))
                    vid_writer[i].write(im0)# Print time (inference-only)
        LOGGER.info(f'{s}Done. ({t3 - t2:.3f}s)')
4. detect.py全部注释
# YOLOv5 🚀 by Ultralytics, GPL-3.0 license"""
Run inference on images, videos, directories, streams, etc.

Usage - sources:
    $ python path/to/detect.py --weights yolov5s.pt --source 0              # webcam # 直播软件/电脑摄像头
                                                             img.jpg        # image
                                                             vid.mp4        # video
                                                             path/          # directory
                                                             path/*.jpg     # glob
                                                             'https://youtu.be/Zgi9g1ksQHc'  # YouTube
                                                             'rtsp://example.com/media.mp4'  # RTSP, RTMP, HTTP stream

Usage - formats:
    $ python path/to/detect.py --weights yolov5s.pt                 # PyTorch
                                         yolov5s.torchscript        # TorchScript
                                         yolov5s.onnx               # ONNX Runtime or OpenCV DNN with --dnn
                                         yolov5s.xml                # OpenVINO
                                         yolov5s.engine             # TensorRT
                                         yolov5s.mlmodel            # CoreML (MacOS-only)
                                         yolov5s_saved_model        # TensorFlow SavedModel
                                         yolov5s.pb                 # TensorFlow GraphDef
                                         yolov5s.tflite             # TensorFlow Lite
                                         yolov5s_edgetpu.tflite     # TensorFlow Edge TPU
"""import argparse
import os
import sys
from pathlib import Path

import cv2
import torch
import torch.backends.cudnn as cudnn

FILE = Path(__file__).resolve()
ROOT = FILE.parents[0]# YOLOv5 root directoryifstr(ROOT)notin sys.path:
    sys.path.append(str(ROOT))# add ROOT to PATH
ROOT = Path(os.path.relpath(ROOT, Path.cwd()))# relativefrom models.common import DetectMultiBackend
from utils.datasets import IMG_FORMATS, VID_FORMATS, LoadImages, LoadStreams
from utils.general import(LOGGER, check_file, check_img_size, check_imshow, check_requirements, colorstr,
                           increment_path, non_max_suppression, print_args, scale_coords, strip_optimizer, xyxy2xywh)from utils.plots import Annotator, colors, save_one_box
from utils.torch_utils import select_device, time_sync

# 预测不更新梯度
@torch.no_grad()defrun(weights=ROOT /'yolov5s.pt',# model.pt path(s) # 权重文件地址 默认 weights/可以是自己的路径
        source=ROOT /'data/images',# file/dir/URL/glob, 0 for webcam 0 自带电脑摄像头, 默认data/images/
        data=ROOT /'data/coco128.yaml',# dataset.yaml path, data文件路径,包括类别/图片/标签等信息
        imgsz=(640,640),# inference size (height, width) 输入图片的大小 默认640*640
        conf_thres=0.25,# confidence threshold # object置信度阈值 默认0.25  用在nms中
        iou_thres=0.45,# NMS IOU threshold # 做nms的iou阈值 默认0.45   用在nms中
        max_det=1000,# maximum detections per image 每张图片最多的目标数量  用在nms中
        device='',# cuda device, i.e. 0 or 0,1,2,3 or cpu 设置代码执行的设备 cuda device, i.e. 0 or 0,1,2,3 or cpu
        view_img=False,# show results 是否展示预测之后的图片或视频 默认False
        save_txt=False,# save results to *.txt 是否将预测的框坐标以txt文件形式保存, 默认False, 使用--save-txt 在路径runs/detect/exp*/labels/*.txt下生成每张图片预测的txt文件
        save_conf=False,# save confidences in --save-txt labels 是否将置信度conf也保存到txt中, 默认False
        save_crop=False,# save cropped prediction boxes 是否保存裁剪预测框图片, 默认为False, 使用--save-crop 在runs/detect/exp*/crop/剪切类别文件夹/ 路径下会保存每个接下来的目标
        nosave=False,# do not save images/videos 不保存图片、视频, 要保存图片,不设置--nosave 在runs/detect/exp*/会出现预测的结果
        classes=None,# filter by class: --class 0, or --class 0 2 3 设置只保留某一部分类别, 形如0或者0 2 3, 使用--classes = n, 则在路径runs/detect/exp*/下保存的图片为n所对应的类别, 此时需要设置data
        agnostic_nms=False,# class-agnostic NMS 进行NMS去除不同类别之间的框, 默认False
        augment=False,# augmented inference TTA测试时增强/多尺度预测,可以提分
        visualize=False,# visualize features 是否可视化网络层输出特征
        update=False,# update all models 如果为True,则对所有模型进行strip_optimizer操作,去除pt文件中的优化器等信息,默认为False
        project=ROOT /'runs/detect',# save results to project/name 保存测试日志的文件夹路径
        name='exp',# save results to project/name 每次实验的名称
        exist_ok=False,# existing project/name ok, do not increment 是否重新创建日志文件, False时重新创建文件
        line_thickness=3,# bounding box thickness (pixels) 画框的线条粗细
        hide_labels=False,# hide labels 可视化时隐藏预测类别
        hide_conf=False,# hide confidences 可视化时隐藏置信度
        half=False,# use FP16 half-precision inference 是否使用F16精度推理, 半进度提高检测速度
        dnn=False,# use OpenCV DNN for ONNX inference 用OpenCV DNN预测):################################################# 1. 初始化配置 ###################################################### 输入的路径变为字符串
    source =str(source)# 是否保存图片和txt文件
    save_img =not nosave andnot source.endswith('.txt')# save inference images# 判断文件是否是视频流# Path()提取文件名 例如:Path("./data/test_images/bus.jpg") Path.name->bus.jpg Path.parent->./data/test_images Path.suffix->.jpg
    is_file = Path(source).suffix[1:]in(IMG_FORMATS + VID_FORMATS)# 提取文件后缀名是否符合要求的文件,例如:是否格式是jpg, png, asf, avi等# .lower()转化成小写 .upper()转化成大写 .title()首字符转化成大写,其余为小写, .startswith('http://')返回True or Flase
    is_url = source.lower().startswith(('rtsp://','rtmp://','http://','https://'))# .isnumeric()是否是由数字组成,返回True or False
    webcam = source.isnumeric()or source.endswith('.txt')or(is_url andnot is_file)if is_url and is_file:# 返回文件
        source = check_file(source)# download# Directories# 预测路径是否存在,不存在新建,按照实验文件以此递增新建
    save_dir = increment_path(Path(project)/ name, exist_ok=exist_ok)# increment run(save_dir /'labels'if save_txt else save_dir).mkdir(parents=True, exist_ok=True)# make dir# Load model# 获取设备 CPU/CUDA
    device = select_device(device)# 检测编译框架PYTORCH/TENSORFLOW/TENSORRT
    model = DetectMultiBackend(weights, device=device, dnn=dnn, data=data)
    stride, names, pt, jit, onnx, engine = model.stride, model.names, model.pt, model.jit, model.onnx, model.engine
    # 确保输入图片的尺寸imgsz能整除stride=32 如果不能则调整为能被整除并返回
    imgsz = check_img_size(imgsz, s=stride)# check image size# Half# 如果不是CPU,使用半进度(图片半精度/模型半精度)
    half &=(pt or jit or onnx or engine)and device.type!='cpu'# FP16 supported on limited backends with CUDAif pt or jit:
        model.model.half()if half else model.model.float()# TENSORRT加速elif engine and model.trt_fp16_input != half:
        LOGGER.info('model '+('requires'if model.trt_fp16_input else'incompatible with')+' --half. Adjusting automatically.')
        half = model.trt_fp16_input


    ################################################# 2. 加载数据 ###################################################### Dataloader 加载数据# 使用视频流或者页面if webcam:
        view_img = check_imshow()
        cudnn.benchmark =True# set True to speed up constant image size inference
        dataset = LoadStreams(source, img_size=imgsz, stride=stride, auto=pt)
        bs =len(dataset)# batch_sizeelse:# 直接从source文件下读取图片
        dataset = LoadImages(source, img_size=imgsz, stride=stride, auto=pt)
        bs =1# batch_size# 保存的路径
    vid_path, vid_writer =[None]* bs,[None]* bs

    ################################################# 3. 网络预测 ###################################################### Run inference# warmup 热身
    model.warmup(imgsz=(1if pt else bs,3,*imgsz), half=half)# warmup
    dt, seen =[0.0,0.0,0.0],0for path, im, im0s, vid_cap, s in dataset:
        t1 = time_sync()# 转化到GPU上
        im = torch.from_numpy(im).to(device)# 是否使用半精度
        im = im.half()if half else im.float()# uint8 to fp16/32
        im /=255# 0 - 255 to 0.0 - 1.0iflen(im.shape)==3:# 增加一个维度
            im = im[None]# expand for batch dim
        t2 = time_sync()
        dt[0]+= t2 - t1

        # Inference# 可是化文件路径
        visualize = increment_path(save_dir / Path(path).stem, mkdir=True)if visualize elseFalse"""
        pred.shape=(1, num_boxes, 5+num_class)
        h,w为传入网络图片的长和宽,注意dataset在检测时使用了矩形推理,所以这里h不一定等于w
        num_boxes = h/32 * w/32 + h/16 * w/16 + h/8 * w/8
        pred[..., 0:4]为预测框坐标=预测框坐标为xywh(中心点+宽长)格式
        pred[..., 4]为objectness置信度
        pred[..., 5:-1]为分类结果
        """
        pred = model(im, augment=augment, visualize=visualize)
        t3 = time_sync()# 预测的时间
        dt[1]+= t3 - t2

        # NMS# 非极大值抑制"""
        pred: 网络的输出结果
        conf_thres:置信度阈值
        ou_thres:iou阈值
        classes: 是否只保留特定的类别
        agnostic_nms: 进行nms是否也去除不同类别之间的框
        max-det: 保留的最大检测框数量
        ---NMS, 预测框格式: xywh(中心点+长宽)-->xyxy(左上角右下角)
        pred是一个列表list[torch.tensor], 长度为batch_size
        每一个torch.tensor的shape为(num_boxes, 6), 内容为box + conf + cls
        """
        pred = non_max_suppression(pred, conf_thres, iou_thres, classes, agnostic_nms, max_det=max_det)# 预测+NMS的时间
        dt[2]+= time_sync()- t3

        # Second-stage classifier (optional)# pred = utils.general.apply_classifier(pred, classifier_model, im, im0s)# Process predictions# 对每张图片做处理for i, det inenumerate(pred):# per image
            seen +=1if webcam:# batch_size >= 1# 如果输入源是webcam则batch_size>=1 取出dataset中的一张图片
                p, im0, frame = path[i], im0s[i].copy(), dataset.count
                s += f'{i}: 'else:# 但是大部分我们一般都是从LoadImages流读取本都文件中的照片或者视频 所以batch_size=1# p: 当前图片/视频的绝对路径 如 F:\yolo_v5\yolov5-U\data\images\bus.jpg# s: 输出信息 初始为 ''# im0: 原始图片 letterbox + pad 之前的图片# frame: 视频流
                p, im0, frame = path, im0s.copy(),getattr(dataset,'frame',0)# 当前路径yolov5/data/images/
            p = Path(p)# to Path# 图片/视频的保存路径save_path 如 runs\\detect\\exp8\\bus.jpg
            save_path =str(save_dir / p.name)# im.jpg# 设置保存框坐标的txt文件路径,每张图片对应一个框坐标信息
            txt_path =str(save_dir /'labels'/ p.stem)+(''if dataset.mode =='image'else f'_{frame}')# im.txt# 设置打印图片的信息
            s +='%gx%g '% im.shape[2:]# print string
            gn = torch.tensor(im0.shape)[[1,0,1,0]]# normalization gain whwh# 保存截图
            imc = im0.copy()if save_crop else im0  # for save_crop
            annotator = Annotator(im0, line_width=line_thickness, example=str(names))iflen(det):# Rescale boxes from img_size to im0 size# 将预测信息映射到原图
                det[:,:4]= scale_coords(im.shape[2:], det[:,:4], im0.shape).round()# Print results# 打印检测到的类别数量for c in det[:,-1].unique():
                    n =(det[:,-1]== c).sum()# detections per class
                    s += f"{n} {names[int(c)]}{'s' * (n > 1)}, "# add to string# Write results# 保存结果: txt/图片画框/crop-imagefor*xyxy, conf, cls inreversed(det):# 将每个图片的预测信息分别存入save_dir/labels下的xxx.txt中 每行: class_id + score + xywhif save_txt:# Write to file
                        xywh =(xyxy2xywh(torch.tensor(xyxy).view(1,4))/ gn).view(-1).tolist()# normalized xywh
                        line =(cls,*xywh, conf)if save_conf else(cls,*xywh)# label formatwithopen(txt_path +'.txt','a')as f:
                            f.write(('%g '*len(line)).rstrip()% line +'\n')# # 在原图上画框 + 将预测到的目标剪切出来 保存成图片 保存在save_dir/crops下 在原图像画图或者保存结果if save_img or save_crop or view_img:# Add bbox to image
                        c =int(cls)# integer class
                        label =Noneif hide_labels else(names[c]if hide_conf else f'{names[c]} {conf:.2f}')
                        annotator.box_label(xyxy, label, color=colors(c,True))if save_crop:# 在原图上画框 + 将预测到的目标剪切出来 保存成图片 保存在save_dir/crops下
                            save_one_box(xyxy, imc,file=save_dir /'crops'/ names[c]/ f'{p.stem}.jpg', BGR=True)# Stream results
            im0 = annotator.result()# 显示图片if view_img:
                cv2.imshow(str(p), im0)
                cv2.waitKey(1)# 1 millisecond# Save results (image with detections)# 保存图片if save_img:if dataset.mode =='image':
                    cv2.imwrite(save_path, im0)else:# 'video' or 'stream'if vid_path[i]!= save_path:# new video
                        vid_path[i]= save_path
                        ifisinstance(vid_writer[i], cv2.VideoWriter):
                            vid_writer[i].release()# release previous video writerif vid_cap:# video
                            fps = vid_cap.get(cv2.CAP_PROP_FPS)
                            w =int(vid_cap.get(cv2.CAP_PROP_FRAME_WIDTH))
                            h =int(vid_cap.get(cv2.CAP_PROP_FRAME_HEIGHT))else:# stream
                            fps, w, h =30, im0.shape[1], im0.shape[0]
                        save_path =str(Path(save_path).with_suffix('.mp4'))# force *.mp4 suffix on results videos
                        vid_writer[i]= cv2.VideoWriter(save_path, cv2.VideoWriter_fourcc(*'mp4v'), fps,(w, h))
                    vid_writer[i].write(im0)# Print time (inference-only)
        LOGGER.info(f'{s}Done. ({t3 - t2:.3f}s)')# Print results# 打印每张图片的速度
    t =tuple(x / seen *1E3for x in dt)# speeds per image
    LOGGER.info(f'Speed: %.1fms pre-process, %.1fms inference, %.1fms NMS per image at shape {(1, 3, *imgsz)}'% t)# 保存图片或者txtif save_txt or save_img:
        s = f"\n{len(list(save_dir.glob('labels/*.txt')))} labels saved to {save_dir / 'labels'}"if save_txt else''
        LOGGER.info(f"Results saved to {colorstr('bold', save_dir)}{s}")if update:
        strip_optimizer(weights)# update model (to fix SourceChangeWarning)defparse_opt():"""
    weights: 训练的权重路径,可以使用自己训练的权重,也可以使用官网提供的权重
    默认官网的权重yolov5s.pt(yolov5n.pt/yolov5s.pt/yolov5m.pt/yolov5l.pt/yolov5x.pt/区别在于网络的宽度和深度以此增加)
    source: 测试数据,可以是图片/视频路径,也可以是'0'(电脑自带摄像头),也可以是rtsp等视频流, 默认data/images
    data: 配置数据文件路径, 包括image/label/classes等信息, 训练自己的文件, 需要作相应更改, 可以不用管
    如果设置了只显示个别类别即使用了--classes = 0 或二者1, 2, 3等, 则需要设置该文件,数字和类别相对应才能只检测某一个类
    imgsz: 网络输入图片大小, 默认的大小是640
    conf-thres: 置信度阈值, 默认为0.25
    iou-thres:  做nms的iou阈值, 默认为0.45
    max-det: 保留的最大检测框数量, 每张图片中检测目标的个数最多为1000类
    device: 设置设备CPU/CUDA, 可以不用设置
    view-img: 是否展示预测之后的图片/视频, 默认False, --view-img 电脑界面出现图片或者视频检测结果
    save-txt: 是否将预测的框坐标以txt文件形式保存, 默认False, 使用--save-txt 在路径runs/detect/exp*/labels/*.txt下生成每张图片预测的txt文件
    save-conf: 是否将置信度conf也保存到txt中, 默认False
    save-crop: 是否保存裁剪预测框图片, 默认为False, 使用--save-crop 在runs/detect/exp*/crop/剪切类别文件夹/ 路径下会保存每个接下来的目标
    nosave: 不保存图片、视频, 要保存图片,不设置--nosave 在runs/detect/exp*/会出现预测的结果
    classes: 设置只保留某一部分类别, 形如0或者0 2 3, 使用--classes = n, 则在路径runs/detect/exp*/下保存的图片为n所对应的类别, 此时需要设置data
    agnostic-nms: 进行NMS去除不同类别之间的框, 默认False
    augment: TTA测试时增强/多尺度预测, 可以提分
    visualize: 是否可视化网络层输出特征
    update: 如果为True,则对所有模型进行strip_optimizer操作,去除pt文件中的优化器等信息,默认为False
    project: 保存测试日志的文件夹路径
    name: 保存测试日志文件夹的名字, 所以最终是保存在project/name中
    exist_ok: 是否重新创建日志文件, False时重新创建文件
    line-thickness: 画框的线条粗细
    hide-labels: 可视化时隐藏预测类别
    hide-conf: 可视化时隐藏置信度
    half: 是否使用F16精度推理, 半进度提高检测速度
    dnn: 用OpenCV DNN预测
    """
    parser = argparse.ArgumentParser()
    parser.add_argument('--weights', nargs='+',type=str, default=ROOT /'yolov5s.pt',help='model path(s)')
    parser.add_argument('--source',type=str, default=ROOT /'data/images',help='file/dir/URL/glob, 0 for webcam')
    parser.add_argument('--data',type=str, default=ROOT /'data/coco128.yaml',help='(optional) dataset.yaml path')
    parser.add_argument('--imgsz','--img','--img-size', nargs='+',type=int, default=[640],help='inference size h,w')
    parser.add_argument('--conf-thres',type=float, default=0.25,help='confidence threshold')
    parser.add_argument('--iou-thres',type=float, default=0.45,help='NMS IoU threshold')
    parser.add_argument('--max-det',type=int, default=1000,help='maximum detections per image')
    parser.add_argument('--device', default='',help='cuda device, i.e. 0 or 0,1,2,3 or cpu')
    parser.add_argument('--view-img', action='store_true',help='show results')
    parser.add_argument('--save-txt', action='store_true',help='save results to *.txt')
    parser.add_argument('--save-conf', action='store_true',help='save confidences in --save-txt labels')
    parser.add_argument('--save-crop', action='store_true',help='save cropped prediction boxes')
    parser.add_argument('--nosave', action='store_true',help='do not save images/videos')
    parser.add_argument('--classes', nargs='+',type=int,help='filter by class: --classes 0, or --classes 0 2 3')
    parser.add_argument('--agnostic-nms', action='store_true',help='class-agnostic NMS')
    parser.add_argument('--augment', action='store_true',help='augmented inference')
    parser.add_argument('--visualize', action='store_true',help='visualize features')
    parser.add_argument('--update', action='store_true',help='update all models')
    parser.add_argument('--project', default=ROOT /'runs/detect',help='save results to project/name')
    parser.add_argument('--name', default='exp',help='save results to project/name')
    parser.add_argument('--exist-ok', action='store_true',help='existing project/name ok, do not increment')
    parser.add_argument('--line-thickness', default=3,type=int,help='bounding box thickness (pixels)')
    parser.add_argument('--hide-labels', default=False, action='store_true',help='hide labels')
    parser.add_argument('--hide-conf', default=False, action='store_true',help='hide confidences')
    parser.add_argument('--half', action='store_true',help='use FP16 half-precision inference')
    parser.add_argument('--dnn', action='store_true',help='use OpenCV DNN for ONNX inference')

    opt = parser.parse_args()# 扩充维度, 如果是一位就扩充一位
    opt.imgsz *=2iflen(opt.imgsz)==1else1# expand# 输出所有参数
    print_args(FILE.stem, opt)return opt

defmain(opt):# 检查环境/打印参数,主要是requrement.txt的包是否安装,用彩色显示设置的参数
    check_requirements(exclude=('tensorboard','thop'))# 执行run()函数
    run(**vars(opt))if __name__ =="__main__":
    opt = parse_opt()
    main(opt)
5. 使用教程
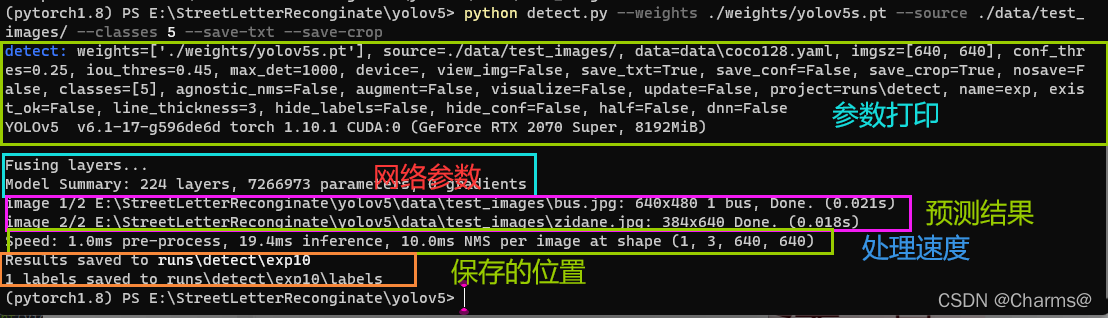
python detect.py --weights ./weights/yolov5s.pt --source ./data/test_images/--classes 5--save-txt --save-crop
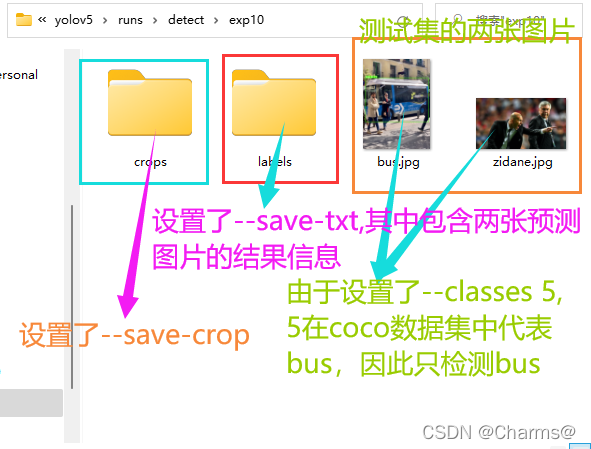
crop文件夹下的文件
labels下面的文件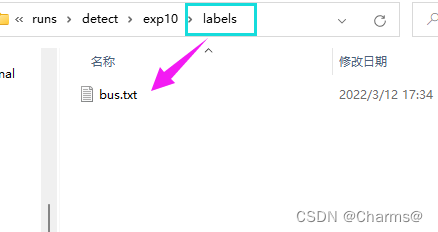
本文转载自: https://blog.csdn.net/CharmsLUO/article/details/123422822
版权归原作者 Charms@ 所有, 如有侵权,请联系我们删除。
版权归原作者 Charms@ 所有, 如有侵权,请联系我们删除。