
✅作者简介:嵌入式入坑者,与大家一起加油,希望文章能够帮助各位!!!!
📃个人主页:@rivencode的个人主页
🔥系列专栏:玩转C语言
💬推荐一款模拟面试、刷题神器,从基础到大厂面试题👉点击跳转刷题网站进行注册学习
前言
俗话说基础不牢地动山摇,从今天开始全新开启对FreeRTOS的学习,从RTOS的源码升入理解到RTOS的熟练应用,真正理解FreeRTOS的底层,但是要想阅读源码要求对C语言的指针与结构体,数据结构的链表和队列的知识的基本功要非常扎实,以及ARM的架构有所了解,本篇文章就带你们深入理解FreeRTOS的链表实现,以及为什么要这样实现,链表和队列贯穿整个操作系统,重要性就不言而喻了。
在学习FreeRTOS源码之前对指针、结构体、链表不熟悉请看:
《C语言链表超详解》
《自定义类型-结构体详解》
《指针超详解》
目录
一.实现带头结点的单链表
在上面推荐的C语言链表超详解已经将链表的基本概念,已经单链表双向循环链表的基本操作全部实现,接下来复习一下链表操以及项目中链表的真正用法。
下面的链表操作可能不是很规范学思想就好了,下面的结点分配空间不是malloc分配的,删除也不用释放结点的空间是因为,结点在FreeRTOS一般是一个任务结构体,而任务不销毁任务结构体也不会销毁。
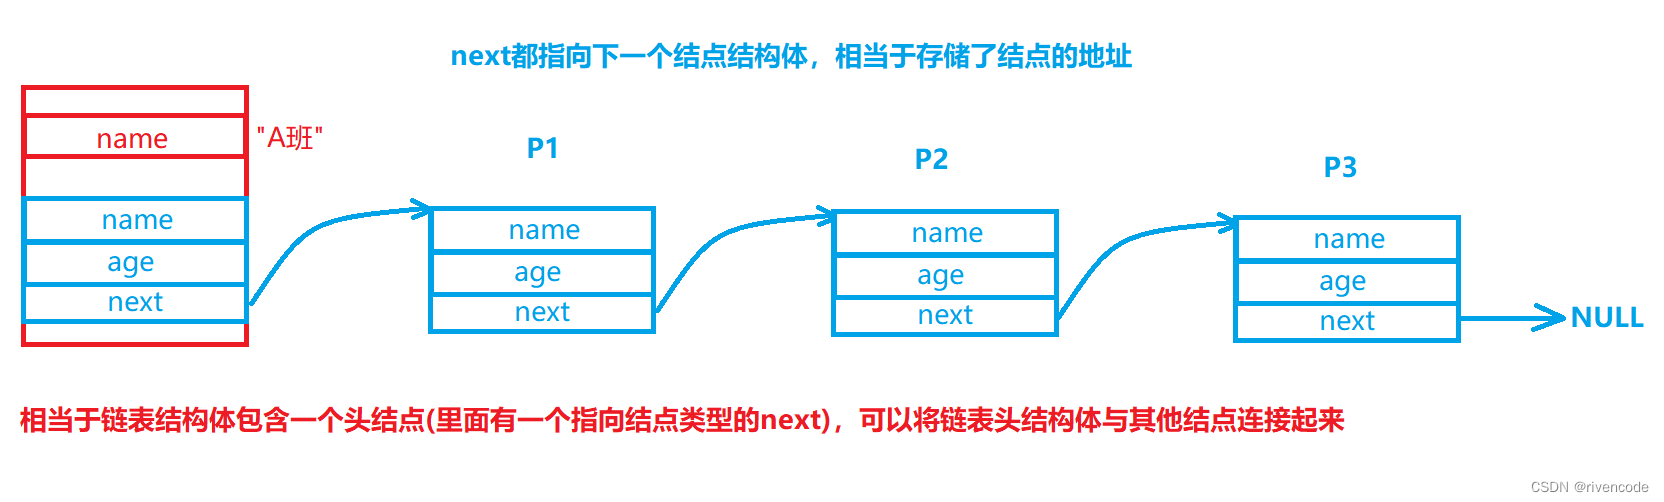
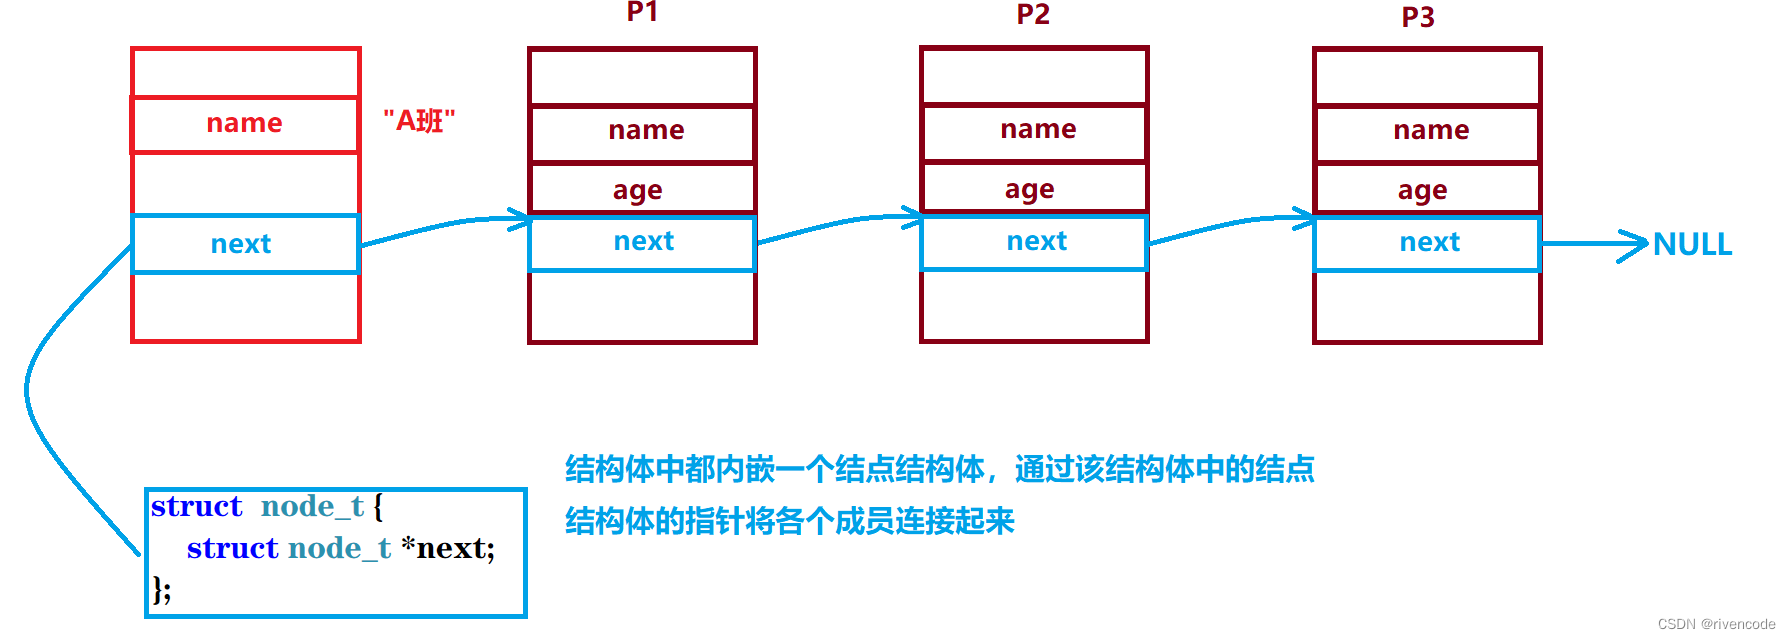
1.声明链表结构体
//结点结构体structperson{char*name;int age;structperson*next;};//链表头structlist{char*name;/* A班 */structperson head;};
一个链表一般包含一个头结点和多个结点,头结点所在的结构体一般记录该链表的结点个数、链表名字、、、,结点则描述它本身的属性。
以上面的举例:一个班级是一个链表,链表头则记录了班级名(为了方便只写一个成员),其他的结点相当于是描述一个同学的属性(姓名、年龄…)
接一下就来实现单链表的基本操作。
2.链表的初始化
voidInitList(structlist*pList,char*name){
    pList->name = name;
    pList->head.next =NULL;}
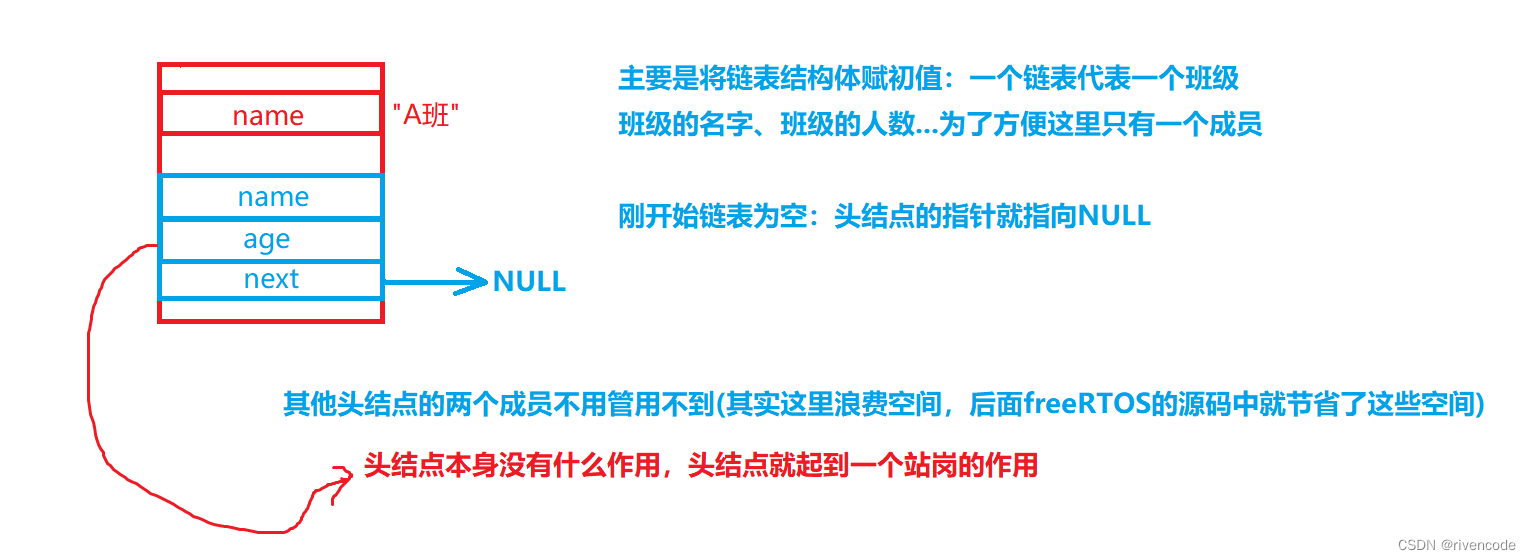
- 头指针
**头指针
是指向链表中第一个结点
(存储该节点的地址)。如果链表中有头结点,则头指针指向头结点;若链表中没有头结点,则头指针指向链表中第一个数据结点。**
- 头结点
**头结点,链表中第一个结点,
一般不存储任何数据
,若
链表有头结点则头指针一直指向头指针
。**
链表带头结点的优点:
当链表为空表时,插入,删除结点都是在头结点后面,头结点指向了第一个带数据的结点。
**当我们单链表无头结点时当我们头插,头插的时候,我们都需要移动头指针的位置指向新的第一个结点,当链表为空时又要将头结点置NULL,这些操作我们都需要去改变头指针的值,而改变头指针要传头指针的地址的,用二级指针来操作,无疑是增加了编程的难度,如果链表有头结点,而头指针一直指向头结点,不管是头删,头插,都是在头结点后面增加删除,
而头指针一直指向头结点不用发生改变,只需要一级指针就搞定
**
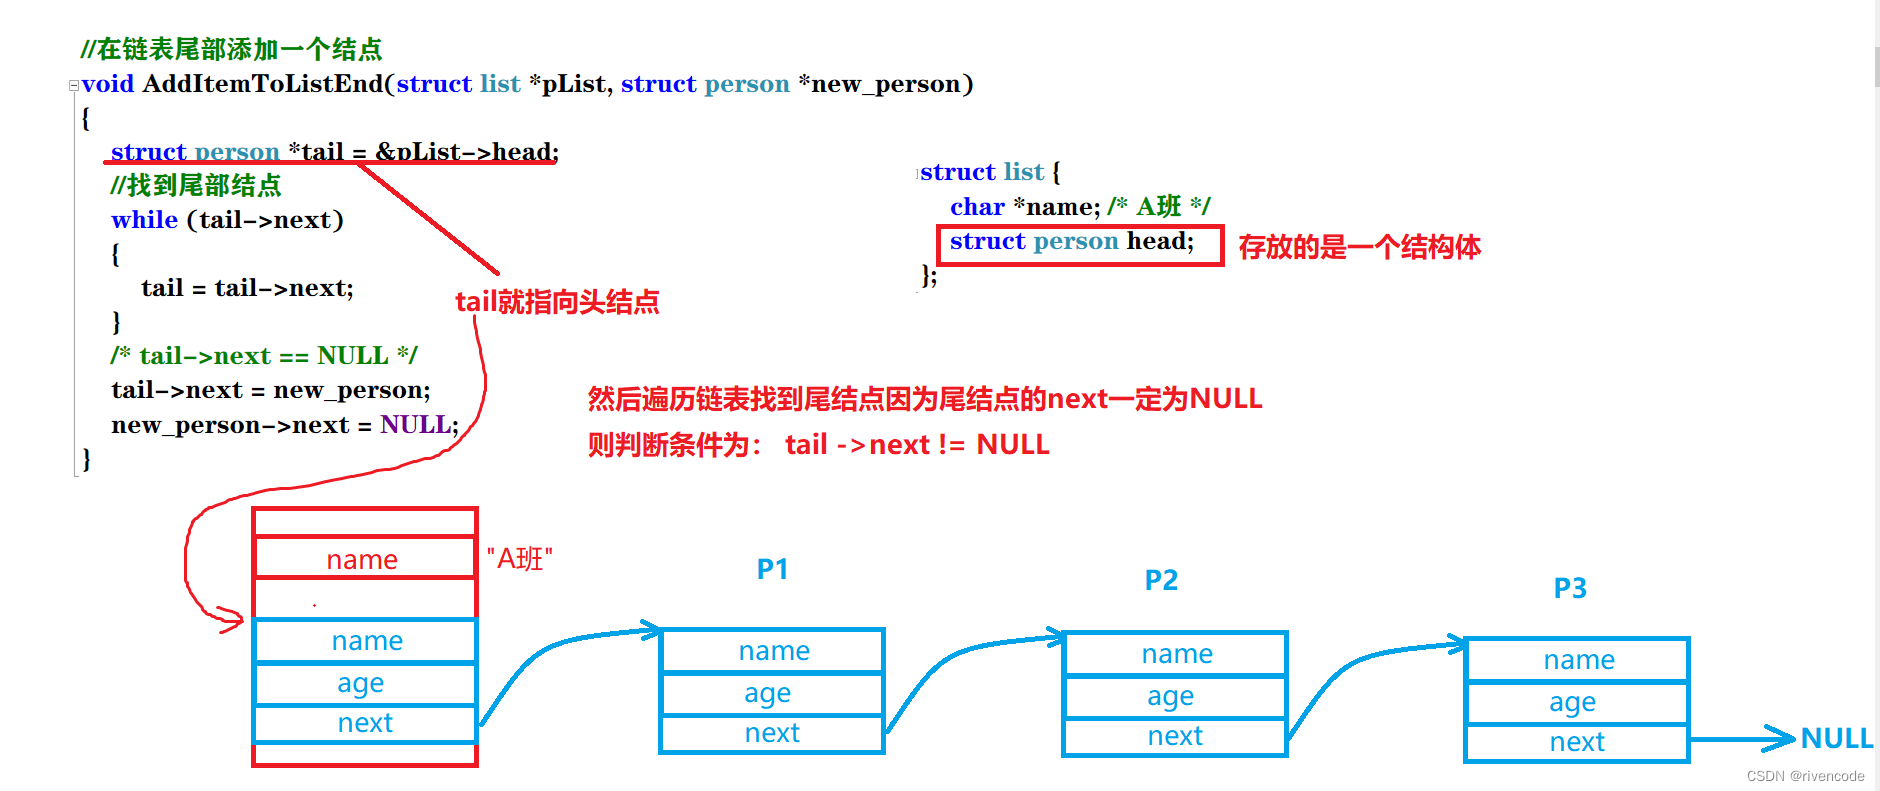
3.链表的尾插
//在链表尾部添加一个结点voidAddItemToListEnd(structlist*pList,structperson*new_person){structperson*tail =&pList->head;//找到尾部结点while(tail->next){
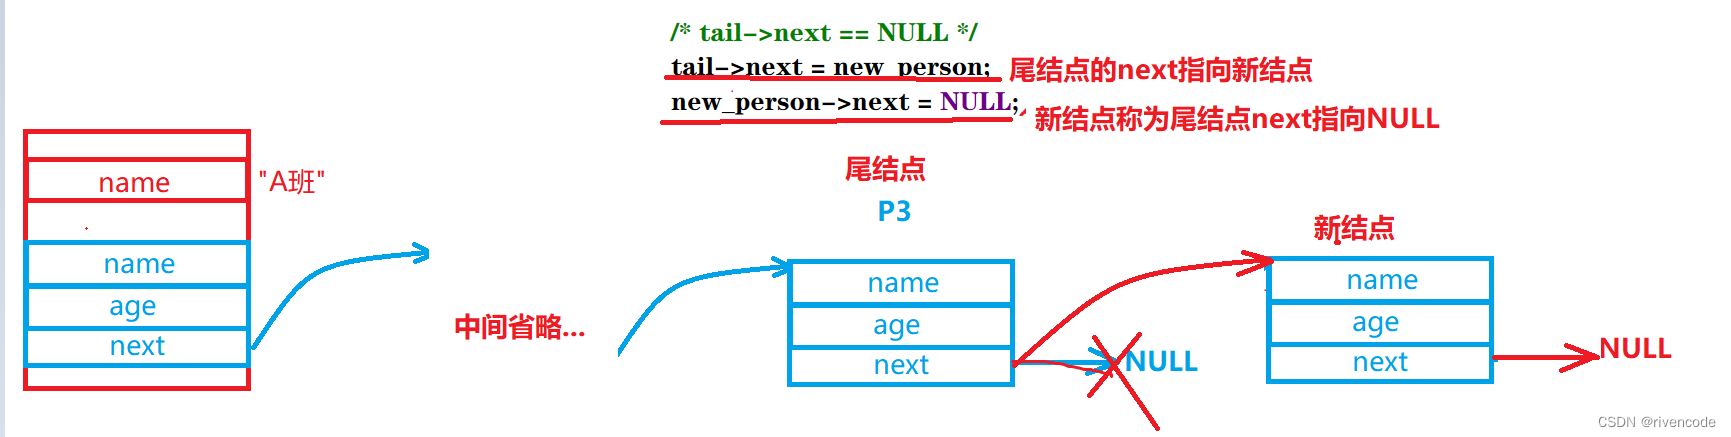
tail = tail->next;}/* last->next == NULL */
tail->next = new_person;
new_person->next =NULL;}
4.链表的头插
//在链表头部添加一个结点voidAddItemToListHead(structlist*pList,structperson*new_person){structperson*head =&pList->head;structperson*next = head->next;

    head->next = new_person;
    new_person->next = next;}
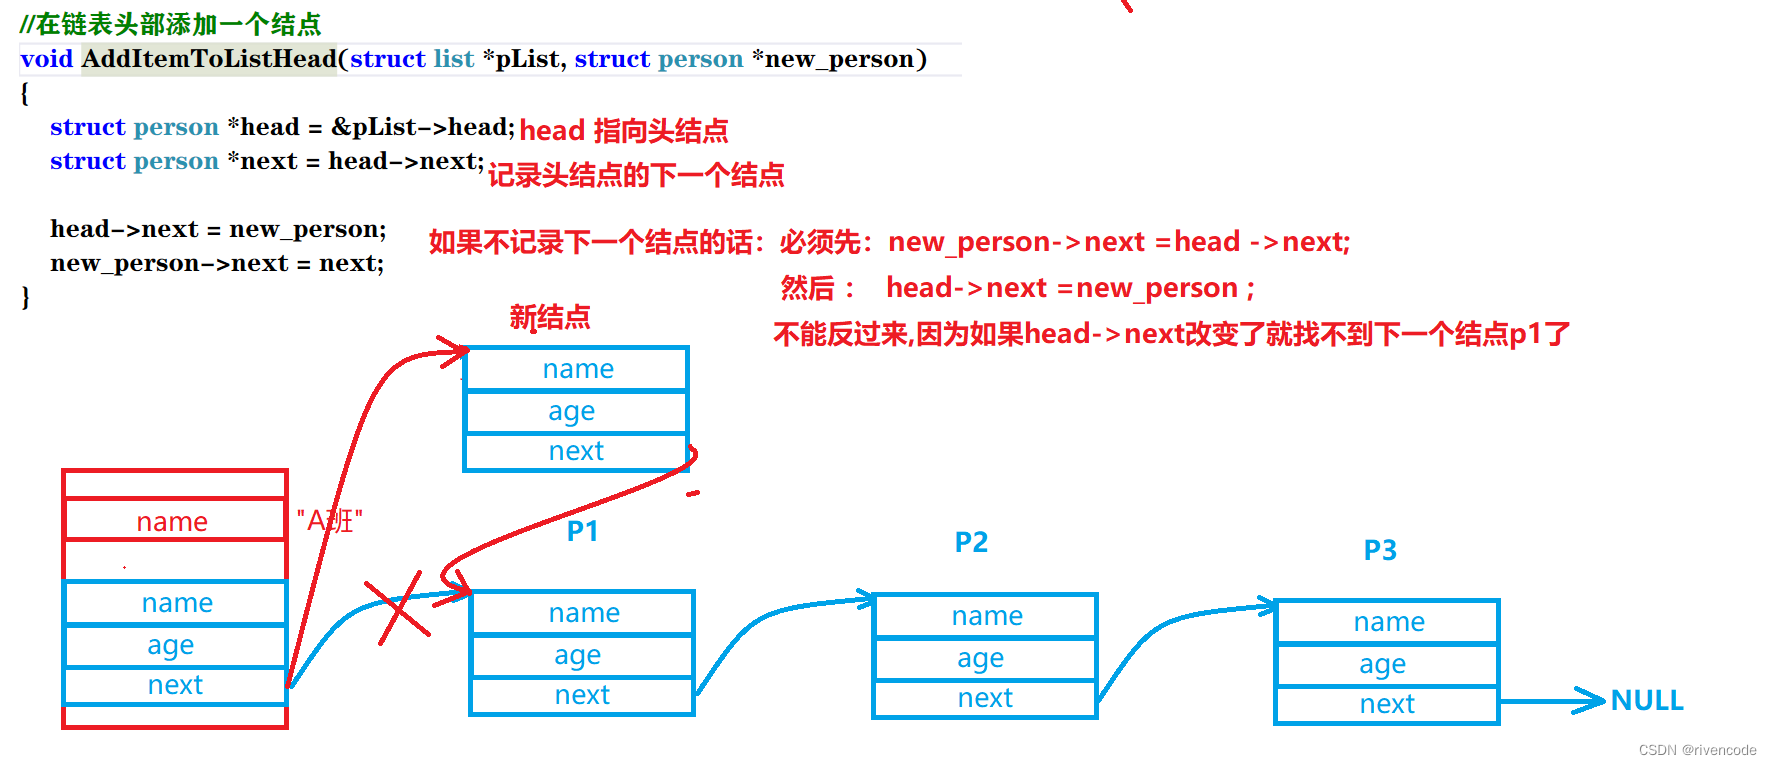
有些人指针指着指着就混了,始终记住next 就是一个结构体指针,里面存放了结构体(结点)的地址,因为通过地址可以访问该结构体里面的成员变量,而我要让他指向另外一个结构体只需将另外一个结构体的地址赋给这个next指针(而原来存储的地址就会覆盖就相当于断开与原来结构体(结点)的连接)。
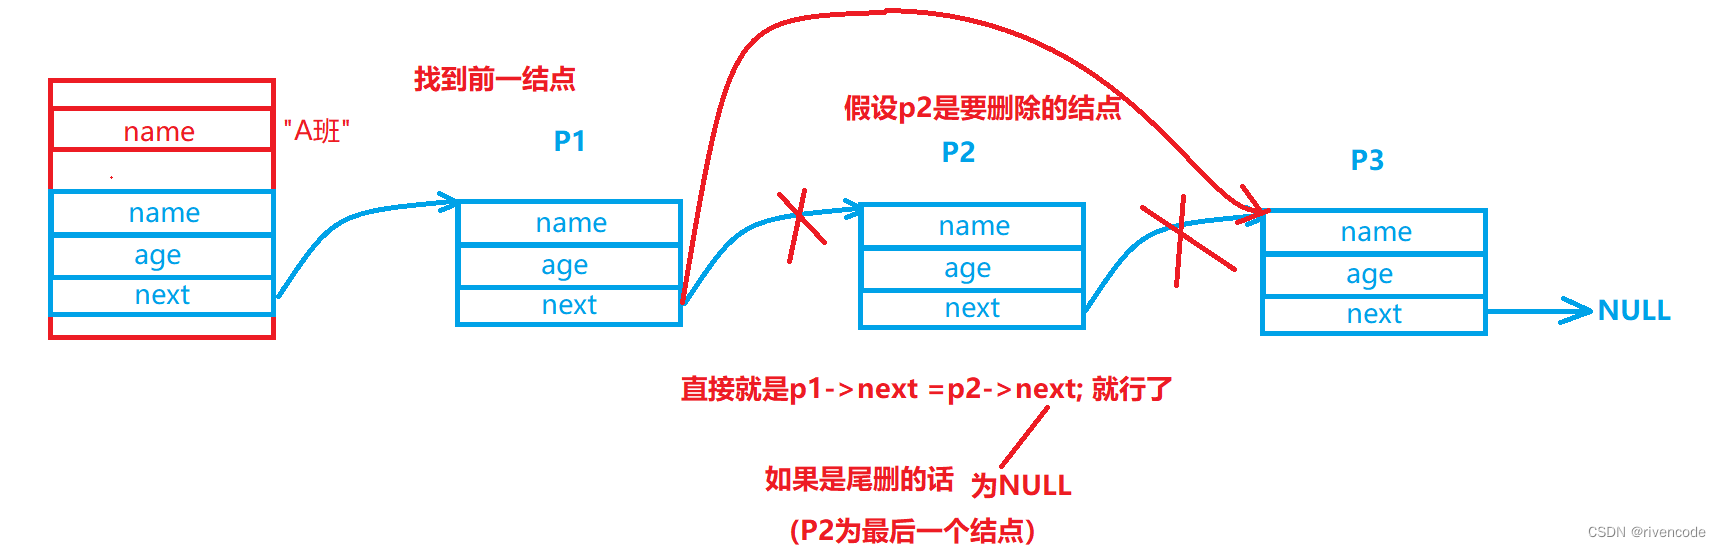
5.删除某个结点
voidDelItemFromList(structlist*pList,structperson*person){structperson*pre =&pList->head;//找到要删除结点的前一个结点while(pre !=NULL&&  pre->next != person){
        pre = pre->next;}if(pre ==NULL){printf("not found \n");}else{
        pre->next = person->next;}}
6.在某个结点后面添加结点
voidAddItemAfter(structperson*pre,structperson*new_person){
    new_person->next = pre->next;
    pre->next = new_person;}
7.链表的排序
voidListBubble_Sort(structlist*pList){structperson*cur = pList->head.next;//pre1记录cur结点的上面一个结点,cur从head->next开始structperson*pre1 =&pList->head;structperson*pre2 =NULL;structperson*next =NULL;structperson*tmp =NULL;while(cur->next->next){//pre2记录next结点的上面一个结点
        pre2 = cur;
        next = cur->next;while(next){if(cur->age > next->age){//删除要交换的两个结点(cur、next)DelItemFromList(pList, cur);DelItemFromList(pList, next);//在pre1后面插入next指向的结点AddItemAfter(pre1, next);//如果cur==pre2(cur与next是相邻的两个结点)\
                则之间在next后面插入curif(cur == pre2)AddItemAfter(next, cur);else//cur与next两个要交换的结点不相邻AddItemAfter(pre2, cur);//cur 与 next互换
                tmp = cur;
                cur = next;
                next = tmp;}//pre2记录next结点的上面一个结点
            pre2 = next;
            next = next->next;}//pre1记录cur结点的上面一个结点
        pre1 = cur;
        cur = cur->next;}}
上面的链表排序是参照数组冒泡排序。
普通冒泡排序
intmain(){int i =0, j =0;int arr[10]={9,8,7,6,5,4,3,2,1,0};int tmp;for(i =0; i<9; i++){for(j = i +1; j<10; j++){if(arr[i]>arr[j]){
                tmp = arr[i];
                arr[i]= arr[j];
                arr[j]= tmp;}}}for(i =0; i <10; i++)printf("%d ",arr[i]);return0;}}}
算法思想: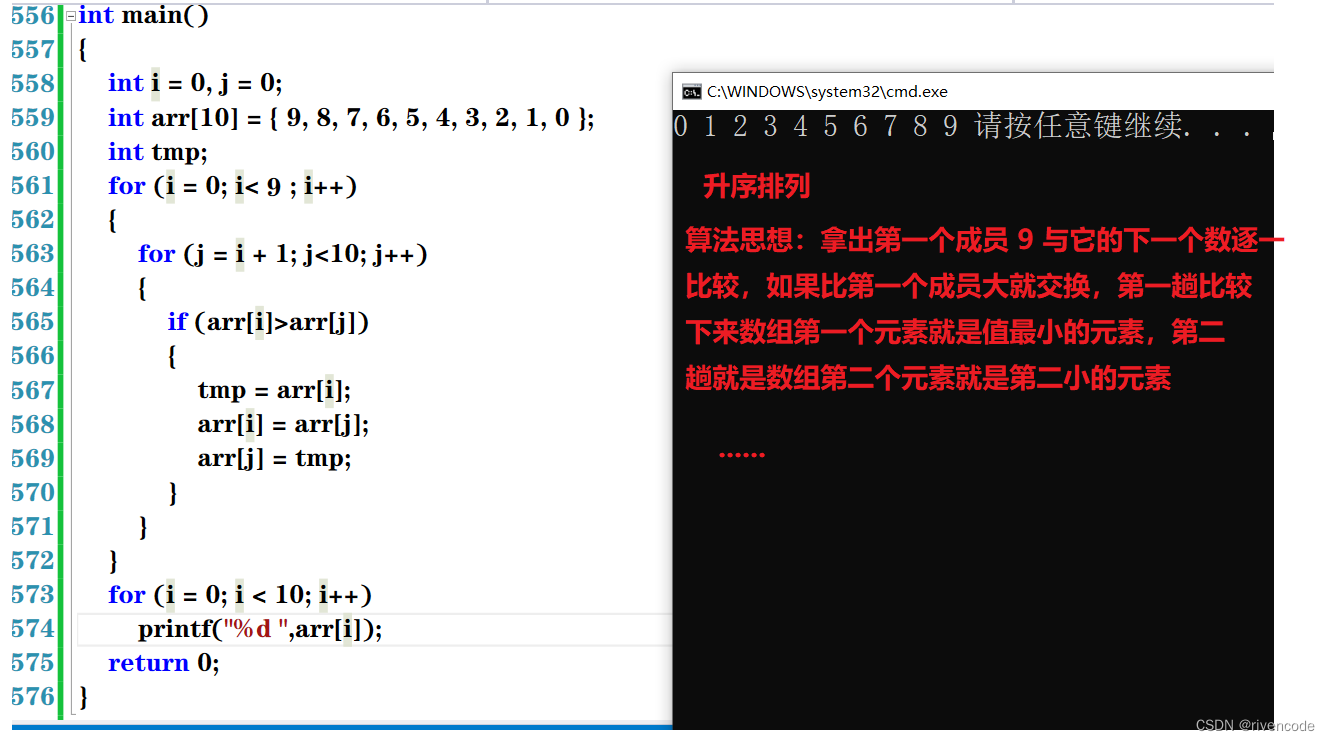
链表排序与数组排序对比:
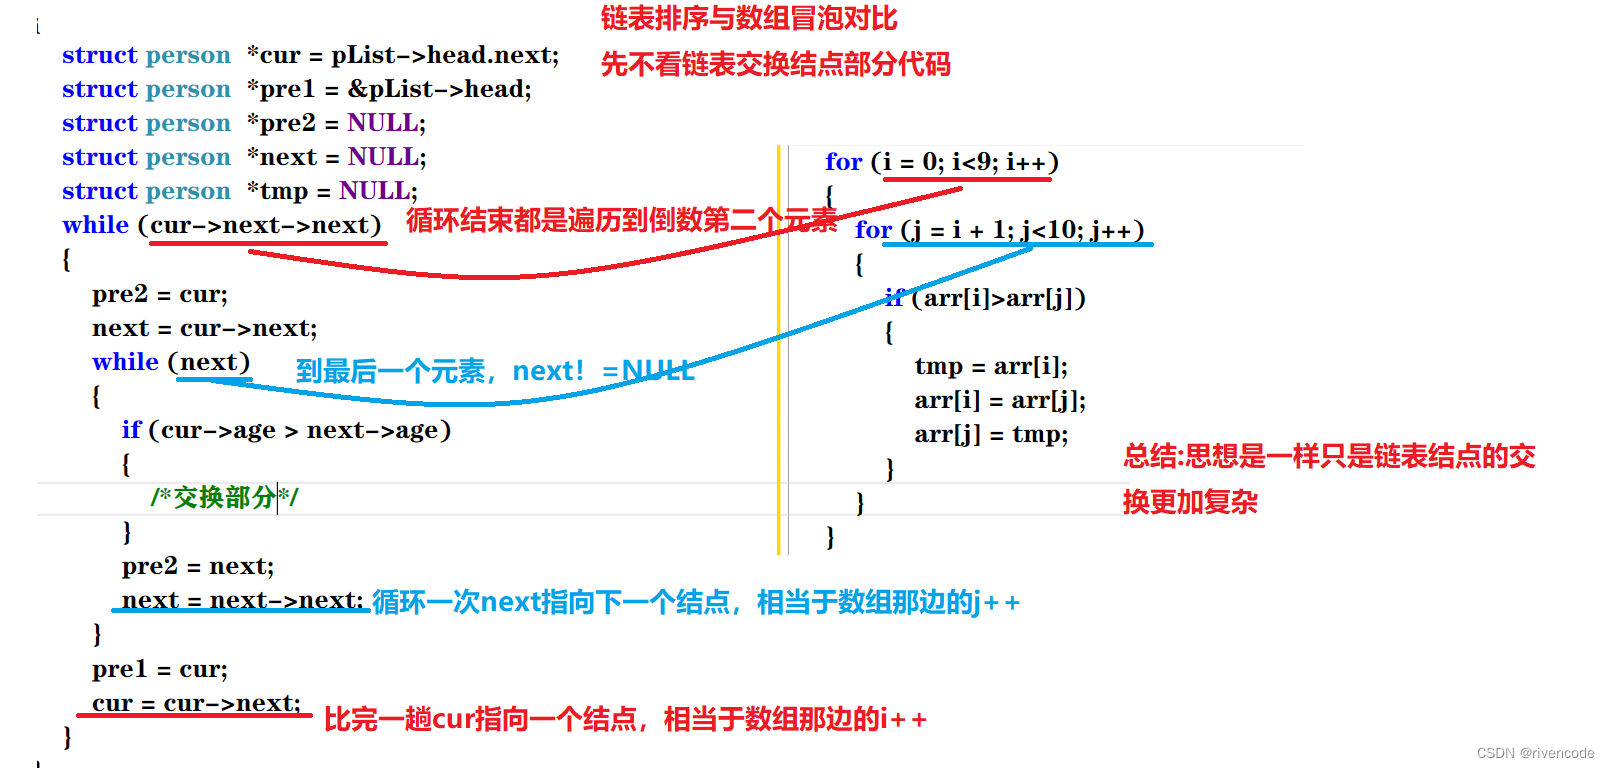
如何交换两个链表结点的位置: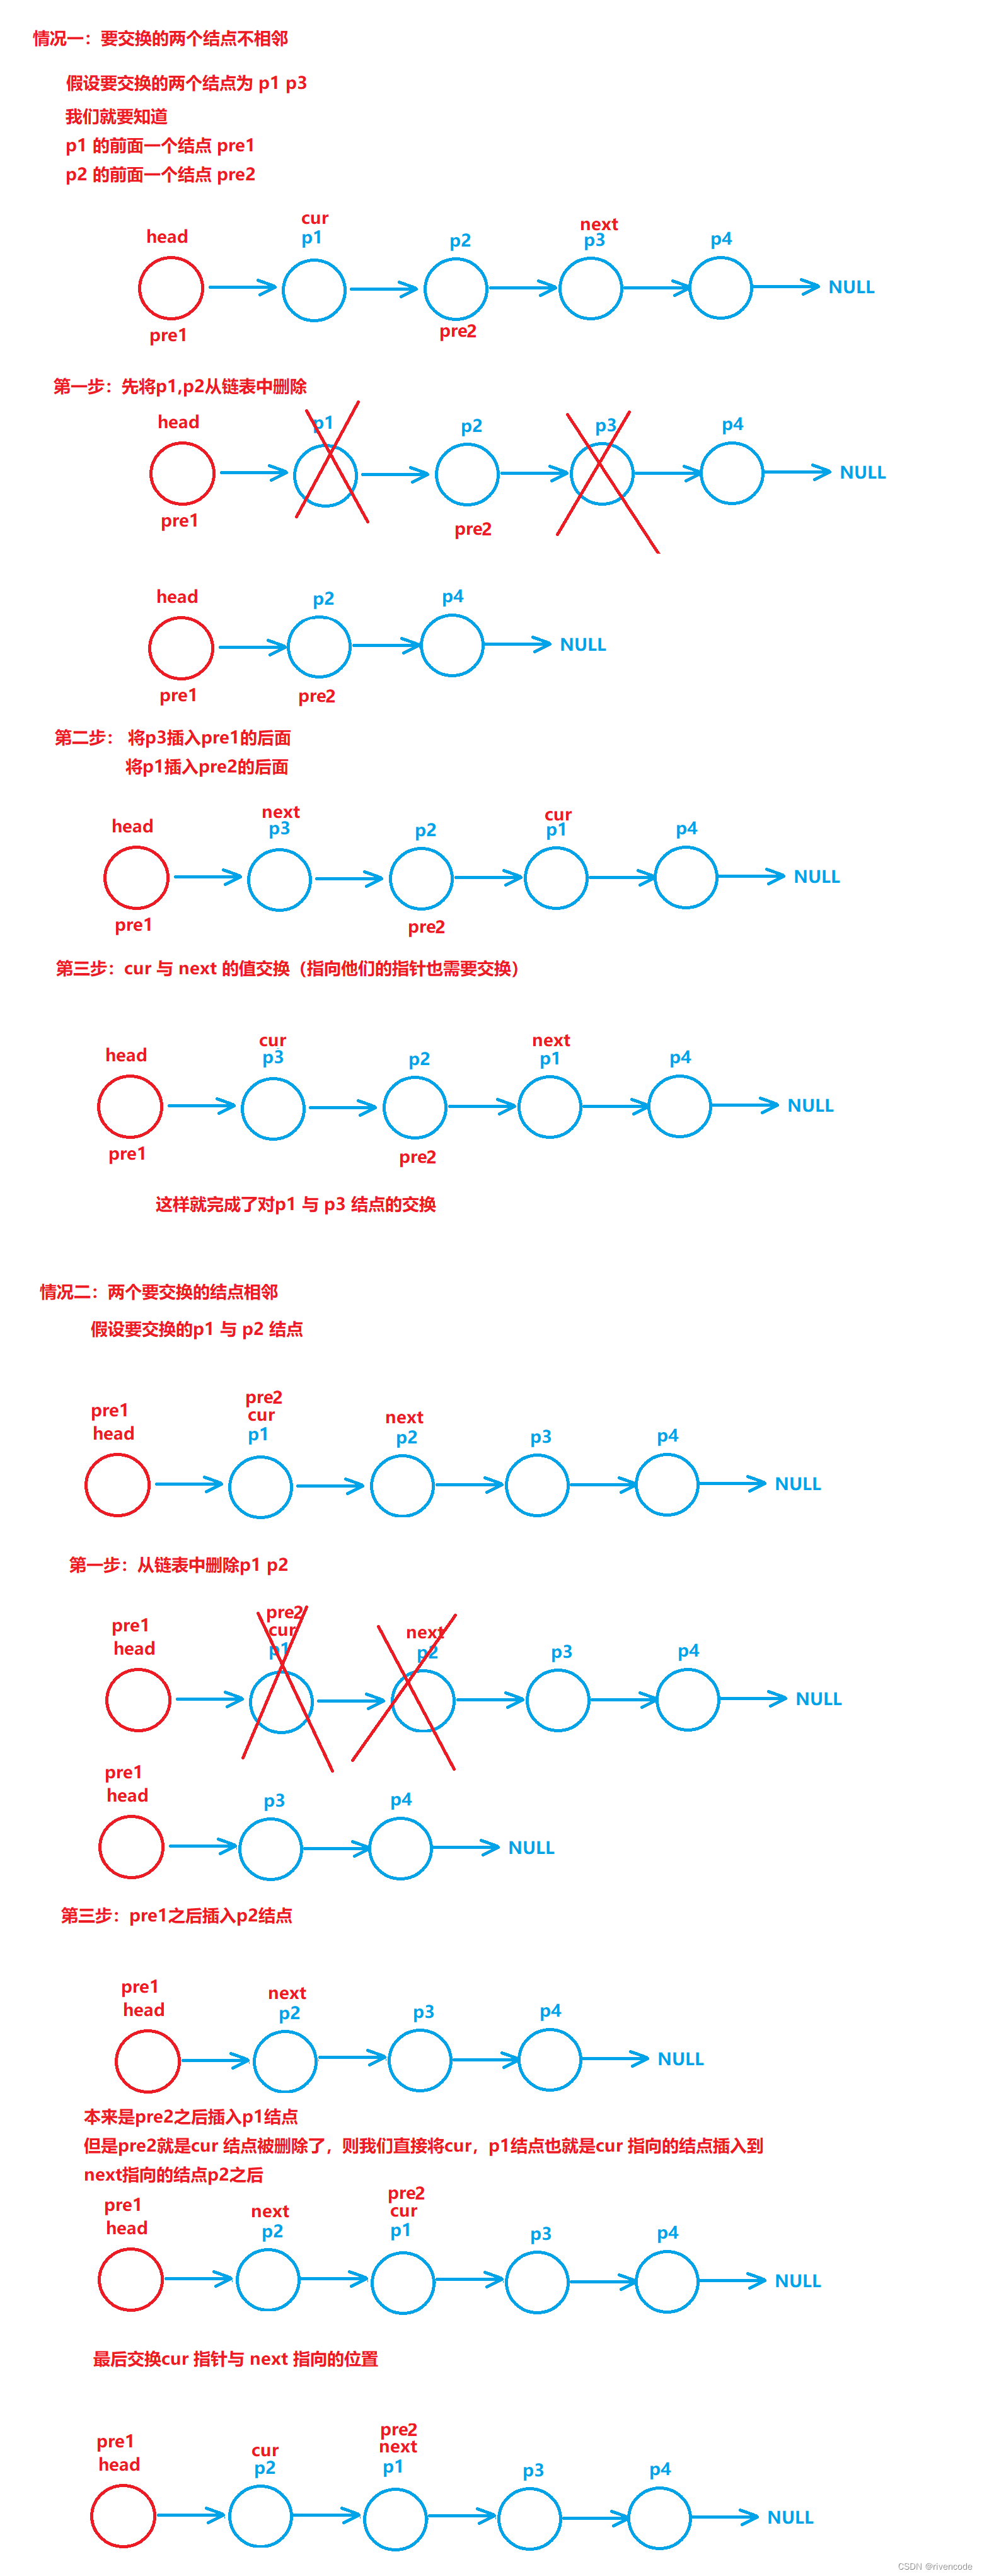
过程已经分析的清清楚楚明明白白,去看上面代码的注释链表的排序就搞定了
8.链表的打印
voidPrintList(structlist*pList){int i =0;structperson*cur= pList->head.next;while(cur!=NULL){printf("person %d: %s is %d\r\n", i++, cur->name, cur->age);/* 后面还有人, 移动到下一个 */
        cur= cur->next;}printf("\n");}
9.链表测试
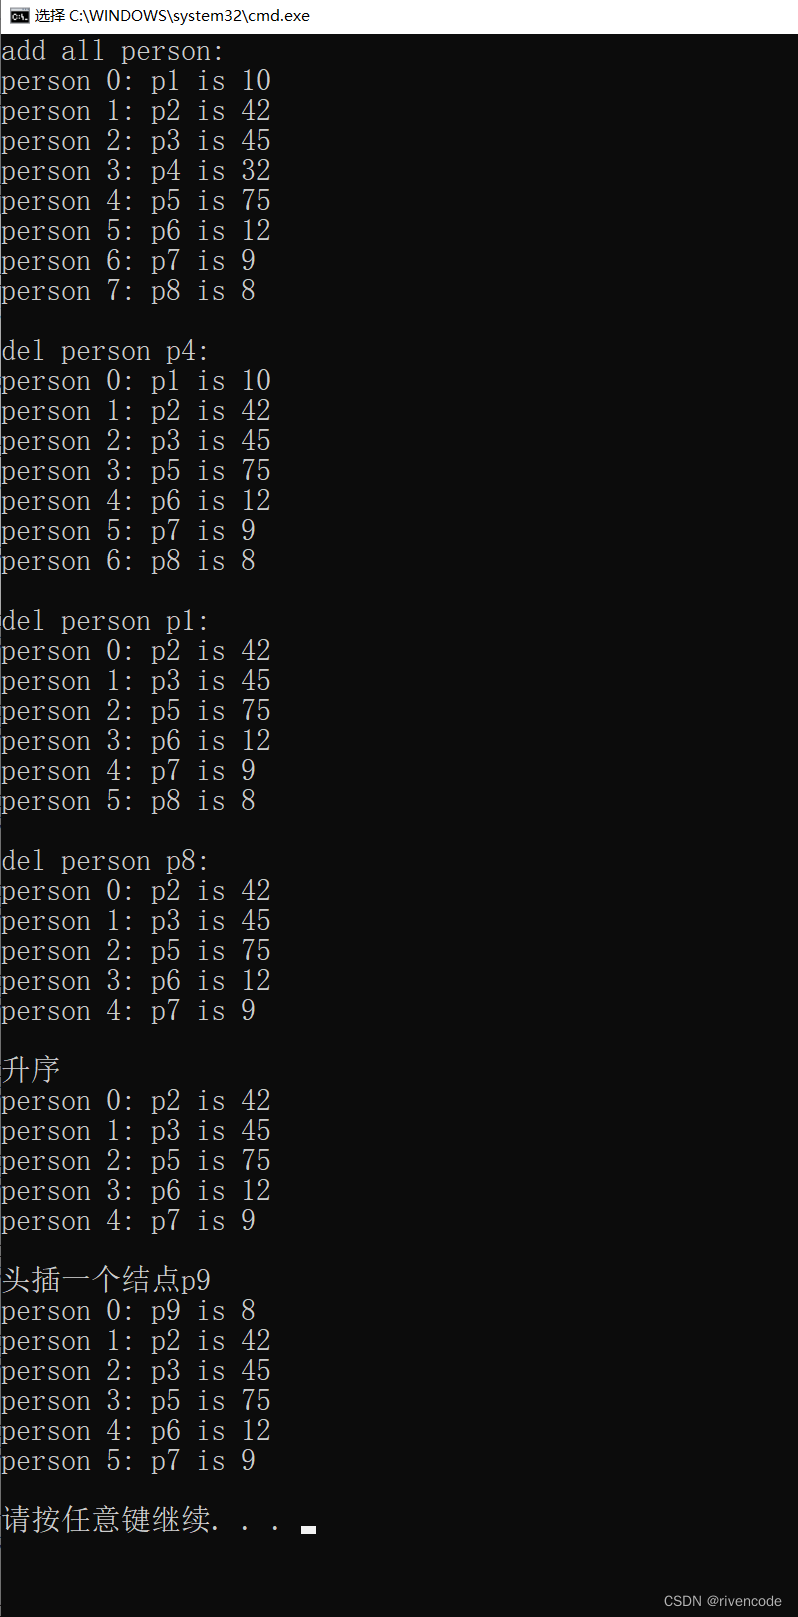
直接采用定义结构体的变量的方式来创建结点
intmain(){structlist a_list;int i;structperson p[]={{"p1",10,NULL},{"p2",42,NULL},{"p3",45,NULL},{"p4",32,NULL},{"p5",75,NULL},{"p6",12,NULL},{"p7",9,NULL},{"p8",8,NULL},{NULL,0,NULL},};InitList(&a_list,"A_class");
    i =0;while(p[i].name !=NULL){AddItemToListEnd(&a_list,&p[i]);
        i++;}printf("add all person:\r\n");PrintList(&a_list);DelItemFromList(&a_list,&p[3]);printf("del person %s:\r\n", p[3].name);PrintList(&a_list);DelItemFromList(&a_list,&p[0]);printf("del person %s:\r\n", p[0].name);PrintList(&a_list);DelItemFromList(&a_list,&p[7]);printf("del person %s:\r\n", p[7].name);PrintList(&a_list);ListBubble_Sort(&a_list);printf("升序\n");PrintList(&a_list);printf("头插一个结点p9\n");structperson p9 ={"p9",8,NULL};AddItemToListHead(&a_list,&p9);PrintList(&a_list);return0;}
测试结果:
更多链表的基本操作,和基本概念请看:《C语言链表超详解》
二.通用链表的三种实现方式
叫啥通用链表呢,回答这个问题前先看看什么我们实现的链表有什么缺陷: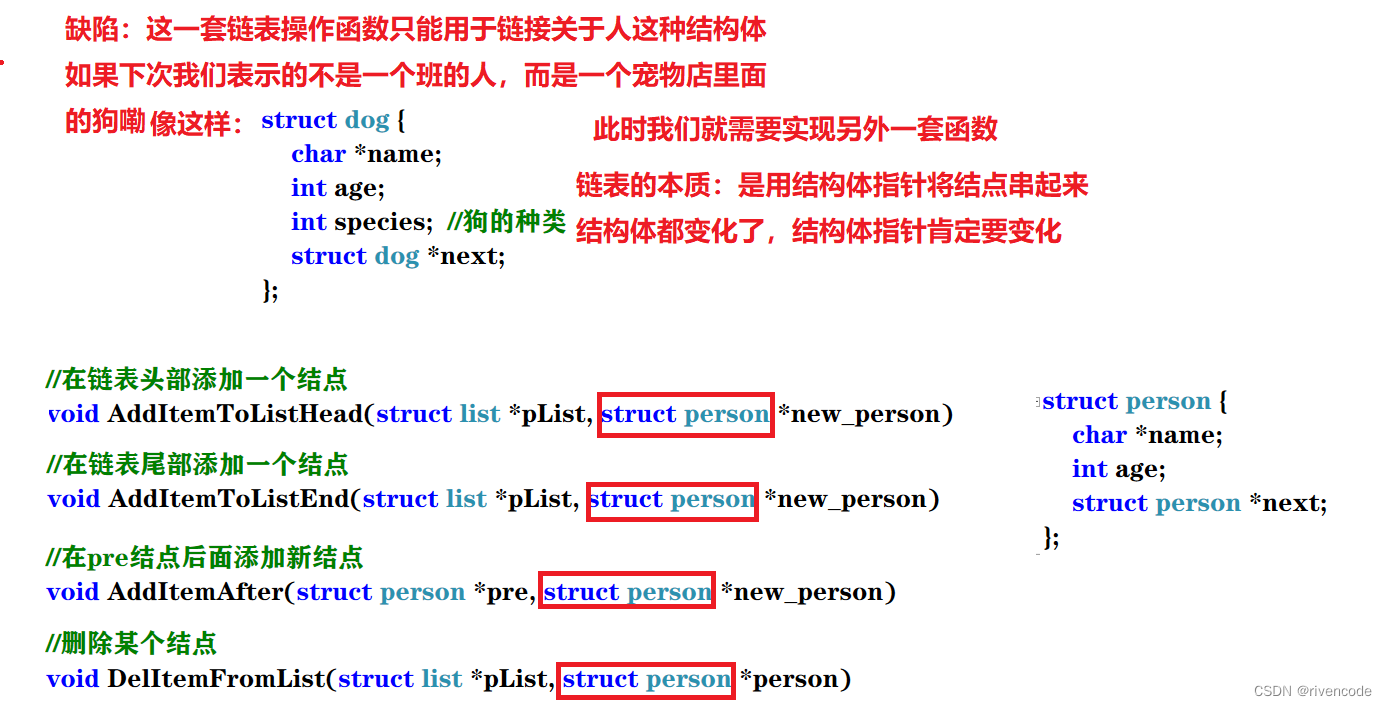
所以我们需要一个通用的链表来将不同的事物(结构体)都可以用通用的链表串联起来。
思路:
第一:前提就是链表结点的结构体不能变
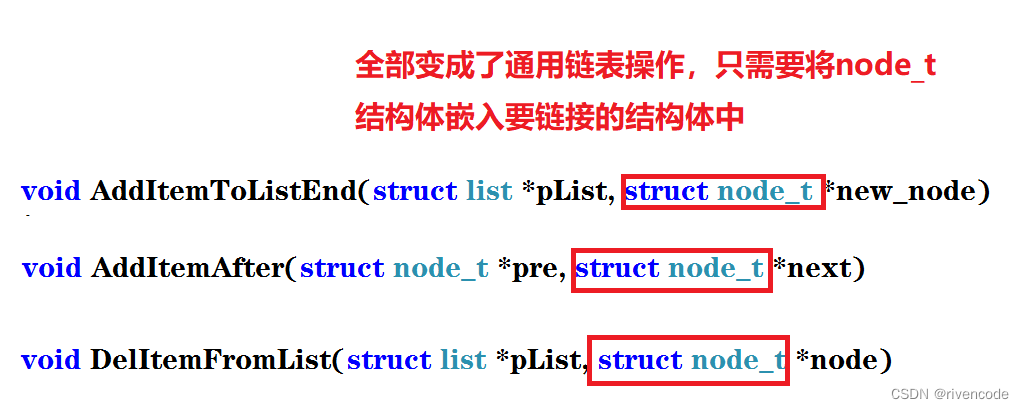
第二:将通用链表结点嵌入到要串联起来的结构体中
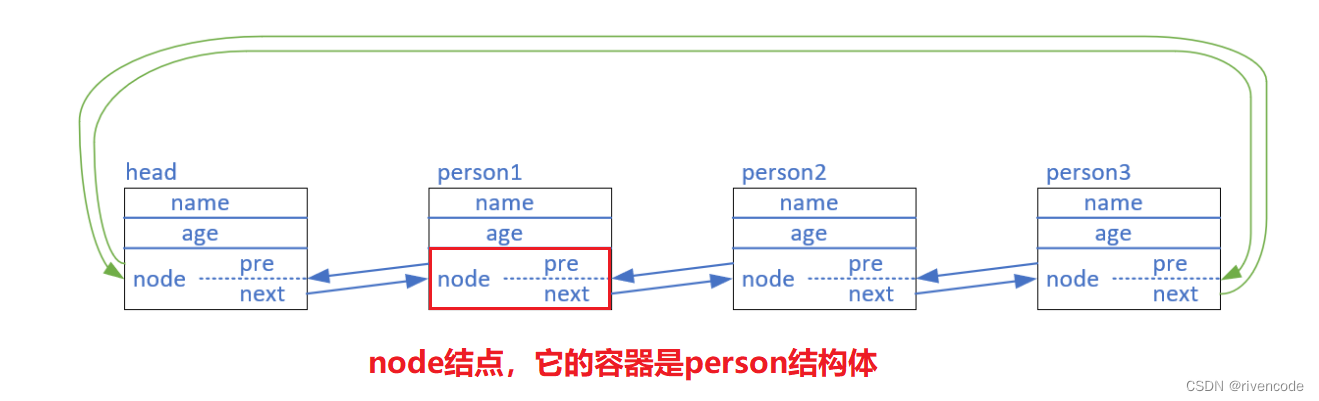
怎么理解看下面的图就知道了:
结构体中内嵌一个结点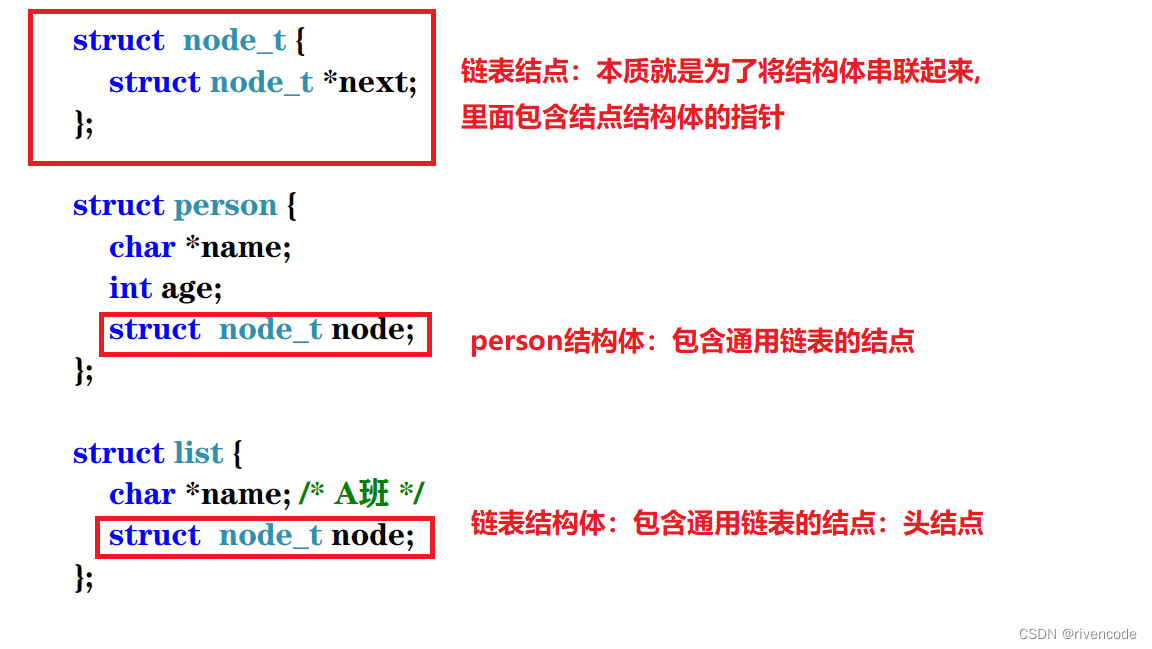
1.引入容器的概念
这样做虽然实现了通用链表但是有一个问题:
person结构体里面包含结点结构体,通过结点结构体将person 结构体链接起来,这样话我们只知道结点(结点结构体)的地址,而person结构体的地址并不知道所以没有办法访问person结构体里面的成员变量。
person结构体里面包含结点结构体,通过结点结构体将person 结构体链接起来,则person结构体相当于node_t结点结构体的容器container。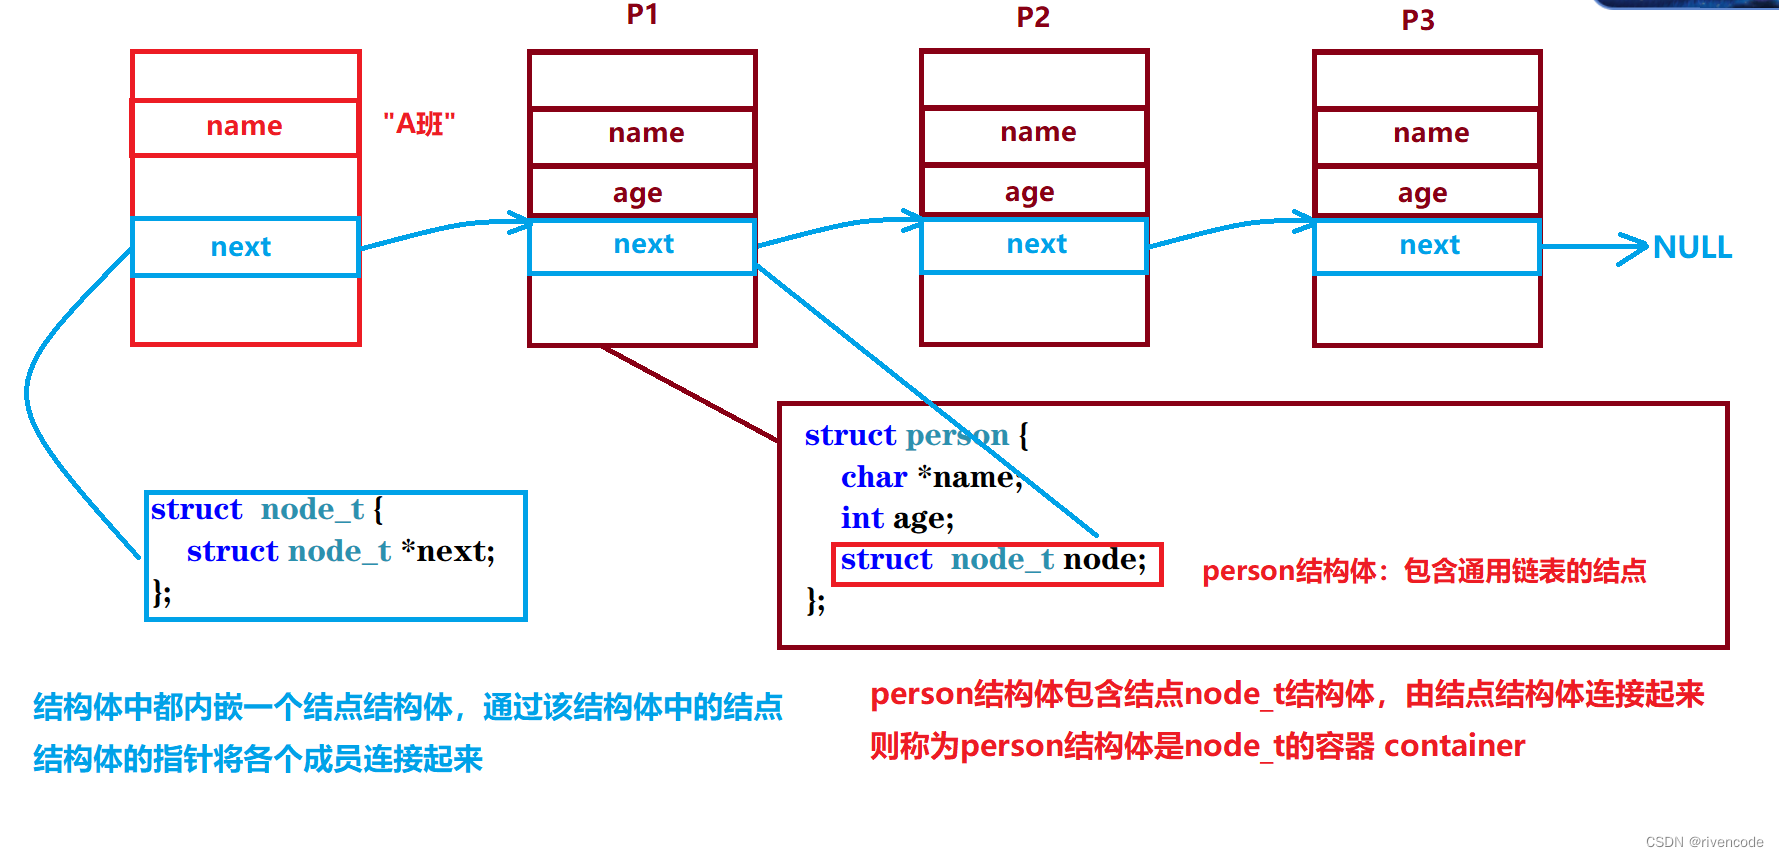
所以我们的核心目的是通过node_t地址寻找container的地址
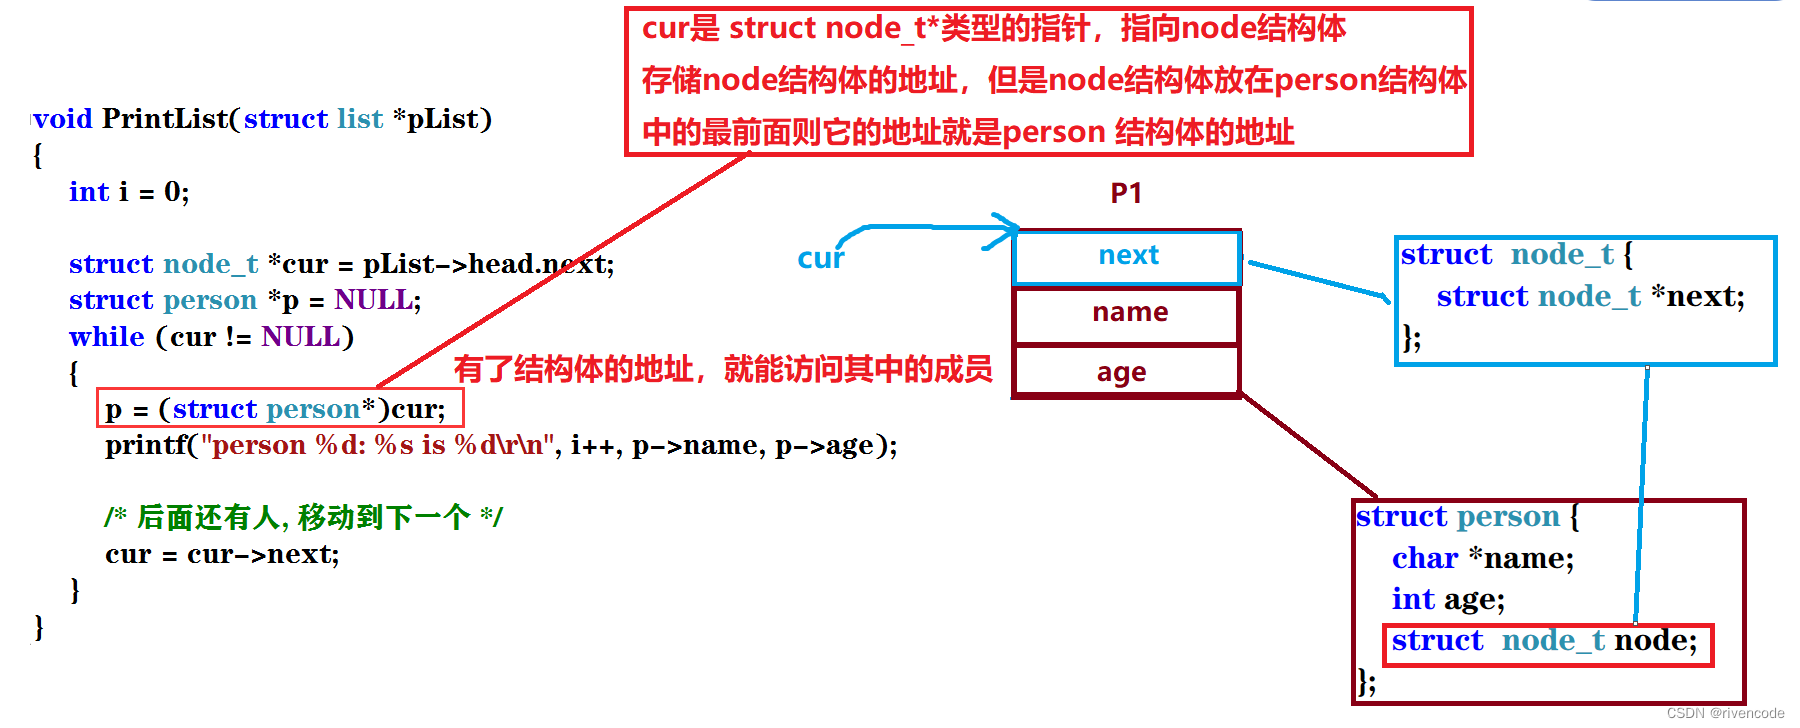
2.方式一:node一定放在container中最前面
structnode_t{structnode_t*next;};structperson{structnode_t node;char*name;int age;};structlist{structnode_t head;char*name;/* A班 */};

改造后的代码:
//链表初始化voidInitList(structlist*pList,char*name){
    pList->name = name;
    pList->head.next =NULL;//pList->next = NULL;}//尾插voidAddItemToListEnd(structlist*pList,structnode_t*new_node){structnode_t*tail =&pList->head;while(tail->next){
        tail = tail->next;}/* last->next == NULL */
    tail->next = new_node;
    new_node->next =NULL;}//在某个结点后面添加一个新结点voidAddItemAfter(structnode_t*pre,structnode_t*next){
    next->next = pre->next;
    pre->next = next;}//删除一个结点voidDelItemFromList(structlist*pList,structnode_t*node){structnode_t*pre =&pList->head;while(pre !=NULL&&  pre->next != node){
        pre = pre->next;}if(pre ==NULL){printf("not found \n");}else{
        pre->next = node->next;}}
打印链表
voidPrintList(structlist*pList){int i =0;structnode_t*cur = pList->head.next;structperson*p =NULL;while(cur !=NULL){
        p =(structperson*)cur;printf("person %d: %s is %d\r\n", i++, p->name, p->age);/* 后面还有人, 移动到下一个 */
        cur = cur->next;}}
链表排序
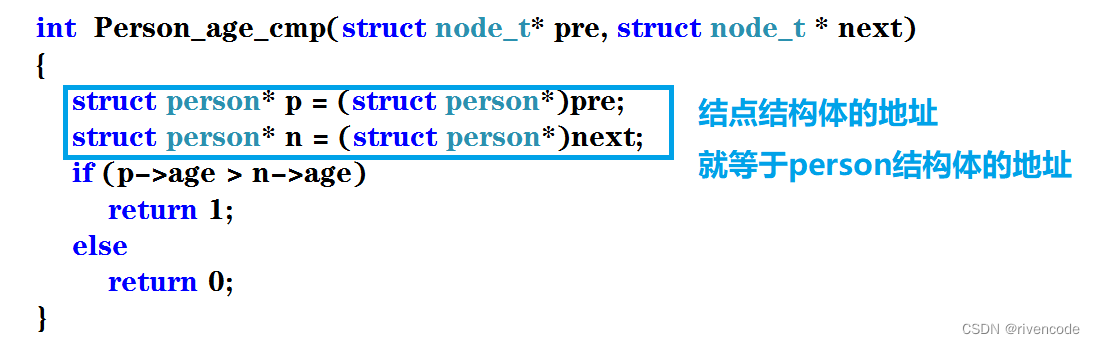
intPerson_age_cmp(structnode_t* pre,structnode_t* next){structperson* p =(structperson*)pre;structperson* n =(structperson*)next;if(p->age > n->age)return1;elsereturn0;}voidListBubble_Sort(structlist*pList){structnode_t*cur = pList->head.next;structnode_t*pre1 =&pList->head;structnode_t*pre2 =NULL;structnode_t*next =NULL;structnode_t*tmp =NULL;while(cur->next->next){
        pre2 = cur;
        next = cur->next;while(next){if(Person_age_cmp(cur, next)){DelItemFromList(pList, cur);DelItemFromList(pList, next);AddItemAfter(pre1, next);if(cur == pre2)AddItemAfter(next, cur);elseAddItemAfter(pre2, cur);//cur 与 next互换
                tmp = cur;
                cur = next;
                next = tmp;}
            pre2 = next;
            next = next->next;}
        pre1 = cur;
        cur = cur->next;}}
3.方式二:node地址偏移反算出container位置
linux \ rt_thread系统常使用这种方式
structnode_t{structnode_t*next;};structperson{char*name;int age;structnode_t node;};structlist{char*name;/* A班 */structnode_t node;};
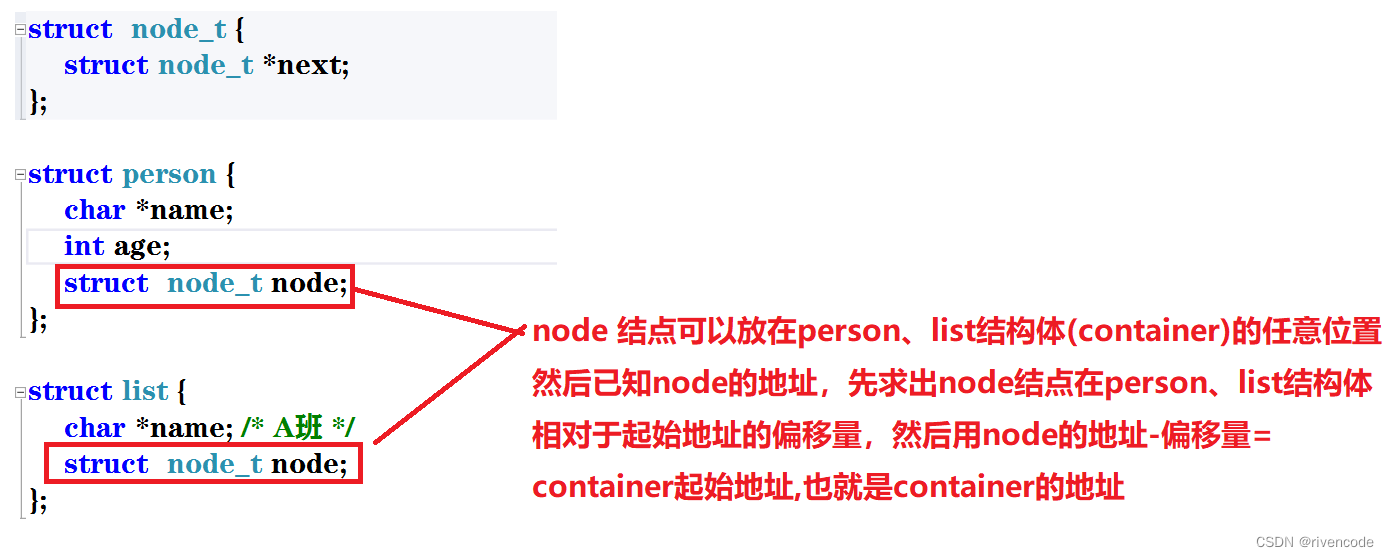
如果计算node结点在container中的地址偏移量呢?
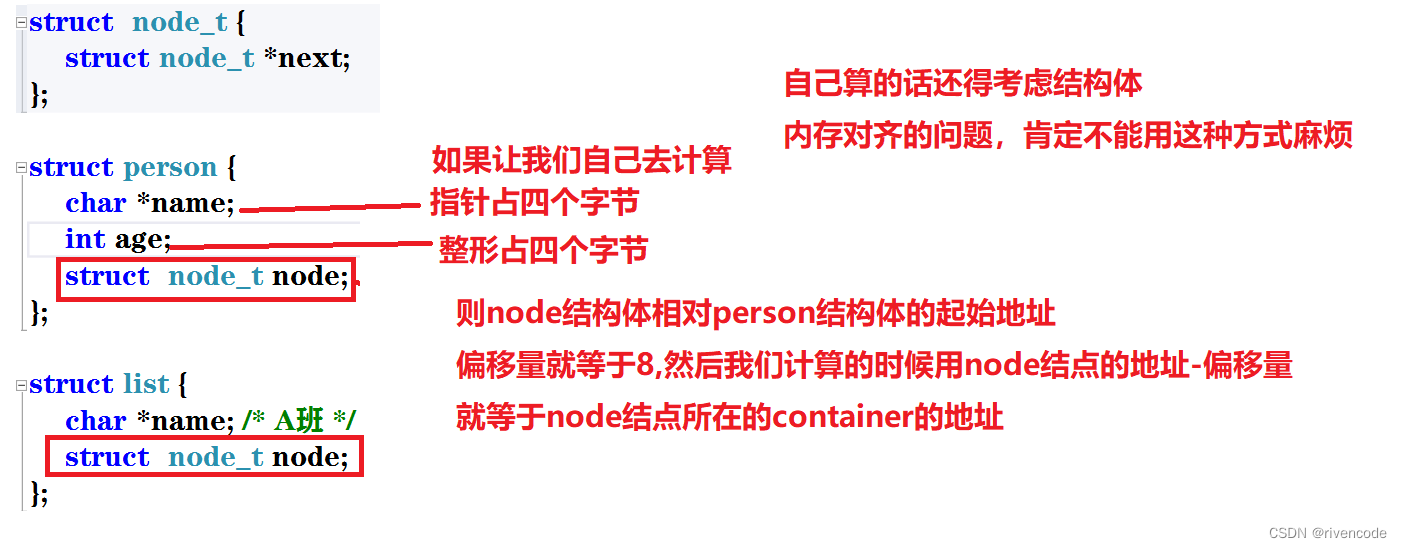
关于结构体内存对齐,已经求结构体成员的地址偏移——》《自定义类型-结构体详解》
实现offsetof宏
offsetof:是一个带参宏可以求出,结构体成员变量地址相对于结构体变量起始地址的偏移量。
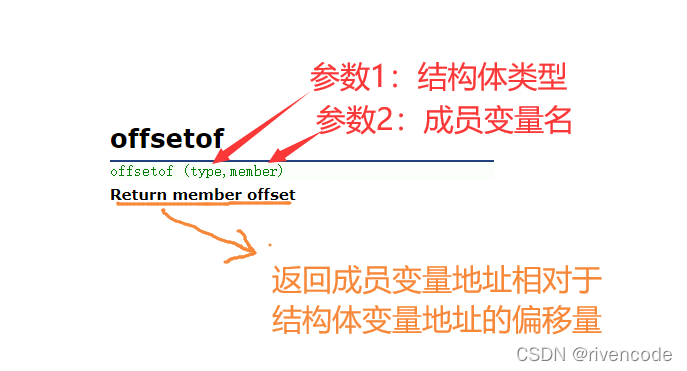
用法: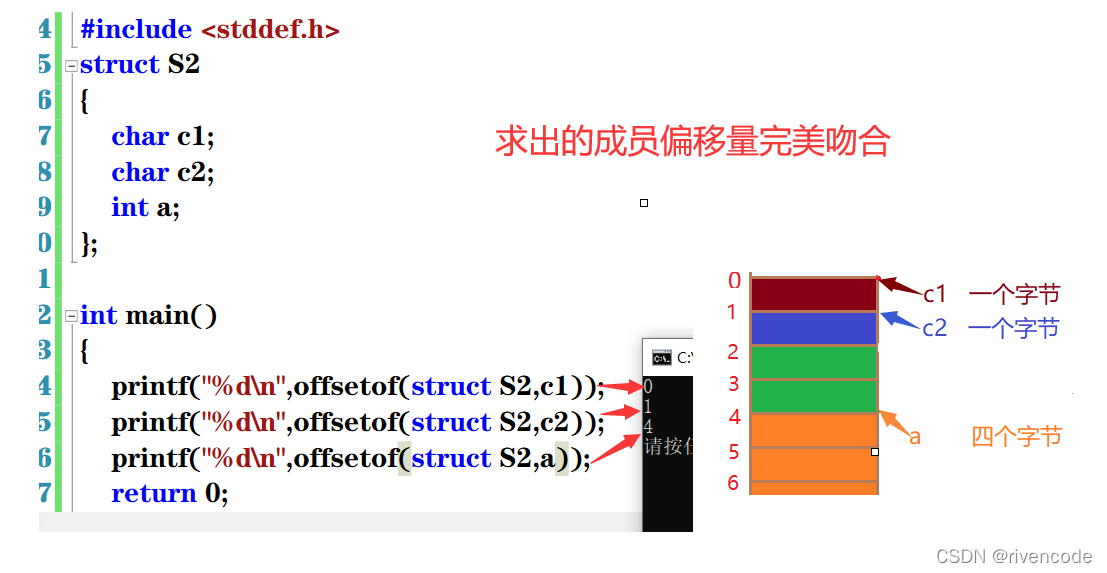
求出的偏移量完美吻合
自己实现offsetof宏
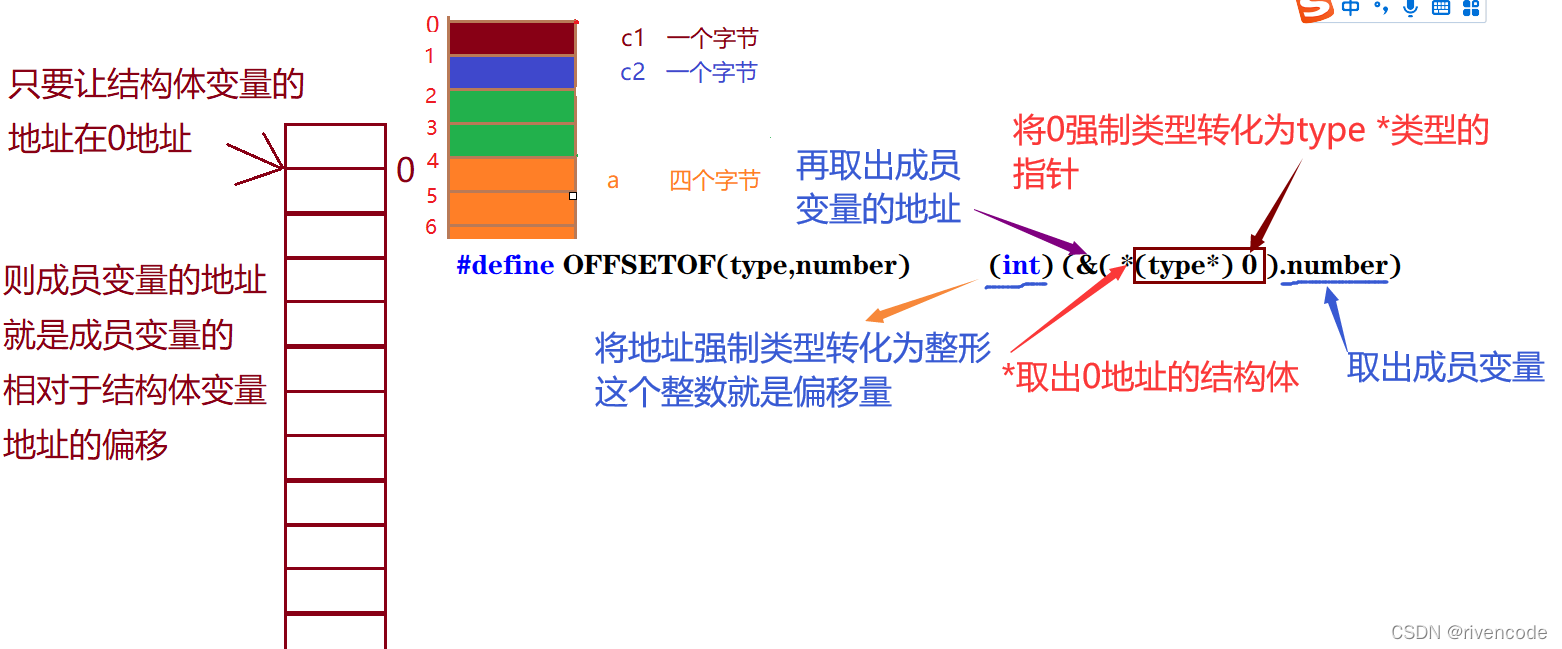
#defineOFFSETOF(type,number)(int)(&(*(type*)0).number)structS2{char c1;char c2;int a;};intmain(){printf("%d\n",OFFSETOF(structS2,c1));printf("%d\n",OFFSETOF(structS2,c2));printf("%d\n",OFFSETOF(structS2,a));return0;}

详细分析:
如果对带参宏的不是很理解的请看——>预编译指令
直接附上源码了
#definecontain_of(ptr,type,member)(type*)((char*)ptr -&(((type*)0)->member))structnode_t{structnode_t*next;};structperson{char*name;int age;structnode_t node;};structlist{char*name;/* A班 */structnode_t node;};//初始化链表voidInitList(structlist*pList,char*name){
    pList->name = name;
    pList->node.next =NULL;//pList->next = NULL;}voidAddItemToListEnd(structlist*pList,structnode_t*new_node){structnode_t*tail =&pList->node;while(tail->next){
        tail = tail->next;}/* last->next == NULL */
    tail->next = new_node;
    new_node->next =NULL;}voidAddItemAfter(structnode_t*pre,structnode_t*next){
    next->next = pre->next;
    pre->next = next;}voidDelItemFromList(structlist*pList,structnode_t*node){structnode_t*pre =&pList->node;while(pre !=NULL&&  pre->next != node){
        pre = pre->next;}if(pre ==NULL){printf("not found \n");}else{
        pre->next = node->next;}}voidPrintList(structlist*pList){int i =0;structnode_t*cur = pList->node.next;structperson*p=NULL;while(cur !=NULL){
        p =contain_of(cur,structperson, node);printf("person %d: %s is %d\r\n", i++, p->name, p->age);/* 后面还有人, 移动到下一个 */
        cur = cur->next;}}intPerson_age_cmp(structnode_t* pre,structnode_t* next){structperson* p =contain_of(pre,structperson, node);structperson* n =contain_of(next,structperson, node);if(p->age > n->age)return1;elsereturn0;}voidBubble_Sort(structlist*pList){structnode_t*cur = pList->node.next;structnode_t*pre1 =&pList->node;structnode_t*pre2 =NULL;structnode_t*next =NULL;structnode_t*tmp =NULL;while(cur->next->next){
        pre2 = cur;
        next = cur->next;while(next){if(Person_age_cmp(cur, next)){DelItemFromList(pList, cur);DelItemFromList(pList, next);AddItemAfter(pre1, next);if(cur == pre2)AddItemAfter(next, cur);elseAddItemAfter(pre2, cur);//cur 与 next互换
                tmp = cur;
                cur = next;
                next = tmp;}
            pre2 = next;
            next = next->next;}
        pre1 = cur;
        cur = cur->next;}}

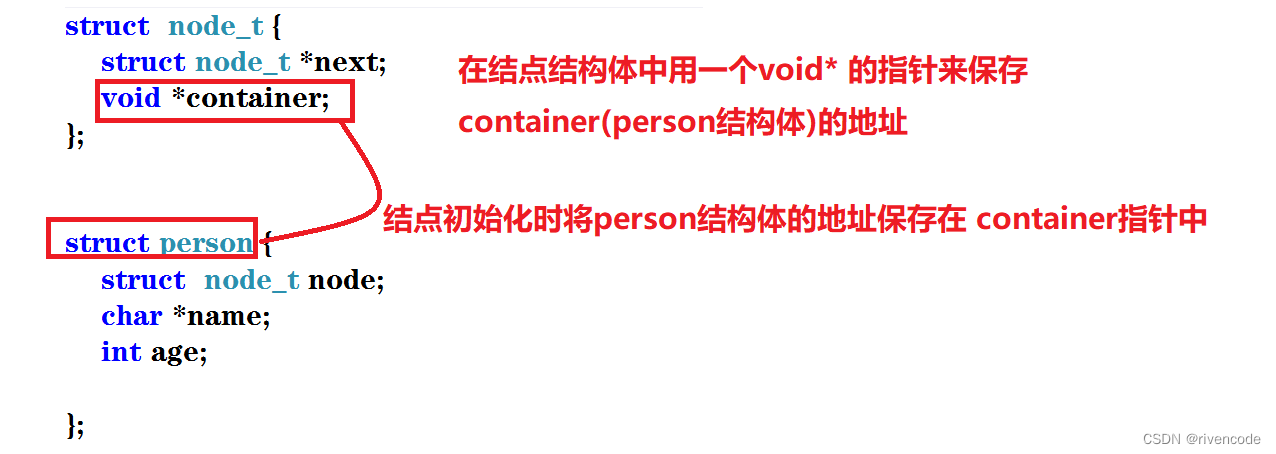
4.方式三:node结点中,保存container地址
最直接的方式就是在结点初始化时在node结点中直接保存container的首地址
这也是FreeRTOS 操作系统中使用的方式
structnode_t{structnode_t*next;void*container;};structperson{structnode_t node;char*name;int age;};structlist{structnode_t head;char*name;/* A班 */};
直接上源码
voidInitList(structlist*pList,char*name){
pList->name = name;
pList->head.next =NULL;//pList->next = NULL;}voidAddItemToListEnd(structlist*pList,structnode_t*new_node){structnode_t*tail =&pList->head;while(tail->next){
tail = tail->next;}/* last->next == NULL */
tail->next = new_node;
new_node->next =NULL;}voidAddItemAfter(structnode_t*pre,structnode_t*next){
next->next = pre->next;
pre->next = next;}voidDelItemFromList(structlist*pList,structnode_t*node){structnode_t*pre =&pList->head;while(pre !=NULL&& pre->next != node){
pre = pre->next;}if(pre ==NULL){printf("not found \n");}else{
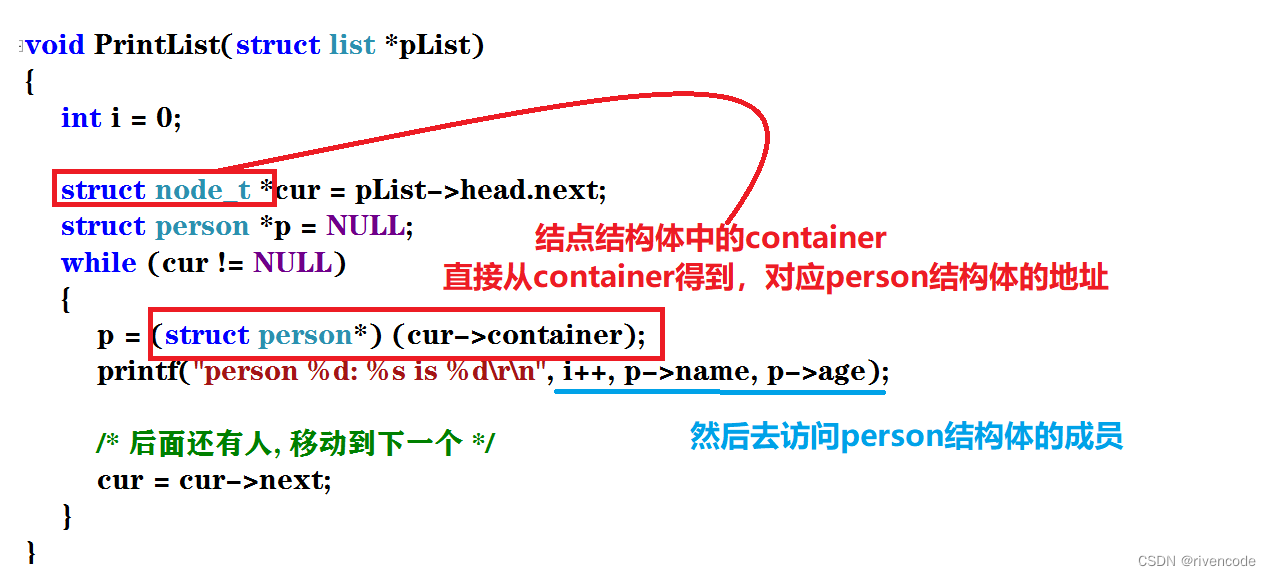
pre->next = node->next;}}voidPrintList(structlist*pList){int i =0;structnode_t*cur = pList->head.next;structperson*p =NULL;while(cur !=NULL){
p =(structperson*)(cur->container);printf("person %d: %s is %d\r\n", i++, p->name, p->age);/* 后面还有人, 移动到下一个 */
cur = cur->next;}}intPerson_age_cmp(structnode_t* pre,structnode_t* next){if(((structperson*)pre->container)->age >((structperson*)next->container)->age)return1;elsereturn0;}voidBubble_Sort(structlist*pList){structnode_t*cur = pList->head.next;structnode_t*pre1 =&pList->head;structnode_t*pre2 =NULL;structnode_t*next =NULL;structnode_t*tmp =NULL;while(cur->next->next){
pre2 = cur;
next = cur->next;while(next){if(Person_age_cmp(cur, next)){DelItemFromList(pList, cur);DelItemFromList(pList, next);AddItemAfter(pre1, next);if(cur == pre2)AddItemAfter(next, cur);elseAddItemAfter(pre2, cur);//cur 与 next互换
tmp = cur;
cur = next;
next = tmp;}
pre2 = next;
next = next->next;}
pre1 = cur;
cur = cur->next;}}
链表测试
intmain(){structlist a_list;int i;structperson p[]={{{NULL,&p[0]},"p1",10},{{NULL,&p[1]},"p2",42},{{NULL,&p[2]},"p3",45},{{NULL,&p[3]},"p4",53},{{NULL,&p[4]},"p5",23},{{NULL,&p[5]},"p6",12},{{NULL,&p[6]},"p7",63},{{NULL,&p[7]},"p8",8},{{NULL,NULL},{NULL}},};InitList(&a_list,"A_class");
    i =0;while(p[i].name !=NULL){AddItemToListEnd(&a_list,&p[i].node);
        i++;}printf("add all person:\r\n");PrintList(&a_list);DelItemFromList(&a_list,&p[3].node);printf("del person %s:\r\n", p[3].name);PrintList(&a_list);DelItemFromList(&a_list,&p[0].node);printf("del person %s:\r\n", p[0].name);PrintList(&a_list);DelItemFromList(&a_list,&p[7].node);printf("del person %s:\r\n", p[7].name);PrintList(&a_list);Bubble_Sort(&a_list);printf("升序\n");PrintList(&a_list);return0;}
5.基于方式三实现双向循链表
**双向循环链表比较简单详细操作—>**《C语言链表超详解》
双向循环链表结合方式三就是FreeRTOS的链表实现方式
#definecontain_of(ptr,type,member)(type*)((char*)ptr -&(((type*)0)->member));structnode_t{structnode_t*next;structnode_t*pre;void*container;};structperson{structnode_t node;char*name;int age;};structlist{structnode_t head;char*name;/* A班 */};voidInitList(structlist*pList,char*name){
    pList->name = name;
    pList->head.next =&pList->head;
    pList->head.pre =&pList->head;//pList->next = NULL;}voidAddItemToListEnd(structlist*pList,structnode_t*new_node){structnode_t*tail = pList->head.pre;/* last->next == NULL */
    tail->next = new_node;
    new_node->pre = tail;
    new_node->next =&pList->head;
    pList->head.pre = new_node;}voidAddItemAfter(structnode_t*pre,structnode_t*new_node){structnode_t* right = pre->next;

    pre->next = new_node;
    new_node->next = right;

    right->pre = new_node;
    new_node->pre = pre;}//查找节点,返回指向节点的指针structnode_t*ListFind(structlist*pList,structnode_t*node){structnode_t*cur = pList->head.next;while(cur !=&pList->head){if(cur == node){return cur;}
        cur = cur->next;}returnNULL;}voidDelItemFromList(structnode_t*node){if(ListFind !=NULL){structnode_t*left = node->pre;structnode_t*right = node->next;
        left->next = right;
        right->pre = left;}elseprintf(" not find this node \n ");}voidPrintList(structlist*pList){int i =0;structnode_t*node = pList->head.next;structperson*p;while(node !=&pList->head){
        p =contain_of(node,structperson, node);printf("person %d: %s is %d\r\n", i++, p->name, p->age);/* 后面还有人, 移动到下一个 */
        node = node->next;}}intPerson_age_cmp(structnode_t* pre,structnode_t* next){if(((structperson*)pre->container)->age >((structperson*)next->container)->age)return1;elsereturn0;}voidBubble_Sort(structlist*pList){structnode_t*cur   = pList->head.next;structnode_t*pre1 =&pList->head;structnode_t*pre2 =NULL;structnode_t*next =NULL;structnode_t*tmp  =NULL;while(cur !=&pList->head){
        pre2 = cur;
        next = cur->next;while(next !=&pList->head){if(Person_age_cmp(cur, next)){DelItemFromList(cur);DelItemFromList(next);AddItemAfter(pre1, next);if(cur == pre2)AddItemAfter(next, cur);elseAddItemAfter(pre2, cur);//cur 与 next互换
                tmp = cur;
                cur = next;
                next = tmp;}
            pre2 = next;
            next = next->next;}
        pre1 = cur;
        cur = cur->next;}}
三.FreeRTOS链表源码深度解析
前面所有的都是铺垫终于讲到我们的重点了,前面主要要理解容器的概念理解通用链表的实现方式。
1.结构体分析
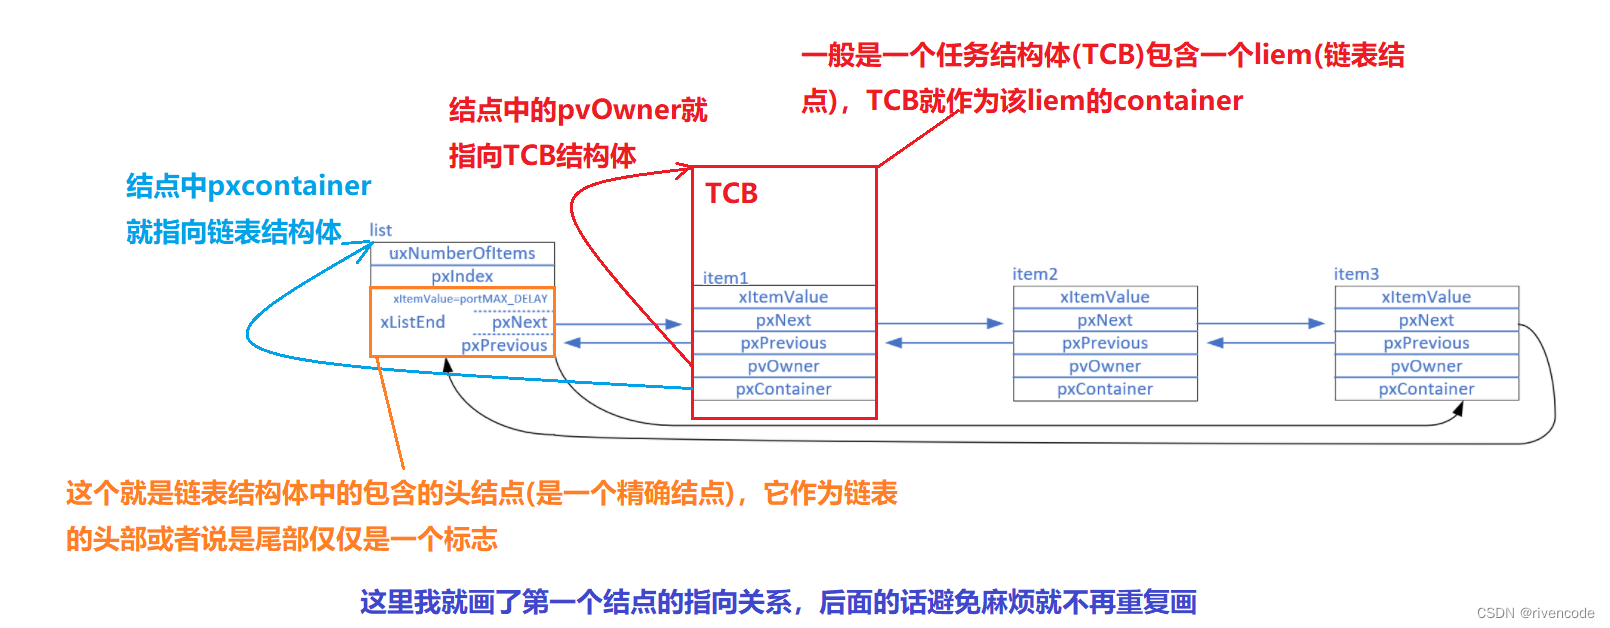
链表结构体: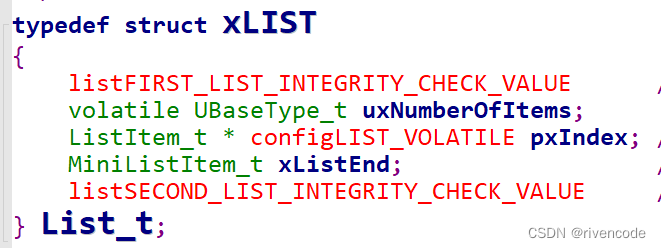
- uxNumberOfItems:链表节点计数器,用于表示该链表下有多少个节点,头结点除外。

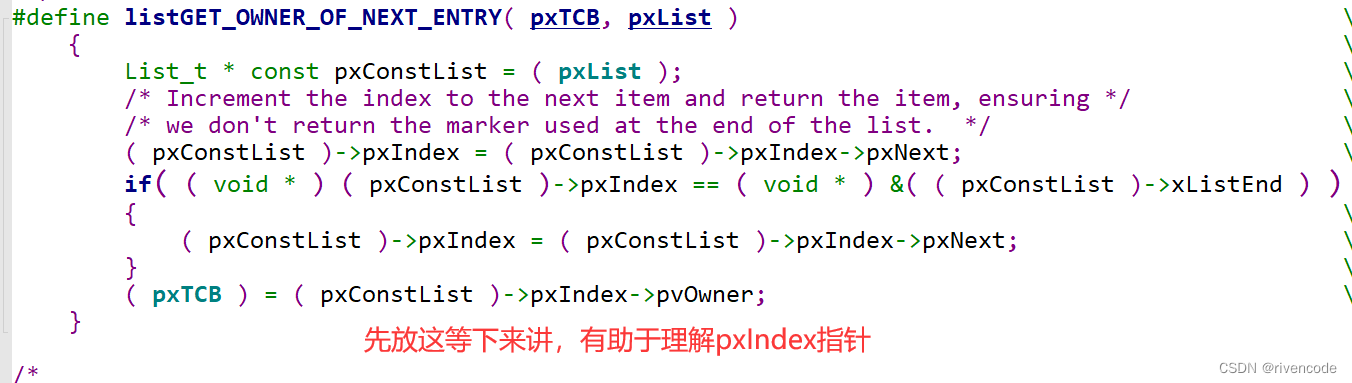
- pxIndex:链表结点索引指针,用于遍历结点,该指针指向的链表项表示该链表项正在使用,可以通过listGET_OWNER_OF_NEXT_ENTRY ()这个宏来调整它的位置。
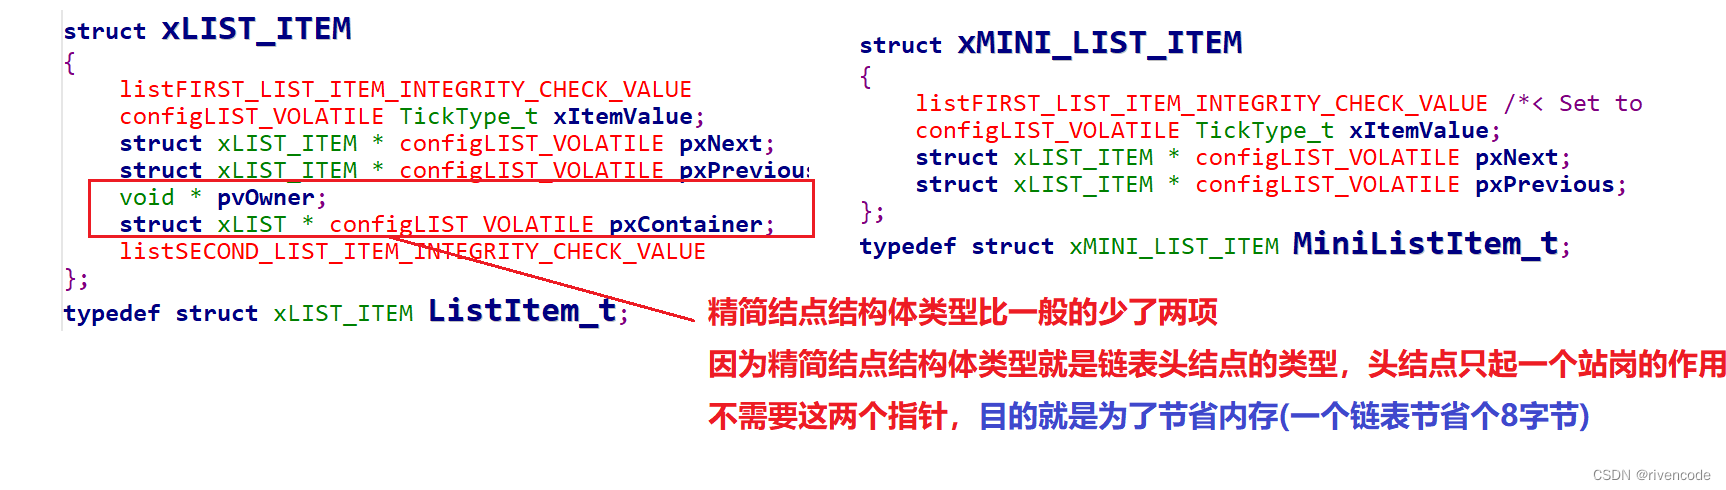
- xListEnd:链表的头结点,只起到站岗的作用,在双向循环链表中既可以说的头也可以说是尾结点,而且数据类型是一个精简的结点
结点(链表项)结构体
1.精简结点类型
精简结点类型就是头结点的类型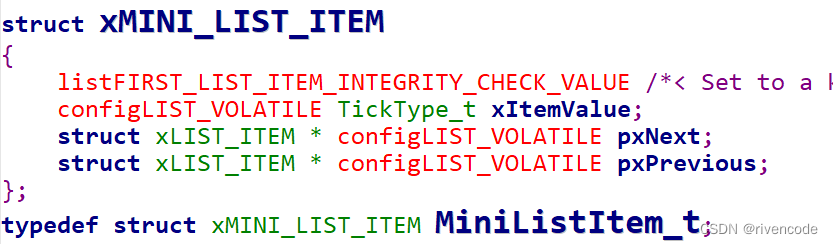
2.结点类型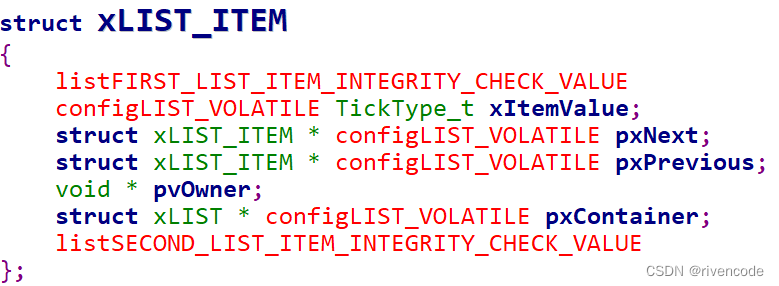
- xItemValue: 辅助值,用于帮助结点做顺序排列
- pxNext:指向链表下一个结点
- pxPrevious:指向链表前一个结点
- pvOwner:指向拥有该结点的内核对象(其实就是指向我们前面讲的包含该结点的容器),通常是 TCB(任务结构体)
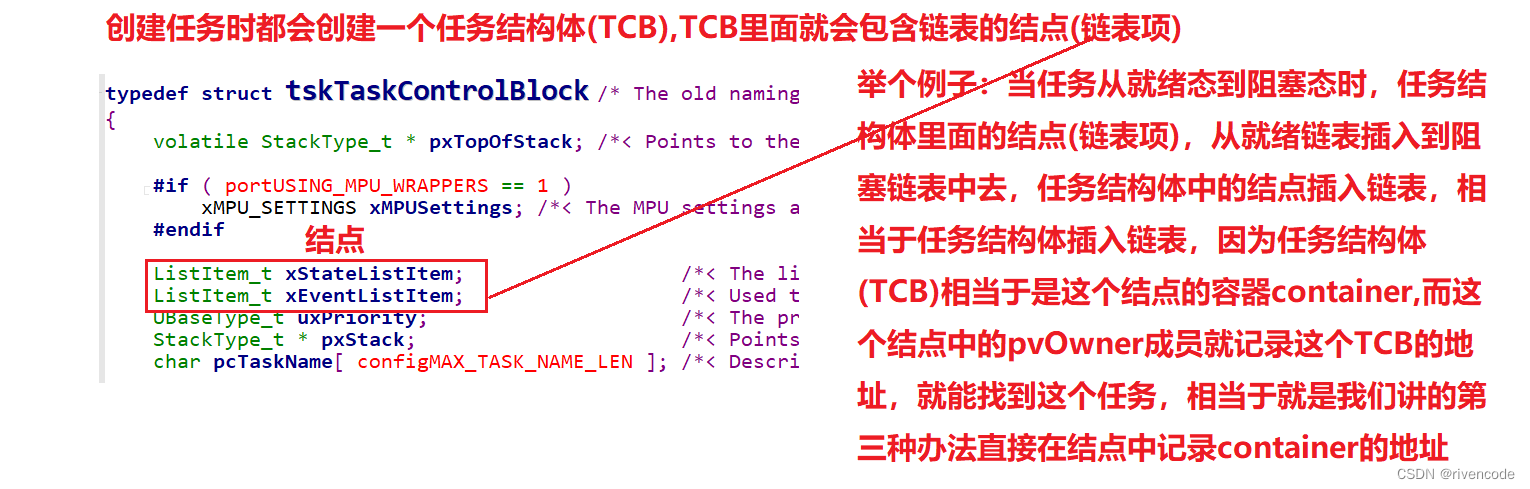 简单来说就是,pvOwner就是结点找到container 的指针,而这个container一般是一个任务结构体(TCB),因为一般是任务挂入链表之中,所以任务结构体中包含一个链表结点用来挂入链表,而结点中的pvOwner成员指向任务结构体,用它可以访问任务结构体。
 - pxContainer:指向该结点所在的链表,这个指针指向前面的链表结构体便于访问链表结构体的其他成员(链表结点个数,索引指针…)。
为什么要有两种结点类型一个是精简一个是一般结点结构体类型
简单来说就是,为了节省内存

- 链表示意图****看图就明白各个指针指向的位置了,清楚明了
2.链表初始化及结点初始化
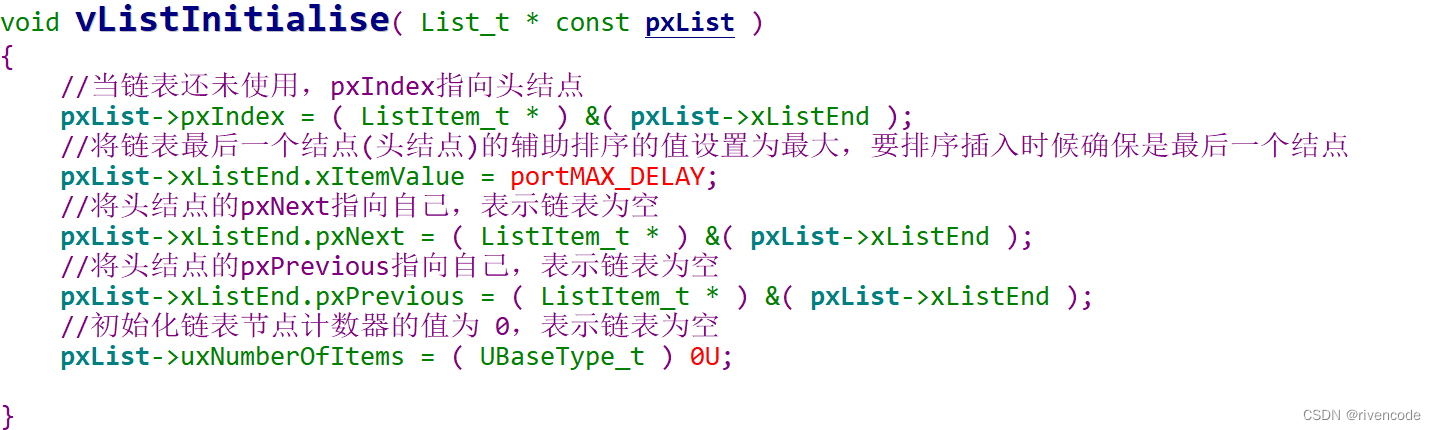
1.链表初始化
voidvListInitialise( List_t *const pxList ){/* The list structure contains a list item which is used to mark the
     * end of the list.  To initialise the list the list end is inserted
     * as the only list entry. */
    pxList->pxIndex =( ListItem_t *)&( pxList->xListEnd );/*lint !e826 !e740 !e9087 The mini list structure is used as the list end to save RAM.  This is checked and valid. *//* The list end value is the highest possible value in the list to
     * ensure it remains at the end of the list. */
    pxList->xListEnd.xItemValue = portMAX_DELAY;/* The list end next and previous pointers point to itself so we know
     * when the list is empty. */
    pxList->xListEnd.pxNext =( ListItem_t *)&( pxList->xListEnd );/*lint !e826 !e740 !e9087 The mini list structure is used as the list end to save RAM.  This is checked and valid. */
    pxList->xListEnd.pxPrevious =( ListItem_t *)&( pxList->xListEnd );/*lint !e826 !e740 !e9087 The mini list structure is used as the list end to save RAM.  This is checked and valid. */

    pxList->uxNumberOfItems =( UBaseType_t )0U;/* Write known values into the list if
     * configUSE_LIST_DATA_INTEGRITY_CHECK_BYTES is set to 1. */listSET_LIST_INTEGRITY_CHECK_1_VALUE( pxList );listSET_LIST_INTEGRITY_CHECK_2_VALUE( pxList );}/*-----------------------------------------------------------*/
指针指向示意图:
2.结点初始化
voidvListInitialiseItem( ListItem_t *const pxItem ){/* Make sure the list item is not recorded as being on a list. */
    pxItem->pxContainer =NULL;/* Write known values into the list item if
     * configUSE_LIST_DATA_INTEGRITY_CHECK_BYTES is set to 1. */listSET_FIRST_LIST_ITEM_INTEGRITY_CHECK_VALUE( pxItem );listSET_SECOND_LIST_ITEM_INTEGRITY_CHECK_VALUE( pxItem );}

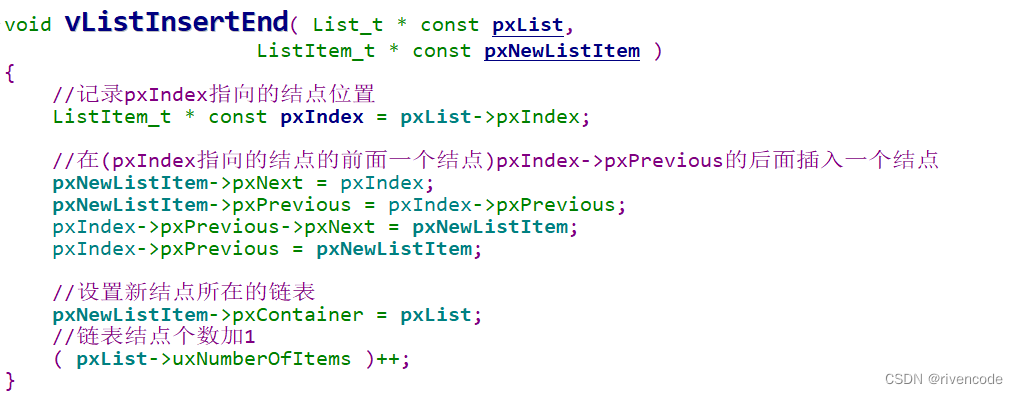
3.插入链表"尾部"
voidvListInsertEnd( List_t *const pxList,
                     ListItem_t *const pxNewListItem ){
    ListItem_t *const pxIndex = pxList->pxIndex;/* Only effective when configASSERT() is also defined, these tests may catch
     * the list data structures being overwritten in memory.  They will not catch
     * data errors caused by incorrect configuration or use of FreeRTOS. */listTEST_LIST_INTEGRITY( pxList );listTEST_LIST_ITEM_INTEGRITY( pxNewListItem );/* Insert a new list item into pxList, but rather than sort the list,
     * makes the new list item the last item to be removed by a call to
     * listGET_OWNER_OF_NEXT_ENTRY(). */
    pxNewListItem->pxNext = pxIndex;
    pxNewListItem->pxPrevious = pxIndex->pxPrevious;/* Only used during decision coverage testing. */mtCOVERAGE_TEST_DELAY();

    pxIndex->pxPrevious->pxNext = pxNewListItem;
    pxIndex->pxPrevious = pxNewListItem;/* Remember which list the item is in. */
    pxNewListItem->pxContainer = pxList;( pxList->uxNumberOfItems )++;}
- 怎么理解链表的尾部?****以及如何插入新结点,看完下图就明白了。
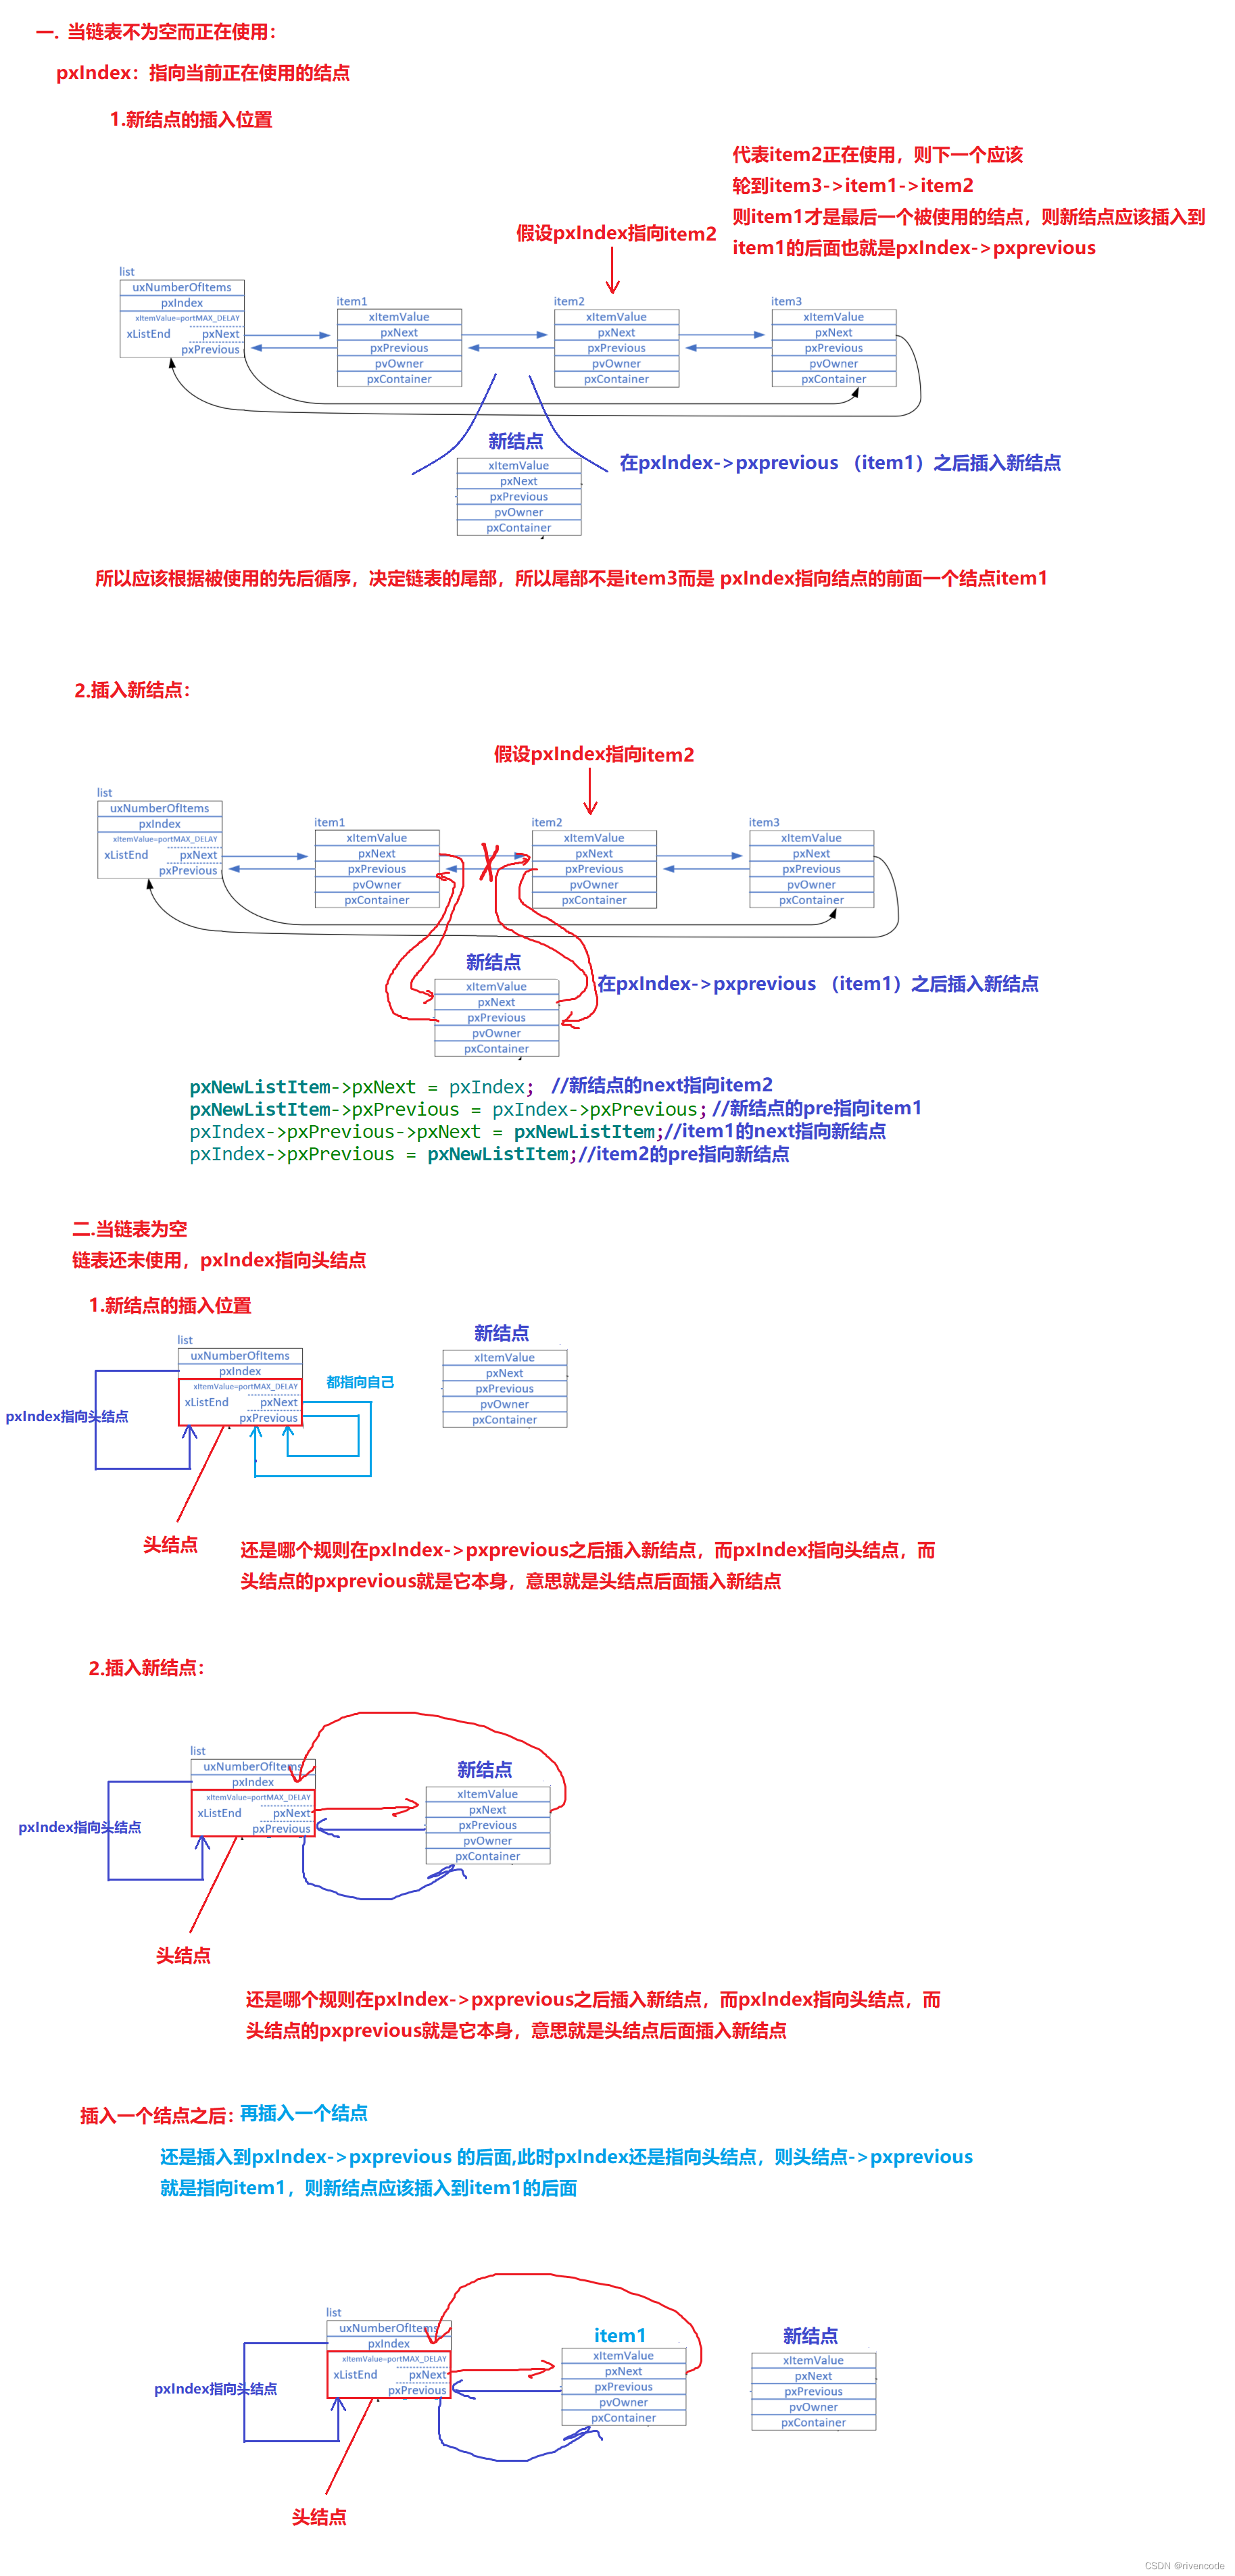
- 如何调整pxIndex的位置?
pxIndex:链表结点索引指针,用于遍历结点,该指针指向的链表项表示该链表项正在使用,可以通过listGET_OWNER_OF_NEXT_ENTRY ()这个宏来调整它的位置。
在链表使用过程中,如果pxIndex指向头结点,则会直接跳过头结点指向头结点的下一个结点,因为头结点只是标识链表尾部/头部的标志并没有其他用处。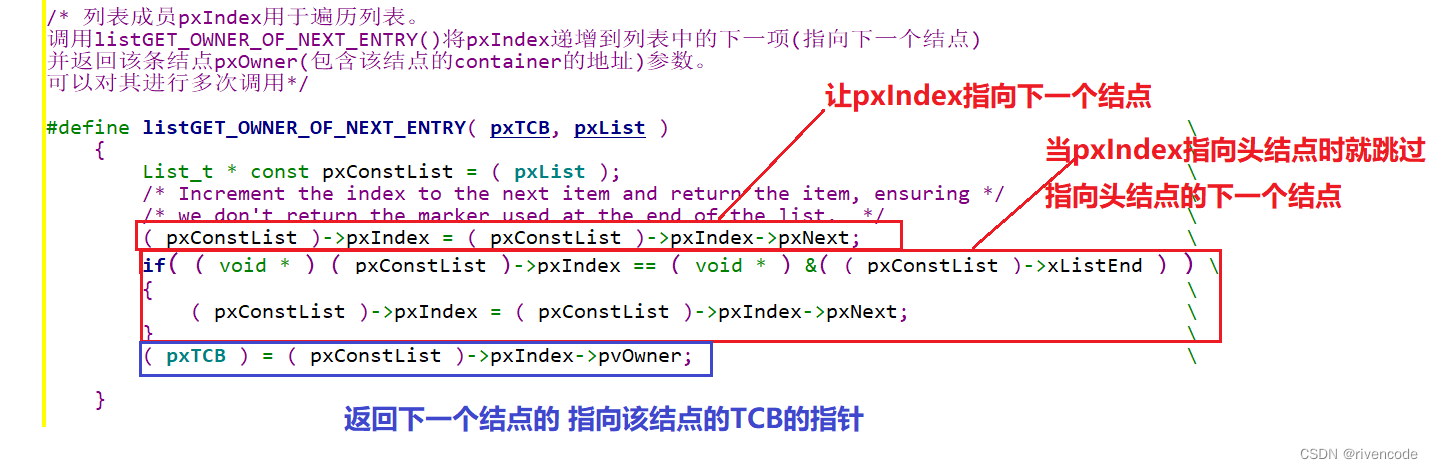
4.按序插入链表
利用结点的辅助排序值xitemVaule来排序插入,比较简单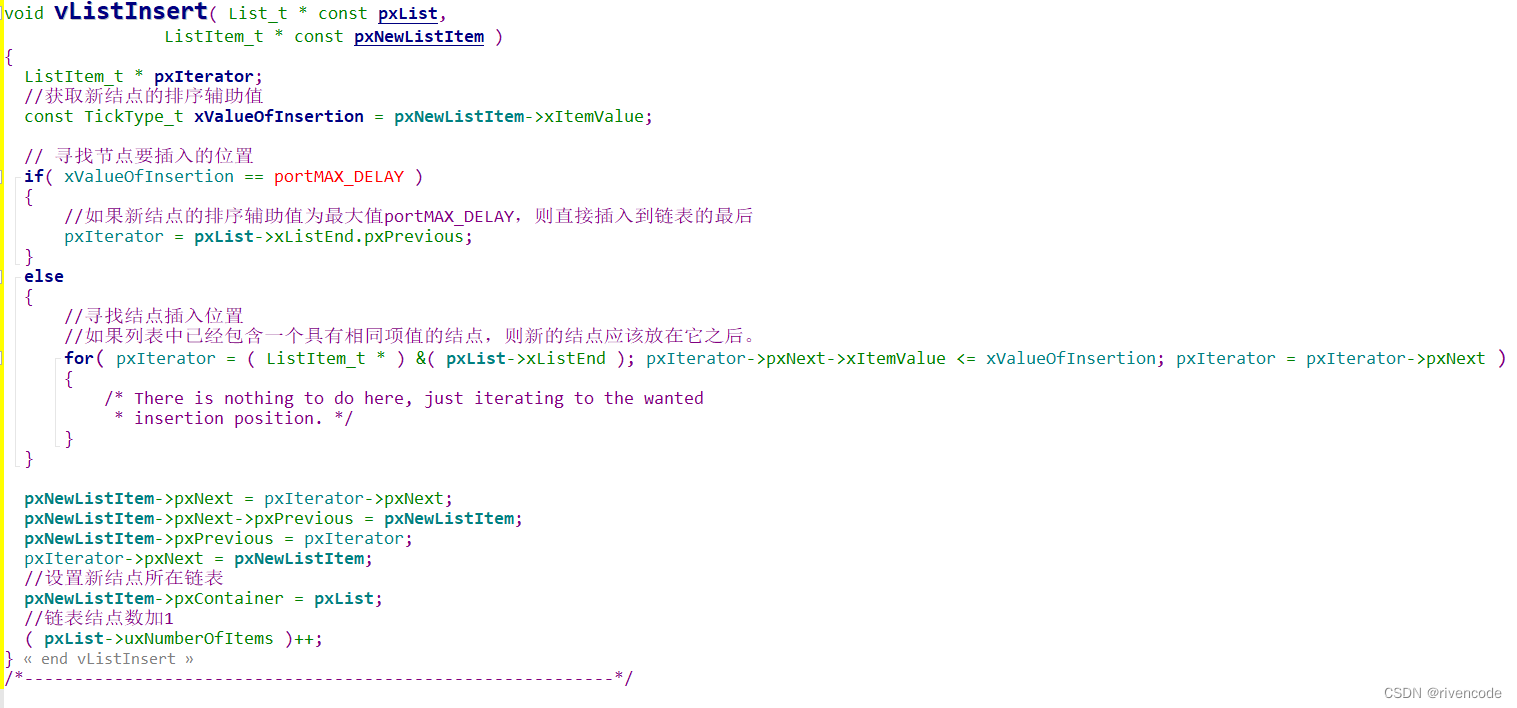
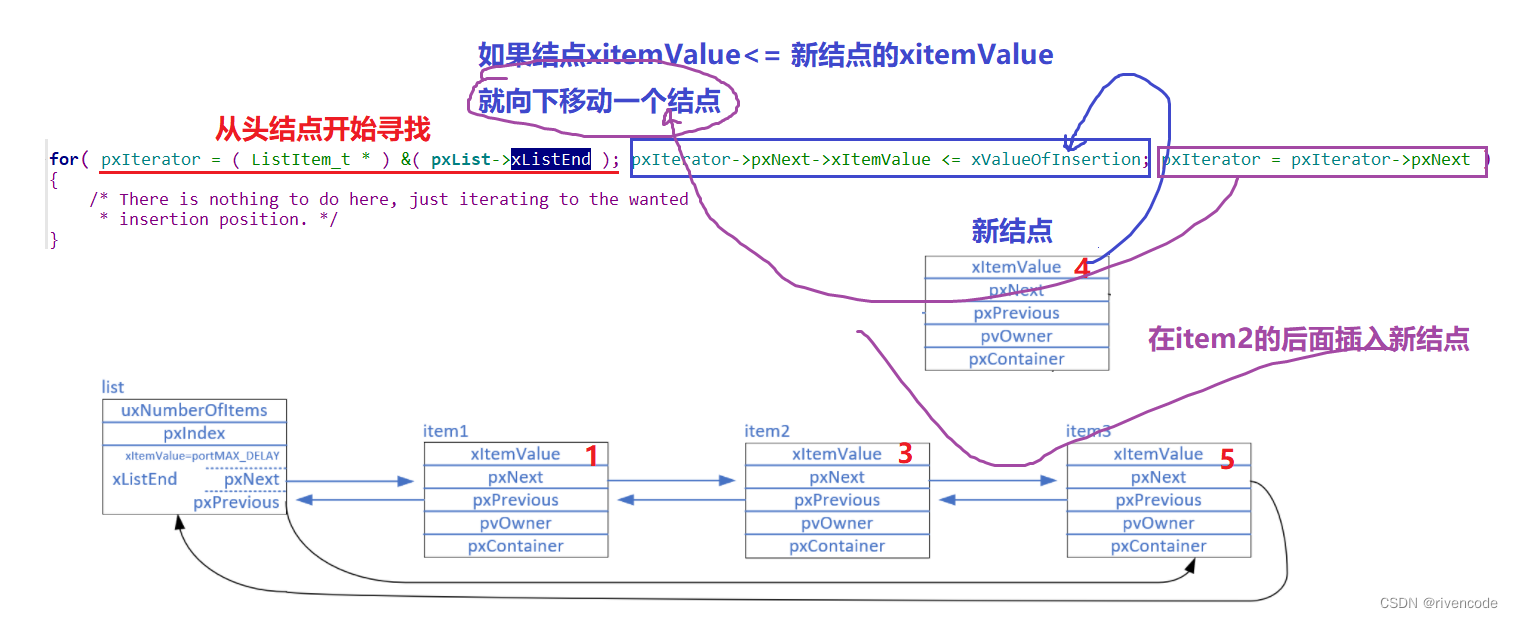
后面的插入结点操作就简单了
5.删除链表项
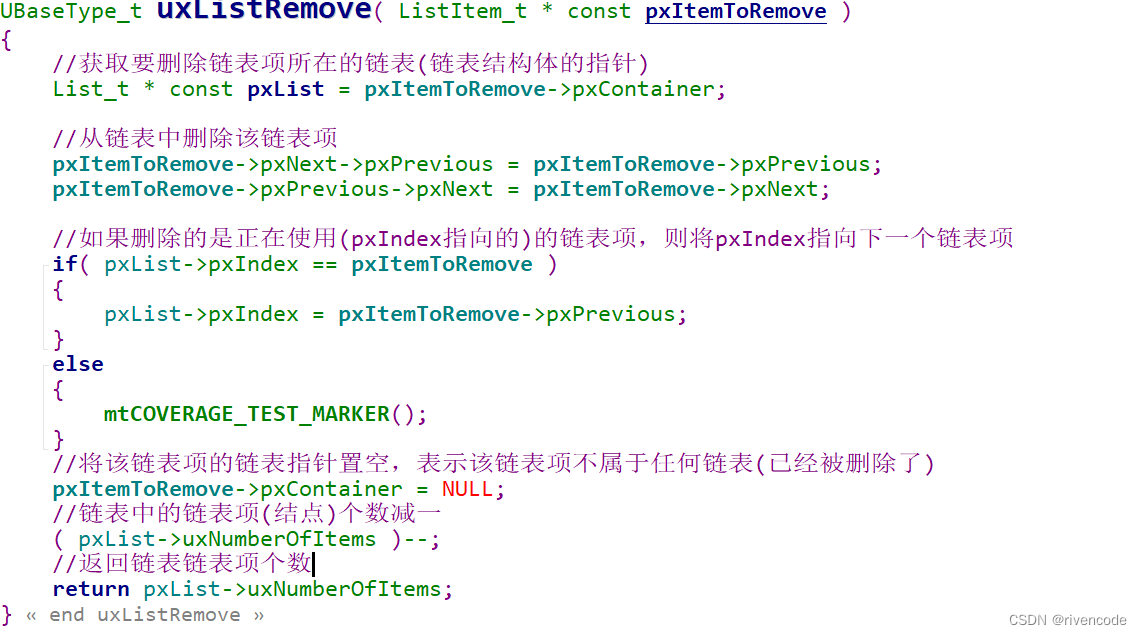
删除链表项结点的操作比较简单就不讲解了
**如果对双向链表基本操作还不熟练的可以参考->**《C语言链表超详解》
6.链表操作-带参"宏函数"
在 list.h 中,还定义了各种各样的带参宏,方便对节点做一些简单的操作
基本看宏名就可以猜出该宏的作用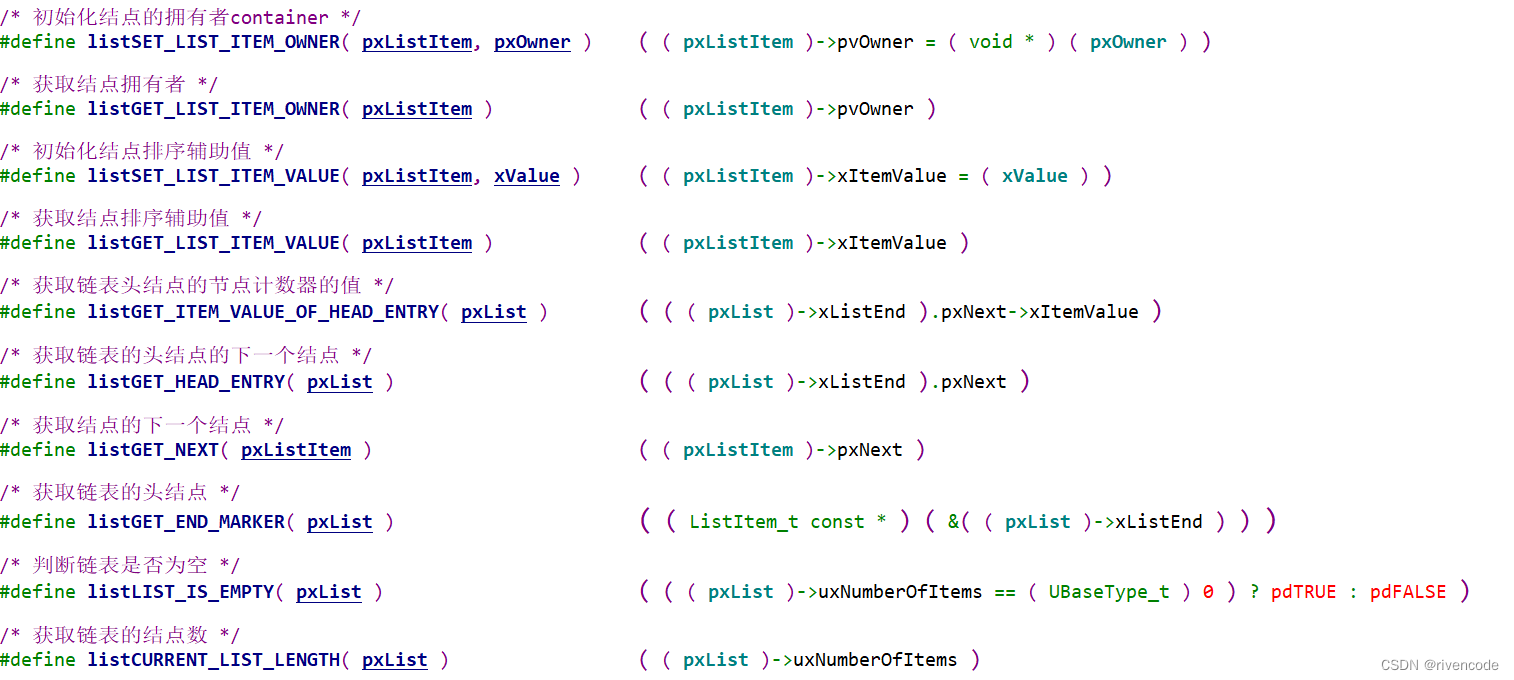
四.总结
FreeROTS的链表实现非常精妙,值得我们大家去学习,不过在学习之前的大家的C语言的高级语法部分需要扎实的基本功,以及数据结构中链表的深度理解,以及一定的C语言的代码能力,所以在学习理论的同时多刷题多敲代码多实践将理论知识融会贯通,得心应手,最后希望文章对你有所帮助加油!!!
结束语:
最近发现一款刷题神器,如果大家想提升编程水平,玩转C语言指针,还有常见的数据结构(最重要的是链表和队列)后面嵌入式学习操作系统的时如freerots、RT-Thread等操作系统,链表与队列知识大量使用。
大家可以点击下面连接进入牛客网刷题
点击跳转进入网站(C语言方向)
点击跳转进入网站(数据结构算法方向)

版权归原作者 rivencode 所有, 如有侵权,请联系我们删除。