
在构建一个大规模 AI 系统时,我们其实就是在把不同的“智能体设计模式(agentic design patterns)”组合起来。不管系统多复杂都可以拆解成有限的几种"设计模式"。这些模式各有各的用法——有的专门负责思考优化,有的处理工具调用,有的管多智能体协作。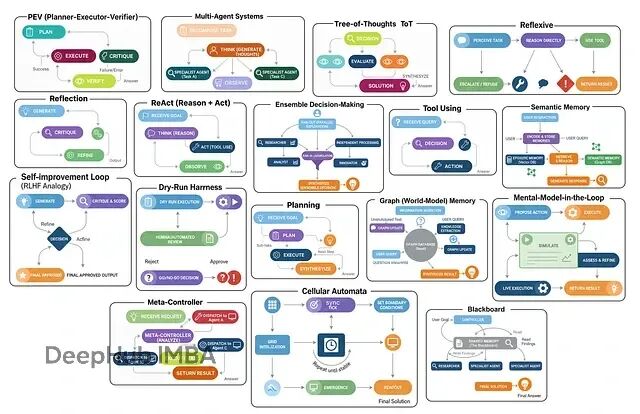
主要就这么几类:多智能体系统让不同角色分工协作;集成决策让多个智能体投票选最优解;思维树(ToT)探索多条推理路径再择优;反思式架构能自我审视和改进;ReAct循环在思考与行动间迭代。
本文将逐一深入解析这17种不同的智能体架构,不仅阐述其核心原理和设计思想,还将通过完整的代码实现来演示其工作机制,并用真实数据验证每种架构的实际效果和适用场景。
环境配置
开始之前得把工具链搞定。现在的RAG或智能体系统,LangChain、LangGraph和LangSmith基本成了标配——前者提供基础组件,LangGraph负责编排流程,LangSmith可以进行调试和监控。
导入
 import os
from typing import List, Dict, Any, Optional, Annotated, TypedDict
from dotenv import load_dotenv  # 从 .env 文件加载环境变量

# 用于数据建模/校验的 Pydantic
from pydantic import BaseModel, Field

# LangChain & LangGraph 组件
from langchain_nebius import ChatNebius  # Nebius LLM 封装器
from langchain_tavily import TavilySearch  # Tavily 搜索工具集成
from langchain_core.prompts import ChatPromptTemplate  # 用于组织提示词
from langgraph.graph import StateGraph, END  # 构建状态机图
from langgraph.prebuilt import ToolNode, tools_condition  # 预置的节点与条件

# 便于更好地输出结果
from rich.console import Console  # 终端样式化输出
 from rich.markdown import Markdown  # 在终端渲染 Markdown
为了作为演示,我还接了Tavily API做实时搜索,避免智能体被训练数据的时效性限制住。每月1000次调用的免费额度已经够用了了。
环境变量这样配:
# Nebius LLM 的 API key(用于 ChatNebius)
NEBIUS_API_KEY="your_nebius_api_key_here"

# LangSmith(LangChain 观测/遥测平台)的 API key
LANGCHAIN_API_KEY="your_langsmith_api_key_here"

# Tavily 搜索工具(用于 TavilySearch 集成)的 API key
TAVILY_API_KEY="your_tavily_api_key_here"
加载和验证:
load_dotenv()  # 加载环境变量

# 启用 LangSmith 跟踪以便监控/调试
os.environ["LANGCHAIN_TRACING_V2"] = "true"
os.environ["LANGCHAIN_PROJECT"] = "Implementing 17 Agentic Architectures"  # 用于分组轨迹的项目名

# 校验所需的 API key 是否齐全
for key in ["NEBIUS_API_KEY", "LANGCHAIN_API_KEY", "TAVILY_API_KEY"]:
    if not os.environ.get(key):  # 若环境变量中未找到
        print(f"{key} not found. Please create a .env file and set it.")
反思架构(Reflection)
反思可能是智能体工作流里最基础也最实用的模式。核心思路就是让智能体"退一步看自己的输出,然后想办法改进"。
这个模式特别适合那种对结果质量要求很高的场景,比如生成复杂代码、写技术文档什么的。如果只给个草稿通常质量都不好,所以需要这个模式。
流程非常简单:
生成(Generate):基于用户需求先出个初版
批判(Critique):切换视角,从代码审查员的角度挑毛病
精炼(Refine):基于批评意见,输出改进版本
实现上用Pydantic模型来约束LLM的输出格式,这样多步骤之间的数据传递会更稳定:
class DraftCode(BaseModel):
    """Schema for the initial code draft generated by the agent."""
    code: str = Field(description="The Python code generated to solve the user's request.")  # 原始草稿
    explanation: str = Field(description="A brief explanation of how the code works.")  # 推理说明

class Critique(BaseModel):
    """Schema for the self-critique of the generated code."""
    has_errors: bool = Field(description="Does the code have any potential bugs or logical errors?")  # 错误排查
    is_efficient: bool = Field(description="Is the code written in an efficient and optimal way?")  # 性能/最佳实践检查
    suggested_improvements: List[str] = Field(description="Specific, actionable suggestions for improving the code.")  # 具体改进建议
    critique_summary: str = Field(description="A summary of the critique.")  # 评审概述

class RefinedCode(BaseModel):
    """Schema for the final, refined code after incorporating the critique."""
    refined_code: str = Field(description="The final, improved Python code.")  # 打磨后的版本
    refinement_summary: str = Field(description="A summary of the changes made based on the critique.")  # 修改说明
Critique这个模型设计得比较巧妙,它强制智能体必须从错误检查、效率评估等具体维度来审视代码,而不是泛泛地说"看起来还行",这样保证了检查的质量。
生成器节点就是标准的prompt调用:
def generator_node(state):
    """Generates the initial draft of the code."""
    console.print("--- 1. Generating Initial Draft ---")
    # 初始化 LLM,并让其输出结构化 DraftCode 对象
    generator_llm = llm.with_structured_output(DraftCode)

    prompt = f"""You are an expert Python programmer. Write a Python function to solve the following request.
    Provide a simple, clear implementation and an explanation.

    Request: {state['user_request']}
    """

    draft = generator_llm.invoke(prompt)
    return {"draft": draft.model_dump()}
批评节点是这个架构的核心,它让智能体作为"资深开发者"来审视自己刚写的代码:
def critic_node(state):
    """Critiques the generated code for errors and inefficiencies."""
    console.print("--- 2. Critiquing Draft ---")
    # 初始化 LLM,并让其输出结构化 Critique 对象
    critic_llm = llm.with_structured_output(Critique)

    code_to_critique = state['draft']['code']

    prompt = f"""You are an expert code reviewer and senior Python developer. Your task is to perform a thorough critique of the following code.

    Analyze the code for:
    1.  **Bugs and Errors:** Are there any potential runtime errors, logical flaws, or edge cases that are not handled?
    2.  **Efficiency and Best Practices:** Is this the most efficient way to solve the problem? Does it follow standard Python conventions (PEP 8)?

    Provide a structured critique with specific, actionable suggestions.

    Code to Review:
    ```python
    {code_to_critique}
    ```
    """

    critique = critic_llm.invoke(prompt)
    return {"critique": critique.model_dump()}
精炼节点负责把批评意见落地成实际的代码改动:
def refiner_node(state):
    """Refines the code based on the critique."""
    console.print("--- 3. Refining Code ---")
    # 初始化 LLM,并让其输出结构化 RefinedCode 对象
    refiner_llm = llm.with_structured_output(RefinedCode)

    draft_code = state['draft']['code']
    critique_suggestions = json.dumps(state['critique'], indent=2)

    prompt = f"""You are an expert Python programmer tasked with refining a piece of code based on a critique.

    Your goal is to rewrite the original code, implementing all the suggested improvements from the critique.

    **Original Code:**
    ```python
    {draft_code}
    ```

    **Critique and Suggestions:**
    {critique_suggestions}

    Please provide the final, refined code and a summary of the changes you made.
    """

    refined_code = refiner_llm.invoke(prompt)
    return {"refined_code": refined_code.model_dump()}
用LangGraph把这三个节点串成工作流:
class ReflectionState(TypedDict):
    """Represents the state of our reflection graph."""
    user_request: str
    draft: Optional[dict]
    critique: Optional[dict]
    refined_code: Optional[dict]

# 初始化 state graph
graph_builder = StateGraph(ReflectionState)

# 添加节点
graph_builder.add_node("generator", generator_node)
graph_builder.add_node("critic", critic_node)
graph_builder.add_node("refiner", refiner_node)

# 线性流程
graph_builder.set_entry_point("generator")
graph_builder.add_edge("generator", "critic")
graph_builder.add_edge("critic", "refiner")
graph_builder.add_edge("refiner", END)

# 编译为可运行应用
reflection_app = graph_builder.compile()

拿经典的斐波那契数列来测试效果。这个问题很适合:因为简单递归容易写但效率极差,改进空间明显。
user_request = "Write a Python function to find the nth Fibonacci number."
initial_input = {"user_request": user_request}

console.print(f"[bold cyan]🚀 Kicking off Reflection workflow for request:[/bold cyan] '{user_request}'\n")

# 流式运行并获取最终状态
final_state = None
for state_update in reflection_app.stream(initial_input, stream_mode="values"):
    final_state = state_update

console.print("\n[bold green]✅ Reflection workflow complete![/bold green]")
结果对比:
--- ### Initial Draft ---
Explanation: This function uses a recursive approach to calculate the nth Fibonacci number... This approach is not efficient for large values of n due to the repeated calculations...

1 def fibonacci(n):
2     if n <= 0:
3         return 0
4     elif n == 1:
5         return 1
6     else:
7         return fibonacci(n-1) + fibonacci(n-2)

--- ### Critique ---
Summary: The function has potential bugs and inefficiencies. It should be revised to handle negative inputs and improve its time complexity.
Improvements Suggested:
- The function does not handle negative numbers correctly.
- The function has a high time complexity due to the repeated calculations. Consider using dynamic programming or memoization.
- The function does not follow PEP 8 conventions...

--- ### Final Refined Code ---
Refinement Summary: The original code has been revised to handle negative inputs, improve its time complexity, and follow PEP 8 conventions.

 1 def fibonacci(n):
 2     """Calculates the nth Fibonacci number."""
 3     if n < 0:
 4         raise ValueError("n must be a non-negative integer")
 5     elif n == 0:
 6         return 0
 7     elif n == 1:
 8         return 1
 9     else:
10         fib = [0, 1]
11         for i in range(2, n + 1):
12             fib.append(fib[i-1] + fib[i-2])
13         return fib[n]
初版是标准的递归实现,复杂度O(2^n),完全不实用。改进版改成动态规划,复杂度降到O(n),还加了输入验证和文档字符串。
为了量化改进效果,可以再加个评分机制:
class CodeEvaluation(BaseModel):
    """Schema for evaluating a piece of code."""
    correctness_score: int = Field(description="Score from 1-10 on whether the code is logically correct.")
    efficiency_score: int = Field(description="Score from 1-10 on the code's algorithmic efficiency.")
    style_score: int = Field(description="Score from 1-10 on code style and readability (PEP 8). ")
    justification: str = Field(description="A brief justification for the scores.")

def evaluate_code(code_to_evaluate: str):
    prompt = f"""You are an expert judge of Python code. Evaluate the following function on a scale of 1-10 for correctness, efficiency, and style. Provide a brief justification.

    Code:
    ```python
    {code_to_evaluate}
    ```
    """
    return judge_llm.invoke(prompt)
评分结果一目了然:
--- Evaluating Initial Draft ---
{
    'correctness_score': 2,
    'efficiency_score': 4,
    'style_score': 2,
    'justification': 'The function has a time complexity of O(2^n)...'
}

--- Evaluating Refined Code ---
{
    'correctness_score': 8,
    'efficiency_score': 6,
    'style_score': 9,
    'justification': 'The code is correct... it has a time complexity of O(n)...'
}
数据说明反思机制确实有效果,不是简单的表面修改。
工具调用架构(Tool Using)
没有外部工具的话,LLM只能依赖训练时的知识,无法访问实时数据或执行具体操作。工具调用架构就是为了解决这个问题。在生产级AI系统中,这几乎是必需的——不管是客服查询订单、金融系统获取股价,还是代码生成器执行测试都离不开工具集成。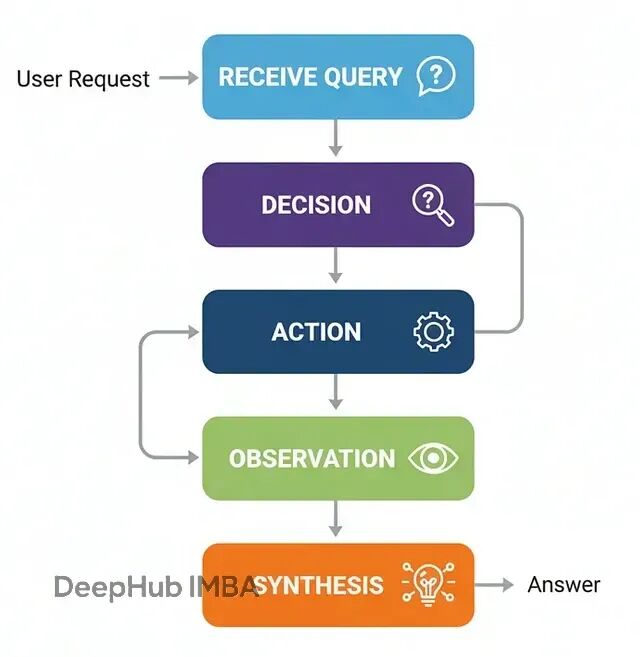
流程如下:
接收查询:智能体收到用户请求
决策分析:判断是否需要调用工具来获取信息
工具调用:按正确格式执行工具调用
结果处理:获取工具输出并整合
生成回复:结合工具结果给出最终答案
我们需要先配置一个搜索工具。这里用TavilySearch,并且工具描述要写清楚,LLM会根据这个自然语言描述来判断什么时候该用:
# 初始化工具。设置返回结果数量以保持上下文简洁。
search_tool = TavilySearchResults(max_results=2)

# 为工具提供明确的名称与描述,便于智能体理解
search_tool.name = "web_search"
search_tool.description = "A tool that can be used to search the internet for up-to-date information on any topic, including news, events, and current affairs."

tools = [search_tool]
智能体的状态结构比反思架构简单,就是维护消息历史:
class AgentState(TypedDict):
    messages: Annotated[list[AnyMessage], add_messages]
不过最关键步骤是让LLM"感知"到工具的存在。用bind_tools把工具信息注入到系统提示中:
llm = ChatNebius(model="meta-llama/Meta-Llama-3.1-8B-Instruct", temperature=0)

# 绑定工具,使 LLM 具备"工具感知"
llm_with_tools = llm.bind_tools(tools)
LangGraph工作流需要两个核心节点:agent_node负责推理决策,tool_node负责执行工具:
def agent_node(state: AgentState):
    """主要节点:调用 LLM 决定下一步动作。"""
    console.print("--- AGENT: Thinking... ---")
    response = llm_with_tools.invoke(state["messages"])
    return {"messages": [response]}

# ToolNode 是 LangGraph 的预置节点,用于执行工具
tool_node = ToolNode(tools)
路由逻辑比较简单:检查最后一条消息是否包含tool_calls,有的话就去执行工具,否则就结束:
    if hasattr(last_message, 'tool_calls') and last_message.tool_calls:
        console.print("--- ROUTER: 检测到工具调用请求 ---")
        return "call_tool"
    else:
        console.print("--- ROUTER: 准备输出最终答案 ---")
        return "__end__"
整个的工作流就是把这些节点用LangGraph串起来。条件边的设计可以让智能体能在推理和工具调用间形成循环:
graph_builder = StateGraph(AgentState)

# 添加节点
graph_builder.add_node("agent", agent_node)
graph_builder.add_node("call_tool", tool_node)

# 入口
graph_builder.set_entry_point("agent")

# 条件路由
graph_builder.add_conditional_edges(
    "agent",
    router_function,
)

# 工具执行后回到智能体,闭合循环
graph_builder.add_edge("call_tool", "agent")

# 编译
tool_agent_app = graph_builder.compile()

测试效果我们选择一些训练数据里不太可能有的实时信息:
user_query = "What were the main announcements from Apple's latest WWDC event?"
initial_input = {"messages": [("user", user_query)]}

console.print(f"[bold cyan]🚀 启动工具调用工作流:[/bold cyan] '{user_query}'\n")

for chunk in tool_agent_app.stream(initial_input, stream_mode="values"):
    chunk["messages"][-1].pretty_print()
    console.print("\n---\n")
跟踪执行过程可以看到智能体的推理轨迹:
================================= Human Message =================================
What were the main announcements from Apple's latest WWDC event?
---
--- AGENT: Thinking... ---
--- ROUTER: 检测到工具调用请求 ---
================================== Ai Message ==================================
Tool Calls:
  web_search (call_abc123)
  Args:
    query: Apple WWDC latest announcements
---
================================= Tool Message =================================
Name: web_search
[{"title": "WWDC 2025: Everything We Know...", "url": "...", "content": "Apple's event lasted for an hour... we recapped all of the announcements... iOS 26, iPadOS 26, macOS Tahoe..."}]
---
--- AGENT: Thinking... ---
--- ROUTER: 准备输出最终答案 ---
================================== Ai Message ==================================
The main announcements from Apple's latest WWDC event include a new design that will inform the next decade of iOS, iPadOS, and macOS development...
整个流程很非常简单:智能体分析问题→判断需要搜索→执行搜索→整合信息→给出答案。
为了量化工具使用的效果,可以设计一个评估框架:
class ToolUseEvaluation(BaseModel):
    """评估智能体工具使用与最终答案。"""
    tool_selection_score: int = Field(description="Score 1-5 on whether the agent chose the correct tool for the task.")
    tool_input_score: int = Field(description="Score 1-5 on how well-formed and relevant the input to the tool was.")
    synthesis_quality_score: int = Field(description="Score 1-5 on how well the agent integrated the tool's output into its final answer.")
    justification: str = Field(description="A brief justification for the scores.")
评估结果通常显示这类架构在工具选择和参数构造上表现不错:
--- Evaluating Tool Use Performance ---
{
    'tool_selection_score': 5,
    'tool_input_score': 5,
    'synthesis_quality_score': 4,
    'justification': "The AI agent correctly used the web search tool to find relevant information... The tool output was well-formed and relevant..."
}
工具调用架构的价值在于让智能体突破训练数据的限制,能够获取实时信息并执行具体操作。这是几乎所有实用AI系统的基础能力。
ReAct循环:推理与行动的迭代
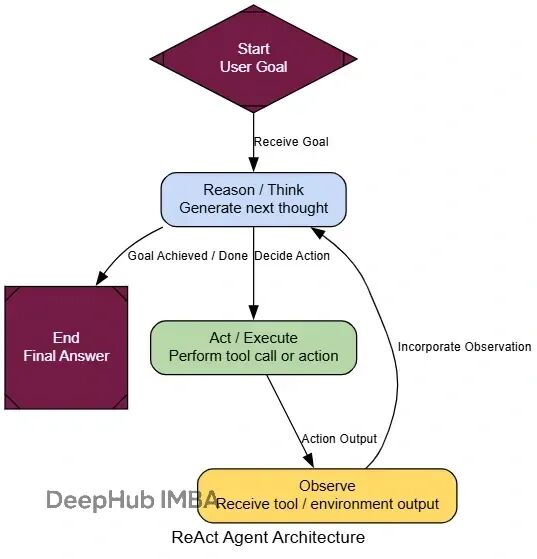
前面的工具调用架构解决了信息获取问题,但还是"一次性"的:判断→调用→回答。当遇到需要多步骤、相互依赖的复杂问题时单次工具调用往往不够。
ReAct(Reason + Act)的核心在于循环:思考下一步→执行行动→观察结果→重新思考。它把静态的工具调用者变成了动态的问题求解器。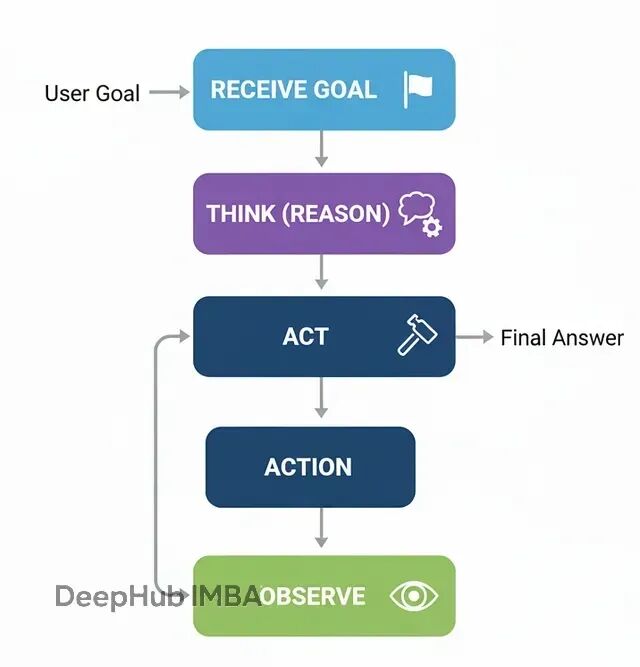
流程:
接收复杂任务
推理(Reason):分析当前状态,决定下一步行动
行动(Act):调用相应工具
观察(Observe):获取行动结果
重复2-4,直到问题解决
所以大部分组件可以复用之前的代码。关键差异在于图结构——工具执行后要回到智能体节点,而不是直接结束:
def react_agent_node(state: AgentState):
    """会思考并决定下一步的智能体节点。"""
    console.print("--- REACT AGENT: 分析中... ---")
    response = llm_with_tools.invoke(state["messages"])
    return {"messages": [response]}

# ReAct 图的特征是循环
react_graph_builder = StateGraph(AgentState)
react_graph_builder.add_node("agent", react_agent_node)
react_graph_builder.add_node("tools", tool_node)

react_graph_builder.set_entry_point("agent")
react_graph_builder.add_conditional_edges(
    "agent",
    router_function,
    {"call_tool": "tools", "__end__": "__end__"}
)

# 关键差异:工具节点返回到智能体节点,形成循环
react_graph_builder.add_edge("tools", "agent")

react_agent_app = react_graph_builder.compile()
就是这一行代码的改动,让我们的智能体具备了多步推理能力。
我们测试的时候测试使用一个需要多跳推理的问题:
multi_step_query = "Who is the current CEO of the company that created the sci-fi movie 'Dune', and what was the budget for that company's most recent film?"

console.print(f"[bold yellow]测试ReAct多步推理:[/bold yellow] '{multi_step_query}'\n")

final_react_output = None
for chunk in react_agent_app.stream({"messages": [("user", multi_step_query)]}, stream_mode="values"):
    final_react_output = chunk
    console.print(f"--- [bold purple]状态更新[/bold purple] ---")
    chunk['messages'][-1].pretty_print()
    console.print("\n")
执行过程会显示智能体的逐步推理:
--- Human Message ---
Who is CEO of company that made 'Dune'...

--- REACT Agent: 分析中... ---
--- ROUTER: 检测到工具调用请求 ---

--- Ai Message ---
Tool Calls: web_search...
Args: query: production company Dune movie 2021

--- Tool Message ---
Name: web_search
Results: [{"title": "Dune (2021) - Production Companies", "content": "Legendary Pictures, Warner Bros..."}]

--- REACT Agent: 分析中... ---
--- ROUTER: 检测到工具调用请求 ---

--- Ai Message ---
Tool Calls: web_search...
Args: query: Legendary Pictures current CEO Joshua Grode

--- Tool Message ---
Results: [{"title": "Joshua Grode CEO Legendary Entertainment", "content": "Joshua Grode serves as CEO..."}]
可以看到智能体进行了多轮推理:
第一轮:搜索《沙丘》的制作公司
第二轮:基于发现的"Legendary Pictures",进一步搜索其CEO信息
第三轮:可能还会搜索该公司最近电影的预算信息
这种循环能力让智能体能够处理复杂的连锁推理任务,而不是被单次工具调用的限制困住。
评估多步推理能力需要考虑额外的维度:
class ReActEvaluation(BaseModel):
    reasoning_quality: int = Field(description="Score 1-5 on the quality of multi-step reasoning")
    step_coherence: int = Field(description="Score 1-5 on how well each step builds on the previous ones")
    efficiency: int = Field(description="Score 1-5 on whether unnecessary steps were avoided")
    final_accuracy: int = Field(description="Score 1-5 on correctness of the final answer")
    justification: str = Field(description="Brief justification for the scores")
ReAct架构的价值在于将简单的工具调用扩展为复杂的问题解决能力,这在需要多步推理的任务中至关重要。
规划式架构(Planning)
ReAct在探索未知问题时很有效,但对于步骤相对固定的任务就显得有些低效了——就像每走一步都要停下来问路,而不是先看完整个地图。
规划式架构的价值就在于"先想后做":在执行任何动作前,先制定完整的执行计划。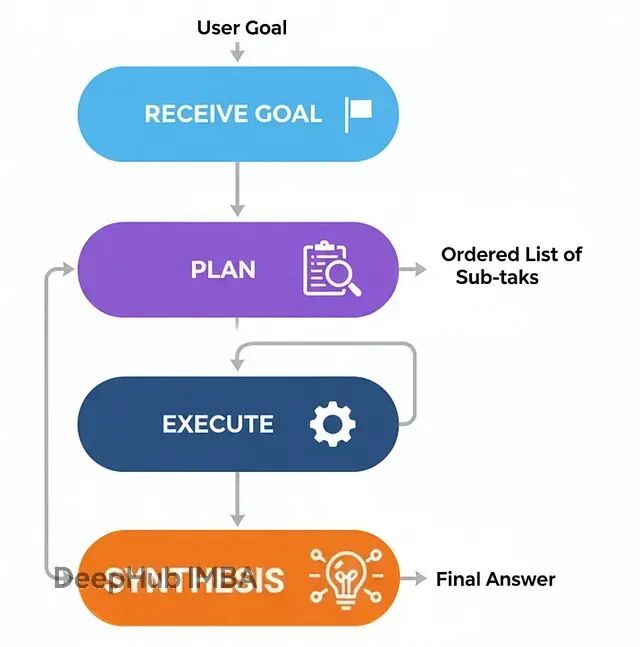
这种方式特别适合那些步骤可预期的结构化任务,比如数据处理流水线、报告生成,或者任何能提前确定步骤顺序的工作。它的好处是过程可预测,智能体行为更容易追踪和调试。
工作流程:
接收目标任务
规划:专门的规划器分析任务,生成有序的子任务列表
执行:执行器按顺序逐步执行,需要时调用工具
汇总:将所有步骤的结果组装成连贯的最终答案
实现上需要三个核心组件:
class Plan(BaseModel):
    """回答用户查询所需的工具调用计划。"""
    steps: List[str] = Field(description="A list of tool calls that, when executed, will answer the query.")

class PlanningState(TypedDict):
    user_request: str
    plan: Optional[List[str]]
    intermediate_steps: List[str] # 保存工具输出
    final_answer: Optional[str]
规划器负责分析任务并生成执行步骤:
def planner_node(state: PlanningState):
    """为用户请求生成行动计划。"""
    console.print("--- PLANNER: 分析任务中... ---")
    planner_llm = llm.with_structured_output(Plan)

    prompt = f"""You are an expert planner. Your job is to create a step-by-step plan to answer the user's request.
        Each step in the plan must be a single call to the `web_search` tool.
        **User's Request:**
        {state['user_request']}
    """
    plan_result = planner_llm.invoke(prompt)
    console.print(f"--- PLANNER: 生成计划: {plan_result.steps} ---")
    return {"plan": plan_result.steps}
执行器按计划逐步执行:
def executor_node(state: PlanningState):
    """执行计划中的下一步。"""
    console.print("--- EXECUTOR: 执行下一步... ---")
    next_step = state["plan"][0]

    # 简化处理,实际项目中需要解析工具名和参数
    query = next_step.replace("web_search('", "").replace("')", "")

    result = search_tool.invoke({"query": query})

    return {
        "plan": state["plan"][1:], # 移除已执行的步骤
        "intermediate_steps": state["intermediate_steps"] + [result]
    }
路由器检查计划状态,决定继续执行还是进入汇总:
def planning_router(state: PlanningState):
    """依据计划状态路由至执行或汇总。"""
    if not state["plan"]:
        console.print("--- ROUTER: 计划执行完毕,进入汇总阶段 ---")
        return "synthesize"
    else:
        console.print("--- ROUTER: 计划还有待执行步骤,继续执行 ---")
        return "execute"
用LangGraph串起整个工作流:
planning_graph_builder = StateGraph(PlanningState)
planning_graph_builder.add_node("plan", planner_node)
planning_graph_builder.add_node("execute", executor_node)
planning_graph_builder.add_node("synthesize", synthesizer_node)

planning_graph_builder.set_entry_point("plan")
planning_graph_builder.add_conditional_edges("plan", planning_router)
planning_graph_builder.add_conditional_edges("execute", planning_router)
planning_graph_builder.add_edge("synthesize", END)

planning_agent_app = planning_graph_builder.compile()

测试一个适合规划式处理的任务:
plan_centric_query = """
Find the population of the capital cities of France, Germany, and Italy.
Then calculate their combined total.
"""

console.print(f"[bold green]测试规划式智能体:[/bold green] '{plan_centric_query}'\n")

initial_planning_input = {"user_request": plan_centric_query, "intermediate_steps": []}
final_planning_output = planning_agent_app.invoke(initial_planning_input)

console.print("\n--- [bold green]规划式智能体最终输出[/bold green] ---")
console.print(Markdown(final_planning_output['final_answer']))
执行过程能清楚看到"先规划后执行"的特点:
--- PLANNER: 分析任务中... ---
--- PLANNER: 生成计划: ["web_search('population of Paris')", "web_search('population of Berlin')", "web_search('population of Rome')"] ---
--- ROUTER: 计划还有待执行步骤,继续执行 ---
--- EXECUTOR: 执行下一步... ---
这种方式的优势在于过程透明且高效——对于可预测的任务,它避免了ReAct那种"边走边看"的开销。
评估
class ProcessEvaluation(BaseModel):
    """评估问题求解过程。"""
    task_completion_score: int = Field(description="Score 1-10 on task completion.")
    process_efficiency_score: int = Field(description="Score 1-10 on the efficiency and directness of the agent's process.")
    justification: str = Field(description="A brief justification for the scores.")
结果通常显示规划式架构在效率上的优势:
--- Evaluating Planning Agent's Process ---
{
    'task_completion_score': 8,
    'process_efficiency_score': 9,
    'justification': "The agent created a clear, optimal plan upfront and executed it without any unnecessary steps. Its process was highly direct and efficient for this predictable task."
}
规划式架构在解题路径明确的场景下,通常比纯反应式方法更结构化、更高效。
PEV架构:加入验证环节的规划执行
前面的规划架构在步骤明确的情况下效果不错,但有个隐含的假设——所有工具调用都会正常工作。实际情况往往不是这样:API可能失败,搜索结果可能不相关,工具输出可能有错误。
PEV(Planner-Executor-Verifier)架构在规划执行的基础上加入了验证和纠错机制,可以解决这个问题。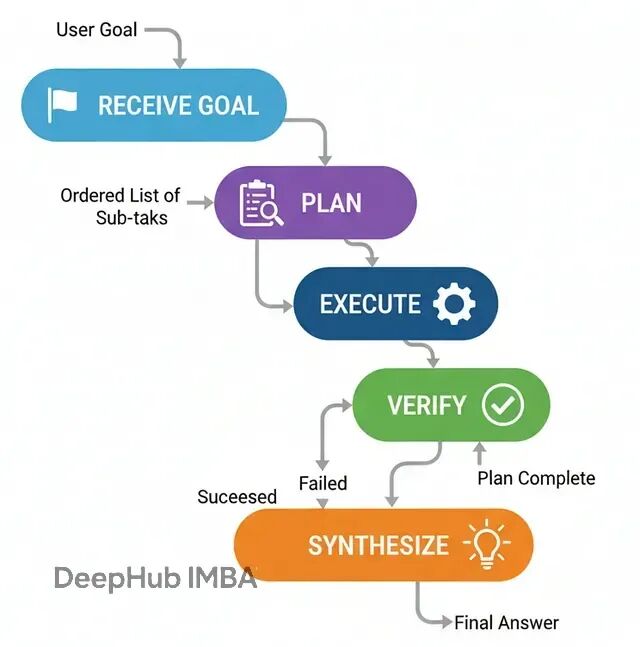
当智能体需要与不太可靠的外部工具交互时,PEV能够构建更健壮的工作流。
流程是这样的:
规划:生成执行步骤
执行:调用工具完成某个步骤
验证:检查工具输出的正确性和相关性
路由决策:根据验证结果决定下一步行动
验证器是PEV的核心,它能检测工具输出是否可靠:
class VerificationResult(BaseModel):
    """验证器的输出。"""
    is_successful: bool = Field(description="True if the tool execution was successful and the data is valid.")
    reasoning: str = Field(description="验证结论的理由。")

def verifier_node(state: PEVState):
    """检查最近一次工具结果是否出错。"""
    console.print("--- VERIFIER: 检查工具输出... ---")
    verifier_llm = llm.with_structured_output(VerificationResult)
    prompt = f"Verify if the following tool output is a successful, valid result or an error message. The task was '{state['user_request']}'.\n\nTool Output: '{state['last_tool_result']}'"
    verification = verifier_llm.invoke(prompt)
    console.print(f"--- VERIFIER: 判断结果 {'成功' if verification.is_successful else '失败'} ---")

    if verification.is_successful:
        return {"intermediate_steps": state["intermediate_steps"] + [state['last_tool_result']]}
    else:
        # 失败时清空计划,触发重新规划
        return {"plan": [], "intermediate_steps": state["intermediate_steps"] + [f"Verification Failed: {state['last_tool_result']}"]}
路由逻辑会检查验证状态,决定是继续执行、重新规划还是进入汇总:
def pev_router(state: PEVState):
    """基于验证与计划状态进行路由。"""
    if not state["plan"]:
        if state["intermediate_steps"] and "Verification Failed" in state["intermediate_steps"][-1]:
            console.print("--- ROUTER: 验证失败,重新规划... ---")
            return "plan"
        else:
            console.print("--- ROUTER: 计划完成,进入汇总 ---")
            return "synthesize"
    else:
        console.print("--- ROUTER: 继续执行计划 ---")
        return "execute"
PEV的优势体现在处理不可靠的外部依赖时。比如某个API偶尔返回错误,普通的规划执行架构会直接失败,而PEV能够识别错误并调整策略。
测试时可以用一个会故意失败的模拟工具:
def flaky_web_search(query: str) -> str:
    """对特定查询故意失败的搜索工具。"""
    if "employee count" in query.lower():
        console.print("--- TOOL: 模拟API失败 ---")
        return "Error: Could not retrieve data. The API endpoint is currently unavailable."
    else:
        return search_tool.invoke({"query": query})
当验证器检测到这种失败时,系统会重新规划,可能改用不同的搜索策略或备用数据源。
评估结果通常显示PEV在健壮性方面的优势:
class RobustnessEvaluation(BaseModel):
    task_completion_score: int = Field(description="Score 1-10 on task completion.")
    error_handling_score: int = Field(description="Score 1-10 on the agent's ability to detect and recover from errors.")
    justification: str = Field(description="A brief justification for the scores.")
PEV的价值不仅在于正常情况下能完成任务,更重要的是在异常情况下能避免错误结果。
思维树架构(Tree-of-Thoughts)
前面的架构基本都是线性的:生成一个计划然后按步执行。但如果问题像迷宫一样,有死路和多条可能的路径怎么办?
思维树(ToT)的核心在于并行探索多条推理路径,而不是押注单一方案。它会同时生成多个可能的下一步,评估各自的前景,剪掉不行的分支,沿着最有希望的方向继续扩展。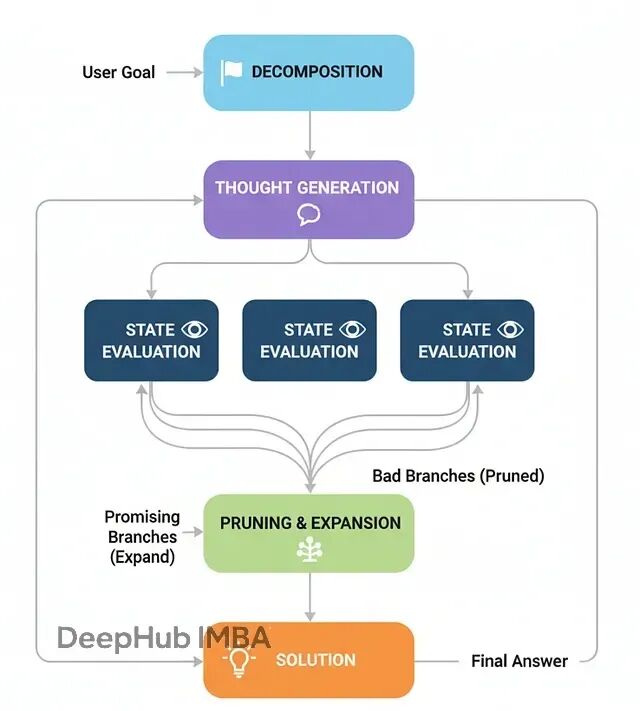
这种方式特别适合那些需要回溯和试错的复杂问题,比如路径规划、调度优化或者逻辑谜题。
ToT的工作流程:
- 问题分解:把复杂问题拆成步骤序列
- 生成想法:在当前状态下生成多个可能的下一步
- 状态评估:评估每个候选步骤的有效性和前景
- 修剪扩展:去掉无效分支,从优质分支继续扩展
- 求解:某个分支达到目标就得到解答
用经典的"狼羊菜过河"谜题来演示ToT。这个问题需要一些反直觉的操作(比如把东西带回去),而且存在明确的无效状态,很适合展示ToT的搜索能力。
先定义状态模型:
class PuzzleState(BaseModel):
    """狼羊菜过河谜题的状态表示。"""
    left_bank: set[str] = Field(default_factory=lambda: {"wolf", "goat", "cabbage"})
    right_bank: set[str] = Field(default_factory=set)
    boat_location: str = "left"
    move_description: str = "Initial state."

    def is_valid(self) -> bool:
        """检查当前状态是否有效(没有被吃掉的情况)。"""
        if self.boat_location == "right":
            if "wolf" in self.left_bank and "goat" in self.left_bank: return False
            if "goat" in self.left_bank and "cabbage" in self.left_bank: return False
        if self.boat_location == "left":
            if "wolf" in self.right_bank and "goat" in self.right_bank: return False
            if "goat" in self.right_bank and "cabbage" in self.right_bank: return False
        return True

    def is_goal(self) -> bool:
        """检查是否达到目标状态。"""
        return self.right_bank == {"wolf", "goat", "cabbage"}
ToT智能体的状态需要维护多条活跃路径:
class ToTState(TypedDict):
    problem_description: str
    active_paths: List[List[PuzzleState]] # 当前正在探索的路径集合
    solution: Optional[List[PuzzleState]]

def expand_paths(state: ToTState) -> Dict[str, Any]:
    """扩展每条活跃路径,生成所有可能的下一步。"""
    console.print("--- 扩展搜索路径 ---")
    new_paths = []

    for path in state['active_paths']:
        last_state = path[-1]
        possible_moves = get_possible_moves(last_state)

        for next_state in possible_moves:
            if next_state not in path:  # 避免循环
                new_paths.append(path + [next_state])

    return {"active_paths": new_paths}
关键是修剪函数,它会评估和过滤路径:
def prune_paths(state: ToTState) -> Dict[str, Any]:
    """评估路径质量,保留最有前景的分支。"""
    console.print("--- 评估和修剪路径 ---")

    # 检查是否有路径已经找到解
    for path in state['active_paths']:
        if path[-1].is_goal():
            console.print(f"--- 找到解决方案!路径长度: {len(path)} ---")
            return {"solution": path, "active_paths": []}

    # 过滤无效路径并按启发式评分排序
    valid_paths = [path for path in state['active_paths'] if path[-1].is_valid()]

    # 简单的启发式:优先选择右岸物品更多的状态
    valid_paths.sort(key=lambda p: len(p[-1].right_bank), reverse=True)

    # 保留前N条最有希望的路径
    max_paths = 5
    pruned_paths = valid_paths[:max_paths]

    console.print(f"--- 保留 {len(pruned_paths)} 条路径继续搜索 ---")
    return {"active_paths": pruned_paths}
ToT的工作流就是在扩展和修剪之间循环:
def tot_router(state: ToTState) -> str:
    """路由逻辑:继续搜索还是结束。"""
    if state.get('solution'):
        return "__end__"
    elif not state['active_paths']:
        console.print("--- 无可行路径,搜索失败 ---")
        return "__end__"
    else:
        return "prune"
构建ToT图:
tot_graph = StateGraph(ToTState)
tot_graph.add_node("expand", expand_paths)
tot_graph.add_node("prune", prune_paths)

tot_graph.set_entry_point("expand")
tot_graph.add_edge("expand", "prune")
tot_graph.add_conditional_edges("prune", tot_router, {
    "prune": "expand",  # 继续搜索循环
    "__end__": "__end__"
})

tot_app = tot_graph.compile()

测试ToT解决经典谜题:
initial_state = PuzzleState()
puzzle_input = {
    "problem_description": "Wolf, Goat, and Cabbage river crossing puzzle",
    "active_paths": [[initial_state]],
    "solution": None
}

result = tot_app.invoke(puzzle_input)

if result['solution']:
    console.print("[bold green]✅ ToT找到解决方案![/bold green]")
    for i, state in enumerate(result['solution']):
        console.print(f"步骤 {i}: {state.move_description}")
else:
    console.print("[bold red]❌ 未找到解决方案[/bold red]")
ToT的执行过程能清楚看到搜索树的扩展:
--- 扩展搜索路径 ---
--- 评估和修剪路径 ---
--- 保留 4 条路径继续搜索 ---
--- 扩展搜索路径 ---
--- 评估和修剪路径 ---
--- 找到解决方案!路径长度: 8 ---
最终输出是完整的解题步骤序列,展示了ToT如何通过并行搜索找到最优解。
评估ToT需要考虑搜索效率:
class SearchEvaluation(BaseModel):
    solution_quality: int = Field(description="Score 1-10 on solution optimality")
    search_efficiency: int = Field(description="Score 1-10 on search process efficiency")
    path_exploration: int = Field(description="Score 1-10 on thoroughness of path exploration")
    justification: str = Field(description="Brief justification for scores")
ToT的价值在于能够系统性地探索问题空间,在复杂的搜索问题中找到其他方法可能错过的解决方案。
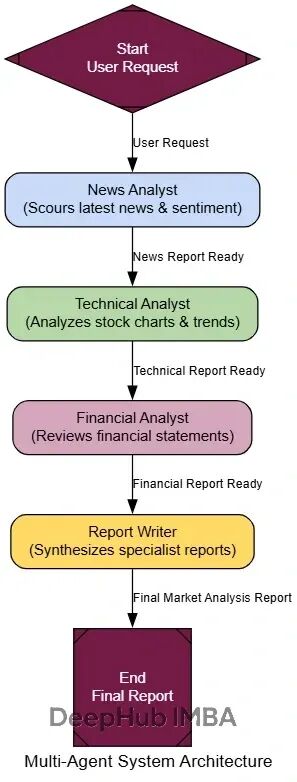
多智能体系统(Multi-Agent Systems)
到目前为止,所有架构都是"单打独斗"——一个智能体承担所有工作。但在现实的复杂系统中,往往需要不同的专家各司其职。
多智能体系统让不同的智能体专门负责不同的任务领域,然后协作完成复杂目标。就像一个软件开发团队:有人负责前端、有人搞后端、有人做测试,最后集成出完整产品。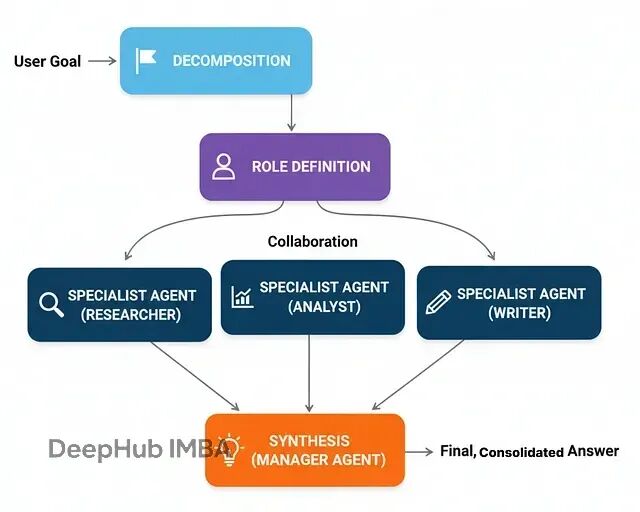
多智能体架构的优势在于:
专业化分工:每个智能体可以针对特定领域优化
并行处理:多个智能体可以同时工作
模块化设计:容易添加新的专家角色
容错性:单个智能体的失败不会影响整个系统
基本的工作流程:
任务分发:协调器分析任务,分派给合适的专家
并行执行:各专家在自己的领域内独立工作
结果汇总:收集各专家的输出
最终整合:生成统一的最终答案
实现上需要定义不同的专家角色:
class ExpertAgent:
    def __init__(self, name: str, expertise: str, llm):
        self.name = name
        self.expertise = expertise
        self.llm = llm

    def process_task(self, task: str) -> str:
        prompt = f"""You are a {self.expertise} expert. Please analyze the following task from your domain perspective:

        Task: {task}

        Provide detailed insights relevant to your expertise."""

        response = self.llm.invoke(prompt)
        return f"[{self.name}]: {response.content}"
创建专家团队:
# 初始化不同领域的专家
tech_expert = ExpertAgent("Tech Analyst", "technology and software development", llm)
business_expert = ExpertAgent("Business Analyst", "business strategy and market analysis", llm)
financial_expert = ExpertAgent("Financial Analyst", "financial analysis and economics", llm)

experts = [tech_expert, business_expert, financial_expert]
多智能体的状态需要跟踪各个专家的输出:
class MultiAgentState(TypedDict):
    user_request: str
    expert_outputs: List[str]
    final_analysis: Optional[str]

def coordinator_node(state: MultiAgentState):
    """协调器:分析任务并分派给相关专家。"""
    console.print("--- COORDINATOR: 分析任务需求 ---")

    # 简化版:把任务发给所有专家
    # 实际应用中可以根据任务类型智能选择专家
    expert_outputs = []

    for expert in experts:
        console.print(f"--- 咨询 {expert.name} ---")
        output = expert.process_task(state['user_request'])
        expert_outputs.append(output)

    return {"expert_outputs": expert_outputs}
最后是综合分析节点:
def synthesizer_node(state: MultiAgentState):
    """综合各专家意见,生成最终分析。"""
    console.print("--- SYNTHESIZER: 整合专家意见 ---")

    all_expert_inputs = "\n\n".join(state['expert_outputs'])

    prompt = f"""Based on the following expert analyses, provide a comprehensive final answer to the user's request:

    User Request: {state['user_request']}

    Expert Analyses:
    {all_expert_inputs}

    Synthesize these perspectives into a coherent, actionable response."""

    final_response = llm.invoke(prompt)
    return {"final_analysis": final_response.content}
构建图结构:
multi_graph = StateGraph(MultiAgentState)
multi_graph.add_node("coordinator", coordinator_node)
multi_graph.add_node("synthesizer", synthesizer_node)

multi_graph.set_entry_point("coordinator")
multi_graph.add_edge("coordinator", "synthesizer")
multi_graph.add_edge("synthesizer", END)

multi_agent_app = multi_graph.compile()
测试可以使用一个需要跨领域知识的复杂任务:
complex_query = "Analyze the potential impact of recent AI developments on Tesla's autonomous driving business model"

result = multi_agent_app.invoke({"user_request": complex_query, "expert_outputs": []})

console.print("[bold green]多智能体分析结果:[/bold green]")
console.print(result['final_analysis'])
执行过程能看到各专家的贡献:
--- COORDINATOR: 分析任务需求 ---
--- 咨询 Tech Analyst ---
[Tech Analyst]: Recent AI developments including GPT-4, computer vision advances...
--- 咨询 Business Analyst ---
[Business Analyst]: From a strategic perspective, Tesla's autonomous driving...
--- 咨询 Financial Analyst ---
[Financial Analyst]: The financial implications include R&D investment requirements...
--- SYNTHESIZER: 整合专家意见 ---
多智能体系统的优势在于每个专家都能从自己的视角深入分析,最后形成全面的见解。
评估可以从多个维度进行:
class CollaborationEvaluation(BaseModel):
    expert_diversity: int = Field(description="Score 1-10 on diversity of expert perspectives")
    synthesis_quality: int = Field(description="Score 1-10 on final synthesis coherence")
    task_coverage: int = Field(description="Score 1-10 on completeness of task coverage")
    justification: str = Field(description="Brief evaluation justification")
多智能体系统特别适合那些需要多角度分析的复杂任务,单一智能体很难同时在所有领域都做到专业级别。
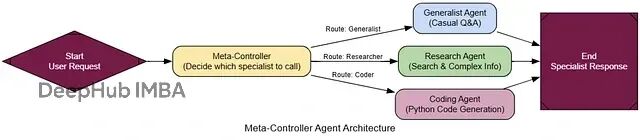
元控制器架构(Meta-Controller)
前面的多智能体系统虽然有效,但路由逻辑比较固定——总是调用所有专家。但如果用户只需要特定类型的分析呢?这就浪费了计算资源和时间。
元控制器就是"智能调度器",它能根据具体任务需求,动态决定调用哪些专家。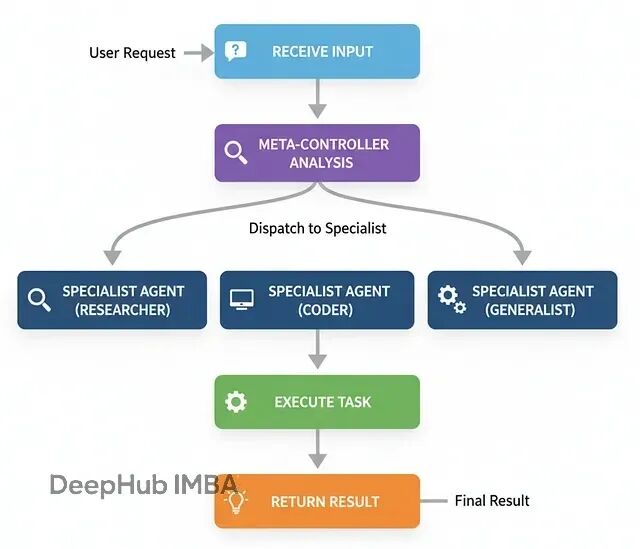
这种架构在大型AI系统中非常常见,特别是当系统有很多专门化模块时。元控制器作为入口点,负责理解用户意图并分派到合适的处理单元。
基本流程:
接收用户请求
分析任务类型和需求
选择最适合的专家
将任务分派给选中的专家
返回专家的处理结果
代码实现需要定义清晰的路由决策:
class ControllerDecision(BaseModel):
    """元控制器的路由决策。"""
    next_agent: str = Field(description="The name of the specialist agent to call next.")
    reasoning: str = Field(description="选择该专家的理由。")

class MetaControllerState(TypedDict):
    user_request: str
    next_agent_to_call: Optional[str]
    final_response: Optional[str]
元控制器的核心逻辑:
def meta_controller_node(state: MetaControllerState):
    """中央控制器,分析请求并决定调用哪个专家。"""
    console.print("--- 🧠 元控制器分析中... ---")

    specialists = {
        "GeneralChat": "处理日常对话、问候和简单问题",
        "WebResearcher": "需要最新信息的问题,使用网络搜索",
        "CodeGenerator": "根据用户需求编写Python代码",
        "DataAnalyst": "数据分析和统计相关任务"
    }

    specialist_list = "\n".join([f"- {name}: {desc}" for name, desc in specialists.items()])

    prompt = f"""分析用户请求,选择最合适的专家处理:

    可用专家:
    {specialist_list}

    用户请求: {state['user_request']}

    请选择最适合的专家并说明原因。"""

    controller_llm = llm.with_structured_output(ControllerDecision)
    decision = controller_llm.invoke(prompt)

    console.print(f"[yellow]路由决策:[/yellow] 分派给 [bold]{decision.next_agent}[/bold]")
    console.print(f"[italic]原因: {decision.reasoning}[/italic]")

    return {"next_agent_to_call": decision.next_agent}
各个专家节点处理具体任务:
def general_chat_node(state: MetaControllerState):
    """通用对话专家。"""
    console.print("--- 💬 通用对话专家处理中... ---")
    prompt = f"You are a friendly AI assistant. Respond to: {state['user_request']}"
    response = llm.invoke(prompt)
    return {"final_response": response.content}

def web_researcher_node(state: MetaControllerState):
    """网络搜索专家。"""
    console.print("--- 🔍 网络研究专家处理中... ---")
    # 使用搜索工具获取信息并分析
    search_result = search_tool.invoke({"query": state['user_request']})

    prompt = f"Based on this search result: {search_result}, provide a comprehensive answer to: {state['user_request']}"
    response = llm.invoke(prompt)
    return {"final_response": response.content}
路由函数和图构建:
def route_to_specialist(state: MetaControllerState) -> str:
    """根据控制器决策路由到相应专家。"""
    return state["next_agent_to_call"]

meta_graph = StateGraph(MetaControllerState)
meta_graph.add_node("meta_controller", meta_controller_node)
meta_graph.add_node("GeneralChat", general_chat_node)
meta_graph.add_node("WebResearcher", web_researcher_node)
meta_graph.add_node("CodeGenerator", code_generator_node)
meta_graph.add_node("DataAnalyst", data_analyst_node)

meta_graph.set_entry_point("meta_controller")
meta_graph.add_conditional_edges("meta_controller", route_to_specialist)

# 所有专家处理完后直接结束
for specialist in ["GeneralChat", "WebResearcher", "CodeGenerator", "DataAnalyst"]:
    meta_graph.add_edge(specialist, END)

meta_controller_app = meta_graph.compile()
测试不同类型的请求:
test_requests = [
    "你好,今天天气怎么样?",
    "帮我写一个计算斐波那契数列的Python函数",
    "最近OpenAI有什么新发布吗?",
    "分析一下这组数据的统计特征:[1,2,3,4,5,6,7,8,9,10]"
]

for request in test_requests:
    console.print(f"\n[bold cyan]测试请求:[/bold cyan] {request}")
    result = meta_controller_app.invoke({"user_request": request})
    console.print(f"[bold green]响应:[/bold green] {result['final_response'][:100]}...")
执行轨迹展示了智能路由:
测试请求: 你好,今天天气怎么样?
--- 🧠 元控制器分析中... ---
路由决策: 分派给 GeneralChat
原因: 这是一个简单的问候,适合通用对话处理

测试请求: 帮我写一个计算斐波那契数列的Python函数
--- 🧠 元控制器分析中... ---
路由决策: 分派给 CodeGenerator
原因: 用户明确要求编写Python代码
元控制器的价值在于提高系统效率和可扩展性——只调用必要的专家,避免不必要的计算开销,同时保持系统的模块化设计。
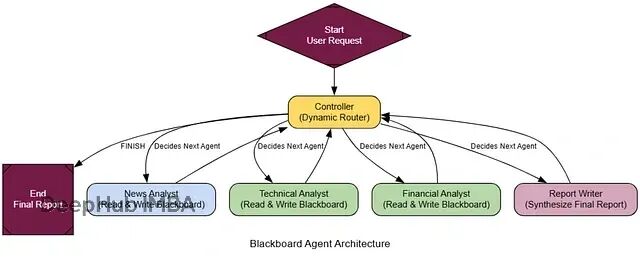
黑板架构(Blackboard)
前面的架构都有个限制:路线相对固定。元控制器虽然能动态选择专家,但选择后就结束了。如果任务需要多个专家协作,而且下一步的选择要基于前面专家的发现呢?
黑板架构提供了一种更灵活的协作方式。想象一群专家围着一块黑板,每个人都能看到别人的工作成果,控制器根据当前状态动态决定下一个发言者。
这种模式特别适合那些解决路径不确定的复杂问题,比如诊断分析、策略制定等。每个新发现都可能改变后续的分析方向。
黑板的核心组件:
共享工作区(黑板):存储所有中间发现和分析结果
专家智能体:各自专注特定领域,能读写黑板
动态控制器:持续评估黑板状态,决定下一步行动
迭代协作:专家依次贡献,直到问题解决
实现黑板状态:
class BlackboardState(TypedDict):
    user_request: str
    blackboard: List[str] # 共享工作区,存储所有发现
    available_agents: List[str]
    next_agent: Optional[str]
    is_complete: bool
动态控制器是黑板架构的大脑:
class ControllerDecision(BaseModel):
    next_agent: str = Field(description="下一个调用的专家名称,或'FINISH'表示完成")
    reasoning: str = Field(description="选择理由")

def blackboard_controller_node(state: BlackboardState):
    """动态控制器:分析黑板状态并决定下一步。"""
    console.print("--- 📊 控制器分析黑板状态... ---")

    blackboard_content = "\n\n".join(state['blackboard']) if state['blackboard'] else "黑板当前为空"

    prompt = f"""你是多智能体系统的中央控制器。分析用户请求和黑板内容,决定下一步行动。

    **用户请求:** {state['user_request']}

    **当前黑板内容:**
    {blackboard_content}

    **可用专家:** {', '.join(state['available_agents'])}

    **任务:**
    1. 分析当前进度和缺失信息
    2. 选择最能推进任务的专家
    3. 如果任务已完成,选择'FINISH'
    """

    controller_llm = llm.with_structured_output(ControllerDecision)
    decision = controller_llm.invoke(prompt)

    console.print(f"--- 控制器决策: {decision.next_agent} ---")
    console.print(f"--- 理由: {decision.reasoning} ---")

    return {
        "next_agent": decision.next_agent,
        "is_complete": decision.next_agent == "FINISH"
    }
专家节点需要能够读写黑板:
def create_blackboard_expert(name: str, expertise: str):
    """创建黑板专家的工厂函数。"""
    def expert_node(state: BlackboardState):
        console.print(f"--- 🔬 {name} 分析中... ---")

        blackboard_content = "\n".join(state['blackboard']) if state['blackboard'] else "黑板为空"

        prompt = f"""你是{expertise}专家。基于用户请求和黑板内容,提供你的专业分析。

        用户请求: {state['user_request']}
        黑板内容: {blackboard_content}

        请提供简洁但深入的分析,重点关注你的专业领域。"""

        response = llm.invoke(prompt)
        new_entry = f"[{name}]: {response.content}"

        return {"blackboard": state['blackboard'] + [new_entry]}

    return expert_node
构建黑板系统:
blackboard_graph = StateGraph(BlackboardState)

# 添加控制器
blackboard_graph.add_node("controller", blackboard_controller_node)

# 添加专家
news_expert = create_blackboard_expert("新闻分析师", "新闻事件和市场动态")
tech_expert = create_blackboard_expert("技术分析师", "技术发展和产品分析")
finance_expert = create_blackboard_expert("财务分析师", "财务数据和投资分析")

blackboard_graph.add_node("NewsAnalyst", news_expert)
blackboard_graph.add_node("TechAnalyst", tech_expert)
blackboard_graph.add_node("FinanceAnalyst", finance_expert)

# 设置路由
blackboard_graph.set_entry_point("controller")

def blackboard_router(state: BlackboardState) -> str:
    if state.get('is_complete'):
        return "__end__"
    return state['next_agent']

blackboard_graph.add_conditional_edges("controller", blackboard_router)

# 所有专家执行后都回到控制器
for agent in ["NewsAnalyst", "TechAnalyst", "FinanceAnalyst"]:
    blackboard_graph.add_edge(agent, "controller")

blackboard_app = blackboard_graph.compile()
测试黑板系统:
complex_analysis_request = "分析特斯拉股价最近的波动原因和未来走势"

initial_state = {
    "user_request": complex_analysis_request,
    "blackboard": [],
    "available_agents": ["NewsAnalyst", "TechAnalyst", "FinanceAnalyst"],
    "next_agent": None,
    "is_complete": False
}

result = blackboard_app.invoke(initial_state)

console.print("[bold green]📋 最终黑板内容:[/bold green]")
for entry in result['blackboard']:
    console.print(f"  {entry}")
黑板架构的优势在于灵活性和适应性——系统能根据分析进展动态调整策略,专家之间的协作更加自然和高效。
集成决策架构(Ensemble Decision-Making)
前面的架构虽然有团队协作,但本质上还是"单线推理"产生答案。考虑到LLM的不确定性——同一个提示多次运行可能给出不同结果,在高风险场景下需要更可靠的决策机制。
集成决策基于"群体智慧"原理:并行运行多个具有不同"性格"的智能体,然后由汇总者综合各自的输出,形成更稳健的结论。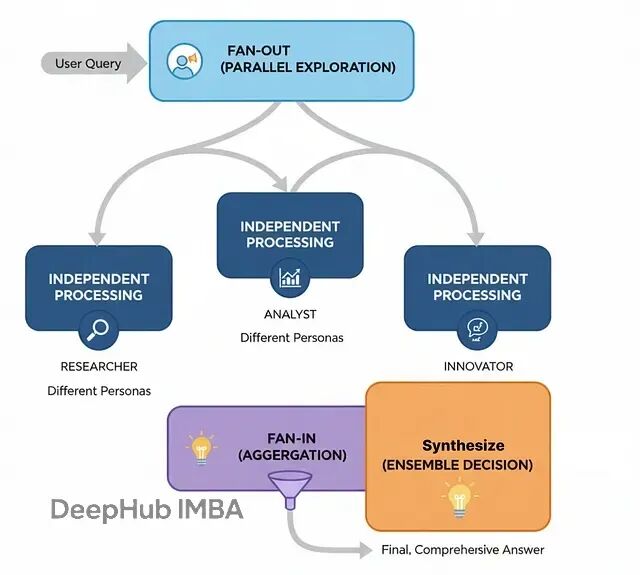
这种方式特别适合关键决策场景,比如投资委员会、医疗诊断等。多个独立视角能显著降低单一智能体的偏见或幻觉导致的错误。
基本流程:
扇出阶段:将同一问题并行分发给多个专家
独立分析:各专家基于不同视角独立完成分析
扇入收集:收集所有专家的输出结果
综合决策:汇总者权衡不同观点,给出最终结论
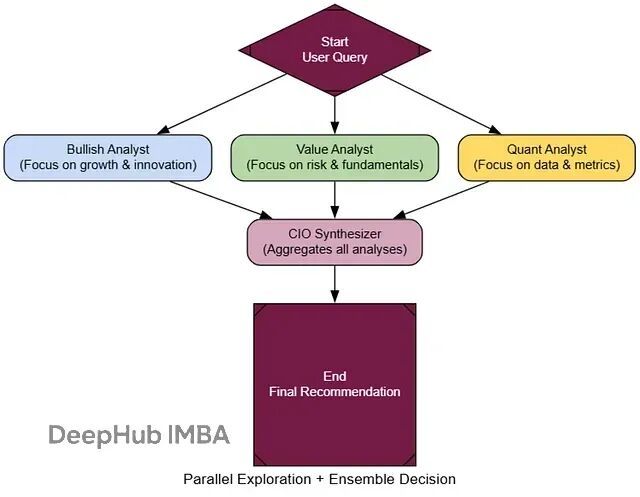
关键在于构造"认知多样性"。我们可以创建三种不同性格的分析师:
class EnsembleState(TypedDict):
    query: str
    analyses: Dict[str, str]  # 存储各智能体的分析结果
    final_recommendation: Optional[Any]

# 创建不同性格的专家
def create_analyst_node(persona: str, name: str):
    def analyst_node(state: EnsembleState):
        console.print(f"--- 🔍 {name} 分析中... ---")

        prompt = f"""{persona}

        请分析以下投资问题:{state['query']}

        根据你的专业视角和投资哲学,提供详细的分析和建议。"""

        response = llm.invoke(prompt)
        return {"analyses": {**state['analyses'], name: response.content}}

    return analyst_node

# 三种不同的投资哲学
bullish_analyst = create_analyst_node(
    "你是乐观成长派分析师,专注于创新和增长潜力,相对不太关注短期风险。", "乐观派"
)

cautious_analyst = create_analyst_node(
    "你是谨慎价值派分析师,重视基本面和风险控制,对估值和财务指标很敏感。", "谨慎派"
)

quantitative_analyst = create_analyst_node(
    "你是量化分析师,纯粹基于数据和技术指标,忽略情绪和叙事因素。", "量化派"
)
汇总者是整个系统的核心,负责平衡不同观点:
class FinalRecommendation(BaseModel):
    final_recommendation: str = Field(description="最终投资建议")
    confidence_score: float = Field(description="置信度评分 0-1")
    synthesis_summary: str = Field(description="综合分析总结")
    key_opportunities: List[str] = Field(description="关键机会点")
    key_risks: List[str] = Field(description="主要风险点")

def cio_synthesizer_node(state: EnsembleState):
    """首席投资官:综合所有分析师意见形成最终决策。"""
    console.print("--- 🏛️ CIO 综合决策中... ---")

    all_analyses = "\n\n".join([
        f"**{name}的分析:**\n{analysis}"
        for name, analysis in state['analyses'].items()
    ])

    prompt = f"""你是首席投资官,需要综合团队的不同观点形成最终投资决策。

    投资问题:{state['query']}

    团队分析:
    {all_analyses}

    请权衡各方观点,特别注意分歧点,给出平衡的最终建议。"""

    cio_llm = llm.with_structured_output(FinalRecommendation)
    decision = cio_llm.invoke(prompt)

    return {"final_recommendation": decision}
构建扇出扇入的图结构:
ensemble_graph = StateGraph(EnsembleState)

# 初始化节点
ensemble_graph.add_node("start", lambda state: {"analyses": {}})
ensemble_graph.add_node("bullish_analyst", bullish_analyst)
ensemble_graph.add_node("cautious_analyst", cautious_analyst)
ensemble_graph.add_node("quant_analyst", quantitative_analyst)
ensemble_graph.add_node("cio_synthesizer", cio_synthesizer_node)

# 设置扇出扇入结构
ensemble_graph.set_entry_point("start")
ensemble_graph.add_edge("start", ["bullish_analyst", "cautious_analyst", "quant_analyst"])
ensemble_graph.add_edge(["bullish_analyst", "cautious_analyst", "quant_analyst"], "cio_synthesizer")
ensemble_graph.add_edge("cio_synthesizer", END)

ensemble_app = ensemble_graph.compile()
测试集成决策:
investment_query = "基于当前市场环境,英伟达(NVDA)是否值得长期投资?"

console.print(f"[bold green]🏛️ 启动投资委员会分析:[/bold green] {investment_query}")

result = ensemble_app.invoke({"query": investment_query})

# 展示各分析师观点
for name, analysis in result['analyses'].items():
    console.print(f"\n[bold cyan]{name}观点:[/bold cyan]")
    console.print(analysis[:200] + "...")

# 展示最终决策
console.print(f"\n[bold yellow]CIO最终决策:[/bold yellow]")
console.print(result['final_recommendation'].final_recommendation)
执行过程展现了多视角的价值:
🏛️ 启动投资委员会分析: 基于当前市场环境,英伟达(NVDA)是否值得长期投资?
--- 🔍 乐观派 分析中... ---
--- 🔍 谨慎派 分析中... ---
--- 🔍 量化派 分析中... ---
--- 🏛️ CIO 综合决策中... ---

乐观派观点: AI革命刚刚开始,英伟达作为基础设施提供商...
谨慎派观点: 当前估值已经充分反映了乐观预期,需要考虑竞争加剧...
量化派观点: 技术指标显示超买状态,但基本面数据支持长期增长...
集成决策的价值在于能够平衡不同视角,避免单一观点的局限性,在不确定环境中做出更可靠的决策。
情景记忆与语义记忆架构
到目前为止的智能体都有个致命缺陷:没有长期记忆。对话一结束就忘得一干二净,无法建立真正的个性化关系。
要构建能够与用户共同成长的智能助手,就必须赋予它两种类型的记忆,这正是"情景+语义记忆架构"要解决的问题。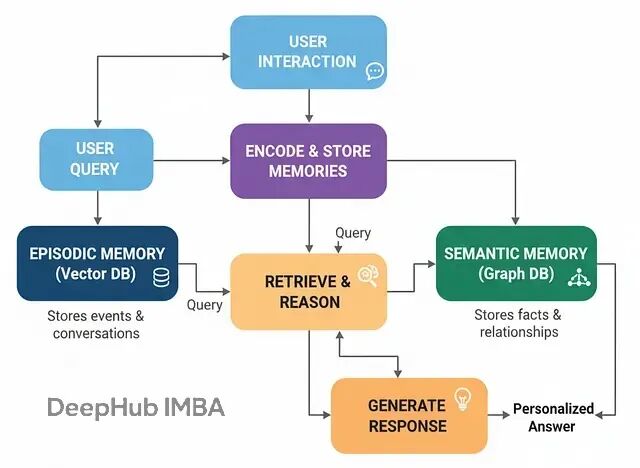
这种设计模仿了人类的认知方式:
情景记忆:具体事件和对话的记录,回答"发生了什么?"
语义记忆:从事件中提取的结构化知识和关系,回答"我知道什么?"
在实际系统中,情景记忆通常用向量数据库实现,语义记忆用知识图谱承载。
基本流程:
交互阶段:智能体与用户对话
记忆检索:处理新查询时同时检索两种记忆
增强生成:基于检索到的记忆生成个性化回复
记忆更新:分析对话内容,更新两种记忆存储
核心是"记忆制造者",负责从对话中创建新记忆:
# 知识抽取的数据模型
class Node(BaseModel):
    id: str = Field(description="实体唯一标识")
    type: str = Field(description="实体类型")

class Relationship(BaseModel):
    source: Node
    target: Node
    type: str = Field(description="关系类型")

class KnowledgeGraph(BaseModel):
    relationships: List[Relationship] = Field(description="提取的关系列表")

def create_memories(user_input: str, assistant_output: str):
    conversation = f"User: {user_input}\\nAssistant: {assistant_output}"

    # 创建情景记忆(对话摘要)
    console.print("--- 📝 创建情景记忆... ---")
    summary_prompt = """你是记忆专家,请为以下对话创建简洁的一句话摘要,用于未来回忆:\\n\\n{conversation}"""

    summary = llm.invoke(summary_prompt.format(conversation=conversation)).content

    # 存储到向量数据库
    memory_doc = Document(page_content=summary, metadata={"timestamp": time.time()})
    episodic_store.add_documents([memory_doc])

    console.print(f"[green]情景记忆已创建:[/green] {summary}")

    # 创建语义记忆(知识抽取)
    console.print("--- 🧠 创建语义记忆... ---")
    extraction_prompt = """分析以下对话,提取关键实体及其关系,构建知识图谱:\\n\\n{conversation}"""

    kg_extractor = llm.with_structured_output(KnowledgeGraph)

    try:
        kg_data = kg_extractor.invoke(extraction_prompt.format(conversation=conversation))

        if kg_data.relationships:
            for rel in kg_data.relationships:
                # 存储到图数据库(这里简化为内存存储)
                knowledge_graph.add_relationship(rel.source.id, rel.type, rel.target.id)

            console.print(f"[green]语义记忆已创建:[/green] 添加了 {len(kg_data.relationships)} 个关系")
        else:
            console.print("[yellow]本次对话未发现新的语义关系[/yellow]")

    except Exception as e:
        console.print(f"[red]语义记忆创建失败: {e}[/red]")
智能体的主要工作流:
class MemoryAgentState(TypedDict):
    user_input: str
    retrieved_memories: Optional[str]
    response: Optional[str]

def retrieve_memories(state: MemoryAgentState):
    """检索相关记忆的节点。"""
    console.print("--- 🔍 检索相关记忆... ---")
    user_query = state['user_input']

    # 检索情景记忆
    episodic_docs = episodic_store.similarity_search(user_query, k=3)
    episodic_context = "\\n".join([doc.page_content for doc in episodic_docs])

    # 检索语义记忆
    relevant_facts = knowledge_graph.find_related_facts(user_query)
    semantic_context = "\\n".join(relevant_facts)

    retrieved_context = f"""相关对话记录:\\n{episodic_context}\\n\\n相关知识:\\n{semantic_context}"""

    console.print(f"[cyan]检索到的记忆上下文:[/cyan]\\n{retrieved_context}")

    return {"retrieved_memories": retrieved_context}

def generate_with_memory(state: MemoryAgentState):
    """基于记忆生成个性化回复。"""
    console.print("--- 💭 基于记忆生成回复... ---")

    prompt = f"""你是一个具有记忆能力的AI助手。基于以下记忆信息,为用户提供个性化的回复:

    用户问题: {state['user_input']}

    相关记忆:
    {state['retrieved_memories']}

    请结合记忆中的用户偏好和历史信息,生成贴心的个性化回复。"""

    response = llm.invoke(prompt).content

    console.print(f"[green]生成的回复:[/green] {response}")

    return {"response": response}

def update_memories(state: MemoryAgentState):
    """更新记忆存储。"""
    console.print("--- 💾 更新记忆存储... ---")
    create_memories(state['user_input'], state['response'])
    return {}
构建记忆智能体:
memory_graph = StateGraph(MemoryAgentState)
memory_graph.add_node("retrieve", retrieve_memories)
memory_graph.add_node("generate", generate_with_memory)
memory_graph.add_node("update", update_memories)

memory_graph.set_entry_point("retrieve")
memory_graph.add_edge("retrieve", "generate")
memory_graph.add_edge("generate", "update")
memory_graph.add_edge("update", END)

memory_agent = memory_graph.compile()

测试记忆能力的关键是多轮对话:
# 第一轮:建立用户偏好
console.print("[bold blue]🔄 第一轮对话 - 建立记忆[/bold blue]")
result1 = memory_agent.invoke({
    "user_input": "你好,我是张三,我比较喜欢稳健的投资方式,主要关注蓝筹股"
})

# 第二轮:测试记忆召回
console.print("\\n[bold blue]🔄 第二轮对话 - 测试个性化[/bold blue]")
result2 = memory_agent.invoke({
    "user_input": "请推荐一些适合我的股票"
})
执行结果展现了记忆的威力:
🔄 第一轮对话 - 建立记忆
--- 🔍 检索相关记忆... ---
[cyan]检索到的记忆上下文:[/cyan] (初次对话,记忆为空)
--- 💭 基于记忆生成回复... ---
[green]生成的回复:[/green] 你好张三!了解了你偏好稳健投资...
--- 💾 更新记忆存储... ---
[green]情景记忆已创建:[/green] 用户张三介绍自己偏好稳健投资和蓝筹股
[green]语义记忆已创建:[/green] 添加了 2 个关系

🔄 第二轮对话 - 测试个性化
--- 🔍 检索相关记忆... ---
[cyan]检索到的记忆上下文:[/cyan] 用户张三偏好稳健投资...
--- 💭 基于记忆生成回复... ---
[green]生成的回复:[/green] 基于你的稳健投资偏好,我推荐以下蓝筹股...
这种记忆架构让智能体从"健忘的工具"进化为"记住用户的伙伴",是构建长期AI关系的关键技术。
图记忆:世界模型的构建
前面的记忆架构能记住对话和事实,但对于复杂的实体关系网络理解还不够深入。图记忆架构就是为了构建更完整的"世界模型"。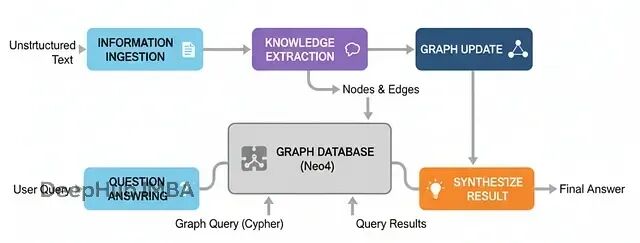
它不只是存储离散的事实,而是将信息构建成一个结构化的关系网络,让智能体能够进行复杂的多跳推理。
这种架构特别适合需要理解复杂实体关系的场景,比如企业情报分析、法律案例研究等。通过构建完整的知识图谱,系统能够回答那些需要跨越多个信息片段才能解答的复杂问题。
基本流程:
信息摄取:读取非结构化文本(新闻、报告等)
知识抽取:使用LLM解析文本,识别实体和关系
图构建:将抽取的信息构建成知识图谱
智能问答:将自然语言问题转换为图查询并执行
核心组件是"图构建器",负责从文本中抽取结构化信息:
class Node(BaseModel):
    id: str = Field(description="实体的唯一标识符")
    type: str = Field(description="实体类型,如Person、Company等")

class Relationship(BaseModel):
    source: Node
    target: Node
    type: str = Field(description="关系类型,如WORKS_FOR、ACQUIRED等")

class KnowledgeGraph(BaseModel):
    relationships: List[Relationship] = Field(description="抽取的关系列表")

def get_graph_maker_chain():
    """创建负责知识抽取的智能体。"""
    extractor_llm = llm.with_structured_output(KnowledgeGraph)

    prompt = ChatPromptTemplate.from_messages([
        ("system", "你是信息抽取专家。从给定文本中提取所有实体和关系。关系类型使用大写动词,如'WORKS_FOR'。"),
        ("human", "从以下文本中抽取知识图谱:\\n\\n{text}")
    ])

    return prompt | extractor_llm

查询引擎负责将自然语言转换为图查询:
def query_graph(question: str, graph_db) -> Dict[str, Any]:
    """完整的Text-to-Cypher查询和综合流程。"""
    console.print(f"\\n[bold]用户问题:[/bold] {question}")

    # 1. 生成Cypher查询
    cypher_prompt = f"""基于以下图谱schema,将问题转换为Cypher查询:
    Schema: {graph_db.get_schema}
    问题: {question}

    请生成准确的Cypher查询语句。"""

    generated_cypher = llm.invoke(cypher_prompt).content
    console.print(f"[cyan]生成的Cypher查询:\\n{generated_cypher}[/cyan]")

    # 2. 执行查询
    try:
        query_result = graph_db.query(generated_cypher)
        console.print(f"[yellow]查询结果: {query_result}[/yellow]")
    except Exception as e:
        console.print(f"[red]查询执行失败: {e}[/red]")
        return {"answer": "抱歉,查询执行时遇到了问题。"}

    # 3. 综合最终答案
    synthesis_prompt = f"""基于以下查询结果回答问题:
    问题: {question}
    查询结果: {query_result}

    请提供清晰准确的回答。"""

    final_answer = llm.invoke(synthesis_prompt).content

    return {"answer": final_answer}
测试多跳推理能力:
# 构建知识库
documents = [
    "AlphaCorp宣布收购初创公司BetaSolutions。",
    "Dr. Evelyn Reed是AlphaCorp的首席科学官。",
    "Innovate Inc的旗舰产品NeuraGen与AlphaCorp的QuantumLeap AI形成竞争。"
]

# 抽取并构建图谱
graph_maker = get_graph_maker_chain()
for doc in documents:
    kg_data = graph_maker.invoke({"text": doc})
    # 将关系存储到图数据库
    for rel in kg_data.relationships:
        graph_db.add_relationship(rel.source, rel.type, rel.target)

# 测试多跳查询
result = query_graph("谁在收购BetaSolutions的公司工作?", graph_db)

console.print(f"[bold green]最终答案:[/bold green] {result['answer']}")
执行过程展现了多跳推理的威力:
系统成功地将问题拆解为多步推理:从BetaSolutions找到收购方AlphaCorp,再找到在AlphaCorp工作的人员。
这种图记忆架构让智能体从简单的信息检索进化为真正的关系推理,能够处理需要跨越多个信息节点的复杂查询。
自我改进循环:类RLHF机制
到目前为止的智能体都是"静态"的——今天什么样,明天还是什么样。要让系统真正能够学习和进步,就需要构建"自我改进循环"。
这个架构模仿了人类的学习过程:做事→获得反馈→改进。智能体的输出会被立即评审,如果不达标就根据具体反馈进行修订,直到满足要求为止。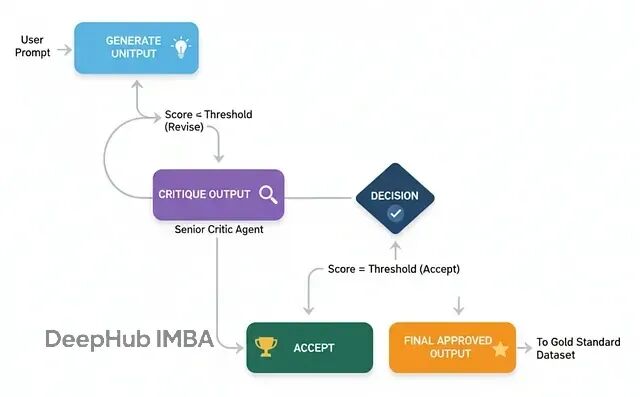
这种机制是让AI系统从"还不错"提升到"专家级"的关键途径。通过不断的反馈和迭代,系统能够积累经验,在后续任务中表现得更好。
基本流程:
生成初稿:基础智能体产出初版内容
批评评审:评审智能体按严格标准打分并提供反馈
条件判断:检查分数是否达到接受阈值
迭代修订:如果不达标,根据反馈进行修订
循环结束:达标后保存最终版本
以营销邮件写作为例,构建生成-批评-修订的循环:
class MarketingEmail(BaseModel):
    """营销邮件数据模型。"""
    subject: str = Field(description="吸引人的邮件主题")
    body: str = Field(description="邮件正文内容,使用markdown格式")

class Critique(BaseModel):
    """结构化的批评反馈。"""
    score: int = Field(description="1-10分的质量评分")
    feedback_points: List[str] = Field(description="具体的改进建议列表")
    is_approved: bool = Field(description="是否通过审核(分数>=8)")

def get_generator_chain():
    """初级文案生成器。"""
    prompt = ChatPromptTemplate.from_messages([
        ("system", "你是初级营销文案。根据用户需求写出邮件初稿,要有创意但重点突出核心信息。"),
        ("human", "为以下主题写一份营销邮件:\\n\\n{request}")
    ])
    return prompt | llm.with_structured_output(MarketingEmail)

def get_critic_chain():
    """资深编辑评审器。"""
    prompt = ChatPromptTemplate.from_messages([
        ("system", """你是资深营销编辑。按以下标准评审邮件草稿:
        1. 主题行是否吸引人,容易被打开?
        2. 正文是否清晰、有说服力?
        3. 是否有明确的行动召唤?
        4. 语调是否专业且友好?

        1-10分评分,8分以上才算通过。提供具体可执行的改进建议。"""),
        ("human", "请评审以下邮件草稿:\\n\\n**主题:** {subject}\\n\\n**正文:**\\n{body}")
    ])
    return prompt | llm.with_structured_output(Critique)

def get_reviser_chain():
    """修订器。"""
    prompt = ChatPromptTemplate.from_messages([
        ("system", "你是刚才写初稿的文案。收到编辑反馈后,请仔细修订草稿,逐一解决每个反馈点。"),
        ("human", """原始需求: {request}

        你的原稿:
        **主题:** {original_subject}
        **正文:** {original_body}

        编辑反馈: {feedback}

        请提供修订后的邮件。""")
    ])
    return prompt | llm.with_structured_output(MarketingEmail)
构建自我改进工作流:
class SelfImproveState(TypedDict):
    request: str
    current_draft: Optional[MarketingEmail]
    critique: Optional[Critique]
    revision_count: int
    final_draft: Optional[MarketingEmail]

def generate_node(state: SelfImproveState):
    """生成初稿节点。"""
    console.print("--- ✍️ 生成初稿 ---")
    generator = get_generator_chain()
    draft = generator.invoke({"request": state['request']})
    return {"current_draft": draft, "revision_count": 0}

def critique_node(state: SelfImproveState):
    """批评评审节点。"""
    console.print(f"--- 📋 评审第{state['revision_count'] + 1}版 ---")
    critic = get_critic_chain()
    critique = critic.invoke({
        "subject": state['current_draft'].subject,
        "body": state['current_draft'].body
    })

    console.print(f"评分: {critique.score}/10")
    console.print(f"反馈: {critique.feedback_points}")

    return {"critique": critique}

def revise_node(state: SelfImproveState):
    """修订节点。"""
    console.print("--- 🔧 根据反馈修订 ---")
    reviser = get_reviser_chain()

    revised_draft = reviser.invoke({
        "request": state['request'],
        "original_subject": state['current_draft'].subject,
        "original_body": state['current_draft'].body,
        "feedback": "\\n".join(state['critique'].feedback_points)
    })

    return {
        "current_draft": revised_draft,
        "revision_count": state['revision_count'] + 1
    }

def should_continue(state: SelfImproveState) -> str:
    """决定是否继续修订。"""
    if state['critique'].is_approved:
        return "approved"
    elif state['revision_count'] >= 3:  # 最大修订次数
        return "max_revisions"
    else:
        return "continue_revising"
组装完整图结构:
self_improve_graph = StateGraph(SelfImproveState)

self_improve_graph.add_node("generate", generate_node)
self_improve_graph.add_node("critique", critique_node)
self_improve_graph.add_node("revise", revise_node)

self_improve_graph.set_entry_point("generate")
self_improve_graph.add_edge("generate", "critique")

self_improve_graph.add_conditional_edges(
    "critique",
    should_continue,
    {
        "continue_revising": "revise",
        "approved": "__end__",
        "max_revisions": "__end__"
    }
)

self_improve_graph.add_edge("revise", "critique")

self_improve_app = self_improve_graph.compile()

测试自我改进能力:
request = "为我们的新AI数据平台'InsightSphere'写一封营销邮件"

result = self_improve_app.invoke({"request": request})

console.print("[bold green]🎯 最终成果:[/bold green]")
console.print(f"主题: {result['current_draft'].subject}")
console.print(f"正文: {result['current_draft'].body}")
执行过程展现了"现场学习"的效果:
通过结构化的反馈循环,智能体能够从低质量的初稿迅速改进到高质量的最终版本。这种机制让AI系统具备了真正的"学习"能力。
预演安全机制(Dry-Run Harness)
当智能体具备了执行真实世界操作的能力(如发送邮件、发布内容)时,安全控制就变得至关重要。预演安全机制的核心原则是"先看后跳"——在实际执行前先模拟运行。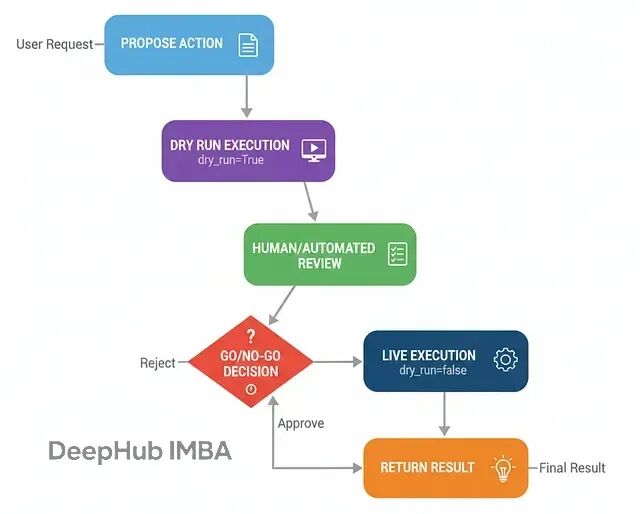
这种架构在任何需要执行不可逆操作的AI系统中都是必需的,它是从实验原型升级为生产级可信系统的关键安全措施。
工作流程:
提议行动:智能体决定执行某个操作
预演模拟:以干运行模式执行,只输出计划不实际操作
人工审核:展示预演结果,等待审批
条件执行:根据审核结果决定真实执行或取消
关键是工具必须支持
dry_run
模式:
class SocialMediaPost(BaseModel):
    content: str = Field(description="帖子内容")
    hashtags: List[str] = Field(description="相关标签")

class SocialMediaAPI:
    """支持预演模式的社交媒体API模拟器。"""
    def publish_post(self, post: SocialMediaPost, dry_run: bool = True) -> Dict[str, Any]:
        full_content = f"{post.content}\\n\\n{' '.join([f'#{tag}' for tag in post.hashtags])}"

        if dry_run:
            console.print(Panel(
                f"[DRY RUN] 将要发布以下内容:\\n{full_content}",
                title="[yellow]预演日志[/yellow]",
                border_style="yellow"
            ))
            return {"status": "DRY_RUN_SUCCESS", "proposed_content": full_content}
        else:
            console.print(Panel(
                "[LIVE] 内容发布成功!",
                title="[green]实际执行日志[/green]",
                border_style="green"
            ))
            return {"status": "LIVE_SUCCESS", "post_id": "post_12345"}
构建预演工作流:
class DryRunState(TypedDict):
    user_request: str
    proposed_post: Optional[SocialMediaPost]
    review_decision: Optional[str]
    final_status: str

def propose_post_node(state: DryRunState):
    """内容创作节点。"""
    console.print("--- 📝 创作社交媒体内容 ---")

    prompt = f"""你是AI公司的社交媒体经理。根据用户需求创作吸引人的社交媒体帖子,包含相关标签。

    用户需求: {state['user_request']}"""

    post_generator = llm.with_structured_output(SocialMediaPost)
    proposed_post = post_generator.invoke(prompt)

    return {"proposed_post": proposed_post}

def dry_run_review_node(state: DryRunState):
    """预演和人工审核节点。"""
    console.print("--- 🧐 预演执行并等待审核 ---")

    # 执行预演
    social_api = SocialMediaAPI()
    dry_result = social_api.publish_post(state['proposed_post'], dry_run=True)

    # 展示审核界面
    review_panel = Panel(
        f"[bold]拟发布内容:[/bold]\\n{dry_result['proposed_content']}",
        title="[bold yellow]人工审核:请做决定[/bold yellow]",
        border_style="yellow"
    )
    console.print(review_panel)

    # 获取审核决定(实际系统中可能是异步的)
    decision = input("输入 'approve' 发布或 'reject' 取消: ").lower()
    while decision not in ["approve", "reject"]:
        decision = input("请输入 'approve' 或 'reject': ").lower()

    return {"review_decision": decision}

def execute_live_node(state: DryRunState):
    """实际执行节点。"""
    console.print("--- ✅ 审核通过,执行发布 ---")
    social_api = SocialMediaAPI()
    result = social_api.publish_post(state['proposed_post'], dry_run=False)
    return {"final_status": f"发布成功!ID: {result.get('post_id')}"}

def reject_node(state: DryRunState):
    """拒绝执行节点。"""
    console.print("--- ❌ 审核被拒绝 ---")
    return {"final_status": "操作被审核员拒绝,未执行。"}

def route_after_review(state: DryRunState) -> str:
    """审核后的路由决策。"""
    return "execute" if state["review_decision"] == "approve" else "reject"
组装预演系统:
dry_run_graph = StateGraph(DryRunState)

dry_run_graph.add_node("propose", propose_post_node)
dry_run_graph.add_node("dry_run_review", dry_run_review_node)
dry_run_graph.add_node("execute", execute_live_node)
dry_run_graph.add_node("reject", reject_node)

dry_run_graph.set_entry_point("propose")
dry_run_graph.add_edge("propose", "dry_run_review")

dry_run_graph.add_conditional_edges(
    "dry_run_review",
    route_after_review,
    {"execute": "execute", "reject": "reject"}
)

dry_run_graph.add_edge("execute", "__end__")
dry_run_graph.add_edge("reject", "__end__")

dry_run_app = dry_run_graph.compile()

测试预演安全机制:
预演机制成功拦截了可能引起争议的内容,展现了这种安全架构的价值。在生产环境中,这种机制能够防止AI系统执行不当或有害的操作,确保人类始终掌握最终控制权。
仿真器架构:内置心理模型的循环
前面的PEV架构能在工具失败时调整计划,但它假设"世界在步骤之间保持静态"。在动态环境(比如股市)中,情况在持续变化,行动结果充满不确定性。
仿真器架构为智能体注入了"内在世界模型":在安全的内部沙盒中运行"假设性"场景,预估行动后果,细化计划,然后在现实中执行更稳健的决策。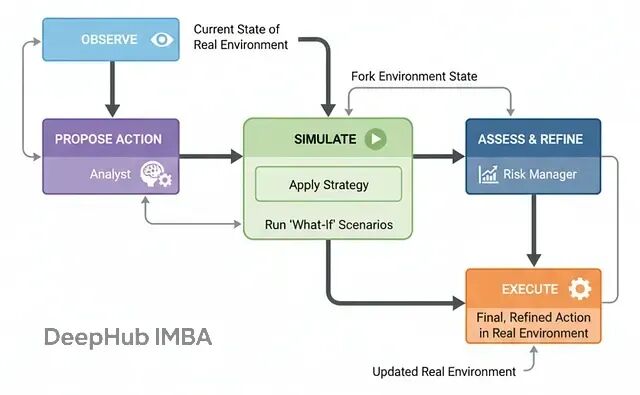
这种架构对于高风险决策至关重要,特别是在机器人控制、量化交易、医疗方案等领域。它让智能体能够"先想后行"。
基本流程:
观察环境:获取真实环境的当前状态
提议策略:分析师模块基于目标生成高层策略
内部仿真:将环境复制到沙盒中,应用策略并前推模拟
评估细化:风控模块分析仿真结果,细化为具体可执行动作
实际执行:在真实环境中执行最终决策
我们构建一个简单的市场仿真器作为测试环境:
通过内置的"心理模型",智能体能够在动态环境中做出更安全、更智能、更审慎的决策。
反思元认知架构:自我边界的认知
现有的智能体虽然能力强大,但都有一个致命缺陷:不知道自己不知道什么。当被问及超出专长的问题时,仍会硬着头皮作答,往往自信满满却危险错误。
反思元认知架构就是为了解决这个问题。它赋予智能体一种"自我觉察"能力:在尝试解决问题之前,先推理自己的能力边界和信心水平。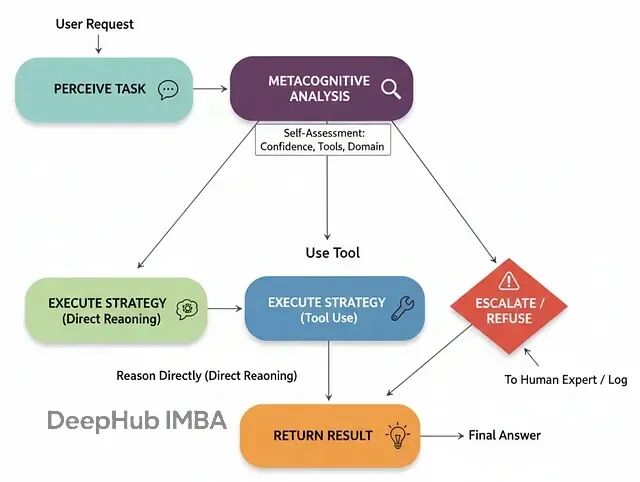
这种架构在高风险领域(如医疗、金融)中不可或缺,它让智能体敢于说"我不知道"或"应该请人类专家处理"。
基本流程:
接收任务:获取用户请求
元认知分析:对照自我模型评估能力和信心
策略选择:根据分析结果选择处理方式
直接推理(高置信度、低风险)
使用工具(需要特定工具支持)
升级处理(低置信度、高风险或超出边界)
执行策略:按选定方式处理请求
执行结果展现了"安全优先"的决策:
这种元认知能力让智能体从"危险的全能者"变成了"负责任的助手"——知道自己能做什么,更重要的是知道自己不该做什么。
元胞自动机:涌现式计算
最后这种架构完全不同于前面的"自上而下"控制方式。元胞自动机采用"自下而上"的方法:在网格上部署大量简单的"细胞智能体",没有中央控制器,"整体智慧"从无数次"局部简单规则"的并行应用中涌现。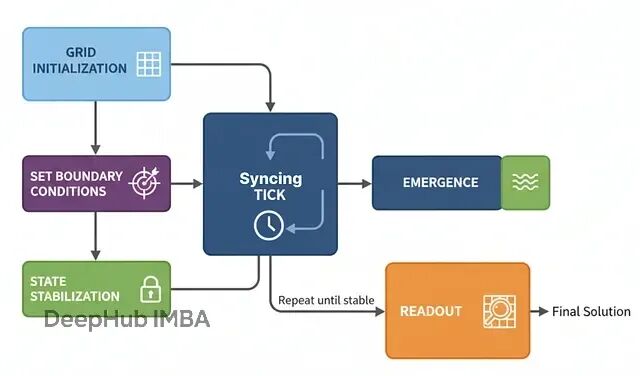
这种架构特别适合空间推理、模拟和优化问题,比如物流路径规划、疾病传播建模、城市规划等。它将问题空间本身变成"计算织物",通过类似波传播的信息流来求解。
基本原理:
网格初始化:创建由细胞智能体构成的网格,每个细胞有类型和状态
边界条件:为目标细胞设定特殊状态作为计算起点
同步更新:每个时间步,所有细胞基于邻居状态同步更新
涌现计算:随着迭代进行,信息如波浪般传播形成梯度场
稳定收敛:直到网格不再变化,计算完成
结果读取:从最终状态直接读出答案
以仓库路径规划为例,实现细胞智能体:
这个例子展现了元胞自动机的独特之处:没有中央规划器计算路径,而是整个网格"自发地"形成了一个梯度场。每个细胞只知道简单的局部规则,但集体行为产生了全局最优解。
这种分布式计算范式在处理大规模空间问题时具有天然的并行性和鲁棒性优势。
总结
实际的大型AI系统很少依赖单一架构。真正的威力来自于将多种模式编排到多层工作流中,让各个组件发挥所长。
这种多层架构的组合让系统既具备了高度的智能性和自主性,又保持了必要的安全性和可控性。每一层都有明确的职责和边界,整体形成了一个既强大又可信赖的AI系统。
通过这17种不同架构的灵活组合,我们可以构建出适应各种复杂业务场景的智能系统,从简单的问答助手到复杂的决策支持平台,每一种都能找到最合适的架构组合方案。
完整代码:
https://github.com/FareedKhan-dev/all-agentic-architectures
作者:Fareed Khan