
ChatGPT是人工智能研究实验室OpenAI新推出的一种人工智能技术驱动的自然语言处理工具,使用了Transformer神经网络架构,也是GPT-3.5架构,这是一种用于处理序列数据的模型,拥有语言理解和文本生成能力,尤其是它会通过连接大量的语料库来训练模型,这些语料库包含了真实世界中的对话,使得ChatGPT具备上知天文下知地理,还能根据聊天的上下文进行互动的能力,做到与真正人类几乎无异的聊天场景进行交流。
ChatGPT不单是聊天机器人,还能进行撰写邮件、视频脚本、文案、翻译、代码等任务。
本篇我们将通过实例说明远程交互式、本地交互式以及定制型客服的应用。
■ 测试智能客服
01、问答智能客服实战
书接上文,目前基于模板的客服应用程序比较多,第一种是基于远程模式的问答对话,详见上一篇推文。本篇主要介绍第二种和第三种。第二种是基于本地模板的问答对话应用,需要提前将模板下载到本地安装。第三种是基于用户定制的问答系统,这种方式用户需要编写自定义代码。
基于Python框架的智能对话应用模板可以在网址https://github.com/microsoft/BotBuilder-Samples/tree/main/samples/python下载。使用到的其他应用包括Bot Framework Emulator(下载网址为https://github.com/Microsoft/BotFramework-Emulator/releases/tag/v4.13.0),代理应用程序Ngrok(下载网址为https://ngrok.com/download)。启动环境执行pip install botbuilder.ai安装智能客服相应库文件。
基于本地交互模式问答客服
基于本地交互模式需要事先将模板文件下载到本地,例如,可以下载 https://github.com/microsoft/BotBuilder-Samples/releases/download/Templates/core.zip。模型下载完成后启动Bot Framework Emulator程序,在客服程序URL中输入“http://localhost:xxxx/api/messages”,参见图1和图2。

■ 图1 本地模板连接设置
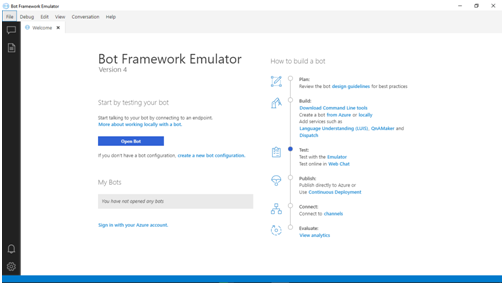
■ 图2 基于本地交互的智能客服设置
连上客服后,单击Ask a question按钮,启动问答型程序,参见图3。

■ 图3 本地模板选项
接着根据提示信息输入问题,进行问答对话,参见图4。
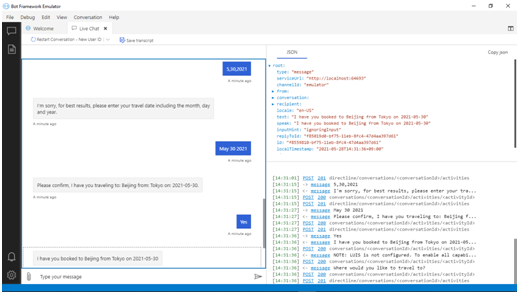
■ 图4 本地模板连接测试
基于定制型问答客服实例
定制型智能客服程序一般需要事先选择语料库,去除噪声信息后根据算法对语料进行训练,最后提供人机接口进行问答对话。基于互联网获得的医学语料库,并通过余弦相似度基本原理,我们设计并开发了问答型智能医疗客服应用程序。
(1) 测试程序function.py主要代码。
# 导入库文件
import numpy as np
def display_response(outcome1,outcome2):

    if outcome1 is not None:
        outcome = outcome1
    elif outcome2 is not None:
        outcome = outcome2
    else:
        outcome = "非常抱歉,目前暂时没有搜索到与您的问题相匹配的答案,我们会继续关注您的问题,欢迎您下次继续光临。"
    return outcome

#文本余弦相似度计算
def cosine_similarity(text1, text2):
    cos_text1 = (Counter(text1))
    cos_text2 = (Counter(text2))
    similarity_text1 = []
    similarity_text2 = []
    for i in set(text1 + text2):
        similarity_text1.append(cos_text1[i])
        similarity_text2.append(cos_text2[i])

    similarity_text1 = np.array(similarity_text1)
    similarity_text2 = np.array(similarity_text2)

    return similarity_text1.dot(similarity_text2) / (np.sqrt(similarity_text1.dot(similarity_text1)) * np.sqrt(similarity_text2.dot(similarity_text2)))

 #智能客服问候语匹配,相似度的数值可以定制
def greeting_response(msg,input_greet,output_greet):
    selection = {}
    for key, value in enumerate(input_greet):
        comparison = cosine_similarity(msg, value)
        if comparison > 0.6:
            selection[key] = comparison
        sort = sorted(selection.items(), key=lambda x: x[1], reverse=True)
    outcome = output_greet[sort[0][0]] if  len(selection) != 0 else None
    return  outcome

  #问答预测操作
def prediction(message):
    input_greet = []
    output_greet = []
    with open("label.csv", 'r',encoding='utf-8') as df:
        greets = csv.reader(df)
        next(greets)
        for greet in greets:
            input_greet.append(greet[1])
            output_greet.append(greet[2])
    #相似度阈值的设定可以定制
    selection = {}
    for key, value in enumerate(input_greet):
        comparison = cosine_similarity(message, value)
        if comparison > 0.1:
            selection[key] = comparison
        sort = sorted(selection.items(), key=lambda x: x[1], reverse=True)
    outcome = output_greet[sort[0][0]] if  len(selection) != 0 else None
    return  outcome


#根据用户输入信息输出响应处理
def entrance(msg):
    input_greet = []
    output_greet = []
    with open("greeting.csv", 'r',encoding='utf-8') as df:
        greets = csv.reader(df)
        next(greets)
        for greet in greets:
            input_greet.append(greet[0])
            output_greet.append(greet[1])
    outcome1 = greeting_response(msg,input_greet,output_greet)
    outcome2 = prediction(msg)
    outcome = display_response(outcome1,outcome2)
    return outcome
(2) 界面显示模块chatrobot.py主要代码。
#导入库文件
import time
import tkinter as tk
from tkinter import *
from tkinter import Tk
from tkinter import  Text
from tkinter import  Button
from function import *

#设置智能客服应用界面风格
tk = Tk(screenName=None, baseName=None)
tk.title('智能医疗客服')
tk.geometry('500x600')
tk.resizable(True, True)

#定义用户提问和客服回答消息处理函数
def msgProcess():
    #获取用户的输入信息
    msg = txt.get("1.0",'end-1c').strip()
    #删除用户的输入信息
    txt.delete("0.0",END)
    #定义用户消息和客服消息的颜色显示区分
    chatmsg.tag_config('question', background="white", foreground="blue")
    chatmsg.tag_config('answer', background="white", foreground="black")

    if msg != "":
    #获取和显示用户消息
        tmsg = '【用户问题】 ' + time.strftime('%Y/%m/%d %H:%M', time.localtime()) + '\n'
        chatmsg.insert(END, tmsg, 'question')
        chatmsg.insert(END, msg + '\n\n','question')
        #根据用户的输入信息进行匹配操作

        outcome = entrance(msg)
        chatmsg.config(state=NORMAL)

        #获取和显示客服应答消息
        botresponse = '【客服回答】 ' + time.strftime('%Y/%m/%d %H:%M', time.localtime()) + '\n'
        chatmsg.insert(END, botresponse, 'answer')
        chatmsg.insert(END, outcome + '\n\n', 'answer')
    else:
        tmsg = '用户问题: ' + time.strftime('%Y/%m/%d %H:%M', time.localtime()) + '\n'
        chatmsg.insert(END, tmsg, 'question')
        chatmsg.config(state=NORMAL)
        chatmsg.insert(END, msg + '\n\n','question')
        botresponse = '客服回答: ' + time.strftime('%Y/%m/%d %H:%M', time.localtime()) + '\n'
        chatmsg.insert(END, botresponse, 'answer')
        chatmsg.insert(END, "对不起,我没有理解您的问题,请输入您要咨询的问题。"+'\n\n', 'answer')

# 取消发送消息
def msgCancel():
    txt.delete('0.0', END)

chatmsg = Text(tk, borderwidth=0, cursor=None,state=NORMAL, background="white", height="12", width="70", font="kaiti",wrap=WORD)

#设置滚动条
srb = Scrollbar(tk, command=chatmsg.yview, activebackground=None,background="white",borderwidth=0,highlightcolor="purple",cursor="arrow",
jump=0,orient=VERTICAL,width=16,elementborderwidth=1)
srb.pack( side = RIGHT, fill = Y )
chatmsg['yscrollcommand'] = srb.set
chatmsg.see("end")

#设置信息输入框风格
txt = Text(tk, borderwidth=0, cursor=None,background="white",width="25", height="8", font="kaiti",wrap=WORD)

#设置发送消息按钮风格
msgBtnS = Button(tk, font=("kaiti",12,"bold"), text="提交咨询", width=12, height=8,highlightcolor=None,image=None,justify=CENTER,state=ACTIVE,borderwidth=0, background="#111fed", activebackground="#524e78",foreground ='white',relief=RAISED,
                    command= msgProcess )

msgBtnC = Button(tk, font=("kaiti",12,"bold"), text="取消咨询", width=12,height=8,highlightcolor=None,image=None,justify=CENTER,state=ACTIVE,borderwidth=0, background="#111fed", activebackground="#524e78",foreground ='white',relief=RAISED,
                    command= msgCancel )

#显示组件内容
srb.place(relx=0.8, rely=0.35, relwidth=0.03, relheight=0.66, anchor='e')
chatmsg.place(relx=0.0, rely=0.35, relwidth=0.8, relheight=0.66, anchor='w')
txt.place(relx=0.002, rely=0.685, relwidth=0.8,relheight=0.2)
msgBtnS.place(bordermode=OUTSIDE,relx=0.1, rely=0.9, relwidth=0.2,relheight=0.05)
msgBtnC.place(bordermode=OUTSIDE,relx=0.4, rely=0.9, relwidth=0.2,relheight=0.05)

tk.mainloop()
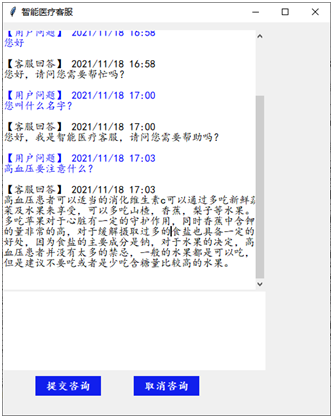
(3) 执行代码,启动智能医疗客服程序,输入问候语后再输入医疗问题查询,客服程序输出反馈应答给用户,如图5和图6所示。
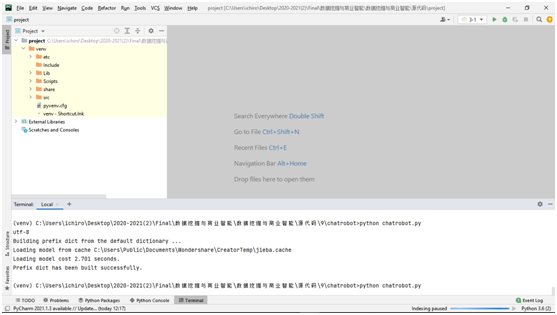
■ 图5 启动智能客服
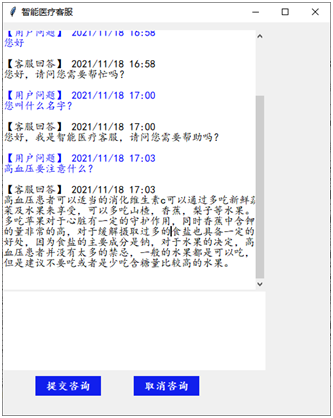
■ 图6 测试智能客服
版权归原作者 TiAmo zhang 所有, 如有侵权,请联系我们删除。