
目录
0 题目简介
本文的主要内容是一套利用百度飞桨深度学习平台下的目标检测套件PaddleDetection(GitHub链接)实现目标检测任务(从模型训练到部署)的流程。
本文中流程将最大限度地利用飞桨现有工具套件和API,以尽最大可能减少编程工作。这也是飞桨API的最大优势所在:源于产业实践,因而简化不必要的重复编程工作。

本文所完成的任务来自“兴智杯”全国人工智能创新应用大赛:国产开发框架工程化应用赛,其主要内容为基于目标检测算法的齿轮瑕疵检测。本文中的相关操作主要参考了大赛的AIStudio Baseline项目,但采用了不同的模型架构。除了基线项目的本地化训练方案外,本文还涉及了飞桨框架下训练完成后模型的部署方案。
1 Baseline项目的本地化
百度AIStudio平台为包括本文中基线项目在内的许多模型提供了在线运行服务。但更多情况下,我们需要将Baseline项目下载到本地进行重新训练。本节将介绍如何实现这一步骤。
1.1 飞桨环境配置
飞桨的安装可以直接通过pip安装命令实现。如果已经完成了。对于CPU环境,这里以文章发布时的最新版本2.4.2为例(采用清华源):
$ python -m pip installpaddlepaddle==2.4.2 -i https://pypi.tuna.tsinghua.edu.cn/simple
对于GPU版本,可参考飞桨安装页以选择和当前环境CUDA对应的飞桨版本。
安装完成后,可通过飞桨内置的测试命令在python内进行验证:
import paddle as pd
pd.utils.run_check()
出现
PaddlePaddle is installed successfully!
即为安装成功。同时,还会返回一系列更细节的运行检测信息,包括部分warning,例如
Running verify PaddlePaddle program ...
PaddlePaddle works well on 1 CPU.
C:\Users\{python安装地址}\lib\site-packages\paddle\fluid\executor.py:1583: UserWarning: Standalone executor is not used for data parallel
  warnings.warn(
W0307 20:13:37.099707  6728 fuse_all_reduce_op_pass.cc:79] Find all_reduce operators: 2. To make the speed faster, some all_reduce ops are fused during training, after fusion, the number of all_reduce ops is 2.
PaddlePaddle works well on 2 CPUs.
PaddlePaddle is installed successfully! Let's start deep learning with PaddlePaddle now.
但无论如何,只要出现了
PaddlePaddle is installed successfully!
,paddle就是可以正常使用的。
飞桨安装注意事项
- 尽可能使用虚拟环境,以避免将飞桨和Pytorch、TensorFlow等其他神经网络API安装在同一环境下——这些API可能在numpy等关键库的版本要求上存在冲突
- python版本应不低于3.6,飞桨将在近期停止对Python 3.5的支持
- 飞桨可能无法支持过新的CUDA版本
- 无法安装GPU版本时,如果只是进行中小模型的预测推理而非训练,CPU版本也可以满足相应需求
1.2 PaddleDetection安装
PaddleDetection为基于飞桨PaddlePaddle 的端到端目标检测套件,内置 30+模型算法及 300+预训练模型,覆盖目标检测、实例分割、跟踪、关键点检测等方向,其中包括服务器端和移动端高精度、轻量级产业级 SOTA 模型、冠军方案和学术前沿算法,并提供配置化的网络模块组件、十余种数据增强策略和损失函数等高阶优化支持和多种部署方案,在打通数据处理、模型开发、训练、压缩、部署全流程的基础上,提供丰富的案例及教程,加速算法产业落地应用。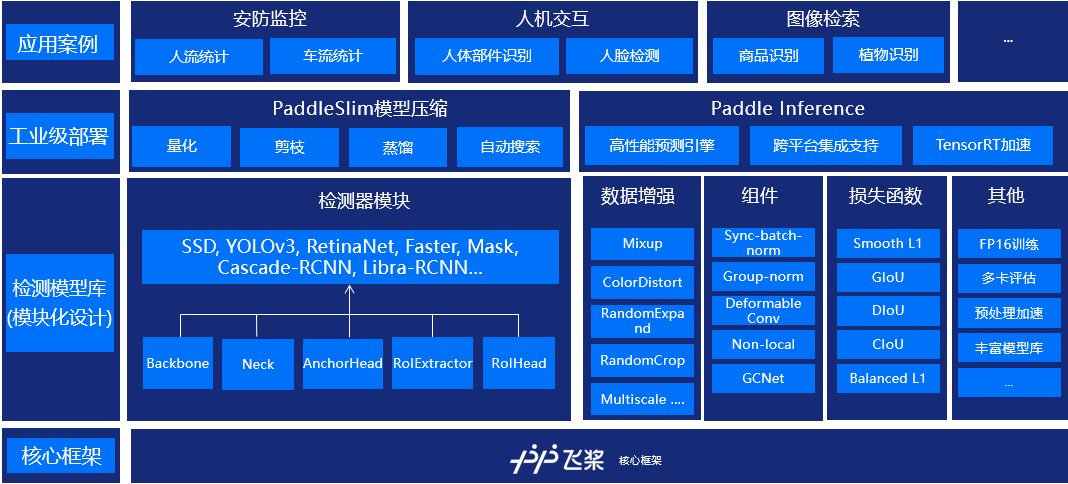
PaddleDetection的最大特点在于:省去了复杂的组网与训练编程步骤。PaddleDetection下的网络架构编辑可以直接通过**编辑
Yaml(.yml)
文件**实现,而不是通过复杂的Python组网代码。同样,数据读取、处理、训练等流程也可以通过PaddleDetection中的现有代码直接完成。
PaddleDetection已在GitHub上开源,通过Git Bash指令可直接获取。
$ git clone https://github.com/paddlepaddle/PaddleDetection
如果不希望PaddleDetection在运行是使用GPU(或者如果你的飞桨是cpu版本),则应修改
(PaddleDetection/)configs/runtime.yml
文件中的
use_gpu
项:
# use_gpu: trueuse_gpu:false# <- 修改use_xpu:falselog_iter:20save_dir: output
snapshot_epoch:1print_flops:false# Exporting the modelexport:post_process:True# Whether post-processing is included in the network when export model.nms:True# Whether NMS is included in the network when export model.benchmark:False# It is used to testing model performance, if set `True`, post-process and NMS will not be exported.fuse_conv_bn:False
PaddleDetection注意事项
- 在运行PaddleDetection时,可能还会出现
no module named ‘{库名}’的报错,这时安装对应库即可 (笔者安装时就出现了filelock库缺失的报错)
1.3 数据集下载与配置
在本节中,我们将会在下载数据集后,利用飞桨全流程开发工具PaddleX实现数据集切分。由于原数据集只提供了训练集,数据集的切分需要自己来做。参考例程,我们按照 9:1 的比例,划分训练集和验证集。
PaddleX安装:
> pip install paddlex -i https://pypi.tuna.tsinghua.edu.cn/simple
PaddleX安装注意事项
- 部分版本的PaddleX内置的scikit-learn相关内容可能触发360安全卫士的木马警告,进而造成安装失败;此时需要暂时关闭360安全卫士以完成安装
- 若安装PaddleX时遇
protobuf版本版本冲突报错,此时应尝试同时卸载PaddleX与protobuf后重新安装PaddleX以解决该问题
train_coco.json
文件可以发现,其内容为对数据集内每张图片信息及其中瑕疵位置的标注:
{"info":{"year":2022,"version":"1","description":"Exported using VGG Image Annotator (http://www.robots.ox.ac.uk/~vgg/software/via/)","contributor":"","url":"http://www.robots.ox.ac.uk/~vgg/software/via/","date_created":"Wed Jun 22 2022 11:23:09 GMT+0800 (\u4e2d\u56fd\u6807\u51c6\u65f6\u95f4)"},"images":[{"id":0,"width":1400,"height":2000,"file_name":"1_10_1__H2_817171_IO-NIO198M_210225A0207-1-1.jpg","license":1,"date_captured":""},{"id":1,"width":1400,"height":2000,"file_name":"1_10_3__H2_817171_IO-NIO198M_210225A0207-1-2.jpg","license":1,"date_captured":""},{"id":2,"width":1400,"height":2000,"file_name":"1_10_5__H2_817171_IO-NIO198M_210225A0207-2-1.jpg","license":1,"date_captured":""},{
    ……
之后,将原数据集中的所有 JPG 图片文件及标注文件
train_coco.json
分别按照下图路径复制到 **
PaddleDetection
所在路径下**新建的
MyDataset
文件夹下,并将标注文件文件名改为
annotations.json
。整理后文件结构如下
MyDataset
│  annotations.json
│
└─JPEGImages
        1_10_1__H2_817171_IO-NIO198M_210225A0207-1-1.jpg
        1_10_3__H2_817171_IO-NIO198M_210225A0207-1-2.jpg
        1_10_5__H2_817171_IO-NIO198M_210225A0207-2-1.jpg
        1_10_7__H2_817171_IO-NIO198M_210225A0207-2-2.jpg
        1_10__H2_817171_IO-NIO198M_210303A0125-2-1.jpg
        1_10__H2_817171_IO-NIO198M_210303A0125-2-2.jpg
        ……
再之后就是数据集切分。在
MyDataset
路径下运行如下命令:
$ paddlex --split_dataset --format COCO --dataset_dir ./ --val_value 0.1 --test_value 0.0
笔者的运行输出:
C:\Users\LibrarristShalinward\AppData\Local\Programs\Python\Python39\lib\site-packages\paddlex\paddleseg\models\losses\decoupledsegnet_relax_boundary_loss.py:19: DeprecationWarning: Please use `shift` from the `scipy.ndimage` namespace, the `scipy.ndimage.interpolation` namespace is deprecated.from scipy.ndimage.interpolation import shift
C:\Users\LibrarristShalinward\AppData\Local\Programs\Python\Python39\lib\site-packages\paddlex\paddleseg\transforms\functional.py:18: DeprecationWarning: Please use `distance_transform_edt` from the `scipy.ndimage` namespace, the `scipy.ndimage.morphology` namespace is deprecated.from scipy.ndimage.morphology import distance_transform_edt
2023-03-07 22:10:02,112-WARNING: type object 'QuantizationTransformPass' has no attribute '_supported_quantizable_op_type'
2023-03-07 22:10:02,114-WARNING: If you want to use training-aware and post-training quantization, please use Paddle >= 1.8.4 or develop version
C:\Users\LibrarristShalinward\AppData\Local\Programs\Python\Python39\lib\site-packages\sklearn\utils\multiclass.py:13: DeprecationWarning: Please use `spmatrix` from the `scipy.sparse` namespace, the `scipy.sparse.base` namespace is deprecated.from scipy.sparse.base import spmatrix
C:\Users\LibrarristShalinward\AppData\Local\Programs\Python\Python39\lib\site-packages\paddlex\ppcls\data\preprocess\ops\timm_autoaugment.py:38: DeprecationWarning: BILINEAR is deprecated and will be removed in Pillow 10 (2023-07-01). Use Resampling.BILINEAR instead.
  _RANDOM_INTERPOLATION = (Image.BILINEAR, Image.BICUBIC)
C:\Users\LibrarristShalinward\AppData\Local\Programs\Python\Python39\lib\site-packages\paddlex\ppcls\data\preprocess\ops\timm_autoaugment.py:38: DeprecationWarning: BICUBIC is deprecated and will be removed in Pillow 10 (2023-07-01). Use Resampling.BICUBIC instead.
  _RANDOM_INTERPOLATION = (Image.BILINEAR, Image.BICUBIC)
2023-03-07 22:10:05 [INFO]      Dataset split starts...
loading annotations into memory...
Done (t=0.18s)
creating index...
index created!
2023-03-07 22:10:06 [INFO]      Dataset split done.
2023-03-07 22:10:06 [INFO]      Train samples: 1800
2023-03-07 22:10:06 [INFO]      Eval samples: 200
2023-03-07 22:10:06 [INFO]      Test samples: 0
2023-03-07 22:10:06 [INFO]      Split files saved in ./
运行后
MyDataset
下的文件结构
MyDataset
│  annotations.json
│  train.json
│  val.json
│
└─JPEGImages
        1_10_1__H2_817171_IO-NIO198M_210225A0207-1-1.jpg
        1_10_3__H2_817171_IO-NIO198M_210225A0207-1-2.jpg
        1_10_5__H2_817171_IO-NIO198M_210225A0207-2-1.jpg
        1_10_7__H2_817171_IO-NIO198M_210225A0207-2-2.jpg
        1_10__H2_817171_IO-NIO198M_210303A0125-2-1.jpg
        1_10__H2_817171_IO-NIO198M_210303A0125-2-2.jpg
        ……
1.4 Baseline模型配置
在采用新的目标检测网络架构前,笔者建议先跑通Baseline模型以验证所安装环境的可用性,以下为Baseline中的目标检测模型配置流程。
首先,从AIStudio Baseline项目中下载描述例程模型的6个超参数
.yml
文件,并用其替换
(PaddleDetection/)configs/
下的相应文件。替换文件路径如下表所示。
序号例程文件被替换文件1
optimizer_1x.yml
(PaddleDetection/)configs/ppyolo/_base_/optimizer_1x.yml
2
ppyolo_r50vd_dcn.yml
(PaddleDetection/)configs/ppyolo/_base_/ppyolo_r50vd_dcn.yml
3
ppyolo_r50vd_dcn_1x_sniper_visdrone.yml
(PaddleDetection/)configs/sniper/ppyolo_r50vd_dcn_1x_sniper_visdrone.yml
4
ppyolo_reader.yml
(PaddleDetection/)configs/sniper/_base_/ppyolo_reader.yml
5
runtime.yml
(PaddleDetection/)configs/runtime.yml
6
sniper_visdrone_detection.yml
(PaddleDetection/)configs/datasets/sniper_visdrone_detection.yml
为了使AIStudio上的文件配置能够适配本地路径,还应将按照表1中各
.yml
文件中的
home/aistudio/
批量替换为 **
PaddleDetection
所在文件夹的绝对路径**。以
(PaddleDetection/)configs/datasets/sniper_visdrone_detection.yml
为例,替换后文件内容如下:
metric: SNIPERCOCO
num_classes:3TrainDataset:!SniperCOCODataSetimage_dir:{MyDataset所在文件夹绝对路径}/MyDataset/JPEGImages
    anno_path:{MyDataset所在文件夹绝对路径}/MyDataset/val.json
    dataset_dir:{MyDataset所在文件夹绝对路径}/MyDataset
    data_fields:['image','gt_bbox','gt_class','is_crowd']allow_empty:trueis_trainset:trueimage_target_sizes:[1600,1600]valid_box_ratio_ranges:[[0.02,0.233125],[-1,-1]]chip_target_size:800chip_target_stride:448use_neg_chip:falsemax_neg_num_per_im:8EvalDataset:!SniperCOCODataSetimage_dir:{MyDataset所在文件夹绝对路径}/MyDataset/JPEGImages
    anno_path:{MyDataset所在文件夹绝对路径}/MyDataset/val.json
    dataset_dir:{MyDataset所在文件夹绝对路径}/MyDataset
    data_fields:['image','gt_bbox','gt_class','is_crowd']allow_empty:trueis_trainset:falseimage_target_sizes:[1600,1600]valid_box_ratio_ranges:[[0.02,0.233125],[-1,-1]]chip_target_size:800chip_target_stride:448max_per_img:-1nms_thresh:0.5TestDataset:!SniperCOCODataSetimage_dir:{MyDataset所在文件夹绝对路径}/MyDataset/JPEGImages
    anno_path:{MyDataset所在文件夹绝对路径}/MyDataset/val.json
    dataset_dir:{MyDataset所在文件夹绝对路径}/MyDataset
    is_trainset:falseimage_target_sizes:[1600,1600]valid_box_ratio_ranges:[[0.02,0.233125],[-1,-1]]chip_target_size:800chip_target_stride:448max_per_img:-1nms_thresh:0.5
1.5 Baseline运行
完成前述所有准备工作后,在
PaddleDetection
文件夹下运行
> python tools/train.py -c configs/sniper/ppyolo_r50vd_dcn_1x_sniper_visdrone.yml --use_vdl=True --vdl_log_dir=./sniper/ --eval
待进入训练流程,即可确认Baseline运行正常。
笔者运行得到的结果如下:
Warning: Unable to use OC-SORT, please install filterpy, for example: `pip install filterpy`, see https://github.com/rlabbe/filterpy
Warning: import ppdet from source directory without installing, run 'python setup.py install' to install ppdet firstly
loading annotations into memory...
Done (t=0.08s)
creating index...
index created![03/07 23:30:36] sniper_coco_dataset INFO: Init AnnoCropper...
[03/07 23:32:31] ppdet.engine INFO: Epoch: [0][0/47] learning_rate: 0.000050 loss: 4.286794 loss_cls: 0.794054 loss_iou: 0.830453 loss_dfl: 2.833213 loss_l1: 5.656240 eta: 4 days, 19:26:52 batch_cost: 110.5353 data_cost: 0.0050 ips: 0.1448 images/s
……
2 网络架构修改
PP-YOLOe是基于PP-YOLOv2的单阶段无锚框模型,性能非常好,超越了多种主流YOLO模型。同时,PP-YOLOe避免了使用诸如Matrix NMS或Deformable Convolution等特殊算子,以使其能轻松地应用和部署在各种设备上,因此在工业界的检测任务中应用非常多。由于齿轮瑕疵检测属于小目标场景,因此AIStudio Baseline项目选择了PP-YOLOe的垂类应用VisDroneDET检测模型完成这一任务,同时使用小目标数航拍场景的预训练权重展开训练。
同样是针对小目标检测场景的垂类模型,基于PP-YOLOe的PP-YOLOe-Alpha-largesize-l的训练速度更快,而且收敛速度非常好:经试验,训练20个epoch在四块V100上耗时在120分钟左右,mAP也快速爬升到了0.6+,拥有非常好的速度和精度性能。以下是试验结果样例:
以下给出在PaddleDetection下应用PP-YOLOe-Alpha-largesize-l所做出的文件修改:
(PaddleDetection/)configs/datasets/sniper_visdrone_detection.yml:同Baseline(PaddleDetection/)configs/ppyoloe/_base_/optimizer_1x.yml:epoch:80# 变更LearningRate:base_lr:0.001schedulers:# 变更-!CosineDecaymax_epochs:96-!LinearWarmupstart_factor:0.epochs:5OptimizerBuilder:optimizer:momentum:0.9type: Momentum regularizer:factor:0.0005type: L2- (新建)
(PaddleDetection/)configs/ppyolo/_base_/ppyolo_r50vd_dcn.yml:architecture: YOLOv3norm_type: sync_bnuse_ema:trueema_decay:0.9998ema_black_list:['proj_conv.weight']custom_black_list:['reduce_mean']YOLOv3:# 变更backbone: CSPResNet neck: CustomCSPPAN yolo_head: PPYOLOEHead post_process:~CSPResNet:layers:[3,6,6,3]channels:[64,128,256,512,1024]return_idx:[1,2,3]use_large_stem:TrueCustomCSPPAN:out_channels:[768,384,192]stage_num:1block_num:3act:'swish'spp:truePPYOLOEHead:fpn_strides:[32,16,8]grid_cell_scale:5.0grid_cell_offset:0.5static_assigner_epoch:100use_varifocal_loss:Trueloss_weight:{class:1.0,iou:2.5,dfl:0.5}static_assigner:name: ATSSAssigner topk:9assigner:name: TaskAlignedAssigner topk:13alpha:1.0beta:6.0nms:name: MultiClassNMS nms_top_k:1000keep_top_k:300score_threshold:0.01nms_threshold:0.7 - (新建)
(PaddleDetection/)configs/sniper/ppyoloe_crn_l_obj365.yml:_BASE_:['../datasets/sniper_visdrone_detection.yml','../runtime.yml','../ppyoloe/_base_/optimizer_1x.yml','../ppyoloe/_base_/ppyoloe_plus_crn.yml','./_base_/ppyolo_reader.yml',]log_iter:100snapshot_epoch:30use_ema:trueweights: output/ppyoloe_plus_crn_l_80e_coco/model_finalpretrain_weights:{PaddleDetection所在文件夹绝对路径}/PaddleDetection/weights/ppyoloe_crn_l_obj365_pretrained.pdparamsdepth_mult:1.0width_mult:1.0LearningRate:base_lr:0.00005schedulers:-!CosineDecaymax_epochs:29-!LinearWarmupstart_factor:0.epochs:1OptimizerBuilder:optimizer:momentum:0.9type: Momentum regularizer:factor:0.0005type: L2 (PaddleDetection/)configs/runtime.yml:use_gpu:true# 变更,不会有人拿cpu训练吧?use_xpu:falselog_iter:200save_dir: outputsnapshot_epoch:30# 变更print_flops:false# Exporting the modelexport:# 变更post_process:True# Whether post-processing is included in the network when export model.nms:True# Whether NMS is included in the network when export model.benchmark:False# It is used to testing model performance, if set `True`, post-process and NMS will not be exported.
更改上述yaml文件后,运行
> python tools/train.py -c configs/sniper/ppyoloe_crn_l_obj365.yml --use_vdl=True --vdl_log_dir=./sniper/ --eval
即可完成训练。模型参数将被保存在
(PaddleDetection/)weights/ppyoloe_crn_l_obj365_pretrained.pdparams
。
3 模型优化与导出
至此,我们训练得到了一个目标检测模型,它被存储在了飞桨参数文件
ppyoloe_crn_l_obj365_pretrained.pdparams
中。至此,算法工程师的工作——“算法设计”和“模型训练”——已经完成了。而接下来我们需要考虑的问题就是如何把这个模型变成网页上或者软件中实际可用的产品,而不只是冷冰冰的文件和命令行。
3.1 模型压缩
笔者得到的
.pdparams
文件大小是203MB,把它通过QQ上传到小组作业群里花了一分多钟——诚然,这是一个对于现代电脑以及相对高配的移动设备来说并不算是负担的数字,对于云端服务器就更不用说了。但如果我们把视角转向诸如树莓派的微型电脑,或者更小的嵌入式系统,百兆级的模型大小对于它们“寸土寸金”的存储空间来说就显得有些不可理喻了。所以怎样把模型变小也是我们需要考虑的问题。
飞桨在这里提供了一种方案:PaddleSlim,一个深度学习模型压缩库,它可以实现包含模型剪裁、定点量化、知识蒸馏、超参搜索和模型结构搜索等一系列模型压缩策略。
(由于时间关系,笔者并没有对训练得到的模型进行裁剪。这里列出笔者原计划参考的帖子https://blog.csdn.net/qq_55796594/article/details/122901306)
3.2 模型导出
.pdparams
可以用作预测时的数据支撑吗?可以,但不完全可以:
.pdparams
确实是飞桨模型的参数文件,但只是中间文件:它只存储了模型中的网络参数,但没有直接存储网络结构。脱离了PaddleDetection,甚至仅仅只是脱离了我们设置好
.yml
参数的PaddleDetection套件,它都无法使用。而我们必然不可能把整套Python环境、飞桨和PaddleDetection搬到实际使用场景的设备中,至少PaddleDetection不行。这时候我们所需要的文件就是
.pdmodel
和
.pdiparams
了——他们分别是飞桨API下的静态图模型结构和数据文件。
一般来说,
.pdmodel
和
.pdiparams
是通过paddle.jit.save方法导出的:
paddle.jit.save(
    layer:'Layer|function',# 需要存储的模型
    path:'str',# 存储模型的路径前缀
    input_spec:'list[InputSpec|Tensor]|None'=None# 模型forward方法的输入,通过InputSpec或者示例Tensor进行描述**configs)
但对于更加集成化的PaddleDetection来说,有更加直接的命令:在
PaddleDetection
路径下运行
> python tools/export_model.py \
  -c configs/sniper/ppyoloe_crn_l_obj365.yml \# 模型配置文件
  --output_dir=./inference_model \# 模型保存路径
  -o weights=weights/ppyoloe_crn_l_obj365_pretrained.pdparams \# 模型参数
  TestReader.inputs_def.image_shape=[3,1600,1600]# 模型输入大小
运行后将会在
(PaddleDetection/)inference_model/
下生成如下文件:
inference_model
└─ppyoloe_crn_l_obj365
        infer_cfg.yml
        model.pdiparams
        model.pdiparams.info
        model.pdmodel
3.3 模型推理
与导出类似,PaddleDetection还提供了模型的推理命令(在
PaddleDetection
路径下运行):
> python -u tools/infer.py \
  -c configs/sniper/ppyoloe_crn_l_obj365.yml \# 模型配置文件
  --infer_img=../MyDataset/JPEGImages/1__H2_817171_IO-NIO198M_210119A0184-1-1.jpg \# 需要被识别的图片
  --output_dir=output_inference/ppyoloe_crn_l_obj365 \# 保存绘制识别框后图片的路径
  --draw_threshold=0.5\# 可选参数:置信度阈值,用于筛选掉置信度过低的无效识别框
  -o weights=weights/ppyoloe_crn_l_obj365_pretrained \# .pdparams模型路径,但应删去.pdparams扩展名
之后便可以在
(PaddleDetection/)output_inference/ppyoloe_crn_l_obj365/1__H2_817171_IO-NIO198M_210119A0184-1-1.jpg
得到输出图片如下
当然,如果想要摆脱PaddleDetetion套件的限制,以及想要使用刚刚得到的
.pdmodel
和
.pdiparams
模型,则可以采用PaddleDetection的Python部署方案。部署方案的相关Python代码位于
(PaddleDetection/)deploy/python
路径下,但其中的推理并不依赖于PaddleDetection套件;亦即,如果条件允许,可以直接将这一文件夹下的代码单独转移到目标场景下,用以独立地实现预测功能。此时的推理命令(在
PaddleDetection
路径下运行):
> python deploy/python/infer.py \
  --model_dir=inference_model/ppyoloe_crn_l_obj365/ \# 模型路径
  --image_file=../MyDataset/JPEGImages/1__H2_817171_IO-NIO198M_210119A0184-1-1.jpg \# 需要被识别的图片
  --output_dir=output_inference/ppyoloe_crn_l_obj365 \# 保存绘制识别框后图片的路径,默认为output/
  --use_gpu=False \# 可选参数,是否使用GPU,默认为否
运行后即可得到相同(类似)的图片结果。但以上述命令进行推理时还将在命令行输出参数细节和图片框结果。笔者获得的结果如下:
-----------  Running Arguments -----------
action_file: None
batch_size: 1
camera_id: -1
combine_method: nms
cpu_threads: 1
device: cpu
enable_mkldnn: False
enable_mkldnn_bfloat16: False
image_dir: None
image_file: ../MyDataset/JPEGImages/1__H2_817171_IO-NIO198M_210119A0184-1-1.jpg
match_metric: ios
match_threshold: 0.6
model_dir: params/outest/ppyolo_r50vd_dcn_1x_sniper_visdrone/
output_dir: output_inference/ppyoloe_crn_l_obj365
overlap_ratio: [0.25, 0.25]
random_pad: False
reid_batch_size: 50
reid_model_dir: None
run_benchmark: False
run_mode: paddle
save_images: True
save_mot_txt_per_img: False
save_mot_txts: False
save_results: False
scaled: False
slice_infer: False
slice_size: [640, 640]
threshold: 0.5
tracker_config: None
trt_calib_mode: False
trt_max_shape: 1280
trt_min_shape: 1
trt_opt_shape: 640
use_coco_category: False
use_dark: True
use_gpu: False
video_file: None
window_size: 50
------------------------------------------
-----------  Model Configuration -----------
Model Arch: YOLO
Transform Order:
--transform op: Resize
--transform op: NormalizeImage
--transform op: Permute
--------------------------------------------
class_id:1, confidence:0.7155, left_top:[532.57,1597.50],right_bottom:[642.86,1661.85]{PaddleDetection所在文件夹绝对路径}\PaddleDetection\deploy\python\visualize.py:162: DeprecationWarning: textsize is deprecated and will be removed in Pillow 10(2023-07-01). Use textbbox or textlength instead.
  tw, th = draw.textsize(text)
class_id:1, confidence:0.6758, left_top:[529.68,1757.23],right_bottom:[640.74,1816.78]{PaddleDetection所在文件夹绝对路径}\PaddleDetection\deploy\python\visualize.py:162: DeprecationWarning: textsize is deprecated and will be removed in Pillow 10(2023-07-01). Use textbbox or textlength instead.
  tw, th = draw.textsize(text)
class_id:1, confidence:0.6492, left_top:[525.94,1910.72],right_bottom:[638.23,1971.16]{PaddleDetection所在文件夹绝对路径}\PaddleDetection\deploy\python\visualize.py:162: DeprecationWarning: textsize is deprecated and will be removed in Pillow 10(2023-07-01). Use textbbox or textlength instead.
  tw, th = draw.textsize(text)
class_id:1, confidence:0.6457, left_top:[426.52,1703.35],right_bottom:[531.89,1758.74]{PaddleDetection所在文件夹绝对路径}\PaddleDetection\deploy\python\visualize.py:162: DeprecationWarning: textsize is deprecated and will be removed in Pillow 10(2023-07-01). Use textbbox or textlength instead.
  tw, th = draw.textsize(text)
class_id:1, confidence:0.6313, left_top:[535.13,1440.65],right_bottom:[634.81,1496.41]{PaddleDetection所在文件夹绝对路径}\PaddleDetection\deploy\python\visualize.py:162: DeprecationWarning: textsize is deprecated and will be removed in Pillow 10(2023-07-01). Use textbbox or textlength instead.
  tw, th = draw.textsize(text)
class_id:1, confidence:0.6120, left_top:[424.67,1859.51],right_bottom:[528.17,1911.82]{PaddleDetection所在文件夹绝对路径}\PaddleDetection\deploy\python\visualize.py:162: DeprecationWarning: textsize is deprecated and will be removed in Pillow 10(2023-07-01). Use textbbox or textlength instead.
  tw, th = draw.textsize(text)
class_id:1, confidence:0.5996, left_top:[425.19,1540.68],right_bottom:[533.70,1596.24]{PaddleDetection所在文件夹绝对路径}\PaddleDetection\deploy\python\visualize.py:162: DeprecationWarning: textsize is deprecated and will be removed in Pillow 10(2023-07-01). Use textbbox or textlength instead.
  tw, th = draw.textsize(text)
class_id:1, confidence:0.5140, left_top:[270.21,1443.09],right_bottom:[305.23,1473.74]{PaddleDetection所在文件夹绝对路径}\PaddleDetection\deploy\python\visualize.py:162: DeprecationWarning: textsize is deprecated and will be removed in Pillow 10(2023-07-01). Use textbbox or textlength instead.
  tw, th = draw.textsize(text)
class_id:1, confidence:0.5099, left_top:[634.90,1496.85],right_bottom:[748.34,1558.13]{PaddleDetection所在文件夹绝对路径}\PaddleDetection\deploy\python\visualize.py:162: DeprecationWarning: textsize is deprecated and will be removed in Pillow 10(2023-07-01). Use textbbox or textlength instead.
  tw, th = draw.textsize(text)
class_id:1, confidence:0.5043, left_top:[1086.65,1580.57],right_bottom:[1131.18,1607.83]{PaddleDetection所在文件夹绝对路径}\PaddleDetection\deploy\python\visualize.py:162: DeprecationWarning: textsize is deprecated and will be removed in Pillow 10(2023-07-01). Use textbbox or textlength instead.
  tw, th = draw.textsize(text)
class_id:2, confidence:0.5508, left_top:[274.81,1181.33],right_bottom:[301.91,1208.23]{PaddleDetection所在文件夹绝对路径}\PaddleDetection\deploy\python\visualize.py:162: DeprecationWarning: textsize is deprecated and will be removed in Pillow 10(2023-07-01). Use textbbox or textlength instead.
  tw, th = draw.textsize(text)
save result to: output_inference/ppyoloe_crn_l_obj365\1__H2_817171_IO-NIO198M_210119A0184-1-1.jpg
Test iter 0
------------------ Inference Time Info ----------------------
total_time(ms): 11563.4, img_num: 1
average latency time(ms): 11563.40, QPS: 0.086480
preprocess_time(ms): 159.90, inference_time(ms): 11403.50, postprocess_time(ms): 0.00
4 模型部署
在获得了导出的模型后,本节将介绍的是如何以更加轻量级的方式将其部署在目标场景下。飞桨常见的部署场景及工具包括:
- PC-Python:见3.4节
- PC-C++
- 移动端(Android与iOS)及嵌入式Linux设备:PaddleLite
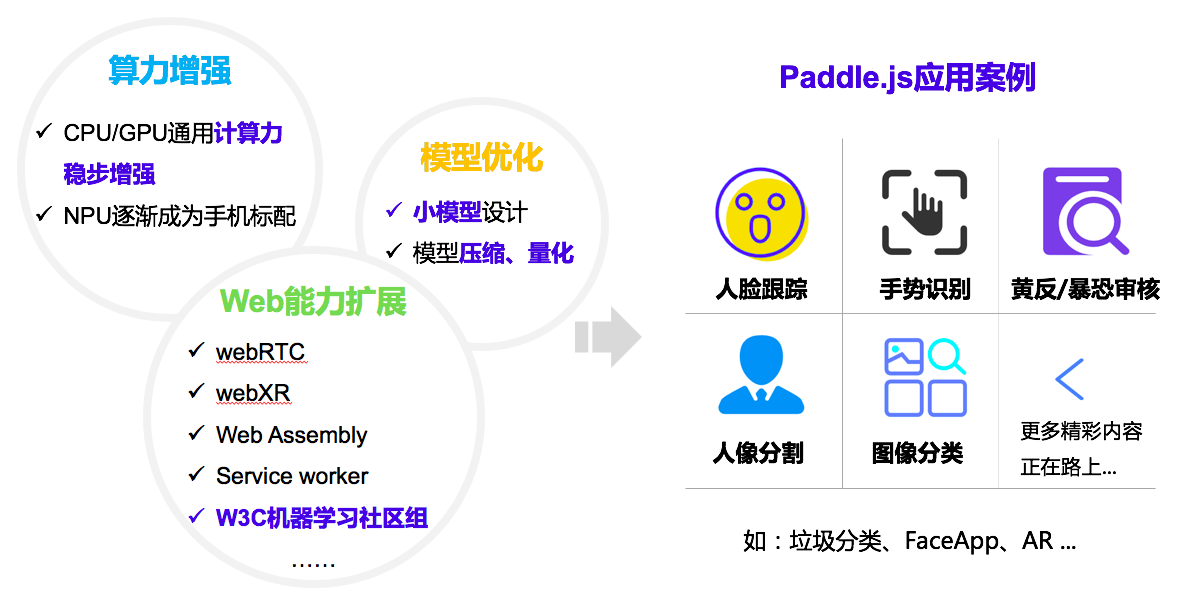
- 网页端(JavaScript及NodeJS)和微信小程序:Paddle.js
在本文中,笔者将给出一个网页端的部署方案
4.0 Paddle.js,但是好像有Bug
事实上,笔者最初的计划是采用Paddle.js进行部署,它是飞桨的web方向子项目,是一个运行在浏览器中的开源深度学习框架。但是经过笔者的尝试,Paddle.js对自定义模型的支持非常不成熟,甚至已经一定程度上影响到了部署方案的可行性。在本小节中将简单介绍笔者在尝试使用Paddle.js过程中遇到的问题,以供其他想要进一步尝试Paddle.js的开发者进行参考
4.0.1 模型转换
虽然之前我们已经进行了一次模型转换(3.2节),但是所获得的
.pdmodel和
.pdiparams模型格式仍然不为Paddle.js所兼容。这是因为
.pdmodel和
.pdiparams是以类pickle形式存储数据的,是专门面向python的,因而用于网页开发时我们需要一种更加通用的数据格式——Paddle.js所兼容的
.json模型和
.dat数据格式。
按照Paddle.js官方文档的介绍,这一转换可以通过convertToPaddleJSModel.py文件实现。理论上的操作方案是
- 命令行下载
paddlejsconverter``````pip install paddlejsconverter -i https://pypi.tuna.tsinghua.edu.cn/simple(官方文档并没有提及通过pip下载paddlejsconverter这一方式来获得convertToPaddleJSModel.py;事实上,官方文档根本没有说明如何获得这一文件,虽然这一文件位于(Paddle.js/)packages/paddlejs-converter路径下。这里的pip下载操作参考的则是同一路径下的README.md)- 通过命令行执行转换
> python convertToPaddleJSModel.py --modelPath=<.pdmodel路径,含文件名>\ --paramPath=<.pdiparams路径,含文件名>\ --outputDir=<输出路径>\ --sliceDataSize=262144\# 可选参数:.mat参数分片大小,单位为KB,默认为4096(KB) --logModelInfo=0\# 可选参数:是否输出模型结构信息,默认为0-不输出 --disableOptimize=1\# 可选参数:是否关闭模型优化,默认为0-开启优化 ---useGPUOpt=False \# 可选参数:优化模型时是否使用GPU,默认为否(在paddlejsconverter上次更新后官方文档并未同步更新,convertToPaddleJSModel.py的disableOptimize参数与旧版本相比参数名不同且定义相反! 使用该函数时参数格式应以源码及其所附README.md为准!)但事实上,
paddlejsconverter最新的1.0.8版本无法通过pip正常安装:其所依赖的paddlejslite >= 0.0.2由于未知原因并没有被飞桨发布;目前已有开发者在Paddle.js的GitHub库针对此问题发起Issue,但该问题尚未被解决- 然而
paddlejsconverter的过往版本亦不可用:作为paddlejslite >= 0.0.2的替代,过往版本依赖于paddlelite==2.7.1进行模型优化;但是,这一版本的paddlelite不知什么原因在pip上被下架了。目前pip上仅保留了paddlejsconverter各版本均不支持的2.10rc0及2.11版本一个退而求其次的解决方案是,在
(Paddle.js/)packages/paddlejs-converter路径下直接运行
convertToPaddleJSModel.py的命令。但是其缺点是,由于缺少了用于优化的
paddlelite库(及可能是尚未发布的
paddlejslite库),转换时不能使用模型优化功能,即
--disableOptimize必须被手动设置为1,这将会造成得到的模型较大。但无论如何,至少我们获得了一套可用的模型文件,其文件结构如下
{输出路径}
    ……
    chunk_1.dat # 模型数据文件
    model.json # 模型结构文件
笔者的命令行输出如下
============Convert Model Args=============
modelPath: ./model/model.pdmodel
paramPath: ./model/model.pdiparams
outputDir: ./model/
enableOptimizeModel: 0
enableLogModelInfo: 0
sliceDataSize:262144
Starting...
[33mYou choosed not to optimize model, consequently, optimizing model is skiped.[0m

Converting model...
Organizing model operators info...
Organizing model operators info successfully.
Organizing model variables info...
Organizing model variables info successfully.
Model chunkNum set successfully.
Model has more than one input feed.
['shape_3.tmp_0_slice_0', 'fill_constant_43.tmp_0', 'fill_constant_45.tmp_0']['shape_4.tmp_0_slice_0', 'fill_constant_47.tmp_0', 'fill_constant_49.tmp_0']['shape_5.tmp_0_slice_0', 'fill_constant_51.tmp_0', 'fill_constant_53.tmp_0']
Dumping model structure to json file...
Dumping model structure to json file successfully
Output No.1 binary file, remain 0 param values.
Slicing data to binary files successfully. (1 output files and 51309142 param values)
Converting model successfully.
============ALL DONE============
4.0.2 模型部署
这一部分内容笔者是直接按照Paddle.js官方文档实现的。但是无论是通过NodeJS命令
npm run init编译通过git克隆的Paddle.js源码,还是直接在html文件中通过
<scriptsrc="https://paddlejs.cdn.bcebos.com/dist/paddle.js"></script>引入Paddle.js,都会存在无法通过编译的报错。
截止文章发布,笔者并未找到相应的解决方案,所以不得不放弃以Paddle.js进行模型部署
4.1 不依赖Paddle.js的网页部署方案
虽然无法使用Paddle.js以JavaScript形式运行飞桨模型,但这并不意味着我们无法通过其他方式将飞桨模型部署在网页上。这里给出笔者的一种方案:以bash命令作为媒介连通网页前端与python在后端实现的目标检测逻辑。具体逻辑是,每次需要进行目标检测任务时:
- 通过网页开发的编程语言(JavaScript或Vue)清空指定中转文件夹内容,并将待识别图片以指定文件名存储在其中
- 网页开发语言以命令行调用python识别程序,该程序的功能是识别前述指定文件名图片文件中的齿轮瑕疵,并以新的指定文件名输出标注检测框的齿轮图片及检测结果(可以
.json等格式输出) - 若执行命令行时网页开发语言运行会被阻塞,则等待命令行执行完成即可;反之,则可以通过反复检测中转文件夹内是否存在指定文件名的输出图片来确认python程序是否执行完成
- 执行完成后,读取输出图片及文件作为结果返回 这里的python识别程序既可以是直接调用3.3节所述的
(PaddleDetection/)deploy/python/,也可以是独立编写的文件。笔者采用的是后一方案,这里给出笔者齿轮检测网络简化复现的(PaddleDetection/)deploy/python/infer.py代码
import cv2
import json
import numpy as np
import os
import paddle.inference as infer
import yaml
from PIL import Image, ImageDraw

model_dir ="./params"# 模型地址
img_path ="./input.jpg"# 待处理图片
save_path =("./output.jpg","./output.json")# 输出图片及输出json地址# visulize.py: draw_boxdefdraw_box(im, np_boxes, labels, threshold =0.5):"""
    Args:
        im (PIL.Image.Image): PIL image
        np_boxes (np.ndarray): shape:[N,6], N: number of box,
                               matix element:[class, score, x_min, y_min, x_max, y_max]
        labels (list): labels:['class1', ..., 'classn']
        threshold (float): threshold of box
    Returns:
        im (PIL.Image.Image): visualized image
    """
    draw_thickness =min(im.size)//320
    draw = ImageDraw.Draw(im)
    clsid2color ={}
    color_list = get_color_map_list(len(labels))
    expect_boxes =(np_boxes[:,1]> threshold)&(np_boxes[:,0]>-1)
    np_boxes = np_boxes[expect_boxes,:]for dt in np_boxes:
        clsid, bbox, score =int(dt[0]), dt[2:], dt[1]if clsid notin clsid2color:
            clsid2color[clsid]= color_list[clsid]
        color =tuple(clsid2color[clsid])iflen(bbox)==4:
            xmin, ymin, xmax, ymax = bbox
            print('class_id:{:d}, confidence:{:.4f}, left_top:[{:.2f},{:.2f}],''right_bottom:[{:.2f},{:.2f}]'.format(int(clsid), score, xmin, ymin, xmax, ymax))# draw bbox
            draw.line([(xmin, ymin),(xmin, ymax),(xmax, ymax),(xmax, ymin),(xmin, ymin)],
                width=draw_thickness,
                fill=color)eliflen(bbox)==8:
            x1, y1, x2, y2, x3, y3, x4, y4 = bbox
            draw.line([(x1, y1),(x2, y2),(x3, y3),(x4, y4),(x1, y1)],
                width=2,
                fill=color)
            xmin =min(x1, x2, x3, x4)
            ymin =min(y1, y2, y3, y4)# draw label
        text ="{} {:.4f}".format(labels[clsid], score)
        tw, th = draw.textsize(text)
        draw.rectangle([(xmin +1, ymin - th),(xmin + tw +1, ymin)], fill=color)
        draw.text((xmin +1, ymin - th), text, fill=(255,255,255))return im

# visulize.py: get_color_map_listdefget_color_map_list(num_classes):"""
    Args:
        num_classes (int): number of class
    Returns:
        color_map (list): RGB color list
    """
    color_map = num_classes *[0,0,0]for i inrange(0, num_classes):
        j =0
        lab = i
        while lab:
            color_map[i *3]|=(((lab >>0)&1)<<(7- j))
            color_map[i *3+1]|=(((lab >>1)&1)<<(7- j))
            color_map[i *3+2]|=(((lab >>2)&1)<<(7- j))
            j +=1
            lab >>=3
    color_map =[color_map[i:i +3]for i inrange(0,len(color_map),3)]return color_map

defmain():# ---------------- 参数获取 ----------------
    deploy_file = os.path.join(model_dir,'infer_cfg.yml')withopen(deploy_file)as f:
        yml_conf = yaml.safe_load(f)# ---------------- 读取图片与图片预处理 ----------------
    im = cv2.imread(img_path)[:,:,::-1]# infer.py: Detector.preprocess# preprocess.py: preprocess# preprocess.py: Resize
    im_scale_y =1600./float(im.shape[0])
    im_scale_x =1600./float(im.shape[1])
    im = cv2.resize(
        im,None,None,
        fx = im_scale_x,
        fy = im_scale_y,
        interpolation =2)
    new_shape = np.array(im.shape[:2]).astype('float32')# preprocess.py: NormalizeImage
    im = im.astype(np.float32, copy=False)/255.0
    im -= np.array([0.485,0.456,0.406])[np.newaxis, np.newaxis,:]
    im /= np.array([0.229,0.224,0.225])[np.newaxis, np.newaxis,:]# preprocess.py: Permute
    im = im.transpose((2,0,1)).copy()# infer.py: create_inputs
    inputs ={}
    inputs['image']= np.array((im,)).astype('float32')
    inputs['im_shape']= np.array((new_shape,)).astype('float32')
    inputs['scale_factor']= np.array((np.array([im_scale_y, im_scale_x]),)).astype('float32')# ---------------- 模型导入与预测推理 ----------------# infer.py: load_predictor(导入模型)
    infer_model = os.path.join(model_dir,'model.pdmodel')
    infer_params = os.path.join(model_dir,'model.pdiparams')

    config = infer.Config(infer_model, infer_params)
    config.disable_gpu()
    config.set_cpu_math_library_num_threads(1)
    config.disable_glog_info()
    config.enable_memory_optim()
    config.switch_use_feed_fetch_ops(False)

    predictor = infer.create_predictor(config)# preprocess.py: preprocess(输入图片)
    input_names = predictor.get_input_names()for i inrange(len(input_names)):
        input_tensor = predictor.get_input_handle(input_names[i])if input_names[i]=='x':
            input_tensor.copy_from_cpu(inputs['image'])else:
            input_tensor.copy_from_cpu(inputs[input_names[i]])# infer.py: Detector.predict()
    predictor.run()
    output_names = predictor.get_output_names()
    boxes_tensor = predictor.get_output_handle(output_names[0])
    np_boxes = boxes_tensor.copy_to_cpu()
    boxes_num = predictor.get_output_handle(output_names[1])
    np_boxes_num = boxes_num.copy_to_cpu()
    result =dict(boxes = np_boxes, masks =None, boxes_num = np_boxes_num)# infer.py: Detector.postprocess
    result ={k: v for k, v in result.items()if v isnotNone}# ---------------- 结果输出 ----------------# visulize.py: visualize_box_mask(可视化)
    im = Image.open(img_path)
    im = draw_box(im, result['boxes'], yml_conf['label_list'], threshold =.5)# 结果保存
    im.save(save_path[0])withopen(save_path[1],'w')as f:
        f.write(json.dumps([{"type":int(box[0]),"confidence": box[1:2].tolist()[0],"box": box[2:].tolist()}for box in result['boxes']if(box[1]>.5)&(box[0]>-1)]))if __name__ =="__main__":
    main()
编写以上代码所需要解决的关键问题是获取模型内所采用的图像预处理方案。笔者获取这一方案数据的方法是,在
(PaddleDetection/)deploy/python/infer.py
的
982
行添加如下
print
与
assert
语句:
……
    detector =eval(detector_func)(
        FLAGS.model_dir,
        device=FLAGS.device,
        run_mode=FLAGS.run_mode,
        batch_size=FLAGS.batch_size,
        trt_min_shape=FLAGS.trt_min_shape,
        trt_max_shape=FLAGS.trt_max_shape,
        trt_opt_shape=FLAGS.trt_opt_shape,
        trt_calib_mode=FLAGS.trt_calib_mode,
        cpu_threads=FLAGS.cpu_threads,
        enable_mkldnn=FLAGS.enable_mkldnn,
        enable_mkldnn_bfloat16=FLAGS.enable_mkldnn_bfloat16,
        threshold=FLAGS.threshold,
        output_dir=FLAGS.output_dir)# -----添加代码----print("图片预处理流程:")for i in detector.pred_config.preprocess_infos:print(i["type"],": ", i)assertFalse,"图片预处理流程:"+str(detector.pred_config.preprocess_infos)# -----########----# predict from video file or camera video streamif FLAGS.video_file isnotNoneor FLAGS.camera_id !=-1:
        detector.predict_video(FLAGS.video_file, FLAGS.camera_id)else:# predict from image
……
之后重新运行推理命令
python deploy/python/infer.py --model_dir=inference_model/ppyoloe_crn_l_obj365/ --image_file=../MyDataset/JPEGImages/1__H2_817171_IO-NIO198M_210119A0184-1-1.jpg --output_dir=output_inference/ppyoloe_crn_l_obj365
(详见3.3节),之后python就会在添加Assert处被中断,并输出图片预处理参数,以下是笔者获得的输出:
-----------  Running Arguments -----------
action_file: None
batch_size: 1
camera_id: -1
combine_method: nms
cpu_threads: 1
device: cpu
enable_mkldnn: False
enable_mkldnn_bfloat16: False
image_dir: None
image_file: ../MyDataset/JPEGImages/1__H2_817171_IO-NIO198M_210119A0184-1-1.jpg
match_metric: ios
match_threshold: 0.6
model_dir: params/outest/ppyolo_r50vd_dcn_1x_sniper_visdrone/
output_dir: output_inference/ppyoloe_crn_l_obj365
overlap_ratio: [0.25, 0.25]
random_pad: False
reid_batch_size: 50
reid_model_dir: None
run_benchmark: False
run_mode: paddle
save_images: True
save_mot_txt_per_img: False
save_mot_txts: False
save_results: False
scaled: False
slice_infer: False
slice_size: [640, 640]
threshold: 0.5
tracker_config: None
trt_calib_mode: False
trt_max_shape: 1280
trt_min_shape: 1
trt_opt_shape: 640
use_coco_category: False
use_dark: True
use_gpu: False
video_file: None
window_size: 50
------------------------------------------
-----------  Model Configuration -----------
Model Arch: YOLO
Transform Order:
--transform op: Resize
--transform op: NormalizeImage
--transform op: Permute
--------------------------------------------
图片预处理流程:
Resize :{'interp':2, 'keep_ratio': False, 'target_size':[1600, 1600], 'type':'Resize'}
NormalizeImage :{'is_scale': True, 'mean':[0.485, 0.456, 0.406], 'std':[0.229, 0.224, 0.225], 'type':'NormalizeImage'}
Permute :{'type':'Permute'}
Traceback (most recent call last):
  File "D:\Gear_Baseline\PaddleDetection\deploy\python\infer.py", line 1038, in<module>
    main()
  File "D:\Gear_Baseline\PaddleDetection\deploy\python\infer.py", line 985, in main
    assert False, "图片预处理流程:" + str(detector.pred_config.preprocess_infos)
AssertionError: 图片预处理流程:[{'interp':2, 'keep_ratio': False, 'target_size':[1600, 1600], 'type':'Resize'}, {'is_scale': True, 'mean':[0.485, 0.456, 0.406], 'std':[0.229, 0.224, 0.225], 'type':'NormalizeImage'}, {'type':'Permute'}]
detector.pred_config.preprocess_infos
对应的图像预处理实现位于
(PaddleDetection/)deploy/python/infer.py
128
行的
Detection.preprocerss(self, )
函数,其中调用了
(PaddleDetection/)deploy/python/preprocess.py
中的各图像处理类。根据相应代码推理函数调用顺序并将其复现,即可针对所需部署的模型实现图像预处理。
版权归原作者 LibraShalinward 所有, 如有侵权,请联系我们删除。