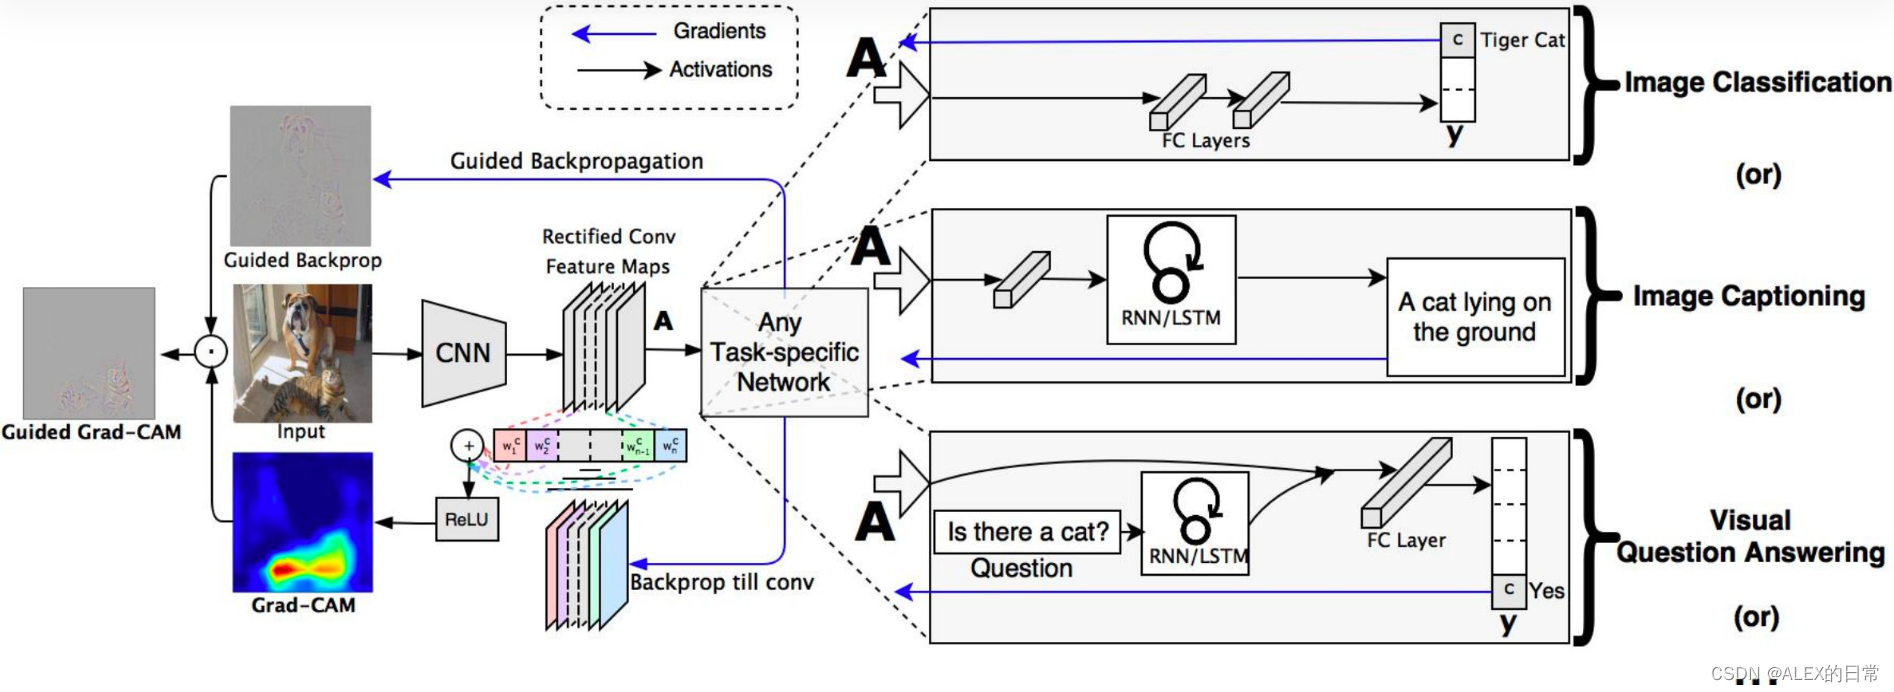
博客中代码已上传至:https://github.com/974938429/Grad-CAM
Grad-CAM是2019年发表在IJCV上的一篇文章,其目的是不更改网络结构的情况下对神经网络进行可视化的解释。笔者根据自己理解,将对源码中部分关键代码进行解释。
对Grad-CAM的调用我们封装到一个py文件中(cam_utils.py),同时在主函数代码中建立模型,加载预训练参数等操作:
1)建立模型、加载预训练参数
model = Net()
checkpoint=torch.load(args.resume, map_location='cpu') #args.resume是预设的模型路径
model.load_state_dict(checkpoint['state_dict'])

2)传入数据、对图片进行预处理
src = Image.open(args.img_src).convert('RGB') #args.img_src是预设的图片路径
data_transform = transforms.Compose([transforms.ToTensor(),
                 transforms.Normalize((0.47,0.43, 0.39), (0.27, 0.26, 0.27))])
src_tensor = data_transform(src)
src_tensor = torch.unsqueeze(src_tensor, dim=0)
#这里是因为模型接受的数据维度是[B,C,H,W],输入的只有一张图片所以需要升维

3)指定需要计算CAM的网络结构
target_layers = [model.down4] #down4()是在Net网络中__init__()方法中定义了的self.down4

4)实例化Grad-CAM类
cam = GradCAM(model=model, target_layers=target_layers, use_cuda=False)
grayscale_cam = cam(input_tensor=src_tensor, target=gt_tensor) #调用其中__call__()方法

5)可视化展示结果
cam = GradCAM(model=model, target_layers=target_layers, use_cuda=False)
grayscale_cam = cam(input_tensor=src_tensor, target=gt_tensor)

grayscale_cam = grayscale_cam[0, :]
visualization = show_cam_on_image(src.astype(dtype=np.float32) / 255.,
                                      grayscale_cam,
                                      use_rgb=True)
plt.imshow(visualization)
plt.show()
之后对cam_utils.py文件中的内容进行介绍:
class GradCAM:
    def __init__(self,
                 model,
                 target_layers,
                 reshape_transform=None,
                 use_cuda=False):
        self.model = model.eval()
        self.target_layers = target_layers
        self.reshape_transform = reshape_transform
        self.use_cuda = use_cuda
        if self.use_cuda:
            self.model = self.model.cuda()
        else:
            pass
        self.activations_and_grads = ActivationsAndGradients(self.model,
                                     target_layers, reshape_transform)
        # 实例化了ActivationsAndGradients类
我们先看一下ActivationsAndGradients中包含哪些内容(完整的cam_utils.py在github上可见):
class ActivationsAndGradients:
    # 自动调用__call__()函数,获取正向传播的特征层A和反向传播的梯度A'
    def __init__(self, model, target_layers, reshape_transform):

        # 传入模型参数,申明特征层的存储空间(self.activations)
        # 和回传梯度的存储空间(self.gradients)
        self.model = model
        self.gradients = []
        self.activations = []
        self.reshape_transform = reshape_transform
        self.handles = []

        # 注意,上文指明目标网络层是是用列表存储的(target_layers = [model.down4])
        # 源码设计的可以得到多层cam图
        # 这里注册了一个前向传播的钩子函数“register_forward_hook()”,其作用是
        # 在不改变网络结构的情况下获取某一层的输出,也就是获取正向传播的特征层
        for target_layer in target_layers:
            self.handles.append(
                target_layer.register_forward_hook(
                    self.save_activation
                )
            )

        # hasattr(object,name)返回值:如果对象有该属性返回True,否则返回False
        # 其作用是判断当前环境中是否存在该函数(解决版本不匹配的问题)
        if hasattr(target_layer, 'register_full_backward_hook'):
            self.handles.append(
                target_layer.register_full_backward_hook(self.save_gradient))
        else:
            # 注册反向传播的钩子函数“register_backward_hook”,用于存储反向传播过程中梯度图
            self.handles.append(
                target_layer.register_backward_hook(self.save_gradient))

    # 官方API文档对于register_forward_hook()函数有着类似的用法,
    # self.activations中存储了正向传播过程中的特征层
    def save_activation(self, module, input, output):
        activation = output
        if self.reshape_transform is not None:
            activation = self.reshape_transform(activation)
        self.activations.append(activation.cpu().detach())

    # 与上述类似,只不过save_gradient()存储梯度信息,值得注意的是self.gradients的存储顺序
    def save_gradient(self, model, grad_input, grad_output):
        grad = grad_output[0]
        if self.reshape_transform is not None:
            grad = self.reshape_transform(grad)
        self.gradients = [grad.cpu().detach()] + self.gradients
        # 反向传播的梯度A’放在最前,目的是与特征层顺序一致

    def __call__(self, x):
        # 自动调用,会self.model(x)开始正向传播,注意此时并没有反向传播的操作
        self.gradients = []
        self.activations = []
        return self.model(x)

    def release(self):
        for handle in self.handles:
            handle.remove()
            # handle要及时移除掉,不然会占用过多内存
可以看到,ActivationsAndGradients类主要的功能是通过钩子函数获取正向传播的特征层和反向传播的梯度图,分别应用了register_forward_hook(hook)和register_backward_hook(hook)方法。这两类钩子函数的作用是自动获取某些中间变量,因为pytorch会自动舍弃图计算中间结果。比如自变量x,中间变量y和结果z,我们在反向传播过程中输出y的梯度时会提示“None”,这就是pytorch自动舍弃的结果,我们可以通过注册钩子函数将这些中间结果获取。
register_forward_hook(hook):调用方法是“网络层结构.register_forward_hook(hook)”在相应的网络层结构正向传播时,获取其特征层,并执行自己定义好的hook函数中(其中包含model、input和output—输出特征层三个参数),来存储特征层信息。
register_backward_hook(hook):同样在指定的网络层结构执行完**.backward()函数后调用钩子函数hook(model, grad_input, grad_output)**。model是指定的网络层结构,grad_input是该层网络的所有输入的梯度(bias)、该层网络输入变量x的梯度(weight)和网络权重的梯度(x);而grad_output是指该层网络输出的梯度。
然后我们返回GradCAM类,除了__init__()方法还定义了如下方法:
class GradCAM:
    def __init__(): # 上述展示过,不再赘述
        ......
    @staticmethod
    def get_loss(output, target):
        loss = output # 直接将预测值作为Loss回传,本文展示的是语义分割的结果
        return loss

    @staticmethod
    def get_cam_weights(grads):
        # GAP全局平均池化,得到大小为[B,C,1,1]
        # 因为我们输入一张图,所以B=1,C为特征层的通道数
        return np.mean(grads, axis=(2,3), keepdims=True)

    @staticmethod
    def get_target_width_height(input_tensor):
        # 获取原图的高和宽
        width, height = input_tensor.size(-1), input_tensor.size(-2)
        return width, height

    def get_cam_image(self, activations, grads):
        # 将梯度图进行全局平均池化,weights大小为[1, C, 1, 1],在通道上具有不同权重分布
        weights = self.get_cam_weights(grads) #对梯度图进行全局平均池化
        weighted_activations = weights * activations #和原特征层加权乘
        cam = weighted_activations.sum(axis=1) # 在C维度上求和,得到大小为(1,h,w)
        return cam

    @staticmethod
    def scale_cam_img(cam, target_size=None):
        # 将cam缩放到与原始图像相同的大小,并将其值缩放到[0,1]之间
        result = []
        for img in cam: # 因为传入的目标层(target_layers)可能为复数,所以一层一层看
            img = img - np.min(img) #减去最小值
            img = img / (1e-7 + np.max(img))
            if target_size is not None:
                img = cv.resize(img, target_size)
                # 注意:cv2.resize(src, (width, height)),width在height前
            result.append(img)
        result = np.float32(result)
        return result

    def compute_cam_per_layer(self, input_tensor):
        activations_list = [a.cpu().data.numpy() for a in
                            self.activations_and_grads.activations]
        grads_list = [a.cpu().data.numpy() for a in
                      self.activations_and_grads.gradients]
        target_size = self.get_target_width_height(input_tensor)
        cam_per_target_layer = []

        for layer_activations, layer_grads in zip(activations_list, grads_list):
            # 一张一张特征图和梯度对应着处理
            cam = self.get_cam_image(layer_activations, layer_grads)
            cam[cam<0] = 0 #ReLU
            scaled = self.scale_cam_img(cam, target_size)
            # 将CAM图缩放到原图大小,然后与原图叠加,这考虑到特征图可能小于或大于原图情况
            cam_per_target_layer.append(scaled[:, None, :])
             # 在None标注的位置加入一个维度,相当于scaled.unsqueeze(1),此时scaled大小为
             # [1,1,H,W]
        return cam_per_target_layer

    def aggregate_multi_layers(self, cam_per_layer):
        cam_per_layer = np.concatenate(cam_per_layer, axis=1)
        # 在Channel维度进行堆叠,并没有做相加的处理
        cam_per_layer = np.maximum(cam_per_layer, 0)
        # 当cam_per_layer任意位置值小于0,则置为0
        result = np.mean(cam_per_layer, axis=1)
        # 在channels维度求平均,压缩这个维度,该维度返回为1
        # 也就是说如果最开始输入的是多层网络结构时,经过该方法会将这些网络结构
        # 在Channels维度上压缩,使之最后成为一张图
        return self.scale_cam_img(result)

    def __call__(self, input_tensor, target): # __init__()后自动调用__call__()方法
        # 这里的target就是目标的gt(双边缘)
        if self.use_cuda:
            input_tensor = input_tensor.cuda()
        # 正向传播的输出结果,创建ActivationsAndGradients类后调用__call__()方法,执行self.model(x)
        # 注意这里的output未经softmax,所以如果网络结构中最后的ouput不能经历激活函数
        output = self.activations_and_grads(input_tensor)[0]
        _output = output.detach().cpu()
        _output=_output.squeeze(0).squeeze(0)

        self.model.zero_grad()
        loss = self.get_loss(output, target)
        loss.backward(torch.ones_like(target), retain_graph=True)
        # 将输出结果作为Loss回传,记录回传的梯度图,
        # 梯度最大的说明在该层特征在预测过程中起到的作用最大,
        # 预测的部分展示出来就是整个网络预测时的注意力

        cam_per_layer = self.compute_cam_per_layer(input_tensor)
        # 计算每一层指定的网络结构中的cam图
        return self.aggregate_multi_layers(cam_per_layer)
        # 将指定的层结构中所有得到的cam图堆叠并压缩为一张图

    def __del__(self):
        self.activations_and_grads.release()

    def __enter__(self):
        return self

    def __exit__(self, exc_type, exc_value, exc_tb):
        self.activations_and_grads.release()
        if isinstance(exc_value, IndexError):
            # Handle IndexError here...
            print(
                f"An exception occurred in CAM with block: {exc_type}. Message: {exc_value}")
            return True
上述代码中注释部分详细解释了各个步骤,也就是说,Grad-CAM通过将输出结果作为Loss回传到网络结构中,并通过钩子函数记录了相应层结构的正向传播的特征层与反向传播的梯度图,将梯度图进行全局平均池化,作为权重乘以相应的特征层,如果权重大,说明网络结构更关注该特征层的预测情况。最后,通过将各个层结构的cam图堆叠融合,得到一张整体的网络注意力图。
整体来说,不改变层结构,通过梯度变化情况来反应神经网络对相应层结构的关注情况,进而得到注意力图,在分类网络这种黑盒程度更深的应用中,可以更好的解释其预测结果。
最后,在调用CAM.py中可视化展示:
grayscale_cam = grayscale_cam[0, :]
visualization = show_cam_on_image(src.astype(dtype=np.float32) / 255.,
                                      grayscale_cam,
                                      use_rgb=True)
plt.imshow(visualization)
plt.show()
调用的方法在cam_utils.py中也有定义:
def show_cam_on_image(img: np.ndarray,
                      mask: np.ndarray,
                      use_rgb: bool = False,
                      colormap: int = cv.COLORMAP_JET) -> np.ndarray:
    heatmap = cv.applyColorMap(np.uint8(255 * mask), colormap) #将cam的结果转成伪彩色图片
    if use_rgb:
        heatmap = cv.cvtColor(heatmap, cv.COLOR_BGR2RGB) #使用opencv方法后,得到的一般都是BGR格式,还要转化为RGB格式
        # OpenCV中图像读入的数据格式是numpy的ndarray数据格式。是BGR格式,取值范围是[0,255].
    heatmap = np.float32(heatmap) / 255. #缩放到[0,1]之间

    if np.max(img) > 1:
        raise Exception(
            "The input image should np.float32 in the range [0, 1]")
    cam = heatmap + img
    cam = cam / np.max(cam)
    return np.uint8(255*cam)
版权归原作者 ALEX的日常 所有, 如有侵权,请联系我们删除。