
经典Seq2Seq模型
写在最前面
改废了两个代码后,又找到了一个文本摘要代码
终于跑起来了
改废的两个代码:
一个是机器翻译改文本摘要,结果没跑起来。。。
一个是英文文本摘要改中文文本摘要,预测的摘要全是,,,这种
代码参考:
https://github.com/jasoncao11/nlp-notebook/tree/master/4-2.Seq2seq_Att
跪谢大佬,文本摘要的全部代码几乎都有了
只有小部分需要修改,可能是版本原因
本代码已跑通,若有问题欢迎留言,一起交流探讨
注释部分结合之前改废的代码加的,方便自己理解
如有理解不对的地方,还请过路的大佬们指点一二
Seq2Seq模型
Seq2Seq模型,地位类似于2014年Kim发表的TextCNN,2017年Google发表的Transformer。
Learning Phrase Representations using RNN Encoder–Decoder for Statistical Machine Translation(2014)
论文的内容比较简单,重点都是在讲解Seq2Seq的原理。
本篇博客将从pytorch实现Seq2Seq的角度讲解用代码逻辑理解Seq2Seq。
案例为文本摘要
参考:https://blog.csdn.net/qq_43592352/article/details/123088043
https://wmathor.com/index.php/archives/1448/
https://wmathor.com/index.php/archives/1449/
https://github.com/bentrevett/pytorch-seq2seq
https://zhuanlan.zhihu.com/p/378802926
理解seq2seq
机器翻译:把一种语言翻译成另一种语言
语音识别:把一段语音识别出来,用文字表示
两个例子都有一个共同的特点,就是我们输入一段序列,然后输出也是一段序列,很好理解,正所谓Sequence-to-sequence
编码、上下文、解码

Encoder
可以看成是编码器,对序列的每个单词(文字)进行编码处理,并通过RNN结构传递信息,最后,整句话变成了一个向量,即上图中的context
Context
Encoder最后一个RNN隐藏层的输出hn:包含了整一句话的所有信息
Decoder
解码器,这个时候的任务就相当于输入了一个带有整个句子的向量,然后输出一串序列。
Seq2Seq模型图
如下图,左边是编码器(Encoder),主要是把一个序列经过多层LSTM后转化为一个固定大小的隐藏层向量
H
H
H 。右边是解码器(Decoder),也是深层LSTM,它的输入是每次产生的词
y
i
y_i
yi 与编码器的输出
H
H
H ,解码器每次产生一个词,直到产生的词是
<EOS>
为止。
模型图以机器翻译为例(文本摘要是一回事,但机器翻译好理解一些)
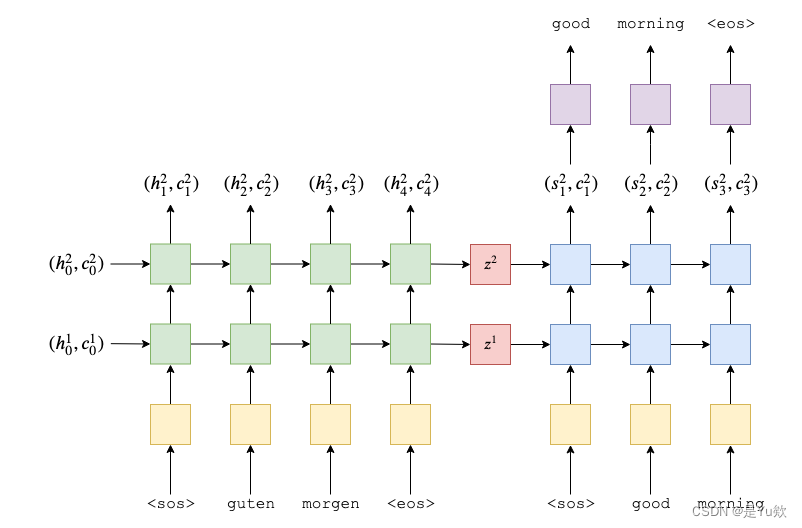
- Encoder 部分是一个双层单向LSTM
输入为 src=[batch size, src len],
经过
Embedding转换为 [batch size, src len, emb dim],
经过
encoder LSTM,输出为所有时刻的隐状态 outputs=[batch size, src len, enc hid
dim * 1] + 最后一个时刻的隐状态 hidden=[2 * 1, batch size, enc hid dim] +
最后一个时刻的 cell state=[2 * 1, batch size, enc hid dim]。hidden 和 cell state 作为 Decoder 的初始输入。
- Decoder 是一个双层单向LSTM
每个时刻接收 inputs=[batch size, 1] + Decoder 上一个时刻的隐状态 hidden + Decoder上一个时刻的 cell state,
inputs经过 embedding 转换为 embedded=[batch size, 1, emb dim],
将 embedded 和 Decoder 上一个时刻的 hidden 以及 cell state 一起传入Decoder LSTM,得到 output=[batch size, 1, dec hid dim] 和当前时刻的 hidden=[2 * 1, batch size, dec hid dim] 以及当前时刻的 cell state=[2 * 1, batch size, dec hid dim],
output 经过线性变换后
得到该时刻的预测[batch size, vocab size],
hidden 和 cell state 则继续作为 Decoder 下一个时刻的输入。
- 真实序列与预测序列之间的关系:
- 传入 Decoder 的第一个输入为起始符
<sos>,预测值填充到输出序列的第二个位置(index=1),以此类推,输出序列的第一个位置(index=0)恒为0。 真实序列与输出序列如下所示:- trg = [<sos>, y1, y2, y3,<eos>]- outputs = [0, y1’, y2’, y3’,<eos>]- 计算损失的时候,将 trg 与 outputs 的第一个元素剔除,得到如下所示:- trg = [ y1, y2, y3,
<eos>]- outputs = [y1’, y2’, y3’,<eos>]
Teacher Forcing
以翻译为例
以 Seq2Seq 为例,在训练过程中,
t
0
t_0
t0时刻 Decoder 的输入是
<SOS>
,输出可能并不是正确的结果 “the”,比方说输出了一个错误的结果 “like”。
那么到了
t
1
t_1
t1时刻,应该继续以正确的单词 “the” 作为输入,还是将上一时刻
t
0
t_0
t0的输出 “like” 作为输入呢?
上面的问题,涉及到两种完全不同的训练方式
① 不管上一时刻输出是什么,当前时刻的输入总是规定好的,
按照给定的 target 进行输入
② 当前时刻的输入和上一时刻的输出,是有关联的。即,
当前时刻的输入就是上一时刻的输出
之前的弊端
但是
第一种训练方式
存在以下的问题:
① 在解码的时候生成的字符都会受到 Ground-Truth 的约束,希望模型生成的结果都必须和参考句一一对应。这种约束在训练过程中减少模型发散,加快收敛速度。但是一方面也扼杀了翻译多样性的可能
② 在这种约束下,还会导致 Overcorrect (矫枉过正) 的问题。
一个例子:
待生成句的 Reference 为: “We should comply with the rule.”
模型在
解码阶段中途预测出来:“We should abide”
然而按照规定,将第三个 ground-truth “comply” 作为第四步的输入。那么模型根据以往学习的 pattern,有可能在第四步预测到的是 “with”
模型
最终的生成变成了 “We should abide with” 事实上,“abide with” 用法是不正确的,但是由于 ground-truth “comply” 的干扰,模型处于矫枉过正的状态,生成了不通顺的语句
如果使用
第二种方式
,其中只要一步预测错,后面的预测就会越来越跑偏,很难收敛
Teacher Forcing的论文
Teacher Forcing
正好介于上述两种训练方法之间。
训练过程中的每个时刻,
有一定概率使用上一时刻的输出作为输入,
也有一定概率使用正确的 target 作为输入
可以参考下面的伪代码
teacher_forcing_ratio =0.5
teacher_forcing = random.random()< teacher_forcing_ratio
if teacher_forcing:passelse:pass
https://arxiv.org/pdf/1506.03099.pdf
Scheduled Sampling for Sequence Prediction with Recurrent Neural Networks,是Google于2015年发表的一篇解决 exposure-bias 的论文
① 模型在训练过程中的每一个steps,有
     p


    p


p 的概率选择使用 teachering-forcing,有


     1


     −


     p


    1-p


1−p 的概率选择使用 Autoregressive。
② 模型在训练前期,
     p


    p


p 应该尽可能的大,这样能够加速收敛;而在快要结束训练的时候,


     1


     −


     p


    1-p


1−p 尽可能的小,让模型在 Autoregressive 的方案中尽可能的修复自身生成的错误。
其他论文可参考:
https://zhuanlan.zhihu.com/p/93030328
环境配置
环境这里贼坑
seq2seq模型需要跑很久,因此显卡尽可能高
(本机RTX3070平均一个epoch要跑2min30s,服务器RTX3090平均一个1s,绝绝子)
但是显卡高意味着cuda版本要高
但是本代码要求torchtext版本小于1.2大于0.9,也就是pytorch版本在1.10,所以cuda版本会相应较低
成功的环境就得是:pytorch1.1+cuda11,区间很小很容易报错
可参考之前的环境配置:
https://blog.csdn.net/WTYuong/article/details/129610709
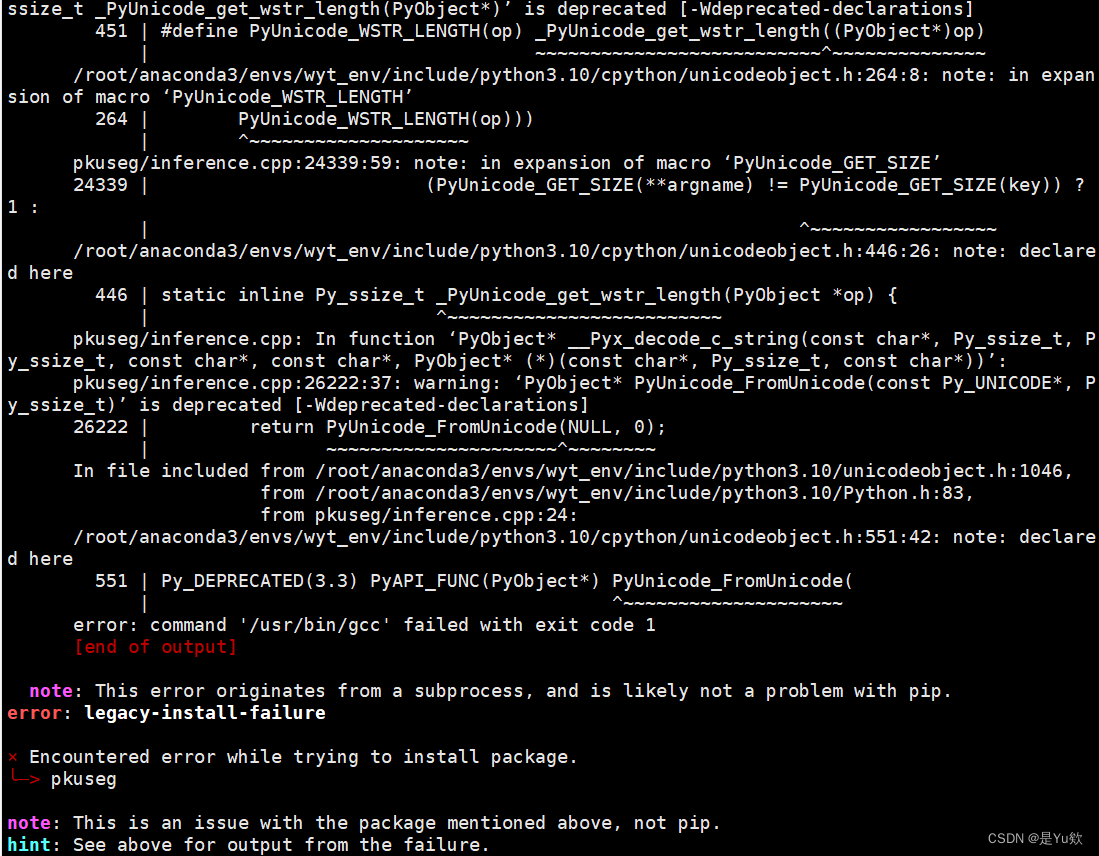
注意,pkuseg最高支持python3.8,因此需要将python降级,否则报错:
note: This error originates from a subprocess, and is likely not a
problem with pip. error: legacy-install-failure× Encountered error while trying to install package. ╰─> pkuseg
note: This is an issue with the package mentioned above, not pip.
hint: See above for output from the failure.
python降级所花时间较长,可以先干点别的事
conda install python=3.8
pip install pkuseg
特定领域的包会自动下载,但我下载失败
因此先下载
https://github.com/lancopku/pkuseg-python/releases/download/v0.0.16/medicine.zip
然后上传到目录下(记得上传解压后的文件夹)
pip install random
pip install scikit-learn # 这个需要注意
pip install pandas
pip install matplotlib
pip install tqdm
pip install openpyxl
注意,本代码要求版本小于1.2大于0.9
官方在0.9.0版本中将Field 等函数放进了legacy中,在最新版的0.12.0中移除了这个文件夹
pip install torchtext==0.11
pip install torchtext==***
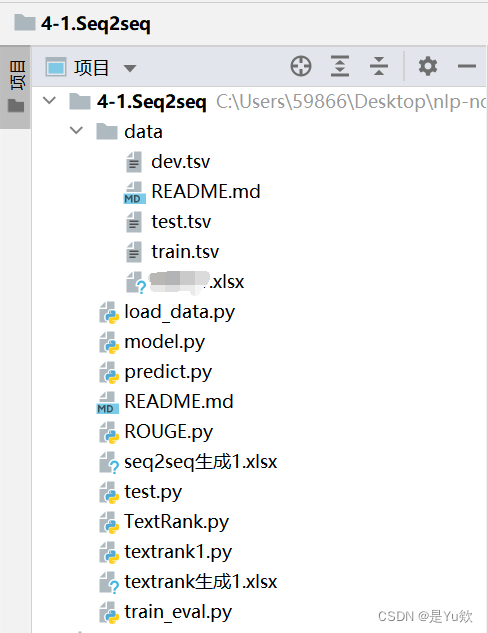
代码结构
process.py
将大佬的nlpcc数据集换成自己的
划分数据集,并保存为tsv文件
import pandas as pd
from sklearn.model_selection import train_test_split

#data:需要进行分割的数据集#random_state:设置随机种子,保证每次运行生成相同的随机数#test_size:将数据分割成训练集的比例
data = pd.read_excel('./data/数据集.xlsx')print(data)

train_set, val_set = train_test_split(data, test_size=0.2, random_state=42)

train_set.to_csv("./data/train.tsv", sep='\t')
val_set.to_csv("./data/dev.tsv", sep='\t')
load_data.py
将jieba分词,换成pkuseg的医疗领域分词(可换成其他领域)
# -*- coding: utf-8 -*-import torch
import pkuseg
from torchtext.legacy import data

device ="cuda"if torch.cuda.is_available()else'cpu'
构建分词函数tokenizer
# 医学领域分词
seg = pkuseg.pkuseg(model_name='medicine')deftokenizer(text):
    token =[tok for tok in seg.cut(text)]return token
构建数据预处理格式(Field)
在自然语言处理的预处理中有很多优秀的工具包,可以节省开发人员的开发成本。
这里使用
torchtext
,是pytorch专门用来处理文本的工具包,使用torchtext的Field函数可以构建预处理格式,这里分别对document和summary进行预处理。
Field
的部分参数如下:(标红的是常用参数)
参考:https://blog.csdn.net/bqw18744018044/article/details/109150802
squential:数据是否为序列数据,默认为Ture。如果为False,则不能使用分词。
use_vocab:是否使用词典,默认为True。如果为False,那么输入的数据类型必须是数值类型(即使用vocab转换后的)。
init_token:文本的起始字符,作为句子的开始标记。默认为None。
eos_token:文本的结束字符,默认为None。
fix_length:所有样本的长度,不够则使用pad_token补全。默认为None,表示灵活长度。
tensor_type:把数据转换成的tensor类型 默认值为torch.LongTensor。
preprocessing:预处理pipeline, 用于分词之后、数值化之前,默认值为None。
postprocessing:后处理pipeline,用于数值化之后、转换为tensor之前,默认为None。
lower:是否把数据转换为小写,默认为False;
tokenize:分词函数,可以传入之前定义的tokenize函数。默认为str.split。
tokenize必须是一个函数,其作用是给定一个字符串,该函数 以列表的形式返回分词结果 。(英文)
lower:代表是否转换成小写,为了统一处理,把所有的字符转换成小写
include_lengths:是否返回一个已经补全的最小batch的元组和和一个包含每条数据长度的列表,默认值为False。
在gpu计算中,通常是对矩阵的运算,因此每个batch中,矩阵的长度为该batch中所有数据里最长的长度,其他长度不够的数据通常用pad字符补齐,这就会导致矩阵中有很多pad字符。为了后续的计算中把这些pad字符规避掉,我们需要返回每个数据的真实长度,这里的长度是指分词后每个文本中词组的数量batch_first:batch作为第一个维度;
pad_token:用于补全的字符,默认为 < pad>。
unk_token:替换袋外词的字符,默认为 < unk>。
pad_first:是否从句子的开头进行补全,默认为False;
truncate_first:是否从句子的开头截断句子,默认为False;
stop_words:停用词;
TEXT = data.Field(tokenize=tokenizer,
                  init_token ='<sos>',
                  eos_token ='<eos>',
                  lower =True,
                  batch_first =True)
载入数据(TabularDataset)
torchtext 的TabularDataset支持直接从csv中载入数据,fileds为csv的每一列指定预处理方式
参考:https://blog.csdn.net/bqw18744018044/article/details/109150919
定义Field对象是明确如何处理不同类型的数据。而具体处理哪里的数据集,对不同的列采用不同的Field进行处理则是由Dataset对象来完成的。
torchtext的Dataset对象继承自pytorch的Dataset对象,该对象提供了下载压缩数据并解压这些数据的方法。
TabularDataset是torchtext内置的Dataset子类,其能够很方便的读取csv、json或tsv格式的文件。
缺点:首先,没有进度条来显示进度;
其次,不能自动统计元数据(例如文本平均长度等);
最后,不能提供数据集的缓存功能;
其中,skip_header代表过滤掉csv的第一行。
train, val = data.TabularDataset.splits(
        path='./data/',
        train='train.tsv',
        validation='dev.tsv',format='tsv',
        skip_header=True,
        fields=[('trg', TEXT),('src', TEXT)])
构建词表(build_vocab)
自然语言处理任务中往往将字符转换成数字,需要构建词表,用以用数字表示每个词组,并用来训练embedding。
在训练集上构建词表,频次低于min_freq的词组会被过滤。构建完词表后会自动将迭代器数据中的字符转换成单词在词表中的序号。
在这里,我们对document和summary分别单独构建了词表,也可以只构建一个词表(本文方式),使document和summary共享词表。
参数共有五个,返回值是Vocab类型实例:
iterator:一个用于创建vocab(词汇字典)的可迭代对象
min_freq:最小频数。只有在文本中出现频率大于等于min_freq的token才会被保留下来
specials:特殊标志,字符串列表。用于在词汇字典中添加一些特殊的token/标记,比如最常用的’< unk>',用于代表词汇字典中未存在的token。
special_first:表示是否将specials放到字典的最前面,默认是True
max_tokens:即限制一下这个词汇字典的最大长度。且这个长度包含的specials列表的长度
若是specials设置为了False,则直接默认加在末尾
通过该方法建立的vocab
默认按照频次从大到小
的顺序排列,若specials_first为True,则specials在最前面
max_tokens也是按照vocab的顺序,从前往后的保存,也就是说如果两个token出现的频次一样,那么在是
按照出现的顺序
来决定vocab中两个单词的顺序
一般使用< unk>时,配合set_default_index()一起使用
TEXT.build_vocab(train, min_freq=2)
id2vocab = TEXT.vocab.itos
vocab2id = TEXT.vocab.stoi
PAD_IDX = vocab2id[TEXT.pad_token]
UNK_IDX = vocab2id[TEXT.unk_token]
SOS_IDX = vocab2id[TEXT.init_token]
EOS_IDX = vocab2id[TEXT.eos_token]print("TEXT词表中前100个词:")print(TEXT.vocab.itos[:100])
构建两个词表(与上面二选一即可)
DOCUMENT.build_vocab(train, min_freq =2)
SUMMARY.build_vocab(train, min_freq =2)
此外,支持指定预训练词向量
参考:https://www.cnblogs.com/linzhenyu/p/13277552.html
自动下载对应的预训练词向量文件到当前文件夹下的.vector_cache目录下,.vector_cache为默认的词向量文件和缓存文件的目录。
TEXT.build_vocab(train, vectors=GloVe(name='6B', dim=300))
另外,可查看字典
# 查看词典(字典形式)
vocab.get_stoi()# 查看词典(字典形式)
vocab.get_stoi()
构建数据迭代器(BucketIterator)
类似于图像当中把图像数据集放到dataloader里面,文本信息采用的是torchtext里面的BucketIterator
深度学习中,训练、验证和测试通常都是批次的形式,需要构建迭代器,分批次进行计算。
这里可以使用torchtext中的BucketIterator或者Iterator自动构建迭代器。两者
区别
在于:
BucketIterator会自动将长度类似的文本归在一个batch,最大程度减少补全字符pad的数量,易于计算。
一些参数如下:
#train_iter 自动shuffle, val_iter 按照sort_key排序
train_iter, val_iter = data.BucketIterator.splits((train, val),
        batch_sizes=(256,256),# 用来排序的指标
        sort_key=lambda x:len(x.src),
        device=device)
train_data可以看上面的例子,就是一串数组。这个迭代器主要的两个功能:
1、根据我们之前建立好的词典把对应的单词转换成数字,并且转换为Tensor张量
2、它会建立batches,建立的这个batch可以减少填充padding的数量,包括原数据和目标数据
vocab.get(word, vocab.get(UNK))
这个代码片段通常用于将文本转换为数字表示(为tokenize后的句子进行转化成id),并且需要处理未知单词的情况。
- 如果word在vocab中,则返回vocab[word],也就是word对应的索引。
- 如果word不在vocab中,则返回vocab.get(UNK),也就是UNK对应的索引。如果UNK也不在vocab中,则返回None。
一种常见的做法是在词汇表中添加一个特殊的单词UNK,用于表示未知单词,然后将所有未知单词都映射为UNK的索引。
这样,当我们遇到词汇表中没有出现过的单词时,就可以将其映射为UNK的索引,而不是直接忽略它。
text ='文本内容1'# 医学领域分词
seg = pkuseg.pkuseg(model_name='medicine')
tokens =[tok for tok in seg.cut(text)]
tokens_idx =[SOS_IDX]+[vocab2id.get(word, UNK_IDX)for word in tokens]+[EOS_IDX]
tokens_idx = torch.tensor(tokens_idx)print(tokens_idx)
生成模型的输出序列
这段代码是一个基本的序列到序列模型中的解码部分,用于生成模型的输出序列。具体而言,这个代码通过模型的encoder对输入序列进行编码,然后使用模型的decoder对编码后的信息进行解码,从而生成模型的输出序列。下面是这段代码的具体解释:
res = []:创建一个空列表,用于存储模型生成的输出序列(字符串)。
encoder_outputs, hidden = model.encoder(tokens_idx.unsqueeze(0).to(device)):将输入序列(tokens_idx)通过模型的encoder进行编码。tokens_idx.unsqueeze(0)将输入序列的维度从(seq_len,)转换为(1, seq_len),以便在encoder中进行计算。这个编码过程会产生一个编码后的输出(encoder_outputs)和一个encoder的最后隐藏状态(hidden)。
inputs = torch.tensor([SOS_IDX]).to(device):创建一个包含起始标记索引的张量对象(inputs),作为decoder的第一个输入。这个起始标记用于表示序列的开始位置。
for t in range(1, 100)::循环100次,最多生成100个输出符号。
output, hidden = model.decoder(inputs, hidden, encoder_outputs):使用当前的decoder输入、encoder的隐藏状态和编码后的输出,通过decoder生成下一个输出。这个过程会产生一个输出张量(output)和一个decoder的最后隐藏状态(hidden)。
inputs = output.argmax(1):选择输出张量中概率最大的符号,并将其作为下一个decoder的输入。
word = id2vocab[inputs.item()]:将当前选择的符号(即上一步中选择的符号)转换为一个字符串,存储在word变量中。
res.append(word):将当前选择的符号添加到输出序列中。
if word == ‘’::检查当前选择的符号是否为结束符号,如果是,则退出循环。
print(‘’.join(res)):将生成的输出序列打印到屏幕上,使用空格连接所有符号,形成一个字符串。
总之,这段代码用于生成一个基本的序列到序列模型的输出序列,通过循环从decoder中不断生成下一个符号,并将其添加到输出序列中,直到生成了结束符号或达到了输出序列的最大长度。
res =[]
encoder_outputs, hidden = model.encoder(tokens_idx.unsqueeze(0).to(device))
inputs = torch.tensor([SOS_IDX]).to(device)for t inrange(1,25):
    output, hidden = model.decoder(inputs, hidden, encoder_outputs)
    inputs = output.argmax(1)
    word = id2vocab[inputs.item()]
    res.append(word)if word =='<eos>':breakprint(''.join(res))
model.py模型结构定义
模型结构定义代码
# -*- coding: utf-8 -*-import random
import torch.nn as nn
import torch
import torch.nn.functional as F
对应下面的公式
Encoder函数 编码器
Encoder函数构建一个encoder,内部RNN使用了torch内置的GRU,参数为:
input_dim:输入词表的大小
emb_dim:embedding词向量的维度
hid_dim:隐藏层的维度,即ht,ct的维度
n_layers:LSTM的层数
dropout:dropout的概率,减少过拟合
forward参数:
[batch size, src len, emb dim]src len填充后句子的长度
hidden = [n layers * n directions, batch size, hid dim][2,1,512]512:这个就是隐藏层维度
1:batchsize
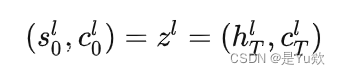
2:由于我们采用了两层的LSTM,所以输出就有2个h,然后叠在了一起
z1=(h[0],c[0]), z2=(h[1],c[1])
具体实现时,矩阵维度的变换比较繁琐,为了矩阵的运算经常需要增减维度或者交换维度的顺序,代码中已给出标注,建议自己调试一遍,感受维度变换过程。
encoder的输入为原文,输出为hidden_state,size需要设置
classEncoder(nn.Module):def__init__(self, input_dim, emb_dim, hid_dim, n_layers, dropout):super().__init__()
        self.hid_dim = hid_dim
        self.n_layers = n_layers
        self.embedding = nn.Embedding(input_dim, emb_dim)
        self.rnn = nn.LSTM(emb_dim, hid_dim, n_layers, dropout=dropout, batch_first=True)
        self.dropout = nn.Dropout(dropout)defforward(self, src):# src = [batch size, src len]# 对输入的数据进行embedding操作
        embedded = self.dropout(self.embedding(src))# embedded = [batch size, src len, emb dim]
        outputs,(hidden, cell)= self.rnn(embedded)# outputs = [batch size, src len, hid dim * n directions]# hidden = [n layers * n directions, batch size, hid dim]# cell = [n layers * n directions, batch size, hid dim]# outputs are always from the top hidden layerreturn hidden, cell
解码器

其中,
然后,我们将隐藏状态从 RNN 的顶层传递到线性层 f ,以预测目标(输出)序列中的下一个标记应该是什么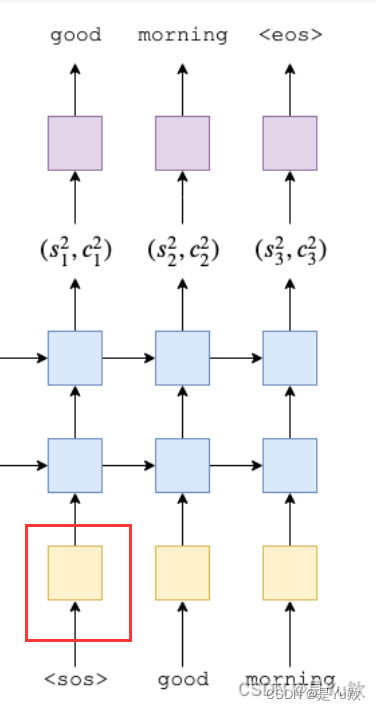
1、这里只是decoder的一部分(即一个黄色方块)
因为我们需要对它的每一个输出进行处理和预测,所以它的输入并不像encoder是一个句子,它的输入
只是一个单词
2、它的第一个输入只是
input.unsqueeze(0)
因为此时我们的输入只是一个单词,那么此时输入的维度就是[batch size]
LSTM的输入是要[句子长度,batch size],所以需要unsqueeze(0),即告诉它我们的句子长度为0
3、这个时候
output
只需要用最上一层的RNN的输出即可,所以不需要hidden,cell
classDecoder(nn.Module):def__init__(self, output_dim, emb_dim, hid_dim, n_layers, dropout):super().__init__()
        self.output_dim = output_dim
        self.hid_dim = hid_dim
        self.n_layers = n_layers
        self.embedding = nn.Embedding(output_dim, emb_dim)
        self.rnn = nn.LSTM(emb_dim, hid_dim, n_layers, dropout=dropout, batch_first=True)
        self.fc_out = nn.Linear(hid_dim, output_dim)
        self.dropout = nn.Dropout(dropout)defforward(self, inputs, hidden, cell):# inputs = [batch size]# hidden = [n layers * n directions, batch size, hid dim]# cell = [n layers * n directions, batch size, hid dim]# n directions in the decoder will both always be 1, therefore:# hidden = [n layers, batch size, hid dim]# cell = [n layers, batch size, hid dim]
        inputs = inputs.unsqueeze(1)# inputs = [batch size, 1]
        embedded = self.dropout(self.embedding(inputs))# embedded = [batch size, 1, emb dim]
        output,(hidden, cell)= self.rnn(embedded,(hidden, cell))# output = [batch size, seq len, hid dim * n directions]# hidden = [n layers * n directions, batch size, hid dim]# cell = [n layers * n directions, batch size, hid dim]# seq len and n directions will always be 1 in the decoder, therefore:# output = [batch size, 1, hid dim]# hidden = [n layers, batch size, hid dim]# cell = [n layers, batch size, hid dim]
        prediction = self.fc_out(output.squeeze(1))# prediction = [batch size, output dim]return prediction, hidden, cell
Seq2Seq
1、teacher_forcing_ratio
这里使用的ratio就表示不一定所有输入都是teacher_forcing的,有概率会出现输入由上一个输出确定,当然这不代表上一个输出都是错的。
2、输入和输出对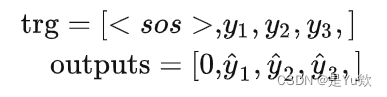
3、计算loss的时候丢掉第一位的元素: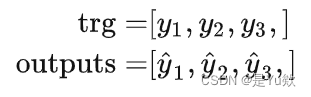
至此,我们就成功搭建好Seq2seq了
classSeq2Seq(nn.Module):def__init__(self, encoder, decoder, device):super().__init__()
        self.encoder = encoder
        self.decoder = decoder
        self.device = device
        assert encoder.hid_dim == decoder.hid_dim, \
            "Hidden dimensions of encoder and decoder must be equal!"assert encoder.n_layers == decoder.n_layers, \
            "Encoder and decoder must have equal number of layers!"defforward(self, src, trg, teacher_forcing_ratio=0.2):# src = [batch size, src len]# trg = [batch size, trg len]# teacher_forcing_ratio is probability to use teacher forcing# e.g. if teacher_forcing_ratio is 0.75 we use ground-truth inputs 75% of the time
        batch_size = trg.shape[0]
        trg_len = trg.shape[1]
        trg_vocab_size = self.decoder.output_dim
        # tensor to store decoder outputs
        outputs = torch.zeros(batch_size, trg_len, trg_vocab_size).to(self.device)# last hidden state of the encoder is used as the initial hidden state of the decoder
        hidden, cell = self.encoder(src)# first inputs to the decoder is the <sos> tokens
        inputs = trg[:,0]for t inrange(1, trg_len):# insert inputs token embedding, previous hidden and previous cell states# receive output tensor (predictions) and new hidden and cell states
            output, hidden, cell = self.decoder(inputs, hidden, cell)# place predictions in a tensor holding predictions for each token
            outputs[:, t,:]= output
            # decide if we are going to use teacher forcing or not
            teacher_force = random.random()< teacher_forcing_ratio
            # get the highest predicted token from our predictions
            top1 = output.argmax(1)# if teacher forcing, use actual next token as next inputs# if not, use predicted token
            inputs = trg[:, t]if teacher_force else top1
        return outputs
train_eval.py
模型训练+验证
# -*- coding: utf-8 -*-import torch
import torch.nn as nn
import torch.optim as optim
import matplotlib.pyplot as plt
import numpy as np
from tqdm import tqdm
from load_data import train_iter, val_iter, id2vocab, PAD_IDX
from model import Encoder, Decoder, Seq2Seq

device ="cuda"if torch.cuda.is_available()else'cpu'# device = torch.device('cuda:3')

INPUT_DIM =len(id2vocab)
OUTPUT_DIM =len(id2vocab)
ENC_EMB_DIM =256
DEC_EMB_DIM =256
HID_DIM =512
N_LAYERS =2
ENC_DROPOUT =0.5
DEC_DROPOUT =0.5
N_EPOCHS =10
CLIP =1

enc = Encoder(INPUT_DIM, ENC_EMB_DIM, HID_DIM, N_LAYERS, ENC_DROPOUT)
dec = Decoder(OUTPUT_DIM, DEC_EMB_DIM, HID_DIM, N_LAYERS, DEC_DROPOUT)

model = Seq2Seq(enc, dec, device).to(device)
权重初始化
权重初始化对于训练神经网络至关重要,好的初始化权重可以有效的避免梯度消失等问题的发生。
definit_weights(m):for name, param in m.named_parameters():
        nn.init.uniform_(param.data,-0.08,0.08)

model.apply(init_weights)
优化算法
参考:https://blog.csdn.net/kgzhang/article/details/77479737
torch.optim是一个实现了多种优化算法的包,大多数通用的方法都已支持,提供了丰富的接口调用
为了使用torch.optim,需先构造一个优化器对象Optimizer,用来保存当前的状态,并能够根据计算得到的梯度来更新参数。
要构建一个优化器optimizer,你必须给它一个可进行迭代优化的包含了所有参数(所有的参数必须是变量s)的列表。 然后,可以指定程序优化特定的选项,例如学习速率,权重衰减等。
Adam的特点有:
1、结合了Adagrad善于处理稀疏梯度和RMSprop善于处理非平稳目标的优点;
2、对内存需求较小;
3、为不同的参数计算不同的自适应学习率;
4、也适用于大多非凸优化-适用于大数据集和高维空间。
optimizer = optim.Adam(model.parameters(), lr=5e-5)# we ignore the loss whenever the target token is a padding token.
criterion = nn.CrossEntropyLoss(ignore_index=PAD_IDX)
模型训练+验证
loss_vals =[]
loss_vals_eval =[]for epoch inrange(N_EPOCHS):
    model.train()
    epoch_loss =[]
    pbar = tqdm(train_iter)
    pbar.set_description("[Train Epoch {}]".format(epoch))for batch in pbar:
        trg= batch.trg
        src = batch.src
        trg, src = trg.to(device), src.to(device)
        model.zero_grad()
        output = model(src, trg)# trg = [batch size, trg len]# output = [batch size, trg len, output dim]
        output_dim = output.shape[-1]
        output = output[:,1:,:].reshape(-1, output_dim)
        trg = trg[:,1:].reshape(-1)# trg = [(trg len - 1) * batch size]# output = [(trg len - 1) * batch size, output dim]
        loss = criterion(output, trg)
        loss.backward()
        torch.nn.utils.clip_grad_norm_(model.parameters(), CLIP)
        epoch_loss.append(loss.item())
        optimizer.step()
        pbar.set_postfix(loss=loss.item())
    loss_vals.append(np.mean(epoch_loss))

    model.eval()
    epoch_loss_eval =[]
    pbar = tqdm(val_iter)
    pbar.set_description("[Eval Epoch {}]".format(epoch))for batch in pbar:
        trg= batch.trg
        src = batch.src
        trg, src = trg.to(device), src.to(device)
        model.zero_grad()
        output = model(src, trg)# trg = [batch size, trg len]# output = [batch size, trg len, output dim]
        output_dim = output.shape[-1]
        output = output[:,1:,:].reshape(-1, output_dim)
        trg = trg[:,1:].reshape(-1)# trg = [(trg len - 1) * batch size]# output = [(trg len - 1) * batch size, output dim]
        loss = criterion(output, trg)
        epoch_loss_eval.append(loss.item())
        pbar.set_postfix(loss=loss.item())
    loss_vals_eval.append(np.mean(epoch_loss_eval))
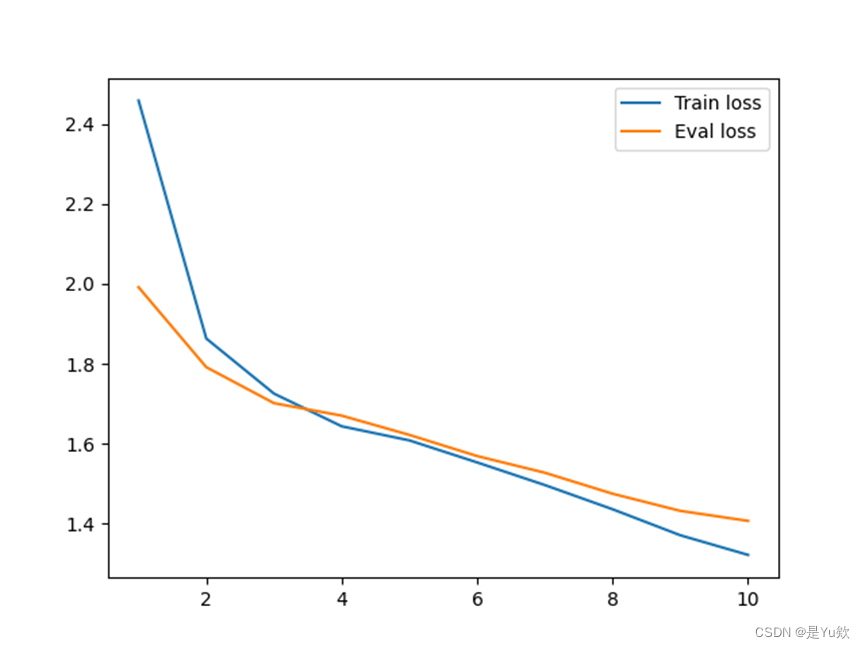
打印loss图像
torch.save(model.state_dict(),'model.pt')

l1,= plt.plot(np.linspace(1, N_EPOCHS, N_EPOCHS).astype(int), loss_vals)
l2,= plt.plot(np.linspace(1, N_EPOCHS, N_EPOCHS).astype(int), loss_vals_eval)
plt.legend(handles=[l1, l2], labels=['Train loss','Eval loss'], loc='best')

plt.show()
predict.py
预测代码
# -*- coding: utf-8 -*-import pkuseg
import torch
from load_data import UNK_IDX, SOS_IDX, EOS_IDX, vocab2id, id2vocab
from model import Encoder, Decoder, Seq2Seq

import os
os.environ['CUDA_LAUNCH_BLOCKING']='1'# 下面老是报错 shape 不一致# device = "cuda" if torch.cuda.is_available() else 'cpu'
device = torch.device('cuda:3')

INPUT_DIM =len(id2vocab)
OUTPUT_DIM =len(id2vocab)
ENC_EMB_DIM =256
DEC_EMB_DIM =256
HID_DIM =512
N_LAYERS =2
ENC_DROPOUT =0.5
DEC_DROPOUT =0.5

enc = Encoder(INPUT_DIM, ENC_EMB_DIM, HID_DIM, N_LAYERS, ENC_DROPOUT)
dec = Decoder(OUTPUT_DIM, DEC_EMB_DIM, HID_DIM, N_LAYERS, DEC_DROPOUT)

model = Seq2Seq(enc, dec, device).to(device)
model.load_state_dict(torch.load('model.pt'))
model.eval()

text ='文本摘要原文'

seg = pkuseg.pkuseg(model_name='medicine')
tokens =[tok for tok in seg.cut(text)]
tokens_idx =[SOS_IDX]+[vocab2id.get(word, UNK_IDX)for word in tokens]+[EOS_IDX]
tokens_idx = torch.tensor(tokens_idx)print(tokens_idx)

res =[]
hidden, cell = model.encoder(tokens_idx.unsqueeze(0).to(device))
inputs = torch.tensor([SOS_IDX]).to(device)for t inrange(1,35):
    output, hidden, cell = model.decoder(inputs, hidden, cell)
    inputs = output.argmax(1)
    word = id2vocab[inputs.item()]
    res.append(word)if word =='<eos>':breakprint(''.join(res))
遇到问题
问题1
对一句话的预测为
<eos><eos><eos>
原因&解决
在文本摘要中,通常用来表示句子的结束,因此,如果输出为,可能的原因有以下几种,为了解决这个问题,尝试以下方法:
- 模型生成了连续的
<eos>标记,这可能是因为模型在训练数据中经常看到连续的<eos>标记,导致模型过度地学习了这种模式。 尝试:调整模型的超参数,例如增加dropout或减小模型的层数,以减少模型的过度拟合。 - 模型生成了多个
<eos>标记,这可能是因为模型对输入的理解存在问题,认为输入中应该存在多个句子,因此在生成摘要时也生成了多个句子的结束标记。 修改模型的输入数据,例如添加标点符号或其他指示句子结束的符号,以更明确地表示句子的边界。 - 数据预处理时出现了错误,例如,在将输入数据转换为模型可接受的格式时,意外地将多个
<eos>标记添加到了输入文本的结尾,导致模型在生成摘要时也生成了多个<eos>标记。 检查数据预处理的过程,确保在将数据转换为模型可接受的格式时没有出现错误。
问题2
对一句话的预测为
<sos><sos><sos>
原因
- 数据集中存在缺失数据或标注不准确的情况,导致训练模型时出现了错误的标注,从而影响了模型的预测结果。
- 训练数据不足或数据质量不高,导致模型没有学习到正确的文本摘要生成方式,从而无法正确地预测摘要。
- 模型本身存在缺陷或设计不当,导致无法正确地学习和预测文本摘要。例如,模型可能存在过拟合、欠拟合、梯度消失、梯度爆炸等问题,从而导致预测结果不准确。
解决
可以考虑对训练数据进行清洗和预处理,增加数据的质量和数量,
重新设计模型架构和参数,
以及尝试不同的训练策略和优化算法,以提高模型的准确性和稳定性。
版权归原作者 是Yu欸 所有, 如有侵权,请联系我们删除。