业务实现之编写写入DIM层业务代码
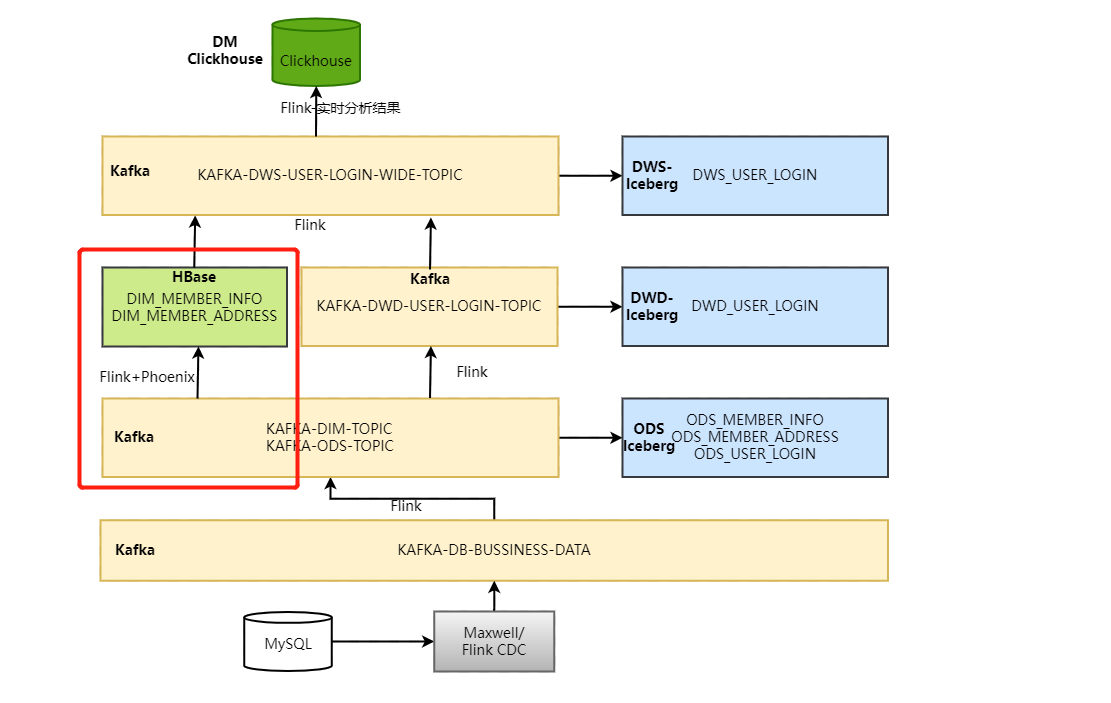
一、代码逻辑和架构图
编写代码读取Kafka “KAFKA-DIM-TOPIC” topic维度数据通过Phoenix写入到HBase中,我们可以通过topic中每条数据获取该条数据对应的phoenix表名及字段名动态创建phoenix表以及插入数据,这里所有在mysql“lakehousedb.dim_tbl_config_info”中配置的维度表都会动态的写入到HBase中。这里使用Flink处理对应topic数据时如果维度数据需要清洗还可以进行清洗


二、代码编写
读取Kafka 维度数据写入HBase代码为“DimDataToHBase.scala”,主要代码逻辑如下:
object DimDataToHBase {
  private val consumeKafkaFromEarliest: Boolean = ConfigUtil.CONSUME_KAFKA_FORMEARLIEST
  private val kafkaBrokers: String = ConfigUtil.KAFKA_BROKERS
  private val kafakDimTopic: String = ConfigUtil.KAFKA_DIM_TOPIC
  private val phoenixURL: String = ConfigUtil.PHOENIX_URL
  var ds: DataStream[String] = _

  def main(args: Array[String]): Unit = {
    val env: StreamExecutionEnvironment = StreamExecutionEnvironment.getExecutionEnvironment

    //1.导入隐式转换
    import org.apache.flink.streaming.api.scala._

    //2.设置Kafka配置
    val props = new Properties()
    props.setProperty("bootstrap.servers",kafkaBrokers)
    props.setProperty("key.deserializer",classOf[StringDeserializer].getName)
    props.setProperty("value.deserializer",classOf[StringDeserializer].getName)
    props.setProperty("group.id","mygroup.id")

    //3.从数据中获取Kafka DIM层  KAFKA-DIM-TOPIC 数据
    /**
      * 数据样例:
      *   {
      *     "gmt_create": "1646037374201",
      *     "commit": "true",
      *     "tbl_name": "mc_member_info",
      *     "type": "insert",
      *     "gmt_modified": "1646037374201",
      *     "member_level": "3",
      *     "database": "lakehousedb",
      *     "xid": "38450",
      *     "pk_col": "id",
      *     "balance": "10482",
      *     "user_id": "0uid9060",
      *     "phoenix_tbl_name": "DIM_MEMBER_INFO",
      *     "tbl_db": "lakehousedb",
      *     "member_points": "7568",
      *     "id": "10014",
      *     "cols": "user_id,member_growth_score,member_level,member_points,balance,gmt_create,gmt_modified",
      *     "table": "mc_member_info",
      *     "member_growth_score": "3028",
      *     "ts": "1646901373"
      *   }
      *
      */
      if(consumeKafkaFromEarliest){
        ds = env.addSource(MyKafkaUtil.GetDataFromKafka(kafakDimTopic,props).setStartFromEarliest())
      }else{
        ds = env.addSource(MyKafkaUtil.GetDataFromKafka(kafakDimTopic,props))
      }

    ds.keyBy(line=>{
      JSON.parseObject(line).getString("phoenix_tbl_name")
    }).process(new KeyedProcessFunction[String,String,String] {

      //设置状态,存储每个Phoenix表是否被创建
      lazy private val valueState: ValueState[String] = getRuntimeContext.getState(new ValueStateDescriptor[String]("valueState",classOf[String]))

      var conn: Connection = _
      var pst: PreparedStatement = _

      //在open方法中,设置连接Phoenix ,方便后期创建对应的phoenix表
      override def open(parameters: Configuration): Unit = {
        println("创建Phoenix 连接... ...")
        conn = DriverManager.getConnection(phoenixURL)
      }

      override def processElement(jsonStr: String, ctx: KeyedProcessFunction[String, String, String]#Context, out: Collector[String]): Unit = {

        val nObject: JSONObject = JSON.parseObject(jsonStr)
        //从json 对象中获取对应 hbase 表名、主键、列信息
        val operateType: String = nObject.getString("type")
        val phoenixTblName: String = nObject.getString("phoenix_tbl_name")
        val pkCol: String = nObject.getString("pk_col")
        val cols: String = nObject.getString("cols")

        //判断操作类型,这里只会向HBase中存入增加、修改的数据,删除等其他操作不考虑
        //operateType.equals("bootstrap-insert") 这种情况主要是使用maxwell 直接批量同步维度数据时,操作类型为bootstrap-insert
        if(operateType.equals("insert")||operateType.equals("update")||operateType.equals("bootstrap-insert")){
          //判断状态中是否有当前表状态,如果有说明已经被创建,没有就组织建表语句,通过phoenix创建维度表
          if(valueState.value() ==null){
            createPhoenixTable(phoenixTblName, pkCol, cols)
            //更新状态
            valueState.update(phoenixTblName)
          }
          //向phoenix表中插入数据,同时方法中涉及数据清洗
          upsertIntoPhoenixTable(nObject, phoenixTblName, pkCol, cols)

          /**
            *  当有维度数据更新时,那么将Redis中维度表缓存删除
            *  Redis中 key 为:维度表-主键值
            */
          if(operateType.equals("update")){
            //获取当前更新数据中主键对应的值
            val pkValue: String = nObject.getJSONObject("data").getString(pkCol)
            //组织Redis中的key
            val key = phoenixTblName+"-"+pkValue
            //删除Redis中缓存的此key对应数据,没有此key也不会报错
            MyRedisUtil.deleteKey(key)
          }
          out.collect("执行成功")
        }
      }

      private def upsertIntoPhoenixTable(nObject: JSONObject, phoenixTblName: String, pkCol: String, cols: String): Unit = {
        //获取向phoenix中插入数据所有列
        val colsList: ListBuffer[String] = MyStringUtil.getAllCols(cols)

        //获取主键对应的值
        val pkValue: String = nObject.getString(pkCol)

        //组织向表中插入数据的语句
        //upsert into test values ('1','zs',18);
        val upsertSQL = new StringBuffer(s"upsert into  ${phoenixTblName} values ('${pkValue}'")

        for (col <- colsList) {
          val currentColValue: String = nObject.getString(col)
          println("colsList = "+colsList.toString+" - current col = "+currentColValue)
          //将列数据中的 “'”符号进行转义
          upsertSQL.append(s",'${currentColValue.replace("'","\\'")}'")
        }
        upsertSQL.append(s")")

        //向表中Phoenix中插入数据
        println("phoenix 插入Sql = "+upsertSQL.toString)
        pst = conn.prepareStatement(upsertSQL.toString)

        pst.execute()

        //这里如果想要批量提交,可以设置状态,当每个key 满足1000条时,commit一次,
        // 另外定义定时器,每隔2分钟自动提交一次,防止有些数据没有达到2000条时没有存入Phoenix
        conn.commit()
      }

      private def createPhoenixTable(phoenixTblName: String, pkCol: String, cols: String): Boolean = {
        //获取所有列
        val colsList: ListBuffer[String] = MyStringUtil.getAllCols(cols)

        //组织phoenix建表语句,为了后期操作方便,这里建表语句所有列族指定为“cf",所有字段都为varchar
        //create table xxx (id varchar primary key ,cf.name varchar,cf.age varchar);
        val createSql = new StringBuffer(s"create table if not exists ${phoenixTblName} (${pkCol} varchar primary key,")
        for (col <- colsList) {
          createSql.append(s"cf.${col.replace("'","\\'")} varchar,")//处理数据中带 ' 的数据
        }
        //将最后一个逗号替换成“) column_encoded_bytes=0” ,最后这个参数是不让phoenix对数据进行16进制编码
        createSql.replace(createSql.length() - 1, createSql.length(), ") column_encoded_bytes=0")

        println(s"拼接Phoenix SQL 为 = ${createSql}")

        //执行sql
        pst = conn.prepareStatement(createSql.toString)
        pst.execute()
      }

      //关闭连接
      override def close(): Unit = {
        pst.close()
        conn.close()
      }
    }).print()

    env.execute()

  }
}
三、代码测试
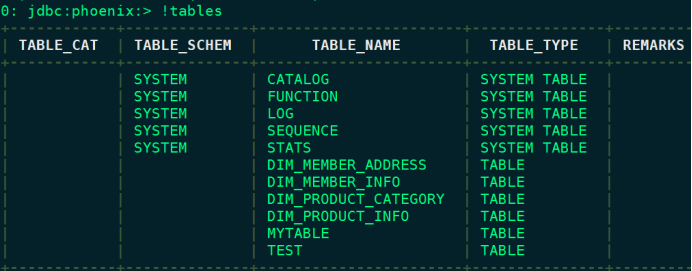
执行代码之前首先需要启动HDFS、HBase,代码中设置读取Kafka数据从头开始读取,然后执行代码,代码执行完成后可以进入phoenix中查看对应的结果
# 在node4节点上启动phoenix
[root@node4 ~]# cd /software/apache-phoenix-5.0.0-HBase-2.0-bin/bin
[root@node4 bin]# ./sqlline.py

- 📢博客主页:https://lansonli.blog.csdn.net
- 📢欢迎点赞 👍 收藏 ⭐留言 📝 如有错误敬请指正!
- 📢本文由 Lansonli 原创,首发于 CSDN博客🙉
- 📢停下休息的时候不要忘了别人还在奔跑,希望大家抓紧时间学习,全力奔赴更美好的生活✨
版权归原作者 Lansonli 所有, 如有侵权,请联系我们删除。