

ClickHouse SQL语法之DDL 操作讲解
DDL:Data Definition Language,数据库定义语言。在ClickHouse中,DDL语言中修改表结构仅支持Merge表引擎、Distributed表引擎及MergeTree家族的表引擎,SQL 中的库、表、字段严格区分大小写。
一、创建库
- 创建库基础语法:
CREATE DATABASE [IF NOT EXISTS] db_name [ON CLUSTER cluster] [ENGINE = engine(...)]
二、查看数据库
- 查看数据库语法
SHOW DATABASES;
三、删除库
- 删除库基础语法:
DROP DATABASE [IF EXISTS] db [ON CLUSTER cluster]
- 示例:
#创建库 test_db
node1 :) create database if not exists test_db;
CREATE DATABASE IF NOT EXISTS test_db
Ok.
0 rows in set. Elapsed: 0.007 sec.

#删除库
node1 :) drop database test_db;
DROP DATABASE test_db
Ok.
0 rows in set. Elapsed: 0.003 sec.
注意:在创建数据库时,在/var/lib/clickhouse/metadata/目录下会有对应的库目录和库.sql文件,库目录中会存入在当前库下建表的信息,xx.sql文件中存入的是建库的信息。如图:
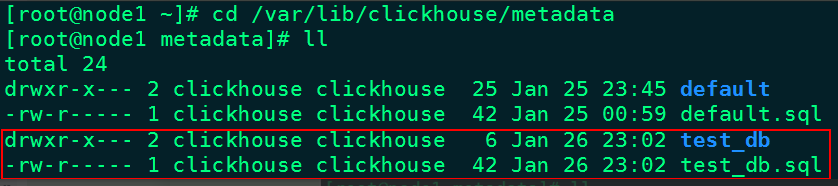
当删除数据库时,/var/lib/clickhouse/metadata/目录下对应的库目录和xx.sql文件也会被清空。
四、创建表
创建表的基本语法:
#第一种
CREATE TABLE [IF NOT EXISTS] [db.]table_name [ON CLUSTER cluster]
(
    name1 [type1] [DEFAULT|MATERIALIZED|ALIAS expr1],
    name2 [type2] [DEFAULT|MATERIALIZED|ALIAS expr2],
    ...
) ENGINE = engine

#第二种
CREATE TABLE [IF NOT EXISTS] [db.]table_name AS [db2.]name2 [ENGINE = engine]

#第三种
CREATE TABLE [IF NOT EXISTS] [db.]table_name ENGINE = engine AS SELECT ...
注意:以上普通第一种建表语句是直接创建表。第二种创建表方式可以创建一个与db2中name2一样结构的表,也可以指定表引擎,也可以不指定,不指定默认与db2中的name2表引擎一样,不会将表name2中的数据填充到对应的新表中。第三种方式可以指定引擎创建一个与Select 子句的结果相同结构的表,并将Select子句的结果填充它。
- 示例:
#第一种方式创建表
node1 :) create table if not exists newdb.t1(
:-] id UInt8 default 0 comment '编号',
:-] name String default '无姓名' comment '姓名',
:-] age UInt8 default 18 comment '年龄'
:-] )engine = TinyLog;

CREATE TABLE IF NOT EXISTS newdb.t1
(
    `id` UInt8 DEFAULT 0 COMMENT '编号',
    `name` String DEFAULT '无姓名' COMMENT '姓名',
    `age` UInt8 DEFAULT 18 COMMENT '年龄'
)
ENGINE = TinyLog
Ok.
0 rows in set. Elapsed: 0.004 sec.

# 第二种方式创建表
node1 :) create table if not exists t2 engine = Memory as newdb.t_tinylog;
CREATE TABLE IF NOT EXISTS t2 AS newdb.t_tinylog
ENGINE = Memory
Ok.
0 rows in set. Elapsed: 0.006 sec.

# 第三种方式创建表
node1 :) create table if not exists t3 engine = Memory as select * from newdb.t_tinylog where id >2;
CREATE TABLE IF NOT EXISTS t3
ENGINE = Memory AS
SELECT *
FROM newdb.t_tinylog
WHERE id > 2
Ok.
0 rows in set. Elapsed: 0.010 sec.

#查询表t3数据
node1 :) select * from t3;
SELECT *
FROM t3
┌─id─┬─name─┬─age─┐
│  3 │ 王五 │  20 │
└────┴──────┴─────┘
1 rows in set. Elapsed: 0.004 sec.
五、查看表
- 查看表语法:
SHOW TABLES;
SHOW TABLES IN default;
六、查看表的定义
- 查看表定义语法:
SHOW CREATE TABLE XXX;
- 示例:
#查看表定义
node1 :) show create table t3;
SHOW CREATE TABLE t3
┌─statement─────────────────────────────────┐
│ CREATE TABLE newdb.t3
(
    `id` UInt8,
    `Name` String
)
ENGINE = TinyLog │
└───────────────────────────────────────────┘
1 rows in set. Elapsed: 0.002 sec.
七、查看表的字段
- 查看表定义语法:
DESC XXXX;
- 示例:
#查看表t3的字段
node1 :) desc t3;
DESCRIBE TABLE t3
┌─name─┬─type───┬─default_type─┬─...
│ id   │ UInt8  │              │  ...
│ Name │ String │              │  ...
└──────┴────────┴──────────────┴──...
2 rows in set. Elapsed: 0.004 sec.
八、删除表
- 删除表的基本语法:
DROP [TEMPORARY] TABLE [IF EXISTS] [db.]name [ON CLUSTER cluster]
- 示例:
#删除表
node1 :) drop table t3;

DROP TABLE t3
Ok.
0 rows in set. Elapsed: 0.003 sec.
九、修改表
- 修改表语法
ALTER TABLE [db].name [ON CLUSTER cluster] ADD|DROP|CLEAR|COMMENT|MODIFY COLUMN ...
1、添加列
- 示例:
#使用default 库,创建表 test1,使用MergeTree引擎
node1 :) use default;
node1 :) create table test1(id UInt8,name String)engine = MergeTree() order by id partition by name;
CREATE TABLE test1
(
    `id` UInt8,
    `name` String,
    `loc` String
)
ENGINE = MergeTree()
PARTITION BY loc
ORDER BY id
Ok.
0 rows in set. Elapsed: 0.005 sec.Ok.

#查看表test1表结构
node1 :) desc test1;
DESCRIBE TABLE test1
┌─name─┬─type───┬...
│ id   │ UInt8  │...
│ name │ String │...
│ loc  │ String │...
└──────┴────────┴...
3 rows in set. Elapsed: 0.004 sec.

#添加表字段
node1 :) alter table test1 add column age UInt8;

#查看表结构,添加字段成功
node1 :) desc test1;
DESCRIBE TABLE test1
┌─name─┬─type───┬...
│ id   │ UInt8  │...
│ name │ String │...
│ loc  │ String │...
│ age  │ UInt8  │...
└──────┴────────┴...
4 rows in set. Elapsed: 0.003 sec.
2、删除列
- 示例:
#删除表test1中的name age字段
node1 :) alter table test1 drop column age;

#查看表 test1表结构
node1 :) desc test1;
DESCRIBE TABLE test1
┌─name─┬─type───┬...
│ id   │ UInt8  │...
│ name │ String │...
│ loc  │ String │...
└──────┴────────┴...
2 rows in set. Elapsed: 0.004 sec.
3、清空列
注意,不能清空排序、主键、分区字段。
- 示例:
#向表 test1中插入以下几条数据
node1 :)  insert into table test1  values (1,'张三','北京'),(2,'李四','上海'),(3,'王五','北京');

#查看表中的数据
┌─id─┬─name─┬─loc──┐
│  1 │ 张三 │ 北京 │
│  3 │ 王五 │ 北京 │
└────┴──────┴──────┘
┌─id─┬─name─┬─loc──┐
│  2 │ 李四 │ 上海 │
└────┴──────┴──────┘

#清空 test1 name列在’北京’分区的值
node1 :) alter table test1 clear column name in partition '北京';

#查看表中的数据
node1 :) select * from test1;
┌─id─┬─name─┬─loc──┐
│  1 │      │ 北京 │
│  3 │      │ 北京 │
└────┴──────┴──────┘
┌─id─┬─name─┬─loc──┐
│  2 │ 李四 │ 上海 │
└────┴──────┴──────┘

#清空 test1 name 列下的值
node1 :) alter table test1 clear column name;

#查看表中的数据
node1 :) select * from test1;
┌─id─┬─name─┬─loc──┐
│  1 │      │ 北京 │
│  3 │      │ 北京 │
└────┴──────┴──────┘
┌─id─┬─name─┬─loc──┐
│  2 │      │ 上海 │
└────┴──────┴──────┘
4、给列修改注释
- 示例:
#修改表 test1 name 列的注释
node1 :) alter table test1 comment column name '姓名';

#查看表 test1描述
┌─name─┬─type───┬─default_type─┬─default_expression─┬─comment─┬...
│ id   │ UInt8  │              │                    │         │...
│ name │ String │              │                    │ 姓名    │...
│ loc  │ String │              │                    │         │...
└──────┴────────┴──────────────┴────────────────────┴─────────┴...
5、修改列类型
- 示例:
#修改表 test1 name列类型为UInt8
node1 :) alter table test1 modify column name UInt8

#node1 :) desc test1;
┌─name─┬─type───┬─default_type─┬─default_expression─┬─comment─┬
│ id   │ UInt8  │              │                    │         │
│ name │ UInt8  │              │                    │ 姓名    │
│ loc  │ String │              │                    │         │
└──────┴────────┴──────────────┴────────────────────┴─────────┴
十、给表重命名
给表重新命名可以作用在任意的表引擎上。
- 给表重命名语法:
RENAME TABLE [db11.]name11 TO [db12.]name12, [db21.]name21 TO [db22.]name22, ... [ON CLUSTER cluster]
示例:
#创建库 testdb1
node1 :) create database testdb1;

#创建库 testdb2
node1 :) create database testdb2;

#使用库testdb1,并创建表 t1
node1 :) use testdb1;
node1 :) create table t1 (id UInt8 ,name String) engine = MergeTree() order by id ;

#将表 t1 重命名为test1
node1 :) rename table t1 to test1;

#将表test1 移动到testdb2库下,并重新命名为t2, testdb1 下没有表了
node1 :) rename table testdb1.test1 to testdb2.t2;
十一、分区表的DDL操作
ClickHouse中只有MergeTree家族引擎下的表才能分区。这里说的分区表就是MergeTree家族表引擎对应的分区表。
1、查看分区信息
- 示例:
#在newdb中创建分区表 t_partition ,使用MergeTree引擎
node1 :) create table t_partition (id UInt8,name String,age UInt8,loc String) engine = MergeTree() order by id partition by loc;

#向表 t_partition 中插入以下数据:
node1 :) insert into t_partition values (1,'张三',18,'BJ'),(2,'李四',19,'GZ'),(3,'王五',20,'BJ'),(4,'马六',21,'GZ');

#查询表 t_partition 的分区信息
node1 :) select database,table,name,partition from system.parts where table = 't_partition';
┌─database─┬─table───────┬─name───────────────────────────────────┬─partition─┐
│ newdb    │ t_partition │ 8700fff36a8bf87b6ea3eedb16d04038_2_2_0 │ GZ        │
│ newdb    │ t_partition │ e35d0ca9d946a627c9fc98b8f80391ce_1_1_0 │ BJ        │
└──────────┴─────────────┴────────────────────────────────────────┴───────────┘

#也可以在ClickHouse节点上查看分区信息,路径为:/var/lib/clickhouse/data/newdb/t_partition/,信息如下:

2、卸载分区
将指定分区的数据移动到 detached 目录。服务器会忽略被分离的数据分区。只有当你使用 ATTACH 时,服务器才会知晓这部分数据。当执行操作以后,可以对 detached 目录的数据进行任意操作,例如删除文件,或者放着不管。
- 卸载分区语法:
ALTER TABLE table_name DETACH PARTITION partition_expr
- 示例:
#卸载 表 t_partition 中 ‘BJ’分区数据
node1 :) alter table t_partition detach partition 'BJ'

#查看表 t_partition中的数据
node1 :) select * from t_partition;
┌─id─┬─name─┬─age─┬─loc─┐
│  2 │ 李四 │  19 │ GZ  │
│  4 │ 马六 │  21 │ GZ  │
└────┴──────┴─────┴─────┘

#查看表 t_partition 中的分区信息
node1 :) select database,table,name,partition from system.parts where table = 't_partition';
┌─database─┬─table───────┬─name───────────────────────────────────┬─partition─┐
│ newdb    │ t_partition │ 8700fff36a8bf87b6ea3eedb16d04038_2_2_0 │ GZ        │
└──────────┴─────────────┴────────────────────────────────────────┴───────────┘

#查看路径/var/lib/clickhouse/data/newdb/t_partition/detached中数据,发现卸载的对应分区移动到此目录中

3、装载分区
我们可以将已经卸载的分区重新装载到对应的表分区中。这里就是将detached目录中的数据重新移动到对应的表数据目录下。
也可以将卸载的分区数据加载到其他表中,但是这个表需要与原来的表具有相同的表结构及相同的分区字段。
- 装载分区数据语法:
ALTER TABLE table_name ATTACH PARTITION partition_expr
- 示例:
#将表 t_partition 对应的 ‘BJ’分区装载回来
node1 :) alter table t_partition attach partition 'BJ';

#查看表 t_partition 中的数据
node1 :) select * from t_partition;
┌─id─┬─name─┬─age─┬─loc─┐
│  1 │ 张三 │  18 │ BJ  │
│  3 │ 王五 │  20 │ BJ  │
└────┴──────┴─────┴─────┘
┌─id─┬─name─┬─age─┬─loc─┐
│  2 │ 李四 │  19 │ GZ  │
│  4 │ 马六 │  21 │ GZ  │
└────┴──────┴─────┴─────┘

#查看表 t_partition 分区信息
node1 :) select database,table,name,partition from system.parts where table = 't_partition';

4、删除分区
ClickHouse中的分区表,可以针对分区表删除某个分区,之后再导入当前分区的数据,以达到数据更新的目的。
执行删除分区命名是直接将对应分区数据删除,不会放入detached目录。该操作会将分区标记为不活跃的,然后在大约10分钟内删除全部数据。
- 删除分区语法:
ALTER TABLE table_name DROP PARTITION partition_expr
- 示例
#删除表 t_partition 中的 'BJ' 分区:
node1 :) alter table t_partition drop partition 'BJ';

#查询 t_partition 中的分区信息:
node1 :) select database,table,name,partition from system.parts where table = 't_partition';
┌─database─┬─table───────┬─name───────────────────────────────────┬─partition─┐
│ newdb    │ t_partition │ 8700fff36a8bf87b6ea3eedb16d04038_2_2_0 │ GZ        │
└──────────┴─────────────┴────────────────────────────────────────┴───────────┘
5、替换分区
替换分区支持将table1表的分区数据复制到table2表,并替换table2表的已有分区。table1表中分区数据不会被删除,table1和table2表必须要有相同的表结构且分区字段相同。这个操作经常用作数据备份、表数据同步操作。
- 替换分区语法:
ALTER TABLE table2 REPLACE PARTITION partition_expr FROM table1
- 示例:
#创建表 table1 和table2 ,使用MergeTree表引擎,并且两表结构相同
node1 :) create table table1 (id UInt8,name String,age UInt8,loc String) engine = MergeTree() order by id partition by loc;

node1 :) create table table2 (id UInt8,name String,age UInt8,loc String) engine = MergeTree() order by id partition by loc;

#向table1中插入以下数据
node1 :) insert into table1 values (1,'张三',18,'BJ'),(2,'李四',19,'GZ'),(3,'王五',20,'BJ'),(4,'马六',21,'GZ');
┌─id─┬─name─┬─age─┬─loc─┐
│  1 │ 张三 │  18 │ BJ  │
│  3 │ 王五 │  20 │ BJ  │
└────┴──────┴─────┴─────┘
┌─id─┬─name─┬─age─┬─loc─┐
│  2 │ 李四 │  19 │ GZ  │
│  4 │ 马六 │  21 │ GZ  │
└────┴──────┴─────┴─────┘

#向table2中插入以下数据
node1 :) insert into table2 values (5,'田七',22,'BJ'),(6,'赵八',23,'GZ'),(7,'李九',24,'BJ'),(8,'郑十',25,'GZ');
┌─id─┬─name─┬─age─┬─loc─┐
│  5 │ 田七 │  22 │ BJ  │
│  7 │ 李九 │  24 │ BJ  │
└────┴──────┴─────┴─────┘
┌─id─┬─name─┬─age─┬─loc─┐
│  6 │ 赵八 │  23 │  GZ │
│  8 │ 郑十 │  25 │  GZ │
└────┴──────┴─────┴─────┘

#将table1表中’BJ’分区内的数据替换到table2中
node1 :) alter table table2 replace partition 'BJ' from table1;

#查看表 table2中的数据
node1 :) select * from table2;
┌─id─┬─name─┬─age─┬─loc─┐
│  1 │ 张三 │  18 │ BJ  │
│  3 │ 王五 │  20 │ BJ  │
└────┴──────┴─────┴─────┘
┌─id─┬─name─┬─age─┬─loc─┐
│  6 │ 赵八 │  23 │ GZ  │
│  8 │ 郑十 │  25 │ GZ  │
└────┴──────┴─────┴─────┘

#查看表 table1中的数据,没有变化,不会删除 ‘BJ’ 分区的数据
node1 :) select * from table1;
┌─id─┬─name─┬─age─┬─loc─┐
│  1 │ 张三 │  18 │ BJ  │
│  3 │ 王五 │  20 │ BJ  │
└────┴──────┴─────┴─────┘
┌─id─┬─name─┬─age─┬─loc─┐
│  2 │ 李四 │  19 │ GZ  │
│  4 │ 马六 │  21 │ GZ  │
└────┴──────┴─────┴─────┘
6、移动分区
该操作将 table_source表的数据分区移动到 table_dest表,并删除table_source表的数据。
- 移动分区语法:
ALTER TABLE table_source MOVE PARTITION partition_expr TO TABLE table_dest
- 示例:
#创建表 table_source ,table_dest, 两表结构相同,都是MergeTree引擎表
node1 :) create table table_source (id UInt8,name String,age UInt8,loc String) engine = MergeTree() order by id partition by loc;

node1 :) create table table_dest (id UInt8,name String,age UInt8,loc String) engine = MergeTree() order by id partition by loc;

#向table_source 表中插入以下数据
node1 :) insert into table_source values (1,'张三',18,'BJ'),(2,'李四',19,'GZ'),(3,'王五',20,'BJ'),(4,'马六',21,'GZ');
┌─id─┬─name─┬─age─┬─loc─┐
│  1 │ 张三 │  18 │ BJ  │
│  3 │ 王五 │  20 │ BJ  │
└────┴──────┴─────┴─────┘
┌─id─┬─name─┬─age─┬─loc─┐
│  2 │ 李四 │  19 │ GZ  │
│  4 │ 马六 │  21 │ GZ  │
└────┴──────┴─────┴─────┘

#向table_dest 表中插入以下数据:
node1 :) insert into table_dest values (5,'田七',22,'BJ'),(6,'赵八',23,'GZ'),(7,'李九',24,'BJ'),(8,'郑十',25,'GZ');
┌─id─┬─name─┬─age─┬─loc─┐
│  5 │ 田七 │  22 │ BJ  │
│  7 │ 李九 │  24 │ BJ  │
└────┴──────┴─────┴─────┘
┌─id─┬─name─┬─age─┬─loc─┐
│  6 │ 赵八 │  23 │  GZ │
│  8 │ 郑十 │  25 │  GZ │
└────┴──────┴─────┴─────┘

#将表 table_source 中的分区‘BJ’的数据移动到 table_dest表中
node1 :) alter table table_source move partition 'BJ' to table table_dest;

#查看表 table_source中的数据
node1 :) select * from table_source;
┌─id─┬─name─┬─age─┬─loc─┐
│  1 │ 张三 │  18 │ BJ  │
│  3 │ 王五 │  20 │ BJ  │
└────┴──────┴─────┴─────┘
┌─id─┬─name─┬─age─┬─loc─┐
│  2 │ 李四 │  19 │ GZ  │
│  4 │ 马六 │  21 │ GZ  │
└────┴──────┴─────┴─────┘

#查看表 table_dest中的数据
node1 :) select * from table_dest;
┌─id─┬─name─┬─age─┬─loc─┐
│  6 │ 赵八 │  23 │ GZ  │
│  8 │ 郑十 │  25 │ GZ  │
└────┴──────┴─────┴─────┘
┌─id─┬─name─┬─age─┬─loc─┐
│  5 │ 田七 │  22 │ BJ  │
│  7 │ 李九 │  24 │ BJ  │
└────┴──────┴─────┴─────┘
┌─id─┬─name─┬─age─┬─loc─┐
│  1 │ 张三 │  18 │ BJ  │
│  3 │ 王五 │  20 │ BJ  │
└────┴──────┴─────┴─────┘

#手动执行 optimize 命令,合并table_dest相同分区数据
node1 :) optimize table table_dest;

#查询表 table_dest中的数据
node1 :) select * from table_dest;
┌─id─┬─name─┬─age─┬─loc─┐
│  1 │ 张三 │  18 │ BJ  │
│  3 │ 王五 │  20 │ BJ  │
│  5 │ 田七 │  22 │ BJ  │
│  7 │ 李九 │  24 │ BJ  │
└────┴──────┴─────┴─────┘
┌─id─┬─name─┬─age─┬─loc─┐
│  6 │ 赵八 │  23 │ GZ  │
│  8 │ 郑十 │  25 │ GZ  │
└────┴──────┴─────┴─────┘

#查看 table_source 表中的数据,分区‘BJ’被删除。
node1 :) select * from table_source;
┌─id─┬─name─┬─age─┬─loc─┐
│  2 │ 李四 │  19 │ GZ  │
│  4 │ 马六 │  21 │ GZ  │
└────┴──────┴─────┴─────┘
7、重置分区列
重置指定分区的特定列的值,就是将指定分区下某列的数据清空,如果建表时使用了 DEFAULT 语句,该操作会将列的值重置为该默认值。
- 重置分区列语法:
ALTER TABLE table_name CLEAR COLUMN column_name IN PARTITION partition_expr
- 示例:
#针对之前的表 table_dest中的数据进行操作,清空当前表中 ‘BJ’分区中name列
node1 :) alter table table_dest clear column name in partition 'BJ';

#查看表 table_dest中的数据
node1 :) select * from table_dest;
┌─id─┬─name─┬─age─┬─loc─┐
│  1 │      │  18 │ BJ  │
│  3 │      │  20 │ BJ  │
│  5 │      │  22 │ BJ  │
│  7 │      │  24 │ BJ  │
└────┴──────┴─────┴─────┘
┌─id─┬─name─┬─age─┬─loc─┐
│  6 │ 赵八 │  23 │ GZ  │
│  8 │ 郑十 │  25 │ GZ  │
└────┴──────┴─────┴─────┘
十二、临时表
ClickHouse支持临时表,临时表具备以下特征:
- 当会话结束或者链接中断时,临时表将随会话一起消失。
- 临时表仅能够使用Memory表引擎,创建临时表时不需要指定表引擎。
- 无法为临时表指定数据库。它是在数据库之外创建的,与会话绑定。
- 如果临时表与另一个表名称相同,那么当在查询时没有显式的指定db的情况下,将优先使用临时表。
- 对于分布式处理,查询中使用的临时表将被传递到远程服务器。
创建一个临时表:
CREATE TEMPORARY TABLE [IF NOT EXISTS] table_name [ON CLUSTER cluster]
(
    name1 [type1] [DEFAULT|MATERIALIZED|ALIAS expr1],
    name2 [type2] [DEFAULT|MATERIALIZED|ALIAS expr2],
    ...
)
注意:不需要指定表引擎,默认是Memory
- 示例:
#查看库 newdb下 表
node1 :) show tables;

SHOW TABLES
┌─name────────┐
│ t1          │
│ t2          │
│ t_log       │
│ t_stripelog │
│ t_tinylog   │
└─────────────┘
5 rows in set. Elapsed: 0.004 sec.

#查询表 t_log表数据
node1 :) select * from t_log;

SELECT *
FROM t_log
┌─id─┬─name─┬─age─┐
│  1 │ 张三 │  18 │
│  2 │ 李四 │  19 │
└────┴──────┴─────┘
┌─id─┬─name─┬─age─┐
│  3 │ 王五 │  20 │
│  4 │ 马六 │  21 │
│  5 │ 田七 │  22 │
└────┴──────┴─────┘
5 rows in set. Elapsed: 0.004 sec.

#创建临时表 t_log ,与当前库下的t_log同名
node1 :) create temporary table t_log(id UInt8 ,name String);

CREATE TEMPORARY TABLE t_log
(
    `id` UInt8,
    `name` String
)

Ok.

0 rows in set. Elapsed: 0.001 sec.

#查询表 t_log的数据与结构,发现没有数据,这里查询的是临时表,结构如下:
node1 :) desc t_log;

DESCRIBE TABLE t_log
┌─name─┬─type───┬
│ id   │ UInt8  │
│ name │ String │
└──────┴────────┴
2 rows in set. Elapsed: 0.003 sec.

#如果想要查询到库newdb下的t_log需要加上数据库名
node1 :) select * from newdb.t_log;

#切换库为default,同样还可以查询到表t_log,说明表不属于任何库
node1 :) use default;
node1 :) desc t_log;
DESCRIBE TABLE t_log
┌─name─┬─type───┬
│ id   │ UInt8  │
│ name │ String │
└──────┴────────┴
2 rows in set. Elapsed: 0.004 sec.

#退出客户端之后,重新登录,查询t_log不存在。
node1 :) select * from t_log;
Exception: Received from localhost:9000. DB::Exception: Table default.t_log doesn't exist..

#也可以不退出客户端直接删除临时表
node1 :) drop table t_log;

DROP TABLE t_log
Ok.
0 rows in set. Elapsed: 0.001 sec.
注意:在大多数情况下,临时表不是手动创建的,而是在使用外部数据进行查询或分布式时创建的,可以使用ENGINE = Memory的表代替临时表。
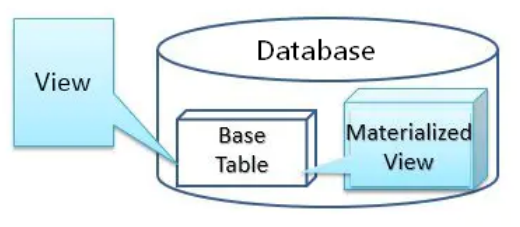
十三、视图
ClickHouse中视图分为普通视图和物化视图,两者区别如图所示:
1、普通视图
普通视图不存储数据,它只是一层select 查询映射,类似于表的别名或者同义词,能简化查询,对原有表的查询性能没有增强的作用,具体性能依赖视图定义的语句,当从视图中查询时,视图只是替换了映射的查询语句。普通视图当基表删除后不可用。
- 创建普通视图语法:
CREATE [OR REPLACE] VIEW [IF NOT EXISTS] [db.]table_name [ON CLUSTER] AS SELECT ...
- 示例:
#在库 newdb中创建表 personinfo
node1 :) create table personinfo(id UInt8,name String,age UInt8,birthday Date) engine = Log;

#向表 personinfo中插入如下数据:
node1 :) insert into personinfo values (1,'张三',18,'2022-06-01');
node1 :) insert into personinfo values (2,'李四',19,'2022-06-02');
node1 :) insert into personinfo values (3,'王五',20,'2022-06-03');
node1 :) insert into personinfo values (4,'马六',21,'2022-06-04');
node1 :) insert into personinfo values (5,'田七',22,'2022-06-05');

#查询表中的数据
node1 :) select * from personinfo;

SELECT *
FROM personinfo
┌─id─┬─name─┬─age─┬───birthday─┐
│  1 │ 张三 │  18 │ 2022-06-01 │
│  2 │ 李四 │  19 │ 2022-06-02 │
└────┴──────┴─────┴────────────┘
┌─id─┬─name─┬─age─┬───birthday─┐
│  3 │ 王五 │  20 │ 2022-06-03 │
│  4 │ 马六 │  21 │ 2022-06-04 │
│  5 │ 田七 │  22 │ 2022-06-05 │
└────┴──────┴─────┴────────────┘
5 rows in set. Elapsed: 0.004 sec.

#创建视图 person_view 映射查询子句
node1 :) create view person_view as select name,birthday from personinfo;
CREATE VIEW person_view AS
SELECT
    name,
    birthday
FROM personinfo
Ok.
0 rows in set. Elapsed: 0.009 sec.

#查询视图person_view中的数据结果
node1 :) select * from person_view;

SELECT *
FROM person_view
┌─name─┬───birthday─┐
│ 张三 │ 2022-06-01 │
│ 李四 │ 2022-06-02 │
└──────┴────────────┘
┌─name─┬───birthday─┐
│ 王五 │ 2022-06-03 │
│ 马六 │ 2022-06-04 │
│ 田七 │ 2022-06-05 │
└──────┴────────────┘
5 rows in set. Elapsed: 0.004 sec.

#删除视图 使用drop即可
node1 :) drop table person_view;

DROP TABLE person_view
Ok.
0 rows in set. Elapsed: 0.002 sec.
2、物化视图
物化视图是查询结果集的一份持久化存储,所以它与普通视图完全不同,而非常趋近于表。”查询结果集”的范围很宽泛,可以是基础表中部分数据的一份简单拷贝,也可以是多表join之后产生的结果或其子集,或者原始数据的聚合指标等等。
物化视图创建好之后,若源表被写入新数据则物化视图也会同步更新,POPULATE 关键字决定了物化视图的更新策略,若有POPULATE 则在创建视图的过程会将源表已经存在的数据一并导入,类似于 create table ... as,若无POPULATE 则物化视图在创建之后没有数据,只会在创建只有同步之后写入源表的数据,clickhouse 官方并不推荐使用populated,因为在创建物化视图的过程中同时写入的数据不能被插入物化视图。
物化视图是种特殊的数据表,创建时需要指定引擎,可以用show tables 查看。另外,物化视图不支持alter 操作。
产生物化视图的过程就叫做“物化”(materialization),广义地讲,物化视图是数据库中的预计算逻辑+显式缓存,典型的空间换时间思路,所以用得好的话,它可以避免对基础表的频繁查询并复用结果,从而显著提升查询的性能。
- 物化视图创建语法:
CREATE MATERIALIZED VIEW [IF NOT EXISTS] [db.]table_name [ON CLUSTER] [TO[db.]name] [ENGINE = engine] [POPULATE] AS SELECT ...
- 示例:
#在库 newdb 中创建物化视图 t_view1
node1 :) create materialized view  t_view1 engine = Log as select * from personinfo;

#查询 所有表
node1 :) show tables;

SHOW TABLES
┌─name───────────┐
│ .inner.t_view1 │
│ personinfo     │
└────────────────┘
2 rows in set. Elapsed: 0.004 sec.

#向表 personinfo中插入如下数据:
node1 :) insert into personinfo values (1,'张三',18,'2022-06-01');
node1 :) insert into personinfo values (2,'李四',19,'2022-06-02');
node1 :) insert into personinfo values (3,'王五',20,'2022-06-03');
node1 :) insert into personinfo values (4,'马六',21,'2022-06-04');
node1 :) insert into personinfo values (5,'田七',22,'2022-06-05');

#查看物化视图 t_view1数据
node1 :) select * from t_view1;

SELECT *
FROM t_view1
┌─id─┬─name─┬─age─┬───birthday─┐
│  1 │ 张三 │  18 │ 2022-06-01 │
│  2 │ 李四 │  19 │ 2022-06-02 │
└────┴──────┴─────┴────────────┘
┌─id─┬─name─┬─age─┬───birthday─┐
│  3 │ 王五 │  20 │ 2022-06-03 │
│  4 │ 马六 │  21 │ 2022-06-04 │
│  5 │ 田七 │  22 │ 2022-06-05 │
└────┴──────┴─────┴────────────┘
5 rows in set. Elapsed: 0.004 sec.

#创建物化视图 t_view2
node1 :) create materialized view  t_view2 engine = Log as select count(name) as cnt from personinfo;

#向表 personinfo中插入以下数据
node1 :) insert into personinfo values (6,'赵八',23,'2022-06-06'),(7,'孙九',22,'2022-06-07');

#查询物化视图表 t_view2数据,可以看到做了预计算,这里不能一条条插入,不然效果是每条数据都会生成一个结果。
node1 :) select * from t_view2;

SELECT *
FROM t_view2
┌─cnt─┐
│   2 │
└─────┘
1 rows in set. Elapsed: 0.004 sec.

#删除物化视图
node1 :) drop table t_view2;
DROP TABLE t_view2
Ok.
0 rows in set. Elapsed: 0.001 sec.
注意:当创建好物化视图t_view1时,可以进入到/var/lib/clickhouse/data/newdb目录下看到%2Einner%2Et_view1目录,当物化视图中同步基表数据时,目录中有对应的列文件和元数据记录文件,与普通创建表一样,有目录结构。
- 📢博客主页:https://lansonli.blog.csdn.net
- 📢欢迎点赞 👍 收藏 ⭐留言 📝 如有错误敬请指正!
- 📢本文由 Lansonli 原创,首发于 CSDN博客🙉
- 📢停下休息的时候不要忘了别人还在奔跑,希望大家抓紧时间学习,全力奔赴更美好的生活✨
版权归原作者 Lansonli 所有, 如有侵权,请联系我们删除。