不知为何,现在大多数的 docker hub 镜像加速站都停止服务,而官方站点又因某些原因访问不到或延迟很高。所以,今天来记录一种通过 CloudFlare 搭建一个自己的镜像加速服务。
0、必看!!!
注意: 此方案需要有域名才行,后续需要给域名绑定到 Cloudflare,建议直接在腾讯云-域名注册上面搞一个,选最便宜的就行。

1、注册 cloudflare
进入官网,自行进行注册操作
https://dash.cloudflare.com/
1.1 修改 DNS
找到你的域名注册商,然后修改 DNS 为
phil.ns.cloudflare.com
和
marjory.ns.cloudflare.com
,这样才能绑定到 cloudflare
1.2 绑定域名
打开 cloudflare,绑定站点,选择免费。
注册后绑定一个域名,这个域名的 DNS 需要设置 cloudflare 的才能绑定成功。
2、新建 workers
在左侧 workers and pages,然后新建,名字随便起。没有过多的配置,直接完成!


3、编辑代码
3.1 编辑代码
点击右上角的
编辑代码
,进入

3.2 新建 index.html
如果所示,代码里面的
docker.xxoo.team
请替换成你自己的域名。

<!DOCTYPEhtml><htmllang="en"><head><metacharset="UTF-8"><metaname="viewport"content="width=device-width, initial-scale=1.0"><title>镜像使用说明</title><style>body{font-family: -apple-system, BlinkMacSystemFont,"Segoe UI", Roboto,"Helvetica Neue", Arial, sans-serif;margin: 0;padding: 0;background-color: #f0f2f5;display: flex;flex-direction: column;min-height: 100vh;}.header{background:linear-gradient(90deg, #4e54c8 0%, #8f94fb 100%);color: white;text-align: center;padding: 20px 0;}.container{flex: 1;display: flex;justify-content: center;align-items: center;padding: 20px;}.content{background: white;border-radius: 8px;box-shadow: 0 0 10px rgba(0, 0, 0, 0.1);padding: 20px;max-width: 800px;/* 调整后的宽度 */width: 100%;font-size: 16px;/* 放大字体 */}.code-block{background: #2d2d2d;color: #f8f8f2;padding: 10px;border-radius: 8px;margin: 10px 0;overflow-x: auto;font-family:"Courier New", Courier, monospace;/* 保持代码块的字体 */}.footer{background: #444;color: white;text-align: center;padding: 5px 0;/* 调低高度 */}.footer a{color: #4caf50;text-decoration: none;}@media(max-width: 600px){.content{padding: 10px;font-size: 14px;/* 在小屏幕上稍微减小字体 */}}</style></head><body><divclass="header"><h1>镜像使用说明</h1></div><divclass="container"><divclass="content"><p>要设置加速镜像服务,你可以执行下面命令:</p><divclass="code-block"><pre>
sudo tee /etc/docker/daemon.json <<EOF
{
"registry-mirrors": ["https://docker.xxoo.team"]
}
EOF
</pre></div><p>如果执行了上述命令,配置了镜像加速服务,可以直接 pull 镜像:</p><divclass="code-block"><pre>
docker pull halohub/halo:latest # 拉取 halo 镜像
</pre></div><p>因为Workers用量有限,在使用加速镜像服务时,你可以手动 pull 镜像然后 re-tag 之后 push 至本地镜像仓库:</p><divclass="code-block"><pre>
docker pull docker.xxoo.team/halohub/halo:latest # 拉取 halo 镜像
</pre></div></div></div><divclass="footer"><p>Powered by Cloudflare Workers</p><p><ahref="https://www.xxoo.team">www.xxoo.team</a></p></div></body></html>
3.3 修改 worker.js

importHTMLfrom'./index.html';exportdefault{asyncfetch(request){const url =newURL(request.url);const path = url.pathname;const originalHost = request.headers.get("host");const registryHost ="registry-1.docker.io";if(path.startsWith("/v2/")){const headers =newHeaders(request.headers);
        headers.set("host", registryHost);const registryUrl =`https://${registryHost}${path}`;const registryRequest =newRequest(registryUrl,{method: request.method,headers: headers,body: request.body,redirect:"follow",});const registryResponse =awaitfetch(registryRequest);
        console.log(registryResponse.status);const responseHeaders =newHeaders(registryResponse.headers);
        responseHeaders.set("access-control-allow-origin", originalHost);
        responseHeaders.set("access-control-allow-headers","Authorization");returnnewResponse(registryResponse.body,{status: registryResponse.status,statusText: registryResponse.statusText,headers: responseHeaders,});}else{returnnewResponse(HTML.replace(/{{host}}/g, originalHost),{status:200,headers:{"content-type":"text/html"}});}}}
3.4 保存
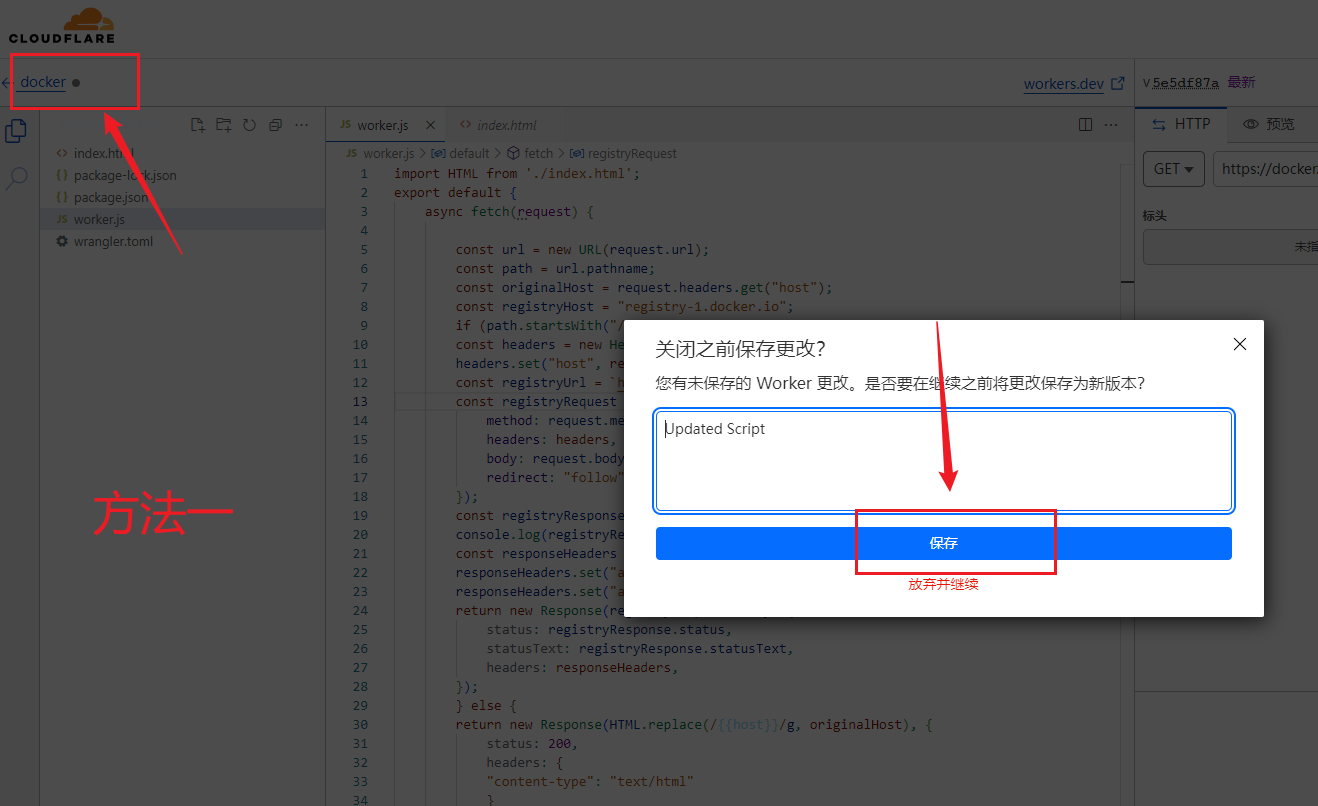
一定要保存!!!一定要保存!!!一定要保存!!!一定要保存!!!
方法一(推荐): 选点左上角返回,会提示你保存
方法二: 点击右上角的下拉保存
4、部署
直接弹出部署,不用填任何东西,即可

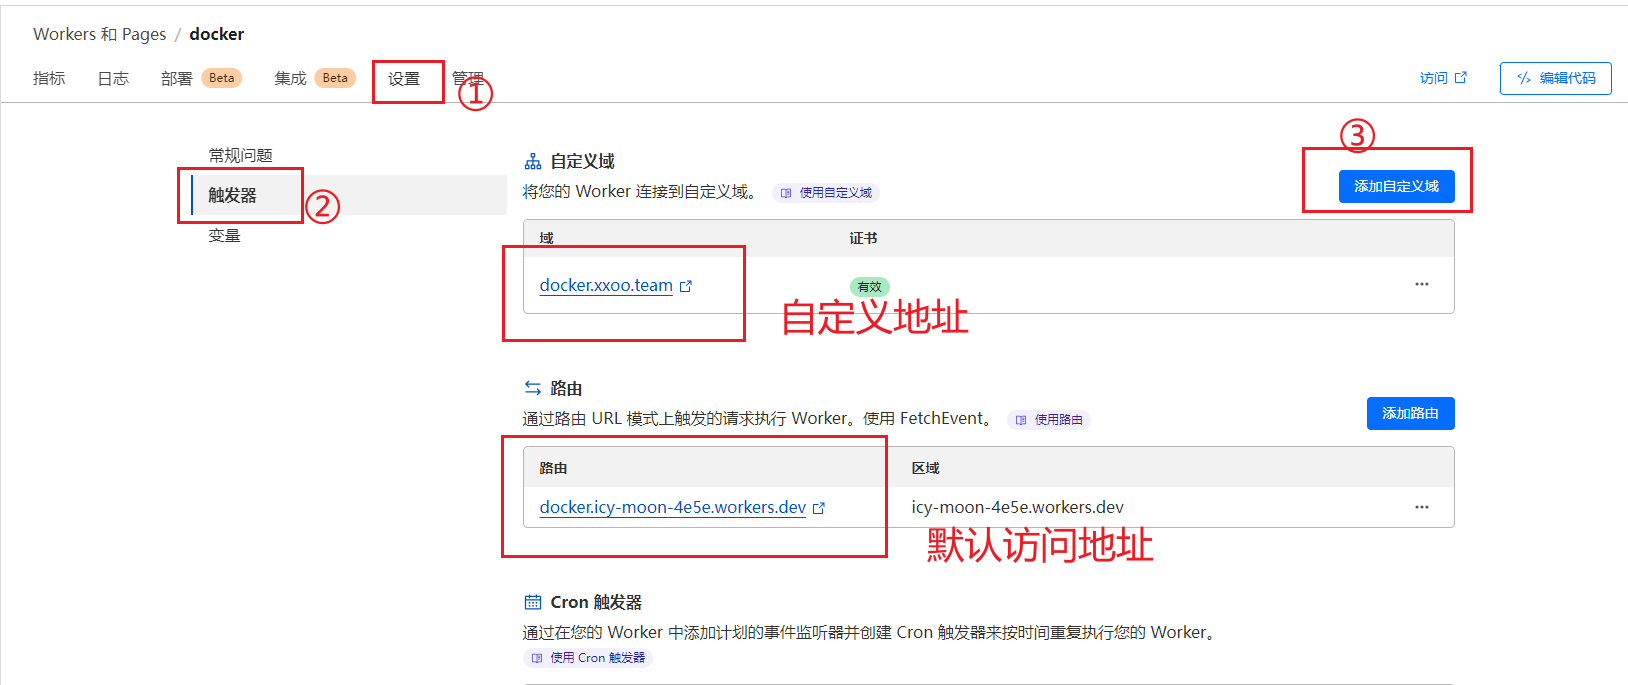
5、绑定域名
系统默认分配的有域名,被墙无法访问,所以只能用自己的域名才行。
绑定成功需要等待几分钟,访问你的域名,如果出现如下页面就完成!

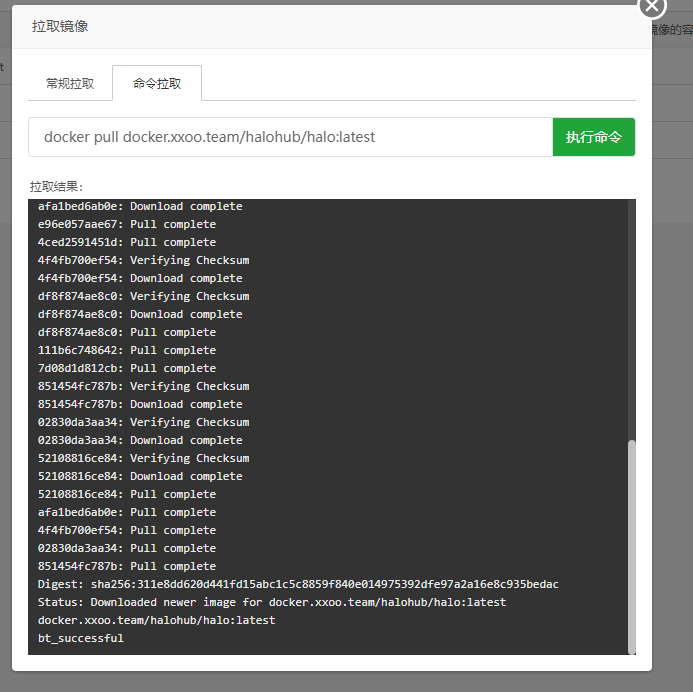
在宝塔中试一下,没问题~~
作者有话
喜欢请留一个关注,如果能转发分享,那最好不过啦。更多源码、软件等请关注微信公众号:干货助手,好饭不怕晚,现在关注正合适!
版权归原作者 码农桃子 所有, 如有侵权,请联系我们删除。