交换机
Fanout交换机(广播)

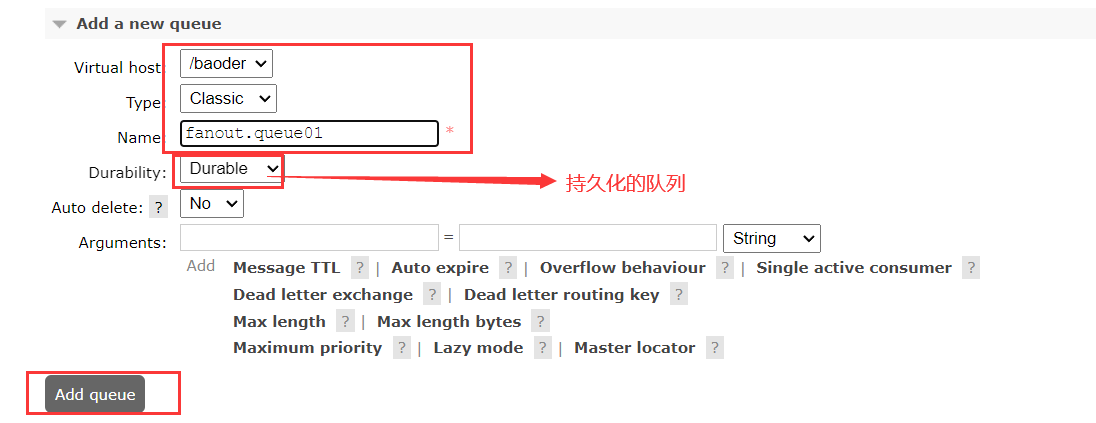
创建队列
创建fanout.queue01和fanout.queue02
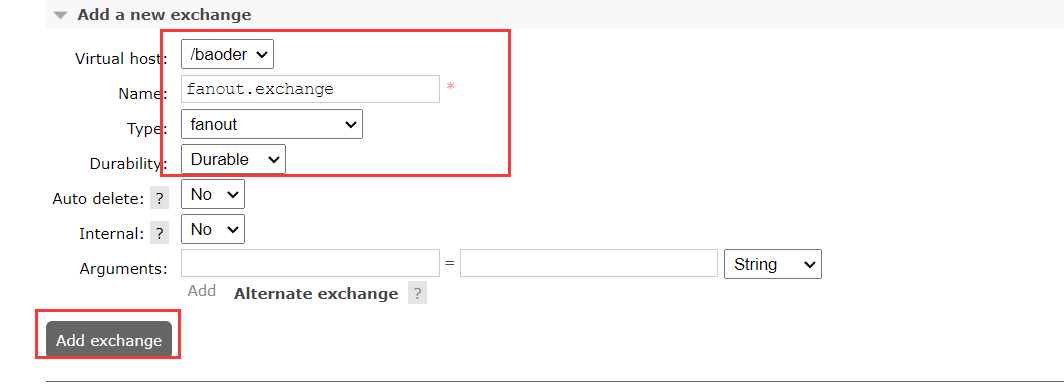
创建交换机
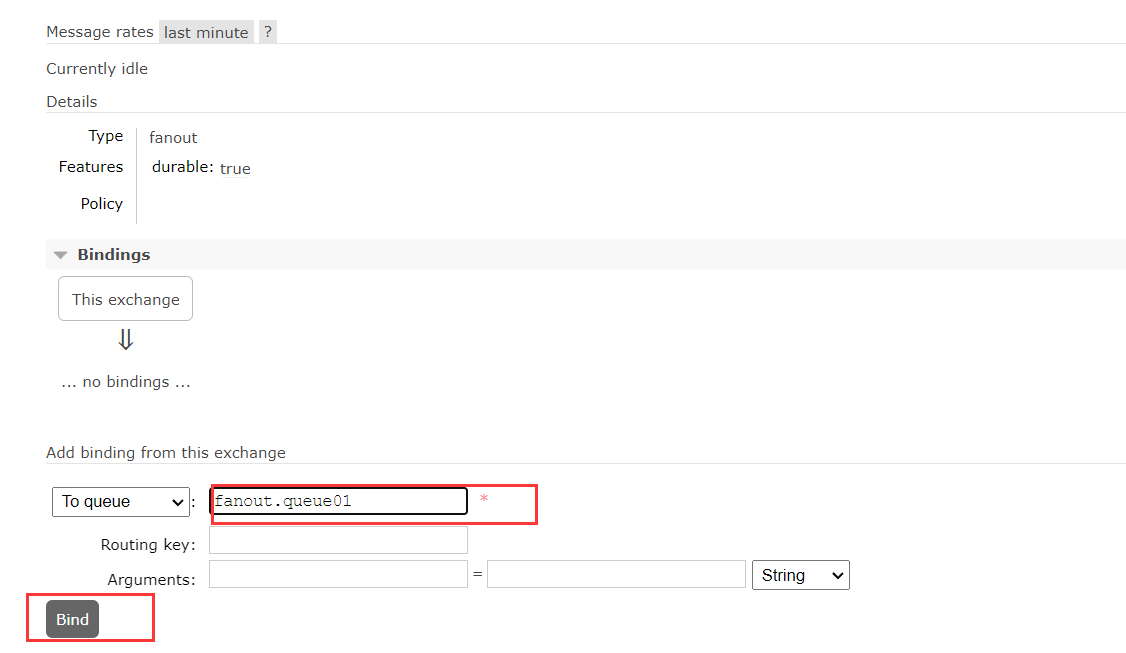
创建绑定关系
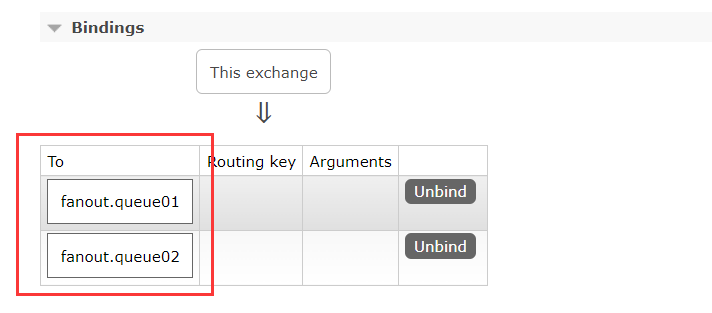
测试
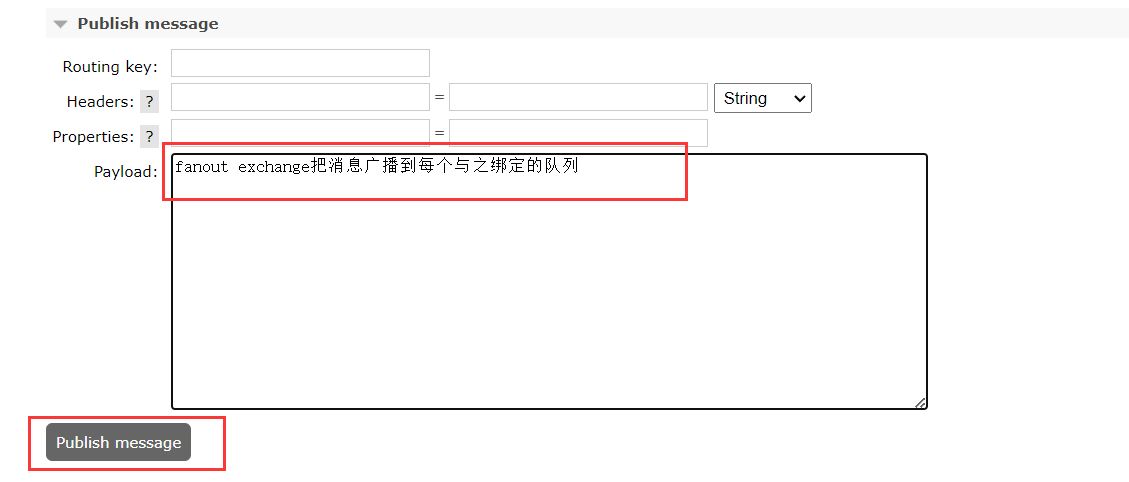
两个队列都收到了消息

总结
交换机的作用
- 接收publisher发送的消息
- 将消息按照规则路由到与之绑定的队列
- 不能缓存消息,路由失败,消息丢失
- FanoutExchange的会将消息路由到每个绑定的队列
Direct交换机

创建队列
创建direct.queue01和direct.queue02

创建交换机

创建绑定关系


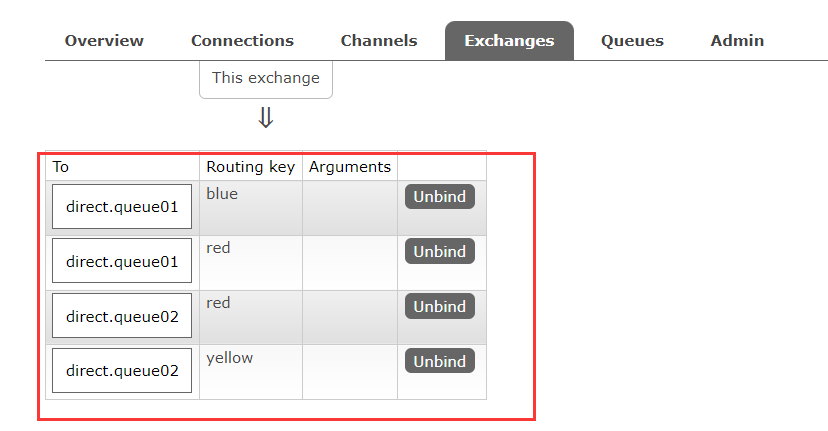
测试
key=red 发送消息
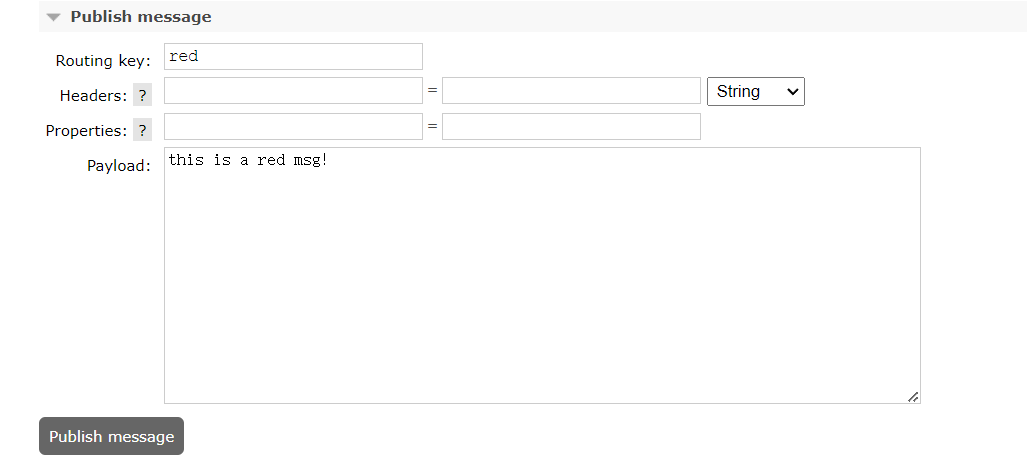
可以看到,两个队列都收到了

key=blue发送消息
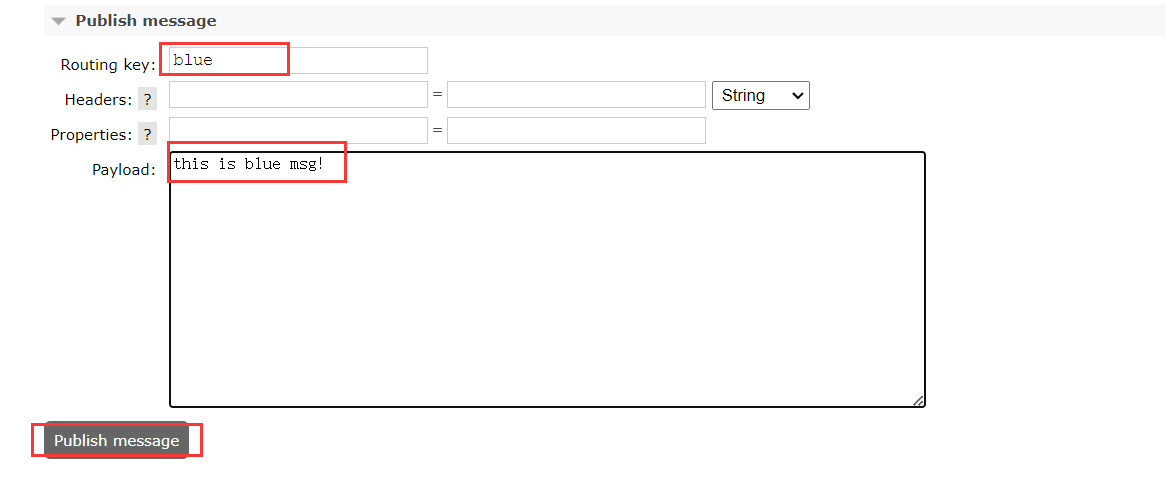
可以看到,只有direct.queue01收到消息了(因为它绑定的key是red和blue)

总结
在direct模型下
- 队列与交换机的绑定,不能是任意绑定了,而是要指定一个RoutingKey(路由key)
- 消息的发送方在 向 Exchange发送消息时,也必须指定消息的 RoutingKey。
- Exchange不再把消息交给每一个绑定的队列,而是根据消息的Routing Key进行判断,只有队列的Routingkey与消息的 Routing key完全一致,才会接收到消息
Topic交换机
Topic
类型的
Exchange
与
Direct
相比,都是可以根据
RoutingKey
把消息路由到不同的队列。
只不过
**Topic**
类型
**Exchange**
可以让队列在绑定
**BindingKey**
** 的时候使用通配符!**
BindingKey
一般都是有一个或多个单词组成,多个单词之间以
.
分割,例如:
item.insert
通配符规则:
- **#**:匹配0个或多个词(包括1个)
- *****:匹配不多不少恰好1个词
举例:
- item.#:能够匹配item.spu.insert 或者 item.spu
- item.*:只能匹配item.spu

假如此时publisher发送的消息使用的
RoutingKey
共有四种:
china.news代表有中国的新闻消息;china.weather代表中国的天气消息;japan.news则代表日本新闻japan.weather代表日本的天气消息;
解释:
topic.queue1:绑定的是china.#,凡是以china.开头的routing key都会被匹配到,包括:china.news-china.weather
topic.queue2:绑定的是#.news,凡是以.news结尾的routing key都会被匹配。包括:china.news-japan.news
创建队列

创建交换机

创建绑定关系


测试
发送消息,routingkey=china.news
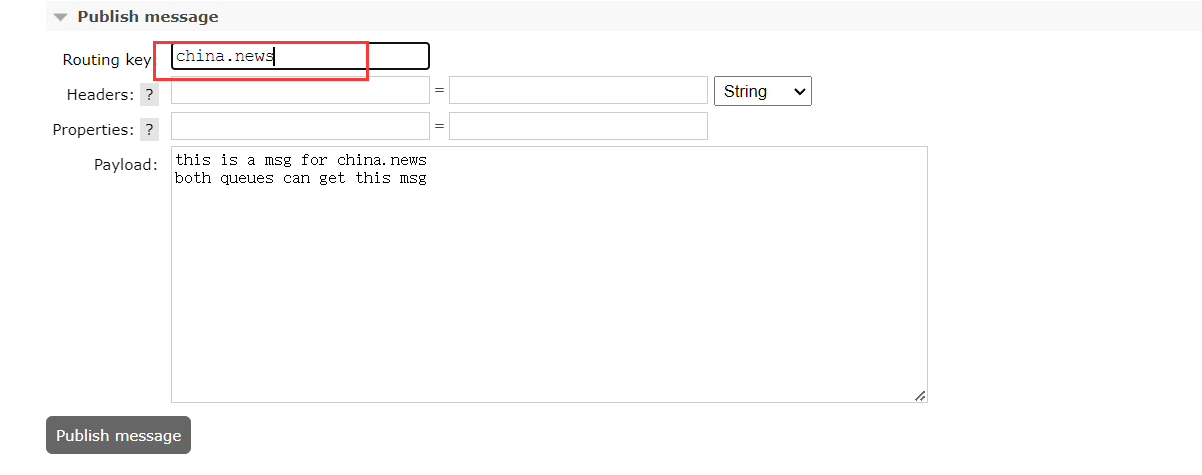
可以看到,两个队列都收到消息了

发送消息,routingkey=china.fujian.news
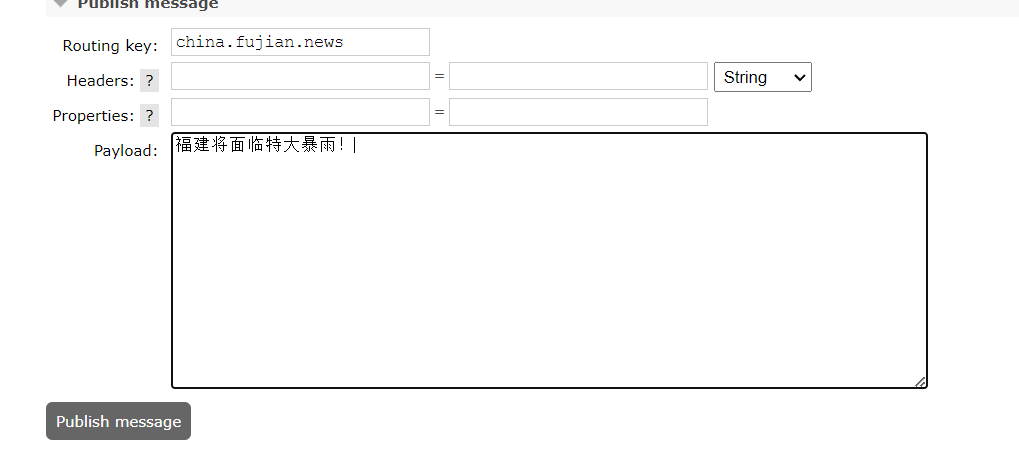
两个队列都收到了,因为#是匹配0个或多个
发送消息,routingkey=china.
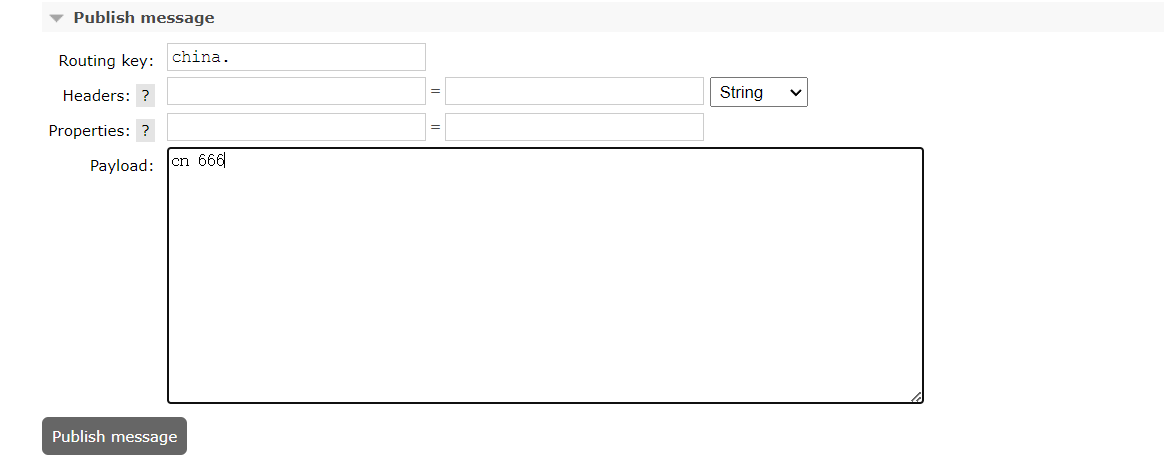
只有topic.queue01收到,符合预期

总结
描述下Direct交换机与Topic交换机的差异?
- Topic交换机接收的消息RoutingKey必须是多个单词,以
**.**分割 - Topic交换机与队列绑定时的bindingKey可以指定通配符
#:代表0个或多个词*:代表1个词
用java代码声明队列和交换机
基本api
SpringAMQP提供了一个Queue类,用来创建队列

SpringAMQP还提供了一个Exchange接口,来表示所有不同类型的交换机:

我们可以自己创建队列和交换机,不过SpringAMQP还提供了ExchangeBuilder来简化这个过程
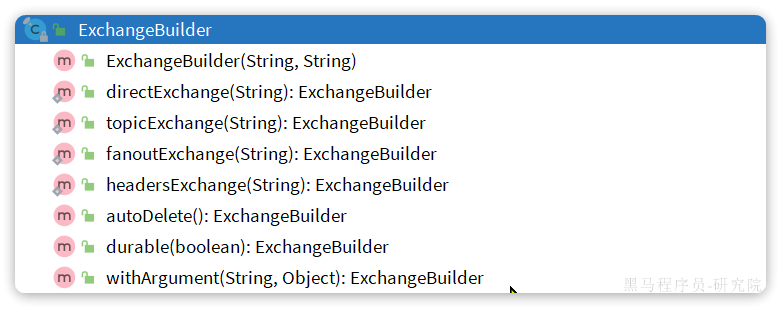
而在绑定队列和交换机时,则需要使用BindingBuilder来创建Binding对象

案例
创建一个springboot项目,导入web rabbitmq依赖
rabbitmq控制台新建一个虚拟主机,名为/test
# 应用服务 WEB 访问端口
server.port=8080

# rabbitmq配置
# 主机ip
spring.rabbitmq.host=192.168.168.168
# rabbitmq的编程端口,默认5672
spring.rabbitmq.port=5672
# 账号和密码
spring.rabbitmq.username=chen
spring.rabbitmq.password=123456
# 虚拟主机
spring.rabbitmq.virtual-host=/test
# 通过设置prefetch来控制消费者预取的消息数量。这条配置告诉RabbitMQ的消费者一次只从队列中拉取一条消息进行处理。
spring.rabbitmq.listener.simple.prefetch=1
只声明队列和交换机,没有声明队列的消费者,队列是不会被创建的
fanout
package com.gmgx.config;

import lombok.extern.slf4j.Slf4j;
import org.springframework.amqp.core.Binding;
import org.springframework.amqp.core.BindingBuilder;
import org.springframework.amqp.core.FanoutExchange;
import org.springframework.amqp.core.Queue;
import org.springframework.context.annotation.Bean;
import org.springframework.context.annotation.Configuration;

@Slf4j
@Configuration
public class FanoutConfig {
    //声明队列
    @Bean
    public Queue fanoutQueue01() {
        return new Queue("fanout.queue1");
    }

    @Bean
    public Queue fanoutQueue02() {
        return new Queue("fanout.queue2");
    }

    //声明交换机
    @Bean
    public FanoutExchange fanoutExchange() {
        return new FanoutExchange("fanout.exchange");
    }

    //声明绑定关系   bind 队列 到 交换机
    @Bean
    public Binding binding01() {
        return BindingBuilder.bind(fanoutQueue01()).to(fanoutExchange());
    }

    @Bean
    public Binding binding02() {
        return BindingBuilder.bind(fanoutQueue02()).to(fanoutExchange());
    }
}
package com.gmgx.listener;

import org.springframework.amqp.rabbit.annotation.RabbitListener;
import org.springframework.stereotype.Component;

@Component
public class FanoutListener {
    @RabbitListener(queues = "fanout.queue1")
    public void listen01(String message) {
        System.out.println("队列1 Received message: " + message);
    }

    @RabbitListener(queues = "fanout.queue2")
    public void listen02(String message) {
        System.out.println("队列2 Received message: " + message);
    }
}
@Test
void testFanout() {
    String msg = "hello 二爷人用额!";
    for (int i = 0; i < 10; i++) {
        rabbitTemplate.convertAndSend("fanout.exchange", "", msg + i);
    }
}
direct
package com.gmgx.config;

import org.springframework.amqp.core.Binding;
import org.springframework.amqp.core.BindingBuilder;
import org.springframework.amqp.core.DirectExchange;
import org.springframework.amqp.core.Queue;
import org.springframework.context.annotation.Bean;
import org.springframework.context.annotation.Configuration;

@Configuration
public class DirectConfig {
    //声明队列
    @Bean
    public Queue queue1() {
        return new Queue("direct.queue1");
    }

    @Bean
    public Queue queue2() {
        return new Queue("direct.queue2");
    }

    //声明交换机
    @Bean
    public DirectExchange exchange() {
        return new DirectExchange("direct.exchange");
    }

    //声明绑定关系
    @Bean
    public Binding binding1() {
        return BindingBuilder.bind(queue1()).to(exchange()).with("red");
    }

    @Bean
    public Binding binding2() {
        return BindingBuilder.bind(queue2()).to(exchange()).with("green");
    }
}
package com.gmgx.listener;

import org.springframework.amqp.rabbit.annotation.RabbitListener;
import org.springframework.stereotype.Component;

@Component
public class DirectListener {
    @RabbitListener(queues = "direct.queue1")
    public void listen01(String msg) {
        System.out.println("队列1 收到消息 : " + msg);
    }

    @RabbitListener(queues = "direct.queue2")
    public void listen02(String msg) {
        System.out.println("队列2 收到消息 : " + msg);
    }
}
@Test
void testDirect() {
    rabbitTemplate.convertAndSend("direct.exchange", "red", "this is a red msg!!");
    rabbitTemplate.convertAndSend("direct.exchange", "green", "this is a green msg!!");
    rabbitTemplate.convertAndSend("direct.exchange", "green", "this is a green msg!!");
}
topic
package com.gmgx.config;

import org.springframework.amqp.core.Binding;
import org.springframework.amqp.core.BindingBuilder;
import org.springframework.amqp.core.Queue;
import org.springframework.amqp.core.TopicExchange;
import org.springframework.context.annotation.Bean;
import org.springframework.context.annotation.Configuration;

@Configuration
public class TopicConfig {
    //声明队列
    @Bean
    public Queue topicQueue1() {
        return new Queue("topic.queue1");
    }

    @Bean
    public Queue topicQueue2() {
        return new Queue("topic.queue2");
    }

    //声明交换机
    @Bean
    public TopicExchange topicExchange() {
        return new TopicExchange("topic.exchange");
    }

    //声明绑定关系
    @Bean
    public Binding topicBinding1() {
        return BindingBuilder.bind(topicQueue1()).to(topicExchange()).with("china.#");
    }

    @Bean
    public Binding topicBinding2() {
        return BindingBuilder.bind(topicQueue2()).to(topicExchange()).with("#.news");
    }
}
package com.gmgx.listener;

import org.springframework.amqp.rabbit.annotation.RabbitListener;
import org.springframework.stereotype.Component;

@Component
public class TopicListener {
    @RabbitListener(queues = "topic.queue1")
    public void listen1(String msg) {
        System.out.println("队列1 routingKey=china.# " + msg);
    }

    @RabbitListener(queues = "topic.queue2")
    public void listen2(String msg) {
        System.out.println("队列2 routingKey=#.news " + msg);
    }
}
@Test
void testTopic() {
    rabbitTemplate.convertAndSend("topic.exchange", "china.news", "key=china.news");
    rabbitTemplate.convertAndSend("topic.exchange", "china.fujian.news", "key=china.fujian.news");
    rabbitTemplate.convertAndSend("topic.exchange", "japan.news", "key=japan.news");
    rabbitTemplate.convertAndSend("topic.exchange", "china.weather", "key=china.weather");
}
基于注解声明交换机、队列、消费者
package com.gmgx.listener;

import org.springframework.amqp.core.ExchangeTypes;
import org.springframework.amqp.rabbit.annotation.Exchange;
import org.springframework.amqp.rabbit.annotation.Queue;
import org.springframework.amqp.rabbit.annotation.QueueBinding;
import org.springframework.amqp.rabbit.annotation.RabbitListener;
import org.springframework.stereotype.Component;

@Component
public class TopicListener {
    @RabbitListener(bindings = @QueueBinding(
            value = @Queue(name = "topic.queue1"),
            exchange = @Exchange(name = "topic.exchange",type = ExchangeTypes.TOPIC),//不指定默认为direct类型
            key = "china.#"
    ))
    public void listen1(String msg) {
        System.out.println("topic.queue1接收到消息 : " + msg);
    }

    @RabbitListener(bindings = @QueueBinding(
            value = @Queue(name = "topic.queue2"),
            exchange = @Exchange(name = "topic.exchange",type = ExchangeTypes.TOPIC),
            key = "#.news"
    ))
    public void listen2(String msg) {
        System.out.println("topic.queue2接收到消息 : " + msg);
    }
}
@Test
void testTopic() {
    rabbitTemplate.convertAndSend("topic.exchange", "china.news", "key=china.news");
    rabbitTemplate.convertAndSend("topic.exchange", "china.fujian.news", "key=china.fujian.news");
    rabbitTemplate.convertAndSend("topic.exchange", "japan.news", "key=japan.news");
    rabbitTemplate.convertAndSend("topic.exchange", "china.weather", "key=china.weather");
}
消息转换器
使用转换器发送对象数据到队列
新建一个obj.queue 往里面发一个Student对象的消息
package com.gmgx.entity;

import lombok.AllArgsConstructor;
import lombok.Data;
import lombok.NoArgsConstructor;

import java.io.Serializable;

@Data
@NoArgsConstructor
@AllArgsConstructor
public class Student implements Serializable {
    private static final long serialVersionUID = 1L;
    private int id;
    private String name;
    private int age;
}
@Test
void testObject(){
    Student stu = new Student(1, "张三", 22);
    rabbitTemplate.convertAndSend("obj.queue", stu);
}
取出来的数据变成了这样

这是因为:
默认情况下Spring采用的序列化方式是JDK序列化。Student对象被序列化后传给队列。
众所周知,JDK序列化存在下列问题:
- 数据体积过大
- 有安全漏洞
- 可读性差
显然,JDK序列化方式并不合适。我们希望消息体的体积更小、可读性更高,因此可以使用JSON方式来做序列化和反序列化。
使用json转换器
<dependency>
    <groupId>com.fasterxml.jackson.dataformat</groupId>
    <artifactId>jackson-dataformat-xml</artifactId>
    <version>2.9.10</version>
</dependency>
注意,如果项目中引入了
spring-boot-starter-web
依赖,则无需再次引入
Jackson
依赖。
package com.gmgx.config;

import org.springframework.amqp.support.converter.Jackson2JsonMessageConverter;
import org.springframework.amqp.support.converter.MessageConverter;
import org.springframework.context.annotation.Bean;
import org.springframework.context.annotation.Configuration;

@Configuration
public class RabbitMqConfig {
    @Bean
    public MessageConverter messageConverter(){
        // 1.定义消息转换器
        Jackson2JsonMessageConverter jackson2JsonMessageConverter = new Jackson2JsonMessageConverter();
        // 2.配置自动创建消息id,用于识别不同消息,也可以在业务中基于ID判断是否是重复消息
        jackson2JsonMessageConverter.setCreateMessageIds(true);
        return jackson2JsonMessageConverter;
    }
}
现在重新发送消息到obj.queue
可以看到是json格式,只占33个字节

现在写一个消费者来监听队列
package com.gmgx.listener;

import com.gmgx.entity.Student;
import org.springframework.amqp.rabbit.annotation.RabbitListener;
import org.springframework.stereotype.Component;

@Component
public class ObjListener {
    @RabbitListener(queues = "obj.queue")
    public void objListener(Student stu) {
        System.out.println("obj.queue 接收到"+stu);
    }
}
重新执行测试,得到如下结果

符合预期
版权归原作者 c1tenj2 所有, 如有侵权,请联系我们删除。