
1.上传apusic安装包并解压
[root@CentOS7 opt]# mkdir /usr/AAS
[root@CentOS7 opt]# cd /usr/AAS/
[root@CentOS7 AAS]# unzip AAS-V9.0.zip
[root@localhost AAS]# ls
3RD-PARTY-LICENSE.txt  AAS-V9.0.zip  bin  classes  common  docs  domains  domains.xml  lib  license.xml  readme.html  sp  src  templates  tools
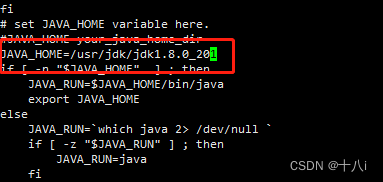
2.配置环境变量
[root@localhost AAS]# cd /usr/AAS/bin/
[root@localhost bin]# vi setenv
配置自己的jdk路径,esc退出,:wq保存。
3.启动运行
[root@localhost /]# cd /usr/AAS/domains/mydomain/bin
[root@localhost bin]# sh ./startapusic
启动后我这里显示license过期,需要替换license.xml文件

进入到金蝶中间件的安装目录下,替换license.xml文件并重新启动
[root@localhost bin]# cd /usr/AAS/
[root@localhost AAS]# ls
3RD-PARTY-LICENSE.txt  AAS-V9.0.zip  bin  classes  common  docs  domains  domains.xml  lib  license.xml  readme.html  sp  src  templates  tools
[root@localhost AAS]# cd /usr/AAS/domains/mydomain/bin
[root@localhost bin]# sh ./startapusic
第一次启动时需要输入管理员密码

输入完成后中间件成功启动,服务器就绪。

但以上运行方式在关闭终端窗口后会导致 AAS 进程退出,因此后续运行可以使用 nohup + 后台方式运行:
nohup ./startapusic > apusic-start.log 2>&1 &
注意:首次运行时建议不要使用该命令,因为首次运行需要设置中间件管理控制台初始密码,而以上命令无法接受终端输入。
通过http://IP地址:6888/admin访问金蝶管理平台,输入账号密码登录,至此金蝶中间件安装完成。(默认账号:admin 密码:首次启动时管理员初始化密码)

4.在金蝶中间上部署服务
首先停止金蝶中间件的运行
[root@localhost bin]# ps -ef|grep apusic
root       8642   8425  0 14:22 pts/0    00:00:00 /bin/sh ./startapusic
root       8660   8642 10 14:22 pts/0    00:00:09 /usr/jdk/jdk1.8.0_201/bin/java -Dcom.apusic.domain.home=/usr/AAS/domains/mydomain -server -Djava.net.preferIPv4Stack=true
root       8733   8425  0 14:24 pts/0    00:00:00 grep --color=auto apusic
[root@localhost bin]# ^C
[root@localhost bin]# kill -9 8660
[root@localhost bin]# ps -ef|grep apusic
root       8737   8425  0 14:25 pts/0    00:00:00 grep --color=auto apusic
进入金蝶中间件的domains域中,删除掉默认的mydomain,复制一份samples重命名为restcloud(也可以不删除mydomain,直接进入mydomain下的applications里上传war包)。
[root@localhost /]# cd /usr/AAS/domains
[root@localhost domains]# rm -rf mydomain/
[root@localhost domains]# ls
samples
[root@localhost domains]# cp -r samples/ restcloud
[root@localhost domains]# ls
restcloud  samples
修改金蝶中间件的默认端口,我这里把端口修改为8080。(也可以不进行使用默认端口:6888)
[root@localhost /]# cd /usr/AAS/domains/restcloud/config/
[root@localhost config]# vi apusic.conf

再进入bin目录下修改启动类文件(在下图标记出后面加上 -Djava.awt.headless=true)。
[root@localhost /]# cd /usr/AAS/domains/restcloud/bin/
[root@localhost bin]# vi startapusic

最后进入到applications下,清空原本的文件并上传war包。
[root@localhost /]# cd /usr/AAS/domains/restcloud/applications/
[root@localhost applications]# ls
default  jpa.ear  jsp.ear  mdb.ear  servlet.ear  stateful.ear  stateless.ear
[root@localhost applications]# rm -rf *
[root@localhost applications]# ls
ROOT.war
然后启动金蝶中间件,使用8080端口访问服务管理平台并登录。


最后正常访问服务平台,服务部署完成

本文转载自: https://blog.csdn.net/weixin_50791990/article/details/126781556
版权归原作者 伍十八i 所有, 如有侵权,请联系我们删除。
版权归原作者 伍十八i 所有, 如有侵权,请联系我们删除。