
1、 概述
1、 为什么需要自动化测试?
项目会从快速迭代走向以维护为主的状态,因此引入自动化测试能有效减少人工维成本 。
自动化的收益 = 迭代次数 * 全手动执行成本 - 首次自动化成本 - 维护次数 * 维护成本
对于自动化测试,相对于发现未知问题,更倾向于避免可能的问题。
2、 分类
(1) 单元测试
单元测试(unit testing),是指对软件中的最小可测试单元进行检查和验证,通常是针对函数、模块、对象进行测试,但在前端应用中组件也是被测单元,对于代码中多个组件共用的工具类库、多个组件共用的子组件应尽可能提高覆盖率。
特点:
- 单元测试执行速度很快;
- 应该避免依赖性问题,如不存取数据库,不访问网络等,而是使用工具虚拟出运行环境;
- 由于单元测试是独立的,因此无法保证多个单元一起运行时的正确性。
意义:
- 通过用例确保模块的功能,不至于在迭代过程中产生 bug ;
- 保证代码重构的安全性,测试用例能给你多变的代码结构一个定心丸;
- 如果模块逻辑越来越复杂,通过单测用例,也能比较快地了解模块的功能 ;
- 提高代码质量,使得代码设计的与外部模块更加解耦。
(2) UI测试
TODO
(3) E2E测试
TODO
3、 测试思想
TDD:Test-Driven Development(测试驱动开发)
TDD 要求在编写某个功能的代码之前先编写测试代码,然后只编写使测试通过的功代码,通过测试来推动整个开发的进行。
BDD:Behavior-Driven Development(行为驱动开发)
BDD 可以让项目成员(甚至是不懂编程的)使用自然语言来描述系统功能和业务辑,从而根据这些描述步骤进行系统自动化的测试。
2、 技术选型
1、 单元测试
框架对比:
框架断言仿真快照异步测试覆盖率Mocha默认不支持默认不支持默认不支持友好不支持Ava默认支持不支持默认支持友好不支持Jasmine默认支持默认支持默认支持不友好Jest默认支持默认支持默认支持友好默认支持Karma不支持不支持不支持不支持
经过对比,主要在Jest和Mocha间进行选择,同样Vue Test Utils ( Vue.js 官方的元测试实用工具库)中也主要介绍了该两种框架的使用方式。
Jest默认支持所需多种场景,可通过较少配置满足所需功能,开箱即用,同时我们通希望与Jenkins完成配合,如设置某项指标覆盖率低于80%则不进行build,不通过Jenkins校验,Jest可以简单配置coverageThreshold进行实现,除此以外也可以单独为某个模块配置报错阈值,提供更灵活的覆盖率选择。
// jest.config.js
module.exports ={
    coverageThreshold: {
      // 覆盖结果的最低阈值设置,如果未达到阈值,jest将返回失败。
      global: {
        branches: 60,
        functions: 80,
        lines: 80,
        statements: 80,
      },
    }}
综上所述,前端单元测试采用Jest框架+ Vue Test Utils完成单元测试,并对工具未覆盖的常用方法进行封装。
使用方式:
- 断言:所谓断言,就是判断源码的实际执行结果与预期结果是否一致,如果不一致就抛出一个错误,通常断言库为expect断言风格(BDD),更接近自然语言;
- 仿真:即通常所说的mock功能,当需要测试的单元需要外部模块时,同时这些模块具有不可控、实现成本高等原因时,此时采用mock,例如模拟http请求;
- 快照:快照测试通常是对UI组件渲染结果的测试,而在jest中,快照测试是保存渲染组件的标记,从而达到快照文件体积小,测试速度快的目的;
- 异步测试:通常异步测试进行http请求的异步获取模拟,支持promise,async/await等语法,能够简单进行异步模拟;
- 覆盖率:覆盖率通常通过以下指标进行统计: - %stmts是语句覆盖率(statement coverage):是不是每个语句都执行了?- %Branch分支覆盖率(branch coverage):是不是每个if代码块都执行了?- %Funcs函数覆盖率(function coverage):是不是每个函数都调用了?- %Lines行覆盖率(line coverage):是不是每一行都执行了?
我们至少需要测试框架(运行测试的工具),断言库来保证单元测试的正常执行。在业务场景中,Api请求等异步场景也希望框架拥有异步测试能力,同时希望框架支持生成覆盖率报告。
2、 UI测试
TODO
3、 E2E测试
TODO
3、 单元测试
1、 依赖安装
vue add @vue/cli-plugin-unit-jest
通过该命令将自动安装Jest和Vue Test Utils等所需工具
依赖安装完成后我们在package.json文件应该能看到以下依赖: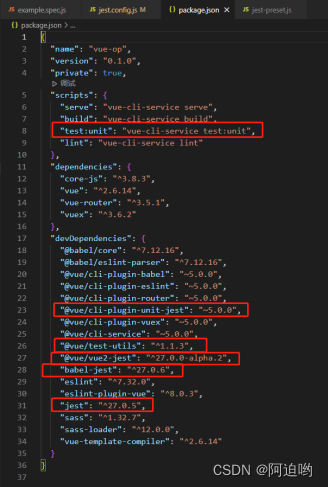
项目自动生成如下文件: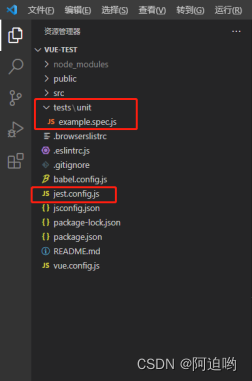
tests目录是自动化测试的工作区,可mock方法、mock请求、预置配置、加入工具方法、编写单元测试等。
jest.config.js文件用于配置jest的测试环境、es6语法转换、需要检测的文件类型、css预处理、覆盖率报告等。
2、 Jest配置
// jest.config.js
module.exports ={
  preset: "@vue/cli-plugin-unit-jest",
  verbose: true, // 多于一个测试文件运行时展示每个测试用例测试通过情况
  bail: true, // 参数指定只要有一个测试用例没有通过,就停止执行后面的测试用例
  testEnvironment: 'jsdom', // 测试环境,jsdom可以在Node虚拟浏览器环境运行测试
  moduleFileExtensions: [ // 需要检测测的文件类型
    'js',
    'jsx',
    'json',
    // tell Jest to handle *.vue files
    'vue'],
  transform: { // 预处理器配置,匹配的文件要经过转译才能被识别,否则会报错
    '.+\\.(css|styl|less|sass|scss|jpg|jpeg|png|svg|gif|eot|otf|webp|ttf|woff|woff2|mp4|webm|wav|mp3|m4a|aac|oga|avif)$':
    require.resolve('jest-transform-stub'),
    '^.+\\.jsx?$': require.resolve('babel-jest')},
  transformIgnorePatterns: ['/node_modules/'], // 转译时忽略 node_modules
  moduleNameMapper: { // 从正则表达式到模块名称的映射,和webpack的alisa类似
    "\\.(css|less|scss|sass)$":"<rootDir>/tests/unit/StyleMock.js",
  },
  snapshotSerializers: [ // Jest在快照测试中使用的快照序列化程序模块的路径列表
    'jest-serializer-vue'],
  testMatch: [ // Jest用于检测测试的文件,可以用正则去匹配
    '**/tests/unit/**/*.spec.[jt]s?(x)',
    '**/__tests__/*.[jt]s?(x)'],
  collectCoverage: true, // 覆盖率报告,运行测试命令后终端会展示报告结果
  collectCoverageFrom: [ // 需要进行收集覆盖率的文件,会依次进行执行符合的文件
    'src/views/**/*.{js,vue}',
    '!**/node_modules * '],
  coverageDirectory: "<rootDir>/tests/unit/coverage", // Jest输出覆盖信息文件的目录,运行测试命令会自动生成如下路径的coverage文件
  coverageThreshold: { // 覆盖结果的最低阈值设置,如果未达到阈值,jest将返回失败
    global: {
      branches: 60,
      functions: 80,
      lines: 80,
      statements: 80,
    },
    "src/views/materialManage/materialList/index.vue":{
      branches: 100,
      functions: 100,
      lines: 100,
      statements: 100,
    },
  },
  setupFiles: ["<rootDir>/tests/unit/setup/main.setup.js"] // 环境预置配置文件入口
};
- **preset(@vue/cli-plugin-unit-jest)**:提供了jest默认配置,可通过路径node_modules/@vue/cli-plugin-unit-jest/presets/default/jest-preset.js找到该默认配置;
- verbose:多于一个测试文件运行时展示每个测试用例测试通过情况,默认多于一个测试文件时不展示;
- bail:默认Jest会运行所有测试用例并将全部错误输出至控制台,bail可设置当n个用例不通过后停止测试,当设置为true时等同于1,在后续与Jenkins配合时可将其配置为true,减少不必要的资源消耗,默认值为0;
- **testEnvironment(jsdom)**:jsdom可以让js在node环境运行,是自动化测试必要条件;
- moduleFileExtensions:jest需要检测测的文件类型;
- transform:预处理器配置,匹配的文件要经过转译才能被识别,否则会报错;
- transformIgnorePatterns:匹配所有源文件路径的regexp模式字符串数组,匹配的文件将跳过转换;
- moduleNameMapper:从正则表达式到模块名称的映射,支持源代码中相同的@别名,与vue.config.js中chainWebpack的alias相对应;
- snapshotSerializers:Jest在快照测试中使用的快照序列化程序模块的路径列表;
- testMatch:当只需要进行某个目录下的单元测试脚本执行时可以进行该配置,例如示例中仅执行unit下的测试脚本,默认直接注释该行即可;
- collectCoverage:是否生成覆盖率报告,将会为每个测试范围内的文件收集并统计覆盖率,生成html可视的测试报告,但会显著降低单元测试运行效率,通常设为默认值false;- 使用浏览器打开tests/unit/coverage/lcov-report路径下的index.html文件即可浏览各个被测试的文件的详细覆盖信息。

- collectCoverageFrom:设置收集覆盖率的文件范围;- 通常业务代码编写在src/views中,因此此处设置src/views下的js,vue文件;- 同时src/components中部分组件不希望在覆盖率中被捕捉,因此可单独配置希望进行收集的目录;- 可以通过在前方配置!设置某目录下不进行覆盖率收集,例如上方node_modules。
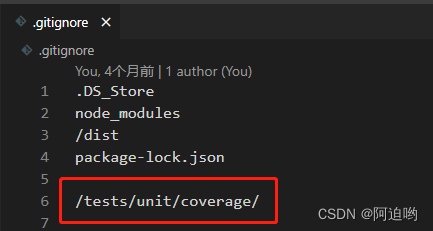
- coverageDirectory:覆盖率报告生成位置,运行npm run test:unit命令跑单测即可生成,配合.gitignore不将覆盖率报告提交至git仓库;
- coverageThreshold:支持设置statements、branches、functions、lines四种指标的最低覆盖率,当未符合设置阈值时,则判定单元测试失败,后续通过设置不同业务的覆盖率阈值来完成与Jenkins的对接;- 支持为某个路径下的文件单独进行阈值设置- 当设置负数-n时,则为未覆盖率不允许超过n%。
- setupFiles:在运行单元测试前,先运行的文件,用于进行预制配置的设置,例如接口mock、插件配置、封装方法等;
3、 目录结构
实际开发过程中,我们应当具备较为完善的自动化测试目录结构: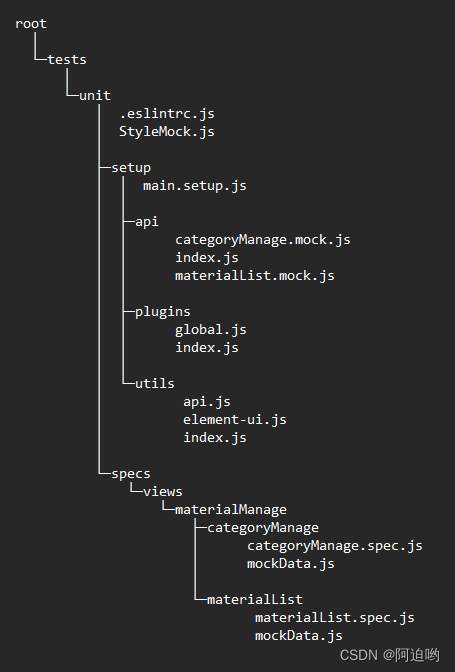
(1) .eslintrc.js
module.exports ={
  env: {
    jest: true,
  },
  globals: {
    utils: "writalbe",
    $: "writalbe",
    moment: "writalbe",
  },
};
配置在unit目录下的eslint规则。
- 声明环境为jest以此保证使用jest api时不会触发Eslint报错;
- 由于上方将utils注册到global中,后续使用直接通过utils.[functionName]调用,此处将utils设置为全局变量,实现在测试脚本中直接使用utils不会出现Eslint报错,$、moment同理。
(2) setup
main.setup.js
import"./api"; // api Mock
import'./utils' // 工具方法
import'./plugins' // 插件声明
按照顺序进行引入,优先声明方法mock/插件声明,后引入预置配置和工具方法。
plugins目录
// index.js
import"./global";
插件声明入口文件,统一引入,下方举例。
// global.js
import Vue from 'vue'import ElementUI from "element-ui";import"element-ui/lib/theme-chalk/index.css";import{ parseTime, resetForm } from "@/utils/general";import{ hasPermi } from "@/directives/hasPermi";import Pagination from "@/components/Pagination";import ebDialog from "@/components/eb-components/EB-dialog";

Vue.prototype.msgSuccess =function(msg){
  this.$message({ showClose: true, message: msg, type: "success"});};

Vue.prototype.msgWarning =function(msg){
  this.$message({ showClose: true, message: msg, type: "warning"});};

Vue.prototype.msgError =function(msg){
  this.$message({ showClose: true, message: msg, type: "error"});};

Vue.use(ElementUI);
Vue.prototype.parseTime = parseTime;
Vue.prototype.resetForm = resetForm;
Vue.directive("hasPermi", { hasPermi });
Vue.component("Pagination", Pagination);
Vue.component("ebDialog", ebDialog);
通过上述方式,将所需插件进行注册:
- jest在执行测试脚本时,不会像正常执行过程中优先执行main.js,例如在测试脚本中渲染materialList/index.vue,此时只会执行该文件的生命周期,因此需要通过该种方式对公用插件进行全局注册,保证测试脚本的正常执行;
- 同样,后续在引入其余插件时,应在该文件同级目录下创建相应以插件名称命名的文件,并在index.js中引入。
utils目录
// index.js
import{ timeout, request, response, mockApi } from "./api"; // api 封装方法
import{ // 工具类封装方法
  getTablesHeader, // 获取表头
  getTablesData, // 获取表格数据
  getTablesAction, // 获取表格操作列
  getButton, // 获取按钮
  getTableButton, // 获取表格按钮
  getModalTitles, // 获取弹窗标题
  getModalCloses, // 获取弹窗关闭按钮
  getNotificationsContent, // 获取Notification提示
  removeNotifications, // 移除Notification提示
  getConfirmsContent, // 获取Confirm气泡确认框内容
  getConfirmButton, // 获取Confirm气泡确认框按钮
  getMessageContent, // 获取Message信息内容
  getFormItems, // 获取表单项
  getFormErrors, // 获取表单校验失败信息
  getSelect, // 获取下拉框
  // 以下未实现,需要使用请自行封装
  getActiveTabs,
  getTabButton,
  getCheckboxs,
  getIcon,
  getTableSelections,
  getBreadcrumbButton,
  getDropdownOptions,
  getDropdownButton,
  getSelectOption,
  getAllowClear,
  getModalClose,
} from "./element-ui";

global.utils ={
  // api
  timeout,
  request,
  response,
  mockApi,
  // element-ui
  getTablesHeader,
  getTablesData,
  getTablesAction,
  getButton,
  getTableButton,
  getModalTitles,
  getModalCloses,
  getNotificationsContent,
  removeNotifications,
  getConfirmsContent,
  getConfirmButton,
  getMessageContent,
  getFormItems,
  getFormErrors,
  getSelect,
  // 以下未实现,需要使用请自行封装
  getActiveTabs,
  getTabButton,
  getCheckboxs,
  getIcon,
  getTableSelections,
  getBreadcrumbButton,
  getDropdownOptions,
  getDropdownButton,
  getSelectOption,
  getAllowClear,
  getModalClose,
};
工具方法注册入口文件,统一引入常用的封装方法,并将其注册置global.utils中,在后续测试脚本中无需import,直接通过utils.${functionName}进行调用。
// api.js
// 延时器
exportfunctiontimeout(time){return new Promise((resolve, reject)=> {
    setTimeout(()=> {
      resolve()
    }, time)
  })
}

// 模拟接口请求
export function request () {
  return jest.fn((params)=>
      utils.response({}))
}
// 模拟接口响应
export function response (data) {
  return new Promise((resolve, reject)=> {
    resolve(data)
  })
}
// 自定义mock-修改单一api响应数据
export function mockApi (mock, api, data) {
  mock[api].mockImplementation(()=> utils.response(data))}
在单元测试中,需要模拟接口响应在多种情况下的不同场景,尤其是在真实开发环境中不好模拟的场景,例如存在时间极短的中间状态等。
- 在原先的Jest调研中,选择的mock对象为axios方法,而通过mock axios时,无法做到灵活的多组mock数据的使用;在本次调研中选择mock各个api,并通过mockImplementation实现在describe以及it中的数据更改,由此实现灵活的多组mock实现,来覆盖更多场景。
api目录
// index.js
jest.mock("@/api/materialList/materialList", ()=>
  require("@/../tests/unit/setup/api/materialList.mock"),
);
jest.mock("@/api/categoryManage/categoryManage", ()=>
  require("@/../tests/unit/setup/api/categoryManage.mock"),
);
通过jest.mock模拟api中的相应方法,达到全局api初始化,与views/api中的文件对应,在api目录下创建对应文件名的.mock.js文件。
export const getMaterialList = utils.request();export const getjudgeCategory = utils.request();export const addMaterial = utils.request();export const getMaterialDetail = utils.request();export const updateMaterial = utils.request();
在对应文件的.mock.js文件中,通过上述方式声明业务代码中的各api函数,上述含义为将所声明接口返回值初始化为空对象{},使用jest.fn进行接口模拟,通过utils.response返回promise,模拟接口响应。
- 文件命名与src/api中相应文件相同,即如src/api/materialList.js中的api则此处应创建materialList.mock.js文件。
(3) specs
specs中的目录结构应与项目所测试目录保持一致,例如views/materialManage/materialList/index.vue的测试脚本在specs中应在views/materialManage/materialList目录下,以此保持单元测试代码的可读/可维护性,下方以materialList目录下的index.vue文件举例(此处仅展示基本流程,具体用例编写参见后续样例)。
// materialList.spec.js
import{mount} from "@vue/test-utils";import materialList from "@/views/materialManage/materialList/index.vue";import mockData from "./mockData";

const materialListApi = require("@/../tests/unit/setup/api/materialList.mock");
const categoryManageApi = require("@/../tests/unit/setup/api/categoryManage.mock");
utils.mockApi(
  materialListApi,
  "getMaterialList",
  mockData.success.getMaterialList,
);
describe("素材列表页", ()=>{
  const wrapper = mount(materialList);
  const _this = wrapper.vm;

  it("素材列表页-查询失败", async ()=>{
    utils.mockApi(
      materialListApi,
      "getMaterialList",
      mockData.failure.getMaterialList,
    );
    _this.pageList =[];
    _this.total =0;
    _this.loading =false;
    await utils.getButton(wrapper, "搜索").trigger("click");
    expect(_this.pageList).toEqual([]);
    expect(_this.total).toBe(0);
    expect(_this.loading).toBe(true);});

  it("素材列表页-查询成功", async ()=>{
    utils.mockApi(
      materialListApi,
      "getMaterialList",
      mockData.success.getMaterialList,
    );
    _this.pageList =[];
    _this.total =0;
    _this.loading =false;
    await utils.getButton(wrapper, "搜索").trigger("click");let expectData = mockData.success.getMaterialList.data;
    expect(_this.pageList).toEqual(expectData.list);
    expect(_this.total).toBe(expectData.total);
    expect(_this.loading).toBe(false);});});
上方示例中通过jest.mock模拟api中的materialList文件的相应方法,下方通过utils.mockApi对getMaterialList进行重新处理,实现灵活的mock数据修改。
// mockData.js
const mockData ={
  success: {
    getMaterialList: {
      code: 200,
      data: {
        total: 83,
        list: [{
            md5File: "969e0a368a3a3ec423fccc39433c7427",
            materialUrl:
              "https://rcs.telinovo.com/material/96/9e0a368a3a3ec423fccc39433c7427.mp4",
            showUrl: null,
            dir: "96",
            realName: "9e0a368a3a3ec423fccc39433c7427.mp4",
            createTime: "2022-12-23T06:19:31.000+0000",
            categoryId: 2,
            materialName: "测试视频",
            phone: null,
            fileType: 2,
            categoryName: "默认分类/默认分类",
          },
          {
            md5File: "ae543e4e6d8706faee63ed3be07f1b7c",
            materialUrl:
              "https://rcs.telinovo.com/material/ae/543e4e6d8706faee63ed3be07f1b7c.png",
            showUrl: null,
            dir: "ae",
            realName: "543e4e6d8706faee63ed3be07f1b7c.png",
            createTime: "2022-12-22T08:58:27.000+0000",
            categoryId: 55,
            materialName: "关注攻略",
            phone: null,
            fileType: 1,
            categoryName: "活动图片/封面图片",
          },
        ],
      },
      message: "操作成功",
    },
  },
  failure: {
    getMaterialList: {
      code: 500,
      data: null,
      message: "操作失败",
    },
  },
};export default mockData;
在mockData中分别设置success,failure时的api mock数据,该种方式利于后续在断言中进行响应结果判断。
(4) StyleMock.js
module.exports ={}
上述moduleNameMapper提到Jest运行无法识别import .css/.less等后缀,将其映射到该js文件,此处直接exports空对象保证测试脚本正常执行。
- 单元测试本身不关注样式,但关注dom结构。
4、 Api
(1) vue-test-utils
vue-test-utils主要负责节点获取,编写测试逻辑。下面列举几个常用的Api,以及介绍一下wrapper对象。
Api
- mount 创建一个包含被挂载和渲染的 Vue 组件的 Wrapper。
import{mount} from '@vue/test-utils'import Foo from './Foo.vue'

describe('Foo', ()=>{
  it('renders a div', ()=>{
    const wrapper = mount(Foo)
    expect(wrapper.contains('div')).toBe(true)})})
- shallowMount 和mount一样,创建一个包含被挂载和渲染的 Vue 组件的 Wrapper,与shallowMount区别: - mount会渲染整个组件树而shallowMount会对子组件存根;- shallowMount可以确保你对一个组件进行独立测试,有助于避免测试中因子组件的渲染输出而混乱结果。
import{ shallowMount } from '@vue/test-utils'import Foo from './Foo.vue'

describe('Foo', ()=>{
  it('renders a div', ()=>{
    const wrapper = shallowMount(Foo)
    expect(wrapper.contains('div')).toBe(true)})})
Wrapper
Wrapper 是一个对象,该对象包含了一个挂载的组件或 vnode,以及测试该组件或 vnode 的方法。
下面介绍一些它的常用方法。
- attributes 返回 Wrapper DOM 节点的特性对象。如果提供了 key,则返回这个 key 对应的值。
import{mount} from '@vue/test-utils'import Foo from './Foo.vue'

const wrapper = mount(Foo)
expect(wrapper.attributes().id).toBe('foo')
expect(wrapper.attributes('id')).toBe('foo')
- classes 返回 Wrapper DOM 节点的 class。 返回 class 名称的数组。或在提供 class 名的时候返回一个布尔值。
import{mount} from '@vue/test-utils'import Foo from './Foo.vue'

const wrapper = mount(Foo)
expect(wrapper.classes()).toContain('bar')
expect(wrapper.classes('bar')).toBe(true)
- contains 判断 Wrapper 是否包含了一个匹配选择器的元素或组件。
import{mount} from '@vue/test-utils'import Foo from './Foo.vue'import Bar from './Bar.vue'

const wrapper = mount(Foo)
expect(wrapper.contains('p')).toBe(true)
expect(wrapper.contains(Bar)).toBe(true)
- find 返回匹配选择器的第一个 DOM 节点或 Vue 组件的 Wrapper。 可以使用任何有效的 DOM 选择器 (使用 querySelector 语法)。
import{mount} from '@vue/test-utils'import Foo from './Foo.vue'import Bar from './Bar.vue'

const wrapper = mount(Foo)

const div = wrapper.find('div')
expect(div.exists()).toBe(true)

const byId = wrapper.find('#bar')
expect(byId.element.id).toBe('bar')
- findAll 返回一个 WrapperArray。 可以使用任何有效的选择器。
import{mount} from '@vue/test-utils'import Foo from './Foo.vue'import Bar from './Bar.vue'

const wrapper = mount(Foo)

const div = wrapper.findAll('div').at(0)
expect(div.is('div')).toBe(true)

const bar = wrapper.findAll(Bar).at(0) // 已废弃的用法
expect(bar.is(Bar)).toBe(true)
- findComponent 返回第一个匹配的 Vue 组件的 Wrapper。
import{mount} from '@vue/test-utils'import Foo from './Foo.vue'import Bar from './Bar.vue'

const wrapper = mount(Foo)

const bar = wrapper.findComponent(Bar) // => 通过组件实例找到 Bar
expect(bar.exists()).toBe(true)
const barByName = wrapper.findComponent({ name: 'bar'}) // => 通过 `name` 找到 Bar
expect(barByName.exists()).toBe(true)
const barRef = wrapper.findComponent({ ref: 'bar'}) // => 通过 `ref` 找到 Bar
expect(barRef.exists()).toBe(true)
- findAllComponents 为所有匹配的 Vue 组件返回一个 WrapperArray。
import{mount} from '@vue/test-utils'import Foo from './Foo.vue'import Bar from './Bar.vue'

const wrapper = mount(Foo)
const bar = wrapper.findAllComponents(Bar).at(0)
expect(bar.exists()).toBeTruthy()
const bars = wrapper.findAllComponents(Bar)
expect(bars).toHaveLength(1)
- html 返回 Wrapper DOM 节点的 HTML 字符串。
import{mount} from '@vue/test-utils'import Foo from './Foo.vue'

const wrapper = mount(Foo)
expect(wrapper.html()).toBe('<div><p>Foo</p></div>')
- text 返回 Wrapper 的文本内容。
import{mount} from '@vue/test-utils'import Foo from './Foo.vue'

const wrapper = mount(Foo)
expect(wrapper.text()).toBe('bar')
- is 断言 Wrapper DOM 节点或 vm 匹配选择器。
import{mount} from '@vue/test-utils'import Foo from './Foo.vue'

const wrapper = mount(Foo)
expect(wrapper.is('div')).toBe(true)
- setData 设置 Wrapper vm 的属性。 setData 通过递归调用 Vue.set 生效。
import{mount} from '@vue/test-utils'import Foo from './Foo.vue'

test('setData demo', async ()=>{
  const wrapper = mount(Foo)
  await wrapper.setData({ foo: 'bar'})
  expect(wrapper.vm.foo).toBe('bar')})
- trigger 在该 Wrapper DOM 节点上异步触发一个事件。
import{mount} from '@vue/test-utils'import Foo from './Foo'

test('trigger demo', async ()=>{
  const wrapper = mount(Foo)

  await wrapper.trigger('click')

  await wrapper.trigger('click', {
    button: 0})

  await wrapper.trigger('click', {
    ctrlKey: true // 用于测试 @click.ctrl 处理函数
  })})
WrapperArray
一个 WrapperArray 是一个包含 Wrapper 数组以及 Wrapper 的测试方法等对象。
下面介绍一些它的常用方法。
- at 返回第 index 个传入的 Wrapper 。数字从 0 开始计数 (比如第一个项目的索引值是 0)。如果 index 是负数,则从最后一个元素往回计数 (比如最后一个项目的索引值是 -1)。
import{ shallowMount } from '@vue/test-utils'import Foo from './Foo.vue'

const wrapper = shallowMount(Foo)
const divArray = wrapper.findAll('div')

const secondDiv = divArray.at(1)
expect(secondDiv.is('div')).toBe(true)

const lastDiv = divArray.at(-1)
expect(lastDiv.is('div')).toBe(true)
- filter 用一个针对 Wrapper 的断言函数过滤 WrapperArray。 该方法的行为和 Array.prototype.filter 相同。
import{ shallowMount } from '@vue/test-utils'import Foo from './Foo.vue'

const wrapper = shallowMount(Foo)
const filteredDivArray = wrapper
  .findAll('div')
  .filter(w =>!w.hasClass('filtered'))
- setData 为 WrapperArray 的每个 Wrapper vm 都设置数据。
import{mount} from '@vue/test-utils'import Foo from './Foo.vue'import Bar from './Bar.vue'

test('setData demo', async ()=>{
  const wrapper = mount(Foo)
  const barArray = wrapper.findAll(Bar)
  await barArray.setData({ foo: 'bar'})
  expect(barArray.at(0).vm.foo).toBe('bar')})
- trigger 为 WrapperArray 的每个 Wrapper DOM 节点都触发一个事件。
import{mount} from '@vue/test-utils'import Foo from './Foo.vue'

test('trigger demo', async ()=>{
  const wrapper = mount(Foo)

  const divArray = wrapper.findAll('div')
  await divArray.trigger('click')})
更多信息详见Vue Test Utils 中文官方文档。
(2) Jest
Jest主要负责对测试结果进行断言。下面例举一些常用断言函数。
- except(data).toBe(value):判断expect内容是否与value相同;
- except(data).toBeTruthy():除了false , 0 , ‘’ , null , undefined , NaN都将通过;
- except(data).toBeFalsy():与上述相反;
- except(data).toEqual(value):比较Object/Array是否相同。
更多信息详见Jest中文文档。
(3) 封装工具
以下例举部分封装的工具方法。
- 获取表格数据
/**
 * 获取全部表格-数据
 * @param {wrapper}
 * @param {scrollable}
 * @returns {Object}
 */
exportfunction getTablesData(wrapper){let result ={};let tables = wrapper.findAll(".el-table");for(let tableIndex =0; tableIndex < tables.length; tableIndex++){
    result["table-" + tableIndex]={};let headers;
    headers = tables.at(tableIndex).find(".el-table__header").findAll("th");let titles =[];let operation =false;for(let headerIndex =0; headerIndex < headers.length; headerIndex++){let title = headers.at(headerIndex).find(".cell").text();
      titles.push(title);if(
        headerIndex === headers.length - 1&&
        headers.at(headerIndex).find(".cell").text().includes("操作")){
        operation =true;}}let rows = tables
      .at(tableIndex)
      .find(".el-table__body")
      .findAll(".el-table__row");for(let rowIndex =0; rowIndex < rows.length; rowIndex++){
      result["table-" + tableIndex]["row-" + rowIndex]={};let tds = rows.at(rowIndex).findAll("td");for(let tdIndex =0; tdIndex < tds.length; tdIndex++){if(tdIndex < tds.length - 1||!operation){let td = tds.at(tdIndex);
          // 由于图片使用的el-image,它会异步渲染真实图片,优先渲染el-image__placeholder,所以同步代码中是拿不到真实图片的
          // 解决方案:使用el-image时,添加placeholder插槽,自定义传入图片资源地址

          if(td.findAll("img").length){
            result["table-" + tableIndex]["row-" + rowIndex][titles[tdIndex]]=
              td.find("img").attributes("src");}if(td.findAll("video").length){
            result["table-" + tableIndex]["row-" + rowIndex][titles[tdIndex]]=
              td.find("video").attributes("src");}if(!td.findAll("img").length &&!td.findAll("video").length){
            result["table-" + tableIndex]["row-" + rowIndex][titles[tdIndex]]=
              td.text();}}}}}return result;}
- 获取表单项
/**
 * 获取全部表单项信息
 * @param {wrapper}
 * @returns {Array}
 */
export async function getFormItems(wrapper){
  await wrapper.vm.$nextTick();let res =[];

  // 后面的元素会覆盖前面的
  let types =["el-radio",
    "el-radio-group",
    "el-checkbox",
    "el-checkbox-group",
    "el-input",
    "el-input-number",
    "el-select",
    "el-cascader",
    "el-switch",
    "el-slider",
    "el-date-editor--time-select",
    "el-date-editor--time",
    "el-date-editor--timerange",
    "el-date-editor--date",
    "el-date-editor--dates",
    "el-date-editor--week",
    "el-date-editor--month",
    "el-date-editor--months",
    "el-date-editor--year",
    "el-date-editor--years",
    "el-date-editor--daterange",
    "el-date-editor--monthrange",
    "el-date-editor--datetime",
    "el-date-editor--datetimerange",
    "el-upload",
    "el-rate",
    "el-color-picker",
    "el-transfer",
  ];let formItems =$($("body").find(".el-form")[$("body").find(".el-form").length - 1],
  ).find(".el-form-item");if(!formItems.length){
    formItems =$($(wrapper.html()).find(".el-form")[$(wrapper.html()).find(".el-form").length - 1],
    ).find(".el-form-item");}
  Array.from(formItems).forEach(formItem =>{let required =false;let classArr =$(formItem).attr("class").split(" ");if(classArr.filter(item => item.includes("required")).length){
      required =true;}let label =$(formItem).find(".el-form-item__label").text();let disabled =$(formItem).html().includes("disabled");lettype="";let htmlContent =$(formItem).find(".el-form-item__content").html();
    types.forEach(item =>{if(htmlContent.includes(item)){if(item ==="el-date-editor--time-select"){type="el-time-select";}elseif(
          item ==="el-date-editor--time"||
          item ==="el-date-editor--timerange"){type="el-time-picker";}elseif(
          item ==="el-date-editor--date"||
          item ==="el-date-editor--dates"||
          item ==="el-date-editor--week"||
          item ==="el-date-editor--month"||
          item ==="el-date-editor--months"||
          item ==="el-date-editor--year"||
          item ==="el-date-editor--years"||
          item ==="el-date-editor--daterange"||
          item ==="el-date-editor--monthrange"||
          item ==="el-date-editor--datetime"||
          item ==="el-date-editor--datetimerange"){type="el-date-picker";}else{type= item;}}});

    res.push({
      label: label,
      required: required,
      type: type,
      disabled: disabled,
    });});return res;}
- 获取表单校验失败信息
/**
 * 获取全部表单报错信息
 * @param {wrapper}
 * @returns {Array}
 */
export async function getFormErrors(wrapper){
  await wrapper.vm.$nextTick();let result =[];let formItems =$($("body").find(".el-form")[$("body").find(".el-form").length - 1],
  ).find(".el-form-item");if(!formItems.length){
    formItems =$($(wrapper.html()).find(".el-form")[$(wrapper.html()).find(".el-form").length - 1],
    ).find(".el-form-item");}
  Array.from(formItems).forEach(formItem =>{let field =$(formItem).find(".el-form-item__label").attr("for");let label =$(formItem).find(".el-form-item__label").text();let error =$(formItem).find(".el-form-item__error").text().trim();

    result.push({
      field,
      label,
      error,
    });});return result;}
4、 UI测试
TODO
5、 E2E测试
TODO
版权归原作者 soul の travel 所有, 如有侵权,请联系我们删除。