
1、首先引入依赖
<dependency>
   <groupId>org.springframework.kafka</groupId>
    <artifactId>spring-kafka</artifactId>
</dependency>
<dependency>
    <groupId>org.springframework.kafka</groupId>
    <artifactId>spring-kafka-test</artifactId>
    <scope>test</scope>
</dependency>
2、设置环境
spring:
  kafka:
    # 配置连接到服务端集群的配置项 ip:port,ip:port
    bootstrap-servers: 192.168.211.136:9092
    consumer:
      #      auto-commit-interval: 100
      auto-offset-reset: earliest
      # enable-auto-commit: false  # 进行手动提交 默认是自动提交
      #      enable-auto-commit: true
      group-id: test-consumer-group
      # 默认值即为字符串
      key-deserializer: org.apache.kafka.common.serialization.StringDeserializer
      # 默认值即为字符串
      value-deserializer: org.apache.kafka.common.serialization.StringDeserializer

    producer:
      batch-size: 16384
      buffer-memory: 33554432
      key-serializer: org.apache.kafka.common.serialization.StringSerializer
      retries: 0
      value-serializer: org.apache.kafka.common.serialization.StringSerializer
3、启动类实现
package com.jjw;

import com.jjw.producer.Producer;
import org.springframework.beans.factory.annotation.Autowired;
import org.springframework.boot.SpringApplication;
import org.springframework.boot.autoconfigure.SpringBootApplication;
import org.springframework.context.annotation.Bean;
import org.springframework.kafka.config.ConcurrentKafkaListenerContainerFactory;
import org.springframework.kafka.config.KafkaListenerContainerFactory;
import org.springframework.kafka.core.ConsumerFactory;
import org.springframework.kafka.listener.ConcurrentMessageListenerContainer;
import org.springframework.kafka.listener.ContainerProperties;
import org.springframework.web.bind.annotation.GetMapping;
import org.springframework.web.bind.annotation.PathVariable;
import org.springframework.web.bind.annotation.RestController;

@SpringBootApplication
public class KafkaClientApplicaton {
    public static void main(String[] args) {
        SpringApplication.run(KafkaClientApplicaton.class, args);
    }

    @RestController
    class TestController {
        @Autowired
        private Producer producer;

        /**
         * @return
         * @throws Exception
         */
        @GetMapping("/send/{message}")
        public String sendM1(@PathVariable(name="message") String message) throws Exception {
            producer.send(message);
            return "ok";
        }
    }

    //1,关闭自动,2.设置手动提交模式 3 在消费者端 进行 确认
    @Bean
    public KafkaListenerContainerFactory<ConcurrentMessageListenerContainer<String, String>> kafkaListenerContainerFactory(ConsumerFactory<String, String> consumerFactory) {
        ConcurrentKafkaListenerContainerFactory<String, String> factory = new ConcurrentKafkaListenerContainerFactory<>();
        factory.setConsumerFactory(consumerFactory);
        //配置手动提交offset
        factory.getContainerProperties().setAckMode((ContainerProperties.AckMode.MANUAL));
        return factory;
    }
}
4、生产者类实现
package com.jjw.producer;

import org.springframework.beans.factory.annotation.Autowired;
import org.springframework.kafka.core.KafkaTemplate;
import org.springframework.stereotype.Component;

@Component
public class Producer {
    @Autowired
    private KafkaTemplate kafkaTemplate;


    public void send(String message) throws Exception {
        //设置主题
        //设置消息内容
        kafkaTemplate.send("jjw", message);
    }
}
5、消费者类实现
package com.jjw.consumer;

import org.apache.kafka.clients.consumer.ConsumerRecord;
import org.springframework.kafka.annotation.KafkaListener;
import org.springframework.kafka.support.Acknowledgment;
import org.springframework.stereotype.Component;

import java.io.IOException;

@Component
public class KafkaConsumer {

    @KafkaListener(topics = {"jjw"})
    public void listen(ConsumerRecord<String, String> record, Acknowledgment ack) throws IOException {
        String value = record.value();
        System.out.println("接收到的消息:"+value);
        System.out.println("offset"+record.offset());
        //System.out.println("key"+record.key());
        // 手动提交
        //ack.acknowledge();
    }
}
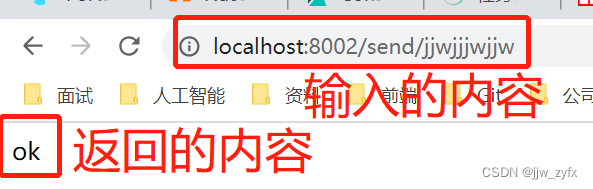
6、运行启动类并进行测试即在浏览器中输入如下内容
7、消息接收方收到的内容
接收到的消息:jjwjjjwjjw
offset46
需要注意的是这个是在服务器上首先把kafka搭建好了的方式,可参考如下方式搭建
1、下载镜像
docker pull wurstmeister/zookeeper
docker pull wurstmeister/kafka
2、创建容器
docker run -d --name zookeeper -p 2181:2181 wurstmeister/zookeeper

docker run -d --name kafka -p 9092:9092 -e KAFKA_BROKER_ID=0 -e KAFKA_ZOOKEEPER_CONNECT=192.168.211.136:2181/kafka -e KAFKA_ADVERTISED_LISTENERS=PLAINTEXT://192.168.211.136:9092 -e KAFKA_LISTENERS=PLAINTEXT://0.0.0.0:9092 wurstmeister/kafka
本文转载自: https://blog.csdn.net/jjw_zyfx/article/details/131498561
版权归原作者 jjw_zyfx 所有, 如有侵权,请联系我们删除。
版权归原作者 jjw_zyfx 所有, 如有侵权,请联系我们删除。