上一章:
一、web ui自动化环境搭建 pytest+allure+selenium_傲娇的喵酱的博客-CSDN博客_pytest+selenium+allure
pytest二次开发相关文章:
pytest框架二次开发之自定义注解_傲娇的喵酱的博客-CSDN博客
pytest框架二次开发之机器人报警_傲娇的喵酱的博客-CSDN博客_基于pytest二次开发
基于pytest框架现有功能的使用。
github地址:
GitHub - 18713341733/python_auto_ui
前面讲解的东西,有点复杂且乱,如果想直接用这个框架直接看第九章节代码实战
一、整个自动化的结构
pytest+selenium+allure
1.1 整体分层
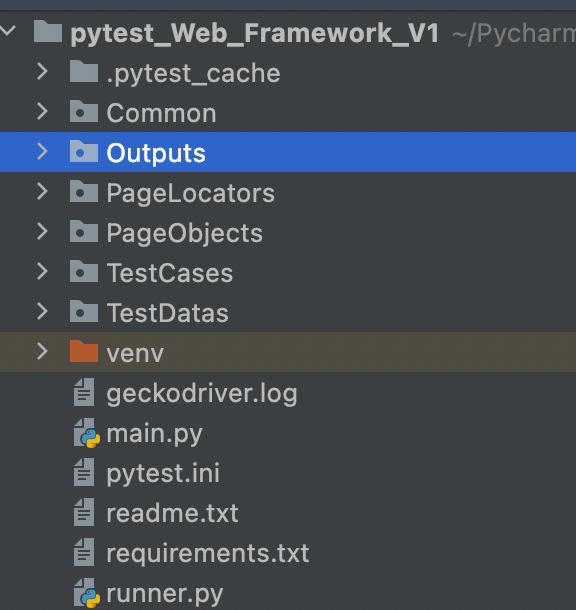
1、公共方法层Common
2、日志&报告层 Output
3、页面元素层PageLocators
4、case具体实现的逻辑层PageObjects
5、case层TestCase
6、测试数据层TestDatas
6、自动化执行入口main.py&runner.py
1.2每层的作用
1、公共方法层Common
封装的是一些公共方法
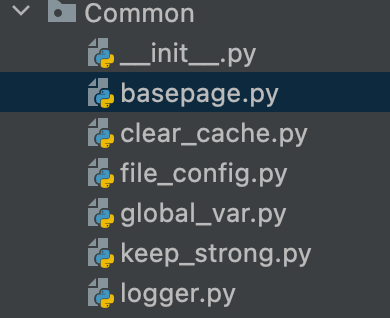
** basepage.py** 存放的是封装的selenium的方法,比如元素点击、元素获取、等待元素的出现、文本框的输入等
**clear_cache.py **就是一个删除文件的方法,在执行case的时候,会调用。判断当前是否有历史的log日志和allure报告。如果有就删除掉。这样报告存放的一直都是最新生成的。不过这样也是有一个问题的,报告文件只保留了最新一次的。(最好能实现保存一周的)
**keep_strong.py **就是一个服务器探活的方法。执行ui自动化,最大的痛点就是不稳定因素太多了。当服务器有波动时,会造成大量的case执行失败。所以我在执行case之前,对本次自动化所依赖的服务ip做一个探活操作,如果正常,则继续执行case。
2、日志&报告层 Output
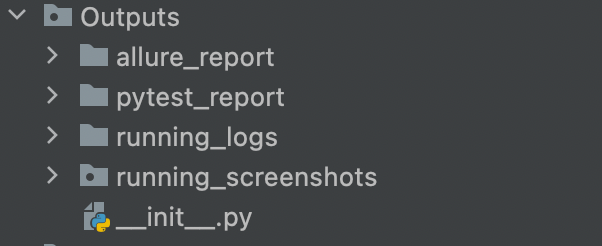
见名知意,里面分别存放的是allure报告、pytest报告、log、和错误截图
3、页面元素层PageLocators
这里面存放的就是页面元素。将每个页面,都各自封装在一个py文件里。如首页所有的元素存放在一个py文件,个人中心所有的页面元素存放在另一个py文件。
主要定位方式就是那些id className xpath等。
定位的时候,如果id classname 是唯一的,尽量使用id 和 classname定位。
在做web自动化时,很多都不是唯一的,web 还有很多表单等,这个就比较复杂,我们这里一般使用xpath 的相对定位方式。
简单举几个例子
example_page_locator.py
from selenium.webdriver.common.by import By

class ExamplePageLocator:
    """
    示例页面的元素定位

    """
    # xpath,通过文案定位
    school = (By.XPATH, "//span[text()='学校']")
    # xpath,通过文案定位
    student = (By.XPATH, "//li[text()='学生']")
    # ID
    searchId = (By.ID, "searchYou")
    # xpath,通过 class
    primaryStudent = (By.XPATH, "//div[@class='ant-primary-student']")
    primaryStudent1 = (By.XPATH, "//button[@class='ant-abc']")
    primaryStudent2 = (By.XPATH, "//span[@class='icon'][1]")
    # 表单
    list1 = (By.XPATH, "//tbody[@class='abc']//tr[@class='bcd'][1]//td[1]")
具体的定位方式,百度一下吧,这里就不往细里讲了。
4、case具体实现的逻辑层PageObjects
构成case的每一个步骤,比如点击A按钮,再点击B按钮,再操作什么什么。具体的下面会有一个整体的自动化实战。往下看
二、case数据的初始化fixture,前置与后置
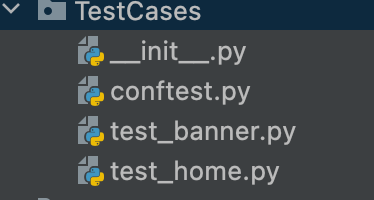
里面装都的都是case,注意
py文件的命名都要以test_开头。
具体的每条case,也是需要以test_开头
这里比较有意思的是conftest.py文件。
import pytest, time
from selenium import webdriver
from selenium.webdriver.common.desired_capabilities import DesiredCapabilities

@pytest.fixture(scope="class")
def access_web():
    # 前置:打开浏览器
    # 修改页面加载策略
    desired_capabilities = DesiredCapabilities.CHROME
    # 注释这两行会导致最后输出结果的延迟,即等待页面加载完成再输出
    desired_capabilities["pageLoadStrategy"] = "none"
    # 实例化对象
    driver = webdriver.Chrome()
    # 访问网址
    driver.get("www.baidu.com")
    # 窗口最大化
    driver.maximize_window()
    # 等待
    time.sleep(4)
    # 返回对象
    yield driver
    # 后置:关闭浏览器
    driver.quit()

@pytest.fixture
def refresh(access_web):
    yield access_web
    # 刷新页面
    access_web.refresh()
    # 操作1
    # access_web.find_element(*LP.s).click()
    # 操作2
    # access_web.find_element(*LP.che).click()
    time.sleep(1)

def pytest_configure(config):
    config.addinivalue_line("markers", 'smoke')
    config.addinivalue_line("markers", 'P0')
    config.addinivalue_line("markers", 'P1')
这个文件,实现的是setup、teardown功能。使用pytest框架提供的能力fixture的功能。
参考链接:
pytest进阶教程之fixture函数详解_Python_脚本之家
Pytest之fixture的使用 - 简书
一、fixture的功能
fixture是pytest特有的功能,用以在测试执行前和执行后进行必要的准备和清理工作。与python自带的unitest测试框架中的setup、teardown类似,pytest提供了fixture函数用以在测试执行前和执行后进行必要的准备和清理工作。但是相对来说又比setup、teardown好用。
- 做测试前后的初始化设置,如测试数据准备,链接数据库,打开浏览器等这些操作都可以使用fixture来实现。
- ** 测试用例的前置条件可以使用fixture实现 。**
- ** 支持经典的xunit fixture ,像unittest使用的setup和teardown。**
- ** fixture可以实现unittest不能实现的功能,比如unittest中的测试用例和测试用例之间是无法传递参数和数据的,但是fixture却可以解决这个问题。**
使用pytest.fixture标识,定义在函数/case前面。
在你编写测试函数的时候,你可以将此函数名称做为传入参数,pytest将会以依赖注入方式,将该函数的返回值作为测试函数的传入参数。
主要的目的是为了提供一种可靠和可重复性的手段去运行那些最基本的测试内容。
从功能上看来,与setup、teardown相似,但是优势明显:
命名方式灵活,不局限于setup和teardown这几个命名
conftest.py 配置里可以实现数据共享,不需要import就能自动找到一些配置
scope="module" 可以实现多个.py跨文件共享前置, 每一个.py文件调用一次
scope="session" 以实现多个.py跨文件使用一个session来完成多个用例
二、fixture的参数详解
@pytest.fixture(scope = "function",params=None,autouse=False,ids=None,name=None)
1、scope
用于控制Fixture的作用范围
默认取值为function(函数级别),控制范围的排序为:session > module > class > function
function 函数级 每一个函数或方法都会调用
class 类级别 每个测试类只运行一次
module 模块级 每一个.py文件调用一次
session 会话级 每次会话只需要运行一次,会话内所有方法及类,模块都共享这个方法
2、fixture函数的返回值:return 和 yield 和 addfinalizer终结函数
return:
通过下面的代码,我们已经发现可以通过测试用例函数传入参数的形式,直接使用fixture函数的返回值,这个相对来说比较简单。
@pytest.fixture
def first_entry():
    return "a"

@pytest.fixture
def order(first_entry):
    return [first_entry]

def test_string(order):
    order.append("b")
    assert order == ["a", "b"], "断言执行失败"

if __name__ == '__main__':
    pytest.main(['test_login.py::test_string', '-s'])
yield:
yeild也是一种函数的返回值类型,是函数上下文管理器,使用yield被调fixture函数执行遇到yield会停止执行,接着执行调用的函数,调用的函数执行完后会继续执行fixture函数yield关键后面的代码。
因此利用fixture函数,我们可以说pytest集合了setup、teardown,既做了初始化,又做了后置的清理工作。
下面的代码,是我们项目中的。解释一下逻辑。
import pytest, time
from selenium import webdriver
from selenium.webdriver.common.desired_capabilities import DesiredCapabilities

# @pytest.fixture,框架提供的能力。将access_web()打上注解,供别人做初始化的调用。
# scope="class",作用范围,class 类级别 每个测试类只运行一次
@pytest.fixture(scope="class")
def access_web():
    # 前置:打开浏览器
    # 修改页面加载策略
    desired_capabilities = DesiredCapabilities.CHROME
    # 注释这两行会导致最后输出结果的延迟,即等待页面加载完成再输出
    desired_capabilities["pageLoadStrategy"] = "none"
    # 实例化对象
    driver = webdriver.Chrome()
    # 访问网址
    driver.get("www.baidu.com")
    # 窗口最大化
    driver.maximize_window()
    # 等待
    time.sleep(4)
    # 返回对象
    yield driver
    # 后置:关闭浏览器
    driver.quit()

# 写每条case,的时候都会传入refresh方法
# 如 test_a_channel_search(self, refresh):
# 则执行顺序,就是在正式执行case执行之前,先执行refresh这个方法
#
@pytest.fixture
def refresh(access_web):
    yield access_web
    # 刷新页面
    access_web.refresh()
    # 操作1
    # access_web.find_element(*LP.s).click()
    # 操作2
    # access_web.find_element(*LP.che).click()
    time.sleep(1)
case
    def test_a_channel(self, refresh):

        result_text = CP(refresh).channel()
        assert result_text == '中'
1、case,test_a_channel(self, refresh):
传入了refresh,且refresh 被@pytest.fixture修饰。
则这里的执行顺序,是先执行refresh函数,执行完了,再执行我们case里面的内容
2、def refresh(access_web):
refresh函数,传入了access_web函数。
则调用refresh函数时,执行顺序是
先执行acces_web函数,执行完了再执行refresh函数。
3、def access_web():
@pytest.fixture(scope="class")
def access_web():
    # 前置:打开浏览器
    # 修改页面加载策略
    desired_capabilities = DesiredCapabilities.CHROME
    # 注释这两行会导致最后输出结果的延迟,即等待页面加载完成再输出
    desired_capabilities["pageLoadStrategy"] = "none"
    # 实例化对象
    driver = webdriver.Chrome()
    # 访问网址
    driver.get("www.baidu.com")
    # 窗口最大化
    driver.maximize_window()
    # 等待
    time.sleep(4)
    # 返回对象
    yield driver
    # 后置:关闭浏览器
    driver.quit()
执行acces_web函数,实例化driver驱动,打开浏览器,访问网站,最大化窗口
遇到yield关键字,中止fixture acces_web函数调用。
将driver return给refresh函数。开始执行refresh 函数。
refresh 函数执行完成后,执行yield函数后的driver.quit(),关闭浏览器
三、fixture的三种调用方式
1、测试用例内直接调用
import pytest

@pytest.fixture()
def test_01():
    print("this is test_01")

def test_02(test_01):
    print("this is test_02")
2、通过fixture decorator调用fixture
注:如果一个方法或者一个class用例想要同时调用多个fixture,可以使用@pytest.mark.usefixtures()进行叠加。注意叠加顺序,先执行的放底层,后执行的放上层。
import pytest

@pytest.fixture()
def test_01():
    print("this is test_01")

# 第一种是每一个函数前声明
@pytest.mark.usefixtures("test_01")
def test_02():
    print("this is test_02")

# 第二种是封装在类里,类里的每一个成员函数声明
class Test01:
    @pytest.mark.usefixtures("test_01")
    def test_03(self):
        print("this is test_03")

    @pytest.mark.usefixtures("test_01")
    def test_04(self):
        print("this is test_04")

# 第三种是在类前声明
@pytest.mark.usefixtures("test_01")
class Test2:
    def test_05(self):
        print("this is test_05")

    def test_06(self):
        print("this is test_06")
3、使用参数autouse调用fixture
autouse设置为True时,在一个session内的所有的test都会自动调用这个fixture。
好了,回归我们自己的conftest.py文件。
@pytest.fixture(scope="class")
def access_web():
@pytest.fixture,框架提供的能力。将access_web()打上注解,供别人做初始化的调用。
scope="class",作用范围,class 类级别 每个测试类只运行一次
三、环境初始化与清理环境setup和teardown方式
1、方法级别初始化、清除,每个方法运行前后执行一次
setup 和 teardown,setup_method,teardown_method
2、类级别初始化、清除
在类中添加方法 def setup_class() 和 def teardown_class()
在定义了该方法 def setup_class() 和 def teardown_class() 的类中所有的用例执行前后只执行一次
3、模块级别初始化、清除,整个模块中所有类中的内容执行前后运行setup_module和teardown_module,必须设置全局方法 def setup_module() 和 def teardown_module()
示例代码如下:
# -*- coding:utf-8 -*-
# @Author: 喵酱
# @time: 2022 - 06 -29
# @File: test_cs_setup.py

import pytest

def setup_module(self):
    print('setup_module环境初始化')

def teardown_module(self):
    print('teardown_module环境清除')

class Test1:
    def setup_class(self):
        print('setup_class环境初始化')

    def teardown_class(self):
        print('teardown_class环境清除')

    def setup_method(self):
        print('setup_method环境初始化')

    def teardown_method(self):
        print('teardown_method环境清除')

    def setup(self):
        print('setup环境初始化')

    def teardown(self):
        print('teardown清理环境')

    def test_1(self):
        assert 1 == 1

    def test_2(self):
        assert 1 == 1
    def test_3(self):
        assert 1 == 1
打印结果:
Process finished with exit code 0
setup_module环境初始化
setup_class环境初始化
setup_method环境初始化
setup环境初始化
PASSED                                   [ 33%]teardown清理环境
teardown_method环境清除
setup_method环境初始化
setup环境初始化
PASSED                                   [ 66%]teardown清理环境
teardown_method环境清除
setup_method环境初始化
setup环境初始化
PASSED                                   [100%]teardown清理环境
teardown_method环境清除
teardown_class环境清除
teardown_module环境清除
四、case的执行入口
有两个入口,一个是main.py入口。
另一个是runner.py。这里是支持了终端调用脚本
一、支持脚本运行方式
1、支持运行所有的case
2、支持运行一个或多个文件下的case
3、支持运行带有标签的case
4、支持运行具体的某一条case
二、总工程执行方式:
python3 runner.py 参数1 参数2 参数3
参数1:
第一个参数 case 执行类型,'all', 'choose', 'tag','single'
type = sys.argv[1]
参数2:
第二个参数要执行的文件名称或者标签名称, 多个文件逗号分割
如果第一个参数为tag,则第二个参数为标签名称。
目前只支持四个标签
somke P0 P1 P2 P3,后续可以自己新增
栗子:
执行所有case
sudo python3 runner.py all
执行部分py文件
sudo python3 runner.py choose test_3_lianxi2.py
多个文件逗号隔开
sudo python3 runner.py choose test_3_lianxi2.py,test_2_lianxi1.py
执行带标签的case
sudo python3 runner.py tag P1
执行具体的某条case
需要传文件名、类名和方法名称
sudo python3 runner.py single test_3_mytest3.py TestService test_b_buildserver
执行不同级别的的case
python3 runner.py severity blocker
python3 runner.py severity blocker,critical
其他说明:
pytest.main():main中传入不同的指令用以执行指定测试用例
-s: 显示程序中的print/logging输出
-v: 丰富信息模式, 输出更详细的用例执行信息
-k:关键字匹配,用and区分:匹配范围(文件名、类名、函数名)
-m: 匹配标签,pytest -m “tag名称” #运行指定tag名称的用例,也就是运行有@pytest.mark.[标记名]这个标记的case
--steup-show #完整展示每个用例的fixture调用顺序
https://www.cnblogs.com/jaxon-chen/p/13204745.html
备注:
调试的时候,可以给具体某一条打一个特殊的标签,这样方便调试
五、给用例/模块打标签,给用例打级别
2.1
在pytest.ini文件下,新增标签名称
2.2
在conftest.py文件下,映射刚刚添加的标签
2.3
用例添加标签
@pytest.mark.P0
给测试类加标签
@pytest.mark.P0
class TestClass1(object):
用例同时打两个标签
@pytest.mark.P0
@pytest.mark.P1
参考方法:
Pytest案例标记,pytest,用例,打,标签
######给用例分级别
等级介绍
blocker:阻塞缺陷(功能未实现,无法下一步)
critical:严重缺陷(功能点缺失)
normal: 一般缺陷(边界情况,格式错误)
minor:次要缺陷(界面错误与ui需求不符)
trivial: 轻微缺陷(必须项无提示,或者提示不规范)
根据测试用例的重要性划分测试用例等级,如果没指定等级,默认为normal级别
栗子:
@allure.severity("blocker")
    @allure.story("渠道编号判重")
    def test_j_check_channel_number(self, refresh):
        result = CP(refresh).channel_number()
        assert result == True
参考文件:
https://blog.csdn.net/qq_33801641/article/details/109339371
执行不同级别的的case
python3 runner.py severity blocker
python3 runner.py severity blocker,critical
六、注意事项
3.1跑自动化时,关掉执行机器的Charles,不然页面可能会报错
3.2确保脚本稳定,尽量加个sleep吧
七、多进程
参考博客:
pytest ui 自动化多进程_傲娇的喵酱的博客-CSDN博客_pytest实现ui自动化
依赖的是pytest-xdist插件
一、通过main函数运行
2个进程
pytest.main(["-s", "-v", "-m", "cs1", "--html=Outputs/pytest_report/pytest.html", "--alluredir=Outputs/allure_report","-n","2"])
默认自动检查系统cpu个数,然后进行并发
pytest.main(["-s", "-v", "-m", "cs1", "--html=Outputs/pytest_report/pytest.html", "--alluredir=Outputs/allure_report","-n","auto"])
二、通过runner.py运行
在原有命令基础上,追加数字或者追加auto就可以了
目前只支持 all 全部运行和 tag标签多进程
默认是单进程
八、失败重试机制
参考博客:
pytest ui 自动化失败后重试_傲娇的喵酱的博客-CSDN博客
依赖pytest-rerunfailures 插件
失败包括1、断言失败2、case执行失败(如元素找不到等情况)
一、通过main函数运行
"--reruns","2" ,失败后再次执行两次
pytest.main(["-s", "-v", "-m", "cs1", "--html=Outputs/pytest_report/pytest.html", "--alluredir=Outputs/allure_report","--reruns","2"])
二、通过runner.py运行
这里默认设置失败后再次执行一次,不支持自定义
目前只支持 all 全部运行和 tag标签多进程
九、代码实战
9.1实现场景
1、访问百度网站,搜索“搜狗”,搜索结果第一条数据的名称为 搜狗
1、访问百度网站,搜索“淘宝”,搜索结果第一条数据的名称为 淘宝
9.2封装页面元素
在PageLocators文件夹下,新建文件。
百度首页 baidu_page_locator.py
baidu_page_locator.py
from selenium.webdriver.common.by import By

class BaiduPageLocator:
    """
    百度首页的页面元素

    """
    # 输入框搜索内容
    searchValue = (By.ID, "kw")

    # 搜索按钮
    searchBtn = (By.ID, "su")

    # 搜索结果第一条数据
    list_name = (By.XPATH, '//*[@id="1"]/div/div[1]/h3/a')
9.3 构建case的步骤
在PageObjects文件夹下,新建py文件
step_baidu_serach.py
import time
import re
from PageLocators.baidu_page_locator import BaiduPageLocator as BD
from Common.basepage import BasePage

class BaiduPage(BasePage):

    def search_sougou(self):
        self.input_text(BD.searchValue,"搜狗",doc="输入框输入搜狗")
        self.click(BD.searchBtn, doc="点击搜索按钮")
        text_search = self.get_element_text(BD.list_name, doc="搜索结果列表的第一条数据")
        return text_search

    def search_taobao(self):
        self.input_text(BD.searchValue, "淘宝", doc="输入框输入搜狗")
        self.click(BD.searchBtn, doc="点击搜索按钮")
        text_search = self.get_element_text(BD.list_name, doc="搜索结果列表的第一条数据")
        return text_search
9.4构建case
这里直接写断言就好了
在TestCases下,新建test_baidu.py文件。一定要以test_开头
# -*- coding:utf-8 -*-
# 创建者: 喵酱
# 功能点:百度搜索页面

import os, pytest, allure

from PageObjects.step_baidu_serach import BaiduPage as BD

root = os.path.dirname(os.path.abspath(__file__))

@allure.feature("模块:百度搜索")
class TestChannel:

    @pytest.mark.P3
    @allure.story("搜索搜狗")
    def test_search_sougou(self, refresh):
        """
        操作:搜索搜狗
        断言:结果列表展示搜狗
        """
        result_text = BD(refresh).search_sougou()
        assert result_text == '搜狗'

    @pytest.mark.P1
    @allure.story("搜索淘宝")
    def test_search_taobao(self, refresh):
        """
        操作:搜索淘宝
        断言:结果列表展示淘宝
        """
        result_text = BD(refresh).search_taobao()
        assert result_text == '淘宝'
9.5 编写框架的初始化
case里面只是写了具体的搜索步骤,但是这些前置条件,比如打开浏览器,进入百度网站这些还没写,这些我们写到TestCases文件下的conftest.py 文件中。
import pytest, time
from selenium import webdriver
from selenium.webdriver.common.desired_capabilities import DesiredCapabilities

# @pytest.fixture,框架提供的能力。将access_web()打上注解,供别人做初始化的调用。
# scope="class",作用范围,class 类级别 每个测试类只运行一次
@pytest.fixture(scope="class")
def access_web():
    # 前置:打开浏览器
    # 修改页面加载策略
    desired_capabilities = DesiredCapabilities.CHROME
    # 注释这两行会导致最后输出结果的延迟,即等待页面加载完成再输出
    desired_capabilities["pageLoadStrategy"] = "none"
    # 实例化对象
    driver = webdriver.Chrome()
    # 访问网址
    driver.get("www.baidu.com")
    # 窗口最大化
    driver.maximize_window()
    # 等待
    time.sleep(4)
    # 返回对象
    yield driver
    # 后置:关闭浏览器
    driver.quit()

# 写每条case,的时候都会传入refresh方法
# 如 test_a_channel_search(self, refresh):
# 则执行顺序,就是在正式执行case执行之前,先执行refresh这个方法
#
@pytest.fixture
def refresh(access_web):
    yield access_web
    # 刷新页面
    access_web.refresh()
    # 操作1
    # access_web.find_element(*LP.s).click()
    # 操作2
    # access_web.find_element(*LP.che).click()
    time.sleep(1)

def pytest_configure(config):
    config.addinivalue_line("markers", 'smoke')
    config.addinivalue_line("markers", 'P0')
    config.addinivalue_line("markers", 'P1')
9.6 执行入口
都写完了,就执行main.py就可以了。
注意:
大家下载了我的源码,执行case时,没有选中case。这个就是执行case(筛选case的入口)
-m: 匹配标签,pytest -m “tag名称” #运行指定tag,我这里运行入口,做了case筛选,只运行tag为sj的case,你把-m sj 删除掉就可以了
者你给不同的case 打不同的标签
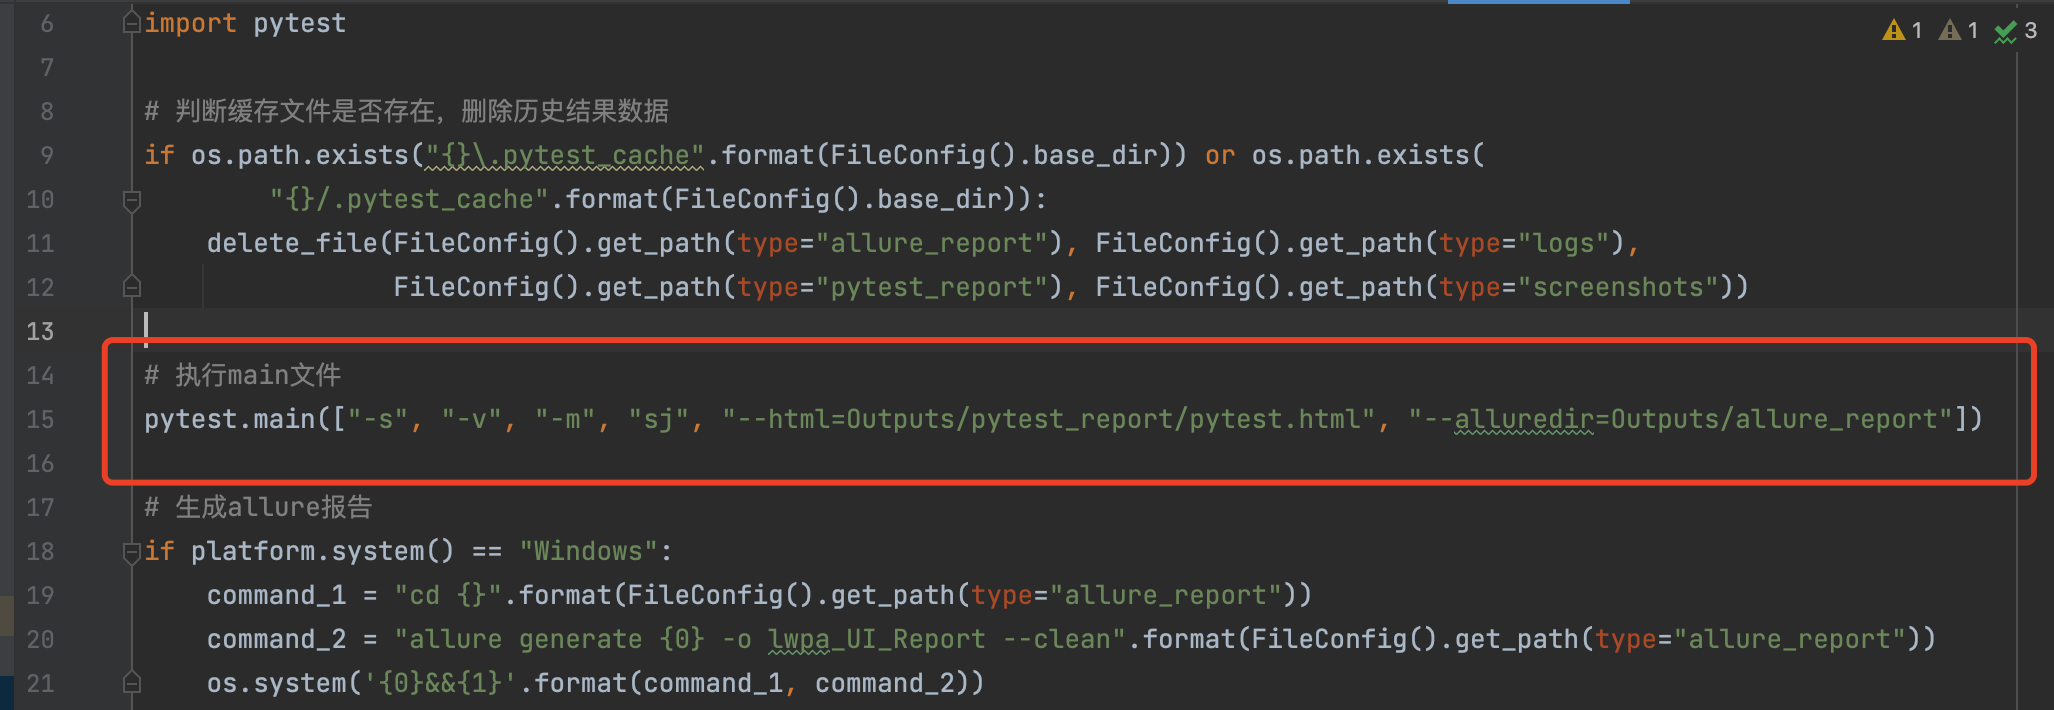
pytest.main():main中传入不同的指令用以执行指定测试用例
-s: 显示程序中的print/logging输出
-v: 丰富信息模式, 输出更详细的用例执行信息
-k:关键字匹配,用and区分:匹配范围(文件名、类名、函数名)
-m: 匹配标签,pytest -m “tag名称” #运行指定tag名称的用例,也就是运行有@pytest.mark.[标记名]这个标记的case
我的V
_miaojiang___
版权归原作者 做测试的喵酱 所有, 如有侵权,请联系我们删除。