Spring框架概述
Spring是轻量级开源JavaEE框架,可以解决企业应用开发的困难性。
有两个核心部分:
- IOC:控制反转, 把创建对象的过程交给Spring去管理
- AOP: 面向切面编程,不修改源码进行功能增强。
Spring 特点:
- 方便解耦、简化开发
- AOP编程支持
- 方便程序测试
- 方便和其他框架整合
- 方便进行事务操作
- 降低API开发难度
Spring 模块
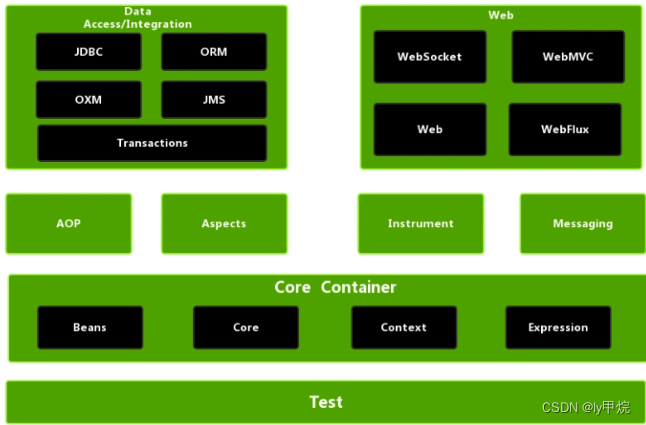
入门案例
1.导入IOC核心jar包
2.创建对象类
publicclassBook{privateString bName;privateString bAuthor;publicvoidtestDemo(){System.out.println(bName +"::"+ bAuthor);}}
3.创建bean1.xml文件
<?xml version="1.0" encoding="UTF-8"?><beansxmlns="http://www.springframework.org/schema/beans"xmlns:xsi="http://www.w3.org/2001/XMLSchema-instance"xsi:schemaLocation="http://www.springframework.org/schema/beans http://www.springframework.org/schema/beans/spring-beans.xsd"><!-- 配置对象创建--><beanid="book"class="cn.lych4.spring5.bean.Book"></bean></beans>
4.创建对象
//1. 加载spring 配置文件ApplicationContext context =newClassPathXmlApplicationContext("bean1.xml");//2.获取配置的对象Book book = context.getBean("book",Book.class);System.out.println(book);
        book.testDemo();
IOC
什么是IOC?
控制反转(IOC), 就算把对象创建和对象之间的调用过程交给Spring容器进行管理
IOC的目的是为了降低耦合
IOC过程
第一步: xml配置文件,配置创建的对象
<beanid="userDao"class="cn.lych4.dao.impl.UserDaoImpl"></bean>
第二步: 有service 类 和 dao 类, 创建工厂类。进一步降低耦合度
classUserFactory{publicstaticUserDaogetDao(){String classValue =class属性值;// 1. XML解析Class clazz =Class.forName(classValue)// 通过反射创建对象return(UserDao)clazz.newInstance();}}
IOC接口
IOC 思想基于IOC容器完成,IOC容器底层就算对象工厂
Spring 提供两种方式实现 IOC 容器: (两个接口)
- BeanFactory: IOC容器基本实现,是Spring 内部的使用接口,一般开发人员不使用 加载配置文件的时候,不会创建对象,在获取对象的时候才去创建对象
- ApplicationContext: 是BeanFactory的子接口,提供更多强大的功能,一般由开发人员使用。 加载配置文件的时候,就会把对象创建
IOC的bean管理
什么是Bean管理
Bean管理指的是两个操作:
- Spring 创建对象
- Spring 注入属性(set值)
Bean管理操作有两种方式
①. 基于XML配置文件方式实现, ②.基于注解方式实现
IOC的Bean管理操作(基于xml)
1.bean标签创建对象
在spring配置文件中,使用bean标签,标签里面添加对应属性,就可以是实现对象创建
*id属性: 对象标识
*class属性: 类全路径
name属性:早期属性,和id类似,只不过可以加特殊符号
默认执行无参构造完成对象创建
DI 依赖注入,注入属性
——set注入
对象类必须有对应set方法
配置文件:
<beanid="book"class="cn.lych4.spring5.bean.Book"><!-- set方法注入属性 --><propertyname="bName"value="易筋经"></property><propertyname="bAuthor"value="达摩老祖"></property></bean>
——有参构造注入
对象类必须有对应有参构造方法
配置文件:
<!-- 有参构造创建对象--><beanid="orders"class="cn.lych4.spring5.bean.Orders"><constructor-argname="oname"value="电脑"></constructor-arg><constructor-argname="address"value="China"></constructor-arg></bean>
xml注入其他类型属性,空值和bean值
1.字面量
null 空值
<!--注入空值--><propertyname="bAuthor"><null/></property>
属性值包括特殊符号
特殊符号转义,或者是把特殊内容写到 <![CDATA[这里]]
<!--注入带特殊符号的值, <[大神]> --><propertyname="bAuthor"><value><![CDATA[<[大神]>]]></value></property>
2.注入属性-外部bean
创建一个Service类和Dao类
在Service类中调用Dao类中的方法
在spring配置文件中进行配置
<!-- 1.service 和 dao 对象创建--><beanid="userService"class="cn.lych4.spring5.service.UserService"><!-- 2.service 中注入 userDao 对象, name:类里面的属性名称--><propertyname="userDao"ref="userDaoImpl"></property></bean><beanid="userDaoImpl"class="cn.lych4.spring5.dao.UserDaoImpl"></bean>
3.注入属性-内部bean
(1)一对多关系:部门和员工
(2)在实体类中表示一对多的关系
//部门类,一publicclassDept{privateString name;publicvoidsetName(String name){this.name = name;}}//员工类,多publicclassEmp{privateString ename;privateString gender;//员工属于某一个部分privateDept dept;publicvoidsetEname(String ename){this.ename = ename;}publicvoidsetGender(String gender){this.gender = gender;}publicvoidsetDept(Dept dept){this.dept = dept;}}
(3)在spring配置文件中进行配置
<!-- 注入内部bean--><beanid="emp"class="cn.lych4.spring5.bean.Emp"><propertyname="ename"value="lucy"></property><propertyname="gender"value="女"></property><!-- 设置对象类型属性--><propertyname="dept"><beanid="dept"class="cn.lych4.spring5.bean.Dept"><propertyname="name"value="安保部"></property></bean></property></bean>
3.注入属性-级联赋值
(1) 第一种
<!-- 注入内部bean--><beanid="emp"class="cn.lych4.spring5.bean.Emp"><propertyname="ename"value="lucy"></property><propertyname="gender"value="女"></property><!-- 级联赋值--><propertyname="dept"ref="dept"></property></bean><beanid="dept"class="cn.lych4.spring5.bean.Dept"><propertyname="dname"value="财务部"></property></bean>
(2)第二种
<!-- 注入内部bean--><beanid="emp"class="cn.lych4.spring5.bean.Emp"><propertyname="ename"value="lucy"></property><propertyname="gender"value="女"></property><!-- 级联赋值--><propertyname="dept"ref="dept"></property><!-- 这里Emp类必须有dept属性的get方法--><propertyname="dept.dname"value="技术部"></property></bean><beanid="dept"class="cn.lych4.spring5.bean.Dept"><propertyname="dname"value="财务部"></property></bean>
xml注入集合属性
注入数组、List、Map
<beanid="stu"class="cn.lych4.spring5.collectiontype.Stu"><!-- 数组类型注入--><propertyname="courses"><array><value>java课程</value><value>数据库课程</value></array></property><!-- list类型注入--><propertyname="list"><list><value>张三</value><value>三哥</value></list></property><!-- map类型属性注入--><propertyname="maps"><map><entrykey="爱好"value="学习"></entry></map></property><!-- set类型属性注入--><propertyname="sets"><set><value>Java</value><value>MySQL</value></set></property></bean>
设置对象集合
<beanid="stu"class="cn.lych4.spring5.collectiontype.Stu"><!-- list类型,里面是对象,属性注入--><propertyname="courseList"><list><refbean="course1"></ref><refbean="course2"></ref><refbean="course3"></ref></list></property></bean><!-- 创建多个course对象--><beanid="course1"class="cn.lych4.spring5.collectiontype.Course"><propertyname="cname"value="Java"></property></bean><beanid="course2"class="cn.lych4.spring5.collectiontype.Course"><propertyname="cname"value="Python"></property></bean><beanid="course3"class="cn.lych4.spring5.collectiontype.Course"><propertyname="cname"value="Go"></property></bean>
抽取集合值, 引入util命名空间
<?xml version="1.0" encoding="UTF-8"?><beansxmlns="http://www.springframework.org/schema/beans"xmlns:xsi="http://www.w3.org/2001/XMLSchema-instance"xmlns:util="http://www.springframework.org/schema/util"xsi:schemaLocation="http://www.springframework.org/schema/beans http://www.springframework.org/schema/beans/spring-beans.xsd
                           http://www.springframework.org/schema/util http://www.springframework.org/schema/util/spring-util.xsd"><util:listid="bookList"><value>MySQL必知必会</value><value>JVM调优</value></util:list><beanid="book"class="cn.lych4.spring5.collectiontype.Book"><propertyname="bnames"ref="bookList"></property></bean></beans>
2. FactoryBean
Spring有两种类型的bean,一种是普通的bean 另外一种是工厂bean (FactoryBean)
- 普通bean: 在配置文件种定义bean类型就是返回类型
- 工厂bean:在配置文件定义bean类型可以和返回类型不一样 第一步:创建类,让这个类作为工厂bean, 实现接口FactoryBean 第二步:实现接口里面的方法,在实现的方法中定义返回的bean类型
创建一个Bean,实现FactoryBean接口
publicclassMyBeanimplementsFactoryBean<Course>{//定义返回beanpublicCoursegetObject()throwsException{Course course =newCourse();
        course.setCname("abc");return course;}publicClass<?>getObjectType(){returnnull;}publicbooleanisSingleton(){returnfalse;}}
xml配置文件
<beanid="myBean"class="cn.lych4.spring5.factorybean.MyBean"></bean>
测试:
@TestpublicvoidtestFactoryBean(){ApplicationContext context =newClassPathXmlApplicationContext("factorybean.xml");// MyBean myBean = context.getBean("myBean", MyBean.class);Course myBean = context.getBean("myBean",Course.class);System.out.println(myBean);}
3. bean作用域
在Spring里面可以设置创建的bean实例是单实例还是多实例
在Spring里面默认情况下创建的bean都是单实例bean
scope属性可以设置单实例还是多实例。scope属性值: singleton、 prototype
<beanid="book"class="cn.lych4.spring5.collectiontype.Book"scope="prototype"></bean>
scope值是 singleton 的时候,加载spring配置文件就会创建实例对象
scope值是 prototype 时候, 不是在加载 spring 配置文件时候创建对象,获取对象的时候才会创建
4. bean生命周期
①通过构造器创建bean实例(无参构造)
②为bean的属性设置值和对其他bean引用(调用set方法)
③把bean实例传递bean后置处理器的Before方法(需要配置)
③调用bean的初始化的方法(需要进行配置初始化的方法)
③把bean实例传递bean后置处理器的After方法 (需要配置)
④bean可以使用了(对象获取到了)
⑤当容器关闭时候,调用bean的销毁的方法(需要进行配置销毁的方法)
<!-- 配置后置处理器, 所有bean都会加上后置处理器--><beanid="myBeanPost"class="cn.lych4.spring5.bean.MyBeanPost"></bean>
5. xml自动装配
bean标签属性autowire,配置自动装配。
两个属性常用值:
- byName 按属性名称注入,注入值bean的id值和类属性名得一样
- byType 按类型属性类型注入
6.xml引入外部属性文件
① 先直接配置数据库信息, 配置德鲁伊连接池
记得引入jar包
<!-- 配置连接池--><beanid="dataSource"class="com.alibaba.druid.pool.DruidDataSource"><propertyname="driverClassName"value="com.mysql.jdbc.Driver"></property><propertyname="url"value="jdbc:mysql://localhost:3306/userDb"></property><propertyname="username"value="root"></property><propertyname="password"value="root"></property></bean>
② 引入外部属性文件
创建外部属性文件
引入context名称空间,把properties属性文件引入到 spring 配置文件中
<?xml version="1.0" encoding="UTF-8"?><beansxmlns="http://www.springframework.org/schema/beans"xmlns:xsi="http://www.w3.org/2001/XMLSchema-instance"xmlns:context="http://www.springframework.org/schema/context"xsi:schemaLocation="http://www.springframework.org/schema/beans http://www.springframework.org/schema/beans/spring-beans.xsd
                           http://www.springframework.org/schema/context http://www.springframework.org/schema/context/spring-context.xsd"><!--    引入外部属性文件--><context:property-placeholderlocation="jdbc.properties"/><beanid="dataSource"class="com.alibaba.druid.pool.DruidDataSource"><propertyname="driverClassName"value="${prop.driverClass}"/><propertyname="url"value="${prop.url}"/><propertyname="password"value="${prop.password}"/></bean></beans>
IOC的Bean管理操作(基于注解)
1.基于注解实现对象创建
注解可以用在类、方法、属性上面
@Component
@Service
@Controller
@Repository
这四个注解功能一样,都可以用来创建bean实例
1.需要额外引入AOP的jar包
2.开启组件扫描
<!-- 开启组件扫描, 多个包逗号隔开, 或者直接扫描上层包 (引入名称空间context)--><context:component-scanbase-package="cn.lych4.spring5"/>
3.创建类,在类上添加创建对象注解
@Component(value ="userService")//效果和 <bean id="userService" class="..."/> 一样publicclassUserService{publicvoidadd(){System.out.println("service::add");}}
常用包扫描设置:
<!-- 示例1: 不使用默认filter, 自己配置filter--><context:component-scanbase-package="cn.lych4.spring5"use-default-filters="false"><!-- 只扫描带Controller注解的类--><context:include-filtertype="annotation"expression="org.springframework.stereotype.Controller"/></context:component-scan><!-- 示例2: 使用默认filter, 并且设置不扫描的注解--><context:component-scanbase-package="cn.lych4.spring5"><!-- 不扫描Controller注解的类--><context:exclude-filtertype="annotation"expression="org.springframework.stereotype.Controller"/></context:component-scan>
2.基于注解实现属性注入
@Autowired : 根据属性类型进行自动装配
@Qualifier: 根据属性名称进行注入
@Resource: 可以根据类型注入,也可以根据名称注入
@Value : 注入普通类型属性
- Service类 和Dao类都加上创建对象注解(对象创建了)
- Service类需要注入Dao类属性, 先在Service类中定义Dao类型属性,不需要加set方法
- 在属性上面添加@Autowired 注解即可
Qualifier 注解要和Autowired 一起使用, 因为按类型注入一个接口可能有多个实现类,对应多个对象,按类型的话就找不到。
@Autowired@Qualifier(value ="userDao1")privateUserDao userDao;
Resource 注解 既可以根据类型直接注入,也可以加个name来指定按名称找
Value 注解
@Value(value ="abc")privateString name;
完全注解开发
包扫描配置都不要了
- 创建配置类,替代xml文件
- 编写测试类
@TestpublicvoidtestService2(){ApplicationContext context =newAnnotationConfigApplicationContext(SpringConfig.class);UserService userService = context.getBean("userService",UserService.class);
        userService.add();}
AOP
什么是AOP?
面向切面编程(AOP), 利用AOP可以对业务进行隔离,降低业务各部分之间的耦合度,提高代码重用性。提高开发效率
通过不修改源码的方式,在主干功能里面添加新的功能
AOP 底层原理
AOP底层使用动态代理
两种情况 的动态代理
①有接口的情况, 使用JDK的动态代理
一个接口,一个实现类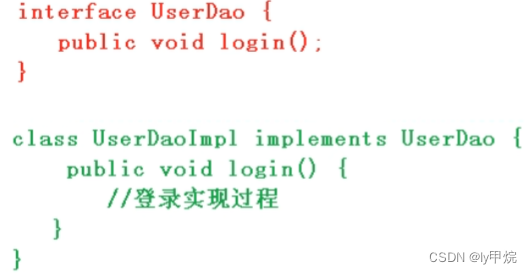
JDK动态代理, 创建一个UserDao 接口的实现类代理对象,去增强类的方法
②没有接口的情况,使用CGLIB动态代理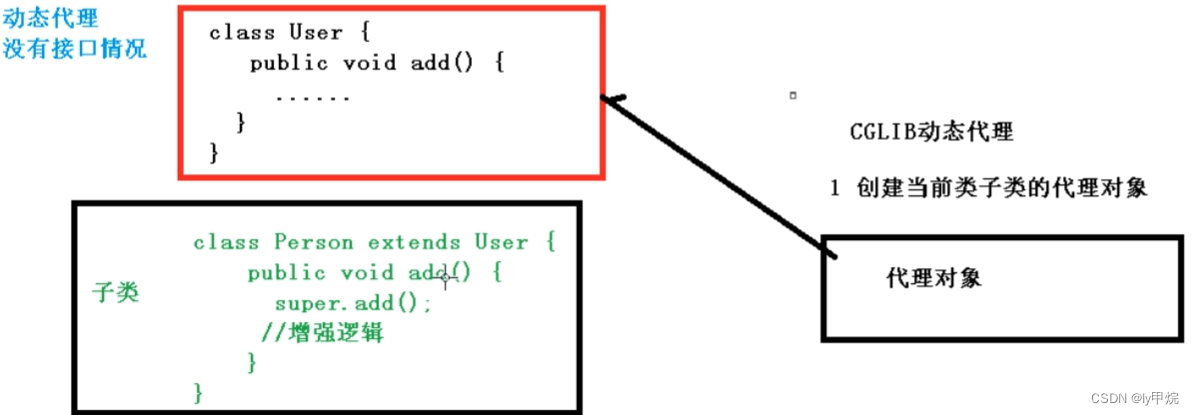
创建当前类的子类的代理对象
JDK动态代理
使用JDK动态代理,使用Proxy类里面的方法创建代理对象
三个参数分别是 类加载器、这个类实现的接口、实现InvocationHandler接口,写增强部分
代码:
publicclassJDKProxy{publicstaticvoidmain(String[] args){//创建接口实现类代理对象Class[] interfaces ={UserDao.class};UserDaoImpl userDao =newUserDaoImpl();UserDao proxyUserDao =(UserDao)Proxy.newProxyInstance(JDKProxy.class.getClassLoader(), interfaces,newUserDaoProxy(userDao));int result = proxyUserDao.add(1,2);System.out.println(result);}}classUserDaoProxyimplementsInvocationHandler{privateObject obj;//1. 创建的是谁的代理对象,把这个人传进来publicUserDaoProxy(Object obj){this.obj = obj;}//增强逻辑publicObjectinvoke(Object proxy,Method method,Object[] args)throwsThrowable{//方法之前, 这里还可以根据方法名实现只增强接口中的某些方法System.out.println("方法执行之前...方法名:"+ method.getName()+"...传递的参数:"+Arrays.toString(args));//执行原方法Object ret = method.invoke(obj, args);//方法之后System.out.println("方法之后执行..."+ obj);return ret;}}
UserDao
publicinterfaceUserDao{publicintadd(int a,int b);}
UserDaoImpl
publicclassUserDaoImplimplementsUserDao{publicintadd(int a,int b){System.out.println("add方法执行了");return a + b;}}
AOP术语
- 连接点: 类中哪些方法可以被增强,这些方法就称为连接点
- 切入点: 实际被真正增强的方法叫做切除点
- 通知(增强):实际增强的逻辑部分称为通知。有前置通知、后置通知、环绕通知、异常通知、最终通知
- 切面 :是动作, 把通知应用到切入点的过程就是切面
实现AOP操作准备操作
Spring 框架中一般基于AspectJ实现AOP操作。
AspectJ是独立的AOP框架, 一般把AspectJ和Spring框架一起使用,进行AOP操作
基于AspectJ 实现AOP操作,两种方式: xml配置方式和注解方式。
1.引入jar包
2.切入点表达式
切入点表达式作用: 知道对哪个类里面的哪个方法进行增强
语法结构:
//举例1: 对cn.lych4.spring5.dao.BookDao 类里面的add()进行增强execution(*cn.lych4.spring5.dao.BookDao.add(..))//举例2: 对cn.lych4.spring5.dao.BookDao 类里面所有方法进行增强execution(*cn.lych4.spring5.dao.BookDao.*(..))//举例3: 对cn.lych4.spring5.dao 包里所有类里面所有方法进行增强execution(* cn.lych4.spring5.dao.*.*(..))
实现AOP操作(AspectJ 注解)
1.创建类,在类中定义方法
@ComponentpublicclassUser{publicvoidadd(){System.out.println("add........");}}
2.创建增强类,编写增强逻辑,不同方法代表不同通知
@Component@AspectpublicclassUserProxy{//前置通知@Before(value ="execution(* cn.lych4.spring5.aopanno.User.add(..))")publicvoidbefore(){System.out.println("before.....");}// 最终通知, 不管有没有异常都通知@After(value ="execution(* cn.lych4.spring5.aopanno.User.add(..))")publicvoidafter(){System.out.println("after.....");}//返回通知, 返回值执行完才通知   //后置通知@AfterReturning(value ="execution(* cn.lych4.spring5.aopanno.User.add(..))")publicvoidafterReturning(){System.out.println("afterReturning.....");}//异常通知@AfterThrowing(value ="execution(* cn.lych4.spring5.aopanno.User.add(..))")publicvoidafterThrowing(){System.out.println("afterThrowing.....");}//环绕通知, 方法前后都执行@Around(value ="execution(* cn.lych4.spring5.aopanno.User.add(..))")publicvoidaround(ProceedingJoinPoint proceedingJoinPoint)throwsThrowable{System.out.println("around.....环绕之前....");
        proceedingJoinPoint.proceed();System.out.println("around.....环绕之后.....");}}
3.进行通知配置
<?xml version="1.0" encoding="UTF-8"?><beansxmlns="http://www.springframework.org/schema/beans"xmlns:context="http://www.springframework.org/schema/context"xmlns:aop="http://www.springframework.org/schema/aop"xmlns:xsi="http://www.w3.org/2001/XMLSchema-instance"xsi:schemaLocation="http://www.springframework.org/schema/beans http://www.springframework.org/schema/beans/spring-beans.xsd
http://www.springframework.org/schema/context http://www.springframework.org/schema/context/spring-context.xsd
http://www.springframework.org/schema/aop http://www.springframework.org/schema/aop/spring-aop.xsd"><!--    开启组件扫描--><context:component-scanbase-package="cn.lych4.spring5"/><!--    开启Aspect生成代理对象--><aop:aspectj-autoproxy/></beans>
4.测试:
@TestpublicvoidtestAopAnno(){ApplicationContext context =newClassPathXmlApplicationContext("bean1.xml");User user = context.getBean("user",User.class);
        user.add();}
5.可以进行公共切入点抽取
//相同切入点抽取@Pointcut(value ="execution(* cn.lych4.spring5.aopanno.User.add(..))")publicvoidpointDemo(){}//前置通知@Before(value ="pointDemo()")publicvoidbefore(){System.out.println("before.....");}
6.如果有多个增强类对同一方法进行增强,可以设置增强优先级
给增强类添加一个@Order() 注解, 括号里填入数字,数字越小优先级越高
@Component@Aspect@Order(3)publicclassPersonProxy{//前置通知@Before(value ="execution(* cn.lych4.spring5.aopanno.User.add(..))")publicvoidbefore(){System.out.println("PersonProxy before.....");}}
基于配置文件方式实现AOP操作(了解)
这样配置就欧克了👇👇👇
<!--创建对象--><beanid="user"class="cn.lych4.spring5.aopanno.User"/><beanid="userProxy"class="cn.lych4.spring5.aopanno.UserProxy"/><!--配置aop增强--><aop:config><!--切入点--><aop:pointcutid="p"expression="execution(* cn.lych4.spring5.aopanno.User.add(..))"/><!--配置切面--><aop:aspectref="userProxy"><!--增强作用在具体的方法上--><aop:beforemethod="before"pointcut-ref="p"/></aop:aspect></aop:config>
完全注解开发
创建配置类,加三个注解
@Configuration//表明这是配置类@ComponentScan(basePackages ={"cn.lych4.spring5"})//开启组件扫描 <context:component-scan base-package="cn.lych4.spring5"/>@EnableAspectJAutoProxy(proxyTargetClass =true)//开启Aspect生成代理对象 <aop:aspectj-autoproxy/>
重点
AOP概念, 底层原理动态代理(有接口、无接口), AOP术语 , AspectJ注解实现AOP操作
JdbcTemplate
JdbcTemplate是什么
JdbcTemplate是Spring框架对JDBC进行封装,使用JdbcTemplate方便实现对数据库的操作
准备工作
1.新引入jar包
2.配置数据库连接池,创建JdbcTemplate对象
jdbc.properties:
jdbc.driverClass=com.alibaba.druid.pool.DruidDataSource
jdbc.url=jdbc:mysql:// /user_db
jdbc.username=root
jdbc.password=
bean1.xml:
<!-- 引入外部属性文件--><context:property-placeholderlocation="jdbc.properties"/><!-- 配置连接池 --><!-- DruidDataSource dataSource = new DruidDataSource(); --><beanid="dataSource"class="com.alibaba.druid.pool.DruidDataSource"><!-- 获取properties文件内容,根据key获取,使用spring表达式获取 --><propertyname="driverClassName"value="${jdbc.driverClass}"/><propertyname="url"value="${jdbc.url}"/><propertyname="username"value="${jdbc.username}"/><propertyname="password"value="${jdbc.password}"/></bean><!--JdbcTemplate对象--><beanid="jdbcTemplate"class="org.springframework.jdbc.core.JdbcTemplate"><!--注入dataSource--><propertyname="dataSource"ref="dataSource"/></bean>
小试牛刀
3.创建Service类、Dao类,在Dao类中注入jdbcTemplate对象
BookService
@ServicepublicclassBookService{//注入Dao@AutowiredprivateBookDao bookDao;publicvoidadd(Book book){
        bookDao.add(book);}}
BookDao
publicinterfaceBookDao{publicvoidadd(Book book);}
BookDaoImpl
@RepositorypublicclassBookDaoImplimplementsBookDao{//注入jdbcTemplate@AutowiredprivateJdbcTemplate jdbcTemplate;publicvoidadd(Book book){//1.创建sql语句String sql ="insert into book values(?,?,?)";//2. 调用方法实现Object[] args ={ book.getBookId(), book.getBookName(), book.getBstatus()};int update = jdbcTemplate.update(sql,args);System.out.println(update);}}
5.创建数据库表对应的实体类, 创建数据库表
publicclassBook{privateString bookId;privateString bookName;privateString bstatus;// +getAndSet方法,toString方法}
注:为了规范,数据库列名最好是下划线分割命名,而不是大驼峰命名
6.测试
@TestpublicvoidtestJdbcTemplate(){ApplicationContext context =newClassPathXmlApplicationContext("bean1.xml");BookService bookService = context.getBean("bookService",BookService.class);Book book =newBook();
        book.setBookId("1");
        book.setBookName("Java");
        book.setBstatus("售出");
        bookService.add(book);}
可以看的数据库添加了一条数据
报错: 严重: {dataSource-1} init error
解决方案: ①检查sql语句 ②MySQL数据库版本和驱动不匹配,改配置文件中的 jdbc.driverClass=com.mysql.jdbc.Driver
修改删除
修改、删除和添加基本一样, 主要sql语句不一样
修改:
publicvoidupdata(Book book){String sql ="update book set book_name=?,bstatus=? where book_id=?";Object[] args ={book.getBookName(), book.getBstatus(), book.getBookId()};int update = jdbcTemplate.update(sql, args);System.out.println(update);}
删除
publicvoiddelete(String id){String sql ="delete from book where book_id=?";int update = jdbcTemplate.update(sql, id);System.out.println(update);}
自行添加接口方法,Service方法, 自行进行修改删除测试, 很简单
查询
查询返回某个值
publicIntegerselectCount(){String sql ="select count(*) from book";//queryForObject(String sql, Class<T> requiredType) 第一个参数sql语句, 第二个参数返回类型class 即你查询的结果返回的类型Integer count = jdbcTemplate.queryForObject(sql,Integer.class);return count;}
查询返回对象
publicBookfindOne(String id){String sql ="select * from book where book_id=?";//queryForObject(String sql, RowMapper<T> rowMapper, Object... args)// 第一个参数sql语句, 第二个参数RowMapper是接口,返回不同类型的数据,使用这个接口里的实现类,完成查询到数据的封装Book book = jdbcTemplate.queryForObject(sql,newBeanPropertyRowMapper<Book>(Book.class), id);return book;}
查询返回集合
publicList<Book>findAllBook(){String sql ="select * from book";//query(String sql, RowMapper<T> rowMapper) 第一个参数sql语句, 第二个参数RowMapper接口List<Book> bookList = jdbcTemplate.query(sql,newBeanPropertyRowMapper<Book>(Book.class));return bookList;}
可能报错:
org.springframework.dao.IncorrectResultSizeDataAccessException:
Incorrect result size: expected 1, actual 2
这个错误的意思是要求返回一个对象,你却返回两个对象,一看数据库,查询的id有两条数据(实际业务id一般是主键不可能重复,这里没设置)
解决方案,手动删除id重复的内容
批量操作
批量添加及测试
publicvoidbatchAddBook(List<Object[]> batchArgs){String sql ="insert into book values(?,?,?)";//批量添加过程就是把batchArgs遍历,每个进行添加int[] ints = jdbcTemplate.batchUpdate(sql, batchArgs);System.out.println(Arrays.toString(ints));}
@TestpublicvoidtestBatch(){ApplicationContext context =newClassPathXmlApplicationContext("bean1.xml");BookService bookService = context.getBean("bookService",BookService.class);List<Object[]> batchArgs =newArrayList<>();Object[] o1 ={"3","python2","未售出2"};Object[] o2 ={"4","redis2","已售出2"};Object[] o3 ={"5","linux2","未售出2"};
        batchArgs.add(o1);
        batchArgs.add(o2);
        batchArgs.add(o3);
        bookService.batchAdd(batchArgs);}
批量修改及测试
@OverridepublicvoidbatchUpdate(List<Object[]> batchArgs){String sql ="update book set book_name=?, bstatus=? where book_id=?";int[] ints = jdbcTemplate.batchUpdate(sql, batchArgs);System.out.println(Arrays.toString(ints));}
@TestpublicvoidtestBatch(){ApplicationContext context =newClassPathXmlApplicationContext("bean1.xml");BookService bookService = context.getBean("bookService",BookService.class);List<Object[]> batchArgs =newArrayList<>();Object[] o1 ={"python2","未售出2","3"};Object[] o2 ={"redis2","已售出2","4"};Object[] o3 ={"linux2","未售出2","5"};
        batchArgs.add(o1);
        batchArgs.add(o2);
        batchArgs.add(o3);
        bookService.batchUpdate(batchArgs);}
批量删除
@OverridepublicvoidbatchDelete(List<Object[]> batchArgs){String sql ="delete from book where book_id=?";int[] ints = jdbcTemplate.batchUpdate(sql, batchArgs);System.out.println(Arrays.toString(ints));}
@TestpublicvoidtestBatch(){ApplicationContext context =newClassPathXmlApplicationContext("bean1.xml");BookService bookService = context.getBean("bookService",BookService.class);List<Object[]> batchArgs =newArrayList<>();Object[] o1 ={"3"};Object[] o2 ={"4"};Object[] o3 ={"5"};
        batchArgs.add(o1);
        batchArgs.add(o2);
        batchArgs.add(o3);
        bookService.batchDelete(batchArgs);}
事务
事务是数据库操作最基本单元,一组操作要么都成功,要么都失败
事务是一个不可分割的数据库操作序列,也是数据库并发控制的基本单位,其执行的结果必须使数据库从一种一致性状态转变为另一种一致性状态。
事务的ACID特性: 原子性、一致性、隔离性、持久性
事务操作
举例: 转账业务
准备工作
建表 t_account

加入原始数据:
创建实体类
publicclassUser{privateString id;privateString username;privateInteger money;// +getAndSet方法 +toString方法}
创建Dao接口、DaoImpl类、 Service类、测试类,注入属性
publicinterfaceUserDao{voidaddMoney(int money,String username);voidreduceMoney(int money,String username);}
@RepositorypublicclassUserDaoImplimplementsUserDao{@AutowiredprivateJdbcTemplate jdbcTemplate;/**
     * 多钱
     * @param money
     */@OverridepublicvoidaddMoney(int money,String username){String sql ="update t_account set money=money+? where username=?";
        jdbcTemplate.update(sql, money, username);}/**
     * 少钱
     * @param money
     */@OverridepublicvoidreduceMoney(int money,String username){String sql ="update t_account set money=money-? where username=?";
        jdbcTemplate.update(sql, money, username);}}
@ServicepublicclassUserService{@AutowiredprivateUserDao userDao;publicvoidaccountMoney(int money,String from,Stringto){//少钱
        userDao.reduceMoney(money, from);//多钱
        userDao.addMoney(money,to);}}
@TestpublicvoidtestAccount(){ApplicationContext context =newClassPathXmlApplicationContext("bean1.xml");UserService userService = context.getBean("userService",UserService.class);
        userService.accountMoney(100,"lucy","mary");}
执行测试方法后:
正常情况这样执行业务是没有问题的,但是万一少钱执行完了,突然断电了,多钱方法没执行。这样就不行了。所有需要数据库事务,多钱和少钱是一个整体,要么都成功,要么都不执行进行回滚。
Spring事务管理操作
一般是把事务添加到Service层
Spring进行事务操作有两种方式:编程式事务管理和声明式事务管理
声明式事务管理: 注解方式 或基于xml配置文件方式
Spring进行声明式事务管理,底层使用的AOP原理
Spring 提供一个接口代表事务管理器,这个接口针对不同的框架提供不同的实现类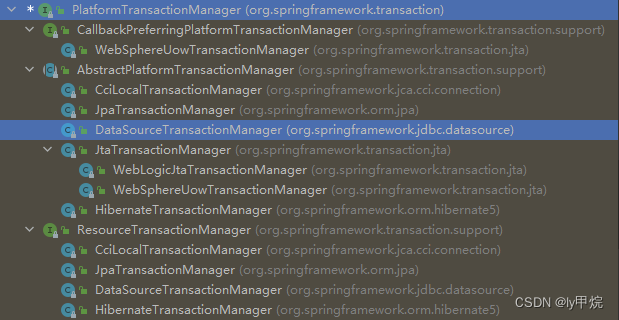
基于注解实现声明式事务管理
1.在Spring配置文件中配置事务管理器
完整配置文件:
<?xml version="1.0" encoding="UTF-8"?><beansxmlns="http://www.springframework.org/schema/beans"xmlns:context="http://www.springframework.org/schema/context"xmlns:tx="http://www.springframework.org/schema/tx"xmlns:xsi="http://www.w3.org/2001/XMLSchema-instance"xsi:schemaLocation="http://www.springframework.org/schema/beans http://www.springframework.org/schema/beans/spring-beans.xsd
                           http://www.springframework.org/schema/context http://www.springframework.org/schema/context/spring-context.xsd
                           http://www.springframework.org/schema/tx http://www.springframework.org/schema/tx/spring-tx.xsd"><!--    开启组件扫描--><context:component-scanbase-package="cn.lych4.spring5"/><!--    引入外部属性文件--><context:property-placeholderlocation="jdbc.properties"/><!-- 配置连接池 --><!-- DruidDataSource dataSource = new DruidDataSource(); --><beanid="dataSource"class="com.alibaba.druid.pool.DruidDataSource"><!-- 获取properties文件内容,根据key获取,使用spring表达式获取 --><propertyname="driverClassName"value="${jdbc.driverClass}"/><propertyname="url"value="${jdbc.url}"/><propertyname="username"value="${jdbc.username}"/><propertyname="password"value="${jdbc.password}"/></bean><!--    JdbcTemplate对象--><beanid="jdbcTemplate"class="org.springframework.jdbc.core.JdbcTemplate"><!--        注入dataSource--><propertyname="dataSource"ref="dataSource"/></bean><!--创建事务管理器--><beanid="transactionManager"class="org.springframework.jdbc.datasource.DataSourceTransactionManager"><propertyname="dataSource"ref="dataSource"/></bean><!-- 开启事务直接--><tx:annotation-driventransaction-manager="transactionManager"/></beans>
2.在Service类(或者方法)上面添加事务注解
@Transactional 注解添加到类上面就是类中所有方法都加上了事务,加方法上就是方法添加事务。
UserService 模拟异常,看看添加事务注解和不加注解数据库数据的区别。
【加了事务注解,程序出现异常事务会回滚,数据库数据不变。不加事务数据库钱少了】
@Transactional@ServicepublicclassUserService{@AutowiredprivateUserDao userDao;publicvoidaccountMoney(int money,String from,Stringto){//少钱
        userDao.reduceMoney(money, from);int i =1/0;//模拟异常//多钱
        userDao.addMoney(money,to);}}
@Transactional注解参数设置
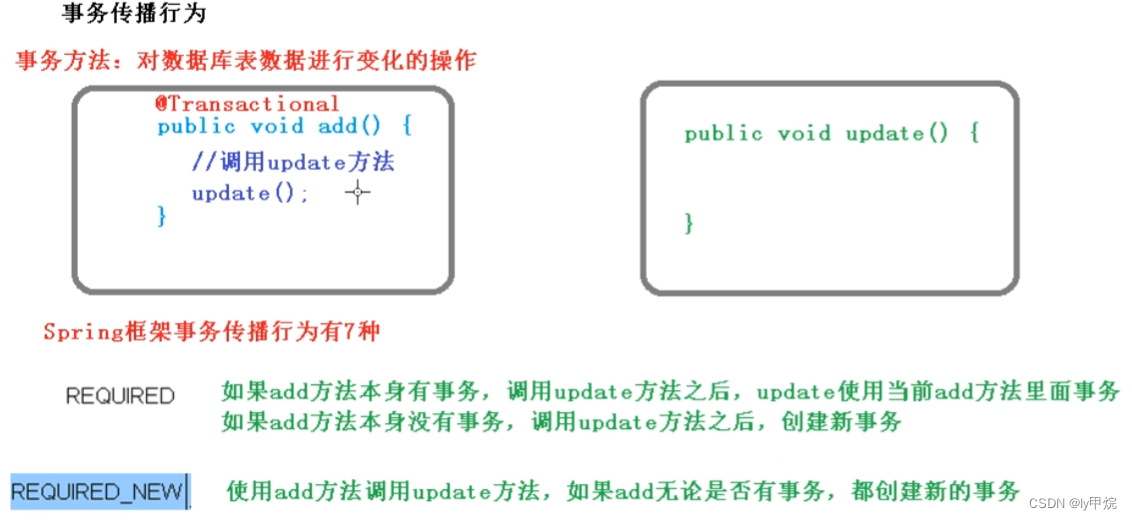
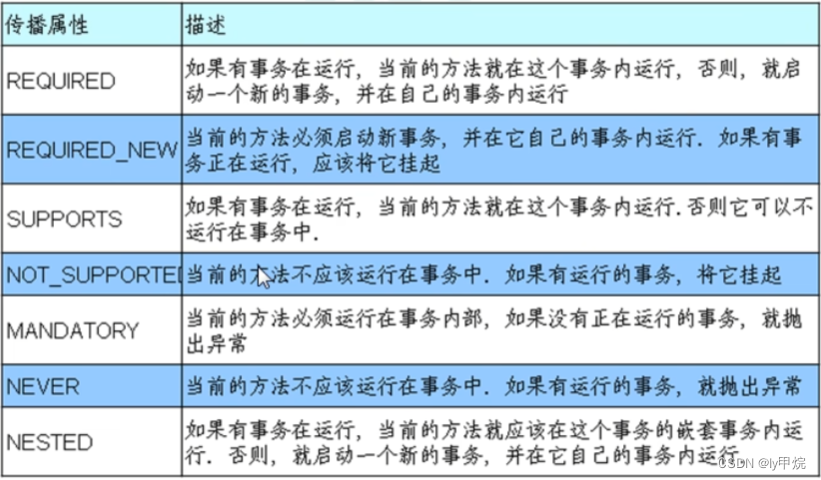
- propagation: 事务传播行为 多事务方法之间进行调用,这个过程中事务是如何进行管理的, 默认是REQUIRED
- ioslation: 事务隔离级别 事务具有隔离性,多事务操作之间不会产生影响。不考虑隔离性会产生很多问题: 脏读:事务A读取到了事务B未提交的数据,然后事务B回滚了,事务A拿到错误数据 不可重复读:事务A读取到事务B已提交的修改数据,事务A中前后两次读这个数据不一样 幻读(虚读):事务A读取到事务B已提交的添加的数据,事务A之前读没看到这数据,然后又读看到了这数据
- timeout:超时时间 事务在一定时间内必须提交,如果一直没有提交就会回滚。默认值是-1,不会超时
- readOnly:是否只读 readOnly默认值是false,表示可以查询也可以增删改。 true的话就只能进行查询操作
- rollbackFor:回滚 设置出现哪些异常进行事务回滚
- noRollback:不回滚 设置出现哪些异常事务不进行回滚
基于xml声明式事务管理
在Spring配置文件中进行配置:
- 配置事务管理器、
<!--创建事务管理器--><bean id="transactionManager"class="org.springframework.jdbc.datasource.DataSourceTransactionManager"><property name="dataSource" ref="dataSource"/></bean>
- 配置通知、
<!-- 2.配置通知--><tx:adviceid="txadvice"><!-- 配置事务参数--><tx:attributes><!-- 指定在哪种规则的方法上面添加事务--><tx:methodname="accountMoney"propagation="REQUIRED"/><!-- <tx:method name="account*"/>--></tx:attributes></tx:advice>
- 配置切入点和切面
<!-- 3.配置切入点和切面--><aop:config><!-- 配置切入点, UserService类中所有方法--><aop:pointcutid="pt"expression="execution(* cn.lych4.spring5.service.UserService.*(..))"/><!-- 配置切面--><aop:advisoradvice-ref="txadvice"pointcut-ref="pt"/></aop:config>
完全注解开发
@Configuration//配置类@ComponentScan(basePackages ="cn.lych4.spring5")//开启组件扫描@EnableTransactionManagement//开启事务publicclassTxConfig{//创建数据库连接池//        <!--    引入外部属性文件-->//    <context:property-placeholder location="jdbc.properties"/>//    <!-- 配置连接池 -->//    <!-- DruidDataSource dataSource = new DruidDataSource(); -->//    <bean id="dataSource" class="com.alibaba.druid.pool.DruidDataSource">//        <!-- 获取properties文件内容,根据key获取,使用spring表达式获取 -->//        <property name="driverClassName" value="${jdbc.driverClass}"/>//        <property name="url" value="${jdbc.url}"/>//        <property name="username" value="${jdbc.username}"/>//        <property name="password" value="${jdbc.password}"/>//    </bean>@BeanpublicDruidDataSourcegetDruidDataSource(){DruidDataSource druidDataSource =newDruidDataSource();
        druidDataSource.setDriverClassName("com.mysql.jdbc.Driver");
        druidDataSource.setUrl("jdbc:mysql// //user_db");
        druidDataSource.setUsername("root");
        druidDataSource.setPassword("");return druidDataSource;}//创建jdbcTemplate对象//    <bean id="jdbcTemplate" class="org.springframework.jdbc.core.JdbcTemplate">//        <!--        注入dataSource-->//        <property name="dataSource" ref="dataSource"/>//    </bean>@BeanpublicJdbcTemplategetJdbcTemplate(DataSource dataSource){//到IOC容器中根据类型找到 dataSource这个对象JdbcTemplate jdbcTemplate =newJdbcTemplate();//注入dataSource
        jdbcTemplate.setDataSource(dataSource);return jdbcTemplate;}//创建事务管理器//    <bean id="transactionManager" class="org.springframework.jdbc.datasource.DataSourceTransactionManager">//        <property name="dataSource" ref="dataSource"/>//    </bean>@BeanpublicDataSourceTransactionManagergetDataSourceTransactionManager(DataSource dataSource){DataSourceTransactionManager transactionManager =newDataSourceTransactionManager();
        transactionManager.setDataSource(dataSource);return transactionManager;}}
Spring5 新功能
- 整个Spring5 框架基于Java8,运行时兼容JDK9,许多不建议使用的类和方法被删除
- Spring5.0 框架自带了通用的日志封装。 也可以整合其他日志框架
整合Log4j2
1. 引入jar包
2. 创建log4j2.xml 必须是这个名字
代码示例
<?xml version="1.0" encoding="UTF-8"?><!--日志级别以及优先级排序: OFF > FATAL > ERROR > WARN > INFO > DEBUG > TRACE > ALL --><!--Configuration后面的status用于设置log4j2自身内部的信息输出,可以不设置,当设置成trace时,可以看到log4j2内部各种详细输出--><configurationstatus="INFO"><!--先定义所有的appender--><appenders><!--输出日志信息到控制台--><consolename="Console"target="SYSTEM_OUT"><!--控制日志输出的格式--><PatternLayoutpattern="%d{yyyy-MM-dd HH:mm:ss.SSS} [%t] %-5level %logger{36} - %msg%n"/></console></appenders><!--然后定义logger,只有定义了logger并引入的appender,appender才会生效--><!--root:用于指定项目的根日志,如果没有单独指定Logger,则会使用root作为默认的日志输出--><loggers><rootlevel="info"><appender-refref="Console"/></root></loggers></configuration>
这样执行代码就会自动输出一些日志,也可以在控制台手动输出日志
publicclassUserLog{privatestaticfinalLogger log =LoggerFactory.getLogger(UserLog.class);publicstaticvoidmain(String[] args){
        log.info("Hello log4j2");
        log.warn("Hello log4j2");}}
@Nullable 注解
@Nullable 注解可以使用在方法上面、属性上面、参数上面,表示方法返回可以为空、属性值可以为空、参数值可以为空。
函数式风格对象注册
整合Junit5.0单元测试
SpringWebFlux
如果发现有错误的地方,欢迎大家提出批评指正
💖致力于分享记录各种知识干货,关注我,让我们一起进步,互相学习,不断创作更优秀的文章。
💖💖不要忘了三连哦 👍 💬 ⭐️
版权归原作者 ly甲烷 所有, 如有侵权,请联系我们删除。