
欢迎关注我的CSDN:https://spike.blog.csdn.net/
本文地址:https://spike.blog.csdn.net/article/details/132334671
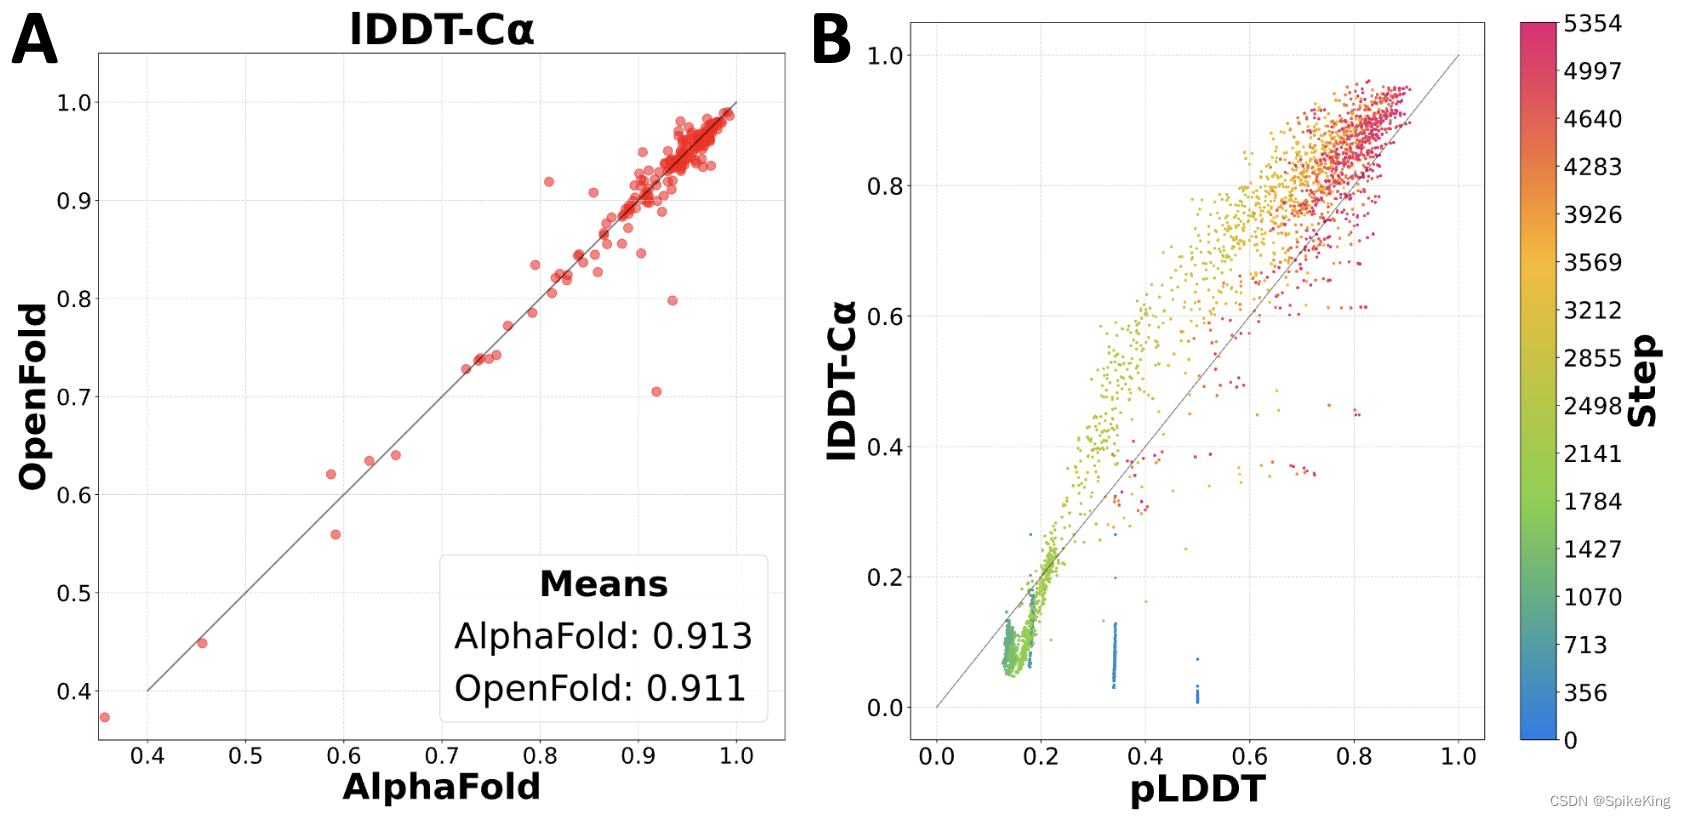
Paper: OpenFold: Retraining AlphaFold2 yields new insights into its learning mechanisms and capacity for generalization
- OpenFold: 重新训练 AlphaFold2 揭示对于学习机制和泛化能力的新见解
OpenFold 是可训练的开源实现用于模拟 AlphaFold2 的结构预测能力,主要特点如下:
- 训练和性能:从头开始训练 OpenFold,并且达到与 AlphaFold2 相当的预测精度。同时 OpenFold 比 AlphaFold2 更快、更节省内存,支持在 PyTorch 框架下运行。
- 学习机制:通过分析 OpenFold 在训练过程中预测的结构,发现一些有趣的现象,例如空间维度、二级结构元素和三级尺度的分阶段学习,以及低维 PCA 投影的近似性。
- 泛化能力:通过使用不同大小和多样性的训练集,以及在结构分类上剔除部分训练数据,来评估 OpenFold 对于未见蛋白质折叠空间的泛化能力。发现 OpenFold 即使在极端缩减的训练集上,也能表现出惊人的鲁棒性和准确性。
GitHub: aqlaboratory/openfold
1. 结构推理
准备模型文件
finetuning_ptm_2.pt
,参考 Huggingface - OpenFold:
pip install bypy
bypy info

mkdir openfold_params
cd openfold_params/
bypy downfile /huggingface/openfold/finetuning_ptm_2.pt finetuning_ptm_2.pt
测试的推理命令,如下:
python3 run_pretrained_openfold.py \
mydata/test \
af2-data-v230/pdb_mmcif/mmcif_files \--uniref90_database_path af2-data-v230/uniref90/uniref90.fasta \--mgnify_database_path af2-data-v230/mgnify/mgy_clusters_2022_05.fa \--pdb70_database_path af2-data-v230/pdb70/pdb70 \--uniclust30_database_path msa_databases/deepmsa2/uniclust30/uniclust30_2018_08 \--output_dir mydata/output \--bfd_database_path af2-data-v230/bfd/bfd_metaclust_clu_complete_id30_c90_final_seq.sorted_opt \--model_device"cuda:0"\--jackhmmer_binary_path /opt/openfold/hhsuite-speed/jackhmmer \--hhblits_binary_path /opt/conda/envs/openfold/bin/hhblits \--hhsearch_binary_path /opt/conda/envs/openfold/bin/hhsearch \--kalign_binary_path /opt/conda/envs/openfold/bin/kalign \--config_preset"model_1_ptm"\--openfold_checkpoint_path openfold/resources/openfold_params/finetuning_ptm_2.pt
运行日志,如下:
INFO:openfold/openfold/utils/script_utils.py:Loaded OpenFold parameters at openfold/resources/openfold_params/finetuning_ptm_2.pt...
INFO:openfold/run_pretrained_openfold.py:Generating alignments for A...
INFO:openfold/openfold/utils/script_utils.py:Running inference for A...
INFO:openfold/openfold/utils/script_utils.py:Inference time: 10.128928968682885
INFO:openfold/run_pretrained_openfold.py:Output written to mydata/output/predictions/A_model_1_ptm_unrelaxed.pdb...
INFO:openfold/run_pretrained_openfold.py:Running relaxation on mydata/output/predictions/A_model_1_ptm_unrelaxed.pdb...
INFO:openfold/openfold/utils/script_utils.py:Relaxation time: 11.812019010074437
INFO:openfold/openfold/utils/script_utils.py:Relaxed output written to mydata/output/predictions/A_model_1_ptm_relaxed.pdb...
替换高性能的 Jackhmmer,位置如下:
cp backup/hhsuite-speed-3.3.2/jackhmmer /opt/openfold/hhsuite-speed/jackhmmer
模型推理的输出,如下:
alignments/          # MSA文件,与 AF2 相同
predictions/        # 预测结果
timings.json        # 时间
tmp_2711.fasta    # 缓存fasta
其中,在
timings.json
中,缓存推理耗时,即:
{"inference":12.08716268837452}
其中,在
alignments/A
文件夹中,包括 MSA 文件,序列数量如下:
mgnify_hits.a3m            # 56 行
pdb70_hits.hhr            # 159 行
uniref90_hits.a3m        # 58 行
bfd_uniref_hits.a3m
注意:与 AF2 不同的是,OpenFold 是 a3m 格式,而 AF2 是 sto 格式。
其中,在
predictions
文件夹中,默认只包括 1 个预测的结构,以及 Relax 的结构,如下:
A_model_1_ptm_relaxed.pdb
A_model_1_ptm_unrelaxed.pdb
timings.json
预测结果如下,其中黄色是 Reference 结构,深蓝色是 AF2 的单模型预测结果,浅蓝色是 OpenFold 的
finetuning_ptm_2.pt
模型预测结果
- AF2:
{'TMScore': 0.9036, 'RMSD(local)': 1.66, 'Align.Len.': 117, 'DockQ': 0.0} - OpenFold:
{'TMScore': 0.8601, 'RMSD(local)': 1.7, 'Align.Len.': 115, 'DockQ': 0.0}
即: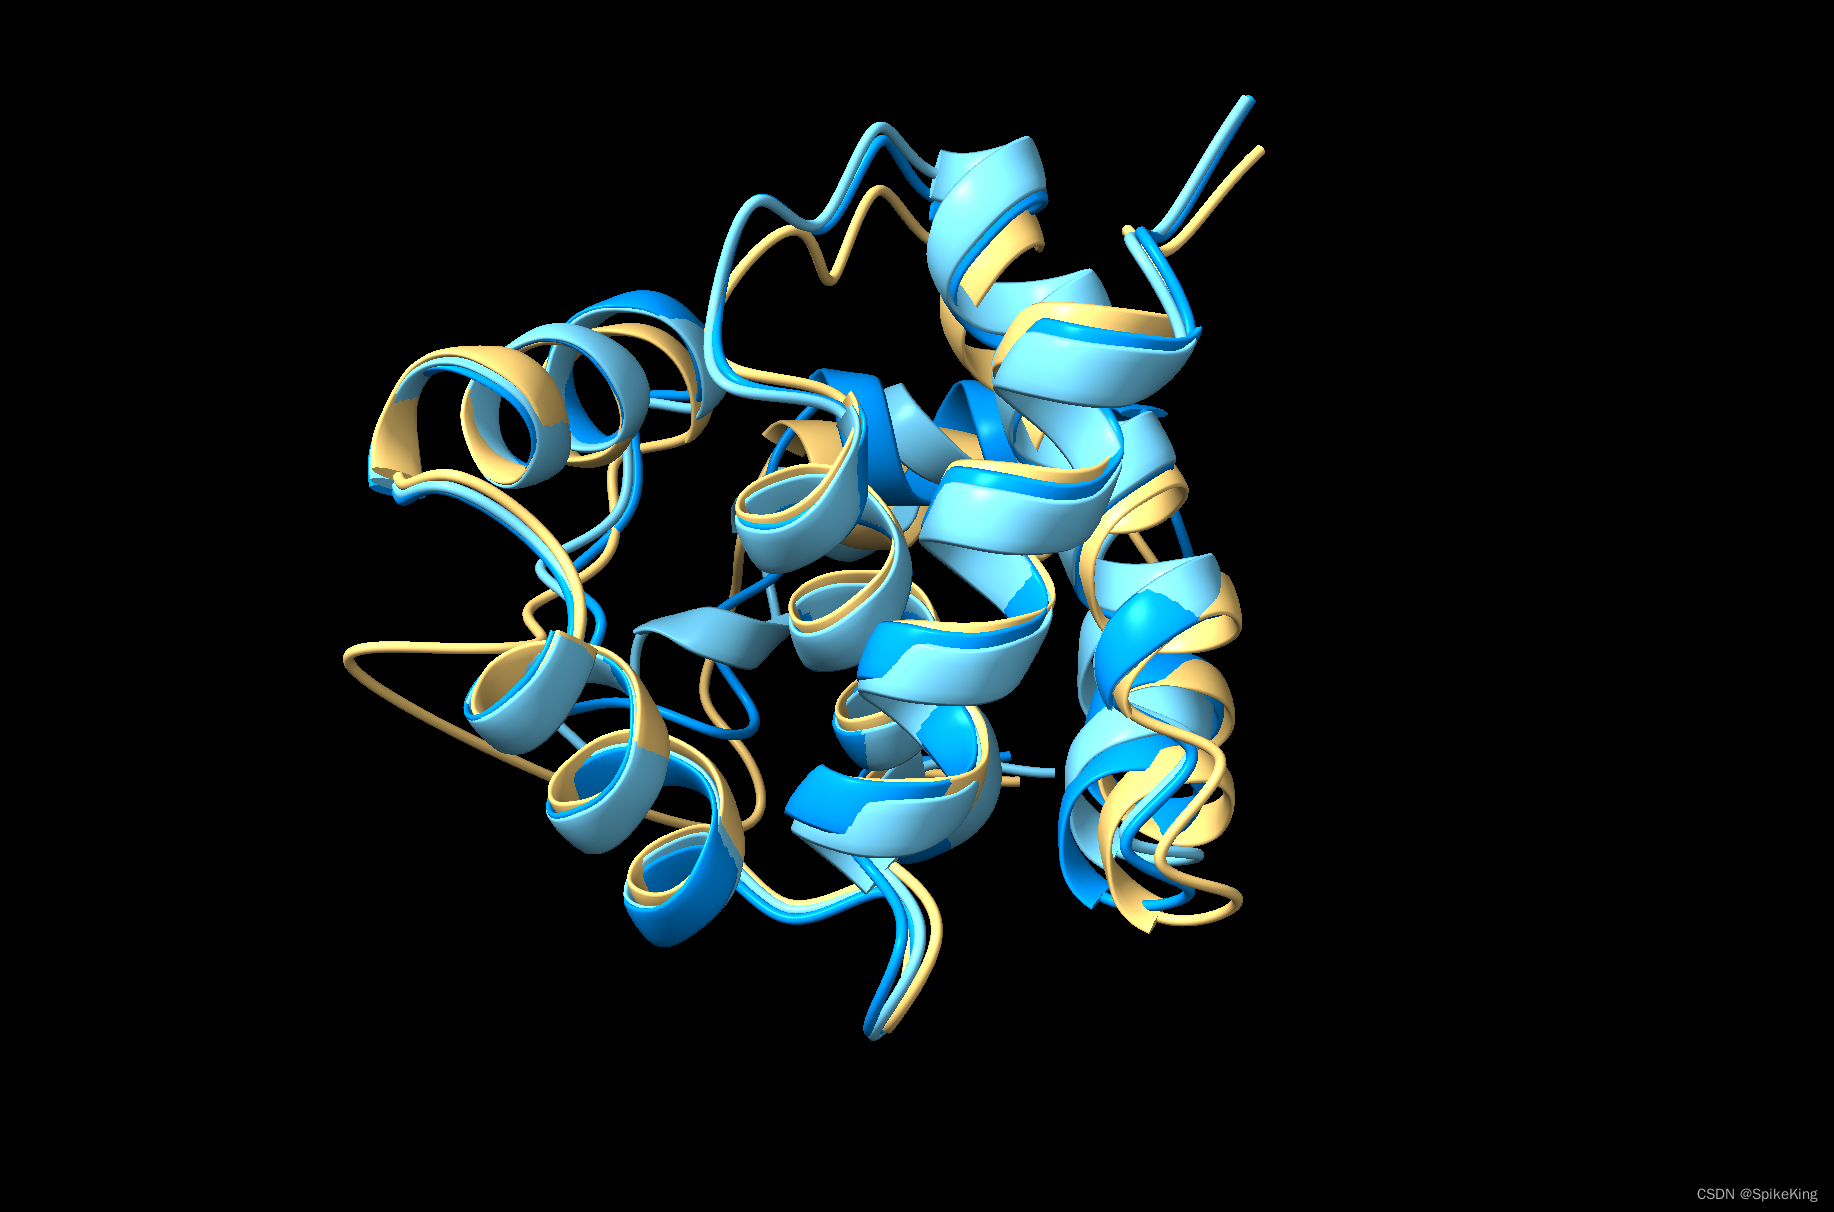
2. 环境配置
构建 base docker 环境,基于 AF2 的 docker,即:
nvidia-docker run -it--name openfold-[your name]-v[nfs path]:[nfs path] af2:v1.02
2.1 配置 conda 与 pip 高速环境
在安装环境时,建议使用国内的 conda 与 pip 源,可以加速下载。
进入 docker 之后,首先修改 conda 与 pip 的环境配置。创建或修改
~/.condarc
,即:
vim ~/.condarc

# 添加如下信息

channels:
  - defaults
show_channel_urls: true
default_channels:
  - https://mirrors.tuna.tsinghua.edu.cn/anaconda/pkgs/main
  - https://mirrors.tuna.tsinghua.edu.cn/anaconda/pkgs/r
  - https://mirrors.tuna.tsinghua.edu.cn/anaconda/pkgs/msys2
custom_channels:
  conda-forge: https://mirrors.tuna.tsinghua.edu.cn/anaconda/cloud
  msys2: https://mirrors.tuna.tsinghua.edu.cn/anaconda/cloud
  bioconda: https://mirrors.tuna.tsinghua.edu.cn/anaconda/cloud
  menpo: https://mirrors.tuna.tsinghua.edu.cn/anaconda/cloud
  pytorch: https://mirrors.tuna.tsinghua.edu.cn/anaconda/cloud
  simpleitk: https://mirrors.tuna.tsinghua.edu.cn/anaconda/cloud
channel_priority: disabled
allow_conda_downgrades: true
在 docker 中,存在默认的 pip 环境,而且优先级较高,即删除 pip 配置,再修改 pip 配置,避免失效或冲突,即:
rm /opt/conda/pip.conf
rm /root/.config/pip/pip.conf
再修改配置
~/.pip/pip.conf
,建议使用 阿里云 的 pip 源,清华源缺少部分安装包,即:
vim ~/.pip/pip.conf

# 添加如下信息# This file has been autogenerated or modified by NVIDIA PyIndex.# In case you need to modify your PIP configuration, please be aware that# some configuration files may have a priority order. Here are the following # files that may exists in your machine by order of priority:## [Priority 1] Site level configuration files#       1. `/opt/conda/pip.conf`## [Priority 2] User level configuration files#       1. `/root/.config/pip/pip.conf`#       2. `/root/.pip/pip.conf`## [Priority 3] Global level configuration files#       1. `/etc/pip.conf`#       2. `/etc/xdg/pip/pip.conf`[global]
no-cache-dir =true
index-url = http://mirrors.aliyun.com/pypi/simple/
extra-index-url = https://pypi.ngc.nvidia.com
trusted-host = mirrors.aliyun.com pypi.ngc.nvidia.com
2.2 配置 Docker 环境
建议 不要 使用默认命令配置 docker 镜像,即
docker build -t openfold .
,原因是下载速度较慢,而且有部分冲突,可以参考 Dockerfile 。
手动配置如下,配置 OpenFold 系统环境,即:
# 添加 apt 源
apt-key del 7fa2af80
apt-key del 3bf863cc
apt-key adv --fetch-keys https://developer.download.nvidia.com/compute/cuda/repos/ubuntu1804/x86_64/7fa2af80.pub
apt-key adv --fetch-keys https://developer.download.nvidia.com/compute/cuda/repos/ubuntu1804/x86_64/3bf863cc.pub

# 安装源apt-get update &&apt-getinstall-ywget libxml2 cuda-minimal-build-11-3 libcusparse-dev-11-3 libcublas-dev-11-3 libcusolver-dev-11-3 git
注意:如果网速很慢,wget 需要耐心等待,建议重试几次。
配置 OpenFold 的 conda 环境
openfold
,即:
# 复制环境文件cd openfold

# 安装环境文件
conda env update -n openfold --file environment.yml && conda clean --all
如果中断,也可以重新更新,即:
# 更新安装环境文件
conda activate openfold
conda env update --file /opt/openfold/environment.yml --prune
注意:需要时间较长,请耐心等待,当安装 pip 包出现异常时,建议手动安装。
遇到安装失败,建议手动安装,日志清晰,推荐 安装方式,即:
# 创建环境
conda create -n openfold python=3.9# 安装 conda 包
conda install-y-c conda-forge python=3.9setuptools=59.5.0 pip openmm=7.5.1 pdbfixer cudatoolkit==11.3.*
conda install-y-c bioconda hmmer==3.3.2 hhsuite==3.3.0 kalign2==2.04
conda install-y-c pytorch pytorch=1.12.*

# 安装 pip 包
pip install'dllogger @ git+https://github.com/NVIDIA/dllogger.git'
pip installbiopython==1.79deepspeed==0.5.10 dm-tree==0.1.6 ml-collections==0.1.0 numpy==1.21.2 PyYAML==5.4.1 requests==2.26.0 scipy==1.7.1 tqdm==4.62.2 typing-extensions==3.10.0.2 pytorch_lightning==1.5.10 wandb==0.12.21 modelcif==0.7# 解决 bug
conda install-c anaconda numpy-base==1.22.3  # 解决 np.object bug,同时避免与 scipy 冲突。
注意:
openmm的 7.5.1 版本,位于
simtk中,即
from simtk.openmm import app,在
sites-package中,没有独立的文件夹。
其他关键安装包:
# jax
pip install--upgrade --no-cache-dir jax==0.3.25 jaxlib==0.3.25+cuda11.cudnn805 -f https://storage.googleapis.com/jax-releases/jax_cuda_releases.html

# modelcif 和 qc-procrustes
pip installmodelcif==0.7 qc-procrustes

# 重新编译 openfold
pip uninstall openfold
python3 setup.py install
关于 DeepSpeed 的版本兼容问题,参考:
- GitHub - Upgrade DeepSpeed version? - deepspeed.utils.is_initialized()
- StackOverflow - TypeError: setup() got an unexpected keyword argument ‘stage’
即
deepspeed.utils.is_initialized()
的替换问题,与
setup()
的配置问题,修复文件
openfold/model/primitives.py
:
         deepspeed_is_initialized =(
                 deepspeed_is_installed and-                deepspeed.utils.is_initialized()+# deepspeed.utils.is_initialized()+                deepspeed.comm.comm.is_initialized())
修复文件
openfold/data/data_modules.py
,即可解决 DeepSpeed 版本兼容问题:
-defsetup(self):+defsetup(self, stage=None):# Most of the arguments are the same for the three datasets
         dataset_gen = partial(OpenFoldSingleMultimerDataset,
             template_mmcif_dir=self.template_mmcif_dir,
2.3 修复文件与编译工程
下载资源
stereo_chemical_props.txt
与修复文件
simtk.openmm
,即:
cd openfold
# 注意位于 openfold/openfold/resources 中# wget -q -P openfold/resources https://git.scicore.unibas.ch/schwede/openstructure/raw/7102c63615b64735c4941278d92b554ec94415f8/modules/mol/alg/src/stereo_chemical_props.txtcd openfold/resources
wget https://git.scicore.unibas.ch/schwede/openstructure/raw/7102c63615b64735c4941278d92b554ec94415f8/modules/mol/alg/src/stereo_chemical_props.txt --no-check-certificate

# 注意 simtk.openmm 的安装位置需要选择# conda show openmm# import simtk# print(simtk.__file__)# /opt/conda/envs/openfold/lib/python3.9/site-packages/
patch -p0-d /opt/conda/envs/openfold/lib/python3.9/site-packages/ < lib/openmm.patch

# 输出日志
patching file simtk/openmm/app/topology.py
Hunk #1 succeeded at 353 (offset -3 lines).
注意:openmm 的 7.5.1 版本需要修复一些 bug,高版本不需要,参考 关于 AlphaFold2 的 openmm.patch 补丁
编译工程,即 conda 环境中包括 openfold 的包,即
cd openfold
python3 setup.py install
2.4 相关文件
配置 conda 环境需要参考
environment.yml
文件,即:
name: openfold_venv
channels:
  - conda-forge
  - bioconda
  - pytorch
dependencies:
  - conda-forge::python=3.9
  - conda-forge::setuptools=59.5.0
  - conda-forge::pip
  - conda-forge::openmm=7.5.1
  - conda-forge::pdbfixer
  - conda-forge::cudatoolkit==11.3.*
  - bioconda::hmmer==3.3.2
  - bioconda::hhsuite==3.3.0
  - bioconda::kalign2==2.04
  - pytorch::pytorch=1.12.*
  - pip:
      - biopython==1.79
      - deepspeed==0.5.10
      - dm-tree==0.1.6
      - ml-collections==0.1.0
      - numpy==1.21.2
      - PyYAML==5.4.1
      - requests==2.26.0
      - scipy==1.7.1
      - tqdm==4.62.2
      - typing-extensions==3.10.0.2
      - pytorch_lightning==1.5.10
      - wandb==0.12.21
      - modelcif==0.7
      - git+https://github.com/NVIDIA/dllogger.git
配置环境需要参考
Dockerfile
文件,即:
FROM nvidia/cuda:11.3.1-cudnn8-runtime-ubuntu18.04

# metainformation
LABEL org.opencontainers.image.version ="1.0.0"
LABEL org.opencontainers.image.authors ="Gustaf Ahdritz"
LABEL org.opencontainers.image.source ="https://github.com/aqlaboratory/openfold"
LABEL org.opencontainers.image.licenses ="Apache License 2.0"
LABEL org.opencontainers.image.base.name="docker.io/nvidia/cuda:10.2-cudnn8-runtime-ubuntu18.04"

RUN apt-key del 7fa2af80
RUN apt-key adv --fetch-keys https://developer.download.nvidia.com/compute/cuda/repos/ubuntu1804/x86_64/7fa2af80.pub
RUN apt-key adv --fetch-keys https://developer.download.nvidia.com/compute/cuda/repos/ubuntu1804/x86_64/3bf863cc.pub

RUN apt-get update &&apt-getinstall-ywget libxml2 cuda-minimal-build-11-3 libcusparse-dev-11-3 libcublas-dev-11-3 libcusolver-dev-11-3 git
RUN wget-P /tmp \"https://repo.anaconda.com/miniconda/Miniconda3-latest-Linux-x86_64.sh"\&&bash /tmp/Miniconda3-latest-Linux-x86_64.sh -b-p /opt/conda \&&rm /tmp/Miniconda3-latest-Linux-x86_64.sh
ENV PATH /opt/conda/bin:$PATH

COPY environment.yml /opt/openfold/environment.yml

# installing into the base environment since the docker container wont do anything other than run openfold
RUN conda env update -n base --file /opt/openfold/environment.yml && conda clean --all

COPY openfold /opt/openfold/openfold
COPY scripts /opt/openfold/scripts
COPY run_pretrained_openfold.py /opt/openfold/run_pretrained_openfold.py
COPY train_openfold.py /opt/openfold/train_openfold.py
COPY setup.py /opt/openfold/setup.py
COPY lib/openmm.patch /opt/openfold/lib/openmm.patch
RUN wget-q-P /opt/openfold/openfold/resources \
    https://git.scicore.unibas.ch/schwede/openstructure/-/raw/7102c63615b64735c4941278d92b554ec94415f8/modules/mol/alg/src/stereo_chemical_props.txt
RUN patch -p0-d /opt/conda/lib/python3.9/site-packages/ < /opt/openfold/lib/openmm.patch
WORKDIR /opt/openfold
RUN python3 setup.py install
2.5 提交 Docker Image
登录 docker 服务器,即:
docker login harbor.[ip address].com
注意:如果无法登录,则需要管理员配置,或切换可登录的服务器。
设置 BOS 命令:
aliasbos='bcecmd/bcecmd --conf-path bcecmd/bceconf/ bos'
提交 docker image,设置标签 (tag),以及上传 docker,即:
# 提交 Tagdockerps-ldocker commit [container id] openfold:v1.0

# 准备远程 Tagdocker tag openfold:v1.0 openfold:v1.0
docker images |grep"openfold"# 推送至远程docker push openfold:v1.0
# 从远程拉取docker pull openfold:v1.0

# 或者保存至本地docker save openfold:v1.0 |gzip> openfold_v1_0.tar.gz
# 加载已保存的 docker imagedocker image load -i openfold_v1_01.tar.gz
docker images |grep"openfold"
进入 Harbor 页面查看,发现已上传的 docker image,以及不同版本,即:

3. Bugfix
3.1 Numpy 版本不兼容
Bug 日志:
openfold/openfold/data/templates.py:88: FutureWarning: In the future `np.object` will be defined as the corresponding NumPy scalar.
  "template_domain_names": np.object,
Traceback (most recent call last):
  File "openfold/run_pretrained_openfold.py", line 47, in<module>
    from openfold.data import templates, feature_pipeline, data_pipeline
  File "openfold/openfold/data/templates.py", line 88, in<module>"template_domain_names": np.object,
  File "/opt/conda/envs/openfold/lib/python3.9/site-packages/numpy/__init__.py", line 319, in __getattr__
    raise AttributeError(__former_attrs__[attr])
AttributeError: module 'numpy' has no attribute 'object'.`np.object` was a deprecated aliasfor the builtin`object`. To avoid this error in existing code, use `object` by itself. Doing this will not modify any behavior and is safe.
The aliases was originally deprecated in NumPy 1.20;formore details and guidance see the original release note at:
    https://numpy.org/devdocs/release/1.20.0-notes.html#deprecations
即 Numpy 版本过高,没有
np.object
属性,建议降低至
1.23.4
版本,即:
conda list numpy

# 当前 numpy-base 的版本是 1.25.2# conda list numpy# packages in environment at /opt/conda/envs/openfold:## Name                    Version                   Build  Channel
numpy                     1.21.2                   pypi_0    pypi
numpy-base                1.25.2           py39hb5e798b_0    defaults

# 降低版本至 1.23.4
conda install-c anaconda numpy-base==1.22.3  # 解决 np.object bug,同时避免与 scipy 冲突。
也可以,修改源码文件
openfold/data/templates.py
与
openfold/data/data_pipeline.py
,将 np.object 替换为 object,注意,全局搜索,需要修改 2 处,即:
TEMPLATE_FEATURES ={"template_aatype": np.int64,"template_all_atom_mask": np.float32,"template_all_atom_positions": np.float32,"template_domain_names": np.object,# 需要修改"template_sequence": np.object,# 需要修改"template_sum_probs": np.float32,}
Bug 参考:
- StackOverflow - module ‘numpy’ has no attribute ‘object’ closed
- 关于 scipy 与 numpy 的兼容性,参考: Toolchain Roadmap
完整的 conda 环境 yaml 文件如下:
name: openfold
channels:- theochem
  - pytorch
  - anaconda
  - bioconda
  - defaults
  - conda-forge
dependencies:- _libgcc_mutex=0.1=conda_forge
  - _openmp_mutex=4.5=2_kmp_llvm
  - alabaster=0.7.13=pyhd8ed1ab_0
  - babel=2.12.1=pyhd8ed1ab_1
  - blas=1.0=mkl
  - brotli-python=1.0.9=py39h5a03fae_9
  - bzip2=1.0.8=h7f98852_4
  - ca-certificates=2023.7.22=hbcca054_0
  - certifi=2023.7.22=py39h06a4308_0
  - colorama=0.4.6=py39h06a4308_0
  - cudatoolkit=11.3.1=hb98b00a_12
  - docutils=0.20.1=py39hf3d152e_0
  - exceptiongroup=1.1.3=pyhd8ed1ab_0
  - fftw=3.3.10=nompi_hc118613_108
  - hhsuite=3.3.0=py39pl5321he10ea66_9
  - hmmer=3.3.2=hdbdd923_4
  - icu=72.1=hcb278e6_0
  - idna=3.4=pyhd8ed1ab_0
  - imagesize=1.4.1=py39h06a4308_0
  - importlib-metadata=6.8.0=pyha770c72_0
  - iniconfig=2.0.0=pyhd8ed1ab_0
  - intel-openmp=2021.4.0=h06a4308_3561
  - jax=0.3.25=py39h06a4308_0
  - jaxlib=0.3.25=py39h6a678d5_1
  - jinja2=3.1.2=py39h06a4308_0
  - kalign2=2.04=h031d066_5
  - ld_impl_linux-64=2.40=h41732ed_0
  - libblas=3.9.0=12_linux64_mkl
  - libcblas=3.9.0=12_linux64_mkl
  - libffi=3.4.4=h6a678d5_0
  - libgcc-ng=13.1.0=he5830b7_0
  - libgfortran-ng=13.1.0=h69a702a_0
  - libgfortran5=13.1.0=h15d22d2_0
  - libhwloc=2.9.2=nocuda_h7313eea_1008
  - libiconv=1.17=h166bdaf_0
  - liblapack=3.9.0=12_linux64_mkl
  - libnsl=2.0.0=h7f98852_0
  - libsqlite=3.42.0=h2797004_0
  - libstdcxx-ng=13.1.0=hfd8a6a1_0
  - libuuid=2.38.1=h0b41bf4_0
  - libxml2=2.11.5=h0d562d8_0
  - libzlib=1.2.13=hd590300_5
  - llvm-openmp=16.0.6=h4dfa4b3_0
  - lz4-c=1.9.4=hcb278e6_0
  - markupsafe=2.1.3=py39hd1e30aa_0
  - mkl=2021.4.0=h06a4308_640
  - mkl-service=2.4.0=py39h7f8727e_0
  - mkl_fft=1.3.1=py39hd3c417c_0
  - mkl_random=1.2.2=py39h51133e4_0
  - ncurses=6.4=hcb278e6_0
  - numpy-base=1.22.3=py39hf524024_0
  - ocl-icd=2.3.1=h7f98852_0
  - ocl-icd-system=1.0.0=1
  - openmm=7.5.1=py39h71eca04_1
  - openssl=3.1.2=hd590300_0
  - opt_einsum=3.3.0=pyhd8ed1ab_1
  - packaging=23.1=pyhd8ed1ab_0
  - pdbfixer=1.7=pyhd3deb0d_0
  - perl=5.32.1=4_hd590300_perl5
  - pip=23.2.1=pyhd8ed1ab_0
  - platformdirs=3.10.0=pyhd8ed1ab_0
  - pluggy=1.2.0=pyhd8ed1ab_0
  - pooch=1.7.0=pyha770c72_3
  - pygments=2.16.1=pyhd8ed1ab_0
  - pysocks=1.7.1=pyha2e5f31_6
  - pytest=7.4.0=py39h06a4308_0
  - python=3.9.17=h0755675_0_cpython
  - python_abi=3.9=3_cp39
  - pytorch=1.12.1=py3.9_cuda11.3_cudnn8.3.2_0
  - pytorch-mutex=1.0=cuda
  - pytz=2023.3=pyhd8ed1ab_0
  - qc-procrustes=1.0.0=py_0
  - readline=8.2=h8228510_1
  - rocm-smi=5.6.0=h59595ed_1
  - setuptools=59.5.0=py39hf3d152e_0
  - six=1.16.0=pyhd3eb1b0_1
  - snowballstemmer=2.2.0=pyhd3eb1b0_0
  - sphinx=7.2.2=pyhd8ed1ab_0
  - sphinxcontrib-applehelp=1.0.7=pyhd8ed1ab_0
  - sphinxcontrib-devhelp=1.0.5=pyhd8ed1ab_0
  - sphinxcontrib-htmlhelp=2.0.4=pyhd8ed1ab_0
  - sphinxcontrib-jsmath=1.0.1=pyhd3eb1b0_0
  - sphinxcontrib-qthelp=1.0.6=pyhd8ed1ab_0
  - sphinxcontrib-serializinghtml=1.1.8=pyhd8ed1ab_0
  - tbb=2021.10.0=h00ab1b0_0
  - tk=8.6.12=h27826a3_0
  - tomli=2.0.1=py39h06a4308_0
  - typing_extensions=4.7.1=pyha770c72_0
  - wheel=0.41.1=pyhd8ed1ab_0
  - xz=5.4.2=h5eee18b_0
  - zipp=3.16.2=pyhd8ed1ab_0
  - zlib=1.2.13=hd590300_5
  - zstd=1.5.5=hc292b87_0
  -pip:- absl-py==1.4.0
      - aiohttp==3.8.5
      - aiosignal==1.3.1
      - async-timeout==4.0.3
      - attrs==23.1.0
      - biopython==1.79
      - bypy==1.8.2
      - cachetools==5.3.1
      - charset-normalizer==2.0.12
      - click==8.1.6
      - contextlib2==21.6.0
      - deepspeed==0.5.10
      - dill==0.3.7
      - dllogger==1.0.0
      - dm-tree==0.1.6
      - docker-pycreds==0.4.0
      - frozenlist==1.4.0
      - fsspec==2023.6.0
      - future==0.18.3
      - gitdb==4.0.10
      - gitpython==3.1.32
      - google-auth==2.22.0
      - google-auth-oauthlib==1.0.0
      - grpcio==1.57.0
      - hjson==3.1.0
      - ihm==0.39
      - lightning-utilities==0.9.0
      - markdown==3.4.4
      - ml-collections==0.1.0
      - modelcif==0.7
      - msgpack==1.0.5
      - multidict==6.0.4
      - multiprocess==0.70.15
      - ninja==1.11.1
      - numpy==1.21.2
      - oauthlib==3.2.2
      - openfold==1.0.1
      - pandas==2.0.3
      - pathtools==0.1.2
      - promise==2.3
      - protobuf==3.20.3
      - psutil==5.9.5
      - py-cpuinfo==9.0.0
      - pyasn1==0.5.0
      - pyasn1-modules==0.3.0
      - pydeprecate==0.3.1
      - python-dateutil==2.8.2
      - pytorch-lightning==1.5.10
      - pyyaml==5.4.1
      - requests==2.26.0
      - requests-oauthlib==1.3.1
      - requests-toolbelt==1.0.0
      - rsa==4.9
      - scipy==1.7.1
      - sentry-sdk==1.29.2
      - setproctitle==1.3.2
      - shortuuid==1.0.11
      - smmap==5.0.0
      - tensorboard==2.14.0
      - tensorboard-data-server==0.7.1
      - torchmetrics==1.0.3
      - tqdm==4.62.2
      - triton==1.0.0
      - typing-extensions==3.10.0.2
      - tzdata==2023.3
      - urllib3==1.26.16
      - wandb==0.12.21
      - werkzeug==2.3.7
      - yarl==1.9.2
prefix: /opt/conda/envs/openfold
参考
参考:
- ENV 设置环境变量
- StackOverflow - How to update an existing Conda environment with a .yml file
- CSDN - 配置 AlphaFold2 的高效 Tensorflow 运行环境
- CSDN - 蛋白质结构预测 ESMFold 算法的工程配置
版权归原作者 SpikeKing 所有, 如有侵权,请联系我们删除。