认识Rabbitmq
一、什么是Rabbitmq
RabbitMQ简称MQ是一套实现了高级消息队列协议的开源消息代理软件,简单来说就是一个消息中间件。是一种程序对程序的通信方法,其服务器也是以高性能、健壮以及可伸缩性出名的Erlang语言编写而成。
二、 Rabbitmq有什么作用
abbitMQ简单来说就是一个消息队列中间件,用来保存消息和传递消息的一个容器。在此过程中充当一个中间人的作用 而队列的主要目的就是提供正确的路由来保证消息的传递;如果发送消息时消费者不可用的话,默认情况下该消息将会一直被存储在队列中,直到消费者消费为止 那么同时呢,如果设置了消息存活的时间,即消息的有效期。在此有效期间消息如果还没有被消费的话,那么该消息就会变成死信,由死信交换机接收。而绑定死信交换机的队列则称为死信队列
三、RabbitMQ的常见作用
RabbitMQ的常见作用有三种,分别是服务间解耦、实现异步通信、流量削峰。
主要实现了消费者和生产者之间的解耦,发送异步消息,高并发访问解决流量削锋等问题。实现高性能,高可用,可伸缩和最终一致性架构。是大型分布式系统不可缺少的中间件。
四、RabbitMQ的应用场景
场景一:用户订单,库存处理。【服务间解耦】
使用MQ前:系统正常时,用户下单,订单系统调用库存系统进行删减操作,操作成功,将成返回消息,提醒下单成功。系统异常时,库存系统将无法访问,导致订单删减操作无法执行,最终导致下单失败。

使用MQ后:订单系统和库存系统之间不在互相影响,独立运行,达到了应用解耦的目的。订单系统只需要将下单消息写入MQ,就可以直接执行下一步操作。这时即使库存系统出现异常也不会影响订单系统的操作,且下单的库存删减记录,将会被永久保存到MQ中,直到库存系统恢复正常,从MQ中订阅下单消息,进行消费成功为止。

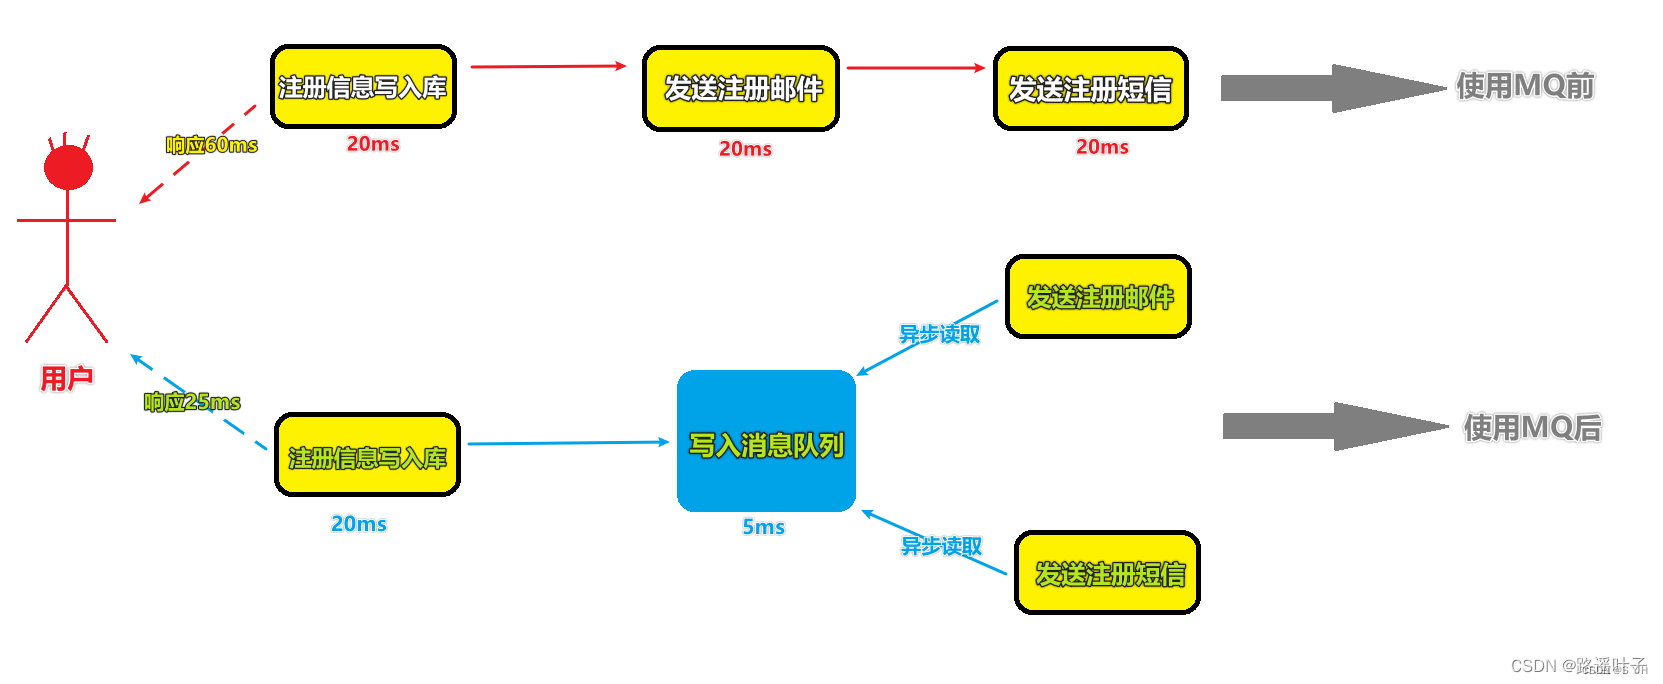
场景二:用户注册,发送手机短信,邮件。【实现异步通信】
使用MQ前:整个操作流程,全部在主线程完成。点击用户注册 --》 入库添加用户 --》发送邮件 --》发送短信。每一步都需要等待上一步完成后才能执行。且每一步操作的响应时间不固定,如果请求过多,会导致主线程请求耗时很长,响应慢,甚至会导致死机的情况出现,严重影响了用户的体验。
使用MQ后:我们在大量用户进行秒杀请求时,将那个巨大的流量请求拒在系统业务处理的上层,并将其转移至MQ中,而不是直接涌入我们的接口。在这里MQ消息队列起到了缓存作用。
场景三:商品秒杀和抢购。【流量削峰】
流量削峰是消息队列中常用的场景 一般在秒杀或团购活动中使用广泛。
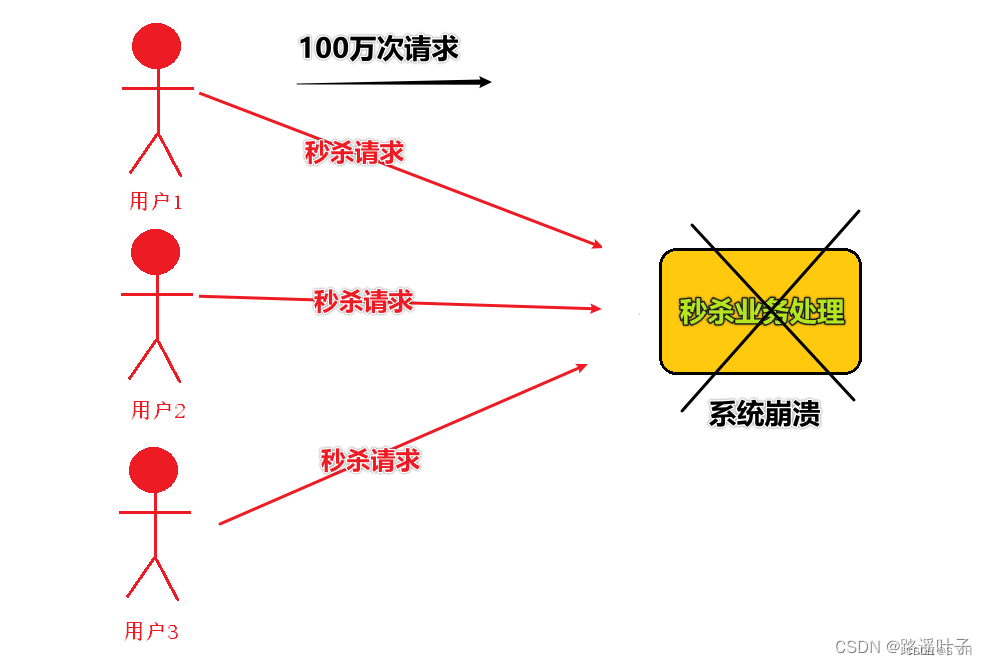
使用MQ前:对于秒杀、抢购活动,用户访问所产生的流量会很大,甚至会在同一时间段出现上万上亿条请求,这股瞬间的流量暴涨,我们的应用系统配置是无法承受的,会导致系统直接崩溃死机。
例如:A系统平时每秒请求100个,系统稳定运行; 但是晚上8点有秒杀活动 ,每秒并发增至1万条 ,系统最大处理每秒1000条 于是导致系统崩溃。
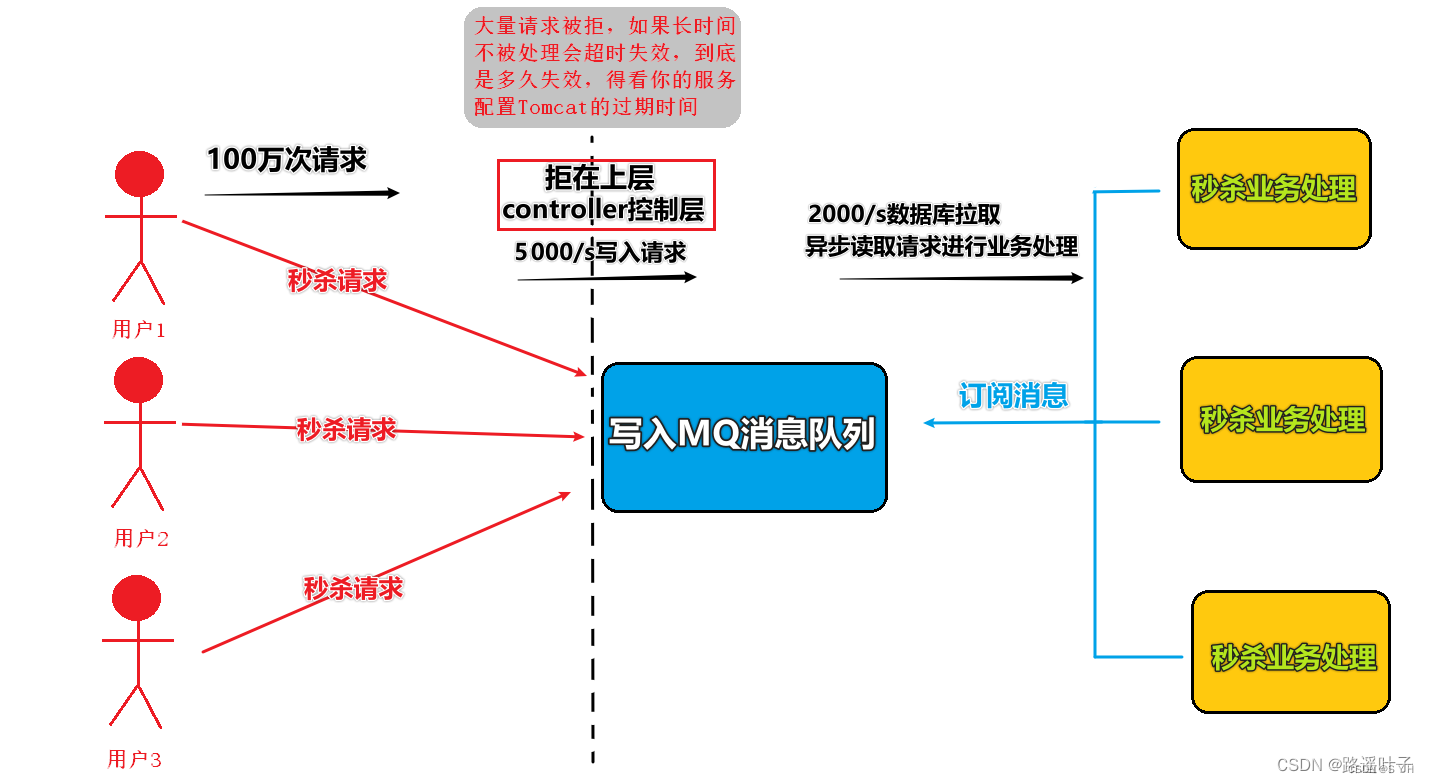
使用MQ后:我们在大量用户进行秒杀请求时,将那个巨大的流量请求拒在系统业务处理的上层,并将其转移至MQ中,而不是直接涌入我们的接口。在这里MQ消息队列起到了缓存作用。
例如:100万用户在高峰期,每秒请求5000个,将这5000个请求写入MQ系统每秒只能处理2000请求,因为MySQL只能处理2000个请求 ; 系统每秒拉取2000个请求 不超过自己的处理能力即可。
下载安装
Centos7 安装rabbitmq详细教程_江東-H的博客-CSDN博客
1、下载erlang
erlang官网http://www.erlang.org/downloads
准备环境:
yum -y install make gcc gcc-c++ kernel-devel m4 ncurses-devel openssl-devel
设定安装规则:
./configure --prefix=/usr/local/erlang --with-ssl --enable-threads --enable-smp-support --enable-kernel-poll --enable-hipe --without-javac
安装:
make && make install
配置环境变量:
vim /etc/profile
export PATH=/root/RabbitMQ/erlang/otp_src_21.1/bin:${PATH}
source /etc/profile #使环境变量生效
检验是否安装成功:
erl
退出用 halt()
2、下载rabbitmq
设置环境变量:export PATH=$PATH:/usr/local/rabbitmq_server-3.7.8/sbin
添加web管理插件命令:rabbitmq-plugins enable rabbitmq_management 启动端口15672
启动rabbitmq
安装目录下 /sbin rabbitmq-server
登录rabbitmq 初始账号密码都是guest
3、初始化登录报:User can only log in via localhost
原因:
rabbitmq从3.3.0开始禁止使用guest/guest权限通过除localhost外的访问
解决问题:
找到安装目录 /ebin/rabbit.app
将:{loopback_users, [<<”guest”>>]}
改为:{loopback_users, []}
mq可视化界面
1.默认会提供一个默认用户guest,密码也是guest,线上环境需要创建一个新用户,并把guest用户删除。
2.首先切换到Admin标签页,可以查看或添加用户,添加用户时,可指定Tags,相当于角色,会拥有对应的权限:

1、Exhanges 功能
Durable 选择是否持久化
- Durable 持久化
- Transient 不持久化
Type-选择交换机类型
- topic 主机模式
- fanout 工作者模式
- direct 路由模式
Auto Delete 是否自动删除

2、交换机详细操作

3、队列
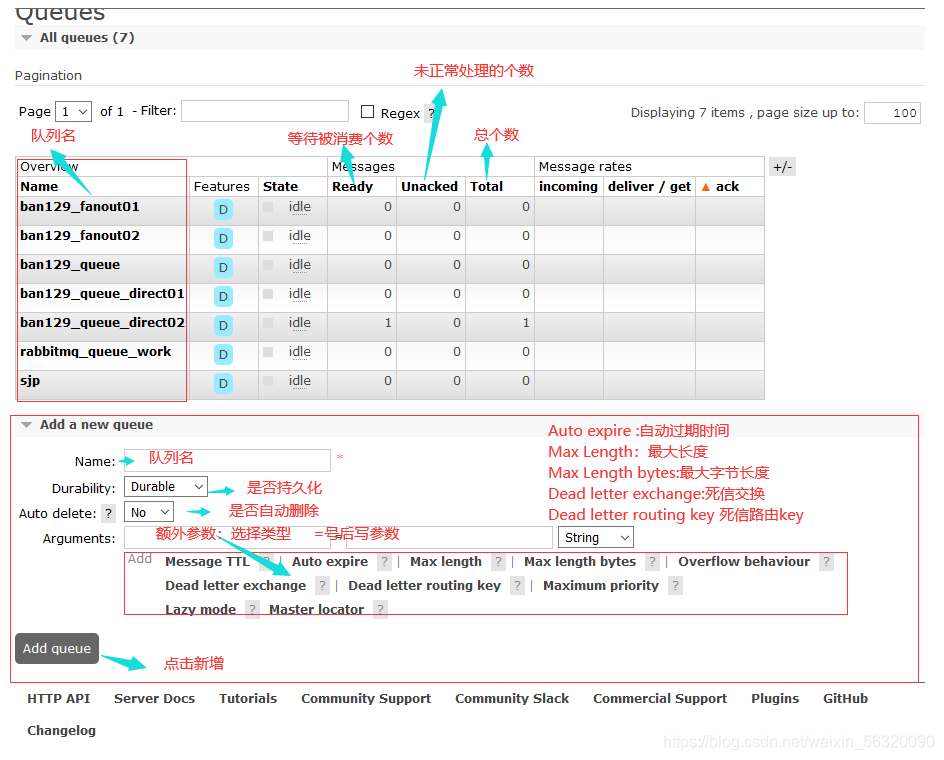
切换到“Queues”标签,可以查看队列信息,点击队列名称,可查看队列所有状态的消息数量和大小等统计信息:
4、队列详细操作

一、常用的mq工具:
- Rabbitmq
- Activemq
- Rocketmq
- Kafka
- Tubemq
二、mq的作用:
RabbitMQ是一种消息中间件,用于处理来自客户端的异步消息。服务端将要发送的消息放入到队列池中。接收端可以根据RabbitMQ配置的转发机制接收服务端发来的消息。RabbitMQ依据指定的转发规则进行消息的转发、缓冲和持久化操作,主要用在多服务器间或单服务器的子系统间进行通信,是分布式系统标准的配置。

三、rabbitmq六种工作模式
Ⅰ、简单模式
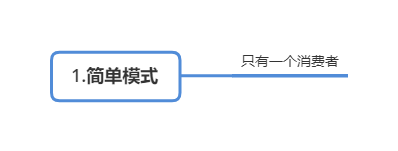
- 发送消息的程序是生产者
- 队列就代表一个邮箱。虽然消息会流经RbbitMQ和你的应用程序,但消息只能被存储在队列里。队列存储空间只受服务器内存和磁盘限制,它本质上是一个大的消息缓冲区。多个生产者可以向同一个队列发送消息,多个消费者也可以从同一个队列接收消息.
- 消费者等待从队列接收消息

使用过程
1、创建springboot工程,添加依赖:
<dependency>
    <groupId>com.rabbitmq</groupId>
    <artifactId>amqp-client</artifactId>
    <version>5.4.3</version>
</dependency>
2、生产者发送消息
import com.rabbitmq.client.Channel;
import com.rabbitmq.client.Connection;
import com.rabbitmq.client.ConnectionFactory;
import com.rabbitmq.client.MessageProperties;

import java.io.IOException;
import java.util.concurrent.TimeoutException;

public class Producer {

    public static void main(String[] args) throws IOException, TimeoutException {
        //1、连接
        ConnectionFactory factory = new ConnectionFactory();
        factory.setHost("192.168.64.140");
        factory.setPort(5672);
        factory.setPassword("admin");
        factory.setUsername("admin");
        Connection connection = factory.newConnection();
        Channel channel = connection.createChannel();   //与rabbitmq通讯的通道

        //2、在服务器上创建helloworld队列(mq里面创建队列)
        /* 注意事项:队列如果已经存在,不会重复创建,对于队列的生产者和消费者,都要创建队列,保证谁先启动谁先创建
        channel.queueDeclare(队列名,
                             是否是持久队列(一直保存在本地),
                             是否是独占(排他)队列(多个消费者能不能从同一个队列接收消息)false表示不是,
                             是否是自动删除的队列(没有消费者时服务器是否自动删除)false表示不自动删除,
                             队列的其他参数属性,使用键值对方式
                             );*/
        channel.queueDeclare("helloworld",false,false,false,null);

        //3、向helloworld队列发送消息,参数4为发送的消息,并且只能为byte数组
        /*channel.basicPublish(交换机(为空表示使用默认交换机),
                               队列名字,
                               消息的其他属性配置(键值对设置消息属性,没有使用null值),
                               队列的内容(byte数组));
        * */
        channel.basicPublish("","helloworld", MessageProperties.PERSISTENT_BASIC,"hello world".getBytes());
                                                                    //现成的键值对

    }
}
注意事项:
消费者与生产者都建立连接的原因,由于相同队列不会重复创建,所以,当谁先启动谁就先创建消息队列,节省时间
3、消费者接收消息
import com.rabbitmq.client.*;
import java.io.IOException;
import java.util.concurrent.TimeoutException;

public class Consumer {

    public static void main(String[] args) throws IOException, TimeoutException {
        //1、连接
        ConnectionFactory factory = new ConnectionFactory();
        factory.setHost("192.168.64.140");
        factory.setPort(5672);
        factory.setPassword("admin");
        factory.setUsername("admin");
        Connection connection = factory.newConnection();
        Channel channel = connection.createChannel();   //与rabbitmq通讯的通道

        //2、在服务器上创建helloworld队列(mq里面创建队列)
        //注意事项:队列如果已经存在,不会重复创建
        channel.queueDeclare("helloworld",false,false,false,null);

        //3.1创建处理消息的回调对象
        DeliverCallback deliverCallback =new DeliverCallback() {

            public void handle(String s, Delivery delivery) throws IOException {

                byte[] a = delivery.getBody(); //获取队列消息,byte类型
                String s1 = new String(a); //将byte类型转换成字符串类型
            }
        };

        //3.2取消消息处理的回调对象
        CancelCallback cancelCallback = new CancelCallback() {

            public void handle(String s) throws IOException {

            }
        };

        /*3、从helloworld队列接收消息,把消息传递到回调对象处理
        channel.basicConsume(队列的名字,
                              确认方式 ACK(Acknowledgment)true自动确认  false手动确认,
                              处理消息的回调对象,
                              取消消息处理的回调对象);*/
        channel.basicConsume("helloworld",true,deliverCallback,cancelCallback);
    }
}
Ⅱ、工作模式****
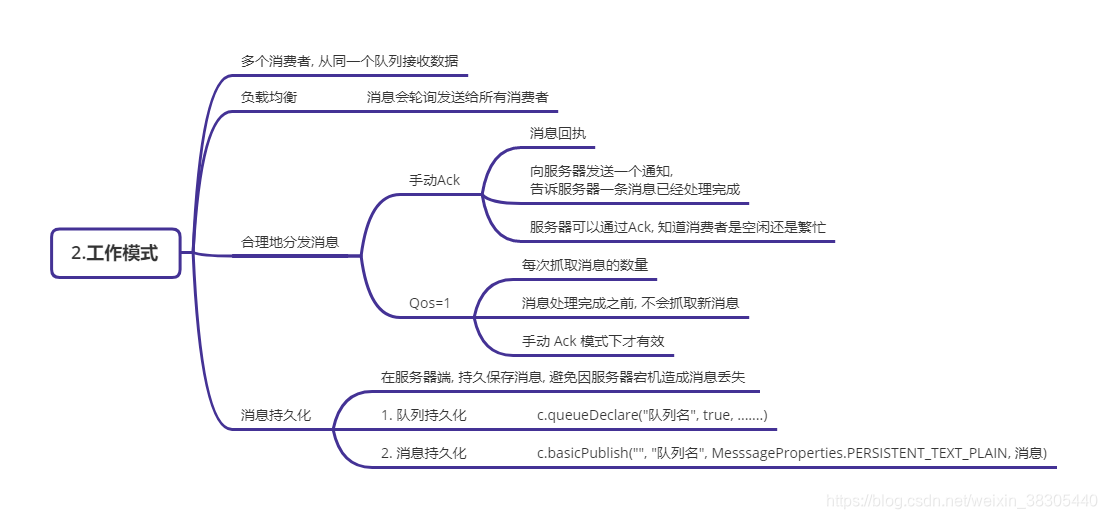
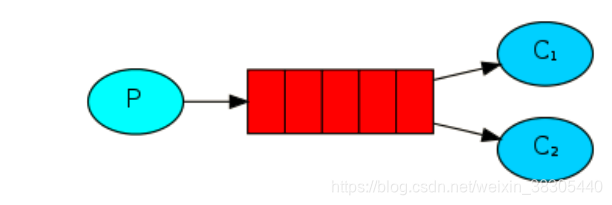
消费者有多个,当生产者发送数据时,多个消费者接收消息默认采用轮询策略,这就导致了当某个消费者处理消息的回调对象内的业务处理不完,造成阻塞,其他闲置的消费者也没办法接收到生产者的信息,所以要更改配置,变为每个消费者处理完自己的消息的回调对象内数据,再接收生产者的信息,避免堵塞。
需要修改如下配置参数:
①、设置qos=1 每次3只接收一条信息,处理完之前不接收下一条channel.basicQos(1);//3、设置Qos 每次只收一条,处理完之前不好收下一条②、当处理完消息,告诉服务器自己已经处理完消息 autoAck=falsechannel.basicAck(delivery.getEnvelope().getDeliveryTag(), false); //2、回执,告诉服务器已经处理完消息③、还要将ACK修改为false手动模式 其他配置 ④、由于数据都在rabbitmq消息中间件,如果该服务器崩溃,会造成传递信息丢失,持 久化到本地磁盘的方法,该参数为truechannel.queueDeclare("helloworld1",**true**,false,false,null);注释:这些修改项已经在代码中标注
使用步骤
1、添加如上依赖
<dependency>
    <groupId>com.rabbitmq</groupId>
    <artifactId>amqp-client</artifactId>
    <version>5.4.3</version>
</dependency>
2、生产者发送消息
import com.rabbitmq.client.Channel;
import com.rabbitmq.client.Connection;
import com.rabbitmq.client.ConnectionFactory;
import java.io.IOException;
import java.util.Scanner;
import java.util.concurrent.TimeoutException;

public class Producer2 {

    public static void main(String[] args) throws IOException, TimeoutException {

        //1、连接
        ConnectionFactory factory = new ConnectionFactory();
        factory.setHost("192.168.64.140");
        factory.setPort(5672);
        factory.setPassword("admin");
        factory.setUsername("admin");
        Connection connection = factory.newConnection();
        Channel channel = connection.createChannel();   //与rabbitmq通讯的通道

       /*2、 在服务器上创建helloworld队列(mq里面创建队列)
        注意事项:队列如果已经存在,不会重复创建,对于队列的生产者和消费者,都要创建队列,保证谁先启动谁先创建
        channel.queueDeclare(队列名,
                             是否是持久队列(一直保存在本地),
                             是否是独占(排他)队列(多个消费者能不能从同一个队列接收消息)false表示不是,
                             是否是自动删除的队列(没有消费者时服务器是否自动删除)false表示不自动删除,
                             队列的其他参数属性,使用键值对方式
                             );*/
        channel.queueDeclare("helloworld1",true,false,false,null);
                                                //④ ④ ④ ④ ④
        //循环向队列写入信息
        while(true){
            System.out.println("输入消息");
            String s = new Scanner(System.in).nextLine();

        //3、向helloworld队列发送消息,参数4为发送的消息,并且只能为byte数组
        /*channel.basicPublish(交换机(为空表示使用默认交换机),
                               队列名字,
                               消息的其他属性配置(键值对设置消息属性,没有使用null值),
                               队列的内容(byte数组));
        * */
            channel.basicPublish("","helloworld1",null,s.getBytes());
        }
    }
}
3、消费者接收消息
import com.rabbitmq.client.*;
import java.io.IOException;
import java.util.concurrent.TimeoutException;

public class Consumer2 {
    public static void main(String[] args) throws IOException, TimeoutException {
        //1、连接
        ConnectionFactory factory = new ConnectionFactory();
        factory.setHost("192.168.64.140");
        factory.setPort(5672);
        factory.setPassword("admin");
        factory.setUsername("admin");
        Connection connection = factory.newConnection();
        final Channel channel = connection.createChannel();   //与rabbitmq通讯的通道

        //2、在服务器上创建helloworld队列(mq里面创建队列)
        //注意事项:队列如果已经存在,不会重复创建
        channel.queueDeclare("helloworld1", true, false, false, null);

        //3.1、创建处理消息的回调对象
        DeliverCallback deliverCallback = new DeliverCallback() {

            public void handle(String s, Delivery delivery) throws IOException {

                String str = new String(delivery.getBody());
                System.out.println(str);  //打印消息队列

                for (int i = 0; i < str.length(); i++) {
                    if (str.charAt(i) == '.') {
                        try {
                            Thread.sleep(5000);
                        } catch (InterruptedException e) {
                            System.out.println(e);
                        }
                    }
                }
                channel.basicAck(delivery.getEnvelope().getDeliveryTag(), false); //2、回执,处理完成回执数据
                                                                        //② ② ② ② ② ②
            }
        };

        //3.1、取消消息处理的回调对象
        CancelCallback cancelCallback = new CancelCallback() {
            public void handle(String s) throws IOException {
            }
        };

        channel.basicQos(1);//3、设置Qos   每次只收一条,处理完之前不好收下一条
        //①①①①①①①①①①①①①①①

        /*3、从helloworld队列接收消息,把消息传递到回调对象处理
        channel.basicConsume(队列的名字,
                              确认方式 ACK(Acknowledgment)true自动确认(如果消息在确认之前消费者崩溃,这条消息作废)  false手动确认(如果消息在确认之前消费者崩溃,客户端消息回滚,重新接收),
                              处理消息的回调对象,
                              取消消息处理的回调对象);*/
        channel.basicConsume("helloworld1", false, deliverCallback, cancelCallback);
                                                //③③③③③③③③
    }
}
Ⅲ、发布订阅模式


**类似于电台和听众之间的关系 **
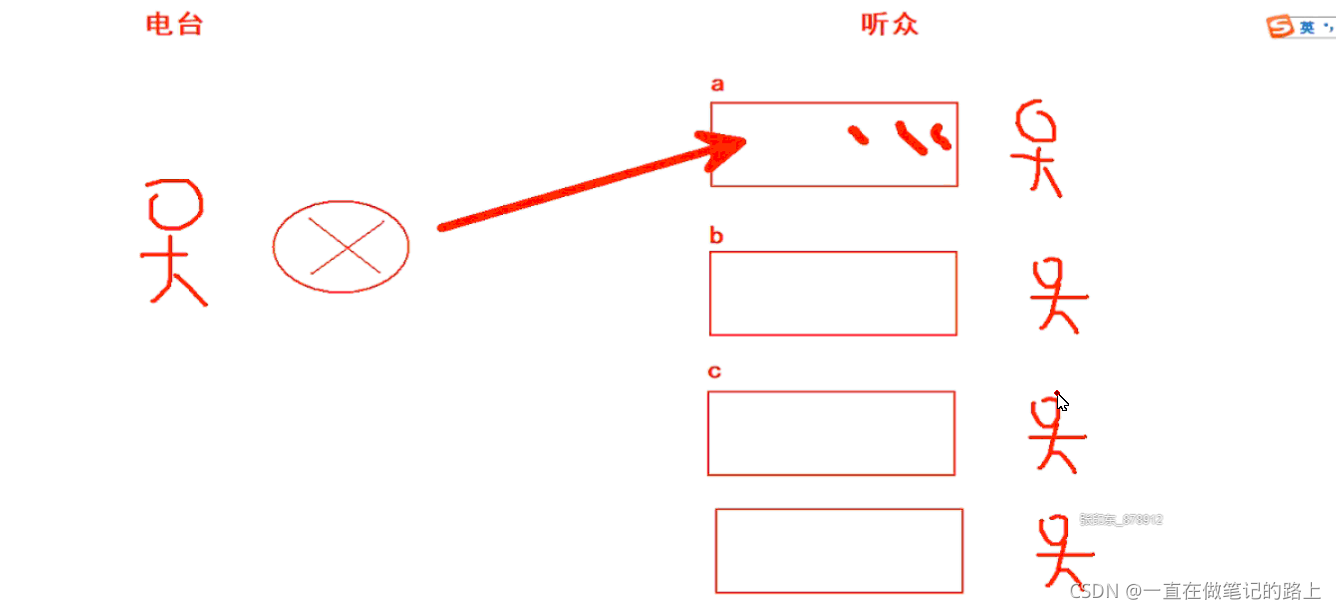
向多个消费者传递同一条消息。这种模式称为“发布/订阅”。
为了说明该模式,我们将构建一个简单的日志系统。它将由两个程序组成——第一个程序将发出日志消息,第二个程序接收它们(开启多个实例)。
首次使用到了交换机(Exchanges)
使用步骤
1、生产者发送消息
import com.rabbitmq.client.BuiltinExchangeType;
import com.rabbitmq.client.Channel;
import com.rabbitmq.client.Connection;
import com.rabbitmq.client.ConnectionFactory;

import java.io.IOException;
import java.util.Scanner;
import java.util.concurrent.TimeoutException;

public class Producer3 {

    //发布订阅模式(将消息广播出去,所有消费者都能接收到)(如果没有消费者接收,发出去的消息直接失效丢失)
    //模拟各个服务向消费者发送发送,中间mq转发
    public static void main(String[] args) throws IOException, TimeoutException {

        //1、连接
        ConnectionFactory factory = new ConnectionFactory();
        factory.setHost("192.168.64.140");
        factory.setPort(5672);
        factory.setPassword("admin");
        factory.setUsername("admin");
        Connection connection = factory.newConnection();
        Channel channel = connection.createChannel();   //与rabbitmq通讯的通道

        //2、创建一个 Fanout 类型的交换机,并且起名字叫logs(交换机在消费者和生产者都要创建)
        //channel.exchangeDeclare(交换机的名字, 交换机的类型);
        channel.exchangeDeclare("logs", BuiltinExchangeType.FANOUT);

        //3、循环向队列写入信息
        while(true){
            System.out.println("输入消息");
            String s = new Scanner(System.in).nextLine();

            //4、向helloworld队列发送消息,参数4为发送的消息,并且只能为byte数组
            /*channel.basicPublish(交换机(为空表示使用默认交换机),
                                   队列名字,
                                   消息的其他属性配置(键值对设置消息属性,没有使用null值),
                                   队列的内容(byte数组));
            * */
            channel.basicPublish("logs","",null,s.getBytes());
                                              //对于Fanout,参数二写不写都无效
        }
    }
}
2、消费者接收消息
import com.rabbitmq.client.*;
import java.io.IOException;
import java.util.UUID;
import java.util.concurrent.TimeoutException;

public class Consumer3 {
    public static void main(String[] args) throws IOException, TimeoutException {
        //1、连接
        ConnectionFactory factory = new ConnectionFactory();
        factory.setHost("192.168.64.140");
        factory.setPort(5672);
        factory.setPassword("admin");
        factory.setUsername("admin");
        Connection connection = factory.newConnection();
        final Channel channel = connection.createChannel();   //与rabbitmq通讯的通道

        //2、在服务器上创建XXXX随机队列{独占(排他),自动删除,非持久}
        //注意事项:消费者需要绑定生产者的频段,才能接收到消息。队列的创建采用随机名字(实际工作中消费者成千上百)
        String str = UUID.randomUUID().toString();
        channel.queueDeclare(str, false, true, true, null);
        //3、创建一个 Fanout 类型的交换机,并且起名字叫logs
        channel.exchangeDeclare("logs", BuiltinExchangeType.FANOUT);
        //4、交换机和队列绑定
        channel.queueBind(str,"logs","");

        //5.1、创建处理消息的回调对象
        DeliverCallback deliverCallback = new DeliverCallback() {

            public void handle(String s, Delivery delivery) throws IOException {
                String str = new String(delivery.getBody());  //接收队列里的消息
                System.out.println("收到" + str);  //处理消息
            }
        };
        //5.2取消消息处理的回调对象
        CancelCallback cancelCallback = new CancelCallback() {
            public void handle(String s) throws IOException {
            }
        };

        /*5、从随机队列接收消息,把消息传递到回调对象处理
        channel.basicConsume(队列的名字,
                              确认方式 ACK(Acknowledgment)true自动确认(如果消息在确认之前消费者崩溃,这条消息作废)  false手动确认(如果消息在确认之前消费者崩溃,客户端消息回滚,重新接收),
                              处理消息的回调对象,
                              取消消息处理的回调对象);*/
        channel.basicConsume(str, true, deliverCallback, cancelCallback);

    }
}
Ⅳ、路由模式
生产者携带路由关键字与接收的消费者关键字做比对,消费者决定该消息是否接收


使用步骤
1、生产者发送消息
import com.rabbitmq.client.BuiltinExchangeType;
import com.rabbitmq.client.Channel;
import com.rabbitmq.client.Connection;
import com.rabbitmq.client.ConnectionFactory;

import java.io.IOException;
import java.sql.SQLOutput;
import java.util.Scanner;
import java.util.concurrent.TimeoutException;

public class Producer4 {

    //路由模式根据绑定的关键词匹配
    //模拟各个服务向消费者发送发送日志,携带关键字,中间mq转发
    public static void main(String[] args) throws IOException, TimeoutException {

        //1、连接
        ConnectionFactory factory = new ConnectionFactory();
        factory.setHost("192.168.64.140");
        factory.setPort(5672);
        factory.setPassword("admin");
        factory.setUsername("admin");
        factory.setVirtualHost("kongjuian1");  //指定使用空间名字,默认空间名为 “/”
        Connection connection = factory.newConnection();
        Channel channel = connection.createChannel();   //与rabbitmq通讯的通道

        //2、创建一个 Direct 类型的交换机,并且起名字叫direct_logs(交换机在消费者和生产者都要创建)
        channel.exchangeDeclare("direct_logs", BuiltinExchangeType.DIRECT);

        //3、发送消息,消息上携带关键字信息
        while(true){
            System.out.println("输入消息");
            String s = new Scanner(System.in).nextLine();
            System.out.println("请输入路由键: ");
            String k = new  Scanner(System.in).nextLine();
            //4、向helloworld队列发送消息,参数4为发送的消息,并且只能为byte数组
            /*channel.basicPublish(交换机(为空表示使用默认交换机),
                                    队列名字,现在表示为携带的关键词
                                    消息的其他属性配置(键值对设置消息属性,没有使用null值),
                                    队列的内容(byte数组));
            * */
            channel.basicPublish("direct_logs",k,null,s.getBytes());
        }
    }
}
2、消费者接收消息
import com.rabbitmq.client.*;

import java.io.IOException;
import java.util.Scanner;
import java.util.UUID;
import java.util.concurrent.TimeoutException;

public class Consumer4 {
    public static void main(String[] args) throws IOException, TimeoutException {
        //1、连接
        ConnectionFactory factory = new ConnectionFactory();
        factory.setHost("192.168.64.140");
        factory.setPort(5672);
        factory.setPassword("admin");
        factory.setUsername("admin");
        factory.setVirtualHost("kongjuian1");  //指定使用空间名字,默认空间名为 “/”
        Connection connection = factory.newConnection();
        final Channel channel = connection.createChannel();   //与rabbitmq通讯的通道

        //2、在服务器上创建XXXX随机队列{独占(排他),自动删除,非持久}
        //让服务器自动命名,自动提供队列参数
        //channel.queueDeclare(随机队列名, false, true, true, null);
        channel.queueDeclare(); //服务器自动提供的参数为上面所示参数
        String name = channel.queueDeclare().getQueue();  //得到服务器创建的随机名字
        //3、创建一个 DIRECT 类型的交换机,并且起名字叫logs
        channel.exchangeDeclare("direct_logs", BuiltinExchangeType.DIRECT);

        //4、设置绑定键
        System.out.println("请输入绑定键,用空格隔开: ");//aa bb cc  获取到,根据空格拆分放到一个数组里面
        String s = new  Scanner(System.in).nextLine();
        String[] a =  s.split("\\s+"); //    \s是空白字符,相当于空格  +表示1到多个

        for (String k : a){
            channel.queueBind(name,"direct_logs",k);
        }

        //5.1、创建处理消息的回调对象
        DeliverCallback deliverCallback = new DeliverCallback() {

            public void handle(String s, Delivery delivery) throws IOException {
                String str = new String(delivery.getBody());  //接收队列里的消息
                System.out.println("收到" + str);  //处理消息
            }
        };
        //5.2取消消息处理的回调对象
        CancelCallback cancelCallback = new CancelCallback() {
            public void handle(String s) throws IOException {
            }
        };

        /*5、从随机队列接收消息,把消息传递到回调对象处理
        channel.basicConsume(队列的名字,
                              确认方式 ACK(Acknowledgment)true自动确认(如果消息在确认之前消费者崩溃,这条消息作废)  false手动确认(如果消息在确认之前消费者崩溃,客户端消息回滚,重新接收),
                              处理消息的回调对象,
                              取消消息处理的回调对象);*/
        channel.basicConsume(name, true, deliverCallback, cancelCallback);

    }
}
mq里面可以创建不同的空间,不同空间相互隔离,互不影响
创建方法:在服务器上创建

factory.setVirtualHost("kongjuian1"); //指定使用空间名字,默认空间名为 “/”
Ⅴ、主题模式

主题模式可以理解为路由模式的升级,绑定的路由关键字,可以使用通配符代替(类似于正则表达式)

*通配一个字符 #通配多个字符
使用步骤
1、生产者发送消息
import com.rabbitmq.client.BuiltinExchangeType;
import com.rabbitmq.client.Channel;
import com.rabbitmq.client.Connection;
import com.rabbitmq.client.ConnectionFactory;

import java.io.IOException;
import java.util.Scanner;
import java.util.concurrent.TimeoutException;

public class Producer5 {

    //主题模式根据绑定的关键词匹配(和路由的区别在于关键词格式,和交换机不一样)
    public static void main(String[] args) throws IOException, TimeoutException {

        //1、连接
        ConnectionFactory factory = new ConnectionFactory();
        factory.setHost("192.168.64.140");
        factory.setPort(5672);
        factory.setPassword("admin");
        factory.setUsername("admin");
        factory.setVirtualHost("kongjuian1");  //指定使用空间名字,默认空间名为 “/”
        Connection connection = factory.newConnection();
        Channel channel = connection.createChannel();   //与rabbitmq通讯的通道

        //2、创建一个 Topic 类型的交换机,并且起名字叫direct_logs(交换机在消费者和生产者都要创建)
        channel.exchangeDeclare("Topic_logs", BuiltinExchangeType.TOPIC);

        //3、发送消息,消息上携带关键字信息
        while(true){
            System.out.println("输入消息");
            String s = new Scanner(System.in).nextLine();
            System.out.println("请输入路由键: ");
            String k = new  Scanner(System.in).nextLine();
            //4、向helloworld队列发送消息,参数4为发送的消息,并且只能为byte数组
            /*channel.basicPublish(交换机(为空表示使用默认交换机),
                                    队列名字,现在表示为携带的关键词
                                    消息的其他属性配置(键值对设置消息属性,没有使用null值),
                                    队列的内容(byte数组));
            * */
            channel.basicPublish("Topic_logs",k,null,s.getBytes());
        }
    }
}
2、消费者接收消息
import com.rabbitmq.client.*;

import java.io.IOException;
import java.util.Scanner;
import java.util.concurrent.TimeoutException;

public class Consumer5 {
    public static void main(String[] args) throws IOException, TimeoutException {
        //1、连接
        ConnectionFactory factory = new ConnectionFactory();
        factory.setHost("192.168.64.140");
        factory.setPort(5672);
        factory.setPassword("admin");
        factory.setUsername("admin");
        factory.setVirtualHost("kongjuian1");  //指定使用空间名字,默认空间名为 “/”
        Connection connection = factory.newConnection();
        final Channel channel = connection.createChannel();   //与rabbitmq通讯的通道

        //2、在服务器上创建XXXX随机队列{独占(排他),自动删除,非持久}
        //让服务器自动命名,自动提供队列参数
        //channel.queueDeclare(随机队列名, false, true, true, null);
        channel.queueDeclare(); //服务器自动提供的参数为上面所示参数
        String name = channel.queueDeclare().getQueue();  //得到服务器创建的随机名字
        //3、创建一个 DIRECT 类型的交换机,并且起名字叫logs
        channel.exchangeDeclare("Topic_logs", BuiltinExchangeType.TOPIC);

        //4、设置绑定键
        System.out.println("请输入绑定键,用空格隔开: ");//aa.ab.bc bb.bb cc.dd.gg  获取到,根据空格拆分放到一个数组里面
        String s = new  Scanner(System.in).nextLine();
        String[] a =  s.split("\\s+"); //    \s是空白字符,相当于空格  +表示1到多个

        for (String k : a){
            channel.queueBind(name,"Topic_logs",k);
        }

        //5.1、创建处理消息的回调对象
        DeliverCallback deliverCallback = new DeliverCallback() {

            public void handle(String s, Delivery delivery) throws IOException {
                String str = new String(delivery.getBody());  //接收队列里的消息
                System.out.println("收到" + str);  //处理消息
            }
        };
        //5.2取消消息处理的回调对象
        CancelCallback cancelCallback = new CancelCallback() {
            public void handle(String s) throws IOException {
            }
        };

        /*5、从随机队列接收消息,把消息传递到回调对象处理
        channel.basicConsume(队列的名字,
                              确认方式 ACK(Acknowledgment)true自动确认(如果消息在确认之前消费者崩溃,这条消息作废)  false手动确认(如果消息在确认之前消费者崩溃,客户端消息回滚,重新接收),
                              处理消息的回调对象,
                              取消消息处理的回调对象);*/
        channel.basicConsume(name, true, deliverCallback, cancelCallback);

    }
}
四、消息服务案例
前两个案例的地址:(1条消息) Spring cloud Netflix_asddasddeedd的博客-CSDN博客
- BUS配置刷新 刷新指令消息发送到Rabbitmq ,其他模块接收执行,执行刷新操作 主题模式
- sleuth + zipkin 链路跟踪 链路跟踪日志,通过 Rabbitmq 中转发送到 Zipkin 服务器 简单模式
- 订单的流量削峰 购物系统产生的订单,不直接存储到数据库,而是发送到 Rabbitmq, 后台的消费者模块接收订单,再向数据库存储, 短时间大量订单并发存储,变成顺序存储 简单模式 / 工作模式。
案例三:
案例简介:
订单的流量削峰 购物系统产生的订单,不直接存储到数据库,而是发送到 Rabbitmq, 后台的消费者模块接收订单,再向数据库存储, 短时间大量订单并发存储,变成顺序存储 简单模式 / 工作模式。
订单发送到 Rabbitmq
1、添加 Rabbitmq 依赖和 Rabbitmq 连接配置
<dependency>
    <groupId>org.springframework.boot</groupId>
    <artifactId>spring-boot-starter-amqp</artifactId>
</dependency>
spring: rabbitmq: host: 192.168.64.140 port: 5672 username: admin password: admin virtual-host: /2、在启动类(或者自定义自动配置类)中设置队列的参数: orderQueue, true, false, false
import org.mybatis.spring.annotation.MapperScan; import org.springframework.amqp.core.Queue; import org.springframework.boot.SpringApplication; import org.springframework.boot.autoconfigure.SpringBootApplication; import org.springframework.context.annotation.Bean; @SpringBootApplication @MapperScan("com.pd.mapper") public class RunPdAPP{ public static void main(String[] args) { SpringApplication.run(RunPdAPP.class, args); } //新建spring的Queue实例用来封装队列的参数 //rabbitmq的自动配置类会自动发现这个Queue实例 //根据其中的参数自动在服务器上创建队列 @Bean public Queue orderQueue(){//持久,非独占,不自动删除 return new Queue("orderQueue",true,false,false); } }3、修改需要发送消息的模块
@Autowired private AmqpTemplate t; //注入对象: AmqpTemplate(用来封装发送消息代码的工具)发送消息 public String saveOrder(PdOrder pdOrder) throws Exception { String orderId = generateId(); // 生成订单id(该方法随机生成时间作为id订单编号) pdOrder.setOrderId(orderId); // 订单id放入订单对象 // 订单id、地址id、用户id、购买的商品id // 转换并发送,先把数据转成byte[]再发送 t.convertAndSend("orderQueue", pdOrder);
订单的消费者
1、Rabbitmq基础配置,准备队列参数
①、添加 Rabbitmq 依赖和 Rabbitmq 连接配置 ③、在启动类(或者自定义自动配置类)中设置队列的参数: orderQueue, true, false, false2、新建消费者类: OrderConsumer
3、用注解配置接收消息import com.pd.pojo.PdOrder; import com.pd.service.OrderService; import org.springframework.amqp.rabbit.annotation.RabbitHandler; import org.springframework.amqp.rabbit.annotation.RabbitListener; import org.springframework.beans.factory.annotation.Autowired; import org.springframework.stereotype.Component; //队列名字 @RabbitListener(queues = "orderQueue") //通过注解配置就可以接收信息,不需要写代码 @Component public class OrderConsumer { @Autowired private OrderService orderService; @RabbitHandler //指定使用哪个方法处理该队列消息,并且该方法只能有一个 public void receive(PdOrder order) throws Exception { orderService.saveOrder(order); System.out.println("=============================订单已经完成=================="); } }4、将接收到的消息储存到数据库
五、RabbitMQ - Spring boot 整合
** 添加RabbitMQ依赖**
<dependency>
<groupId>org.springframework.boot</groupId>
<artifactId>spring-boot-starter-amqp</artifactId>
</dependency>
配置yml,配置RabbitMQ连接信息
spring:
  rabbitmq:
    host: 192.168.64.140
    port: 5672
    username: admin
    password: admin
    virtual-host: /
1、简单模式整合
①、配置启动类
import org.springframework.amqp.core.Queue; import org.springframework.beans.factory.annotation.Autowired; import org.springframework.boot.SpringApplication; import org.springframework.boot.autoconfigure.SpringBootApplication; import org.springframework.context.annotation.Bean; import javax.annotation.PostConstruct; @SpringBootApplication public class Main1 { public static void main(String[] args) { SpringApplication.run(Main1.class,args); } //设置队列参数 @Bean public Queue helloWorld(){ //参数简介 :队列名称,非持久,非独占,不自动删除 return new Queue("helloworld",false,false,false); } //调用生产者发送消息 @Autowired private Producer1 producer; //spring的执行流程 //自动扫描创建实例--》完成依赖注入--》@PostConstruct-->后续步骤 @PostConstruct public void test(){ //开启一个新的线程,不阻塞程序主线程执行 new Thread(new Runnable() { @Override public void run() { try { Thread.sleep(3000); //等待helloworld队列被创建 } catch (InterruptedException e) { e.printStackTrace(); } producer.send(); } }).start(); } }②、创建生产者类
import org.springframework.amqp.core.AmqpTemplate; import org.springframework.beans.factory.annotation.Autowired; import org.springframework.stereotype.Component; @Component public class Producer1 { //发送消息的封装工具 // @Autowired private AmqpTemplate t; public void send(){ //向helloworld队列发送消息 //自动转换成byter数组 //相当于: channel.basicPublish("logs","",null,s.getBytes()); t.convertAndSend("helloworld","hello world"); } }③、创建消费者类
import org.springframework.amqp.rabbit.annotation.RabbitListener; import org.springframework.stereotype.Component; //@RabbitListener(queues = "helloworld") //接收队列helloworld, //如果放在类上,要与 @RabbitHandler配合使用 //也可以直接梵高方法上。 @Component public class Consumer1 { @RabbitListener(queues = "helloworld") public void receive(String msg){ System.out.println("收到消息:" + msg); } }
2、工作模式
修改yml,每次抓取消息修改为1
spring: rabbitmq: host: 192.168.64.140 port: 5672 username: admin password: admin virtual-host: / listener: simple: prefetch: 1 #每次抓取一条消息,处理完之前不收下一条,默认抓取250条①、配置启动类
import org.springframework.amqp.core.Queue;
import org.springframework.beans.factory.annotation.Autowired;
import org.springframework.boot.SpringApplication;
import org.springframework.boot.autoconfigure.SpringBootApplication;
import org.springframework.context.annotation.Bean;

import javax.annotation.PostConstruct;
import java.util.Scanner;

/*
    合理分发
          1. autoAck=false,手动确认
             spring封装的rabbitmq,默认就是手动确认,
             spring会自动执行发送回执

          2. qos=1,预抓取消息数量(配置类中修改)
             yml 添加 pre-fetch=1,默认是250

    消息持久化
          1. 队列持久化
             new Queue("", true)

          2. 消息数据的持久化
             spring发送的消息,默认就是持久消息
 */

@SpringBootApplication
public class Main2 {

    public static void main(String[] args) {
        SpringApplication.run(Main2.class, args);
    }

    // 设置队列参数
    @Bean
    public Queue taskQueue() {
        // 持久,非独占,不自动删除
        return new Queue("task_queue"); //只给队列名,其他参数是下面的默认值
        // return new Queue("task_queue",true,false,false);
    }

    @Autowired
    private Producer2 p;
    /*
    spring的主线程执行流程
    自动扫描创建实例 --> 完成依赖注入 --> @PostConstruct --> 后续步骤
     */
    @PostConstruct
    public void test() {
        // 在新线程中执行自己的运算,不阻塞 spring 主线程执行
        new Thread(() -> {
            while (true){
                System.out.print("输入消息:");
                String s = new Scanner(System.in).nextLine();
                p.send(s);
            }
        }).start();
    }

}
②创建生产者类
import org.springframework.amqp.core.AmqpTemplate;
import org.springframework.beans.factory.annotation.Autowired;
import org.springframework.stereotype.Component;


@Component
public class Producer2 {
    // 发送消息的封装工具
    // RabbitAutoConfiguration 中创建了 AmqpTemplate 实例
    @Autowired
    private AmqpTemplate t;

    public void send(String s) {
        // 向 helloworld 队列发送消息
        // 队列的参数在启动类中设置
        t.convertAndSend("task_queue", s);

        /*
        t.convertAndSend("task_queue", s, 消息预处理对象);
        在预处理对象中,可以对消息的参数进行调整,
        可以把持久化参数设置成非持久
         */
    }
}
③创建消费者类
import org.springframework.amqp.rabbit.annotation.RabbitListener;
import org.springframework.stereotype.Component;


//每个@RabbitListener都会注册成为一个消费者
@Component
public class Consumer2 {
    @RabbitListener(queues = "task_queue")
    public void receive1(String msg) {
        System.out.println("消费者1收到:"+msg);
    }

    @RabbitListener(queues = "task_queue")
    public void receive2(String msg) {
        System.out.println("消费者2收到:"+msg);
    }
}
3、发布订阅模式
启动类
import org.springframework.amqp.core.FanoutExchange;
import org.springframework.beans.factory.annotation.Autowired;
import org.springframework.boot.SpringApplication;
import org.springframework.boot.autoconfigure.SpringBootApplication;
import org.springframework.context.annotation.Bean;

import javax.annotation.PostConstruct;
import java.util.Scanner;

@SpringBootApplication
public class Main3 {

    public static void main(String[] args) {
        SpringApplication.run(Main3.class,args);
    }


    //创建FANOUT交换机
    @Bean
    public FanoutExchange logs(){
        return new FanoutExchange("logs",false,false);
    }


    //开始调用生产者发送消息
    @Autowired
    private Producer3 producer3;

    //spring的执行流程
    //自动扫描创建实例--》完成依赖注入--》@PostConstruct-->后续步骤
    @PostConstruct
    public void test(){

        //开启一个新的线程,不阻塞程序主线程执行
        new Thread(new Runnable() {
            @Override
            public void run() {
                while(true){
                    System.out.println("输入消息: ");
                    String s = new Scanner(System.in).nextLine();
                    producer3.send(s);
                }
            }
        }).start();
    }
}
生产者
import org.springframework.amqp.core.AmqpTemplate;
import org.springframework.beans.factory.annotation.Autowired;
import org.springframework.stereotype.Component;

@Component
public class Producer3 {

    //发送消息的封装工具
    @Autowired
    private AmqpTemplate t;


    public void send(String s){
        //向helloworld队列发送消息     //自动转换成byter数组
        t.convertAndSend("logs","",s);
        //相当于: channel.basicPublish("logs","",null,s.getBytes());
    }
}
消费者
import org.springframework.amqp.rabbit.annotation.Exchange;
import org.springframework.amqp.rabbit.annotation.Queue;
import org.springframework.amqp.rabbit.annotation.QueueBinding;
import org.springframework.amqp.rabbit.annotation.RabbitListener;
import org.springframework.stereotype.Component;

@Component
public class Consumer3 {


    //创建队列,并且和交换机进行绑定
    //参数为绑定配置
    @RabbitListener(bindings = @QueueBinding(
            value = @Queue,   //创建队列,该注解不给参数表示创建随机队列,
            exchange = @Exchange(name = "logs" ,declare = "false")  //设置交换机
                                                    //false表示不创建新的交换机,使用已经存在的交换机
    ))
    public void receive1(String msg){
        System.out.println("1号收到消息:" + msg);
    }


    @RabbitListener(bindings = @QueueBinding(
            value = @Queue,
            exchange = @Exchange(name = "logs" ,declare = "false")
    ))
    public void receive2(String msg){
        System.out.println("2号收到消息:" + msg);
    }
}
4、主题模式
启动类
import org.springframework.amqp.core.DirectExchange;
import org.springframework.beans.factory.annotation.Autowired;
import org.springframework.boot.SpringApplication;
import org.springframework.boot.autoconfigure.SpringBootApplication;
import org.springframework.context.annotation.Bean;

import javax.annotation.PostConstruct;
import java.util.Scanner;

@SpringBootApplication
public class Main4 {

    public static void main(String[] args) {
        SpringApplication.run(Main4.class,args);
    }


    //创建Direct交换机
    @Bean
    public DirectExchange logs(){
        return new DirectExchange("direct_log",false,false);
    }


    //开始调用生产者发送消息
    @Autowired
    private Producer4 producer4;

    //spring的执行流程
    //自动扫描创建实例--》完成依赖注入--》@PostConstruct-->后续步骤
    @PostConstruct
    public void test(){

        //开启一个新的线程,不阻塞程序主线程执行
        new Thread(new Runnable() {
            @Override
            public void run() {
                while(true){
                    System.out.println("输入消息: ");
                    String s = new Scanner(System.in).nextLine();
                    System.out.println("输入路由键: ");
                    String k = new Scanner(System.in).nextLine();
                    producer4.send(k,s);
                }
            }
        }).start();
    }
}
生产者
import org.springframework.amqp.core.AmqpTemplate;
import org.springframework.beans.factory.annotation.Autowired;
import org.springframework.stereotype.Component;

@Component
public class Producer4 {

    //发送消息的封装工具
    @Autowired
    private AmqpTemplate t;


    public void send(String k , String s){

        //向队列发送消息     //自动转换成byter数组
        //相当于: channel.basicPublish("logs","",null,s.getBytes());
        t.convertAndSend("direct_log",k,s);

    }
}
消费者
import org.springframework.amqp.rabbit.annotation.Exchange;
import org.springframework.amqp.rabbit.annotation.Queue;
import org.springframework.amqp.rabbit.annotation.QueueBinding;
import org.springframework.amqp.rabbit.annotation.RabbitListener;
import org.springframework.stereotype.Component;

@Component
public class Consumer4 {


    //创建队列,并且和交换机进行绑定
    //参数为绑定配置
    @RabbitListener(bindings = @QueueBinding(
            value = @Queue,   //创建队列,该注解不给参数表示创建随机队列,
            exchange = @Exchange(name = "direct_log" ,declare = "false"),  //设置交换机
                                                    //表示不创建新的交换机,使用已经存在的交换机
            key = {"error"}
    ))
    public void receive1(String msg){
        System.out.println("1号收到消息:" + msg);
    }


    @RabbitListener(bindings = @QueueBinding(
            value = @Queue,
            exchange = @Exchange(name = "direct_log" ,declare = "false"),
            key = {"info","error","warning"}
    ))
    public void receive2(String msg){
        System.out.println("2号收到消息:" + msg);
    }
}
5、路由模式
启动类
import org.springframework.amqp.core.TopicExchange;
import org.springframework.beans.factory.annotation.Autowired;
import org.springframework.boot.SpringApplication;
import org.springframework.boot.autoconfigure.SpringBootApplication;
import org.springframework.context.annotation.Bean;

import javax.annotation.PostConstruct;
import java.util.Scanner;

@SpringBootApplication
public class Main5 {

    public static void main(String[] args) {
        SpringApplication.run(Main5.class,args);
    }


    //创建Topic交换机
    @Bean
    public TopicExchange topict(){
        return new TopicExchange("topict_log",false,false);
    }


    //开始调用生产者发送消息
    @Autowired
    private Producer5 producer5;

    //spring的执行流程
    //自动扫描创建实例--》完成依赖注入--》@PostConstruct-->后续步骤
    @PostConstruct
    public void test(){

        //开启一个新的线程,不阻塞程序主线程执行
        new Thread(new Runnable() {
            @Override
            public void run() {
                while(true){
                    System.out.println("输入消息: ");
                    String s = new Scanner(System.in).nextLine();
                    System.out.println("输入路由键: ");
                    String k = new Scanner(System.in).nextLine();
                    producer5.send(k,s);
                }
            }
        }).start();
    }
}
生产者
import org.springframework.amqp.core.AmqpTemplate;
import org.springframework.beans.factory.annotation.Autowired;
import org.springframework.stereotype.Component;

@Component
public class Producer5 {

    //发送消息的封装工具
    @Autowired
    private AmqpTemplate t;


    public void send(String k , String s){

        //向队列发送消息     //自动转换成byter数组
        //相当于: channel.basicPublish("logs","",null,s.getBytes());
        t.convertAndSend("topic_log",k,s);

    }
}
消费者
import org.springframework.amqp.rabbit.annotation.Exchange;
import org.springframework.amqp.rabbit.annotation.Queue;
import org.springframework.amqp.rabbit.annotation.QueueBinding;
import org.springframework.amqp.rabbit.annotation.RabbitListener;
import org.springframework.stereotype.Component;

@Component
public class Consumer5 {


    //创建队列,并且和交换机进行绑定
    //参数为绑定配置
    @RabbitListener(bindings = @QueueBinding(
            value = @Queue,   //创建队列,该注解不给参数表示创建随机队列,
            exchange = @Exchange(name = "topic_log" ,declare = "false"),  //设置交换机
                                                    //表示不创建新的交换机,使用已经存在的交换机
            key = {"*.orange.*"}
    ))
    public void receive1(String msg){
        System.out.println("1号收到消息:" + msg);
    }


    @RabbitListener(bindings = @QueueBinding(
            value = @Queue,
            exchange = @Exchange(name = "topict_log" ,declare = "false"),
            key = {"*.*.rabbit","lazy.#"}
    ))
    public void receive2(String msg){
        System.out.println("2号收到消息:" + msg);
    }
}
版权归原作者 S Y H 所有, 如有侵权,请联系我们删除。