1 SpringBoot是什么
SpringBoot 的诞生就是为了简化 Spring 中繁琐的 XML 配置,其本质依然还是Spring框架,使用SpringBoot之后可以不使用任何 XML 配置来启动一个服务,使得我们在使用微服务架构时可以更加快速的建立一个应用。
简单来说就是SpringBoot其实不是什么新的框架,它默认配置了很多框架的使用方式。
2 SpringBoot的特点
提供了固定的配置来简化配置,即约定大于配置
尽可能地自动配置 Spring 和第三方库,即能自动装配
内嵌容器,创建独立的 Spring 应用
让测试变的简单,内置了JUnit、Spring Boot Test等多种测试框架,方便测试
提供可用于生产的特性,如度量、运行状况检查和外部化配置。
完全不需要生成代码,也不需要 XML 配置。
3 启动类
下面探究SpringBoot的启动原理,关于一些细节就不赘述,我们捉住主线分析即可。
注意:本文的 SpringBoot 版本为 2.6.1
3.1 @SpringBootApplication
一切的来自起源SpringBoot的启动类,我们发现main方法上面有个注解:@SpringBootApplication
@SpringBootApplication
public class SpringbootWorkApplication {
    public static void main(String[] args) {
        SpringApplication.run(SpringbootWorkApplication.class, args);
    }
}
@SpringBootApplication 标注在某个类上说明这个类是 SpringBoot 的主配置类, SpringBoot 就应该运行这个类的main方法来启动 SpringBoot 应用;它的本质是一个组合注解,我们点进去查看该类的元信息主要包含3个注解:
@Target({ElementType.TYPE})
@Retention(RetentionPolicy.RUNTIME)
@Documented
@Inherited
@SpringBootConfiguration
@EnableAutoConfiguration
@ComponentScan(
    excludeFilters = {@Filter(
    type = FilterType.CUSTOM,
    classes = {TypeExcludeFilter.class}
), @Filter(
    type = FilterType.CUSTOM,
    classes = {AutoConfigurationExcludeFilter.class}
)}
)
public @interface SpringBootApplication {
@SpringBootConfiguration(里面就是@Configuration,标注当前类为配置类,其实只是做了一层封装改了个名字而已)
@EnableAutoConfiguration(开启自动配置)
@ComponentScan(包扫描)
注:@Inherited是一个标识,用来修饰注解,如果一个类用上了@Inherited修饰的注解,那么其子类也会继承这个注解
我们下面逐一分析这3个注解作用
3.1.1 @SpringBootConfiguration
我们继续点@SpringBootConfiguration进去查看源码如下:
@Target({ElementType.TYPE})
@Retention(RetentionPolicy.RUNTIME)
@Documented
@Configuration
@Indexed
public @interface SpringBootConfiguration {
    @AliasFor(
        annotation = Configuration.class
    )
    boolean proxyBeanMethods() default true;
}
@Configuration标注在某个类上,表示这是一个 springboot的配置类。可以向容器中注入组件。
3.1.2 @ComponentScan
@ComponentScan:配置用于 Configuration 类的组件扫描指令。
提供与 Spring XML 的 context:component-scan 元素并行的支持。
可以 basePackageClasses 或basePackages 来定义要扫描的特定包。 如果没有定义特定的包,将从声明该注解的类的包开始扫描。
3.1.3 @EnableAutoConfiguration
@EnableAutoConfiguration顾名思义就是:开启自动导入配置
这个注解是SpringBoot的重点,我们下面详细讲解
4 @EnableAutoConfiguration
- 我们点进去看看该注解有什么内容
@Target({ElementType.TYPE})
@Retention(RetentionPolicy.RUNTIME)
@Documented
@Inherited
@AutoConfigurationPackage   //自动导包
@Import({AutoConfigurationImportSelector.class}) //自动配置导入选择
public @interface EnableAutoConfiguration {
    String ENABLED_OVERRIDE_PROPERTY = "spring.boot.enableautoconfiguration";

    Class<?>[] exclude() default {};

    String[] excludeName() default {};
}
4.1 @AutoConfigurationPackage
自动导入配置包
点进去查看代码:
@Target({ElementType.TYPE})
@Retention(RetentionPolicy.RUNTIME)
@Documented
@Inherited
@Import({Registrar.class})
public @interface AutoConfigurationPackage {
    String[] basePackages() default {};

    Class<?>[] basePackageClasses() default {};
}
@Import 为spring的注解,导入一个配置文件,在springboot中为给容器导入一个组件,而导入的组件由 AutoConfigurationPackages.class的内部类Registrar.class 执行逻辑来决定是如何导入的。
4.1.1 @Import({Registrar.class})
点Registrar.class进去查看源码如下:
static class Registrar implements ImportBeanDefinitionRegistrar, DeterminableImports {
    Registrar() {
    }

    public void registerBeanDefinitions(AnnotationMetadata metadata, BeanDefinitionRegistry registry) {
        //断点
        AutoConfigurationPackages.register(registry, (String[])(new AutoConfigurationPackages.PackageImports(metadata)).getPackageNames().toArray(new String[0]));
    }

    public Set<Object> determineImports(AnnotationMetadata metadata) {
        return Collections.singleton(new AutoConfigurationPackages.PackageImports(metadata));
    }
}
注:Registrar实现了ImportBeanDefinitionRegistrar类,就可以被注解@Import导入到spring容器里。
这个地方打断点
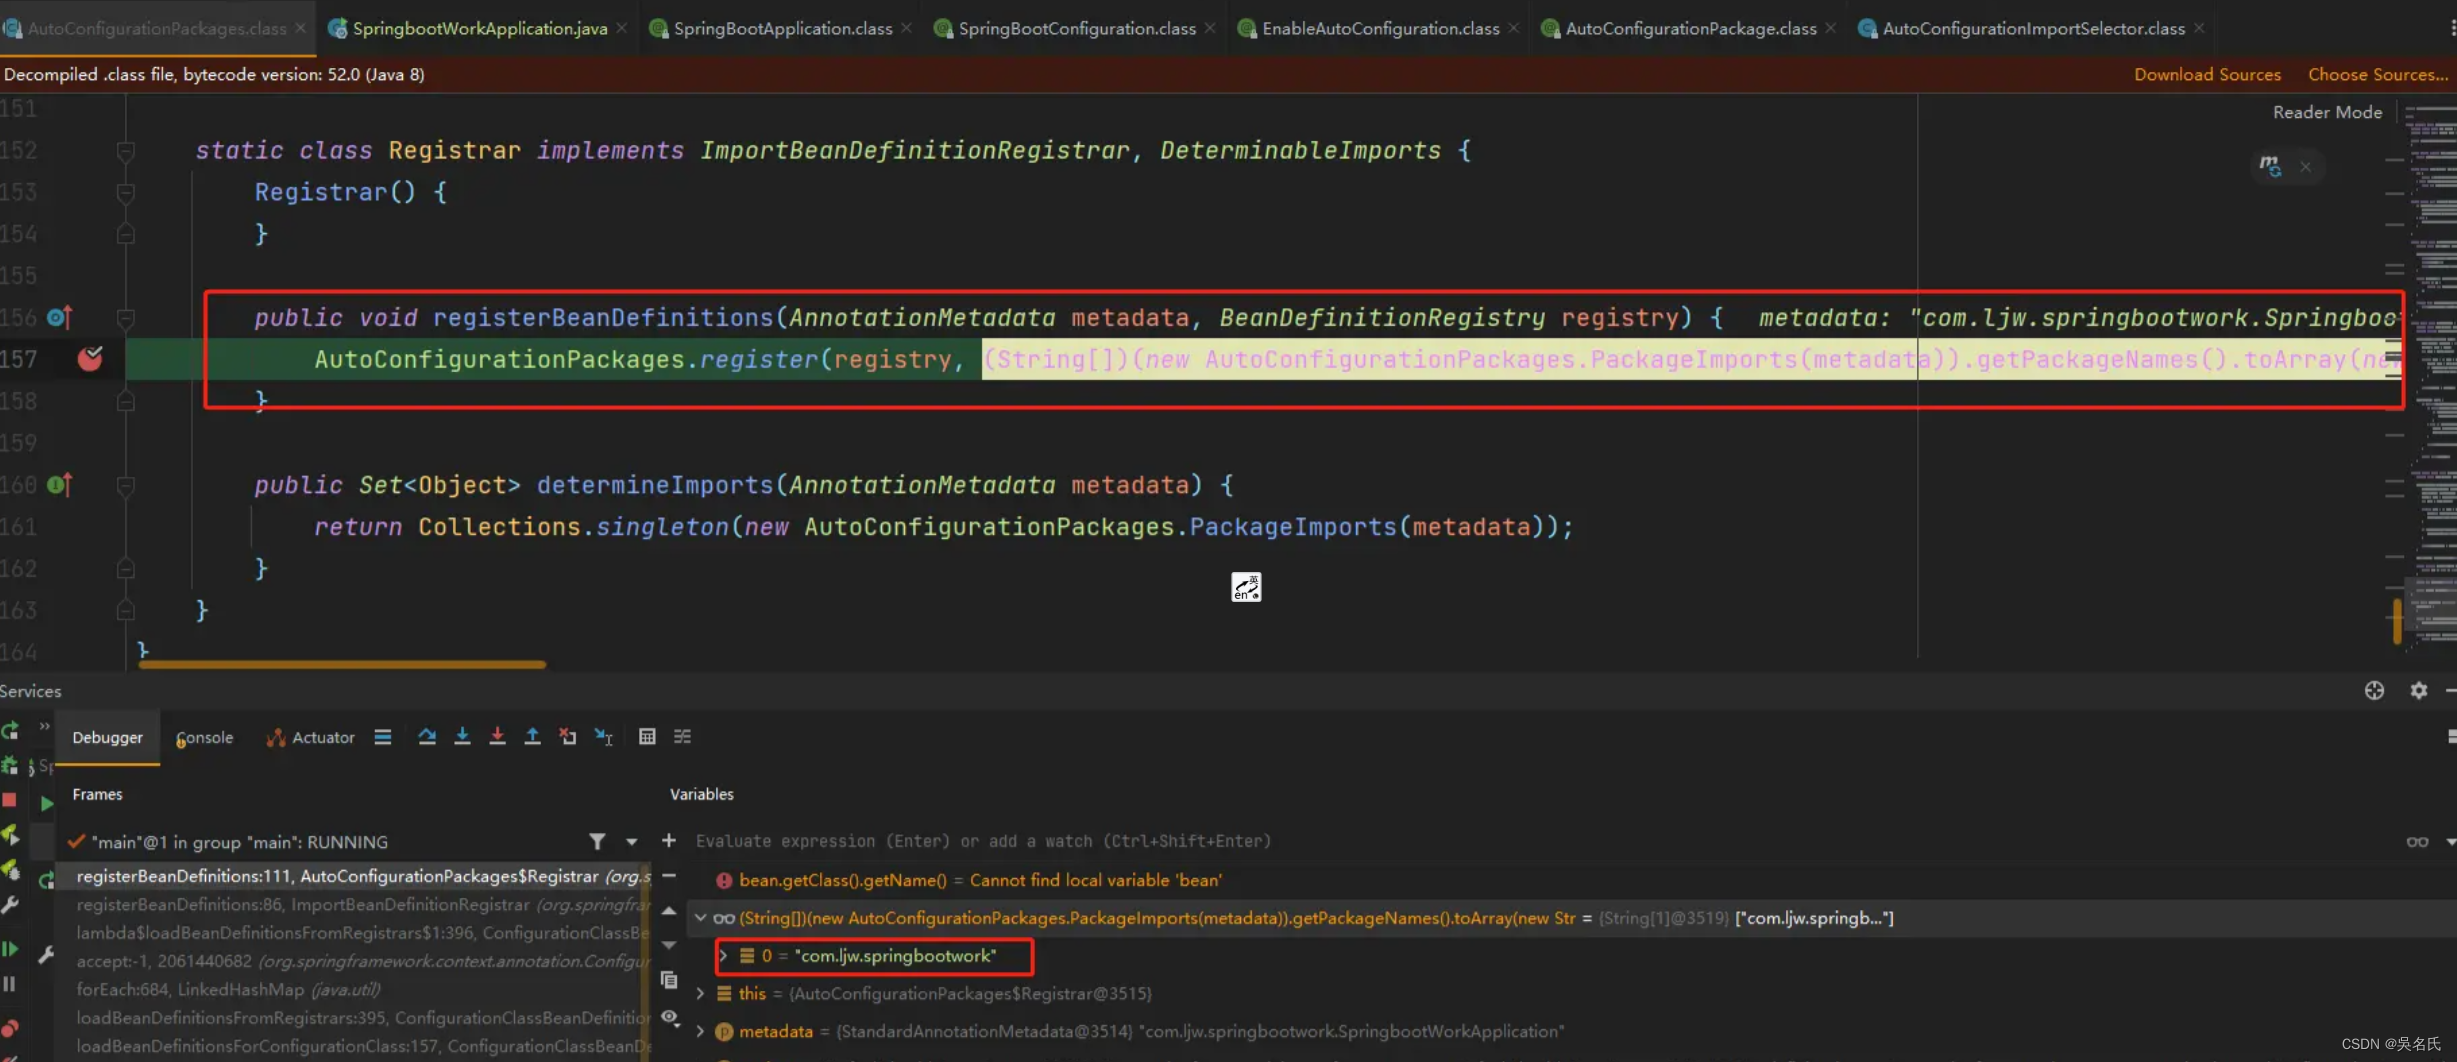
运行可以查看到(String[])(new AutoConfigurationPackages.PackageImports(metadata)).getPackageNames().toArray(new String[0])的值为com.ljw.springbootwork:当前启动类所在的包名
结论:@AutoConfigurationPackage 就是将主配置类(@SpringBootApplication 标注的类)所在的包下面所有的组件都扫描注冊到 spring 容器中。
4.2 @Import({AutoConfigurationImportSelector.class})
作用:AutoConfigurationImportSelector开启自动配置类的导包的选择器,即是带入哪些类,有选择性的导入
点AutoConfigurationImportSelector.class进入查看源码,这个类中有两个方法见名知意:
- selectImports:选择需要导入的组件
public String[] selectImports(AnnotationMetadata annotationMetadata) {
    if (!this.isEnabled(annotationMetadata)) {
        return NO_IMPORTS;
    } else {
        AutoConfigurationImportSelector.AutoConfigurationEntry autoConfigurationEntry = this.getAutoConfigurationEntry(annotationMetadata);
        return StringUtils.toStringArray(autoConfigurationEntry.getConfigurations());
    }
}
- getAutoConfigurationEntry:根据导入的@Configuration类的AnnotationMetadata返回AutoConfigurationImportSelector.AutoConfigurationEntry
protected AutoConfigurationImportSelector.AutoConfigurationEntry getAutoConfigurationEntry(AnnotationMetadata annotationMetadata) {
    if (!this.isEnabled(annotationMetadata)) {
        return EMPTY_ENTRY;
    } else {
        AnnotationAttributes attributes = this.getAttributes(annotationMetadata);
         // 这打个断点,看看 返回的数据
        List<String> configurations = this.getCandidateConfigurations(annotationMetadata, attributes);
        //删除重复项
        configurations = this.removeDuplicates(configurations);
        Set<String> exclusions = this.getExclusions(annotationMetadata, attributes);
        //检查
        this.checkExcludedClasses(configurations, exclusions);
        //删除需要排除的依赖
        configurations.removeAll(exclusions);
        configurations = this.getConfigurationClassFilter().filter(configurations);
        this.fireAutoConfigurationImportEvents(configurations, exclusions);
        return new AutoConfigurationImportSelector.AutoConfigurationEntry(configurations, exclusions);
    }
}
this.getCandidateConfigurations(annotationMetadata, attributes)这里断点查看

configurations数组长度为133,并且文件后缀名都为 **AutoConfiguration
结论: 这些都是候选的配置类,经过去重,去除需要的排除的依赖,最终的组件才是这个环境需要的所有组件。有了自动配置,就不需要我们自己手写配置的值了,配置类有默认值的。
我们继续往下看看是如何返回需要配置的组件的
4.2.1 getCandidateConfigurations(annotationMetadata, attributes)
方法如下:
protected List<String> getCandidateConfigurations(AnnotationMetadata metadata, AnnotationAttributes attributes) {
    List<String> configurations = SpringFactoriesLoader.loadFactoryNames(this.getSpringFactoriesLoaderFactoryClass(), this.getBeanClassLoader());
    Assert.notEmpty(configurations, "No auto configuration classes found in META-INF/spring.factories. If you are using a custom packaging, make sure that file is correct.");
    return configurations;
}
这里有句断言: Assert.notEmpty(configurations, "No auto configuration classes found in META-INF/spring.factories. If you are using a custom packaging, make sure that file is correct.");
意思是:“在 META-INF/spring.factories 中没有找到自动配置类。如果您使用自定义包装,请确保该文件是正确的。“
结论: 即是要loadFactoryNames()方法要找到自动的配置类返回才不会报错。
4.2.1.1 getSpringFactoriesLoaderFactoryClass()
我们点进去发现:this.getSpringFactoriesLoaderFactoryClass()返回的是EnableAutoConfiguration.class这个注解。这个注解和@SpringBootApplication下标识注解是同一个注解。
protected Class<?> getSpringFactoriesLoaderFactoryClass() {
    return EnableAutoConfiguration.class;
}
结论:获取一个能加载自动配置类的类,即SpringBoot默认自动配置类为EnableAutoConfiguration
4.2.2 SpringFactoriesLoader
SpringFactoriesLoader工厂加载机制是Spring内部提供的一个约定俗成的加载方式,只需要在模块的META-INF/spring.factories文件,这个Properties格式的文件中的key是接口、注解、或抽象类的全名,value是以逗号 “ , “ 分隔的实现类,使用SpringFactoriesLoader来实现相应的实现类注入Spirng容器中。
注:会加载所有jar包下的classpath路径下的META-INF/spring.factories文件,这样文件不止一个。
4.2.2.1 loadFactoryNames()
public static List<String> loadFactoryNames(Class<?> factoryType, @Nullable ClassLoader classLoader) {
   ClassLoader classLoaderToUse = classLoader;
   if (classLoaderToUse == null) {
      classLoaderToUse = SpringFactoriesLoader.class.getClassLoader();
   }
   String factoryTypeName = factoryType.getName();
   return loadSpringFactories(classLoaderToUse).getOrDefault(factoryTypeName, Collections.emptyList());
}
断点查看factoryTypeName:

先是将 EnableAutoConfiguration.class 传给了 factoryType
然后String factoryTypeName = factoryType.getName();,所以factoryTypeName 值为 org.springframework.boot.autoconfigure.EnableAutoConfiguration
4.2.2.2 loadSpringFactories()
接着查看loadSpringFactories方法的作用
private static Map<String, List<String>> loadSpringFactories(ClassLoader classLoader) {
    //断点查看
   Map<String, List<String>> result = cache.get(classLoader);
   if (result != null) {
      return result;
   }

   result = new HashMap<>();
   try {
      //注意这里:META-INF/spring.factories
      Enumeration<URL> urls = classLoader.getResources(FACTORIES_RESOURCE_LOCATION);
      while (urls.hasMoreElements()) {
         URL url = urls.nextElement();
         UrlResource resource = new UrlResource(url);
         Properties properties = PropertiesLoaderUtils.loadProperties(resource);
         for (Map.Entry<?, ?> entry : properties.entrySet()) {
            String factoryTypeName = ((String) entry.getKey()).trim();
            String[] factoryImplementationNames =
                  StringUtils.commaDelimitedListToStringArray((String) entry.getValue());
            for (String factoryImplementationName : factoryImplementationNames) {
            //断点
               result.computeIfAbsent(factoryTypeName, key -> new ArrayList<>())
                     .add(factoryImplementationName.trim());
            }
         }
      }

      // Replace all lists with unmodifiable lists containing unique elements
      //去重,断点查看result值
      result.replaceAll((factoryType, implementations) -> implementations.stream().distinct()
            .collect(Collectors.collectingAndThen(Collectors.toList(), Collections::unmodifiableList)));
      cache.put(classLoader, result);
   }
   catch (IOException ex) {
      throw new IllegalArgumentException("Unable to load factories from location [" +
            FACTORIES_RESOURCE_LOCATION + "]", ex);
   }
   return result;
}
这里的 FACTORIES_RESOURCE_LOCATION 在上面有定义:META-INF/spring.factories
public final class SpringFactoriesLoader {

   /**
    * The location to look for factories.
    * <p>Can be present in multiple JAR files.
    */
   public static final String FACTORIES_RESOURCE_LOCATION = "META-INF/spring.factories";
META-INF/spring.factories文件在哪里?? 在所有引入的java包的当前类路径下的META-INF/spring.factories文件都会被读取,如:
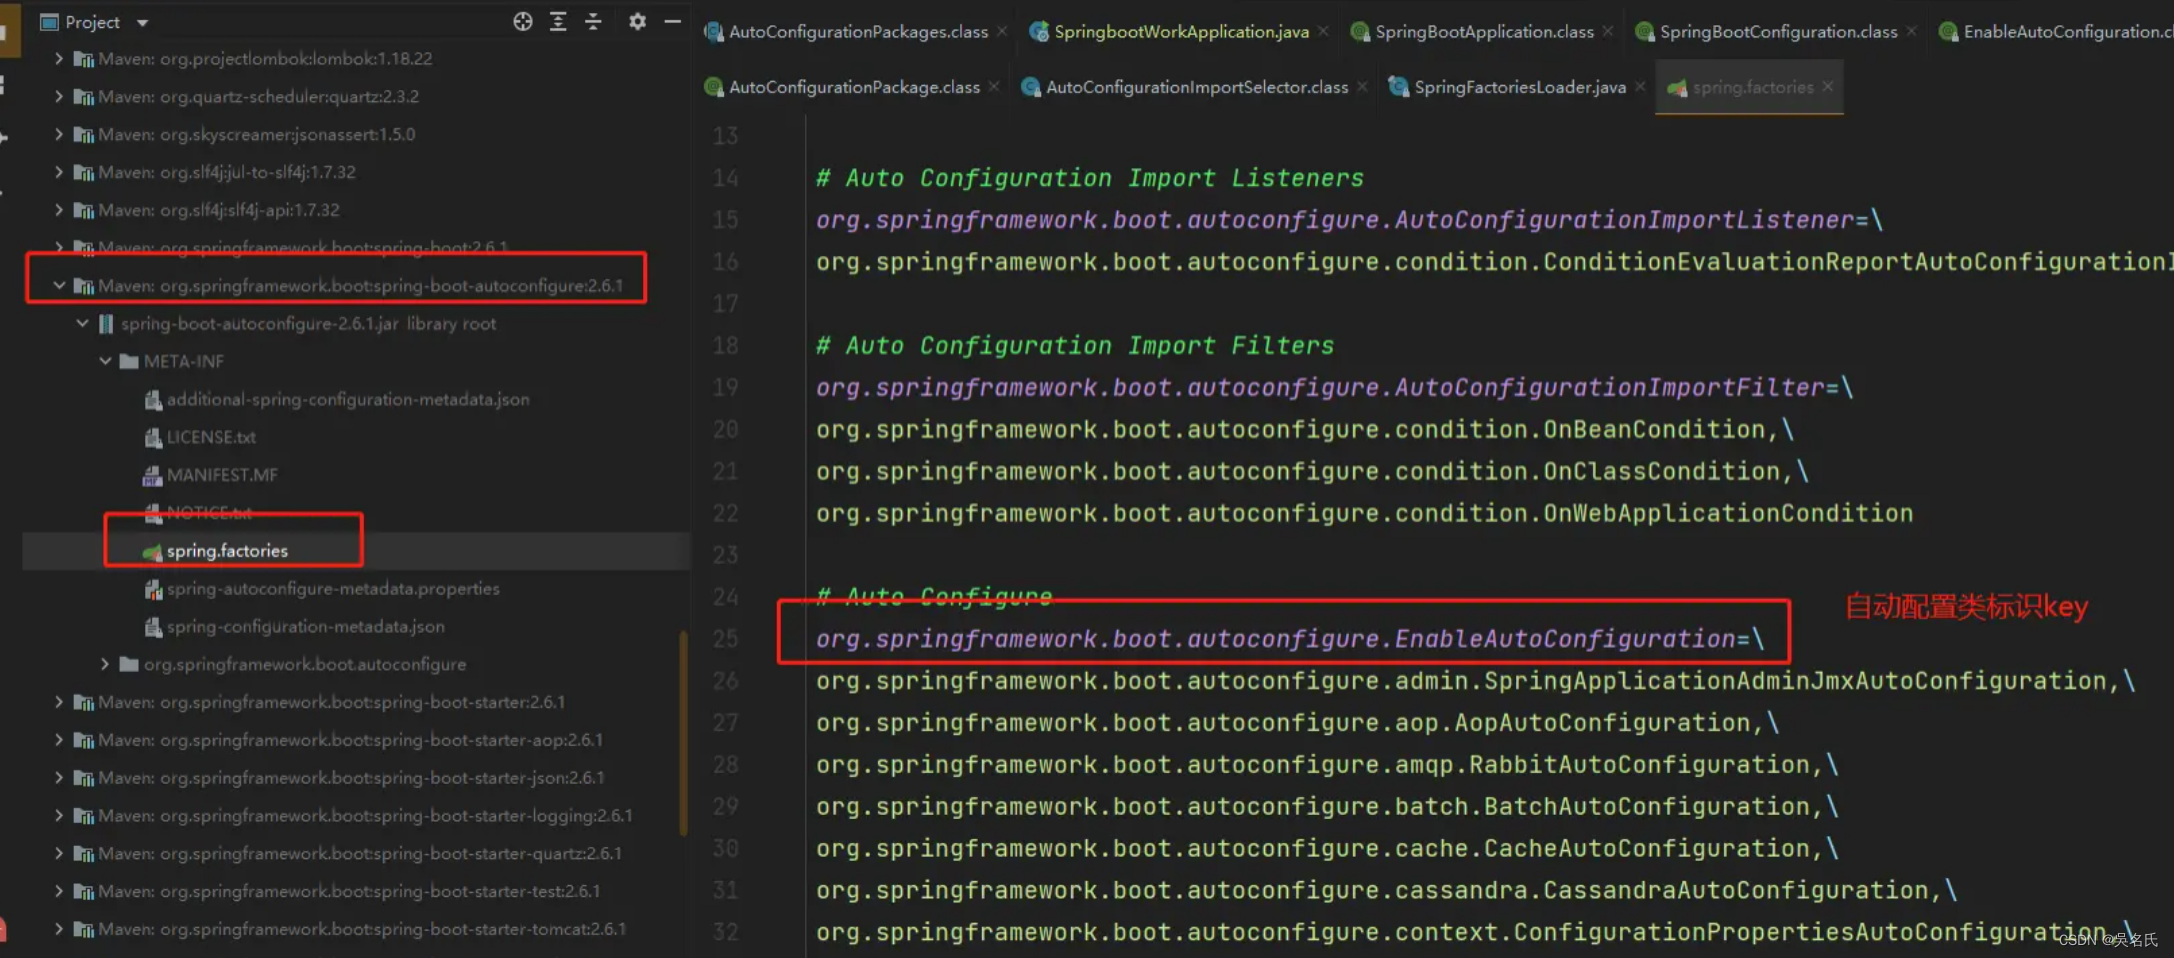
断点查看result值如下:

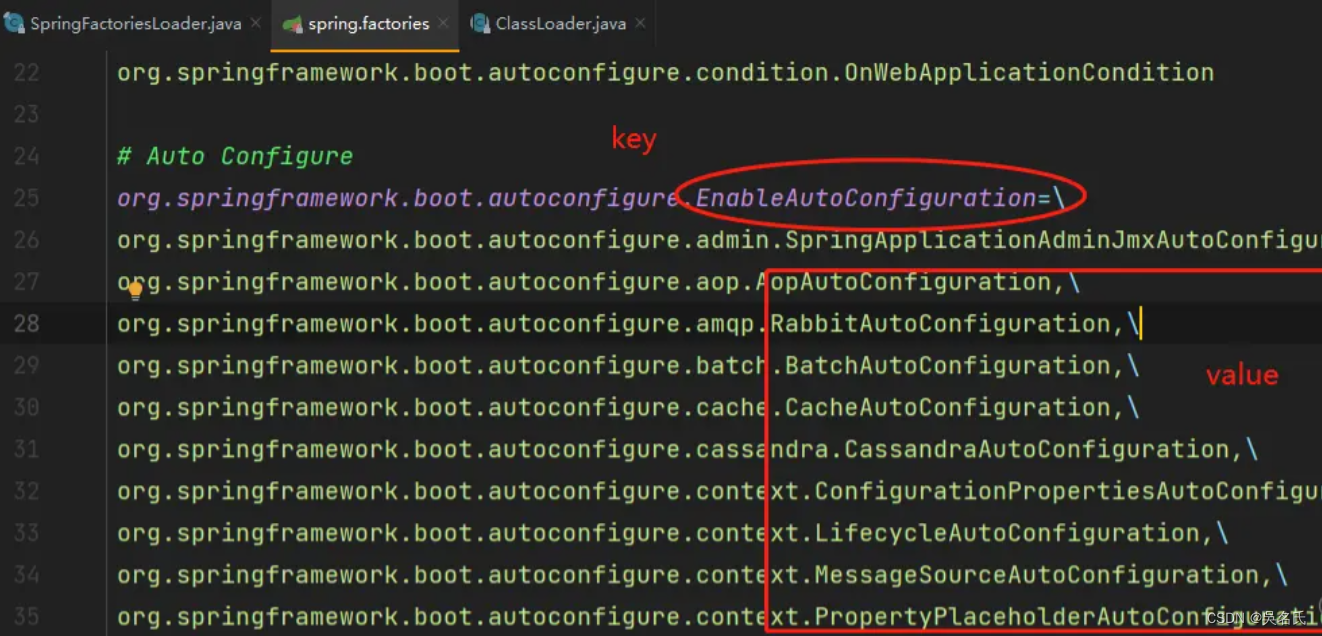
该方法作用是加载所有依赖的路径META-INF/spring.factories文件,通过map结构保存,key为文件中定义的一些标识工厂类,value就是能自动配置的一些工厂实现的类,value用list保存并去重。
在回看 loadSpringFactories(classLoaderToUse).getOrDefault(factoryTypeName, Collections.emptyList());
因为 loadFactoryNames 方法携带过来的第一个参数为 EnableAutoConfiguration.class,所以 factoryType 值也为 EnableAutoConfiguration.class,那么 factoryTypeName 值为 EnableAutoConfiguration。拿到的值就是META-INF/spring.factories文件下的key为org.springframework.boot.autoconfigure.EnableAutoConfiguration的值
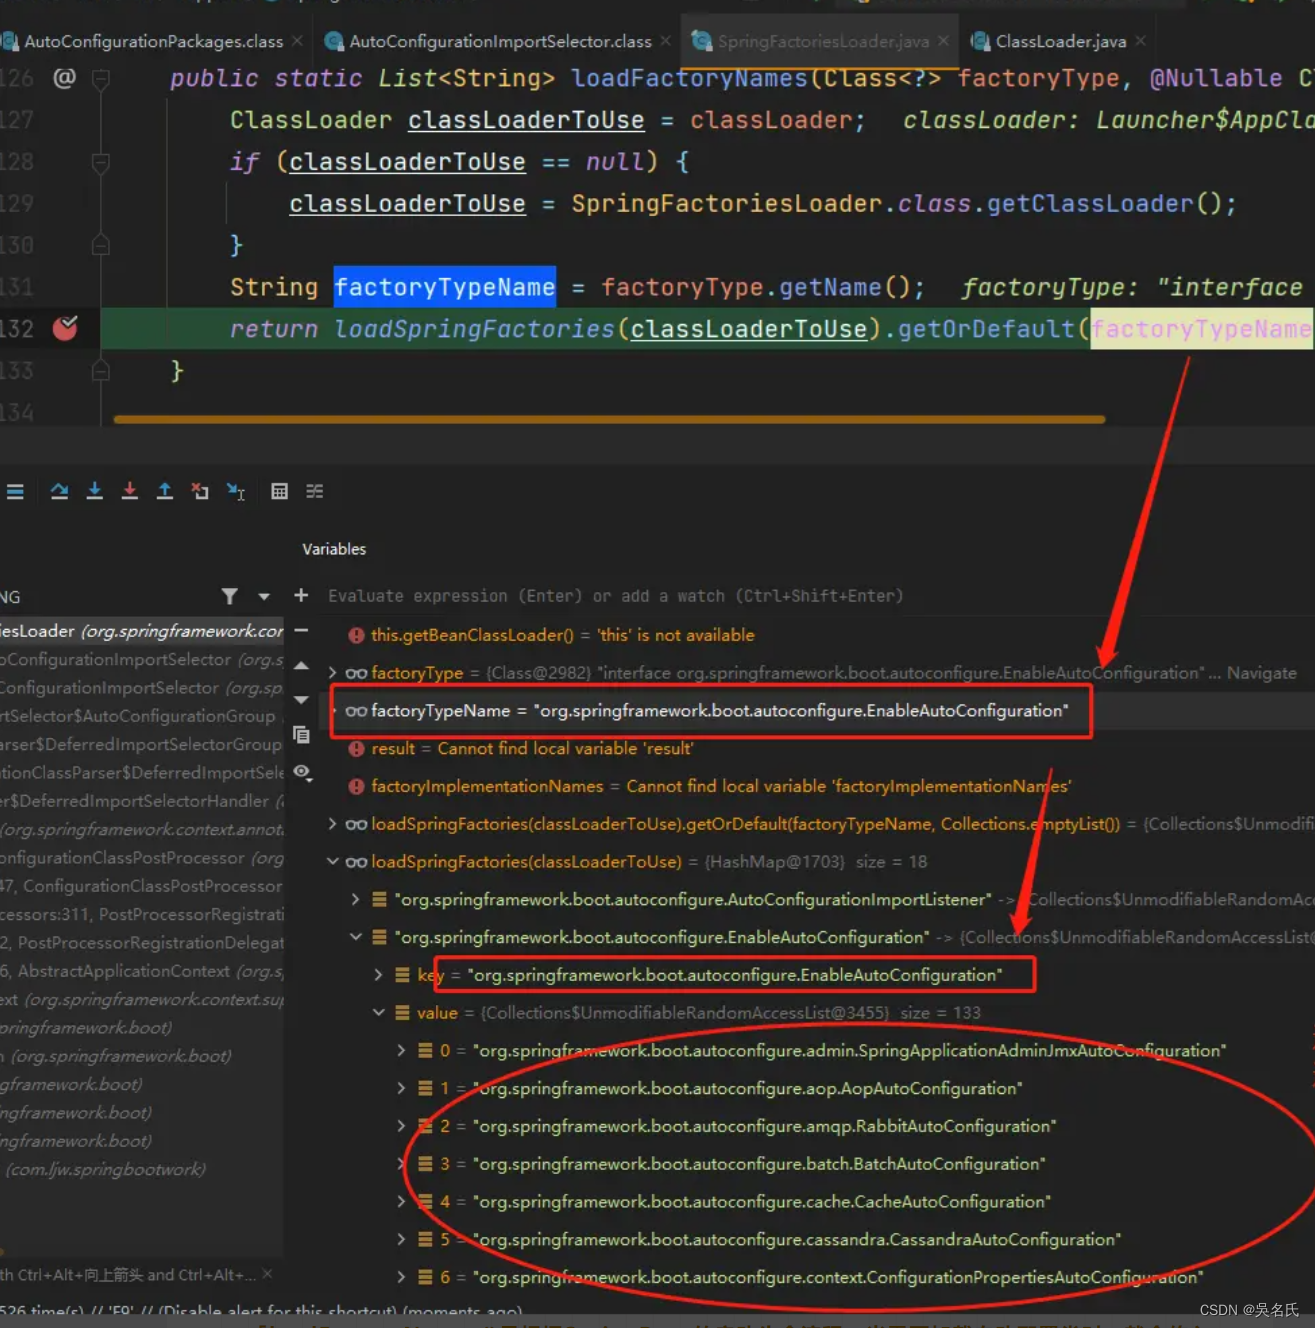
getOrDefault 当 Map 集合中有这个 key 时,就使用这个 key值,如果没有就使用默认值空数组
结论:
loadSpringFactories()该方法就是从“META-INF/spring.factories”中加载给定类型的工厂实现的完全限定类名放到map中
loadFactoryNames()是根据SpringBoot的启动生命流程,当需要加载自动配置类时,就会传入org.springframework.boot.autoconfigure.EnableAutoConfiguration参数,从map中查找key为org.springframework.boot.autoconfigure.EnableAutoConfiguration的值,这些值通过反射加到容器中,之后的作用就是用它们来做自动配置,这就是Springboot自动配置开始的地方
只有这些自动配置类进入到容器中以后,接下来这个自动配置类才开始进行启动
当需要其他的配置时如监听相关配置:listenter,就传不同的参数,获取相关的listenter配置。
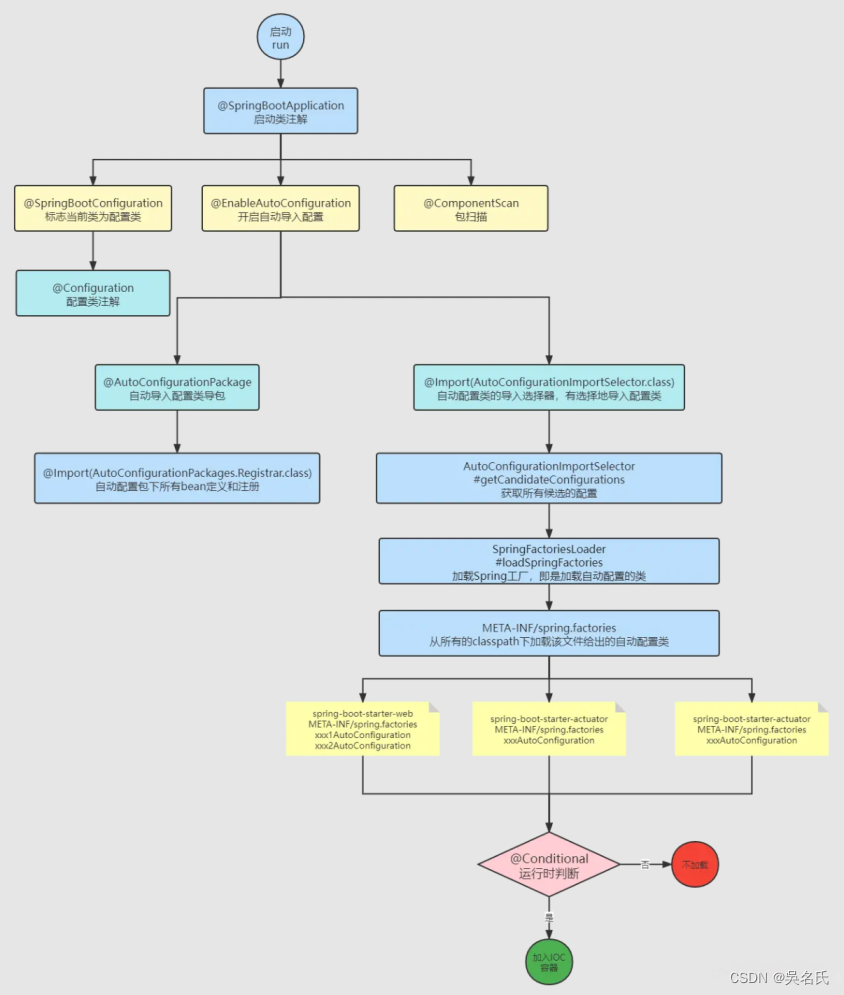
5 流程图总结
6 常用的Conditional注解
在加载自动配置类的时候,并不是将spring.factories的配置全部加载进来,而是通过@Conditional等注解的判断进行动态加载
@Conditional其实是spring底层注解,意思就是根据不同的条件,来进行自己不同的条件判断,如果满足指定的条件,那么配置类里边的配置才会生效。
常用的Conditional注解:
@ConditionalOnClass : classpath中存在该类时起效
@ConditionalOnMissingClass : classpath中不存在该类时起效
@ConditionalOnBean : DI容器中存在该类型Bean时起效
@ConditionalOnMissingBean : DI容器中不存在该类型Bean时起效
@ConditionalOnSingleCandidate : DI容器中该类型Bean只有一个或@Primary的只有一个时起效
@ConditionalOnExpression : SpEL表达式结果为true时
@ConditionalOnProperty : 参数设置或者值一致时起效
@ConditionalOnResource : 指定的文件存在时起效
@ConditionalOnJndi : 指定的JNDI存在时起效
@ConditionalOnJava : 指定的Java版本存在时起效
@ConditionalOnWebApplication : Web应用环境下起效
@ConditionalOnNotWebApplication : 非Web应用环境下起效
7 @Import支持导入的三种方式
带有@Configuration的配置类
ImportSelector 的实现
ImportBeanDefinitionRegistrar 的实现
版权归原作者 吴名氏. 所有, 如有侵权,请联系我们删除。