
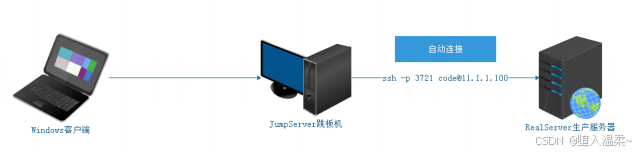
一、远程管理SSH服务免密登录解决方案
1.使用yum安装了nodejs环境
yum -y install nodejs.x86_64
2.安装npm,设置镜像
yum -y install npm
npm config set registry https://registry.npmmirror.com
3.使用npm安装了vue
npm install @vue/cli -g
4.使用安装vue软件,创建vue项目 vue create vuehtml1000
5.跳到项目目录中,npm run serve启动项目
cd vuehtml1000/
npm run serve

6.npm run build 构建项目
7.将构建的项目目录中的所有文件部署到nginx的html目录中

8.reload nginx
9.浏览器访问IP地址
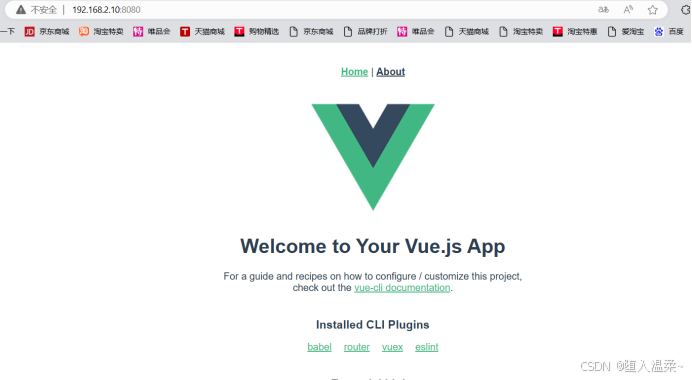
任务背景
经过一段时间后,开发人员和运维人员都觉得使用密码SSH登录的方式太麻烦(每次登录都需要输入密码,难记又容易泄露密码)。为了安全和便利性方面考虑,要求运维人员给所有服务器实现免密码登录。
任务要求
所有开发人员通过远程管理用户code登录生产服务器实现免密码登录。
任务拆解
1.==理解免密登录原理==
2.==根基需求针对不同用户配置免密登录==
涉及知识点
1.免密登录原理(==理解==)
2.用户生成密钥对(公钥和私钥)
3.免密码登录配置(==重点==)
课程目标
1.了解sshd服务的认证方式
2.理解免密等原理
3.能够根据需求对用户进行免密码登录配置
理论储备
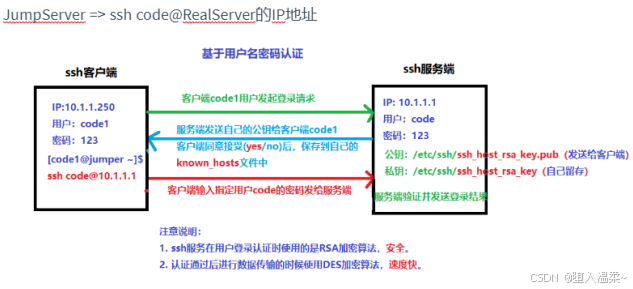
SSH两种认证方式
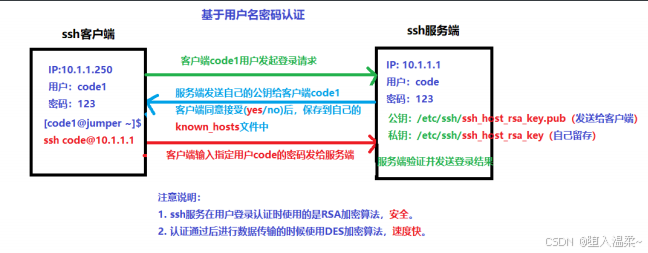
1.基于用户密码的认证
2.基于密钥对的认证
基于密钥对认证,也就是所谓的免密码登录,理解免密码登陆原理:

任务解决方案
1.跳板机上的开发人员自己生成一对密钥
[root@y ~]# su zhangsan
[zhangsan@y root]$ ssh-keygen
Generating public/private rsa key pair.
Enter file in which to save the key (/home/zhangsan/.ssh/id_rsa):
Enter passphrase (empty for no passphrase):
Enter same passphrase again:
Your identification has been saved in /home/zhangsan/.ssh/id_rsa.
Your public key has been saved in /home/zhangsan/.ssh/id_rsa.pub.
The key fingerprint is:
SHA256:sYQbcjxyflyheQuAPmyirYafcNtH3FDV/L25vGZIH14 zhangsan@y
The key's randomart image is:
+---[RSA 2048]----+
| .. .oo |
| .. o.o .o |
| oo B.* o . . |
| . =. * . . .|
| o o oooS . o|
|. . o.. . +E|
|o.. . . = +|
|o+ + . . B |
|..+ .. o..|
+----[SHA256]-----+
[zhangsan@y root]$
[zhangsan@y root]$
[zhangsan@y root]$ cd
[zhangsan@y ~]$ ls ./.ssh/
id_rsa id_rsa.pub known_hosts
[zhangsan@y ~]$ ls -l ./.ssh/
总用量 12
-rw-------. 1 zhangsan code 1679 7月 17 16:17 id_rsa
-rw-r--r--. 1 zhangsan code 392 7月 17 16:17 id_rsa.pub
-rw-r--r--. 1 zhangsan code 173 7月 17 14:46 known_hosts
2.将zhangsan用户的公钥远程拷贝到生产服务器上指定用户的指定目录
[zhangsan@y ~]$ ssh-copy-id root@192.168.2.10
/usr/bin/ssh-copy-id: INFO: Source of key(s) to be installed: "/home/zhangsan/.ssh/id_rsa.pub"
The authenticity of host '192.168.2.10 (192.168.2.10)' can't be established.
ECDSA key fingerprint is SHA256:EfMzVBUrczaT3PIJrQ9HR+sbSb5B8+MbwUyl0QH7ZBo.
ECDSA key fingerprint is MD5:6b:c3:cd:8e:75:b5:37:33:77:50:99:f8:c9:4f:1a:10.
Are you sure you want to continue connecting (yes/no)? yes
/usr/bin/ssh-copy-id: INFO: attempting to log in with the new key(s), to filter out any that are already installed
/usr/bin/ssh-copy-id: INFO: 1 key(s) remain to be installed -- if you are prompted now it is to install the new keys
root@192.168.2.10's password:
Number of key(s) added: 1
Now try logging into the machine, with: "ssh 'root@192.168.2.10'"
and check to make sure that only the key(s) you wanted were added.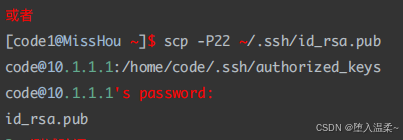
3.验证测试
[zhangsan@y ~]$ ssh -lroot 192.168.2.10
Last login: Wed Jul 17 11:31:47 2024 from 192.168.2.1
[root@x ~]# exit
登出
扩展总结
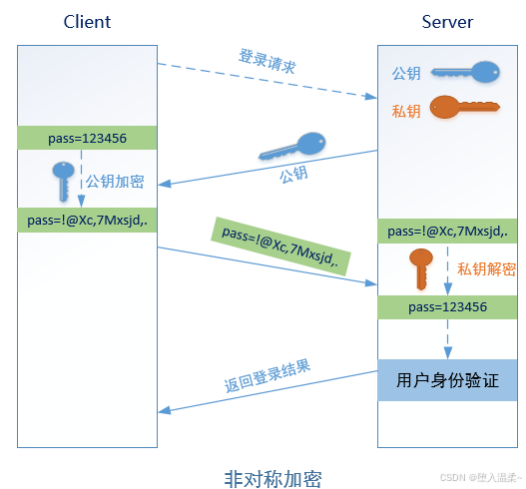
图解SSH加密算法
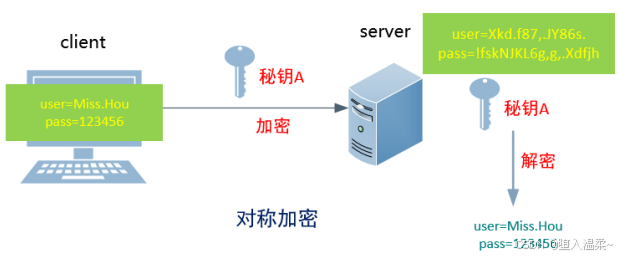
1.des 对称的公钥加密算法,安全低,数据传输速度快;使用一个密钥进行加密或解密
2.rsa 非对称的公钥加密算法,安全,数据传输速度慢,SSH默认的加密算法
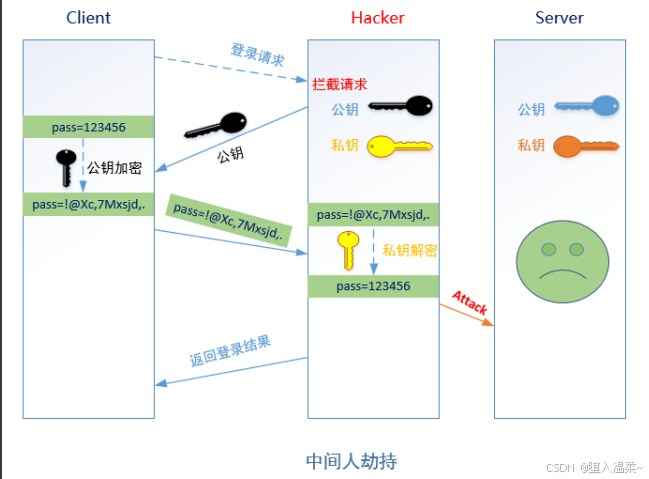
问题: SSH中是如何解决这个问题的呢?
答:基于⽤户名密码认证和密钥对认证。
==基于⽤户密码的认证==
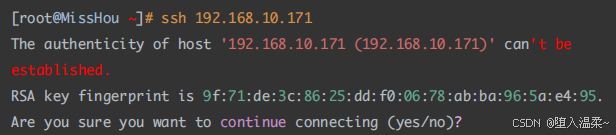
提示信息:⽆法确认主机192.168.10.171的真实性,指纹是
9f:71:de:3c:86:25:dd:f0:06:78:ab:ba:96:5a:e4:95. ,你确定想要继续吗?
说明:
- 理论上应该是对公钥的确认,由于公钥通过RSA算法加密,太⻓,不好直接⽐较,所以给
公钥⽣成⼀个hash的指纹,⽅便⽐较。
- 当客户端输⼊yes确认对⽅的公钥指纹后,server端的公钥就会被存放到客户机的⽤户家
⽬录⾥~/.ssh/known_hosts⽂件中,下次再访问就直接通过密码登录,不需要再确认公
钥。
==基于秘钥对的认证(免密码登录)==
**相关⽂件解读: **
id_rsa:保存私钥
id_rsa.pub:保存公钥
authorized_keys:保存已授权的客户端公钥
known_hosts:保存已认证的远程主机公钥
二、SSH实操
远程管理SSH服务
**⼀、搭建SSH服务 **
0.安装ssh服务
1.openssh
2.ssh-server
3.ssh-client
当前的系统已经默认安装了openssh
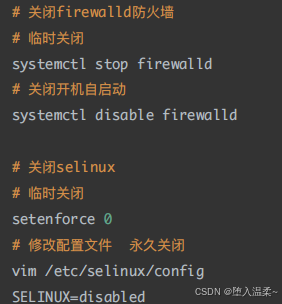
1、关闭防⽕墙与SELinux(不关SElinux导致sshd的端⼝⽆法修改)
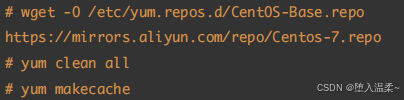
2、配置yum源
JumpServer配置外⽹YUM源 => 阿⾥云
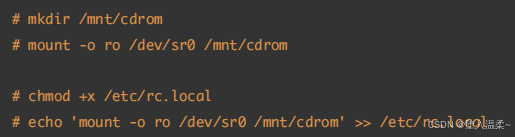
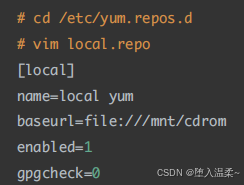
RealServer配置本地YUM源 => 把光盘镜像作为仓库(⾃建YUM仓库)
① 挂载光盘
② 编写local.repo⽂件
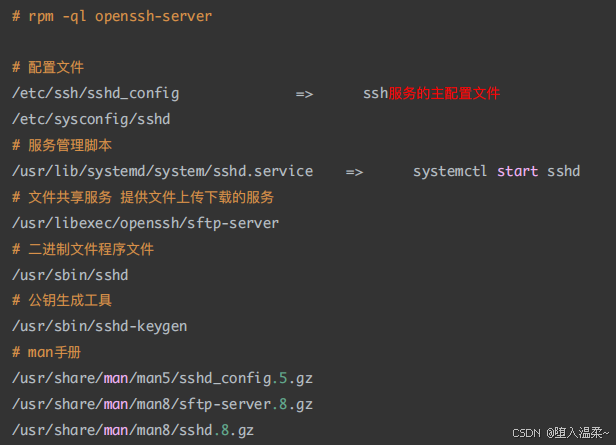
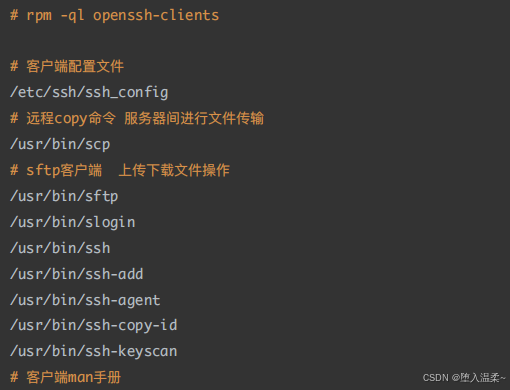
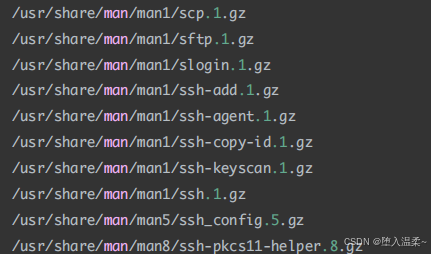
**3、openssh软件的安装 **
SSH服务底层的软件名称叫做openssh,open开源,ssh就是ssh服务。openssh属于C/S架构
软件,其拥有客户端与服务器端。
客户端:ssh
服务端:openssh-server
安装步骤:

检查openssh是否安装成功

获取openssh⽣成的⽂件列表
4、查看并修改ssh服务端的配置⽂件

RealServer:禁⽌root账号远程登录


在配置⽂件设置permitRootlogin no,不允许root账户远程登录可以设置其他账户远程登录。
zhangsan
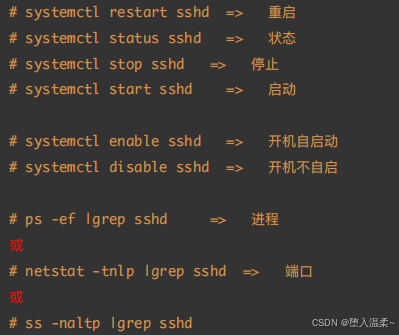
5、sshd服务管理
**⼆、SSH服务任务解决⽅案 **
**1、创建⽤户并授权 **
JumpServer跳板机创建⽤户并授权
第⼀步:创建⽤户与⽤户组(html前端组,tom与jerry)
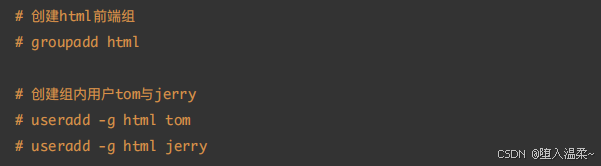
第⼆步:为⽤户添加密码

第三步:为开发⼈员创建数据⽬录并且设置相应的权限
① 创建⽤户的数据⽬录:

② 更改⽬录的⽂件所属组(更改为html,代表html组内成员可以对这个⽬录进⾏管理)

刚才我们做了什么
由于root不能远程登录,我们创建了zhangsan,lisi两个账户,并且设置了密码
现在zhangsan。lisi两个程序猿需要对y服务器中的code⽬录进⾏编辑
将zhangsan、lisi都添加到附加组 code(使⽤groupadd code提前创建好附加组)
usermod -g code zhangsan
user mod -g code lisi
为code⽬录添加code组的权限
chgrp -R code /code/ #将code所属组修改为code组
chmod -R g+w /code/ 为code⽬录的组⽤户加上w权限
在实际⼯作中,不断的添加或者移除⽤户的组⻆⾊
**2、测试⽤户权限 **
测试⽤户权限是否设置成功,可以结合第1步⼀起完成
**3、禁⽤root登录 **
RealServer服务器端:

**4、更改SSH默认端⼝ **
RealServer服务器端:

刚才做什么什么事情
1.修改 vim /etc/ssh/sshd_config 第17⾏的# 删除,22换成9999
2.重启sshd服务
setenforce 0 停⽤selinux
systemctl stop firewalld 停⽤防⽕墙
systemctl restart ssh
重启ssh服务
ssh连接服务器,如果服务端⼝是22,可以不⽤添加-p选项
如果不是22端⼝,就不许添加-p选项
ssh -p9999 -llisi 192.168.71.135
ssh -p9999 lisi@192.168.71.135
5、重启SSH服务

restart与reload的本质区别:
① restart其实相当于stop然后在start
② reload不停⽌现有业务,只是重新加载sshd对应的配置⽂件
6、在RealServer创建⼀个code账号

测试:在JumpServer远程连接RealServer

**7、⽤专业⼯具pwgen⽣成⽤户密码 **
在实际⽣产环境中,其⽤户密码⼀定不要⼿⼯设置,建议使⽤专业的密码⽣成⼯具如pwgen。
① 安装随机密码⽣成⼯具pwgen
② 使⽤pwgen⼯具⽣成随机密码
③ 给账号code设置密码
第⼀步:创建code开发者账号

第⼆步:配置EPEL源,安装pwgen⼯具
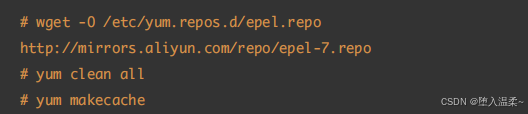
第三步:安装pwgen密码⽣成⼯具

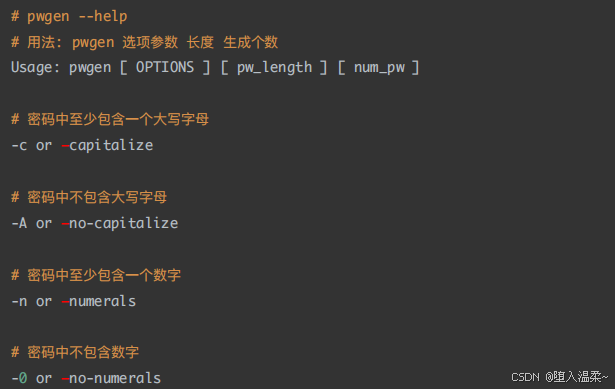
第四步:使⽤pwgen⽣成随机密码

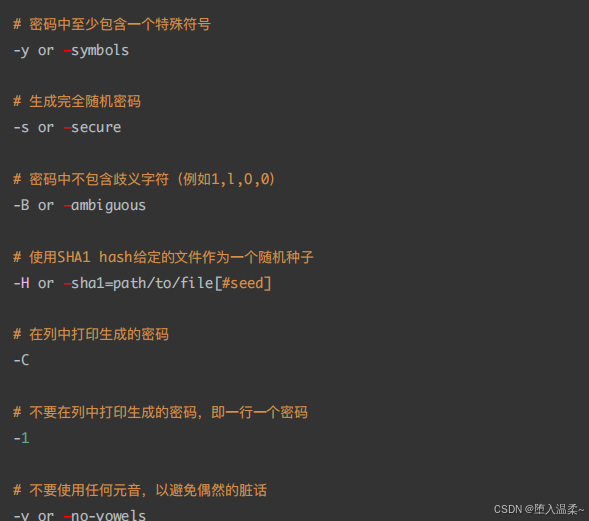
扩展:pwgen密码⽣成器的使⽤
三、SSH服务补充
**1、scp命令 **
主要功能:⽤于Linux系统与Linux系统之间进⾏⽂件的传输(上传、下载)
上传:

下载:

scp 指定端⼝ - P ⼤写
ssh 指定端⼝ -p ⼩写
使⽤的默认的22端⼝,不需要指定
scp上传也要注意⽤户的权限问题,没有权限的⽬录⽆法上传
**2、踢出⽤户 **

四、SSH免密登录解决⽅案
1、为什么需要免密登录
**2、SSH认证原理(基于⽤户名密码+基于密钥对) **
① 回顾基于⽤户名密码的认证⽅式
② 基于密钥对(公钥与私钥)的认证⽅式 => 免密登录

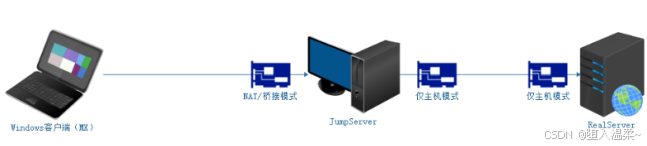
A主机 => JumpServer,B主机 => RealServer
第⼀步:在A主机(JumpServer)⽣成⼀个密钥对(公钥和私钥)
第⼆步:把A主机的公钥通过⽹络拷⻉到B主机(RealServer)上,然后把其内容追加到B主机
的~/.ssh/authorized_keys
第三步:由A主机(JumpServer)向B主机(RealServer)发起登录请求,然后直接在B主机
上进⾏公钥⽐对(判断A主机的公钥是否已经存储在B主机的authorized_keys⽂件中),如果
存在且正确,则⽣成⼀个随机的字符串(如itcast),然后使⽤A主机的公钥对其加密得到加密
的后字符串(如dXdh,34njasz!z.)
第四步:通过⽹络,由B主机讲刚才⽣成的加密后的字符串传输给主机A,主机A接收到加密后
的字符串以后,使⽤⾃⼰本地存储的私钥进⾏解密操作(得到itcast)
第五步:把解密得到的itcast发送到B主机,然后验证与刚才⽣成的字符串是否⼀致,如果⼀
致,返回登录成功。反之,则返回登录失败。
到此免密登录全部完成!
**3、SSH免密登录的具体实现 **
SSH免密的实现思路⼀共分为三个步骤(三步⾛)
第⼀步:在A主机针对某个账号(tom或jerry)⽣成公钥与私钥
第⼆步:使⽤某些⽅法把公钥发送到B主机中,然后追加到authorized_keys⽂件中
第三步:测试是否实现免密登录
**☆ ⽅法⼀:⽐较常⽤(tom) **
① 在A主机针对某个账号⽣成公钥与私钥


注:如果不想⼀路确认,可以在ssh-keygen -P "",直接⽣成公私钥
② 使⽤ssh-copy-id把公钥⽂件中的内容传输到服务器端的~/.ssh/authorized_keys⽂件中

③ 在JumpServer客户端测试免密登录是否成功

**☆ ⽅法⼆:集群常⽤(jerry) **
① ⽣成公钥与私钥

② 把id_rsa.pub⽂件,scp到RealServer服务器端

③ 在RealServer服务器端,把id_rsa.pub⽂件中的内容追加到~/.ssh/authorized_keys⽂件中

注意事项:以上配置也⽐较简单,但是实际应⽤时要注意⽂件的权限

④ 测试免密是否成功

1.随便找个账户执⾏ ssh-keygen 按三次回撤,会在当前和⽤户的家⽬录下
~/.ssh/id_res 私钥
~/.ssh/id_rsa_pub 公钥
2.ssh-copy-id -p22 root@192.168.71.140 ⽤root'对root,⽤zhangsan对zhangsan免密
3.ssh -pxxx root@ip地址
三、练习:
****1.****新增账号 zhangsan lisi wangwu zhaoliu aaa bbb ccc ddd
2.设置和账号同名的如果长度不够8位就重复账号
[root@y ~]# useradd zhangsan
[root@y ~]# passwd zhangsan
更改用户 zhangsan 的密码 。
新的 密码:
无效的密码: 密码少于 8 个字符
重新输入新的 密码:
passwd:所有的身份验证令牌已经成功更新。
[root@y ~]#useradd lisi
[root@y ~]#passwd lisi
更改用户 lisi 的密码 。
新的 密码:
无效的密码: 密码少于 8 个字符
重新输入新的 密码:
passwd:所有的身份验证令牌已经成功更新。
[root@y ~]# useradd wangwu
[root@y ~]# passwd wangwu
更改用户 wangwu 的密码 。
新的 密码:
无效的密码: 密码少于 8 个字符
重新输入新的 密码:
passwd:所有的身份验证令牌已经成功更新。
[root@y ~]# useradd zhaoliu
[root@y ~]# passwd zhaoliu
更改用户 zhaoliu 的密码 。
新的 密码:
无效的密码: 密码少于 8 个字符
重新输入新的 密码:
passwd:所有的身份验证令牌已经成功更新。
[root@y ~]# useradd aaa
[root@y ~]# passwd aaa
更改用户 aaa 的密码 。
新的 密码:
无效的密码: 密码少于 8 个字符
重新输入新的 密码:
passwd:所有的身份验证令牌已经成功更新。
[root@y ~]# useradd bbb
[root@y ~]# passwd bbb
更改用户 bbb 的密码 。
新的 密码:
无效的密码: 密码少于 8 个字符
重新输入新的 密码:
passwd:所有的身份验证令牌已经成功更新。
[root@y ~]# useradd ccc
[root@y ~]# passwd ccc
更改用户 ccc 的密码 。
新的 密码:
无效的密码: 密码少于 8 个字符
重新输入新的 密码:
passwd:所有的身份验证令牌已经成功更新。
[root@y ~]# useradd ddd
[root@y ~]# passwd ddd
更改用户 ddd 的密码 。
新的 密码:
无效的密码: 密码少于 8 个字符
重新输入新的 密码:
passwd:所有的身份验证令牌已经成功更新。
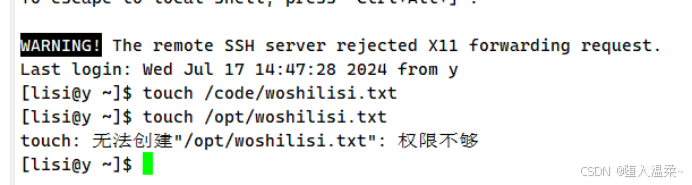
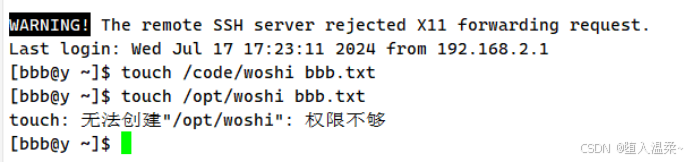
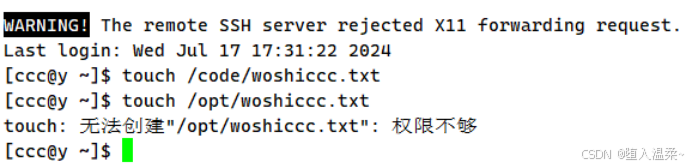
3.设置这些账户都有对code目录w的权限
[root@y ~]# mkdir /code/
[root@y ~]# ls -l /
总用量 22
lrwxrwxrwx. 1 root root 7 7月 17 03:39 bin -> usr/bin
dr-xr-xr-x. 5 root root 4096 7月 17 03:43 boot
drwxr-xr-x. 2 root root 6 7月 17 14:56 code
[root@y ~]# groupadd code
[root@y ~]# usermod -g code zhangsan
[root@y ~]# usermod -g code lisi
[root@y ~]# usermod -g code wangwu
[root@y ~]# usermod -g code zhaoliu
[root@y ~]# usermod -g code aaa
[root@y ~]# usermod -g code bbb
[root@y ~]# usermod -g code ccc
[root@y ~]# usermod -g code ddd
[root@y ~]# chgrp -R code /code/
[root@y ~]# ls -l /
总用量 22
lrwxrwxrwx. 1 root root 7 7月 17 03:39 bin -> usr/bin
dr-xr-xr-x. 5 root root 4096 7月 17 03:43 boot
drwxr-xr-x. 2 root code 6 7月 17 14:56 code
[root@y ~]# chmod -R g+w /code/
[root@y ~]# ls -l /
总用量 22
lrwxrwxrwx. 1 root root 7 7月 17 03:39 bin -> usr/bin
dr-xr-xr-x. 5 root root 4096 7月 17 03:43 boot
drwxrwxr-x. 2 root code 6 7月 17 14:56 code
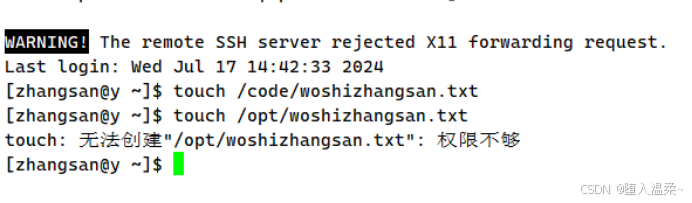


4.为以上的用户设置免密登录
(1)在x上免密登录zhangsan
[root@localhost ~]# ssh-keygen
Generating public/private rsa key pair.
Enter file in which to save the key (/root/.ssh/id_rsa):
Enter passphrase (empty for no passphrase):
Enter same passphrase again:
Your identification has been saved in /root/.ssh/id_rsa.
Your public key has been saved in /root/.ssh/id_rsa.pub.
The key fingerprint is:
SHA256:T4f3PsMciZSuWUAE2nTIMvwAXcxxoUWr88PytSOT7SI root@x
The key's randomart image is:
+---[RSA 2048]----+
| .+ ==*B. |
| *+==.. |
| .=o.. . |
| ....o |
| S o+o. . |
| * o+.o |
| . =*.o.. |
| EoBooo= |
| ..=o..o |
+----[SHA256]-----+
[root@localhost ~]# ls ./.ssh/
authorized_keys id_rsa id_rsa.pub known_hosts
[root@localhost ~]# ssh-copy-id -p9999 zhangsan@192.168.2.8
/usr/bin/ssh-copy-id: INFO: Source of key(s) to be installed: "/root/.ssh/id_rsa.pub"
/usr/bin/ssh-copy-id: INFO: attempting to log in with the new key(s), to filter out any that are already installed
/usr/bin/ssh-copy-id: INFO: 1 key(s) remain to be installed -- if you are prompted now it is to install the new keys
zhangsan@192.168.2.8's password:
Number of key(s) added: 1
Now try logging into the machine, with: "ssh -p '9999' 'zhangsan@192.168.2.8'"
and check to make sure that only the key(s) you wanted were added.
[root@localhost ~]# ssh -p9999 zhangsan@192.168.2.8
Last login: Wed Jul 17 16:16:11 2024
[zhangsan@y ~]$
(2)在x上设置lisi免密登录
[root@localhost ~]# ssh-copy-id -p9999 lisi@192.168.2.8
/usr/bin/ssh-copy-id: INFO: Source of key(s) to be installed: "/root/.ssh/id_rsa.pub"
/usr/bin/ssh-copy-id: INFO: attempting to log in with the new key(s), to filter out any that are already installed
/usr/bin/ssh-copy-id: INFO: 1 key(s) remain to be installed -- if you are prompted now it is to install the new keys
lisi@192.168.2.8's password:
Number of key(s) added: 1
Now try logging into the machine, with: "ssh -p '9999' 'lisi@192.168.2.8'"
and check to make sure that only the key(s) you wanted were added.
[root@localhost ~]# ssh -p9999 lisi@192.168.2.8
Last login: Wed Jul 17 15:24:08 2024 from 192.168.2.1
[lisi@y ~]$
(3)在x上设置wangwu免密登录
[root@localhost ~]# ssh-copy-id -p9999 wangwu@192.168.2.8
/usr/bin/ssh-copy-id: INFO: Source of key(s) to be installed: "/root/.ssh/id_rsa.pub"
/usr/bin/ssh-copy-id: INFO: attempting to log in with the new key(s), to filter out any that are already installed
/usr/bin/ssh-copy-id: INFO: 1 key(s) remain to be installed -- if you are prompted now it is to install the new keys
wangwu@192.168.2.8's password:
Number of key(s) added: 1
Now try logging into the machine, with: "ssh -p '9999' 'wangwu@192.168.2.8'"
and check to make sure that only the key(s) you wanted were added.
[root@localhost ~]# ssh -p9999 wangwu@192.168.2.8
Last login: Wed Jul 17 16:37:43 2024 from y
[wangwu@y ~]$
(4)在x上设置zhaoliu免密登录
[root@localhost ~]# ssh-copy-id -p9999 zhaoliu@192.168.2.8
/usr/bin/ssh-copy-id: INFO: Source of key(s) to be installed: "/root/.ssh/id_rsa.pub"
/usr/bin/ssh-copy-id: INFO: attempting to log in with the new key(s), to filter out any that are already installed
/usr/bin/ssh-copy-id: INFO: 1 key(s) remain to be installed -- if you are prompted now it is to install the new keys
zhaoliu@192.168.2.8's password:
Number of key(s) added: 1
Now try logging into the machine, with: "ssh -p '9999' 'zhaoliu@192.168.2.8'"
and check to make sure that only the key(s) you wanted were added.
[root@localhost ~]# ssh -p9999 zhaoliu@192.168.2.8
Last login: Wed Jul 17 17:15:03 2024 from 192.168.2.1
(5)在x上设置aaa免密登录
[root@localhost ~]# ssh-copy-id -p9999 aaa@192.168.2.8
/usr/bin/ssh-copy-id: INFO: Source of key(s) to be installed: "/root/.ssh/id_rsa.pub"
/usr/bin/ssh-copy-id: INFO: attempting to log in with the new key(s), to filter out any that are already installed
/usr/bin/ssh-copy-id: INFO: 1 key(s) remain to be installed -- if you are prompted now it is to install the new keys
aaa@192.168.2.8's password:
Number of key(s) added: 1
Now try logging into the machine, with: "ssh -p '9999' 'aaa@192.168.2.8'"
and check to make sure that only the key(s) you wanted were added.
[root@localhost ~]# ssh -p9999 aaa@192.168.2.8
Last login: Wed Jul 17 17:23:03 2024 from 192.168.2.1
[aaa@y ~]$
(6)在x上设置bbb免密登录
[root@localhost ~]# ssh-copy-id -p9999 bbb@192.168.2.8
/usr/bin/ssh-copy-id: INFO: Source of key(s) to be installed: "/root/.ssh/id_rsa.pub"
/usr/bin/ssh-copy-id: INFO: attempting to log in with the new key(s), to filter out any that are already installed
/usr/bin/ssh-copy-id: INFO: 1 key(s) remain to be installed -- if you are prompted now it is to install the new keys
bbb@192.168.2.8's password:
Number of key(s) added: 1
Now try logging into the machine, with: "ssh -p '9999' 'bbb@192.168.2.8'"
and check to make sure that only the key(s) you wanted were added.
[root@localhost ~]# ssh -p9999 bbb@192.168.2.8
Last login: Wed Jul 17 17:25:55 2024 from 192.168.2.1
[bbb@y ~]$
(7)在x上设置ccc免密登录
[root@localhost ~]# ssh-copy-id -p9999 ccc@192.168.2.8
/usr/bin/ssh-copy-id: INFO: Source of key(s) to be installed: "/root/.ssh/id_rsa.pub"
/usr/bin/ssh-copy-id: INFO: attempting to log in with the new key(s), to filter out any that are already installed
/usr/bin/ssh-copy-id: INFO: 1 key(s) remain to be installed -- if you are prompted now it is to install the new keys
ccc@192.168.2.8's password:
Number of key(s) added: 1
Now try logging into the machine, with: "ssh -p '9999' 'ccc@192.168.2.8'"
and check to make sure that only the key(s) you wanted were added.
[root@localhost ~]# ssh -p9999 ccc@192.168.2.8
Last login: Wed Jul 17 17:32:39 2024 from 192.168.2.1
[ccc@y ~]$
(8)在x上设置ddd免密登录
[root@localhost ~]# ssh-copy-id -p9999 ddd@192.168.2.8
/usr/bin/ssh-copy-id: INFO: Source of key(s) to be installed: "/root/.ssh/id_rsa.pub"
/usr/bin/ssh-copy-id: INFO: attempting to log in with the new key(s), to filter out any that are already installed
/usr/bin/ssh-copy-id: INFO: 1 key(s) remain to be installed -- if you are prompted now it is to install the new keys
ddd@192.168.2.8's password:
Number of key(s) added: 1
Now try logging into the machine, with: "ssh -p '9999' 'ddd@192.168.2.8'"
and check to make sure that only the key(s) you wanted were added.
[root@localhost ~]# ssh -p9999 ddd@192.168.2.8
Last login: Wed Jul 17 17:34:02 2024 from 192.168.2.1
[ddd@y ~]$
版权归原作者 堕入温柔~ 所有, 如有侵权,请联系我们删除。