
- TensorRT系列之 Windows10下yolov8 tensorrt模型加速部署
- TensorRT系列之 Linux下 yolov8 tensorrt模型加速部署
- TensorRT系列之 Linux下 yolov7 tensorrt模型加速部署
- TensorRT系列之 Linux下 yolov6 tensorrt模型加速部署
- TensorRT系列之 Linux下 yolov5 tensorrt模型加速部署
- TensorRT系列之 Linux下 yolox tensorrt模型加速部署
- TensorRT系列之 Linux下 u2net tensorrt模型加速部署
- 更多(点我进去)…#### 文章目录
ubuntu下libfacedetection-tensorrt模型部署
libfacedetection的仓库:https://github.com/ShiqiYu/libfacedetection,**其训练代码仓库**:https://github.com/ShiqiYu/libfacedetection.train 下面简介下其代码仓库:
- libfacedetection的作者是深圳大学于仕琪 老师,现在好像在南方科技大学任教,使用opencv超过7年的人肯定都认识于老师。
- libfacedetection是一个基于cnn的图像人脸检测的开源库。CNN模型已在C源文件中转换为静态变量。源代码不依赖于任何其他库。你所需要的只是一个c++编译器。你可以用c++编译器在Windows、Linux、ARM和任何平台上编译源代码。
- SIMD指令用于加快检测速度。如果您使用Intel CPU或NEON for ARM,则可以启用AVX2。
- 模型文件在src/facedetectcnn-data.cpp (c++数组)和OpenCV Zoo中的模型(ONNX)中提供。您可以使用ONNX模型在openv_dnn /中尝试我们的脚本(c++和Python)。在这里查看网络架构。
- OpenCV DNN不支持最新版本的动态输入形状的YuNet。请确保您的输入形状与ONNX模型中的输入形状完全相同,以便使用OpenCV DNN运行最新的YuNet。
- Examples /detect-image.cpp和Examples /detect-camera.cpp展示了如何使用这个库。
该库由libfacedetection.train进行训练。本文提供libfacedetection-tensorrt加速方法。
有源码!有源码!有源码!
下图右边是libfacedetection 部署之后,tensorrt部署效果,和python推理结果一致。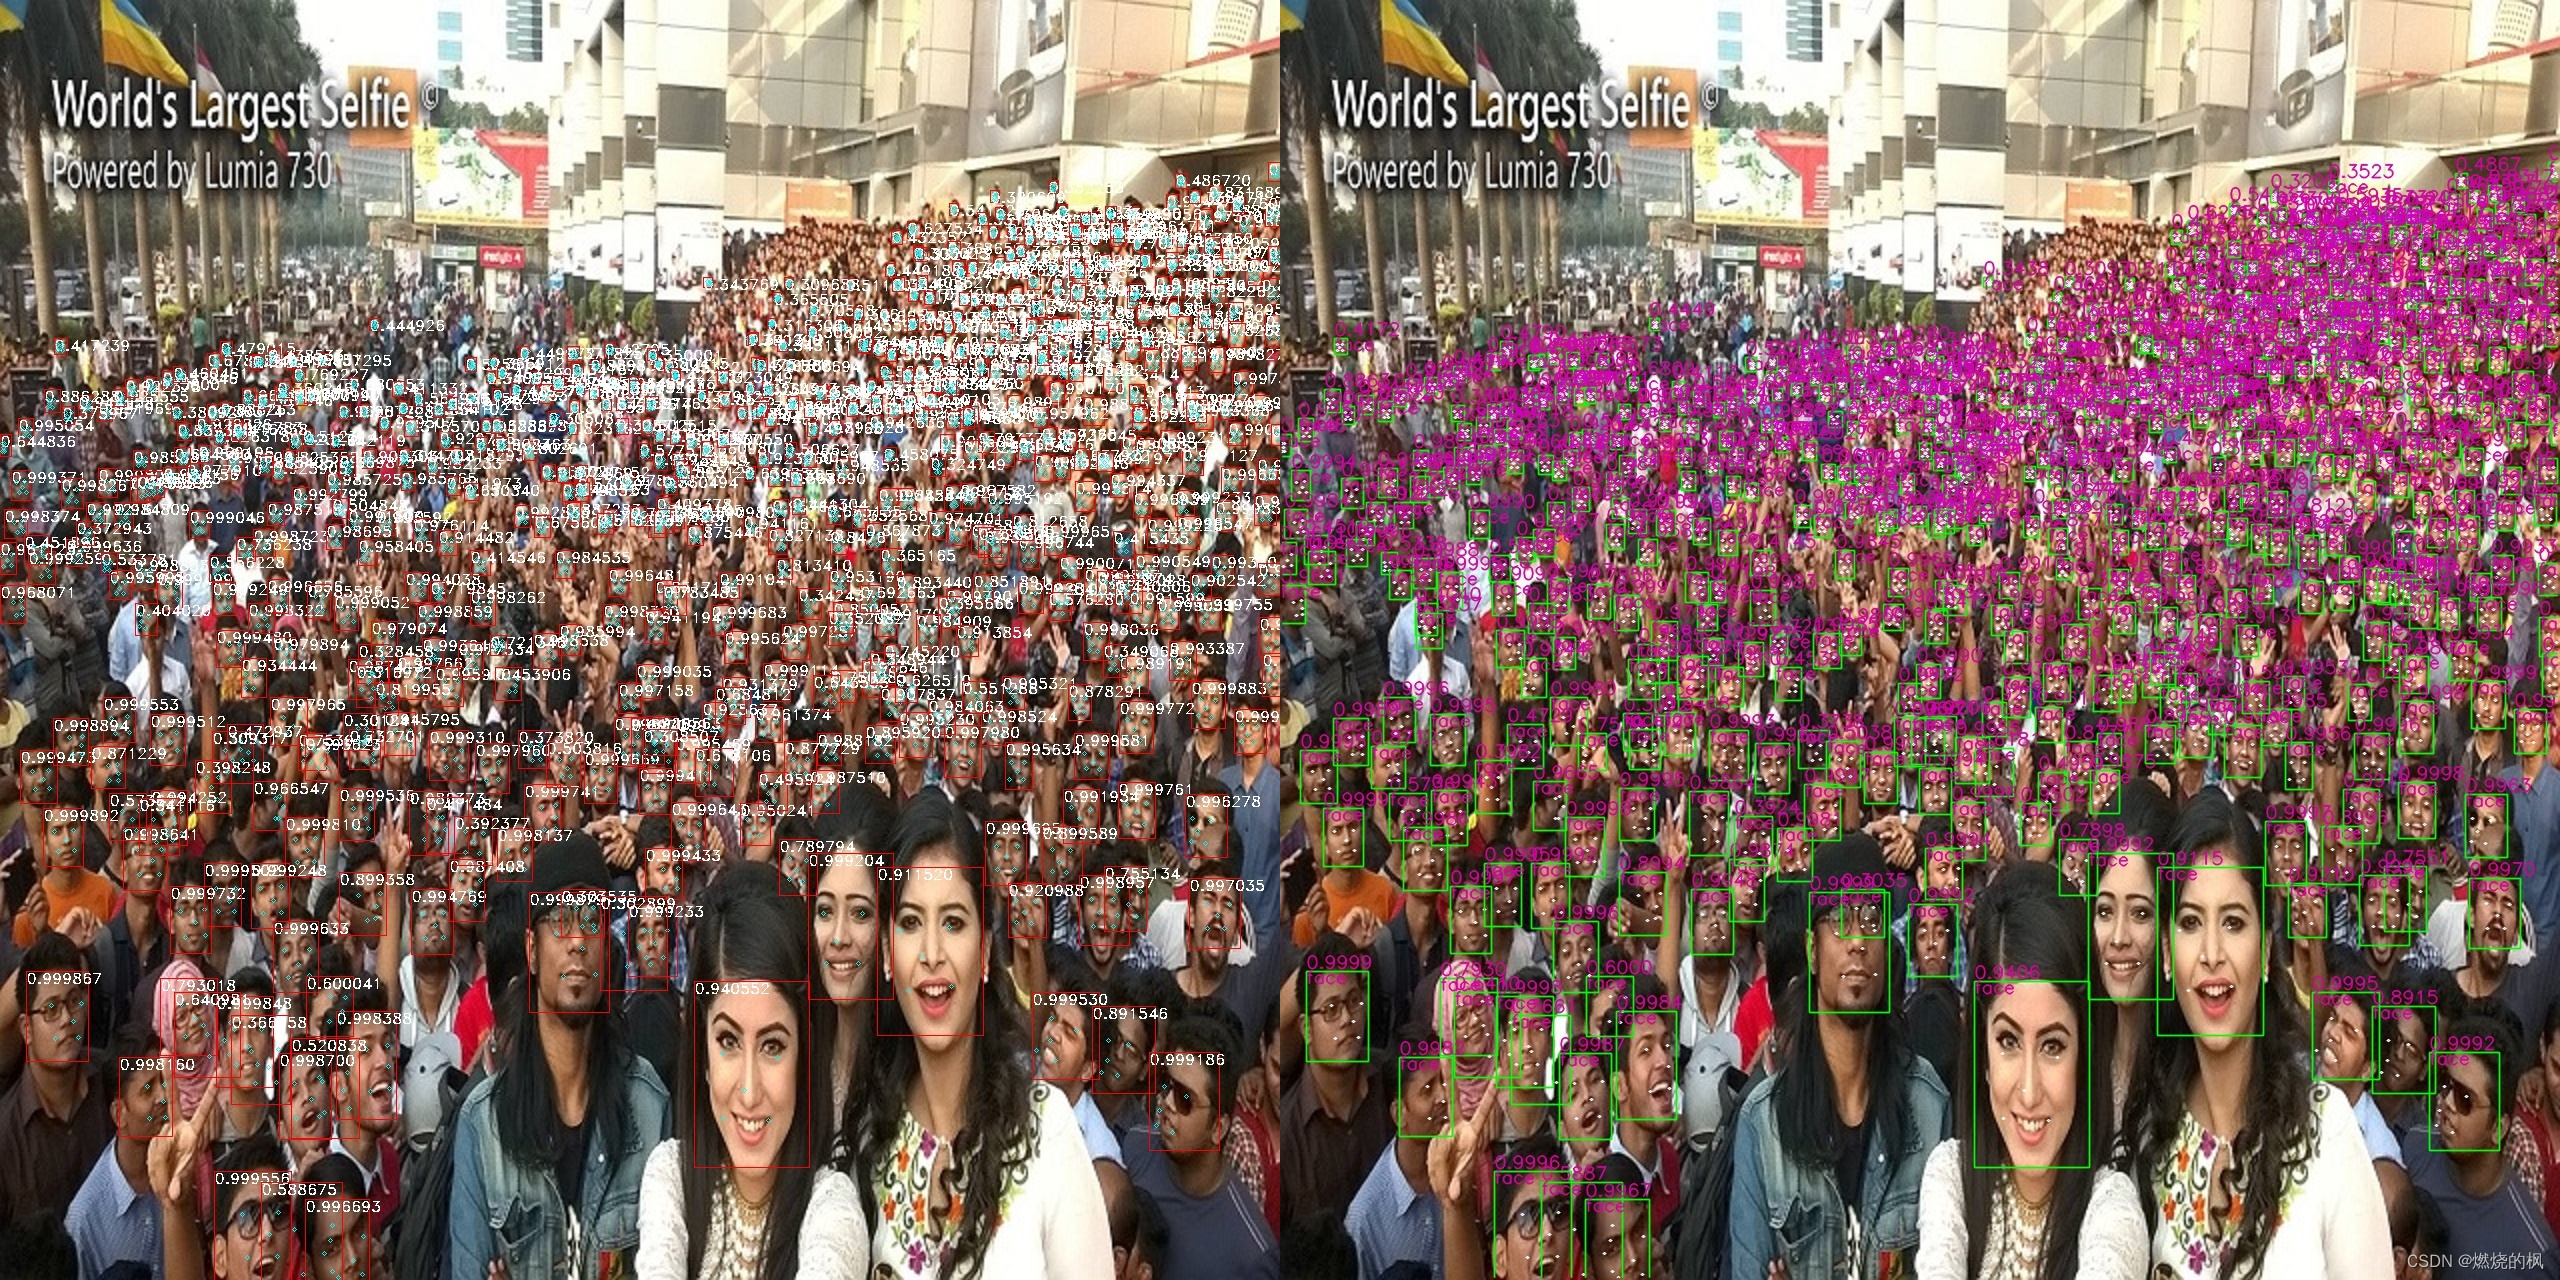
libfacedetection : Offical( left ) vs Ours( right )
以下是tensorrt加速效果,仔细看左上角时间开销,是有1000FPS的,然而还有手段能够进一步加速。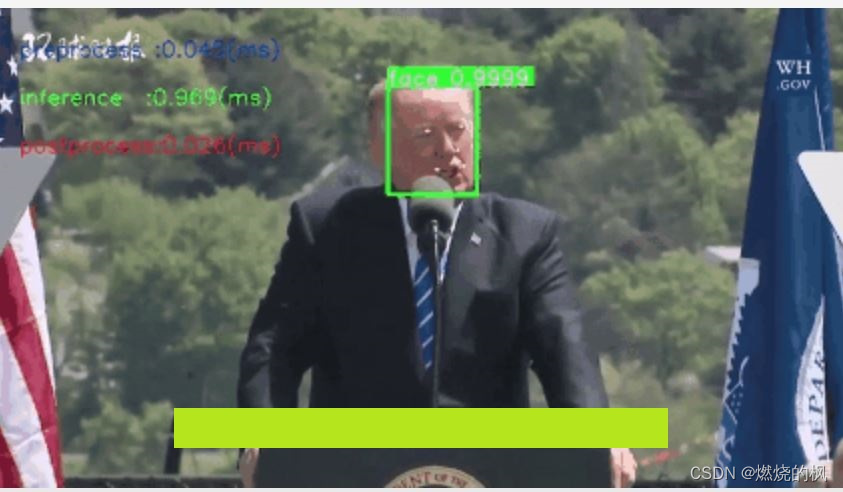
tensorrt加速效果
一、Ubuntu18.04环境配置
如果您对tensorrt不是很熟悉,请务必保持下面库版本一致。
请注意: Linux系统安装以下库,务必去进入系统bios下,关闭安全启动(设置 secure boot 为 disable)
1.1 安装工具链和opencv
sudoapt-get update
sudoapt-getinstall build-essential
sudoapt-getinstallgitsudoapt-getinstall gdb
sudoapt-getinstall cmake
sudoapt-getinstall libopencv-dev
# pkg-config --modversion opencv
1.2 安装Nvidia相关库
注:Nvidia相关网站需要注册账号。
1.2.1 安装Nvidia显卡驱动
ubuntu-drivers devices
sudo add-apt-repository ppa:graphics-drivers/ppa
sudoapt update
sudoaptinstall nvidia-driver-470-server # for ubuntu18.04
nvidia-smi
1.2.2 安装 cuda11.3
- 进入链接: https://developer.nvidia.com/cuda-toolkit-archive
- 选择:CUDA Toolkit 11.3.0(April 2021)
- 选择:[Linux] -> [x86_64] -> [Ubuntu] -> [18.04] -> [runfile(local)] 在网页你能看到下面安装命令,我这里已经拷贝下来:
wget https://developer.download.nvidia.com/compute/cuda/11.3.0/local_installers/cuda_11.3.0_465.19.01_linux.run
sudosh cuda_11.3.0_465.19.01_linux.run
cuda的安装过程中,需要你在bash窗口手动作一些选择,这里选择如下:
- select:[continue] -> [accept] -> 接着按下回车键取消Driver和465.19.01这个选项,如下图(it is important!) -> [Install]
 bash窗口提示如下表示安装完成
#===========#= Summary =#===========#Driver: Not Selected#Toolkit: Installed in /usr/local/cuda-11.3/#......
把cuda添加到环境变量:
vim ~/.bashrc
把下面拷贝到 .bashrc里面
# cuda v11.3exportPATH=/usr/local/cuda-11.3/bin${PATH:+:${PATH}}exportLD_LIBRARY_PATH=/usr/local/cuda-11.3/lib64${LD_LIBRARY_PATH:+:${LD_LIBRARY_PATH}}exportCUDA_HOME=/usr/local/cuda-11.3
刷新环境变量和验证
source ~/.bashrc
nvcc -V
bash窗口打印如下信息表示cuda11.3安装正常
nvcc: NVIDIA (R) Cuda compiler driver<br>
Copyright (c)2005-2021 NVIDIA Corporation<br>
Built on Sun_Mar_21_19:15:46_PDT_2021<br>
Cuda compilation tools, release 11.3, V11.3.58<br>
Build cuda_11.3.r11.3/compiler.29745058_0<br>
1.2.3 安装 cudnn8.2
- 进入网站:https://developer.nvidia.com/rdp/cudnn-archive
- 选择: Download cuDNN v8.2.0 (April 23rd, 2021), for CUDA 11.x
- 选择: cuDNN Library for Linux (x86_64)
- 你将会下载这个压缩包: “cudnn-11.3-linux-x64-v8.2.0.53.tgz”
# 解压tar-zxvf cudnn-11.3-linux-x64-v8.2.0.53.tgz
将cudnn的头文件和lib拷贝到cuda11.3的安装目录下:
sudocp cuda/include/cudnn.h /usr/local/cuda/include/
sudocp cuda/lib64/libcudnn* /usr/local/cuda/lib64/
sudochmod a+r /usr/local/cuda/include/cudnn.h
sudochmod a+r /usr/local/cuda/lib64/libcudnn*
1.2.4 下载 tensorrt8.4.2.4
本教程中,tensorrt只需要下载\、解压即可,不需要安装。
- 进入网站: https://developer.nvidia.cn/nvidia-tensorrt-8x-download
- 把这个打勾: I Agree To the Terms of the NVIDIA TensorRT License Agreement
- 选择: TensorRT 8.4 GA Update 1
- 选择: TensorRT 8.4 GA Update 1 for Linux x86_64 and CUDA 11.0, 11.1, 11.2, 11.3, 11.4, 11.5, 11.6 and 11.7 TAR Package
- 你将会下载这个压缩包: “TensorRT-8.4.2.4.Linux.x86_64-gnu.cuda-11.6.cudnn8.4.tar.gz”
# 解压tar-zxvf TensorRT-8.4.2.4.Linux.x86_64-gnu.cuda-11.6.cudnn8.4.tar.gz
# 快速验证一下tensorrt+cuda+cudnn是否安装正常cd TensorRT-8.4.2.4/samples/sampleMNIST
makecd../../bin/
导出tensorrt环境变量(it is important!),注:将LD_LIBRARY_PATH:后面的路径换成你自己的!后续编译onnx模型的时候也需要执行下面第一行命令
exportLD_LIBRARY_PATH=$LD_LIBRARY_PATH:/home/xxx/temp/TensorRT-8.4.2.4/lib
./sample_mnist
bash窗口打印类似如下图的手写数字识别表明cuda+cudnn+tensorrt安装正常
1.2.5 下载仓库TensorRT-Alpha并设置
git clone https://github.com/FeiYull/tensorrt-alpha
设置您自己TensorRT根目录:
git clone https://github.com/FeiYull/tensorrt-alpha
cd tensorrt-alpha/cmake
vim common.cmake
# 在文件common.cmake中的第20行中,设置成你自己的目录,别和我设置一样的路径eg:# set(TensorRT_ROOT /root/TensorRT-8.4.2.4)
二、libfacedetection 环境安装与onnx导出
推理的时候是支持多batch推理的,可以直接从网盘下载onnx文件[weiyun]:weiyun or google driver :
# 下载libfacedetection 源码git clone https://github.com/ShiqiYu/libfacedetection.train
git checkout  a3bc97c7e85bb206c9feca97fbd541ce82cfa3a9  # 一定要执行
官方仓库提供了onnx导出指令,同时它也提供了导出后的onnx文件,如下图,本文直接使用第三个动态onnx文件。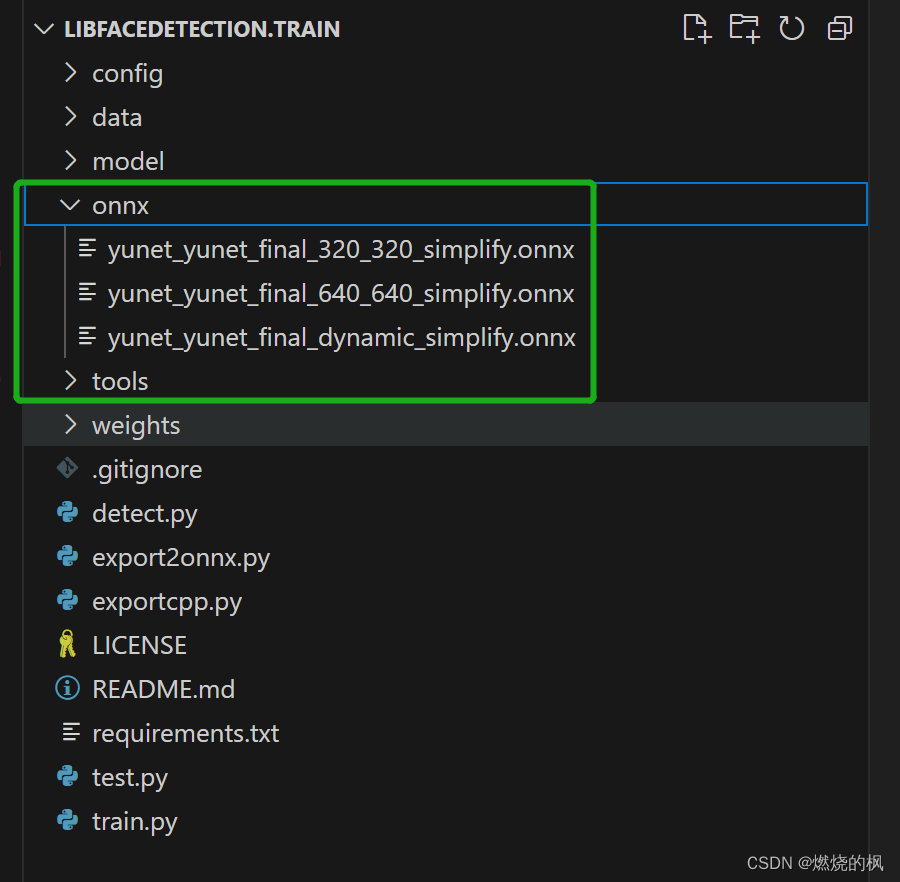
三、利用tensorrt编译onnx模型
将你的onnx模型放到这个路径:tensorrt-alpha/data/libfacedetection
cd tensorrt-alpha/data/libfacedetection
exportLD_LIBRARY_PATH=$LD_LIBRARY_PATH:~/TensorRT-8.4.2.4/lib
编译onnx模型指令,其中参数 --minShapes=input:1x3x120x120中,1表示batch_size,3表示通道,120X120表示图像宽高,minShapes表示最小输入尺寸。同理,optShapes和maxShapes表示最优和最大输入尺寸。
../../../../TensorRT-8.4.2.4/bin/trtexec --onnx=alpha_yunet_yunet_final_dynamic_simplify.onnx --saveEngine=alpha_yunet_yunet_final_dynamic_simplify.trt --buildOnly--minShapes=input:1x3x120x120 --optShapes=input:4x3x320x320 --maxShapes=input:8x3x2000x2000
四、编译执行libfacedetection -tensorrt工程
使用命令行编译下代码
git clone https://github.com/FeiYull/tensorrt-alpha
cd tensorrt-alpha/libfacedetection
mkdir build
cd build
cmake ..make-j10
按照需求执行推理,支持推理一张图片、在线推理视频文件,或者在线从摄像头获取视频流并推理。
# infer image
./app_libfacedetction  --model=../../data/libfacedetction/alpha_yunet_yunet_final_dynamic_simplify.trt  --batch_size=1--img=../../data/6406401.jpg  --show--savePath# infer video
./app_libfacedetction  --model=../../data/libfacedetction/alpha_yunet_yunet_final_dynamic_simplify.trt  --batch_size=4--video=../../data/people.mp4  --show# infer camera
./app_libfacedetction  --model=../../data/libfacedetction/alpha_yunet_yunet_final_dynamic_simplify.trt  --batch_size=2--cam_id=0--show
例如:以下是libfacedetection 推理视频流效果。
五、结束语
libfacedetection 的tensorrt部署到这里结束。都看到这里了,觉得可以请点赞收藏,有条件的去仓库点个star,仓库:https://github.com/FeiYull/tensorrt-alpha
版权归原作者 韩师兄_ 所有, 如有侵权,请联系我们删除。