
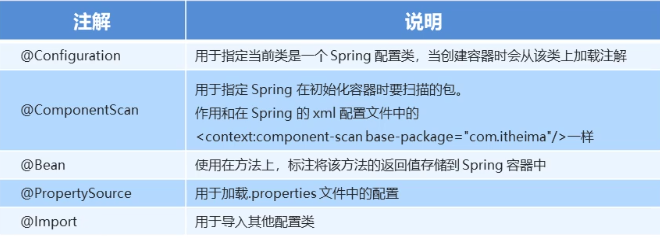
Spring介绍
Spring是什么
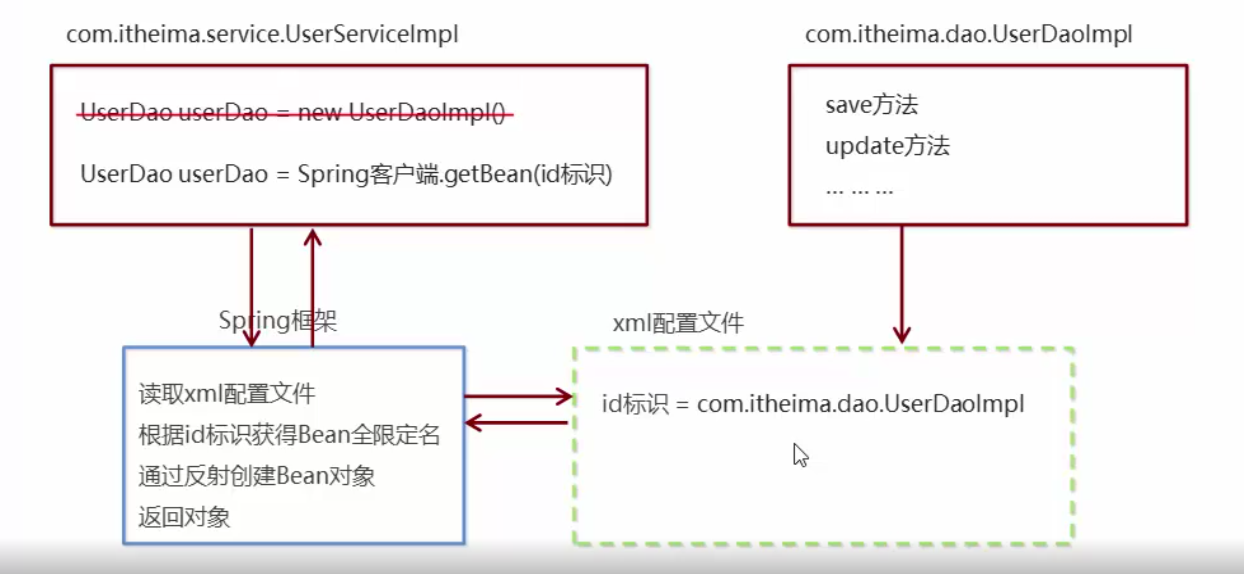
Spring是分层的JavaSE/EE应用full-stack轻量级开源框架,以loC(InverseOfControl:反转控制)和 AOP(AspectOrientedProgramming:面向切面编程)为内核。
提供了展现层SpringMVC和持久层Spring JDBCTemplate以及业务展事务管理等众多的企业级应用技术还能整合开源世界众多著名的第三方框架和类库,逐渐成为使用最多的JavaEE企业应用开源框架。
Spring发展历程
1997年,IBM提出了EJB的思想
1998年,SUN制定开发标准规范EJB1.0
1999年,EJB1.1发布
2001年,EJB2.0发布
2003年,EJB2.1发布
2006年,EJB3.0发布
Rod Johnson(Spring之父)
ExpertOne-to-OneJ2EEDesignand Development(2002)
阐述了J2EE使用EJB开发设计的优点及解决方案
ExpertOne-to-OneJ2EEDevelopment without EJB(2004)
阐述了J2EE开发不使用EJB的解决方式(Spring雏形)
2017年9月份发布了Spring的最新版本 Spring5.0通用版(GA)
Spring优势
①方便解耦,简化开发
通过Spring提供的loC容器,可以将对象间的依赖关系交由Spring进行控制,避免硬编码所造成的过度耦合。用户也不必再为单例模式类、属性文件解析等这些很底层的需求编写代码,可以更专注于上层的应用。
②AOP编程的支持
通过Sprina的AOP功能,方便进行面向切面编程,许多不容易用传统OOP实现的功能可以通过AOP轻松实现
③声明式事务的支持
可以将我们从单调烦闷的事务管理代码中解脱出来,通过声明式方式灵活的进行事务管理,提高开发效率和质量
④方便程序的测试
可以用非容器依赖的编程方式进行几平所有的测试工作,测试不再是昂贵的操作,而是随手可做的事情
⑤方便集成各种优秀框架
Spring对各种优秀框架(Struts、Hibernate、Hessian、Quartz等)的支持。
⑥降低JavaEE API的使用难度
Spring对JavaEEAPI(如JDBC、JavaMail、远程调用等)进行了薄薄的封装层,使这些API的使用难度大为降低
⑦Java 源码是经典学习范例
Spring的源代码设计精妙、结构清晰、匠心独用,处处体现着大师对Java设计模式灵活运用以及对Java技术的高深造诣。它的源代码无意是Java技术的最佳实践的范例。
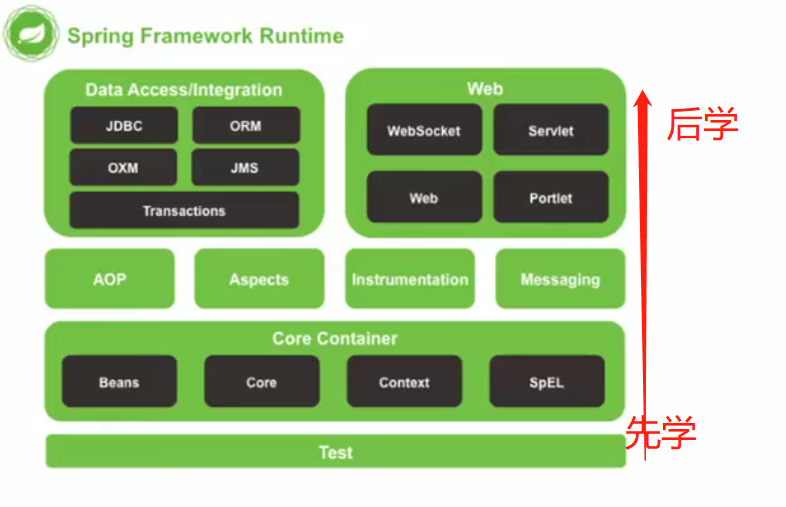
Spring的体系结构
Spring快速入门
Spring程序开发步骤
①导入Spring开发的基本包坐标
②编写Dao接口和实现类
③创建Spring核心配置文件
④在Spring配置文件中配置UserDaoImpl
⑤使用Spring的API获得Bean
这种 方式完成了解耦,后续只需要给配置文件即可
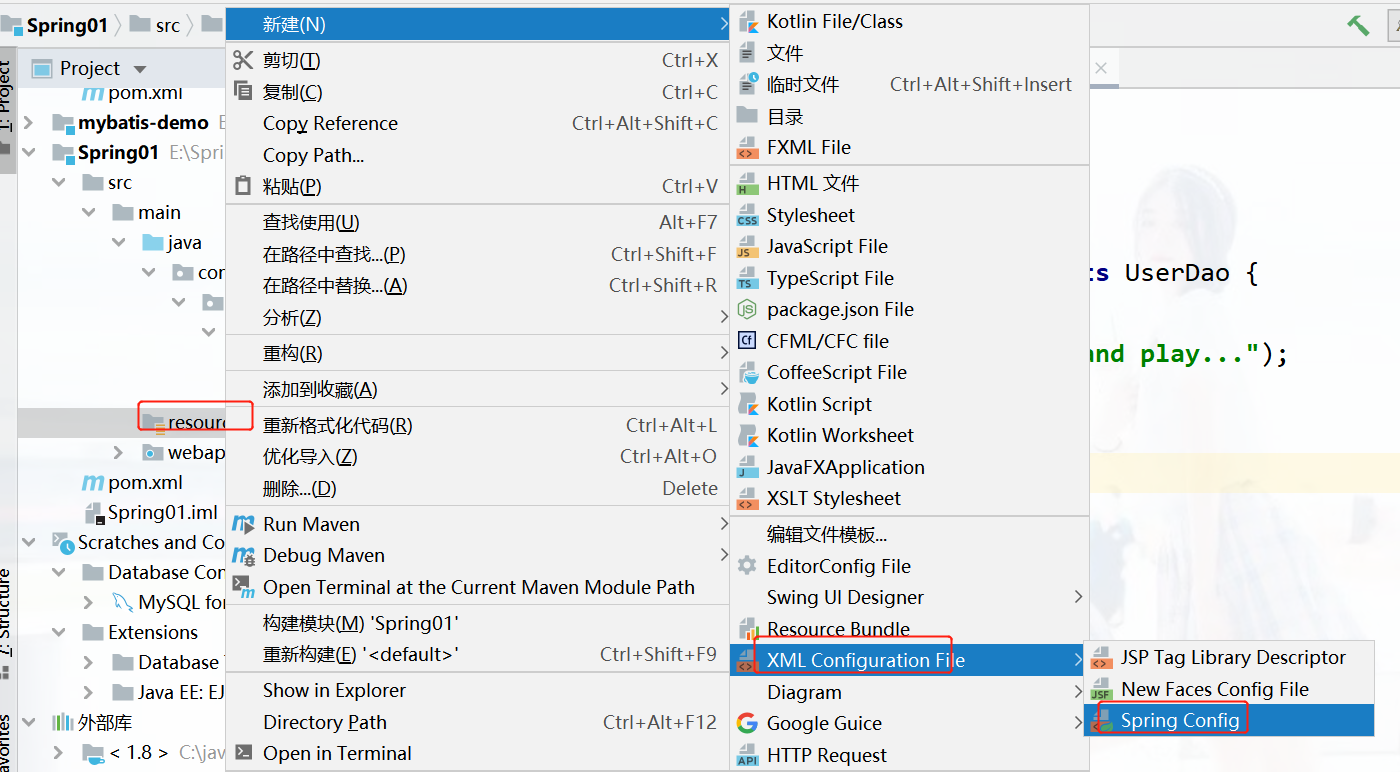
idea中快速入门
①:在pom.xml中配置spring的坐标
<dependencies>

    <dependency>
    <groupId>org.springframework</groupId>
    <artifactId>spring-context</artifactId>
    <version>5.0.5.RELEASE</version>
  </dependency>

  </dependencies>
②:在src下创建com.Dao.UserDao
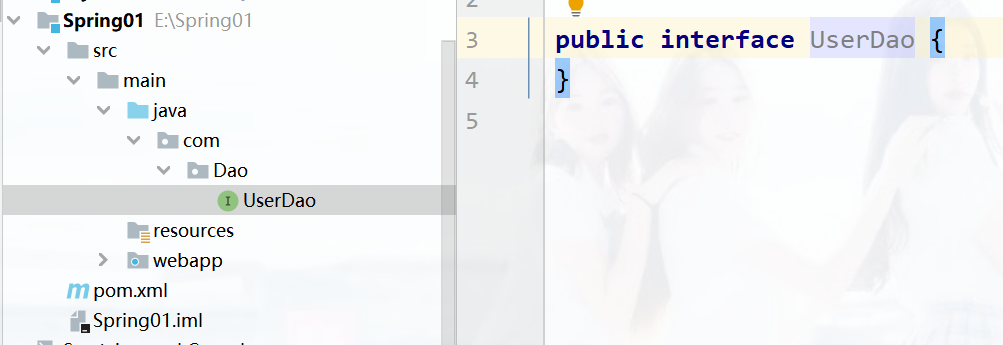
创建一个接口
public interface UserDao {
    public void play();
}
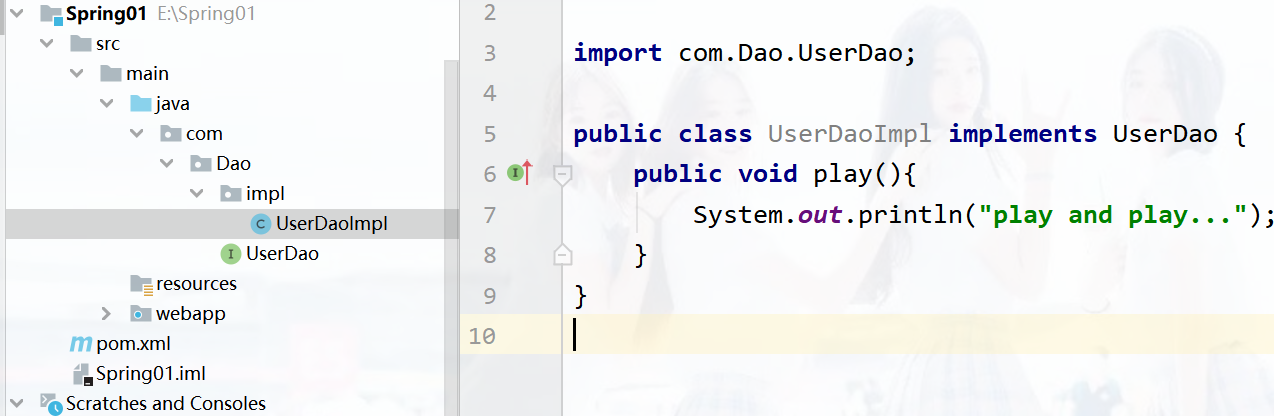
创建UserDao的实现类
import com.Dao.UserDao;

public class UserDaoImpl implements UserDao {
    public void play(){
        System.out.println("play and play...");
    }
}
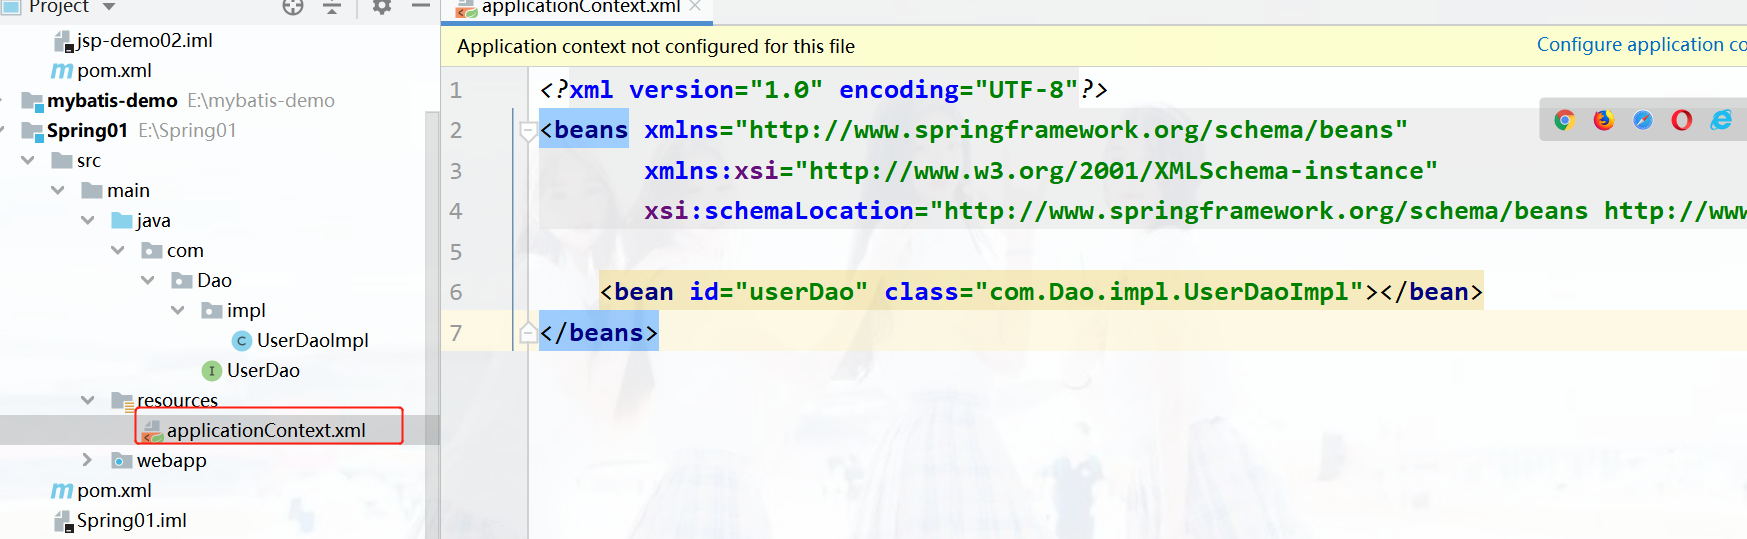
③:创建spring核心配置文件(文件的名字任意)
一般起名为applicationContext.xml
④在Spring配置文件中配置UserDaoImpl(id任意)
<bean id="userDao" class="com.Dao.impl.UserDaoImpl"></bean>
⑤:使用springAPI获得Bean
创建一个Demo包下的UserDemo
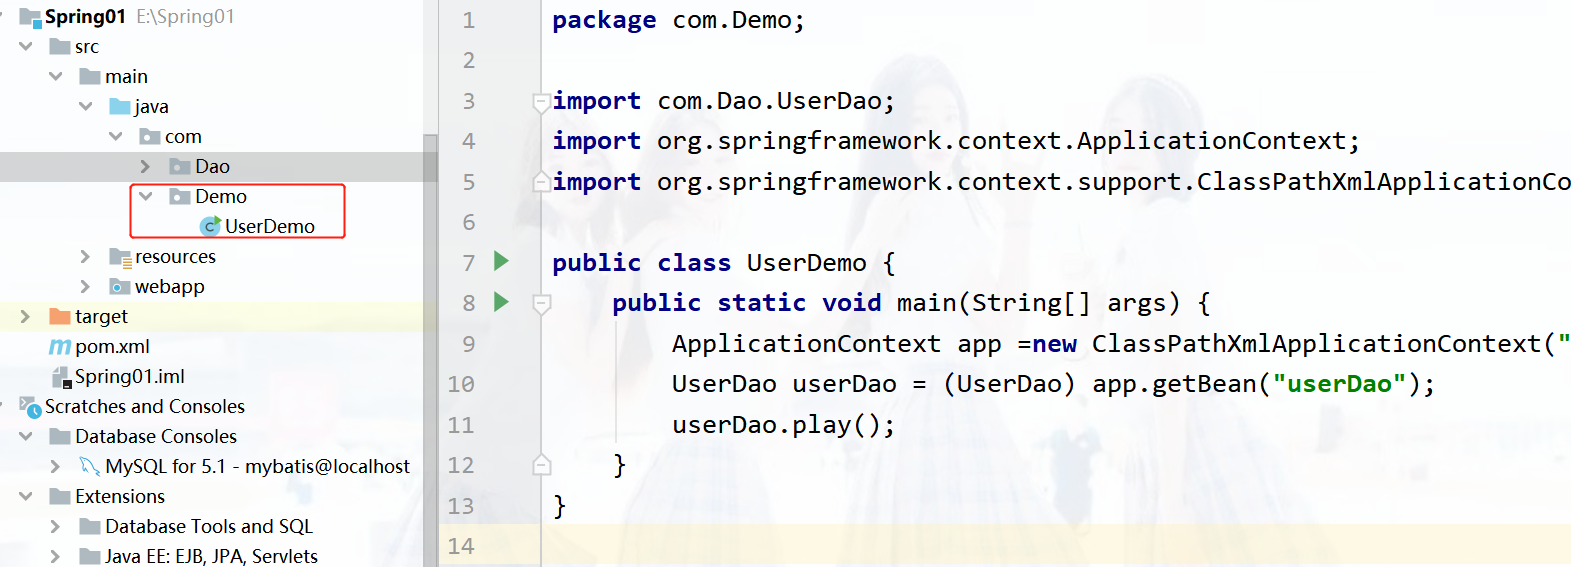
import com.Dao.UserDao;
import org.springframework.context.ApplicationContext;
import org.springframework.context.support.ClassPathXmlApplicationContext;
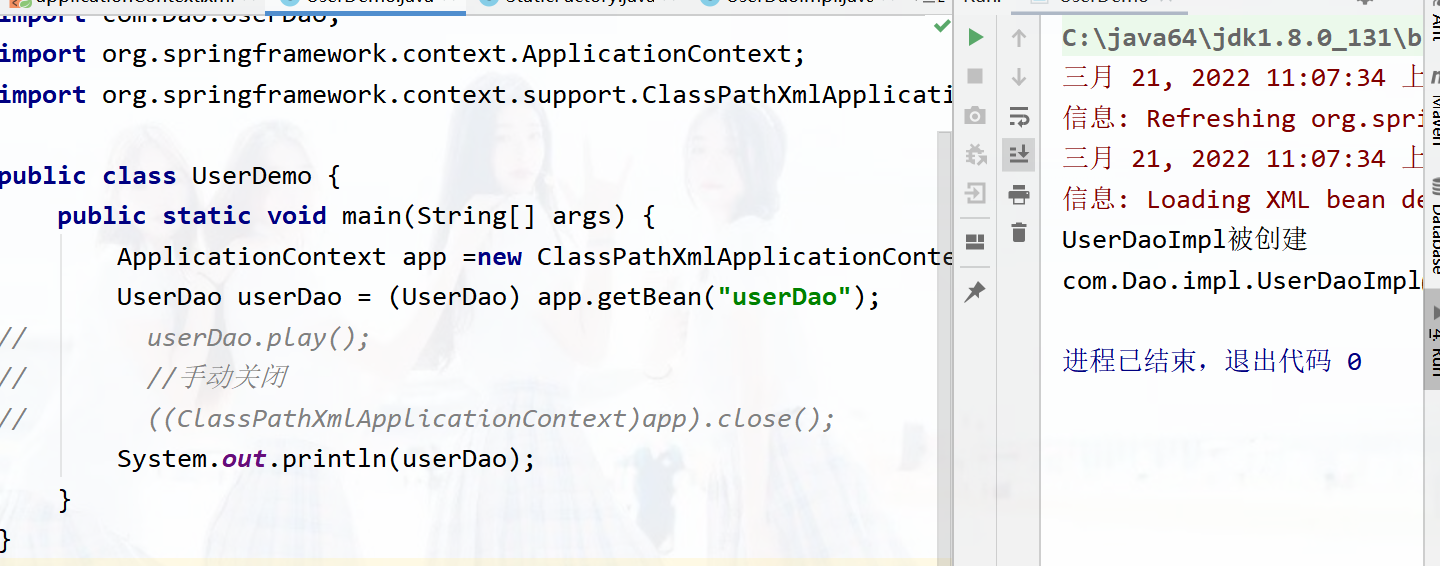
public class UserDemo {
public static void main(String[] args) {
ApplicationContext app =new ClassPathXmlApplicationContext("applicationContext.xml");
UserDao userDao = (UserDao) app.getBean("userDao");
userDao.play();
}
}
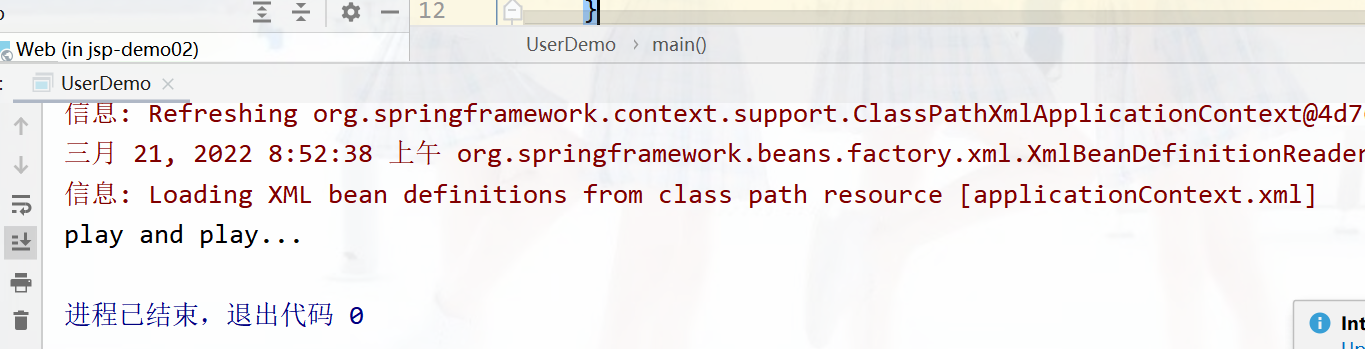
运行之后:
Spring配置文件
Bean标签基本配置
用于配置对象交由Spring来创建
默认情况下他调用的是类中的无参构造函数,如果没有无参构造函数则不能创建成功。
基本属性:
id:Bean实例在Spring容器中的唯一标识
class:Bean的限定名称
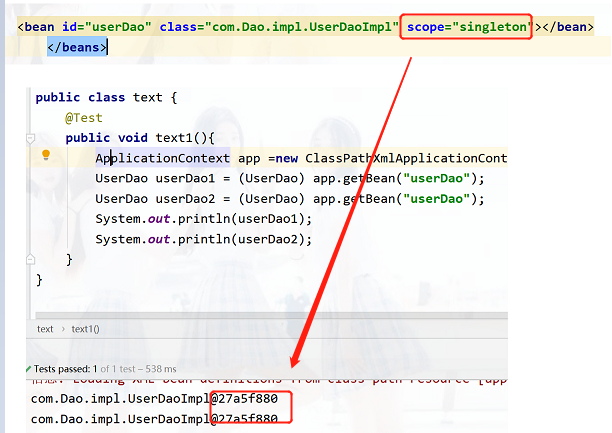
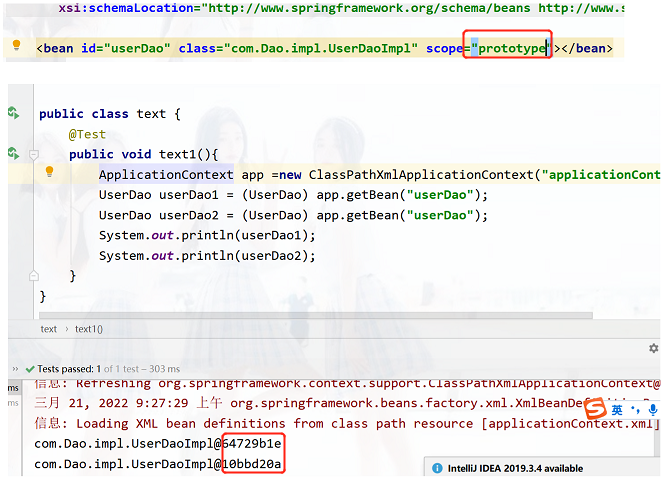
Bean标签范围配置
scope:指对象的作用范围,取值如下:
取值范围说明singleton默认值,单例的prototype****多例的requestWEB项目中,Spring创建一个Bean的对象,将对象存入到request域中sessionWEB项目中,Spring创建一个Bean的对象,将对象存入到session域中global sessionWEB项目中,应用在Portlet环境,如果没有Porlet环境那么globalSession相当于session
下pom.xml中配置junit的坐标
   <dependency>
      <groupId>junit</groupId>
      <artifactId>junit</artifactId>
      <version>4.11</version>
    </dependency>
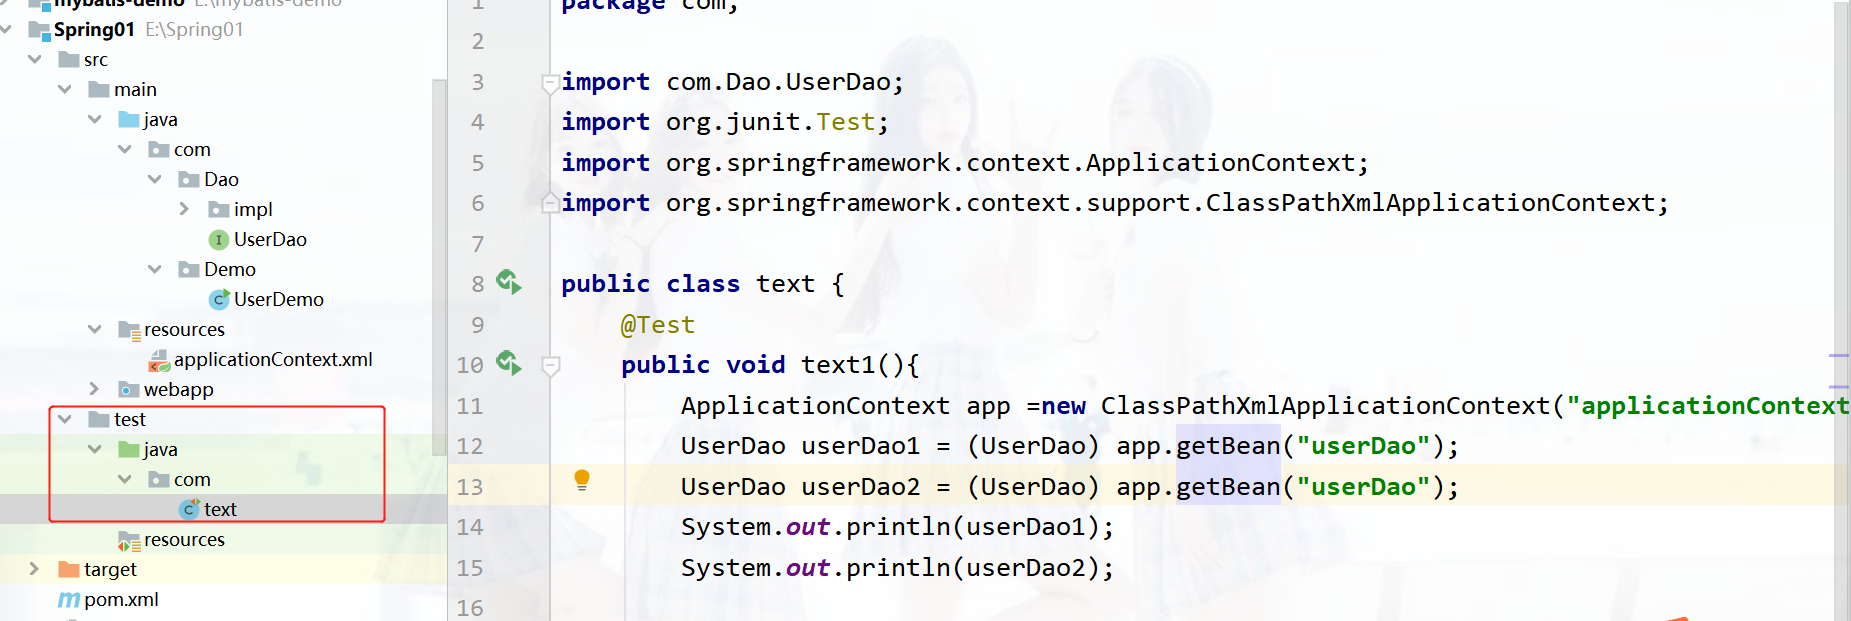
在test模块下创建text类
package com;

import com.Dao.UserDao;
import org.junit.Test;
import org.springframework.context.ApplicationContext;
import org.springframework.context.support.ClassPathXmlApplicationContext;

public class text {
    @Test
    public void text1(){
        ApplicationContext app =new ClassPathXmlApplicationContext("applicationContext.xml");
        UserDao userDao1 = (UserDao) app.getBean("userDao");
        UserDao userDao2 = (UserDao) app.getBean("userDao");
        System.out.println(userDao1);
        System.out.println(userDao2);

    }
}
使用singleton打印出来的地址一致说明容器中只有一份
使用prototype打印出来的地址不一致说明容器中有多份
无参构造创建时机
1)当scope的取值为singleton时
Bean的实例化个数:1个
Bean的实例化时机:当Spring核心文件被加载时,实例化配置的Bean实例
Bean的生命周期:
- 对象创建:当应用加载,创建容器时,对象就被创建了
- 对象运行:只要容器在,对象一直活着
- 对象销毁:当应用卸载,销毁容器时,对象就被销毁了
2)当scope取值为prototype时
Bean的实例化个数:多个
Bean的实例化时机:当调用getBean()方法时实例化Bean
Bean的生命周期
- 对象创建:当使用对象时,创建新的对象实例
- 对象运行:只要对象在使用中,就一直活着
- 对象销毁:当对象长时间不用时,被Java的垃圾回收器回收了
Bean生命周期配置
init-method:指定类中的初始化方法名称
destory-method:指定类中的销毁方法名称
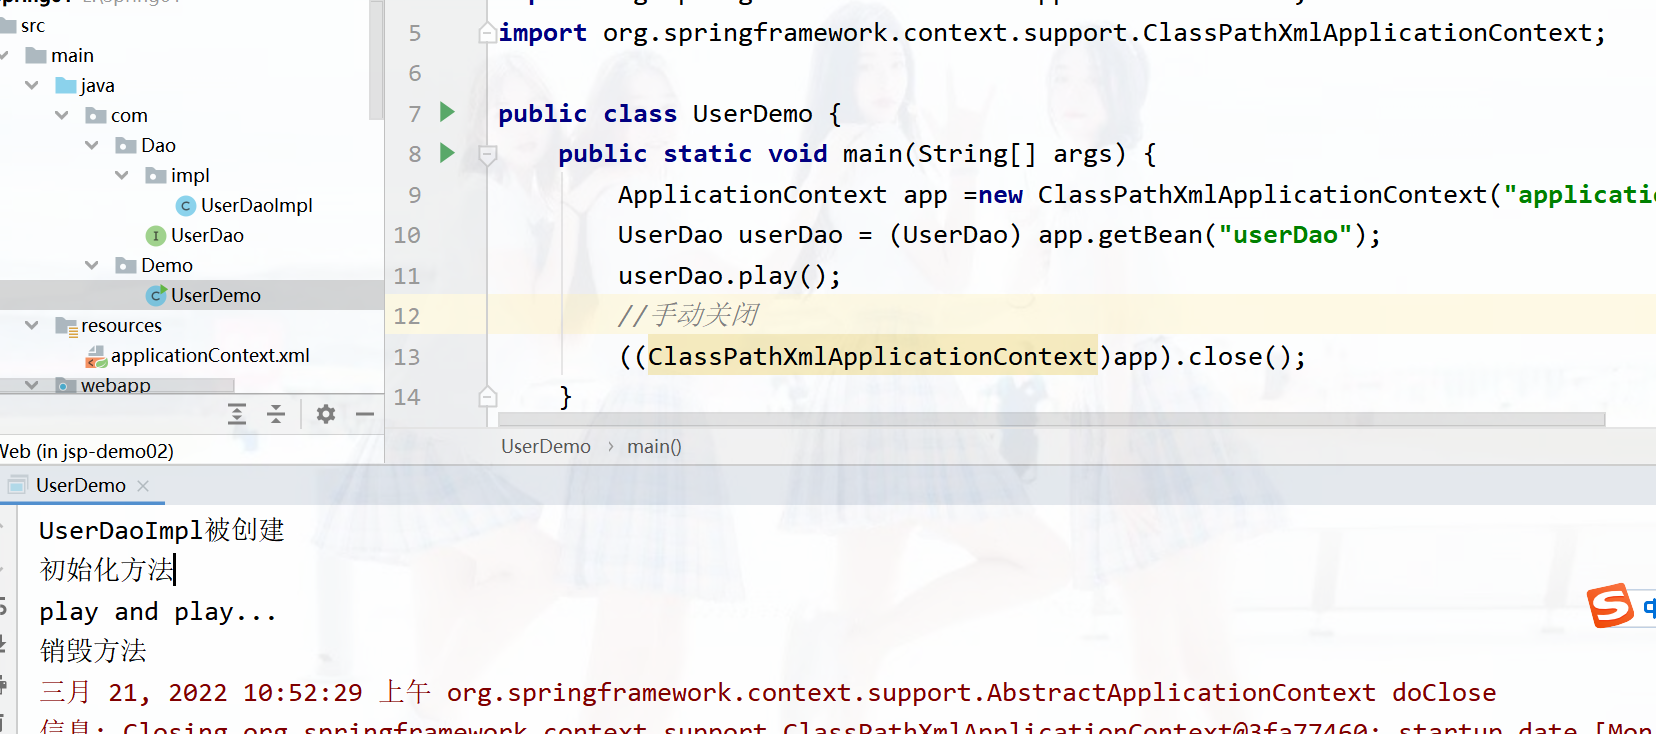
在UserDaoImp类下
创建的初始化方法init和销毁方法destory(名字为任意的)
public class UserDaoImpl implements UserDao {
    public void play(){
        System.out.println("play and play...");
    }
    public UserDaoImpl(){
        System.out.println("UserDaoImpl被创建");
    }
    public void init(){
        System.out.println("初始化方法");
    }
    public void destory(){
        System.out.println("销毁方法");
    }
}
在applicationContext.xml文件中指定初始化和销毁方法
 <bean id="userDao" class="com.Dao.impl.UserDaoImpl"
    init-method="init" destroy-method="destory"
    ></bean>
在UserDemo方法运行结果:
Bean实例化三种方式
无参构造方法实例化
工厂静态方法实例化
工厂实例方法实例化
①:工厂静态方法实例化
创建一个factory包下
package com.factory;

import com.Dao.UserDao;
import com.Dao.impl.UserDaoImpl;

public class StaticFactory {
    public static UserDao getUserDao(){
        return new UserDaoImpl();
    }
}
xml中配置:
<bean id="userDao" class="com.factory.StaticFactory" factory-method="getUserDao"></bean>

在userDemo下运行,或者在test运行也可
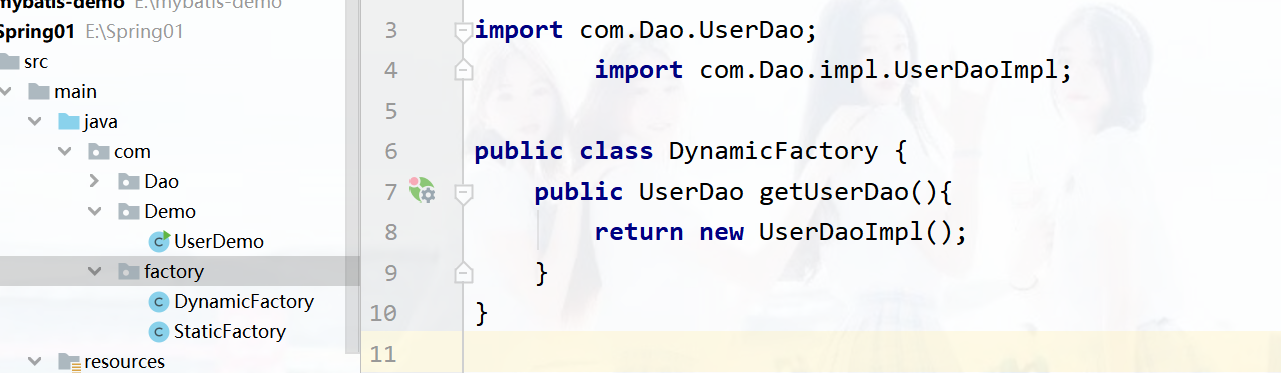
② 工厂实例方法实例化演示
创建一个DynamicFactory类
import com.Dao.UserDao;
import com.Dao.impl.UserDaoImpl;

public class DynamicFactory {
    public UserDao getUserDao(){
        return new UserDaoImpl();
    }
}
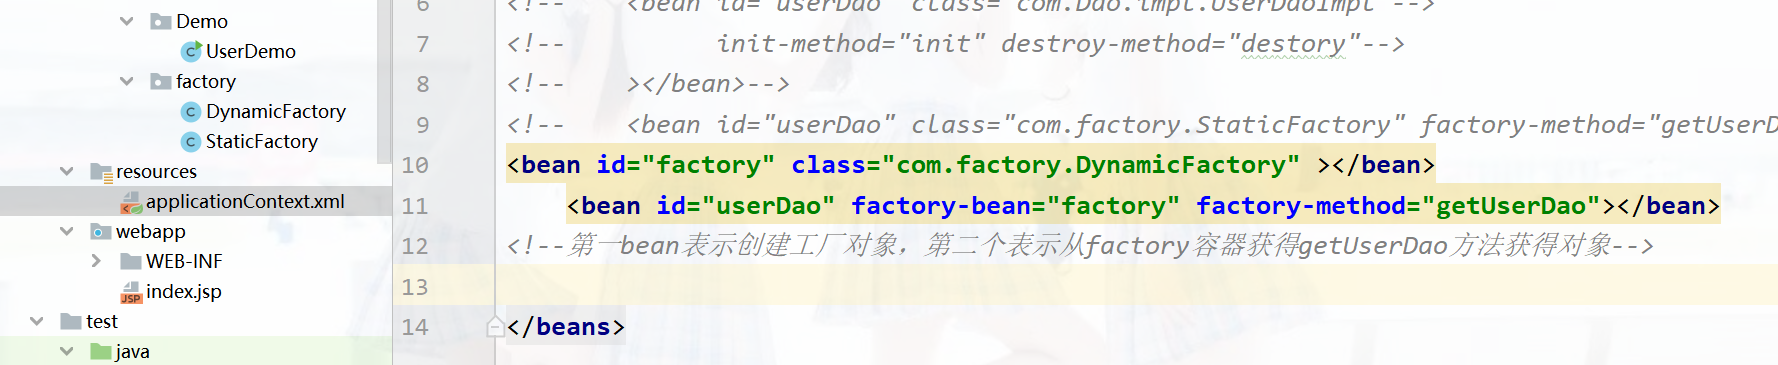
在applicationContext.xml中
<bean id="factory" class="com.factory.DynamicFactory" ></bean>
    <bean id="userDao" factory-bean="factory" factory-method="getUserDao"></bean>
<!--第一bean表示创建工厂对象,第二个表示从factory容器获得getUserDao方法获得对象-->
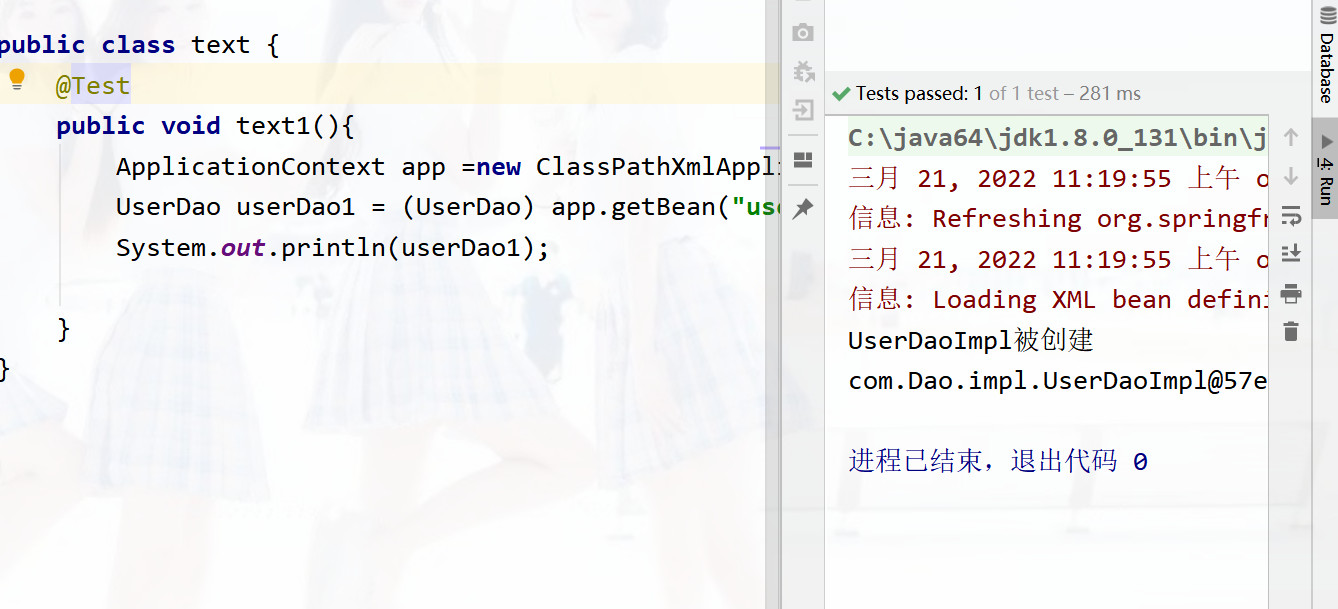
其余代码不变,在text下运行得
Bean的依赖注入分析
创建一个Service服务层的接口和实现类
接口中写入
public interface UserService {
    public void save();
}
service服务层的实现类去实现save方法
public class UserServiceImpl implements UserService {

    @Override
    public void save() {

        ApplicationContext app =new ClassPathXmlApplicationContext("applicationContext.xml");
        UserDao userDao = (UserDao) app.getBean("userDao");
         userDao.save();

    }
}
dao持久层下的接口和实现类
public interface UserDao {
    public void save();

}
实现类下
public class UserDaoImpl implements UserDao {
    public void save(){
        System.out.println("run save...");
    }
}
resource下的applicationContext.xml下
<?xml version="1.0" encoding="UTF-8"?>
<beans xmlns="http://www.springframework.org/schema/beans"
       xmlns:xsi="http://www.w3.org/2001/XMLSchema-instance"
       xsi:schemaLocation="http://www.springframework.org/schema/beans http://www.springframework.org/schema/beans/spring-beans.xsd">

    <bean id="userDao" class="com.Dao.impl.UserDaoImpl"></bean>
    <bean id="userService" class="com.Service.Impl.UserServiceImpl"></bean>

</beans>
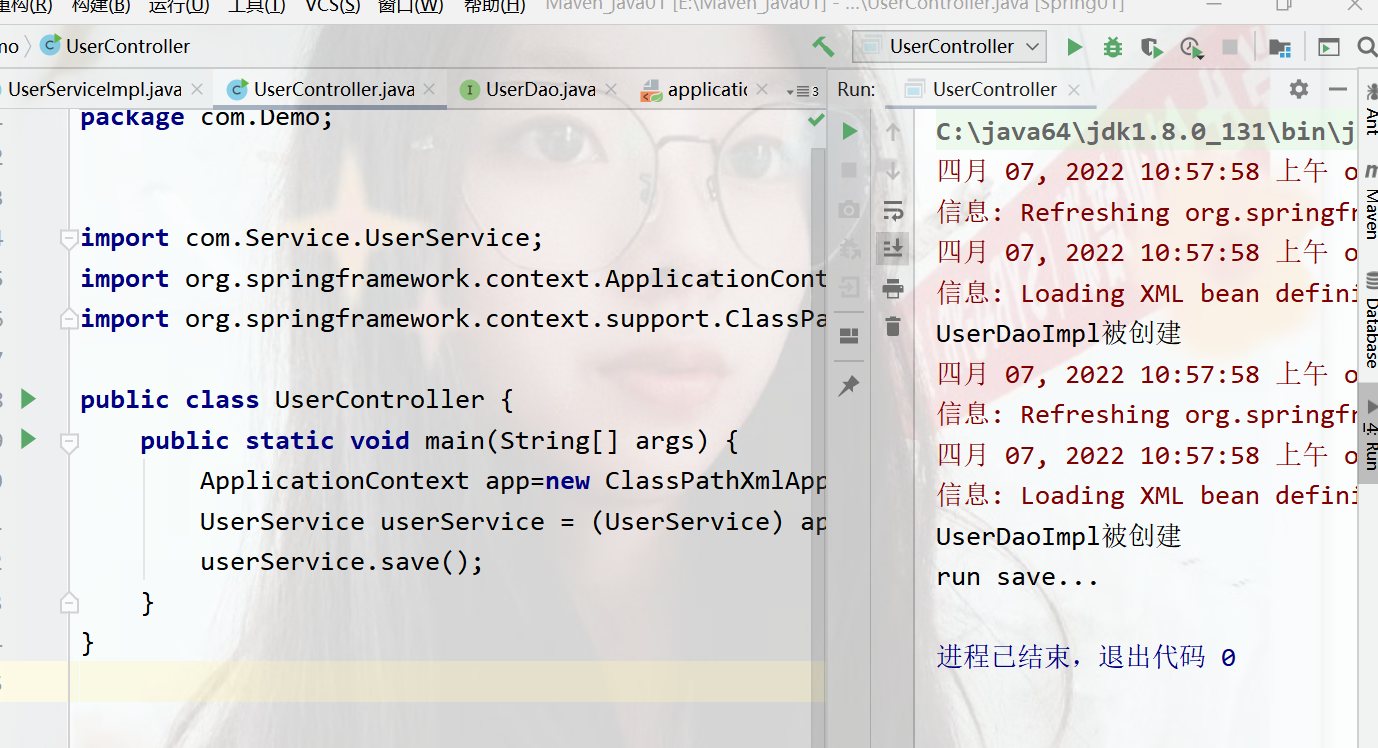
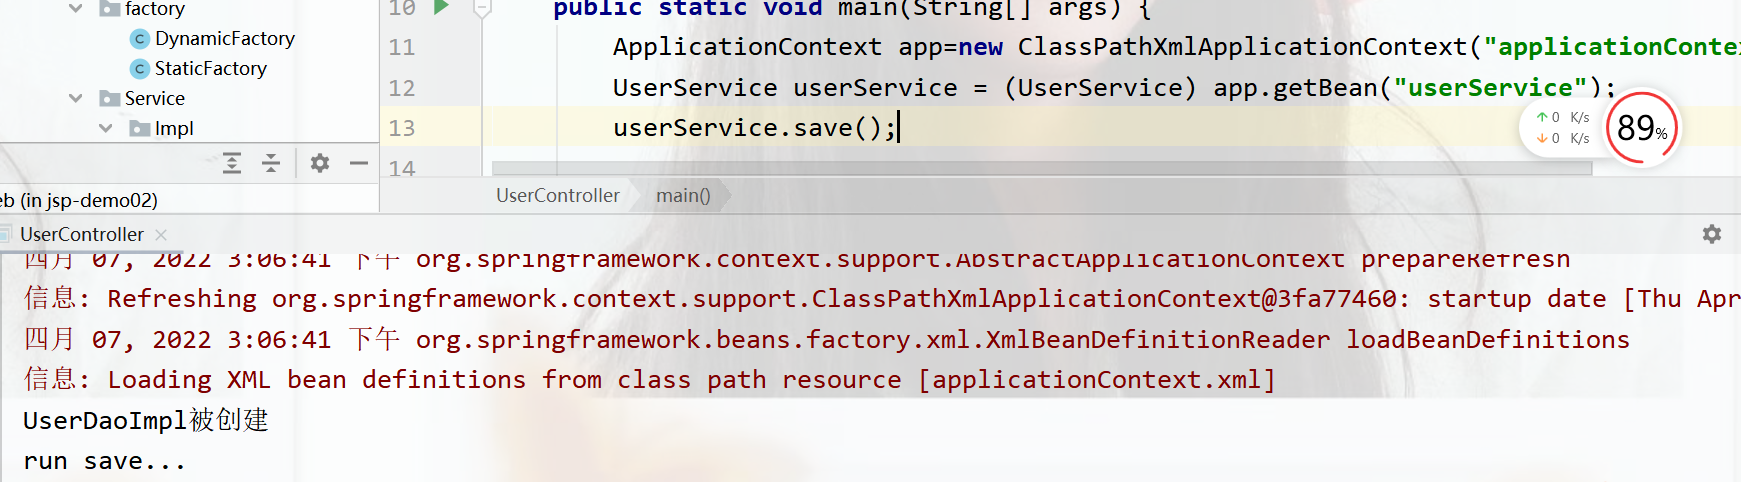
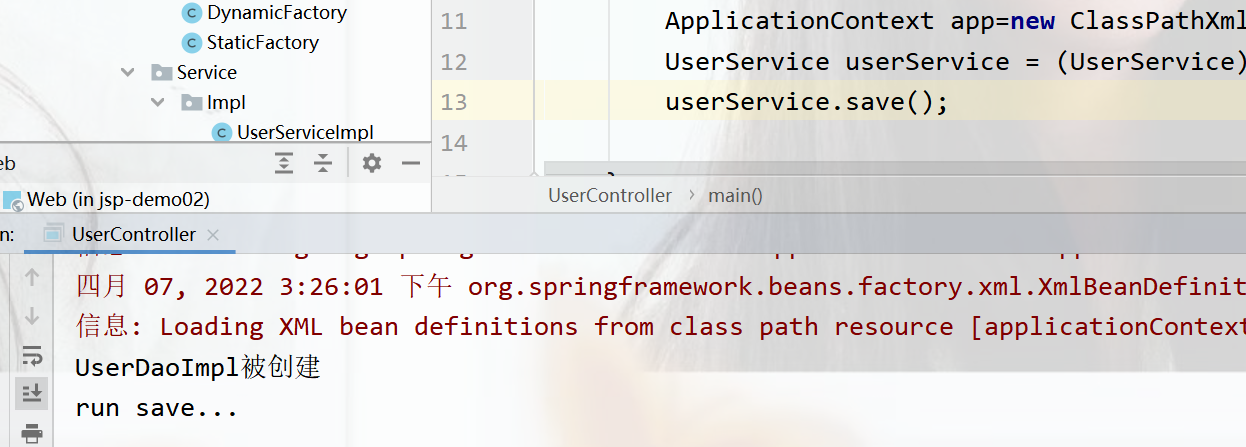
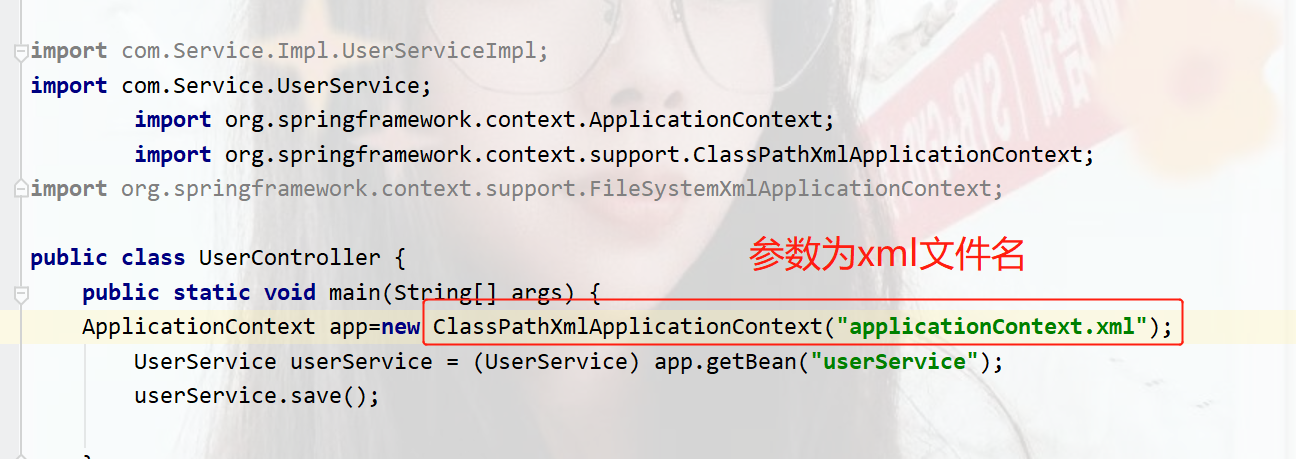
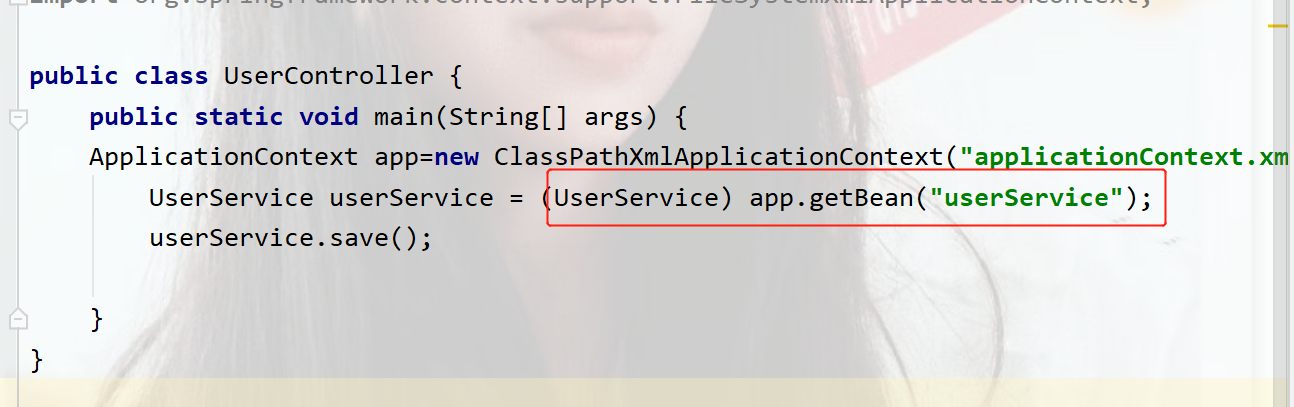
在demo包下模拟web环境的创建一个UserController
import com.Service.UserService;
import org.springframework.context.ApplicationContext;
import org.springframework.context.support.ClassPathXmlApplicationContext;

public class UserController {
    public static void main(String[] args) {
        ApplicationContext app=new ClassPathXmlApplicationContext("applicationContext.xml");
        UserService userService = (UserService) app.getBean("userService");
        userService.save();
    }
}
运行之后
依赖注入概念
上面的缺点也很明显,是同时获取service和dao层的到时我们只想要service层,所以此时,需要依赖注入,把dao注入到service服务层
依赖注入(DependencyInjection):它是Spring框架核心IOC的具体实现。
在编写程序时,通过控制反转,把对象的创建交给了Spring,但是代码中不可能出现没有依赖的情况。 IOC解耦只是降低他们的依赖关系,但不会消除。例如:业务层仍会调用持久层的方法。
那这种业务层(Service)和持久层(Dao)的依赖关系,在使用Spring之后,就让Spring来维护了。简单的说,就是坐等框架把持久层对象传入业务层,而不用我们自己去获取。
将UserDao注入到UserService内部的方式
构造方法和set方法
法1:set方法
在UserServiceImpl下创建userDao
import com.Dao.UserDao;
import com.Service.UserService;

public class UserServiceImpl implements UserService {
    private UserDao userDao;

    public void setUserDao(UserDao userDao) {
        this.userDao = userDao;
    }

    @Override
    public void save() {
        userDao.save();
    }
}
在applicationContext.xml文件中配置
<bean id="userDao" class="com.Dao.impl.UserDaoImpl"></bean>
<bean id="userService" class="com.Service.Impl.UserServiceImpl">
    <property name="userDao" ref="userDao"></property>

</bean>
然后之前创建的UserController就可以启动了
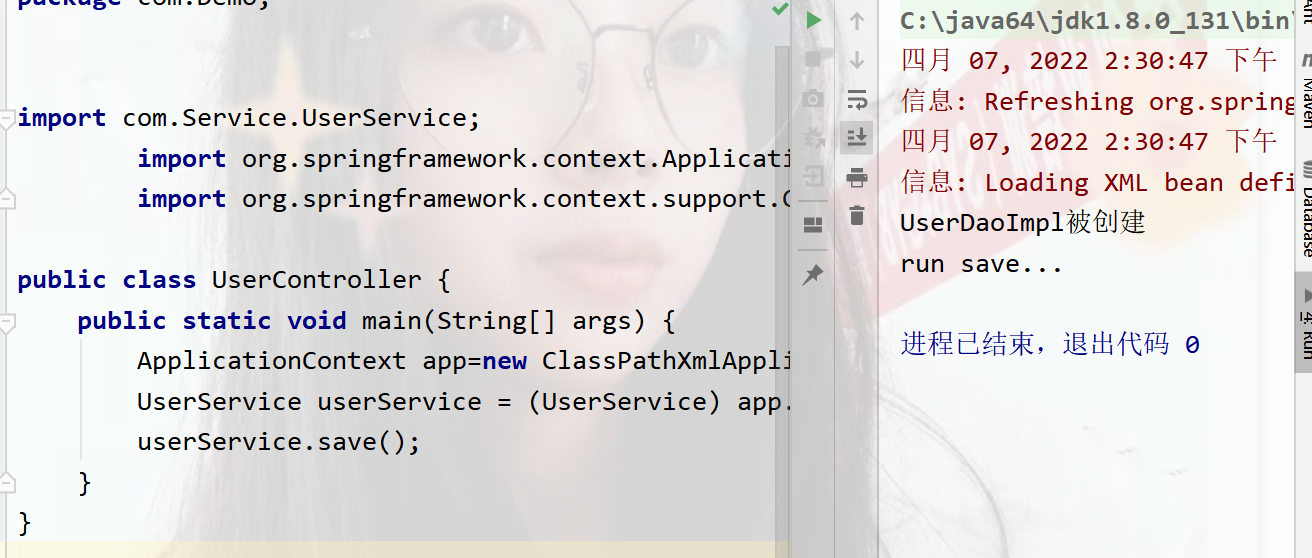
如果直接new UserServiceImpl对象会报空指针异常的错,
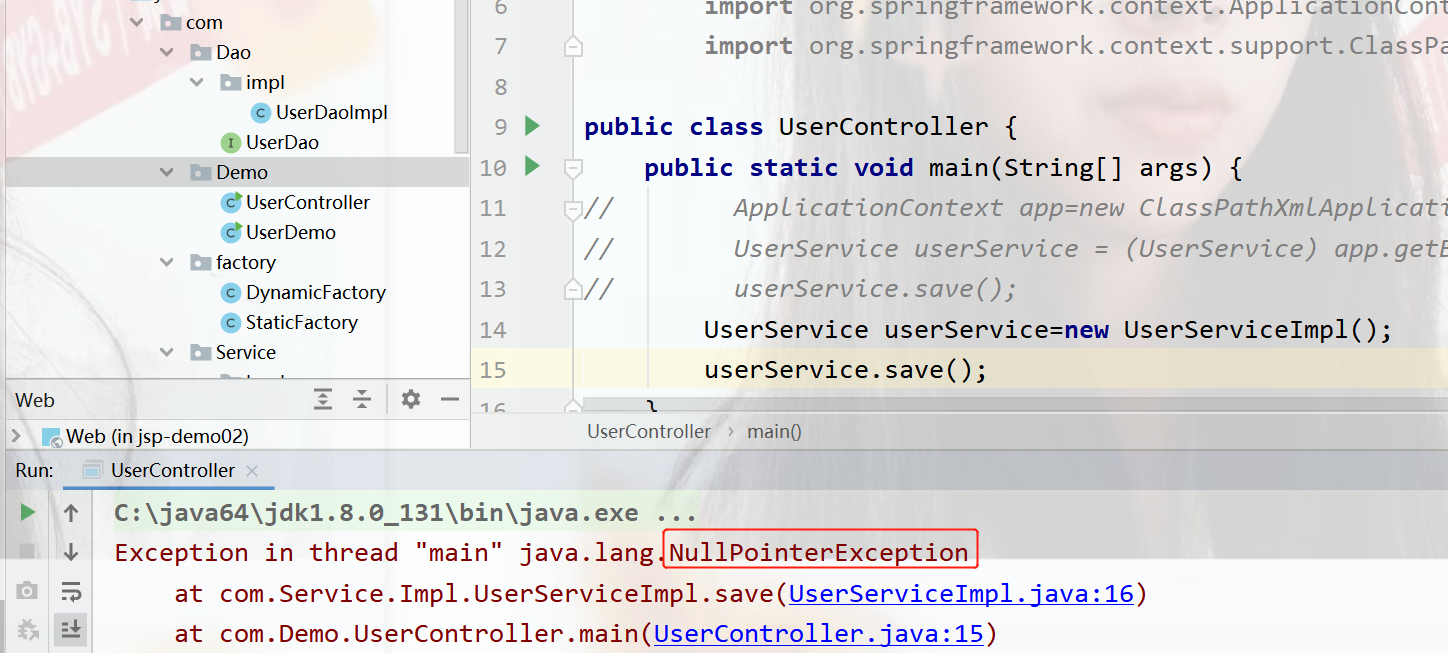
因为useDao是不是通过spring容器来获取的,自然就是null值了
set注入方法改进
P命名空间注入本质也是set方法注入,但比起上述的set方法更加方便,首先需要引入p命名空间:
xmlns:p="http://www.springframework.org/schema/p"
修改注入方式
<bean id="userService" class="com.Service.Impl.UserServiceImpl" p:userDao-ref="userDao">
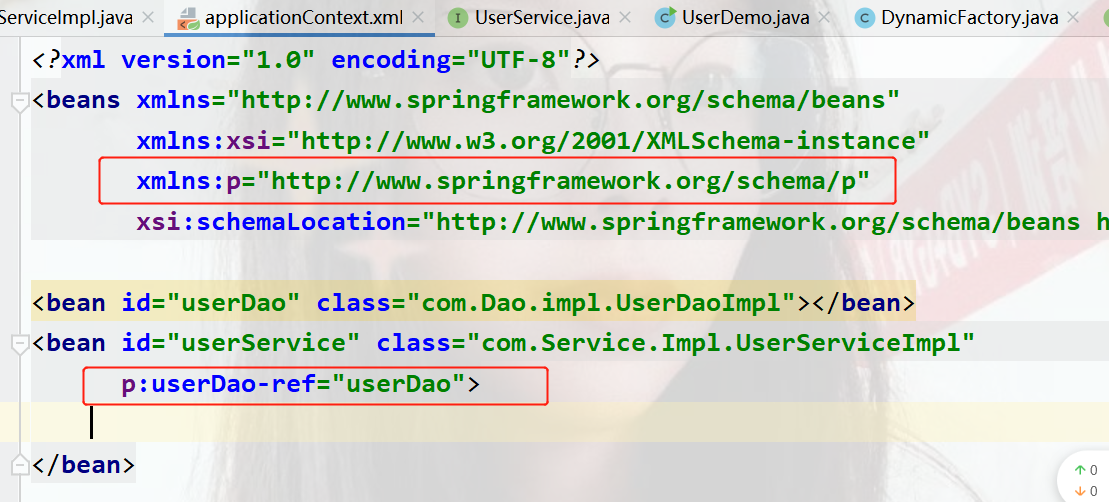
是一个对象就用-ref,普通属性就不用
userController运行之后
有参构造注入方法
在applicationContext.xml文件中
    <bean id="userService" class="com.Service.Impl.UserServiceImpl">
<!--        name后的userDao表示构造内部的参数名,ref表示引用容器bean的id-->
        <constructor-arg name="userDao" ref="userDao"></constructor-arg>
    </bean>
userServiceImpl下
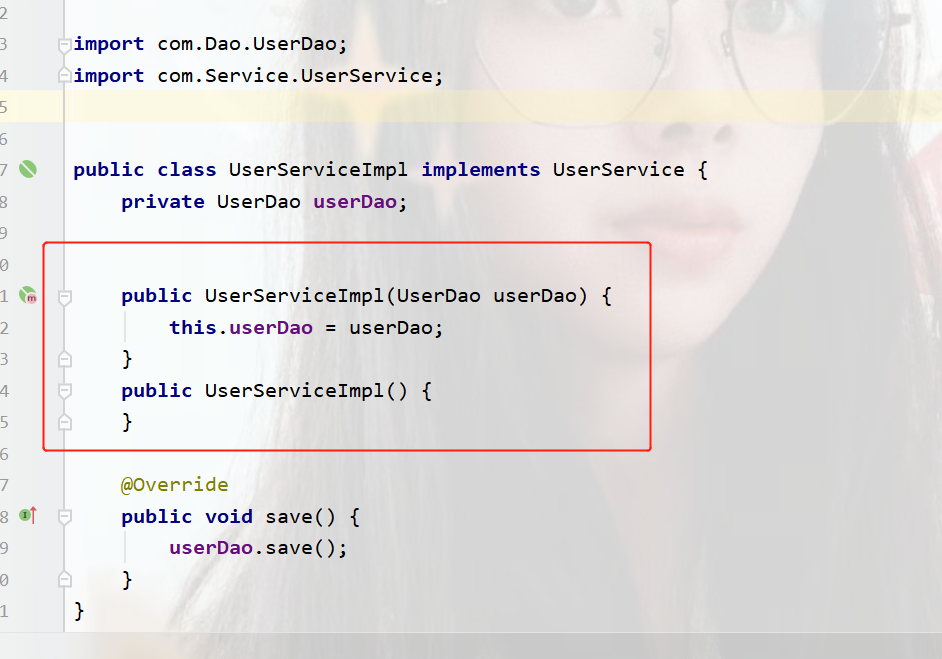
运行结果:
Bean的依赖注入的数据类型
上面的操作,都是注入引用Bean,除了对象的引用可以注入,普通数据类型,集合都可以在容器中进行注入。
注入数据的三种数据类型
- 普通数据类型
- 引用数据类型
- 集合数据类型
普通数据注入,如在UserDao层注入两个普通数据类型(采用set方式注入)
public class UserDaoImpl implements UserDao {
private String name;
private int age;
public void setName(String name) {
this.name = name;
}
public void setAge(int age) {
this.age = age;
}
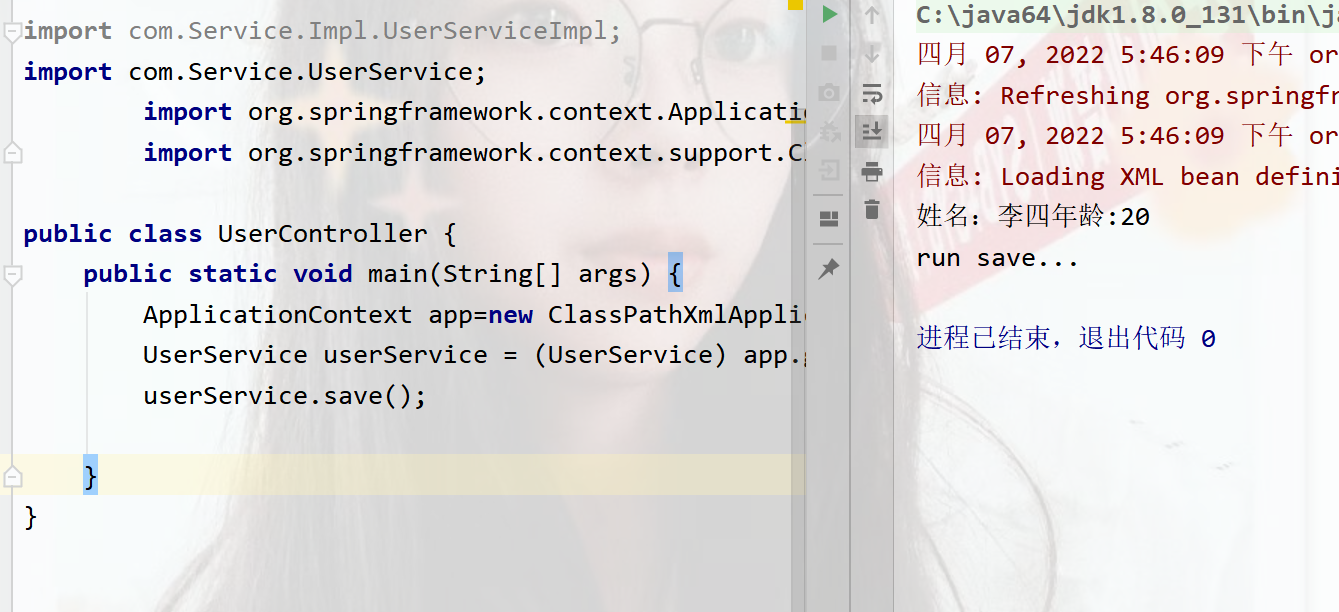
public void save(){
System.out.println("姓名:"+name+"年龄:"+age);
System.out.println("run save...");
}
}
在applicationContext.xml文件中,在配置dao中设置参数
<bean id="userDao" class="com.Dao.impl.UserDaoImpl">
    <property name="name" value="李四"/>
    <property name="age" value="20" />
</bean>
在Usercontroller下
public class UserController {
    public static void main(String[] args) {
        ApplicationContext app=new ClassPathXmlApplicationContext("applicationContext.xml");
        UserService userService = (UserService) app.getBean("userService");
        userService.save();

    }
}
运行结果
集合的数据类型注入
在UserDaoImpl下
采用set注入方式,设置集合,提供对应得set方法
package com.Dao.impl;
import com.Dao.UserDao;
import com.pojo.User;
import java.util.List;
import java.util.Map;
import java.util.Properties;
public class UserDaoImpl implements UserDao {
private List<String> strList;
private Map<String, User> userMap;
private Properties properties;
public void setStrList(List<String> strList) {
this.strList = strList;
}
public void setUserMap(Map<String, User> userMap) {
this.userMap = userMap;
}
public void setProperties(Properties properties) {
this.properties = properties;
}
public void play(){
System.out.println("play and play...");
}
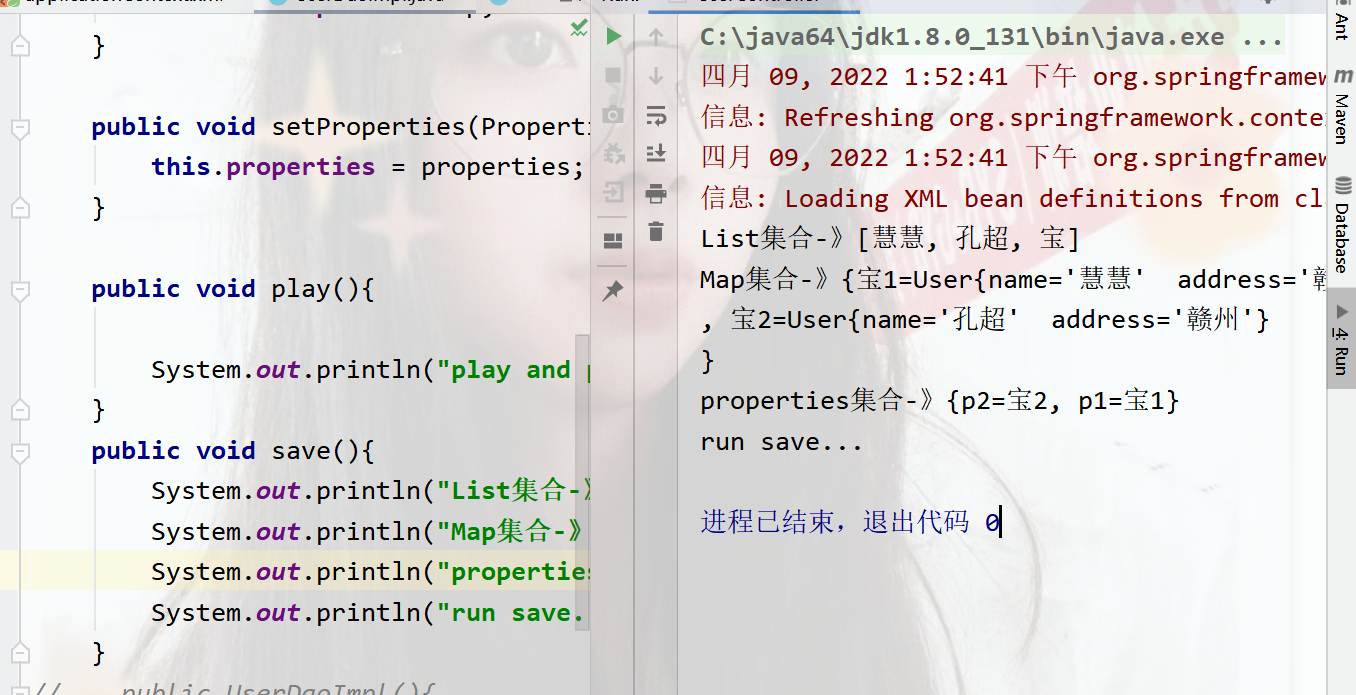
public void save(){
System.out.println("List集合-》"+strList);
System.out.println("Map集合-》"+userMap);
System.out.println("properties集合-》"+properties);
System.out.println("run save...");
}
}
在applicationContext.xml下配置注入值
<?xml version="1.0" encoding="UTF-8"?>
<beans xmlns="http://www.springframework.org/schema/beans"
       xmlns:xsi="http://www.w3.org/2001/XMLSchema-instance"
       xmlns:p="http://www.springframework.org/schema/p"
       xsi:schemaLocation="http://www.springframework.org/schema/beans http://www.springframework.org/schema/beans/spring-beans.xsd">

<!--<bean id="userDao" class="com.Dao.impl.UserDaoImpl">-->
<!--    <property name="name" value="李四"/>-->
<!--    <property name="age" value="20" />-->
<!--</bean>-->
    <bean id="userDao" class="com.Dao.impl.UserDaoImpl">
       <!--给list集合注入值 -->
        <property name="strList" >
            <list>
                <value>慧慧</value>
                <value>孔超</value>
                <value>宝</value>
            </list>
        </property>
<property name="userMap">
    <map>
       <!--key表示map里的key,value-ref是对象的引用,引用id为user1和user2   -->
        <entry key="宝1" value-ref="user1"></entry>
        <entry key="宝2" value-ref="user2"></entry>
    </map>
</property>

        <!-- 给properties注入的值  -->
        <property name="properties">
            <props>
                <prop key="p1">宝1</prop>
                <prop key="p2">宝2</prop>
            </props>
        </property>
    </bean>
<!--    这是给map对象的user设置的值的-->
    <bean id="user1" class="com.pojo.User">
        <property name="name" value="慧慧"/>
        <property name="address" value="赣州"/>
    </bean>
    <bean id="user2" class="com.pojo.User">
        <property name="name" value="孔超"/>
        <property name="address" value="赣州"/>
    </bean>

    <bean id="userService" class="com.Service.Impl.UserServiceImpl">
<!--        name后的userDao表示构造内部的参数名,ref表示引用容器bean的id-->
        <constructor-arg name="userDao" ref="userDao"></constructor-arg>
    </bean>

</beans>
在UserController测试下
import com.Service.UserService;
        import org.springframework.context.ApplicationContext;
        import org.springframework.context.support.ClassPathXmlApplicationContext;

public class UserController {
    public static void main(String[] args) {
        ApplicationContext app=new ClassPathXmlApplicationContext("applicationContext.xml");
        UserService userService = (UserService) app.getBean("userService");
        userService.save();

    }
}
运行结果:
引入其他配置文件(分模块开发)
实际开发中,Spring的配置内容非常的多,这就导致Spring配置很繁琐且体积很大,所以可以将部分配置拆解到其他配置文件中,而且主配置文件通过import标签进行加载
语法格式:
<import resource="xxxx.xml"/>
Spring的重点配置
<bean>标签
- id属性:在容器中Bean实例的唯一标识,不允许重复
- class属性:要实例化的Bean的全限定名
- scope属性:bean的作用范围,常用是Singleton(默认)和prototype
<property>标签:属性注入
name属性:属性名称value属性:注入的普通属性值ref属性:注入的对象引用值
<list>标签
<map>标签
<constructor-arg>标签
<import>标签:导入其他的Spring的分文件
Spring相关的API
ApplicationContext的继承体系
applicationContext:接口类型,代表应用上下文,可以通过其实例获得Spring容器中的Bean对象
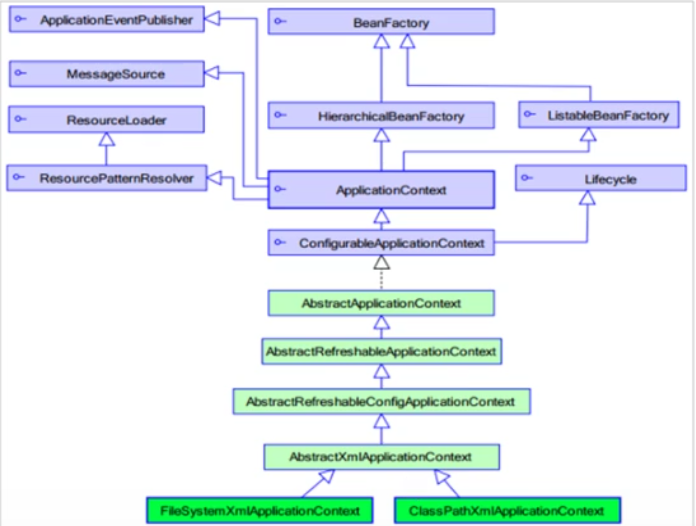
** 紫色的为接口,浅绿色的为抽象类,绿色的为实现类**
ApplicationContext的实现类
①ClassPathXmlApplicationContext
它是从类的跟路径下加载配置文件,只需要创建resource下的xml,参数写入xxx.xml即可(推荐使用)
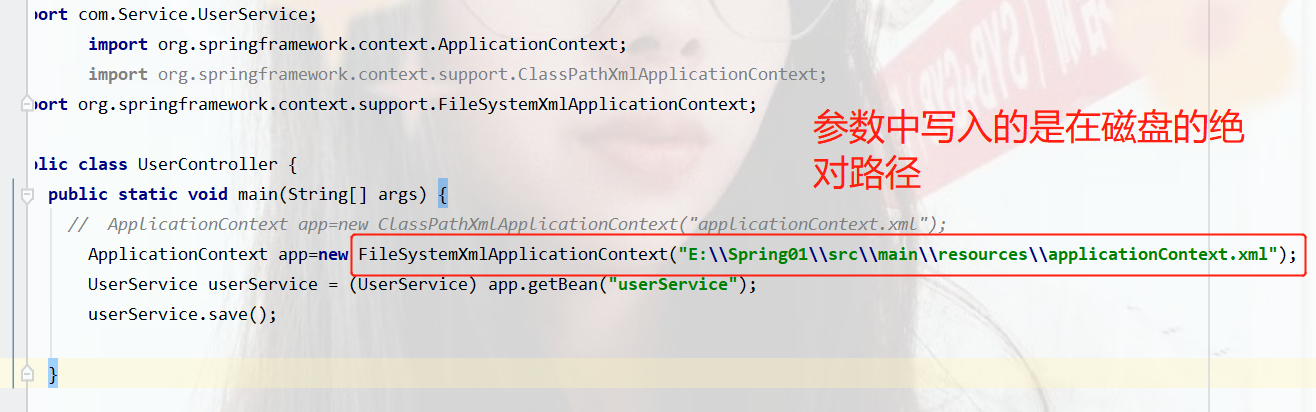
②FileSystemXmlApplicationContext
他是从磁盘路径上加载配置文件,配置文件可以在磁盘的任意位置。
③AnnotationConfigApplicationContext
当使用注解配置容器对象时,需要食用此类来创建spring容器骂他用来读取注解
getBean()方法使用
//根据id找
public object getBean(String name) throws BeansException {
    assertBeanFactoryActive();
    return getBeanFactory().getBean(name);
}

//根据字节码对象找
public <T> T getBean(Class<T> requiredType) throws BeansException {
    assertBeanFactoryActive();
    return getBeanFactory().getBean(requiredType);
}
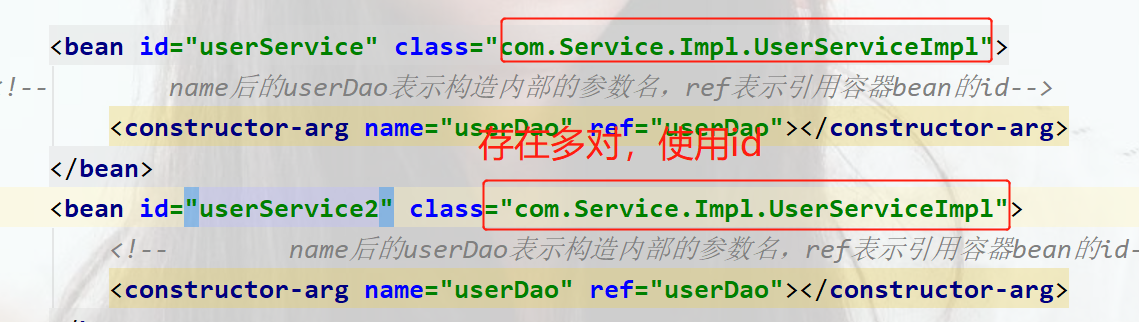
其中,当参数的数据类型是字符串时,表示根据Bean的id从容器这种获得Bean实例,返回Object,需要强转。当参数的数据类型是Class类型是,表示根据类型从容器中匹配Bean实例,当容器中相同类型的Bean有多个是是,则clss方法会报错
根据id
** 根据字节码对象**
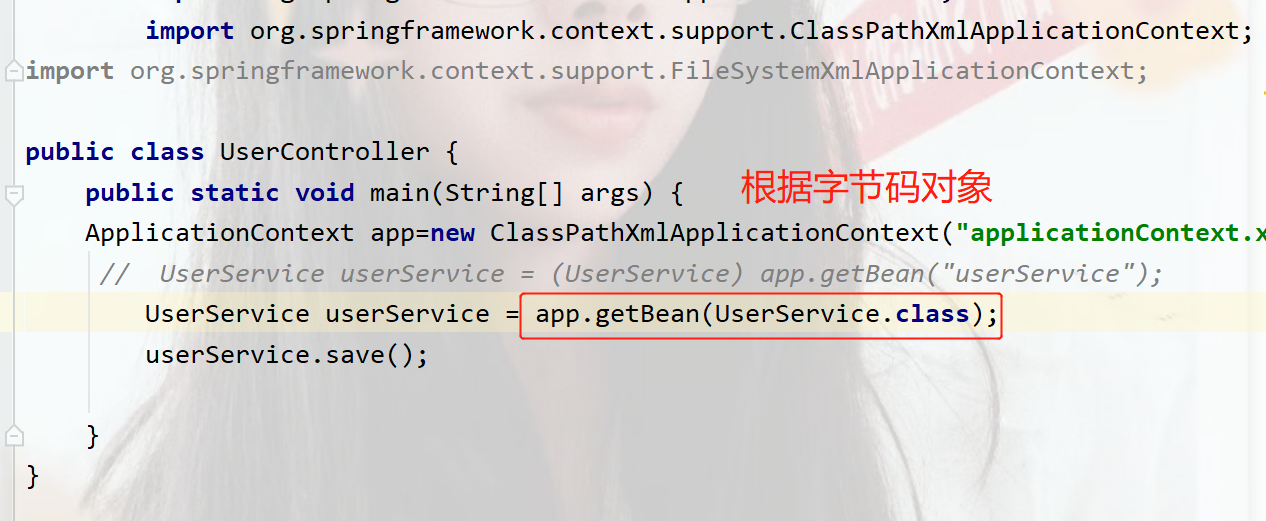
某一类型的bean对象存在多对时,只能使用id,因为id是唯一的,某一类型的bean对象存在一对是时,可以用id,也可以使用字节码对象,使用字节码对象更方便些。
Spring配置数据源(连接池)
- 数据源(连接池)是提高程序性能出现的
- 事先实例化数据源,初始化部分连接资源
- 使用连接资源时从数据源中获取
- 使用完毕后将连接资源归还给数据源
常见的数据源(连接池):DBCP、C3P0、BoneCP、Druid等
数据源的开发步骤
- 导入数据源的坐标和数据库驱动坐标
- 创建数据源对象
- 设置数据源的基本连接数据
- 使用数据源获取连接资源和归还连接资源
①:导入数据源坐标
  <dependencies>
    <dependency>
      <groupId>mysql</groupId>
      <artifactId>mysql-connector-java</artifactId>
      <version>5.1.32</version>
    </dependency>
//c3p0数据源
    <dependency>
      <groupId>c3p0</groupId>
      <artifactId>c3p0</artifactId>
      <version>0.9.1.2</version>
    </dependency>
//druid数据源
    <dependency>
      <groupId>com.alibaba</groupId>
      <artifactId>druid</artifactId>
      <version>1.1.10</version>
    </dependency>

    <dependency>
      <groupId>junit</groupId>
      <artifactId>junit</artifactId>
      <version>4.11</version>
      <scope>test</scope>
    </dependency>
  </dependencies>
在test测试中创建类
package com.test;

import com.mchange.v2.c3p0.ComboPooledDataSource;
import org.junit.Test;

import java.sql.Connection;

public class DateSourceTest {
    @Test
    public void test1() throws Exception{
        ComboPooledDataSource dataSource=new ComboPooledDataSource();
        dataSource.setDriverClass("com.mysql.jdbc.Driver");
        //访问数据库中kc_db01库
        dataSource.setJdbcUrl("jdbc:mysql://localhost:3306/kc_db01");
        //数据库的账号密码
        dataSource.setUser("root");
        dataSource.setPassword("123456");
        Connection connection=dataSource.getConnection();
        System.out.println(connection);
        connection.close();
    }
}
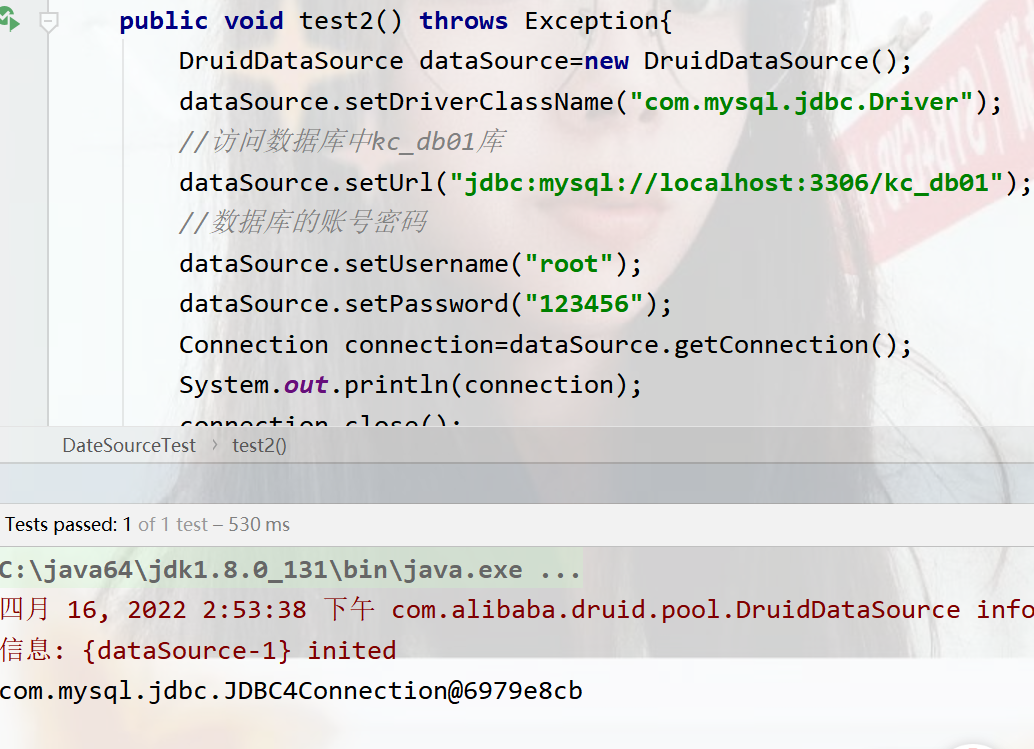
运行结果
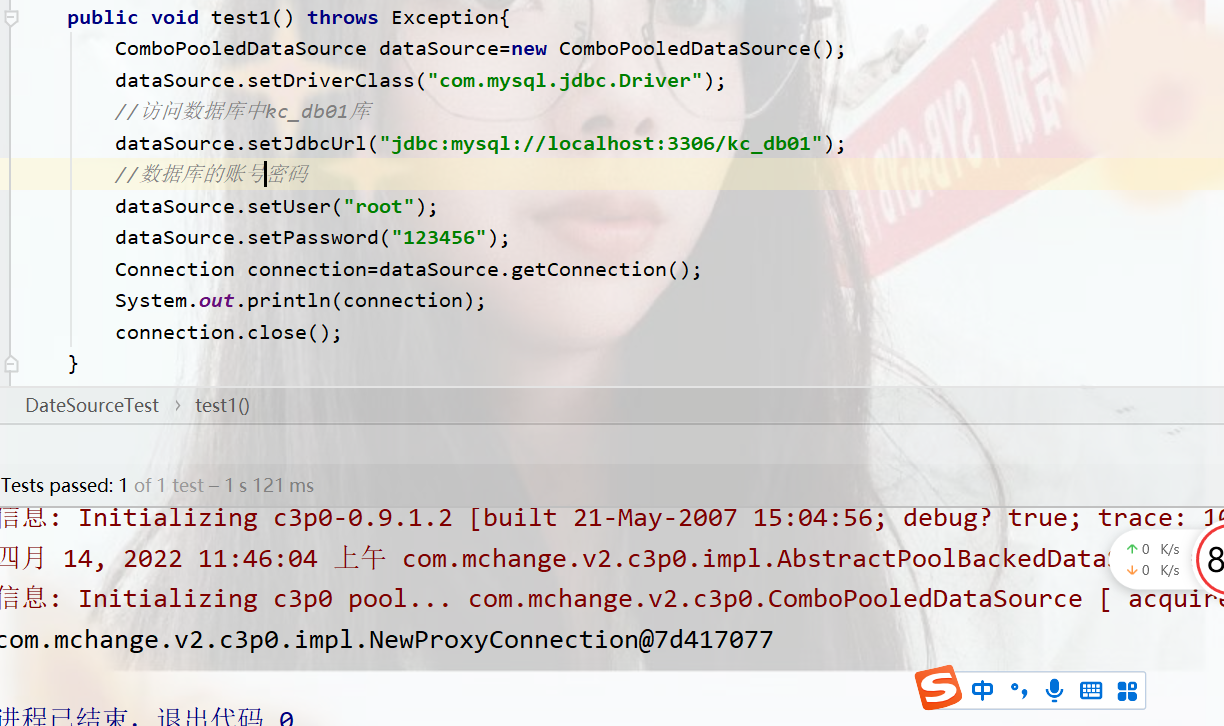
打印出地址说明连接成功
**测试连接druid **
    @Test
    public void test2() throws Exception{
        DruidDataSource dataSource=new DruidDataSource();
        dataSource.setDriverClassName("com.mysql.jdbc.Driver");
        //访问数据库中kc_db01库
        dataSource.setUrl("jdbc:mysql://localhost:3306/kc_db01");
        //数据库的账号密码
        dataSource.setUsername("root");
        dataSource.setPassword("123456");
        Connection connection=dataSource.getConnection();
        System.out.println(connection);
        connection.close();
    }
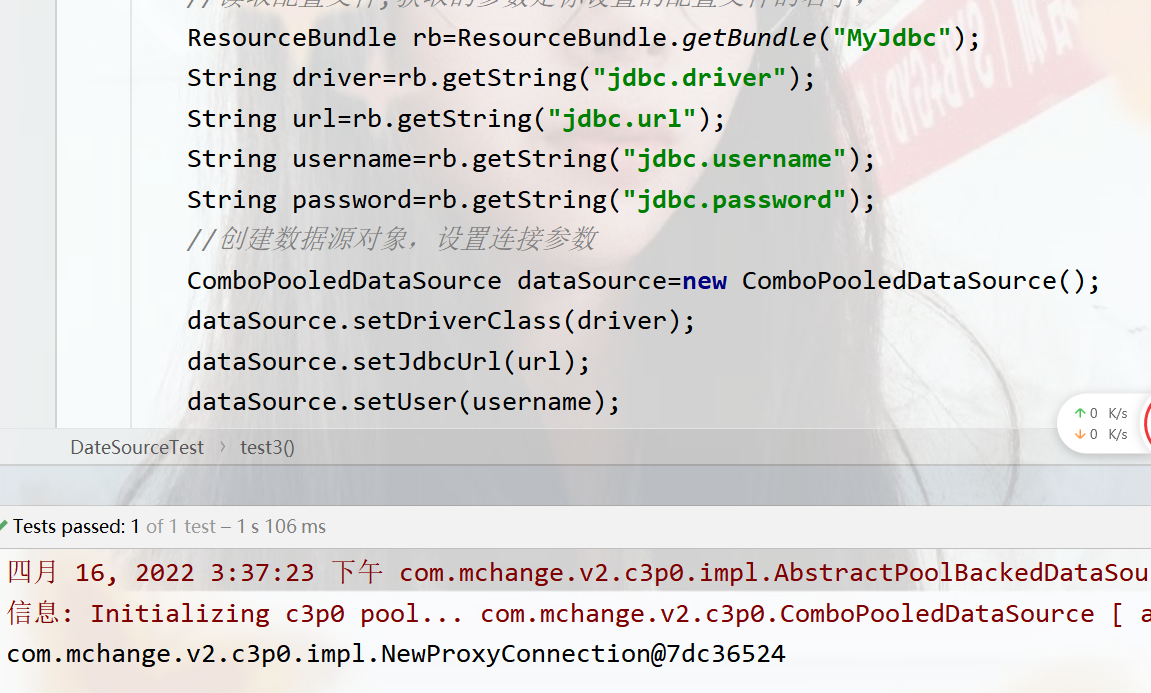
加载配置文件方式创建
在resource资源下创建一个MyJdbc.properties文件测试c3p0数据源)
内容是:
jdbc.driver=com.mysql.jdbc.Driver
jdbc.url=jdbc:mysql://localhost:3306/kc_db01
jdbc.username=root
jdbc.password=123456
在测试类中:
  @Test
    //测试手动创建c3p0数据库源(加载properties配置文件)
    public void test3() throws Exception{
        //读取配置文件,获取的参数是你设置的配置文件的名字,
        ResourceBundle rb=ResourceBundle.getBundle("MyJdbc");
        String driver=rb.getString("jdbc.driver");
        String url=rb.getString("jdbc.url");
        String username=rb.getString("jdbc.username");
        String password=rb.getString("jdbc.password");
        //创建数据源对象,设置连接参数
        ComboPooledDataSource dataSource=new ComboPooledDataSource();
        dataSource.setDriverClass(driver);
        dataSource.setJdbcUrl(url);
        dataSource.setUser(username);
        dataSource.setPassword(password);
        Connection connection=dataSource.getConnection();
        System.out.println(connection);
        connection.close();
    }
运行结果:
配置文件的好处有给程序解耦,打完包之后不会变化,程序打完包都是对应的字节码文件,而配置文件还是原模原样。
将DateSource的创建权交给Spring容器去完成
先在pom.xml导入spring的基本坐标
    <dependency>
      <groupId>org.springframework</groupId>
      <artifactId>spring-context</artifactId>
      <version>5.0.5.RELEASE</version>
    </dependency>
在resource资源下创建ApplicationContext.xml
<?xml version="1.0" encoding="UTF-8"?>
<beans xmlns="http://www.springframework.org/schema/beans"
       xmlns:xsi="http://www.w3.org/2001/XMLSchema-instance"
       xsi:schemaLocation="http://www.springframework.org/schema/beans http://www.springframework.org/schema/beans/spring-beans.xsd">

  <!--这个value是ComboPooledDataSource数据源的路径 -->
<bean id="dataSource" class="com.mchange.v2.c3p0.ComboPooledDataSource">

<!--这里面的name值是数据源中的set的内容-->
    <property name="driverClass" value="com.mysql.jdbc.Driver"></property>
    <property name="jdbcUrl" value="jdbc:mysql://localhost:3306/kc_db01"></property>
    <property name="user" value="root"></property>
    <property name="password" value="123456"></property>
</bean>

</beans>
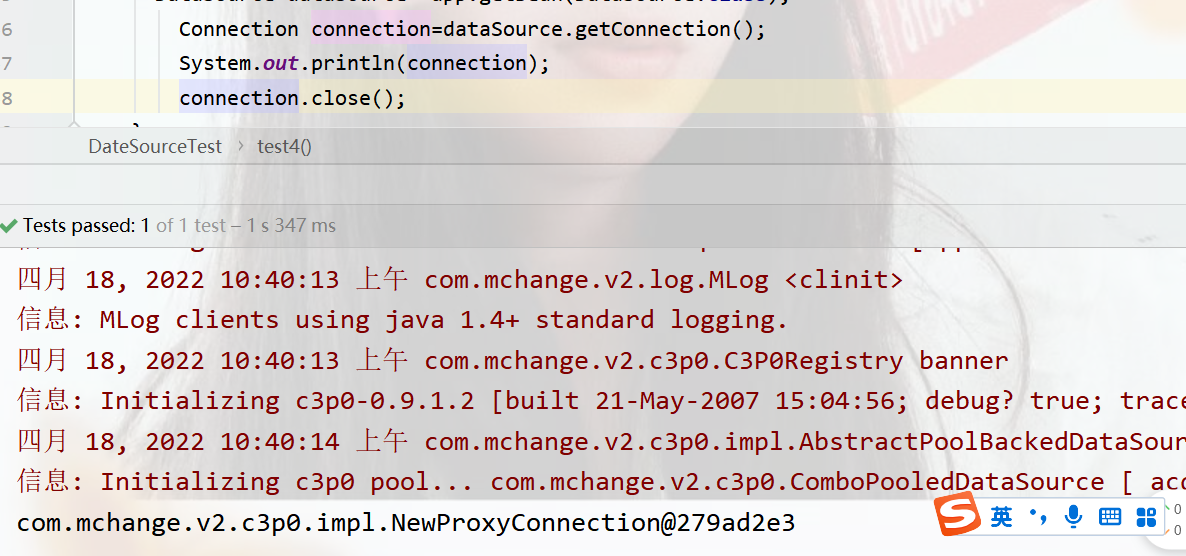
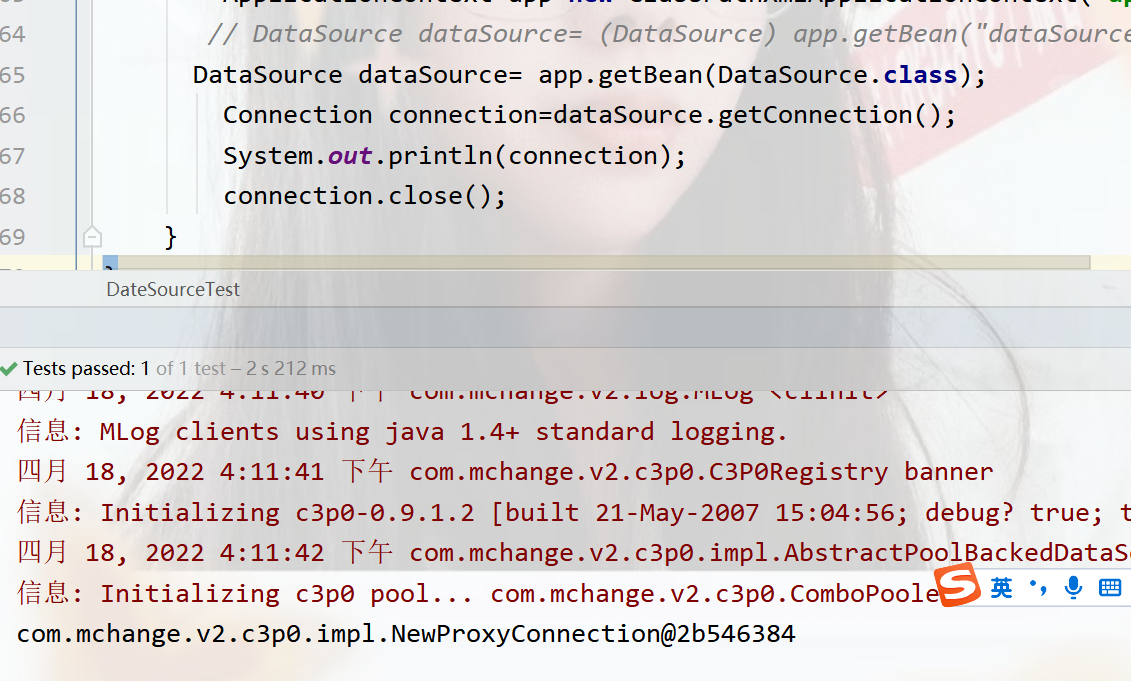
在DataSourceTest类下
   @Test
    public void test4() throws Exception{
        ApplicationContext app=new ClassPathXmlApplicationContext("applicationContext.xml");
       // DataSource dataSource= (DataSource) app.getBean("dataSource");
      DataSource dataSource= app.getBean(DataSource.class);
        Connection connection=dataSource.getConnection();
        System.out.println(connection);
        connection.close();
    }
运行结果
抽取jdbc配置文件
applicationContext.xml加载jdbc.properties配置文件获得连接信息
首先,需要引入context命名空间和约束路径:
命名空间:
xmlns:context="http://www.springframework.org/schema/context"
约束路径:
http://www.springframework.org/schema/context

http://www.springframework.org/schema/context/spring-context.xsd
applicationContext.xml文件
<?xml version="1.0" encoding="UTF-8"?>
<beans xmlns="http://www.springframework.org/schema/beans"
       xmlns:xsi="http://www.w3.org/2001/XMLSchema-instance"
       xmlns:context="http://www.springframework.org/schema/context"
       xsi:schemaLocation=
               "http://www.springframework.org/schema/beans http://www.springframework.org/schema/beans/spring-beans.xsd
            http://www.springframework.org/schema/context http://www.springframework.org/schema/context/spring-context.xsd">

<!-- 加载外部properties文件   -->
    <context:property-placeholder location="classpath:MyJdbc.properties"/>
    <!--这个value是ComboPooledDataSource数据源的路径 -->
<bean id="dataSource" class="com.mchange.v2.c3p0.ComboPooledDataSource">
<!--这里面的name值是数据源中的set的内容-->

    <property name="driverClass" value="${jdbc.driver}"></property>
    <property name="jdbcUrl" value="${jdbc.url}"></property>
    <property name="user" value="${jdbc.username}"></property>
    <property name="password" value="${jdbc.password}"></property>

</bean>

</beans>
MyJdbc.properties文件下
jdbc.driver=com.mysql.jdbc.Driver
jdbc.url=jdbc:mysql://localhost:3306/kc_db01
jdbc.username=root
jdbc.password=123456
类中代码不变,运行结果为
Spring注解开发
Spring是轻代码而中配置,配置比较繁琐,影响开发效率,所以注解开发是一种趋势,注解代替xml配置文件可以简化配置,提高开发效率。
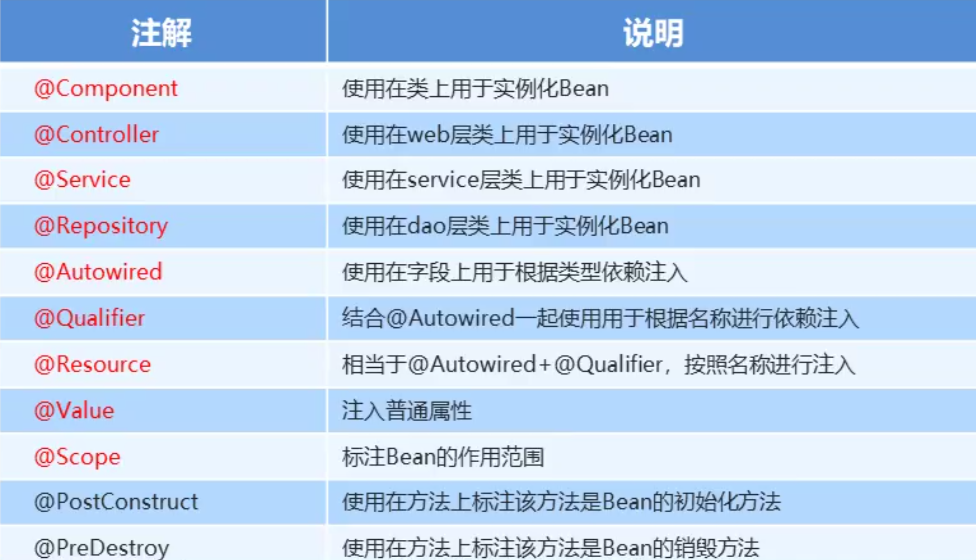
Spring原始注解
Spring原始注解主要是替代<Bean>的配置
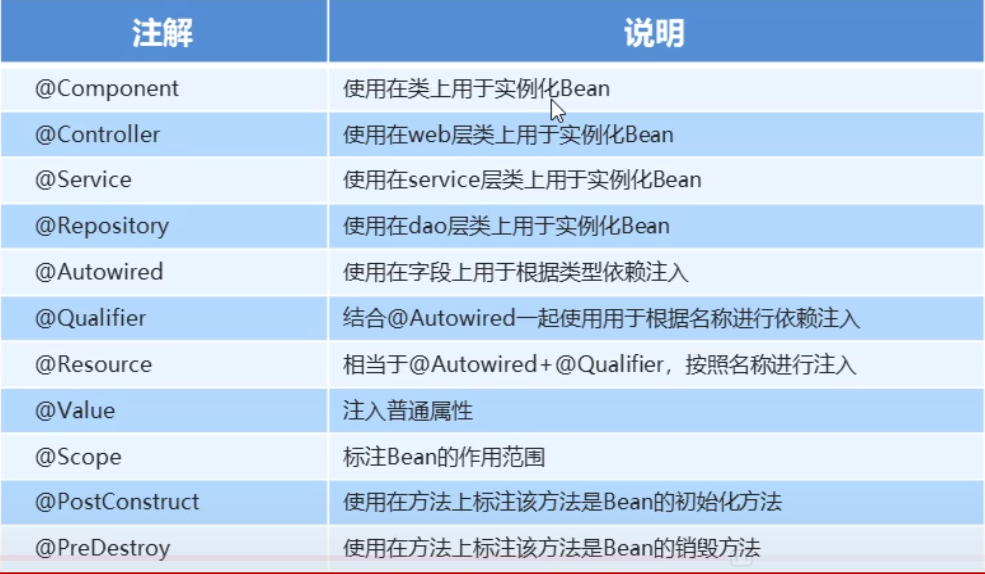
注意:使用注解进行开发是,需要在applicationContext.xml中配置组件扫描,作用是值定哪个宝及其子包下的Bean需要进行扫描以便识别使用注解的类、字段个方法
使用注解改进
在com包下创建Dao包,service包,web包
在Dao包下的UserDao接口
public interface UserDao {
    public void save();
}
在Dao包下的Impl包下的UserDaoImpl类
注解替换位置
//<bean id="userDao" class="com.Dao.impl.UserDaoImpl"></bean>
@Component("userDao")
//这个注解和上面xml一样
package com.Dao.impl;

import com.Dao.UserDao;
import org.springframework.stereotype.Component;

//<bean id="userDao" class="com.Dao.impl.UserDaoImpl"></bean>
@Component("userDao")
//这个注解和上面xml一样
public class UserDaoImpl implements UserDao {
    @Override
    public void save() {
        System.out.println("running...");
    }
}
service包下的UserService接口
public interface UserService {
    public void save();
}
service包下的Impl包下的UserServiceImpl类
注解替换位置
//  <bean id="userService" class="com.service.Impl.UserServiceImpl">
@Component("userService")//这是一个组件,这个注解等于以上的xml配置
    //<property name="userDao" ref="userDao"></property>
    @Autowired  // 这个表示自动注入
    @Qualifier("userDao")//里面写要注入的bean的id
package com.service.Impl;

import com.Dao.UserDao;
import com.service.UserService;
import org.springframework.beans.factory.annotation.Autowired;
import org.springframework.beans.factory.annotation.Qualifier;
import org.springframework.stereotype.Component;

//  <bean id="userService" class="com.service.Impl.UserServiceImpl">
@Component("userService")//这是一个组件
public class UserServiceImpl implements UserService {

    //<property name="userDao" ref="userDao"></property>
    @Autowired  // 这个表示自动注入
    @Qualifier("userDao")//里面写要注入的bean的id
    private UserDao userDao;
  //使用注解可以不写set方法
   /* public void setUserDao(UserDao userDao) {
       this.userDao = userDao;
    }
   */

    @Override
    public void save() {
        userDao.save();
    }
}
在web包下的UserController类下
package com.web;

import com.service.UserService;
import org.springframework.context.ApplicationContext;
import org.springframework.context.support.ClassPathXmlApplicationContext;

public class UserController {
    public static void main(String[] args) {
        ApplicationContext app=new ClassPathXmlApplicationContext("ApplicationContext.xml");
        UserService userService = app.getBean(UserService.class);
        userService.save();
    }

}
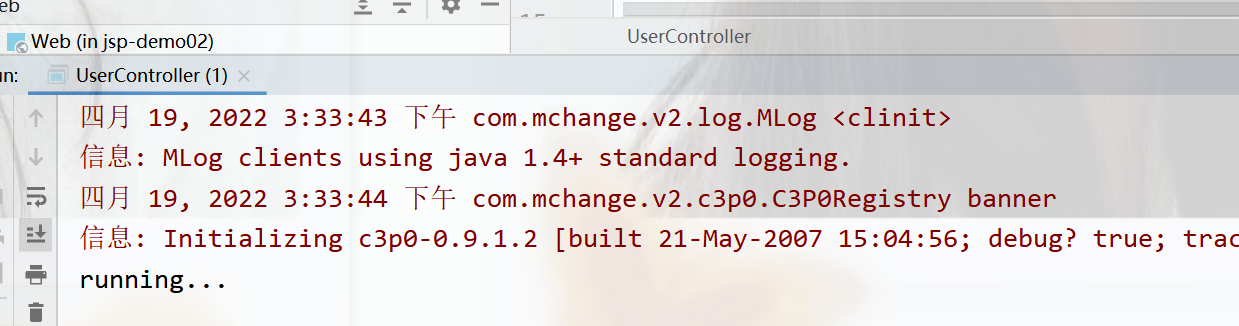
运行结果
在UserServiceImpl中其他改进写法
@Component("userService")//这是一个组件
public class UserServiceImpl implements UserService {

    //<property name="userDao" ref="userDao"></property>
    @Autowired  // 按照数据类型从Spring容器中进行匹配的

    private UserDao userDao;

    @Override
    public void save() {
        userDao.save();
    }
}
如果根据id进行匹配就要
    @Autowired  // 按照数据类型从Spring容器中进行匹配的
    @Qualifier("userDao")//是按照id从容器中进行匹配的,但是主要此处的 @Qualifier结合@Autowired一起使用
@Resource(name ="userDao")//等价于 @Autowired +@Qualifier
package com.service.Impl;

import com.Dao.UserDao;
import com.service.UserService;
import org.springframework.beans.factory.annotation.Autowired;
import org.springframework.beans.factory.annotation.Qualifier;
import org.springframework.stereotype.Component;

import javax.annotation.Resource;

//  <bean id="userService" class="com.service.Impl.UserServiceImpl">
@Component("userService")//这是一个组件
public class UserServiceImpl implements UserService {

    //<property name="userDao" ref="userDao"></property>
//    @Autowired  // 按照数据类型从Spring容器中进行匹配的
//    @Qualifier("userDao")//是按照id从容器中进行匹配的,但是主要此处的 @Qualifier结合@Autowired一起使用
   @Resource(name ="userDao")//等价于 @Autowired +@Qualifier
    private UserDao userDao;

    @Override
    public void save() {
        userDao.save();
    }
}
使用注解的方式set方法可以省略不写,使用想xml配置就必须写,注解是通过反射
注解方式注入普通值
@Value可以注入值,一般使用el表达式获取配置文件中的值
   @Value("${jdbc.driver}")
    private String user;

**运行结果 **
也可以注入普通值,但是显示十分的多余,下面两种方式一样。
@Value("hello")
private String test;

private String test="hello";
初始方法注解
在serviceImpl中
    @PostConstruct
public void init(){
    System.out.println("初始方法");
}
@PreDestroy
public void destory(){
    System.out.println("销毁方法");
}
Spring新注解
使用上面的注解还不能 全部不代替xml配置文件,还需要使用注解替代的配置如下:
非自定义的Bean的配置:<bean>
加载properties文件的配置:context:property-placeholder
组件扫描的配置:context:component-scan
引入其他文件:<import>
spring新注解
使用新注解替换xml文件
在config包下,创建名为DataSourceConfiguration类下
package com.config;

import com.mchange.v2.c3p0.ComboPooledDataSource;
import org.springframework.beans.PropertyAccessException;
import org.springframework.beans.factory.annotation.Value;
import org.springframework.context.annotation.Bean;
import org.springframework.context.annotation.PropertySource;

import javax.sql.DataSource;
import java.beans.PropertyVetoException;

// 加载外部properties文件<context:property-placeholder location="classpath:MyJdbc.properties"/>
@PropertySource("classpath:MyJdbc.properties")

public class DataSourceConfiguration {
    @Value("${jdbc.driver}")
    private String driver;
    @Value("${jdbc.url}")
    private String url;
    @Value("${jdbc.password}")
    private String password;
    @Value("${jdbc.username}")
    private String username;

    @Bean("dataSource")//Spring会将当前方法的返回值以指定名称存储到Spring容器中
    public DataSource getDateSource() throws PropertyAccessException, PropertyVetoException {
        ComboPooledDataSource dataSource=new ComboPooledDataSource();
        dataSource.setDriverClass(driver);
        dataSource.setJdbcUrl(url);
        dataSource.setPassword(password);
        dataSource.setUser(username);
        return dataSource;
    }
}
在config包下创建SpringConfiguration类下
package com.config;

import com.mchange.v2.c3p0.ComboPooledDataSource;
import org.springframework.beans.PropertyAccessException;
import org.springframework.beans.factory.annotation.Value;
import org.springframework.context.annotation.*;

import javax.sql.DataSource;
import java.beans.PropertyVetoException;

//标志该类是Spring的核心配置类
@Configuration

// base是基本包他会扫描其子类下的所有包<context:component-scan base-package="com"/>
@ComponentScan("com")

//在总配置中加载分配置,加载核心配置类,若有多个,则写xx.class,xxx.class....
@Import(DataSourceConfiguration.class)
public class SpringConfiguration {

}
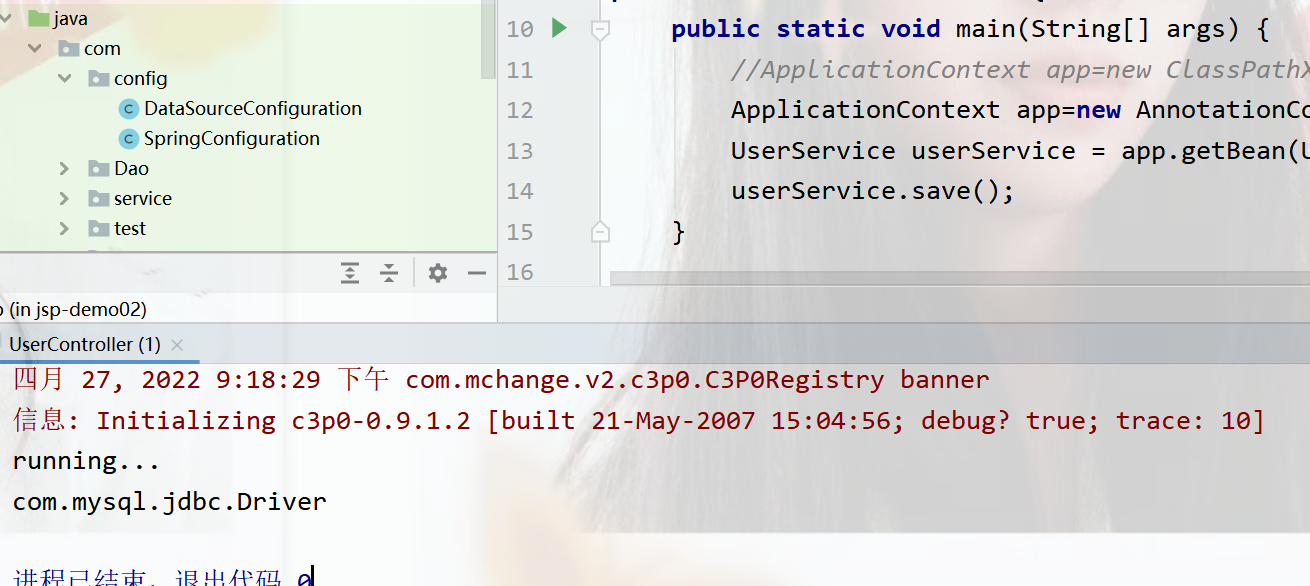
web包下的UserController测试下
package com.web;

import com.config.SpringConfiguration;
import com.service.UserService;
import org.springframework.context.ApplicationContext;
import org.springframework.context.annotation.AnnotationConfigApplicationContext;
import org.springframework.context.support.ClassPathXmlApplicationContext;

public class UserController {
    public static void main(String[] args) {
        //ApplicationContext app=new ClassPathXmlApplicationContext("ApplicationContext.xml");
        ApplicationContext app=new AnnotationConfigApplicationContext(SpringConfiguration.class);
        UserService userService = app.getBean(UserService.class);
        userService.save();
    }

}
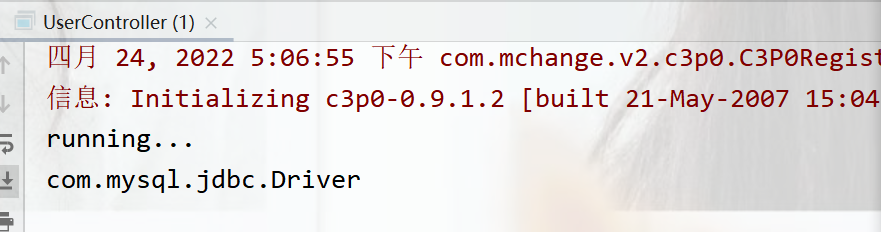
运行结果
Spring集成Junit
原始Junit测试Spring的问题
在测试类中,每个测试方法都有一下两行代码:
//获得应用上下文对象
ApplicationContext ac=new ClassPathXmlApplicationContext("bean.xml");

//获取要被测试的对象
IAccountService as=ac.getBean("accountService",IAccountService.class);
这两行代码的作用是获取容器,如果不写的话,直接会提示空指针异常,所以又不能轻易删除。
解决思路
- 让SpringJunit负责创建Spring容器,但是需要将配置文件的名称告诉他
- 将需要进行测试Bean直接在测试类中进行注入
** Spring集成Junit步骤**
①导入spring集成Junit的坐标(首先导入好junit)
②使用@Runwith注解替换原来的运行期
③使用@ContextConfiguration指定配置文件或配置类
④使用@Autowired注入需要测试的对象
⑤创建测试方法进行测试
在pom.xml中导入
  <dependencies>

 <dependency>
      <groupId>org.springframework</groupId>
      <artifactId>spring-context</artifactId>
      <version>5.0.5.RELEASE</version>
    </dependency>

    <dependency>
      <groupId>junit</groupId>
      <artifactId>junit</artifactId>
      <version>4.12</version>

    </dependency>

    <dependency>
      <groupId>org.springframework</groupId>
      <artifactId>spring-test</artifactId>
      <version>5.0.5.RELEASE</version>
    </dependency>

  </dependencies>
** 在test包下创建SpringJunitTest类**
package com.test;

import com.service.UserService;
import org.junit.Test;
import org.junit.runner.RunWith;
import org.springframework.beans.factory.annotation.Autowired;
import org.springframework.test.context.ContextConfiguration;
import org.springframework.test.context.junit4.SpringJUnit4ClassRunner;

//指定Spring提供的内核去测试
@RunWith(SpringJUnit4ClassRunner.class)

//将要测试的文件告诉它
@ContextConfiguration("classpath:ApplicationContext.xml")
public class SpringJunitTest {
    @Autowired
    private UserService userService;
    @Test
    public void test1(){
        userService.save();
    }
}
测试结果

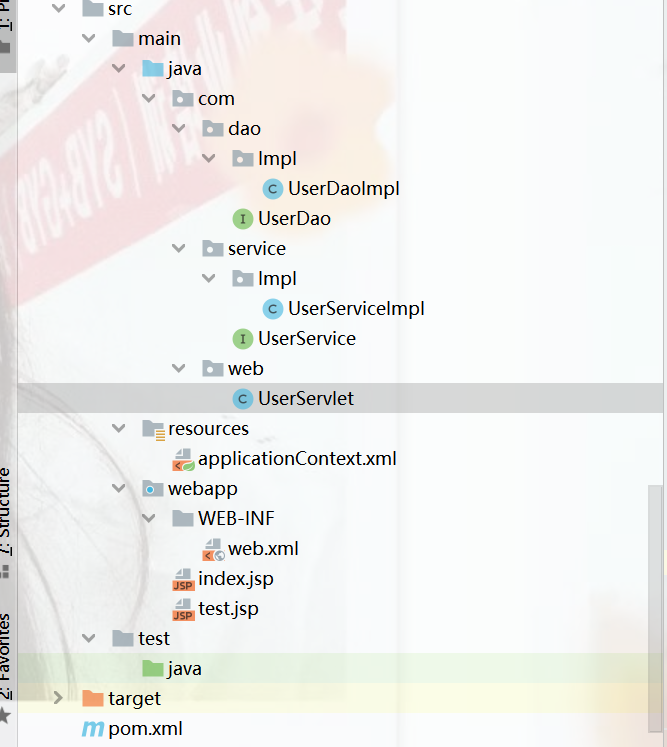
Spring与Web环境集成
在创建dao包,创建service包,创建web包,在resource资源
在创建一个UserDao和UserDaoImpl实现类
接口下
package com.dao;

public interface UserDao {
    public void save();
}
实现类
package com.dao.Impl;

import com.dao.UserDao;

public class UserDaoImpl implements UserDao {
    public void save() {
        System.out.println("save running...");
    }
}
service包下,创建UserService和UserServiceImpl
接口
package com.service;

public interface UserService {
    public void save();
}
实现类下
package com.service.Impl;

import com.dao.UserDao;
import com.service.UserService;

public class UserServiceImpl implements UserService {

    public UserDao userDao;

    public void setUserDao(UserDao userDao) {
        this.userDao = userDao;
    }

    public void save() {
        userDao.save();
    }
}
pom.xml下
 <dependencies>

    <dependency>

    <dependency>
      <groupId>junit</groupId>
      <artifactId>junit</artifactId>
      <version>4.11</version>
    </dependency>
    <dependency>
      <groupId>org.springframework</groupId>
      <artifactId>spring-test</artifactId>
      <version>5.0.5.RELEASE</version>
    </dependency>
    <dependency>
      <groupId>javax.servlet.jsp</groupId>
      <artifactId>javax.servlet.jsp-api</artifactId>
      <version>2.2.1</version>
      <scope>provided</scope>
    </dependency>

    <dependency>
      <groupId>javax.servlet.jsp</groupId>
      <artifactId>javax.servlet.jsp-api</artifactId>
      <version>2.2.1</version>
      <scope>provided</scope>
    </dependency>
    <dependency>
      <groupId>org.springframework</groupId>
      <artifactId>spring-context</artifactId>
      <version>5.3.0</version>
      <scope>compile</scope>
    </dependency>

  </dependencies>
resource资源路径下
applicationContext.xml下
<?xml version="1.0" encoding="UTF-8"?>
<beans xmlns="http://www.springframework.org/schema/beans"
       xmlns:xsi="http://www.w3.org/2001/XMLSchema-instance"
       xsi:schemaLocation="http://www.springframework.org/schema/beans http://www.springframework.org/schema/beans/spring-beans.xsd">

    <bean id="userDao" class="com.dao.Impl.UserDaoImpl"></bean>

    <bean id="userService" class="com.service.Impl.UserServiceImpl">
<!-- 给service注入dao的值       -->
        <property name="userDao" ref="userDao"></property>
    </bean>

</beans>
web包下,UserServlet类下,使用注解完成配置
package com.web;

import com.service.UserService;
import org.springframework.context.ApplicationContext;
import org.springframework.context.support.ClassPathXmlApplicationContext;

import javax.servlet.ServletException;
import javax.servlet.annotation.WebServlet;
import javax.servlet.http.HttpServlet;
import javax.servlet.http.HttpServletRequest;
import javax.servlet.http.HttpServletResponse;
import java.io.IOException;

//使用注解代替web.xml中的配置
@WebServlet("/user")
public class UserServlet extends HttpServlet  {
    @Override
    protected void service(HttpServletRequest req, HttpServletResponse resp) throws ServletException, IOException {
        ApplicationContext app= new ClassPathXmlApplicationContext("applicationContext.xml");
        UserService userService = app.getBean(UserService.class);
        userService.save();
        System.out.println("jin");

    }
}
项目结构总览
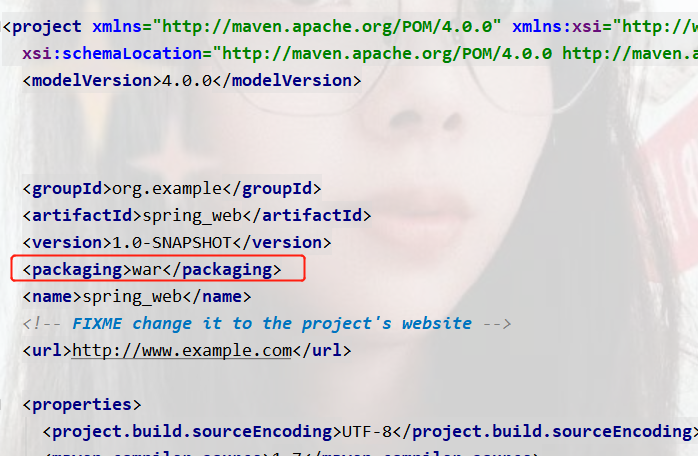
给Maven配置tomcat服务器
首先这得是war包,如果这是普通包得添加webapp,并将pom.xml中加入如下,表示这是一个web文件
<packaging>war</packaging>
加完之后点击编辑配置
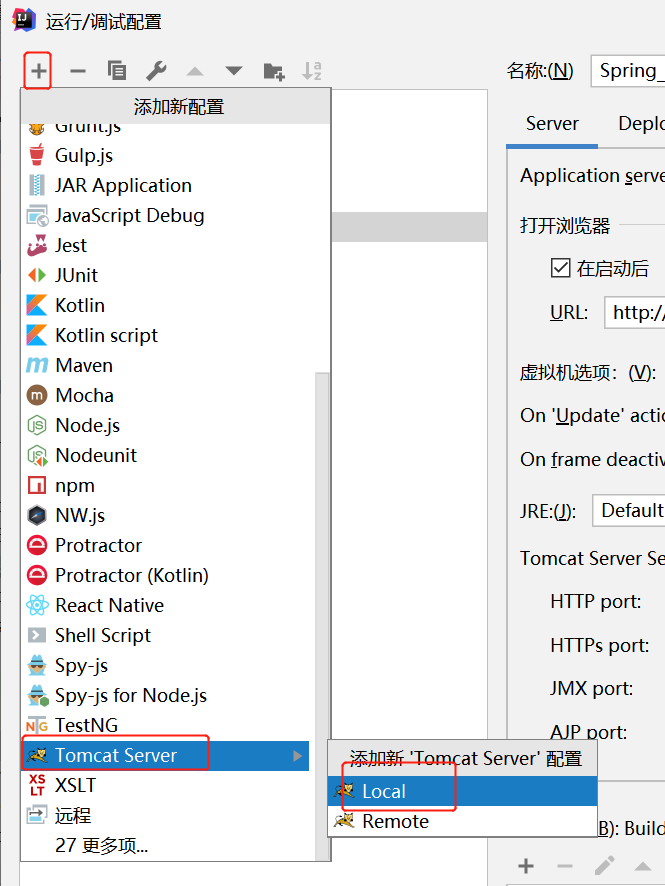
其下的war二选一即可
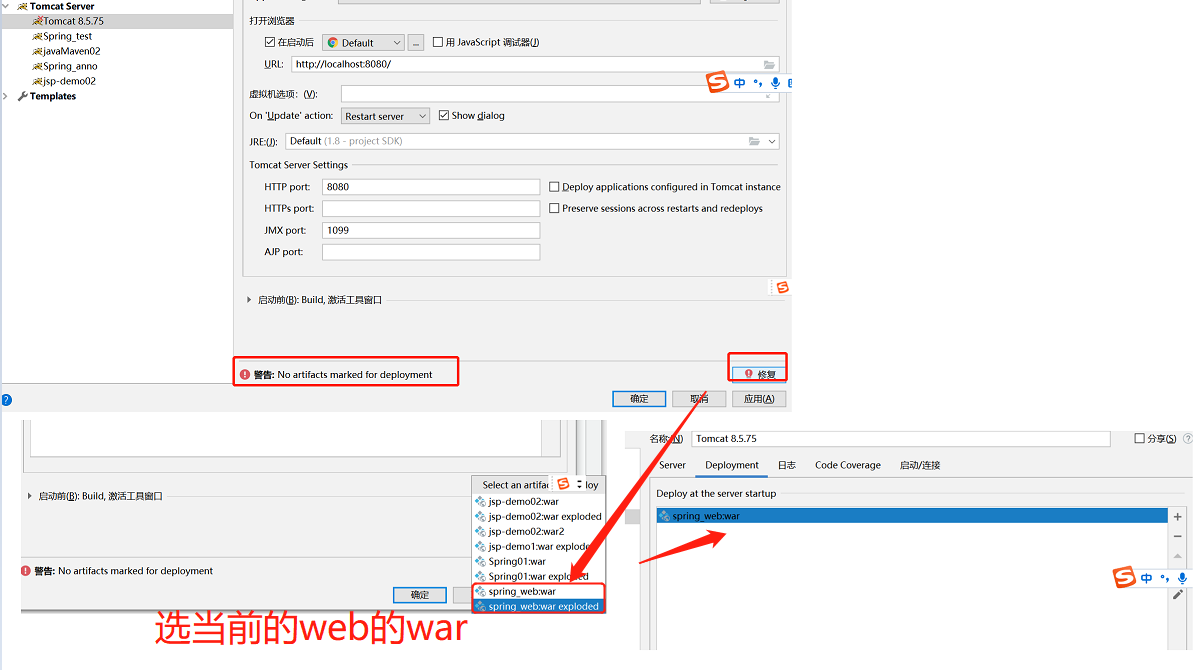
完成之后点击确认即可完成配置。
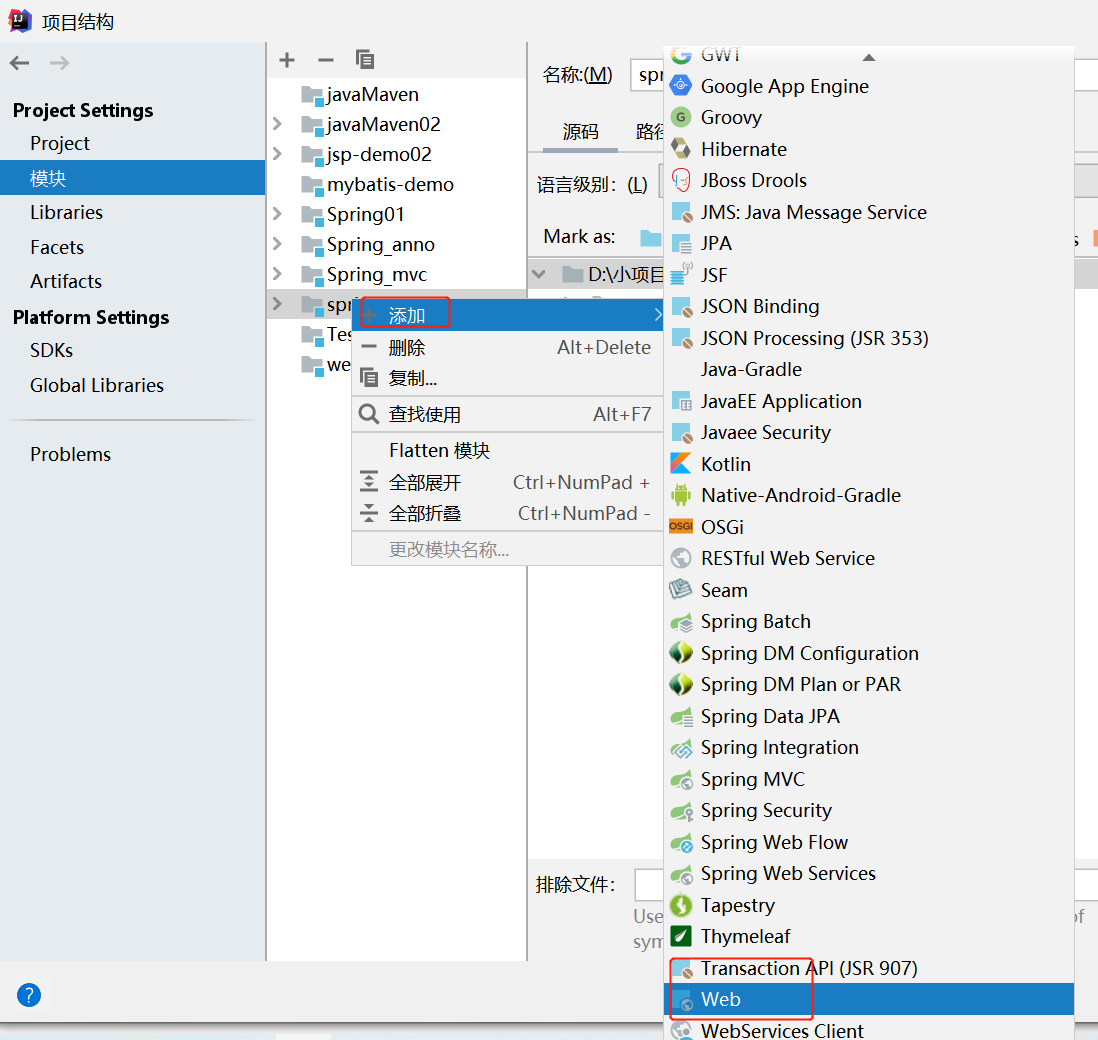
使用maven手动创建web工程
第一步,点击项目结构,选中 要添加的maven工程,右键添加web。
第二步,点击web工程,修改web工程路径
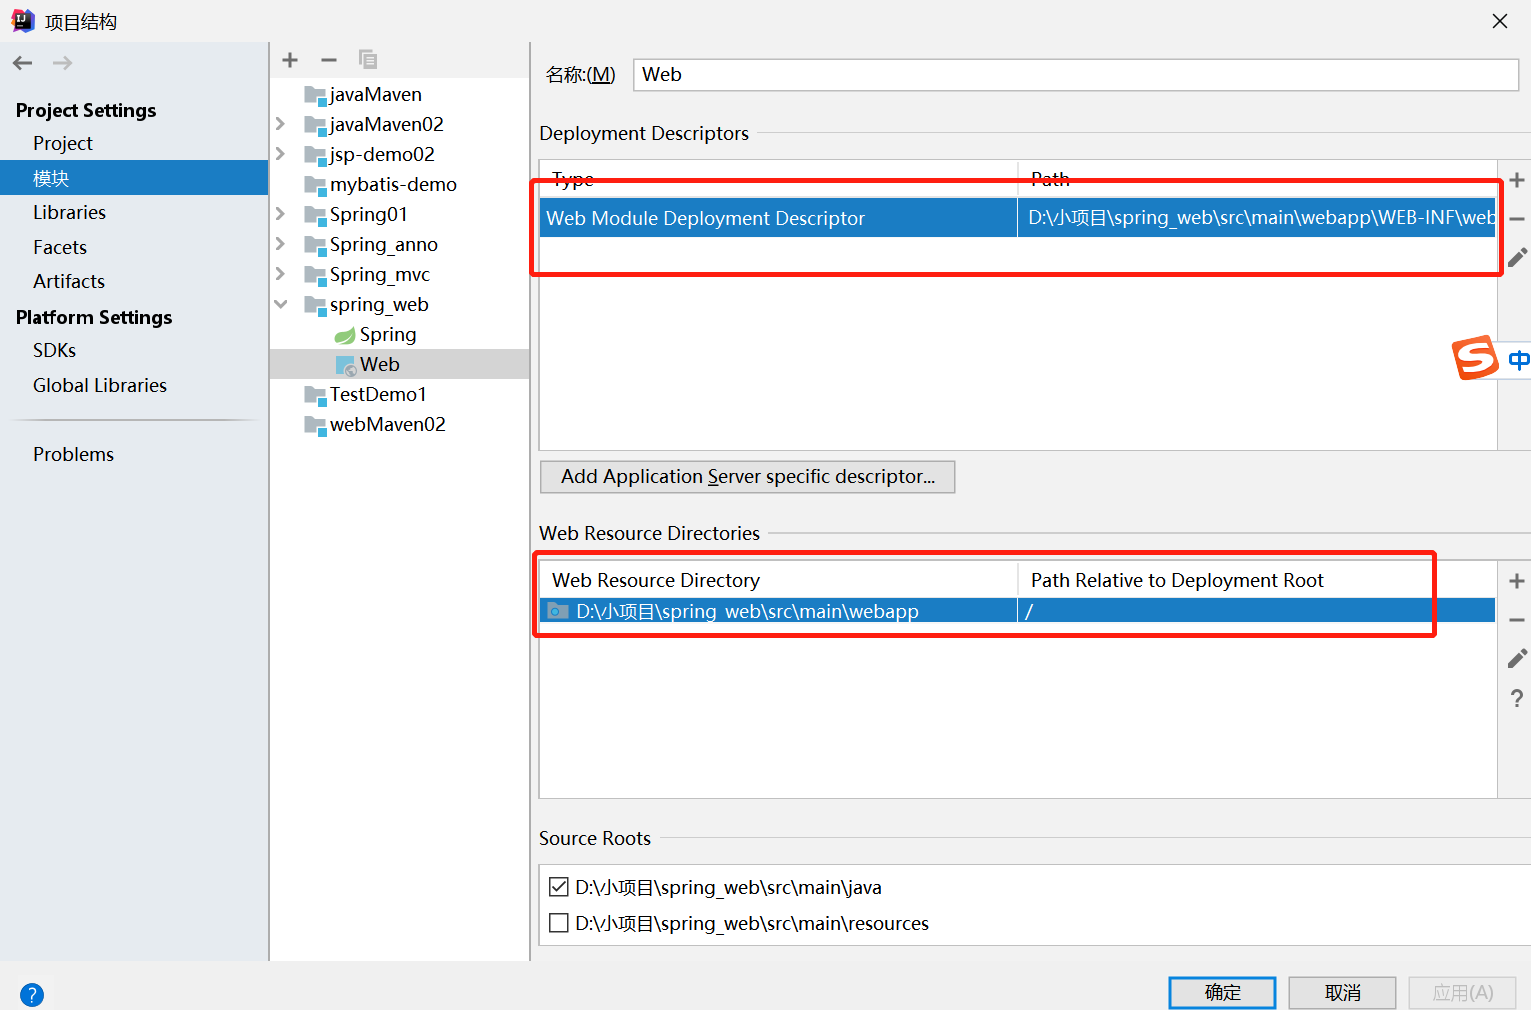
点击完成即可完成web工程的手动配置。
ApplicationContext应用上下文获取方法
应用上下文对象是通过**new ClasspathXmlApplicationContext(spring配置文件)方式获取的,但是每次从容器中获得Bean时都要编写new ClasspathXmlApplicationContext(spring配置文件)**,这样的弊端是配置文件加载多次,应用上下文对象创建多次。
在Web项目中,可以使用ServletContextListener监听Web应用的启动,我们可以在Web应用启动时,就加载Sprina的配置文件,创建应用上下文对象ApplicationContext,在将其存储到最大的域servletContext域中,这样就可以在任意位置从域中获得应用上下文ApplicationContext对象了。
新建一个Listenter包下的ContextLoderListener
package com.Listener;

import org.springframework.context.ApplicationContext;
import org.springframework.context.support.ClassPathXmlApplicationContext;

import javax.servlet.ServletContext;
import javax.servlet.ServletContextEvent;
import javax.servlet.ServletContextListener;

public class ContextLoaderListener implements ServletContextListener {
    public void contextInitialized(ServletContextEvent servletContextEvent) {
        ApplicationContext app = new ClassPathXmlApplicationContext("applicationContext.xml");
        //将Spring的应用上下文对象存储到ServletContext域中
        ServletContext servletContext = servletContextEvent.getServletContext();
        servletContext.setAttribute("app", app);
        System.out.println("Spring容器创建完毕");

    }
    public void contextDestroyed(ServletContextEvent servletContextEvent) {

    }
}
web包下
package com.web;

import com.service.*;
import org.springframework.context.ApplicationContext;

import javax.servlet.ServletContext;
import javax.servlet.ServletException;
import javax.servlet.annotation.WebServlet;
import javax.servlet.http.HttpServlet;
import javax.servlet.http.HttpServletRequest;
import javax.servlet.http.HttpServletResponse;
import java.io.IOException;

@WebServlet("/user")
public class UserServlet extends HttpServlet {
    @Override
    protected void doGet(HttpServletRequest req, HttpServletResponse resp) throws ServletException, IOException {
     //   ApplicationContext app= new ClassPathXmlApplicationContext("applicationContext.xml");
    ServletContext servletContext = req.getServletContext();
    ApplicationContext app = (ApplicationContext) servletContext.getAttribute("app");
    UserService userService=app.getBean(UserService.class);

    }
}
web.xml下配置监听器
<?xml version="1.0" encoding="UTF-8"?>
<web-app xmlns="http://xmlns.jcp.org/xml/ns/javaee"
         xmlns:xsi="http://www.w3.org/2001/XMLSchema-instance"
         xsi:schemaLocation="http://xmlns.jcp.org/xml/ns/javaee http://xmlns.jcp.org/xml/ns/javaee/web-app_4_0.xsd"
         version="4.0">
    <!--配置监听器-->
    <listener>
        <listener-class>com.Listener.ContextLoaderListener</listener-class>
    </listener>

</web-app>
自动创建spring容器
优化代码
解耦合1
由于监听器内部我们将代码写固定了,不利于后期的维护操作,所以要解耦合,写在配置文件中进行解耦合。(“”引号内的名字任意)
ApplicationContext app = new ClassPathXmlApplicationContext("applicationContext.xml");
将此个代码写入到web.xml中进
<!--全局初始化参数-->
    <context-param>
     <!--name和value为任意  -->
        <param-name>ContextConfigLocation</param-name>
        <param-value>applicationContext.xml</param-value>
    </context-param>
在ContextLoaderListenter类中
package com.Listener;

import org.springframework.context.ApplicationContext;
import org.springframework.context.support.ClassPathXmlApplicationContext;

import javax.servlet.ServletContext;
import javax.servlet.ServletContextEvent;
import javax.servlet.ServletContextListener;

public class ContextLoaderListener implements ServletContextListener {
    public void contextInitialized(ServletContextEvent servletContextEvent) {
        ServletContext servletContext = servletContextEvent.getServletContext();

        //读取web.xml中的全局参数
       String contextConfigLocation = servletContext.getInitParameter("ContextConfigLocation");
        ApplicationContext app = new ClassPathXmlApplicationContext(contextConfigLocation);
        //将Spring的应用上下文对象存储到ServletContext域中

        servletContext.setAttribute("app", app);
        System.out.println("Spring容器创建完毕");

    }

}
读取配置文件的值,这样就完成了解耦合
解耦合2
在userServlet类中
ApplicationContext app = (ApplicationContext) servletContext.getAttribute("app");
这样耦合了app代码,让这个只能叫做app,这样不利于后期维护和辨认。
所以我们这么改,在Listener包下创建一个工具类WebApplicationContextUtils
package com.Listener;

import org.springframework.context.ApplicationContext;

import javax.servlet.ServletContext;

public class WebApplicationContextUtils {
    public static ApplicationContext getApplicationContext(ServletContext servletContext){
        return (ApplicationContext) servletContext.getAttribute("app");
    }
}
在userServlet处代码修改为
package com.web;

        import com.Listener.WebApplicationContextUtils;
        import com.service.*;
        import org.springframework.context.ApplicationContext;

        import javax.servlet.ServletContext;
        import javax.servlet.ServletException;
        import javax.servlet.annotation.WebServlet;
        import javax.servlet.http.HttpServlet;
        import javax.servlet.http.HttpServletRequest;
        import javax.servlet.http.HttpServletResponse;
        import java.io.IOException;

@WebServlet("/user")
public class UserServlet extends HttpServlet {
    @Override
    protected void doGet(HttpServletRequest req, HttpServletResponse resp) throws ServletException, IOException {
        //   ApplicationContext app= new ClassPathXmlApplicationContext("applicationContext.xml");
        ServletContext servletContext = req.getServletContext();
        //ApplicationContext app = (ApplicationContext) servletContext.getAttribute("app");
     //变动处
        ApplicationContext app = WebApplicationContextUtils.getApplicationContext(servletContext);
        UserService userService=app.getBean(UserService.class);

    }
}
spring自带的监听器
上面写出的手动实现的监听器,Spring提供了一个监听器ContextLoderListener就是对上述功能的封装,该监听器内部加载Spring配置文件,创建应用上下文对象,并存储到ServletContext域中,提供一个客户亿工具WebApplicationContextUtils供使用者获得上下文对象
要使用监听器,需要做两件事:
①:在web.xml中配置ContextLoaderListener监听器(导入spring-web坐标)
②:使用WebApplicationContextUtils获得应用上下文对象 ApplicationContext
在pim.xml中导入坐标
  <dependency>
            <groupId>org.springframework</groupId>
            <artifactId>spring-web</artifactId>
            <version>5.0.5.RELEASE</version>
        </dependency>
web.xml中
<!--全局初始化参数-->
    <context-param>
     <!--name和value为任意  -->
        <param-name>ContextConfigLocation</param-name>
        <param-value>classpath:applicationContext.xml</param-value>
    </context-param>

    <!--配置监听器-->
    <listener>
<!--        <listener-class>com.Listener.ContextLoaderListener</listener-class>-->
        <listener-class>org.springframework.web.context.ContextLoaderListener</listener-class>

    </listener>
userServlet类中,使用WebApplicationUtils获得上下文
@WebServlet("/user")
public class UserServlet extends HttpServlet {
    @Override
    protected void doGet(HttpServletRequest req, HttpServletResponse resp) throws ServletException, IOException {
        //   ApplicationContext app= new ClassPathXmlApplicationContext("applicationContext.xml");
        ServletContext servletContext = req.getServletContext();
        //ApplicationContext app = (ApplicationContext) servletContext.getAttribute("app");
     //变动处
        //ApplicationContext app = WebApplicationContextUtils.getApplicationContext(servletContext);
        WebApplicationContext app = WebApplicationContextUtils.getWebApplicationContext(servletContext);
        UserService userService=app.getBean(UserService.class);

    }
}
这样就成功使用了spring给我们提供的监听器。
SpringMVC概述
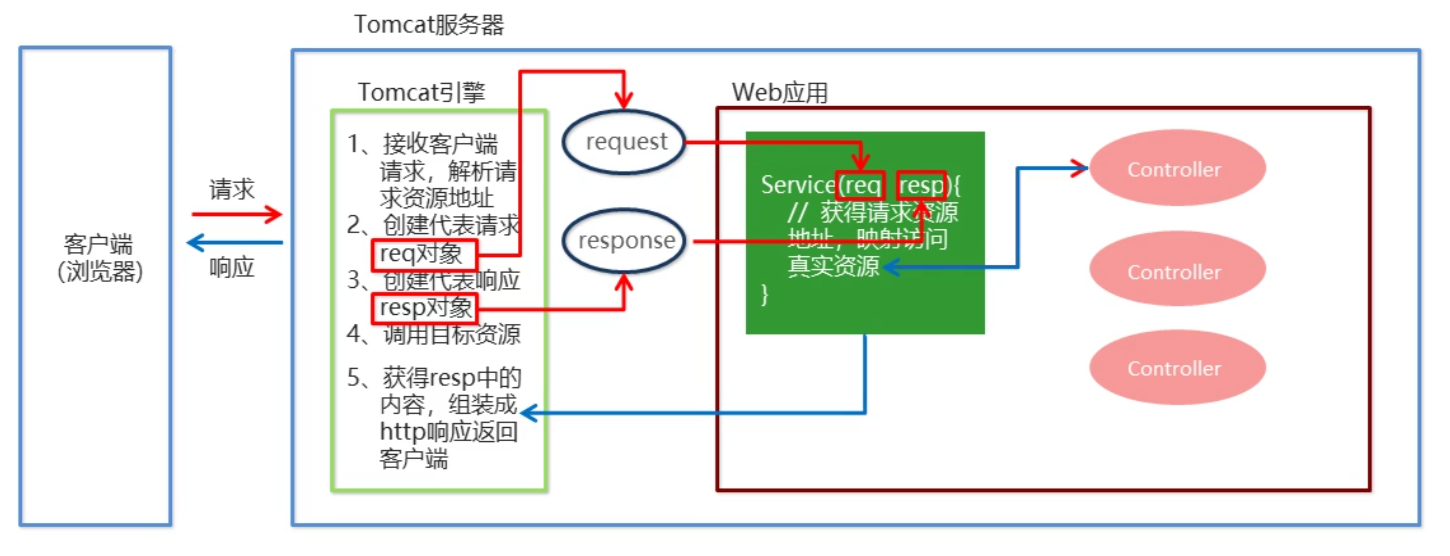
SpringMVC(M:Model模型,V:views视图,C:Controller控制器)是一种基于Java的实现MVC设计模型的请求驱动类型的轻量级Web框架,属于SpringFrameWork的后续产品,已经融合在Spring Web Flow中。
SpringMVC已经成为目前最主流的MVC框架之一,并且随着Spring3.0的发布,全面超越Struct2,成为最优秀的MVC框架,他通过一套注解,让一个简单的Java类成为处理请求的控制器,而无须实现任何接口,同时他还支持RESTful编程分格的请求
web层的框架完成的相应的操作图示
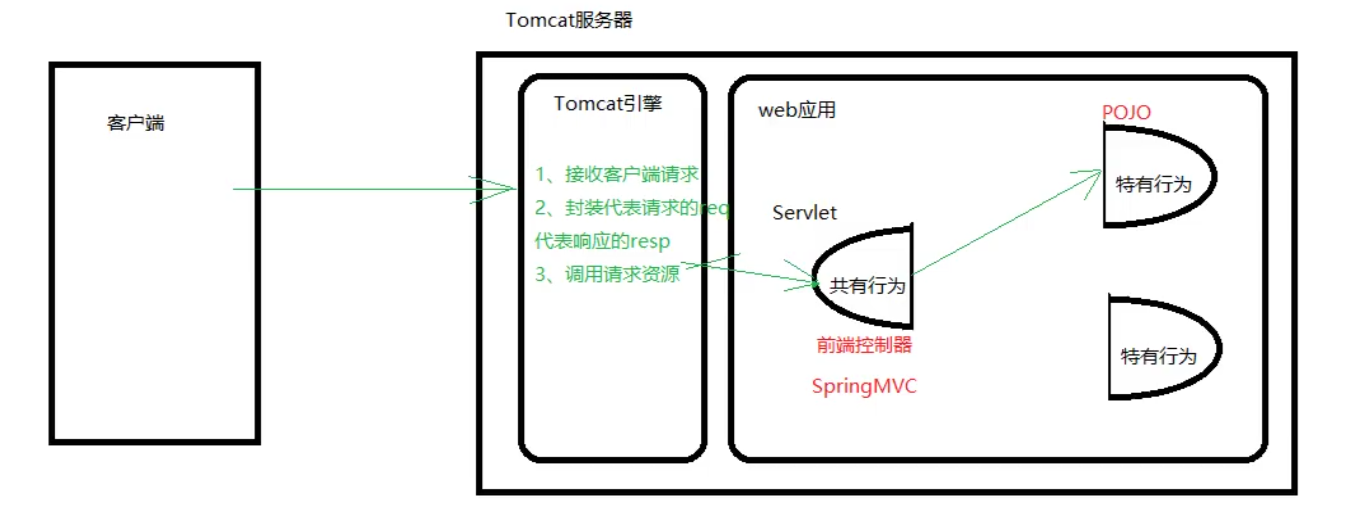
SpringMVC的核心是前端控制器,SpringMVC使用Servlet充当前端控制器
SpringMVC开发使用步骤
需求::客户端发起请求,服务器接受请求,执行逻辑并进行视图跳转。
1、先导入SpringMVC的相关坐标
2、配置SpringMVC核心控制器DispathcerServlet
3、创建Controller类和视图界面
4、使用注解配置Controller类中业务方法的映射地址
5、配置SpringMVC核心文件spring-mvc.xml
6、客户端发起请求测试
②、导入坐标
      <dependency>
            <groupId>org.springframework</groupId>
            <artifactId>spring-webmvc</artifactId>
            <version>5.0.5.RELEASE</version>
        </dependency>
②、配置控制器
<!-- 配置spring的前端控制器   -->
    <servlet>
        <servlet-name>DispatcherServlet</servlet-name>
        <servlet-class>org.springframework.web.servlet.DispatcherServlet</servlet-class>
<!-- 设置控制器服务器开始就启动,没有设置则第一次访问才创建对象-->
        <load-on-startup>1</load-on-startup>
    </servlet>
<servlet-mapping>
    <servlet-name>DispatcherServlet</servlet-name>
    <url-pattern>/</url-pattern>
</servlet-mapping>
③、创建controller视图和视图界面④、使用注解映射地址
创建一个controller包,包下创建一个userController类,类中
package com.controller;

import org.springframework.stereotype.Controller;
import org.springframework.web.bind.annotation.RequestMapping;

//配置类,使用注解把这个类放到容器中
@Controller
public class userController {

//用注解给这个方法请求映射某个地址
    @RequestMapping("/quick")
    public String save(){
        System.out.println("controller save running");
       //就会跳转到KCandZH.jsp这个页面上去
        return "KCandZH.jsp";
    }
}
在webapp下创建一个KCandZH.jsp页面
<%@ page language="java" contentType="text/html; charset=utf-8" pageEncoding="utf-8" %>
<%
    String path = request.getContextPath();
    String basepath = request.getScheme() + "://" + request.getServerName() + ":" + request.getServerPort() + path + "/";
%>
<html>
<head>
    <base href="<%=basepath %>"/>
    <meta charset="utf-8"/>
    <title>Insert title here</title>
</head>
<body>
kCandZH forever
</body>
</html>
⑤、配置核心spring-mvc.xml(web.xml中)
<!-- 配置spring的前端控制器   -->
    <servlet>
        <servlet-name>DispatcherServlet</servlet-name>
        <servlet-class>org.springframework.web.servlet.DispatcherServlet</servlet-class>
<!-- 设置配置SpringMVC核心文件spring-mvc.xml-->
        <init-param>
            <param-name>contextConfigLocation</param-name>
            <param-value>classpath:spring-mvc.xml</param-value>
        </init-param>
        <!-- 设置控制器服务器开始就启动,没有设置则第一次访问才创建对象-->
        <load-on-startup>1</load-on-startup>
    </servlet>
<servlet-mapping>
    <servlet-name>DispatcherServlet</servlet-name>
    <url-pattern>/</url-pattern>
</servlet-mapping>
在resource下写一个spring-mvc.xml用于组件扫描
<?xml version="1.0" encoding="UTF-8"?>
<beans xmlns="http://www.springframework.org/schema/beans"
       xmlns:xsi="http://www.w3.org/2001/XMLSchema-instance"
       xmlns:context="http://www.springframework.org/schema/context"
       xsi:schemaLocation="http://www.springframework.org/schema/beans http://www.springframework.org/schema/beans/spring-beans.xsd
                            http://www.springframework.org/schema/context http://www.springframework.org/schema/context/spring-context.xsd"  >

<!--controller的组件扫描 -->
    <context:component-scan base-package="com.controller"/>
</beans>
SpringMVC流程图示
SpringMVC的组件解析
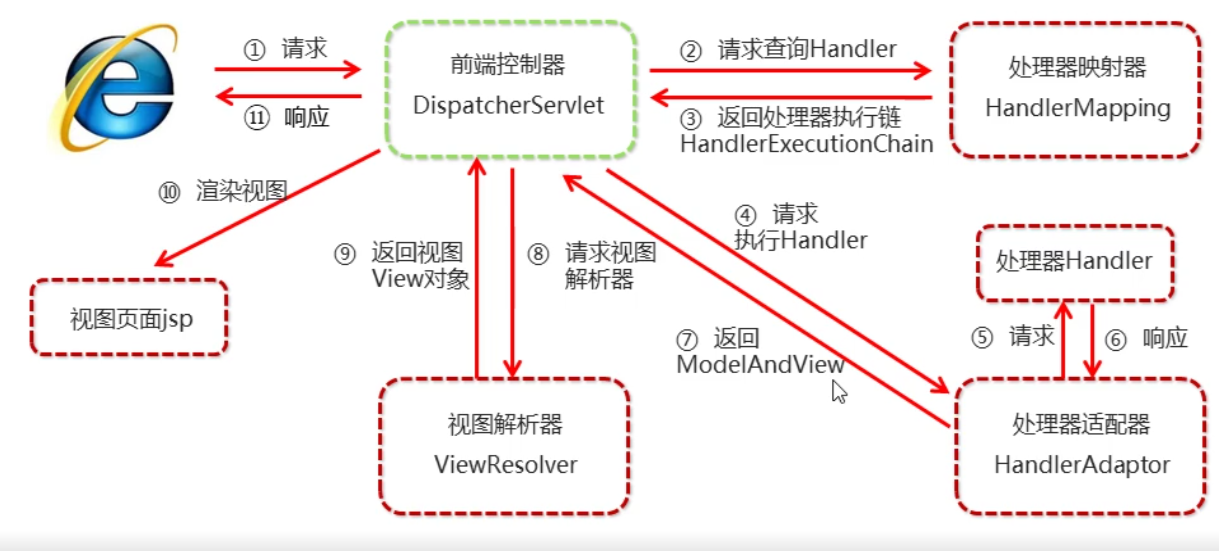
SpringMVC执行流程
①用户发送请求至前端控制器DispatcherServlet(负责组件调度)。
②DispatcherServlet收到请求调用HandlerMapping处理器映射器。
③处理器映射器找到具体的处理器(可以根据xml配置、注解进行查找),生成处理器对象及处理器拦截器(如果有则生成)一并返回给DispatcherServlet
④ DispatcherServlet调用HandlerAdapter处理器适配器。
⑤ HandlerAdapter经过适配调用具体的处理器(Controller(封装特有行为的后端代码),也叫后端控制器)。
⑥Controller执行完成返回ModelAndView。
⑦HandlerAdapter将controller执行结果ModelAndView返回给DispatcherServlet。
⑧DispatcherServlet将ModelAndView传给ViewReslover视图解析器。
⑨ViewReslover解析后返回具体View。
⑩DispatcherServlet根据View进行渲染视图(即将模型数据填充至视图中)。DispatcherServlet响应用户。
执行流程图示
SpringMVC注解解析
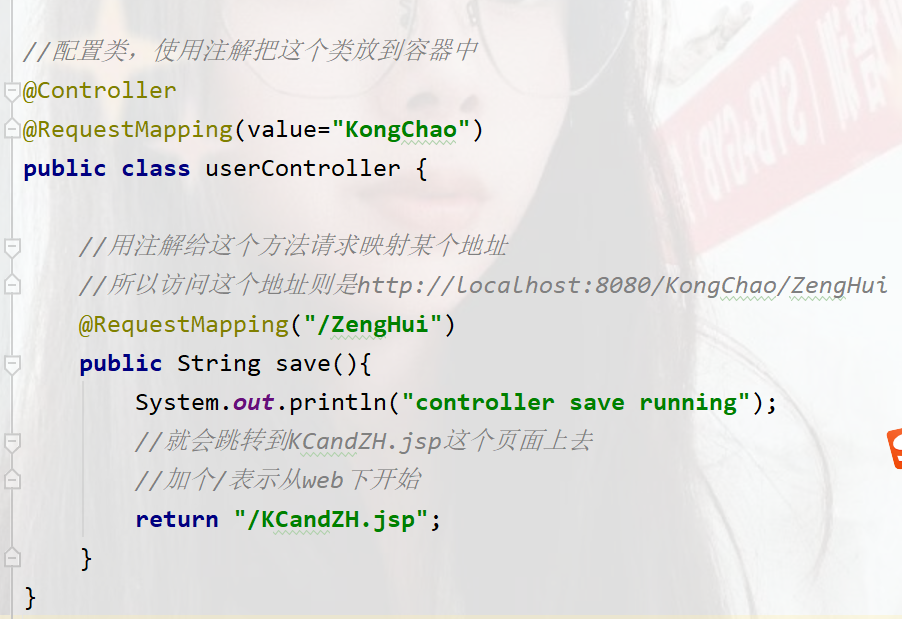
@RequestMapping
作用:用于建立请求URL和处理请求方法之间的对应关系
位置:①类上,请求URL的第一级访问目录,此处不写的话,就相当于应用的根目录
②方法上,请求URL的第二级访问目录,与类上的使用@RequestMapping标注的以及目录一起组成访问虚拟路径。
//配置类,使用注解把这个类放到容器中
@Controller
@RequestMapping(value="KongChao")
public class userController {
//用注解给这个方法请求映射某个地址
//所以访问这个地址则是http://localhost:8080/KongChao/ZengHui
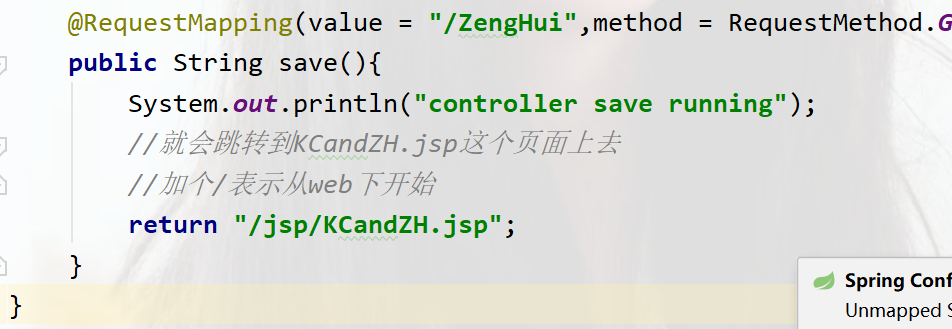
@RequestMapping("/ZengHui")
public String save(){
System.out.println("controller save running");
//就会跳转到KCandZH.jsp这个页面上去
//加个/表示从web工程下开始
return "/KCandZH.jsp";
}
}
属性:
- value:用于指定请求的URL,他和path属性作用是一样的,只有一个url可以省略value,有多个用逗号隔开【如:
@RequestMapping(value="user")@RequestMapping("user ") - method:用于指定请求的方式(不是这种请求无法访问)
- params:用于指定限制请求参数的条件,他支持简单的表达式,要求请求参数的key和value必须和配置的一模一样,如:
params={"accoubtName"},表示请求参数必须要accountName,直接在?后面写这个参数即可params={"eys!4"},表示请求参数中的money不能是4`````` @RequestMapping(value = "/ZengHui",method = RequestMethod.GET,params = {"KCaZH"})> 则访问路径是ZengHui,请求方式是GET,带有参数KCaZH xxx内容可以任意,只要带有指定的参数即可。
1.mvc命名空间引入
命名空间:xmlns:context="http://www.springframework.org/schema/context"
        xmlns:mvc="http://www.springframework.org/schema/mvc"

约束地址:http://www.springframework.org/schema/context
        http://www.springframework.org/schema/context/spring-context.xsd
        http://www.springframework.org/schema/mvc
        http://www.springframework.org/schema/mvc/spring-mvc.xsd
2、组件扫描基于Spring容器,所以在进行SpringMVC操作时,需要将Controller存储到Spring容器中,如果使用@Controller注解标注的话,就需要使用
<context:component-scan base-package="con.controller"/>
进行组件扫描
SpringMVC的xml配置解析
1、视图解析器
SpringMVC有默认组件配置,默认组件都是DispatcherServlet.propertier配置文件中配置的,该配置文件地址org/springframework/web/servlet/DospatcherServlet.properties,该文件中配置了默认视图解析器,如下:
org.springframework.web.servlet.ViewResolver=org.springframework .web.servlet.view.I
nternalResourceViewResolver
翻看该解析器源码,可以看到该解析器的默认设置,如下:
REDIRECT URL PREFIX = "redirect:" --重定向前缀
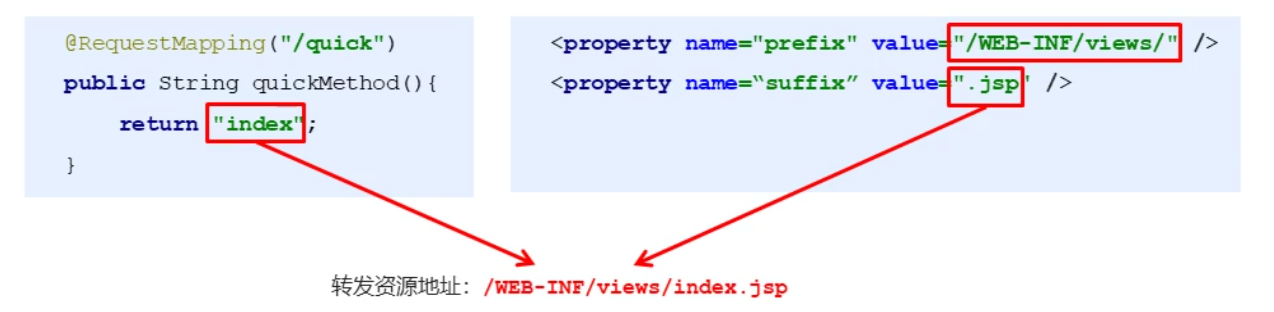
FORWARD URL PREFIX="forward:" --转发前缀(默认值)
prefix=""; --视图名称前缀
suffix =""; --视图名称后缀
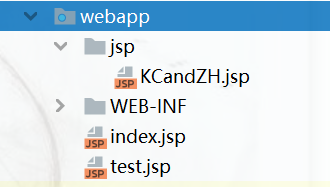
在webapp下新建一个jsp包,则每次访问视图,需要加上**/jsp/xxx.jsp**
前面的是文件夹的名字,后面的是扩展名,每次都需要加上, 这十分的麻烦,所以我们可以在spring-mvc.xml(名字自定义的)配置文件中 ,配置前缀和后缀

<?xml version="1.0" encoding="UTF-8"?>
<beans xmlns="http://www.springframework.org/schema/beans"
       xmlns:xsi="http://www.w3.org/2001/XMLSchema-instance"
       xmlns:context="http://www.springframework.org/schema/context"
       xsi:schemaLocation="http://www.springframework.org/schema/beans http://www.springframework.org/schema/beans/spring-beans.xsd
                            http://www.springframework.org/schema/context http://www.springframework.org/schema/context/spring-context.xsd"  >

<!--controller的组件扫描 -->
    <context:component-scan base-package="com.controller"/>

    <!--配置内部资源视图解析器-->
    <!--/jsp/xxx.jsp -->
    <bean id="viewResolver" class="org.springframework.web.servlet.view.InternalResourceViewResolver">

     <property name="prefix" value="/jsp/"></property>
     <property name="suffix" value=".jsp"></property>
    </bean>
</beans>
配置完成之后,我们只需写jsp的名字即可,它会自动给我们拼接上前后缀
SpringMVC的相关组件
- 前端控制器:DispatcherServlet(负责调用其他功能组件,需要手动配置)
- 处理器映射器:HandlerMapping
- 处理器适配器:HandlerAdapter(被前端控制器调用,去执行处理器)
- 处理器:Handler(可以理解为Controller,把一些特有行为进行封装的组件)
- 视图解析器:ViewResolver.(负责把view解析处理)
- 视图:View(视图的一些信息)
SpringMVC的注解和配置
- 请求映射注解:@RequestMapping(作用是进行虚拟地址映射,可以放在类上,也可以放在方法上)
- 视图解析器配置:
- REDIRECT URL PREFIX="redirect:" (重定向)
- FORWARD URL PREFIX ="forward:"(转法)(默认值,可以不写)
- prefix = "";(前缀)
- suffix= "";(后缀)
SpringMVC的数据响应
SpringMVC的数据响应方式
①页面跳转
- 直接返回字符串(如在一个方法中,return了一个"xxx.jsp",就会转发到那个jsp页面中,这就是直接返回字符串的形式)
- 通过ModelAndView对象返回
②回写数据
- 直接返回字符串(相当于在javaweb里的resp.getwrite(),print)
- 返回对象或集合
页面跳转
1、返回字符串形式
直接返回字符串:此种方式会将返回的字符串与视图解析器的前后缀拼接后跳转。
返回带有前缀的字符串:
转发:forward:/WEB_INF/views/index.jsp(forward可以省略不写)

重定向:redirect:/index.jsp
2、返回ModelAndView对象
方式1:直接new对象
//配置类,使用注解把这个类放到容器中
@Controller
@RequestMapping(value="KongChao")
public class userController {
@RequestMapping(value = "/ZengHui2")
public ModelAndView save2(){
/*
Model 模型 作用是封装数据
View 视图 作用是展示数据
*/
ModelAndView modelAndView=new ModelAndView();
//设置模型数据(键值对,键为String,值为Oject)
modelAndView.addObject("username", 1);
//设置视图名字
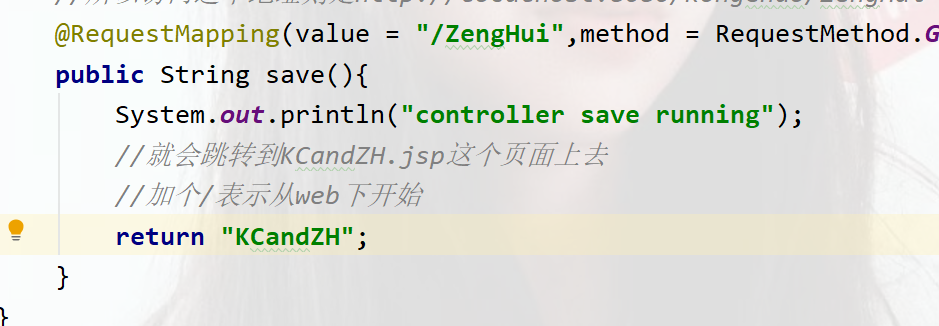
modelAndView.setViewName("KCandZH");//经过前后缀拼接就位/jsp/KCandZH.jsp
return modelAndView;
}
}
在jsp包下的KCandZH.jsp中
<html>
<head>
<base href="<%=basepath %>"/>
<meta charset="utf-8"/>
<title>Insert title here</title>
</head>
<body>
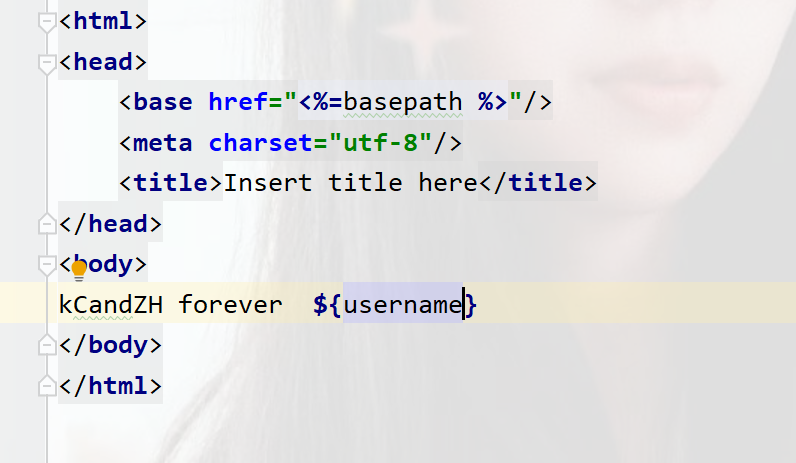
kCandZH forever ${username}
</body>
</html>
加上一个El表达式,这样浏览器访问localhost:8080/KongChao/ZengHui2,就会显示出kCandZH forever 1
** 方式2:写在方法里让SpringMVC创建**
也可以不new对象的方式,在方法中直接写model对象,SpringMVC会自动帮你创建
//配置类,使用注解把这个类放到容器中
@Controller
@RequestMapping(value="KongChao")
public class userController {

    @RequestMapping(value = "/ZengHui3")
    public ModelAndView save3( ModelAndView modelAndView){
        //设置模型数据(键值对,键为String,值为Oject)
        modelAndView.addObject("username", "babala");
        //设置视图名字
        modelAndView.setViewName("KCandZH");//经过前后缀拼接就位/jsp/KCandZH.jsp
        return modelAndView;
    }
}
方式3:model和view分开做
model是SpringMVC框架封装好的
//配置类,使用注解把这个类放到容器中
@Controller
@RequestMapping(value="/KongChao")
public class userController {
    @RequestMapping(value = "/ZengHui4")
    public String save4(Model model){//是model
        //设置模型数据(键值对,键为String,值为Oject)
      model.addAttribute("username","曾慧");

      return "KCandZH";//是view

    }
}
方式4:通过HttpServletRequest
//配置类,使用注解把这个类放到容器中
@Controller
@RequestMapping(value="/KongChao")
public class userController {
    @RequestMapping(value = "/ZengHui5")
    public String save5(HttpServletRequest request){//是model
        //设置模型数据(键值对,键为String,值为Oject)
        request.setAttribute("username","kckckc");

        return "KCandZH";
    }
}
方式3和方式4的区别,model是SpringMVC封装好的,而HttpServletRequest是原生的javaweb,是由tomcat服务器产生的,这个产生的对象中有数据,有http请求的数据(请求行,请求体....),model对象则是空的。方式4不常用
回写数据
1、直接返回字符串
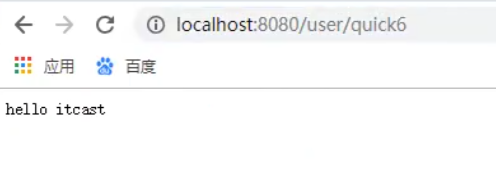
Web基础截断,客户端访问服务器端,如果想直接回写字符串作为响应题返回的话,只需要使用response.getWrite().print("KCandZH")即可,所以在Controller中想直接回写字符串,可以直接在方法中写入response。
方法1:通过SpringMVC框架注入的response对象,使用response.getWrite().print("hello")回写数据,此时不需要视图跳转,业务方法返回值为void
//配置类,使用注解把这个类放到容器中
@Controller
@RequestMapping(value="/user")
public class userController {
    @RequestMapping("/quick6")
    public void save6(HttpServletResponse response) throws IOException {
        response.getWriter().print("hello itcase");

    }
}
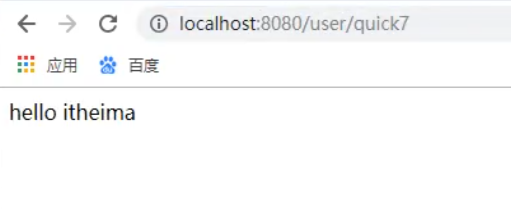
②将需要回写的字符串直接返回,但需要通过**@ResponseBody**注解告知SpringMVC框架,方法返回的字符串不是跳转某个视图,而是直接在http响应体重返回。(加上则不会进行前后缀拼接)
//配置类,使用注解把这个类放到容器中
@Controller
@RequestMapping(value="/user")
  @ResponseBody//告诉SpringMVC框架不进行视图跳转,而是直接进行数据响应
public class userController {
    @RequestMapping("/quick7")
    public String  save7(HttpServletResponse response) throws IOException {
        return "hello itcase";

    }
}
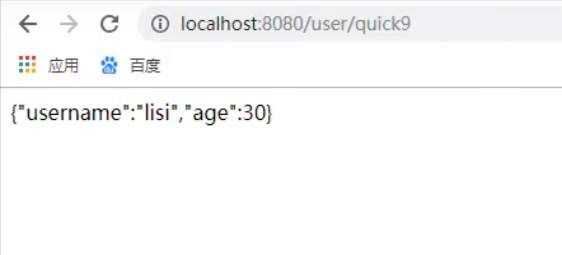
将字符串转成json格式回传到客户端
user类下
package com.pojo;

public class User {
    private int age;
    private String username;

    public User() {

    }
    public void setAge(int age) {
        this.age = age;
    }

    public void setName(String username) {
        this.username = username;
    }
}
userController类下
//配置类,使用注解把这个类放到容器中
@Controller
@RequestMapping(value="/user")
    public class userController {
        @RequestMapping("/quick9")
        @ResponseBody
        public String save9() throws JsonProcessingException {
            User user=new User();
            user.setAge(30);
            user.setName("lisi");
        //使用json的转换工具将对象转换成json格式字符串再返回
            ObjectMapper objectMapper=new ObjectMapper();
            String json = objectMapper.writeValueAsString(user);
            return json;
        }
}
要使用json转换工具,还得导入依赖
<!-- 导入json相关依赖       -->
        <dependency>
            <groupId>com.fasterxml.jackson.core</groupId>
            <artifactId>jackson-core</artifactId>
            <version>2.9.0</version>
        </dependency>
        <dependency>
            <groupId>com.fasterxml.jackson.core</groupId>
            <artifactId>jackson-databind</artifactId>
            <version>2.9.0</version>
        </dependency>

        <dependency>
            <groupId>com.fasterxml.jackson.core</groupId>
            <artifactId>jackson-annotations</artifactId>
            <version>2.9.0</version>
        </dependency>
运行结果
2、直接返回对象或集合
使用SpringMVC自动将对象或集合转化为json格式
通过SpringMVC帮助我们对对象或集合进行json字符串的转换并回写,为处理器适配器配置消息转换参数是,指定使用jackson进行对象或集合的转换,因此需要在spring-mvc.xml中进行这样配置
配置spring-mvc.xml中处理器映射器
<!--配置处理器映射器 (将指定的对象或集合转为json格式)   -->
    <bean             class="org.springframework.web.servlet.mvc.method.annotation.RequestMappingHandlerAdapter">
        <property name="messageConverters">
            <list>
                <bean class="org.springframework.http.converter.json.MappingJackson2HttpMessageConverter"/>
            </list>
        </property>
    </bean>
在userController类中
//配置类,使用注解把这个类放到容器中
@Controller
@RequestMapping(value="/user")
public class userController {
@RequestMapping("/quick10")
@ResponseBody
//配置完成处理器映射器后,SpringMVC会将USer转化为json格式
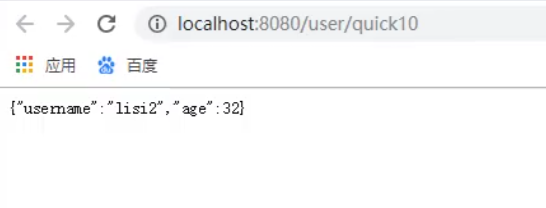
public User save10() throws JsonProcessingException {
User user=new User();
user.setAge(32);
user.setName("lisi2");
return user;
}
}
运行结果
注解方式优化转化json
在方法上添加@ResponseBody就可以返回json格式的字符串,但是这样配置比较麻烦,配置的代码比较多,因此,我们可以使用mvc的注解驱动代替上述配置。
<!--mvc的注解驱动-->
<mvc:annotation-driven/>
、
在SpringMVC的各个组件中,处理器映射器、处理器适配器、视图解析器称为SpringMVC的三大组件。使用mvc:annotation-driven自动加载RequestMappingHandlerMapping(处理映射器)和RequestMappingHandlerAdapter(处理适配器),可用在Spring-xml.xml配置文件中使用mvc:annotation-driven替代注解处理器和适配器的配置。
同时使用<mvcannotation-driven>默认底层就会集成jackson进行对象或集合的json格式字符串的转换
因为使用了mvc命名空间,所以得导入mvc
<beans xmlns="http://www.springframework.org/schema/beans"
    xmlns:mvc="http://www.springframework.org/schema/mvc"
       xmlns:xsi="http://www.w3.org/2001/XMLSchema-instance"
       xsi:schemaLocation="http://www.springframework.org/schema/beans http://www.springframework.org/schema/beans/spring-beans.xsd

                            http://www.springframework.org/schema/mvc http://www.springframework.org/schema/mvc/spring-mvc.xsd">
在spring-mvc.xml配置文件中
<!--    配置注解驱动-->
    <mvc:annotation-driven/>
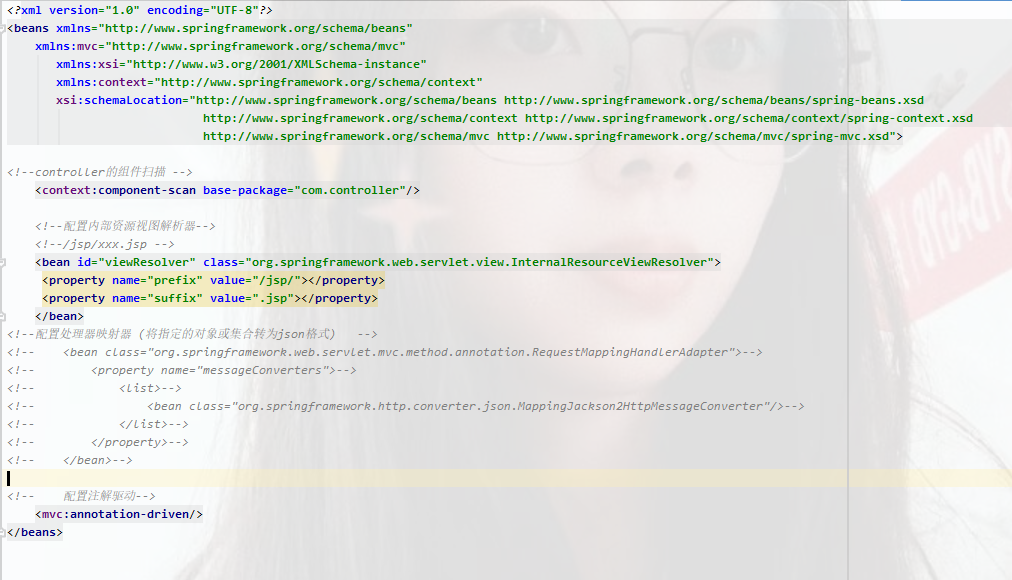
这样就完成了注解配置
SpringMVC获得请求数据
获得请求参数
客户端请求参数的格式是:name=value&name=value.....
服务器端要获得请求的参数,有时还需要进行数据的封装,SpringMVC可以接受如下类型的参数:
- 基本数据类型
- pojo类型 参数
- 数据类型参数
- 集合类型参数
基本数据类型
//配置类,使用注解把这个类放到容器中
@Controller
@RequestMapping(value="/user")
    public class userController {
    @RequestMapping("/quick11")
    @ResponseBody
    public void save11(String username,int age)  {
        System.out.println(username);
        System.out.println(age);
    }
}
这个方法不进行页面跳转和回写数据@ResponseBody和void)
然后在网页访问书写参数

就可以看到控制台打印出张三 18,这就是基本数据类型
获得POJO类型参数
Controller中的业务方法的pojo参数的属性名与请求参数的name一直,参数值会自动映射匹配
如:
** 上图中的username和age属于User之中的,SpringMVC就会自动将这些值加进User去**
pojo包下的User类
package com.pojo;

public class User {
    private int age;
    private String username;

    public User() {

    }
    public User(int age, String username) {
        this.age = age;
        this.username = username;
    }
    public void setAge(int age) {
        this.age = age;
    }
    public int getAge() {
        return age;
    }
    public String getUsername() {
        return username;
    }
    public void setUsername(String username) {
        this.username = username;
    }
    @Override
    public String toString() {
        return "User{" +
                "age=" + age +
                ", username='" + username + '\'' +
                '}';
    }
}
//配置类,使用注解把这个类放到容器中
@Controller
@RequestMapping(value="/user")
    public class userController {
    @RequestMapping("/quick12")
    @ResponseBody
    public void save12(User user)  {
        System.out.println(user);
    }
}

控制台可以看到

获得数组类型参数
Controller的业务方法数组名称与请求参数的name一致,参数值救赎自动映射配置。
//配置类,使用注解把这个类放到容器中
@Controller
@RequestMapping(value="/user")
    public class userController {
    @RequestMapping("/quick13")
    @ResponseBody
    public void save13(String[] strs)  {
        //数组直接打印是地址,为了更清楚看到,用Arrays,asList(作为集合打印)
        System.out.println(Arrays.asList(strs));
    }
}
网址搜素输入

控制台显示

获得集合类型参数
获得集合参数时,要将集合参数包装到pojo对象才可以
所以我们在pojo包下创建一个vo对象
package com.pojo;

import java.util.List;

public class VO {
    private List<User> userList;

    public VO(List<User> userList) {
        this.userList = userList;
    }

    public List<User> getUserList() {
        return userList;
    }

    public void setUserList(List<User> userList) {
        this.userList = userList;
    }

    @Override
    public String toString() {
        return "VO{" +
                "userList=" + userList +
                '}';
    }
}
userController类下
//配置类,使用注解把这个类放到容器中
@Controller
@RequestMapping(value="/user")
    public class userController {
    @RequestMapping("/quick14")
    @ResponseBody
    public void save14(VO vo){
        System.out.println(vo);
    }
}
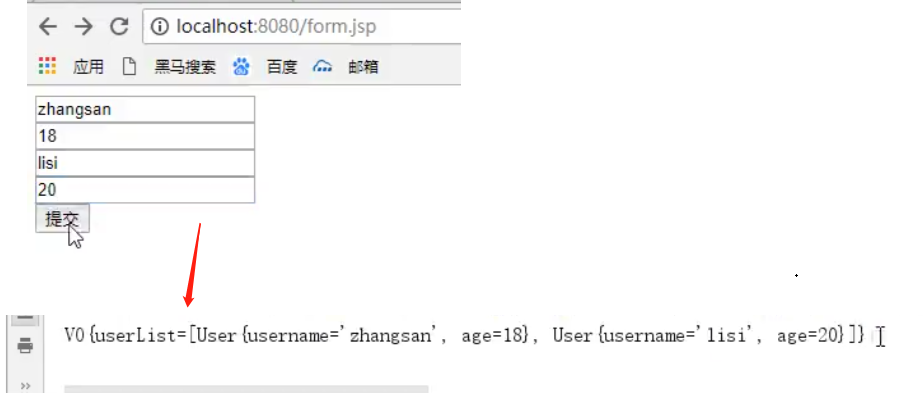
form.jsp页面下
<%@ page language="java" contentType="text/html; charset=utf-8" pageEncoding="utf-8" %>
<%
    String path = request.getContextPath();
    String basepath = request.getScheme() + "://" + request.getServerName() + ":" + request.getServerPort() + path + "/";
%>
<html>
<head>
    <base href="<%=basepath %>"/>
    <meta charset="utf-8"/>
    <title>Insert title here</title>
</head>
<body>
<form action="${pageContext.request.contextPath}/user/quick14" method="post">
<%--表明是第一个User对象username age--%>
<input type="text" name="userList[0].name"><br/>
    <input type="text" name="userList[0].age"><br/>
    <input type="text" name="userList[1].name"><br/>
    <input type="text" name="userList[1].age"><br/>
    <input type="submit" value="提交">
</form>
</body>
</html>
运行之后在页面输入数据,控制台输出
获得集合类型参数
静态资源访问的开启
当使用ajax提交时,可以指定contentType为json形式,那么在方法参数位置使用@RequestBody可以是直接接收结合数据而无需使用POJO进行包装。
创建一个js下的
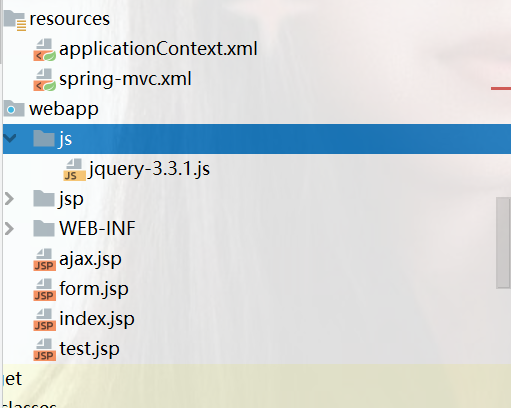
还有ajax.jsp
<%@ page language="java" contentType="text/html; charset=utf-8" pageEncoding="utf-8" %>
<%
    String path = request.getContextPath();
    String basepath = request.getScheme() + "://" + request.getServerName() + ":" + request.getServerPort() + path + "/";
%>
<html>
<head>
    <base href="<%=basepath %>"/>
    <meta charset="utf-8"/>
    <title>Insert title here</title>
    <script src="${pageContext.request.contextPath}/js/jquery-3.3.1.js">
        <%-- 创建一个js数组--%>
        var userList=new Array();
        //给集合添加数据
        userList.push({username:"zhangsan",age:18});
        userList.push({username:"lisi",age:28});

        //发送请求
        $.ajax({
            type:"POST",//请求方式
            url:"${pageContext.request.contextPath}/user/quick15",//请求地址
            date:JSON.stringify(userList),//提交的参数,转为json格式
            contentType:"application/json;charset=utf-8"
        });

    </script>
</head>
<body>

</body>
</html>
userController类下
//配置类,使用注解把这个类放到容器中
@Controller
@RequestMapping(value="/user")
    public class userController {
    @RequestMapping("/quick15")
    @ResponseBody
    public void save15(@ResponseBody List<User> userList) throws Exception {
        System.out.println(userList);
    }
}
运行服务器后,发现控制台没有打印数据

一般是页面出现了问题,打开开发者工具中查看
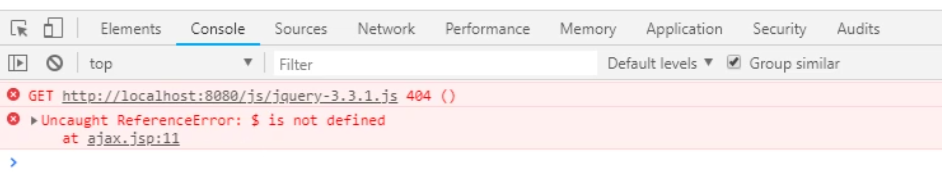
发现是这个jQuery文件找不到
这是静态资源访问权限的问题,解决方式是在spring-mvc中加入
<!-- 静态资源访问权限-->
    <mvc:resources mapping="/js/**" location="/js/"/>
重启服务器运行之后就可以访问了,在网络中查看访问包的情况,共有三次请求
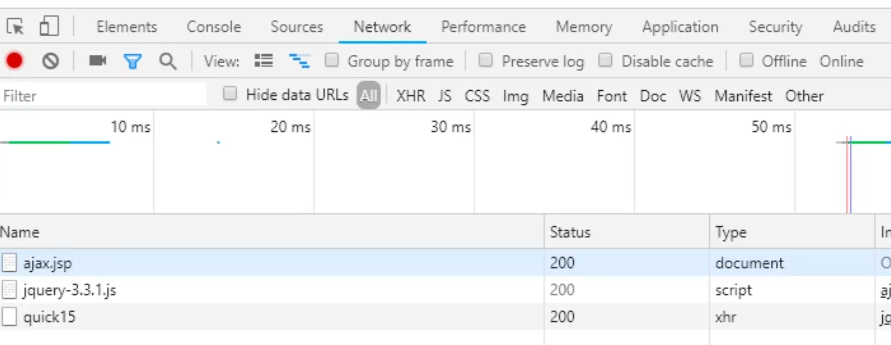
运行之后控制台会打印数组中的数据。
也可以在spring-mvc中配置,只需写入一个即可(常用)
<!-- 静态资源访问权限-->
   <mvc:default-servlet-handler/>

</beans>
解释:访问资源时,SpringMVC找对应的匹配地址,如果找不到则交给原始的容器(这原始的容器为tomcat)tomcat可以找有能力访问静态资源
配置全局乱码过滤器
请求数据的乱码问题
当postt请求时,数据会出现乱码,我们可以设置一个过滤器来进行编码的过滤。
在web.xml中配置过滤器即可
<!--配置过滤的filter-->
<filter>
<!--起个名字    -->
    <filter-name>CharacterEncodingFilter</filter-name>
    <filter-class>org.springframework.web.filter.CharacterEncodingFilter</filter-class>
<init-param>
<!-- 将字符集设置utf-8   -->
    <param-name>encoding</param-name>
    <param-value>UTF-8</param-value>
</init-param>
</filter>
    <filter-mapping>
        <filter-name>CharacterEncodingFilter</filter-name>
        <!--所有文件都进行过滤扫描        -->
        <url-pattern>/*</url-pattern>
    </filter-mapping>
参数绑定注解@RequestParam
当请求的参数名称与Controller的业务方法参数名称不一致是,就需要通过@RequestParam注解显式的绑定
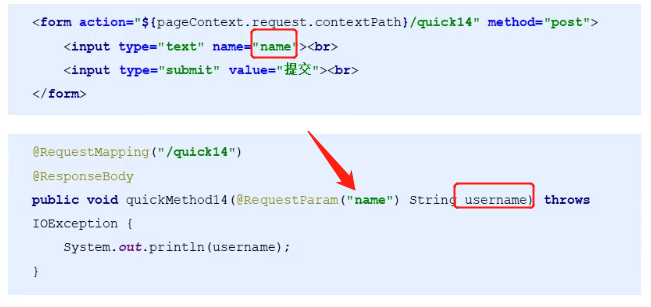
业务方法中的参数为username,请求的参数为name,两者不一致,所以需要进行绑定,使用**@RequestParam(value="name")进**行
注解@RequestParam的参数使用说明
value:与请求参数名称
required:指在指定的请求参数是否必须包括,默认是true,默认值下提交时如果没有此参数则报错
defaultValue:放没有指定参数时,则使用的默认值赋值
获得Restful风格的参数
Restful是一种软件架构风格、设置风格,而不是标准,只是提供了一组设计原则和约束条件。主要用于客服端和服务器交互的软件,基于这个风格设计的软件可以更简洁,更有层次,更易于实现缓存机制等
Restful风格的请求是使用“url+请求方式”表示一次请求的目的地,HTTP协议里面四个表示操作方式的动词如下
- GET:用于获取资源
- POST:用于新建资源
- PUT:用于更新资源
- DELETE:用于删除资源
例如:
- /user/1 GET: 得到id=1的user
- /user.1 DELETE: 删除id=1的user
- /user/1 PUT: 更新id=1的user
- /user POST: 新增user
上述url地址/user/1中的1就是要获得的请求参数,在SpringMVC中可以使用占位符进行参数绑定。地址/user/1可以写成/user/{id},占位符{id}对应的就是1的值。在业务方法中我们可以使用**@PathVariable注解进行占位符的匹配获取工作。**

//配置类,使用注解把这个类放到容器中
@Controller
@RequestMapping(value="/user")
    public class userController {
    //localhost:8080/quick17/zhangsan
    @RequestMapping(value = "/quick17/{username}",method=RequestMethod.GET)
    @ResponseBody
    public void save17(@PathVariable(value = "username") String username)  {
        System.out.println(username);
    }
}

控制台就会打印出张三
自定义类型转换器
SpringMVC默认已经提供了一些常用的类型转换器,例如客户端提交得字符串转化为int型进行参数设置但不是所有的数据类型都提供了转换器,没有提供的就需要自定义转换器,例如:日期类型的数据就需要自定义转换器。
自定义转换器的开发步骤:
- ①定义转换器类实现Converter接口
- ②在配置文件中声明转换器
- ③在<annotation-driven>中引用转换器
时间类型的,Spring提供了yyyy/MM/dd的日期输入格式,但是我们习惯使用,如2022-7-21而不会写2022/7/21,我们没按照规定写就会报错,所以我们配置自定义的转换器
①定义转换器类实现Converter接口
在converter包下。
package com.converter;

import org.springframework.core.convert.converter.Converter;

import java.text.ParseException;
import java.text.SimpleDateFormat;
import java.util.Date;
//Converter<s,d>String类型转date类型
public class DateConverter implements Converter<String, Date> {
    public Date convert(String dateStr) {
        //将日期的字符串转换成日期对象 返回
        SimpleDateFormat format=new SimpleDateFormat("yyyy-MM-dd");
        Date date = null;
        try {
            date = format.parse(dateStr);
        } catch (ParseException e) {
            e.printStackTrace();
        }
        return date;
    }
}
②在配置文件中声明转换器
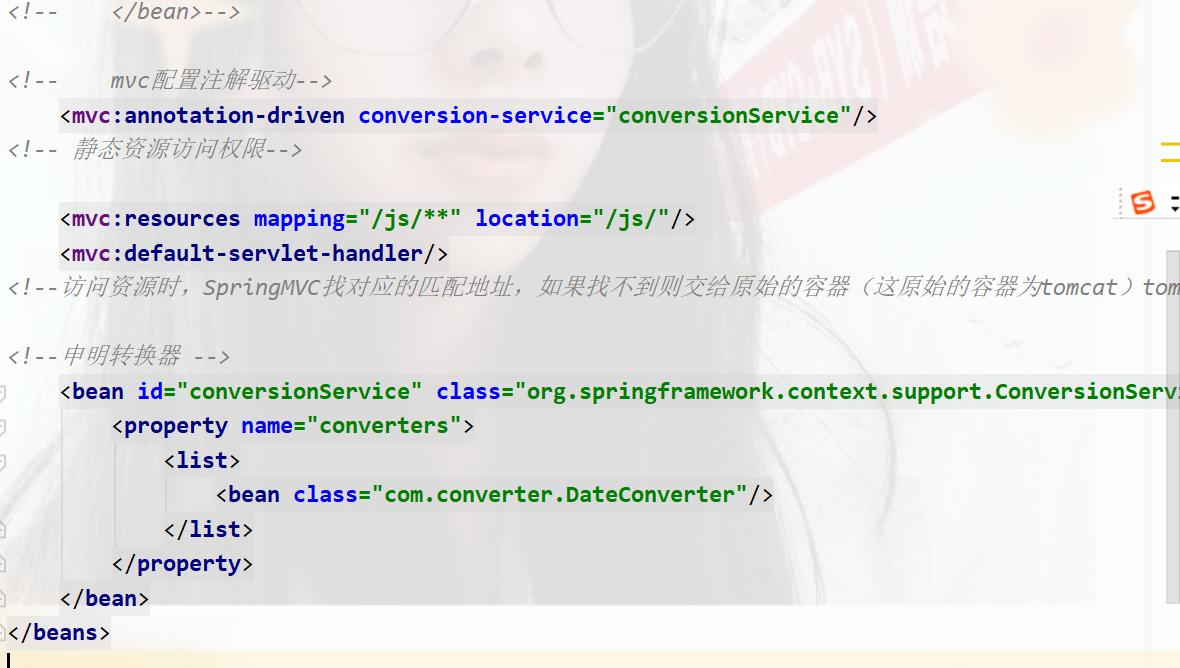
spring-mvc.xml中
<!--申明转换器 -->
    <bean id="conversionService" class="org.springframework.context.support.ConversionServiceFactoryBean">
        <property name="converters">
            <list>
                <bean class="com.converter.DateConverter"/>
            </list>
        </property>
    </bean>
③在<annotation-driven>中引用转换器
也在spring-mvc.xml中
<!--    mvc配置注解驱动-->
    <mvc:annotation-driven conversion-service="conversionService"/>
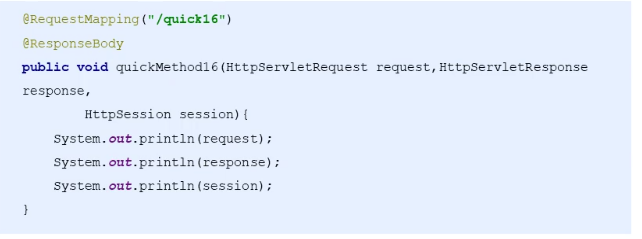
获得Servlet相关API
SpringMVC支持使用原始ServletAPI对象作为控制器方法的参数进行注入,常用的对象如下:
- HttpServletyRequest
- HttpServletResponse
- HttpSession
会打印一些地址。
获得请求头
@RequestHeader
使用@RequestHeader可以获得请求头信息,相当于web阶段学习的requestgetHeader(name)
@RequestHeader注解的属性如下:
- value:请求头的名称
- required:是否必须携带此请求头,(写true必须携带请求头参数才可以访问)
下列代码是,把请求头名为User-Agent的请求数据赋值给headerValue,然后
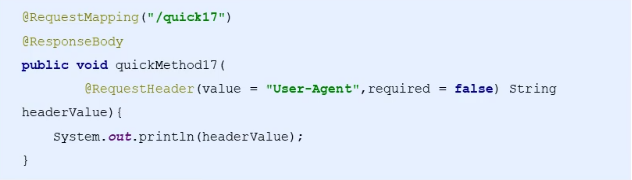
访问之后, F12打开网络查看。
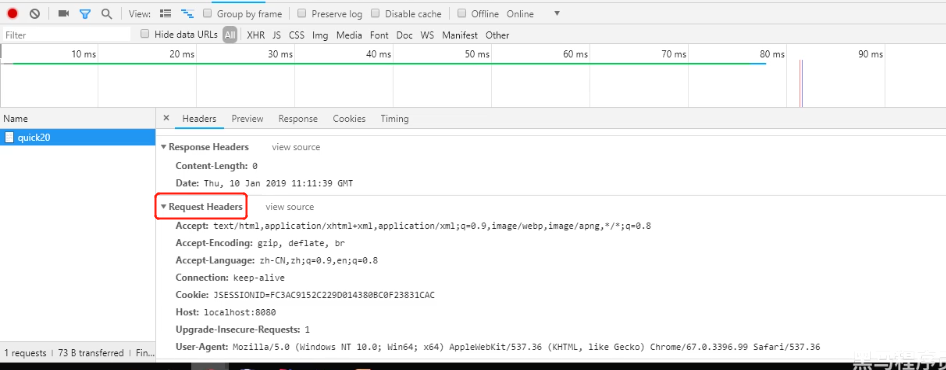
@CookieValue
使用@CookieValue可以获得指定的Cookie的值
@CookieValue注解的属性如下:
- value:指定cookie的名称
- required:是否必须携带此cookie
//配置类,使用注解把这个类放到容器中
@Controller
@RequestMapping(value="/user")
    public class userController {
        @RequestMapping("/quick21")
        @ResponseBody
        public void save21(@CookieValue(value = "JSEEEIONID")String jsessionId ) throws Exception {
            System.out.println(jsessionId);
        }
}
这样就可以获得cookie的值,cookie也是键值对的形式
文件上传
文件上传客服端三要素
- 表单项type="file"
- 表单的提交方式是post
- 表单的enctyoe属性是多部分表单形式,以及enctype="multipart/form-data"
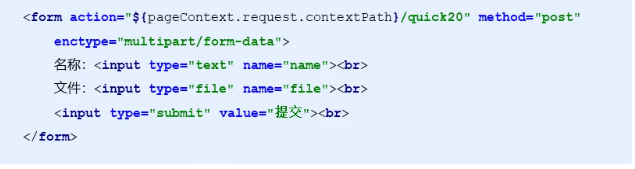
单文件上传步骤
①导入fileupload和io坐标
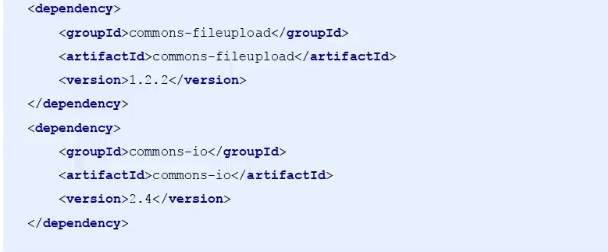
    <dependency>
        <groupId>commons-fileupload</groupId>
        <artifactId>commons-fileupload</artifactId>
        <version>1.2.2</version>
    </dependency>
    <dependency>
        <groupId>commons-io</groupId>
        <artifactId>commons-io</artifactId>
        <version>2.4</version>
    </dependency>
②配置文件上传解析器
在spring-mvc.xml中
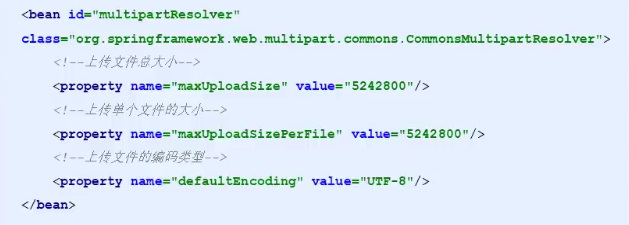
 <bean id="MultipartResolver" class="org.springframework.web.multipart.commons.CommonsMultipartResolver">
<!--         上传文件的大小5M-->
        <property name="maxUploadSize" value="5242800"/>
<!--        上传单个文件的大小-->
        <property name="maxUploadSizePerFile" value="5242800"/>
<!--        上传文件的编码类型-->
        <property name="defaultEncoding" value="UTF-8"/>
    </bean>
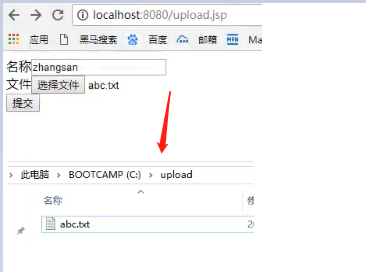
③编写文件上传代码
** upload.jsp中代码**
<%@ page language="java" contentType="text/html; charset=utf-8" pageEncoding="utf-8" %>
<%
String path = request.getContextPath();
String basepath = request.getScheme() + "://" + request.getServerName() + ":" + request.getServerPort() + path + "/";
%>
<html>
<head>
<base href="<%=basepath %>"/>
<meta charset="utf-8"/>
<title>Insert title here</title>
</head>
<body>
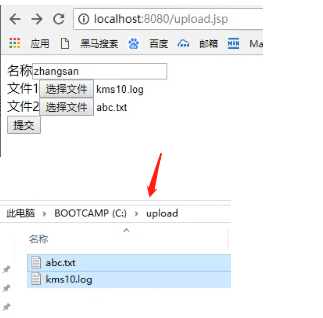
<form action="${pageContext.request.contextPath}/user/quick22" method="post" enctype="multipart/form-data">
名称<input type="text" name="username"><br/>
文件<input type="file" name="uploadFile"><br/>
<input type="submit" value="提交">
</form>
</body>
</html>
方法中参数要和jsp中的name值对应
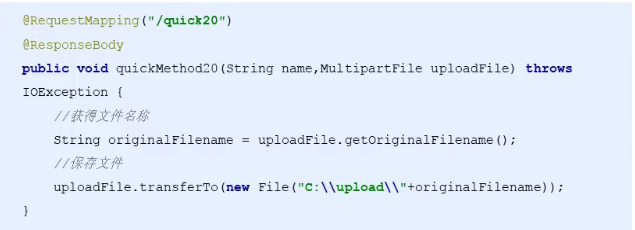
//配置类,使用注解把这个类放到容器中
@Controller
@RequestMapping(value="/user")
    public class userController {
    @RequestMapping("/quick22")
    @ResponseBody
    public void save22(String usernam, MultipartFile uploadFile) throws Exception{
        System.out.println(usernam);
    //获得上传文件的名称
        String originalFilename = uploadFile.getOriginalFilename();
        uploadFile.transferTo(new File("C:\\upload\\"+originalFilename));
    }
}
运行访问后
多文件上传实现
多文件上传只需要多加参数即可
法一:写下多个参数
<form action="${pageContext.request.contextPath}/user/quick22" method="post" enctype="multipart/form-data">
    名称<input type="text" name="username"><br/>
    文件1<input type="file" name="uploadFile"><br/>
    文件2<input type="file" name="uploadFile2"><br/>
    <input type="submit" value="提交">


</form>
//配置类,使用注解把这个类放到容器中
@Controller
@RequestMapping(value="/user")
    public class userController {
    @RequestMapping("/quick22")
    @ResponseBody
    public void save22(String usernam, MultipartFile uploadFile,MultipartFile uploadFile2) throws Exception{
        System.out.println(usernam);
    //获得上传文件的名称
        String originalFilename = uploadFile.getOriginalFilename();
        uploadFile.transferTo(new File("C:\\upload\\"+originalFilename));
   String originalFilename2 = uploadFile2.getOriginalFilename();
        uploadFile2.transferTo(new File("C:\\upload\\"+originalFilename2));
    }
}
运行访问后:
法二:数组接收
jsp中name的值都一致
<form action="${pageContext.request.contextPath}/user/quick23" method="post" enctype="multipart/form-data">
    名称<input type="text" name="username"><br/>
    文件1<input type="file" name="uploadFile"><br/>
    文件2<input type="file" name="uploadFile"><br/>
    <input type="submit" value="提交">


</form>
//配置类,使用注解把这个类放到容器中
@Controller
@RequestMapping(value="/user")
    public class userController {
    @RequestMapping("/quick23")
    @ResponseBody
    public void save23(String username, MultipartFile[] uploadFile) throws Exception{
            System.out.println(username);
            //获得上传文件的名称
            for (MultipartFile multipartFile : uploadFile) {
                String originalFilename = multipartFile.getOriginalFilename();
                multipartFile.transferTo(new File("C:\\upload\\"+originalFilename));

            }
   }
}
运行结果也是一致的
JdbcTemplate概述
他是spring框架中提供的一个对象,是对原始繁琐的jdbc API对象的简单封装。spring框架为我们提供了很多的操作模板类。例如:操作关系型数据的JdbcTemplate和HivernateTenplate,操作nosql数据库的RedisTemplate,操作消息队列的JmsTemplate等
JdbcTemplate开发步骤
- ①导入spring-jdbc和spring-tx坐标
- ②创建数据库表和实体
- ③创建JdbcTemplate对象
- ④执行数据库操作
数据库中account表
pom.xml中
 <dependency>
            <groupId>org.springframework</groupId>
            <artifactId>spring-jdbc</artifactId>
            <version>5.0.5.RELEASE</version>
        </dependency>
        <dependency>
            <groupId>org.springframework</groupId>
            <artifactId>spring-tx</artifactId>
            <version>5.0.5.RELEASE</version>
        </dependency>
测试java中实体类中
package test;
import com.mchange.v2.c3p0.ComboPooledDataSource;
import org.junit.Test;
import org.springframework.jdbc.core.JdbcTemplate;
import java.beans.PropertyVetoException;
public class JdbcTemplateTest {
@Test
//测试JdbcTemplate开发步骤
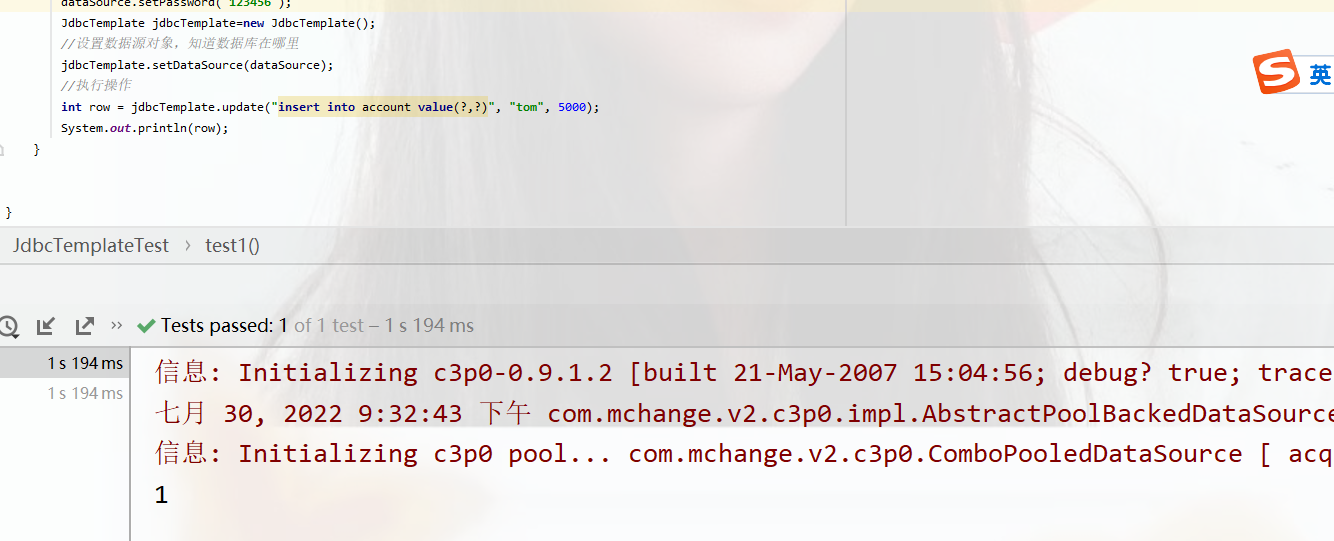
public void test1() throws PropertyVetoException {
//创建数据源对象
ComboPooledDataSource dataSource=new ComboPooledDataSource();
dataSource.setDriverClass("com.mysql.jdbc.Driver");
//位置为本地,3306端口,test数据库
dataSource.setJdbcUrl("jdbc:mysql://localhost:3306/test");
//用户名
dataSource.setUser("root");
//用户密码
dataSource.setPassword("123456");
JdbcTemplate jdbcTemplate=new JdbcTemplate();
//设置数据源对象,知道数据库在哪里
jdbcTemplate.setDataSource(dataSource);
//执行操作
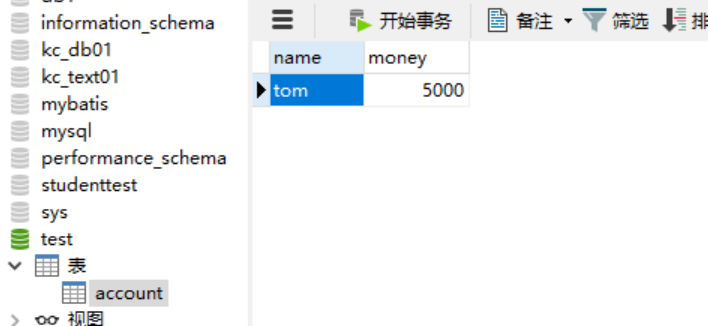
int row = jdbcTemplate.update("insert into account value(?,?)", "tom", 5000);
System.out.println(row);
}
}
domain包下的account类下
package domain;

public class Account {
    private String name;
    private double money;

    public String getName() {
        return name;
    }

    public void setName(String name) {
        this.name = name;
    }

    public double getMoney() {
        return money;
    }

    public void setMoney(double money) {
        this.money = money;
    }

    @Override
    public String toString() {
        return "Account{" +
                "name='" + name + '\'' +
                ", money=" + money +
                '}';
    }
}
运行结果:
数据库中的test数据库,account表
Spring产生JdbcTemplate对象
测试插入
仔细看,这些都是参数注入(用了setXxx。。),我们可以将JdbcTemplate的创建权交给Spring,将数据源DataSource的创建权也交给Spring,在Spring容器内部将数据源DateSource注入到JdbcTemplate模版对象中,配置如下:
在test测试包下创建一系列
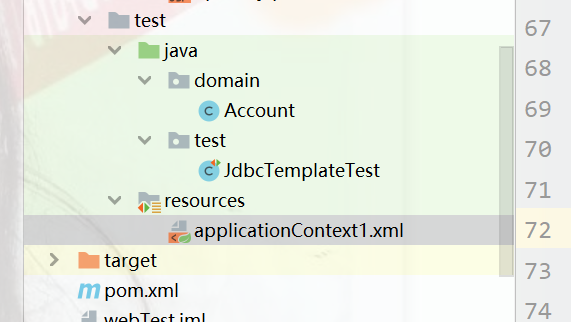
在applicationContext1.xml下
<?xml version="1.0" encoding="UTF-8"?>
<beans xmlns="http://www.springframework.org/schema/beans"
       xmlns:xsi="http://www.w3.org/2001/XMLSchema-instance"
       xsi:schemaLocation="http://www.springframework.org/schema/beans http://www.springframework.org/schema/beans/spring-beans.xsd">

<!--数据源对象-->
    <bean id="dataSource" class="com.mchange.v2.c3p0.ComboPooledDataSource">
        <property name="driverClass" value="com.mysql.jdbc.Driver"/>
        <property name="jdbcUrl" value="jdbc:mysql://localhost:3306/test"/>
        <property name="user" value="root"/>
        <property name="password" value="123456"/>
    </bean>
<!--    jdbc模版对象-->
    <bean id="jdbcTemplate" class="org.springframework.jdbc.core.JdbcTemplate">
        <property name="dataSource" ref="dataSource"/>
    </bean>
</beans>
pom.xml中
<?xml version="1.0" encoding="UTF-8"?>
<project xmlns="http://maven.apache.org/POM/4.0.0"
         xmlns:xsi="http://www.w3.org/2001/XMLSchema-instance"
         xsi:schemaLocation="http://maven.apache.org/POM/4.0.0 http://maven.apache.org/xsd/maven-4.0.0.xsd">
    <modelVersion>4.0.0</modelVersion>

    <groupId>org.example</groupId>
    <artifactId>javaMaven02</artifactId>
    <version>1.0-SNAPSHOT</version>
    <dependencies>

        <dependency>
            <groupId>mysql</groupId>
            <artifactId>mysql-connector-java</artifactId>
            <version>5.1.32</version>
        </dependency>
        <dependency>
            <groupId>c3p0</groupId>
            <artifactId>c3p0</artifactId>
            <version>0.9.1.2</version>
        </dependency>
        <dependency>
            <groupId>com.alibaba</groupId>
            <artifactId>druid</artifactId>
            <version>1.1.10</version>
        </dependency>

        <dependency>
            <groupId>junit</groupId>
            <artifactId>junit</artifactId>
            <version>4.11</version>
        </dependency>
        <dependency>
            <groupId>org.springframework</groupId>
            <artifactId>spring-test</artifactId>
            <version>5.0.5.RELEASE</version>
        </dependency>


        <dependency>
            <groupId>org.springframework</groupId>
            <artifactId>spring-context</artifactId>
            <version>5.0.5.RELEASE</version>
            <scope>compile</scope>
        </dependency>
        <dependency>
            <groupId>org.springframework</groupId>
            <artifactId>spring-web</artifactId>
            <version>5.0.5.RELEASE</version>
        </dependency>
        <dependency>
            <groupId>org.springframework</groupId>
            <artifactId>spring-webmvc</artifactId>
            <version>5.0.5.RELEASE</version>
        </dependency>
<!-- 导入json相关依赖       -->
        <dependency>
            <groupId>com.fasterxml.jackson.core</groupId>
            <artifactId>jackson-core</artifactId>
            <version>2.9.0</version>
        </dependency>
        <dependency>
            <groupId>com.fasterxml.jackson.core</groupId>
            <artifactId>jackson-databind</artifactId>
            <version>2.9.0</version>
        </dependency>

        <dependency>
            <groupId>com.fasterxml.jackson.core</groupId>
            <artifactId>jackson-annotations</artifactId>
            <version>2.9.0</version>
        </dependency>

        <dependency>
            <groupId>org.springframework</groupId>
            <artifactId>spring-jdbc</artifactId>
            <version>5.0.5.RELEASE</version>
        </dependency>
        <dependency>
            <groupId>org.springframework</groupId>
            <artifactId>spring-tx</artifactId>
            <version>5.0.5.RELEASE</version>
        </dependency>

    </dependencies>

</project>
JdbcTemplateTest类下
public class JdbcTemplateTest {
@Test
//测试Spring产生jdbcTemplate对象
public void test2() throws PropertyVetoException {
ApplicationContext app=new ClassPathXmlApplicationContext("applicationContext1.xml");
JdbcTemplate jdbcTemplate=app.getBean(JdbcTemplate.class);
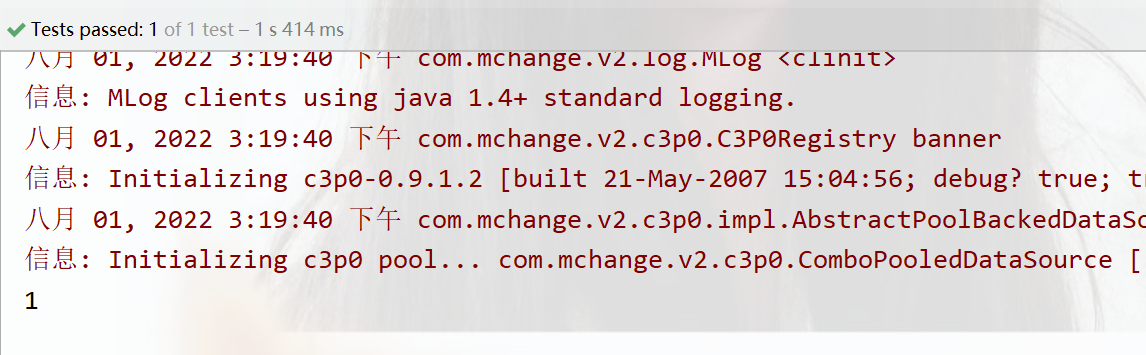
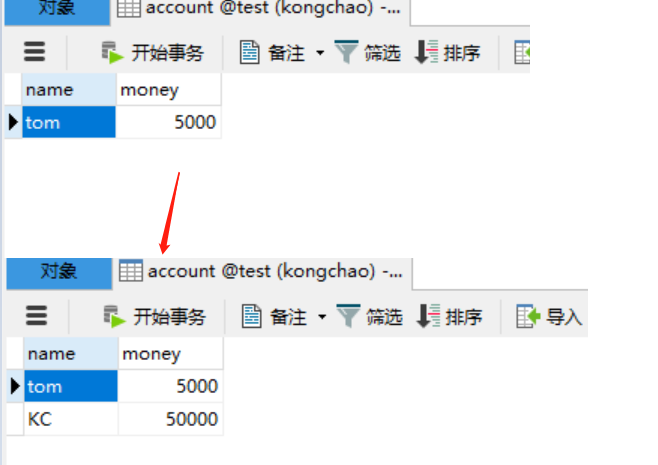
int row = jdbcTemplate.update("insert into account value(?,?)", "KC", 50000);
System.out.println(row);
}
}
运行结果:
数据库中的变化
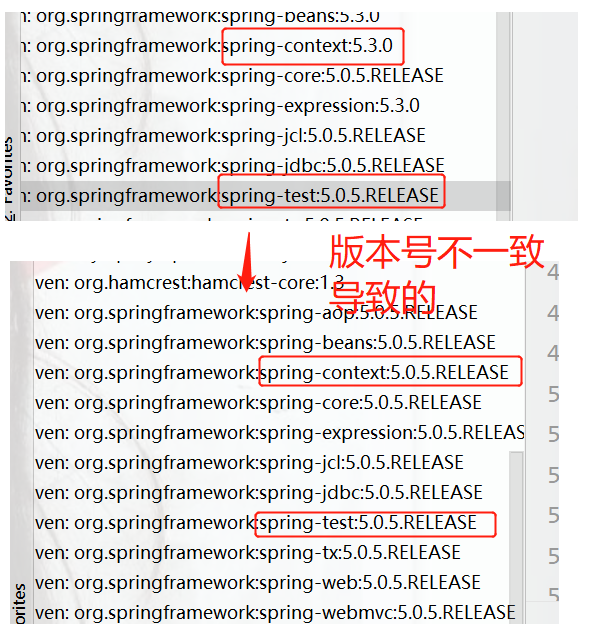
运行时,出现java.lang.NoClassDefFoundError: org/springframework/core/metrics/ApplicationStartup
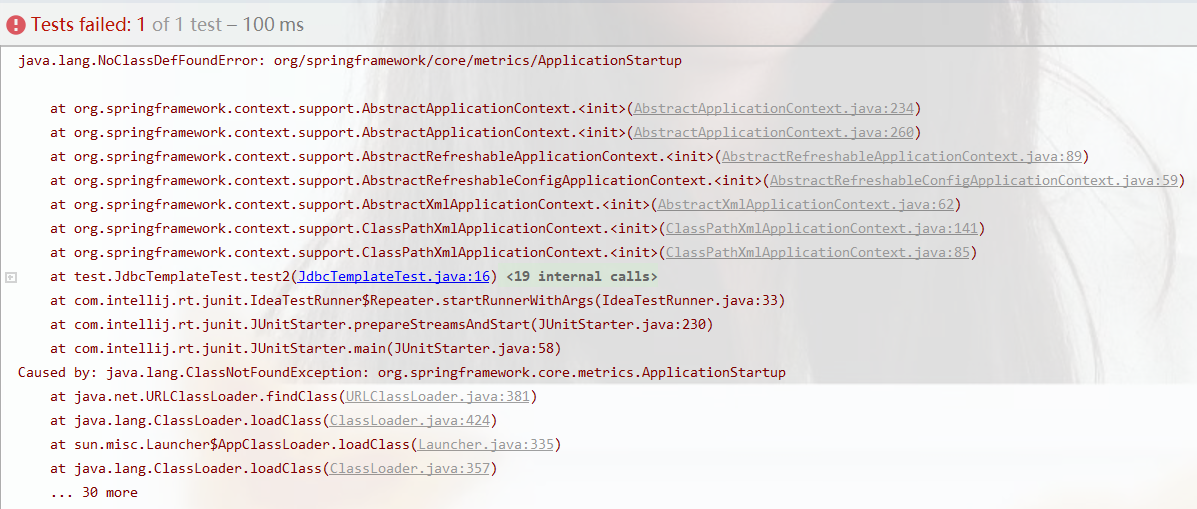
原因是:版本号不一致,改为一致即可正常运行
jdbc内容和配置解耦合
抽取配置文件中的jdbc代码,使用单独的一个配置文件将次分开

jdbc.properties下
jdbc.driver=com.mysql.jdbc.Driver
jdbc.url=jdbc:mysql://localhost:3306/test
jdbc.username=root
jdbc.password=123456
applicationContext1.xml下
<?xml version="1.0" encoding="UTF-8"?>
<beans xmlns="http://www.springframework.org/schema/beans"
       xmlns:xsi="http://www.w3.org/2001/XMLSchema-instance"
       xmlns:context="http://www.springframework.org/schema/context"
       xsi:schemaLocation="
       http://www.springframework.org/schema/beans http://www.springframework.org/schema/beans/spring-beans.xsd
       http://www.springframework.org/schema/context http://www.springframework.org/schema/context/spring-context.xsd
">

<!--    解耦合,抽取到配置文件中去-->
<!-- 加载外部的properties,需要使用context命名空间   -->
<context:property-placeholder location="classpath:jdbc.properties"/>
<!--数据源对象-->
    <bean id="dataSource" class="com.mchange.v2.c3p0.ComboPooledDataSource">
        <property name="driverClass" value="${jdbc.driver}"/>
        <property name="jdbcUrl" value="${jdbc.url}"/>
        <property name="user" value="${jdbc.username}"/>
        <property name="password" value="${jdbc.password}"/>
    </bean>
<!--    jdbc模版对象-->
    <bean id="jdbcTemplate" class="org.springframework.jdbc.core.JdbcTemplate">
        <property name="dataSource" ref="dataSource"/>
    </bean>
</beans>
修改一下数据
public class JdbcTemplateTest {
    @Test
  //测试Spring产生jdbcTemplate对象
    public void test2() throws PropertyVetoException {
        ApplicationContext app=new ClassPathXmlApplicationContext("applicationContext1.xml");
        JdbcTemplate jdbcTemplate=app.getBean(JdbcTemplate.class);
        int row = jdbcTemplate.update("insert into account value(?,?)", "ZH",66666);
        System.out.println(row);

    }
}
返回测试,运行结果
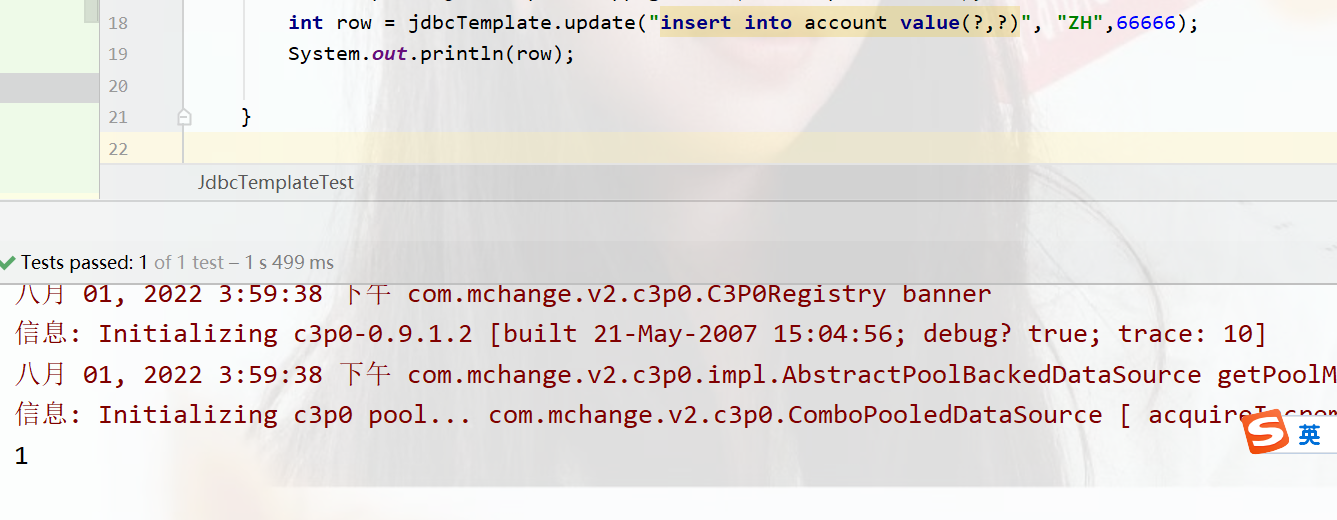
数据库中变化:
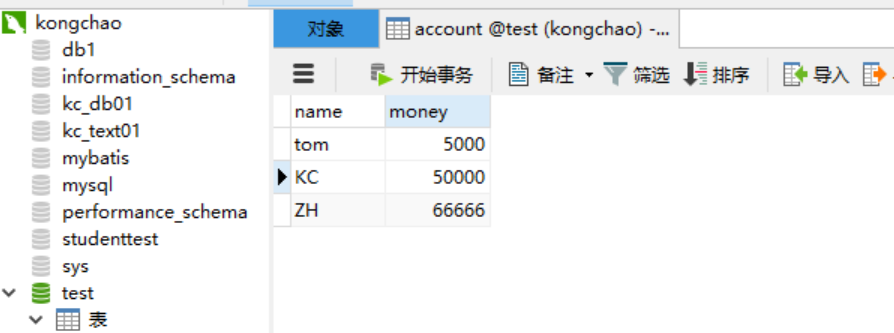
使用Spring集成Junit完成JdbcTemplate修改和删除
在pom.xml需要导入两个包,spring-test包和Juit包
pom.xml
      <dependency>
            <groupId>junit</groupId>
            <artifactId>junit</artifactId>
            <version>4.12</version>
        </dependency>
        <dependency>
            <groupId>org.springframework</groupId>
            <artifactId>spring-test</artifactId>
            <version>5.0.5.RELEASE</version>
        </dependency>
新建一个类
package test;

import org.junit.Test;
import org.junit.runner.RunWith;
import org.springframework.beans.factory.annotation.Autowired;
import org.springframework.jdbc.core.JdbcTemplate;
import org.springframework.test.context.ContextConfiguration;
import org.springframework.test.context.junit4.SpringJUnit4ClassRunner;

//指定使用spring做为驱动内核进行测试

@RunWith(SpringJUnit4ClassRunner.class)
//配置文件的位置
@ContextConfiguration("classpath:applicationContext1.xml")

 public class JdbcTemplateCRUDTest {

    //被测试的用 @Autowired注入(测试谁就注入谁)
    @Autowired
 private JdbcTemplate jdbcTemplate;

    @Test
    public void testUpdate(){
        int row = jdbcTemplate.update("update account set money=? where name=?", 222, "tom");
        System.out.println(row);
    }
  }
Junit4.11版本导致错误
一开始我使用了junit4.11的版本
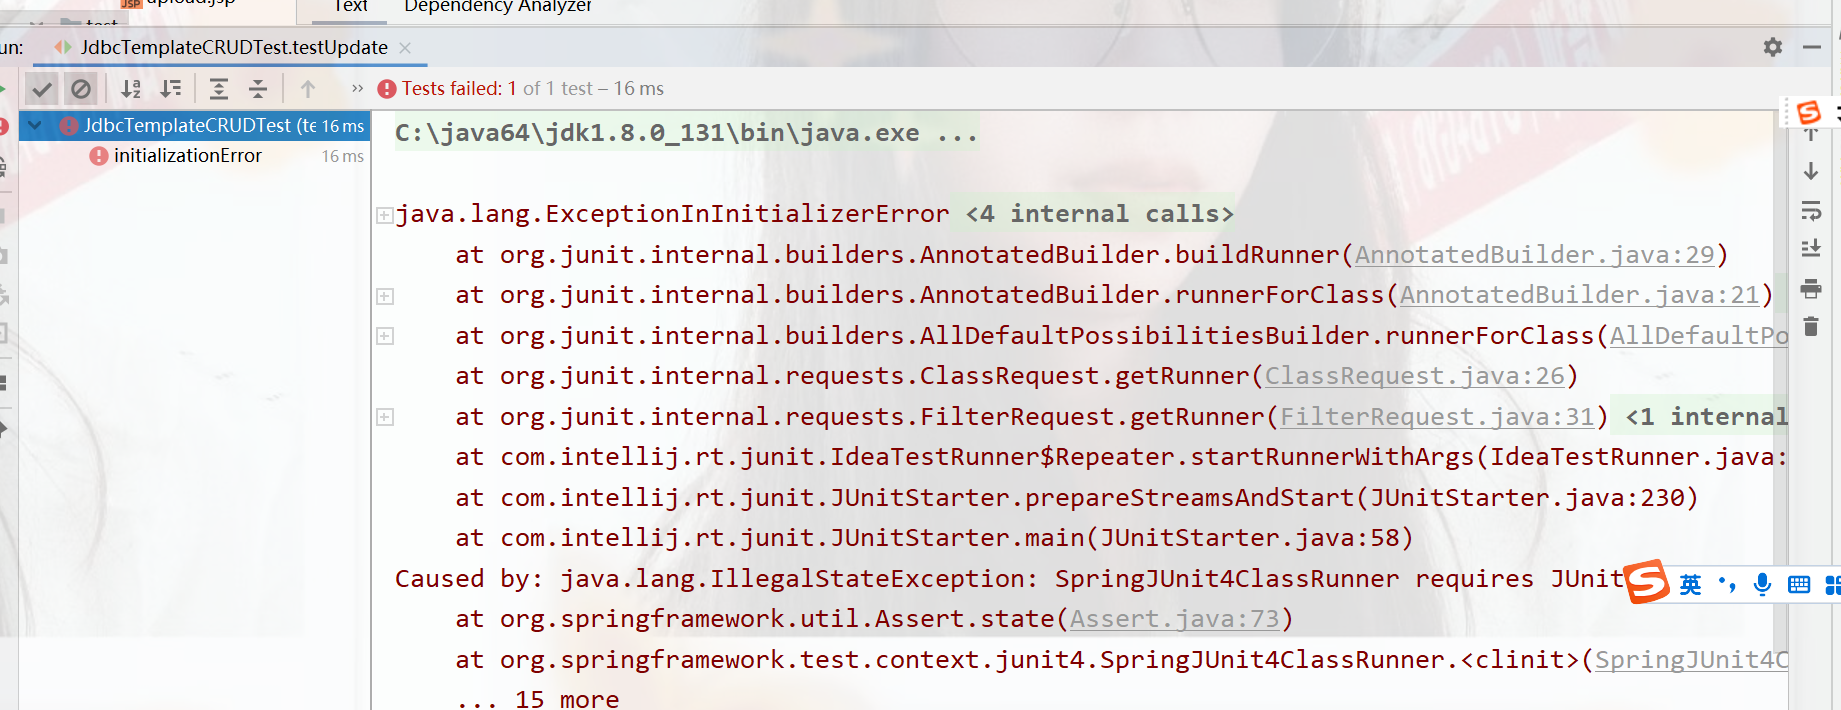
C:\java64\jdk1.8.0_131\bin\java.exe -ea -Didea.test.cyclic.buffer.size=1048576 "-javaagent:D:\Program Files\JetBrains\IntelliJ IDEA 2019.3.3\lib\idea_rt.jar=4613:D:\Program Files\JetBrains\IntelliJ IDEA 2019.3.3\bin" -Dfile.encoding=UTF-8 -classpath "D:\Program Files\JetBrains\IntelliJ IDEA 2019.3.3\lib\idea_rt.jar;D:\Program Files\JetBrains\IntelliJ IDEA 2019.3.3\plugins\junit\lib\junit5-rt.jar;D:\Program Files\JetBrains\IntelliJ IDEA 2019.3.3\plugins\junit\lib\junit-rt.jar;C:\java64\jdk1.8.0_131\jre\lib\charsets.jar;C:\java64\jdk1.8.0_131\jre\lib\deploy.jar;C:\java64\jdk1.8.0_131\jre\lib\ext\access-bridge-64.jar;C:\java64\jdk1.8.0_131\jre\lib\ext\cldrdata.jar;C:\java64\jdk1.8.0_131\jre\lib\ext\dnsns.jar;C:\java64\jdk1.8.0_131\jre\lib\ext\jaccess.jar;C:\java64\jdk1.8.0_131\jre\lib\ext\jfxrt.jar;C:\java64\jdk1.8.0_131\jre\lib\ext\localedata.jar;C:\java64\jdk1.8.0_131\jre\lib\ext\nashorn.jar;C:\java64\jdk1.8.0_131\jre\lib\ext\sunec.jar;C:\java64\jdk1.8.0_131\jre\lib\ext\sunjce_provider.jar;C:\java64\jdk1.8.0_131\jre\lib\ext\sunmscapi.jar;C:\java64\jdk1.8.0_131\jre\lib\ext\sunpkcs11.jar;C:\java64\jdk1.8.0_131\jre\lib\ext\zipfs.jar;C:\java64\jdk1.8.0_131\jre\lib\javaws.jar;C:\java64\jdk1.8.0_131\jre\lib\jce.jar;C:\java64\jdk1.8.0_131\jre\lib\jfr.jar;C:\java64\jdk1.8.0_131\jre\lib\jfxswt.jar;C:\java64\jdk1.8.0_131\jre\lib\jsse.jar;C:\java64\jdk1.8.0_131\jre\lib\management-agent.jar;C:\java64\jdk1.8.0_131\jre\lib\plugin.jar;C:\java64\jdk1.8.0_131\jre\lib\resources.jar;C:\java64\jdk1.8.0_131\jre\lib\rt.jar;D:\小项目\webTest\target\test-classes;D:\小项目\webTest\target\classes;E:\Maven_project\lib\javax.transaction.jar;E:\Maven_project\lib\javax.annotation.jar;E:\Maven_project\lib\javax.jms.jar;E:\Maven_project\lib\javax.resource.jar;E:\Maven_project\lib\javax.ejb.jar;E:\Maven_project\lib\javax.persistence.jar;E:\Maven_project\lib\javax.servlet.jar;E:\Maven_project\lib\javax.servlet.jsp.jstl.jar;E:\Maven_project\lib\javax.servlet.jsp.jar;C:\Users\执久\.m2\repository\mysql\mysql-connector-java\5.1.32\mysql-connector-java-5.1.32.jar;C:\Users\执久\.m2\repository\c3p0\c3p0\0.9.1.2\c3p0-0.9.1.2.jar;C:\Users\执久\.m2\repository\com\alibaba\druid\1.1.10\druid-1.1.10.jar;C:\Users\执久\.m2\repository\junit\junit\4.11\junit-4.11.jar;C:\Users\执久\.m2\repository\org\hamcrest\hamcrest-core\1.3\hamcrest-core-1.3.jar;C:\Users\执久\.m2\repository\org\springframework\spring-test\5.0.5.RELEASE\spring-test-5.0.5.RELEASE.jar;C:\Users\执久\.m2\repository\org\springframework\spring-core\5.0.5.RELEASE\spring-core-5.0.5.RELEASE.jar;C:\Users\执久\.m2\repository\org\springframework\spring-jcl\5.0.5.RELEASE\spring-jcl-5.0.5.RELEASE.jar;C:\Users\执久\.m2\repository\org\springframework\spring-context\5.0.5.RELEASE\spring-context-5.0.5.RELEASE.jar;C:\Users\执久\.m2\repository\org\springframework\spring-aop\5.0.5.RELEASE\spring-aop-5.0.5.RELEASE.jar;C:\Users\执久\.m2\repository\org\springframework\spring-beans\5.0.5.RELEASE\spring-beans-5.0.5.RELEASE.jar;C:\Users\执久\.m2\repository\org\springframework\spring-expression\5.0.5.RELEASE\spring-expression-5.0.5.RELEASE.jar;C:\Users\执久\.m2\repository\org\springframework\spring-web\5.0.5.RELEASE\spring-web-5.0.5.RELEASE.jar;C:\Users\执久\.m2\repository\org\springframework\spring-webmvc\5.0.5.RELEASE\spring-webmvc-5.0.5.RELEASE.jar;C:\Users\执久\.m2\repository\com\fasterxml\jackson\core\jackson-core\2.9.0\jackson-core-2.9.0.jar;C:\Users\执久\.m2\repository\com\fasterxml\jackson\core\jackson-databind\2.9.0\jackson-databind-2.9.0.jar;C:\Users\执久\.m2\repository\com\fasterxml\jackson\core\jackson-annotations\2.9.0\jackson-annotations-2.9.0.jar;C:\Users\执久\.m2\repository\org\springframework\spring-jdbc\5.0.5.RELEASE\spring-jdbc-5.0.5.RELEASE.jar;C:\Users\执久\.m2\repository\org\springframework\spring-tx\5.0.5.RELEASE\spring-tx-5.0.5.RELEASE.jar" com.intellij.rt.junit.JUnitStarter -ideVersion5 -junit4 test.JdbcTemplateCRUDTest,testUpdate

java.lang.ExceptionInInitializerError
    at sun.reflect.NativeConstructorAccessorImpl.newInstance0(Native Method)
    at sun.reflect.NativeConstructorAccessorImpl.newInstance(NativeConstructorAccessorImpl.java:62)
    at sun.reflect.DelegatingConstructorAccessorImpl.newInstance(DelegatingConstructorAccessorImpl.java:45)
    at java.lang.reflect.Constructor.newInstance(Constructor.java:423)
    at org.junit.internal.builders.AnnotatedBuilder.buildRunner(AnnotatedBuilder.java:29)
    at org.junit.internal.builders.AnnotatedBuilder.runnerForClass(AnnotatedBuilder.java:21)
    at org.junit.runners.model.RunnerBuilder.safeRunnerForClass(RunnerBuilder.java:59)
    at org.junit.internal.builders.AllDefaultPossibilitiesBuilder.runnerForClass(AllDefaultPossibilitiesBuilder.java:26)
    at org.junit.runners.model.RunnerBuilder.safeRunnerForClass(RunnerBuilder.java:59)
    at org.junit.internal.requests.ClassRequest.getRunner(ClassRequest.java:26)
    at org.junit.internal.requests.FilterRequest.getRunner(FilterRequest.java:31)
    at com.intellij.junit4.JUnit4IdeaTestRunner.startRunnerWithArgs(JUnit4IdeaTestRunner.java:49)
    at com.intellij.rt.junit.IdeaTestRunner$Repeater.startRunnerWithArgs(IdeaTestRunner.java:33)
    at com.intellij.rt.junit.JUnitStarter.prepareStreamsAndStart(JUnitStarter.java:230)
    at com.intellij.rt.junit.JUnitStarter.main(JUnitStarter.java:58)
Caused by: java.lang.IllegalStateException: SpringJUnit4ClassRunner requires JUnit 4.12 or higher.
    at org.springframework.util.Assert.state(Assert.java:73)
    at org.springframework.test.context.junit4.SpringJUnit4ClassRunner.<clinit>(SpringJUnit4ClassRunner.java:104)
    ... 15 more

进程已结束,退出代码 -1
** 将其改为Junit4.12就可以正确执行了**
运行结果
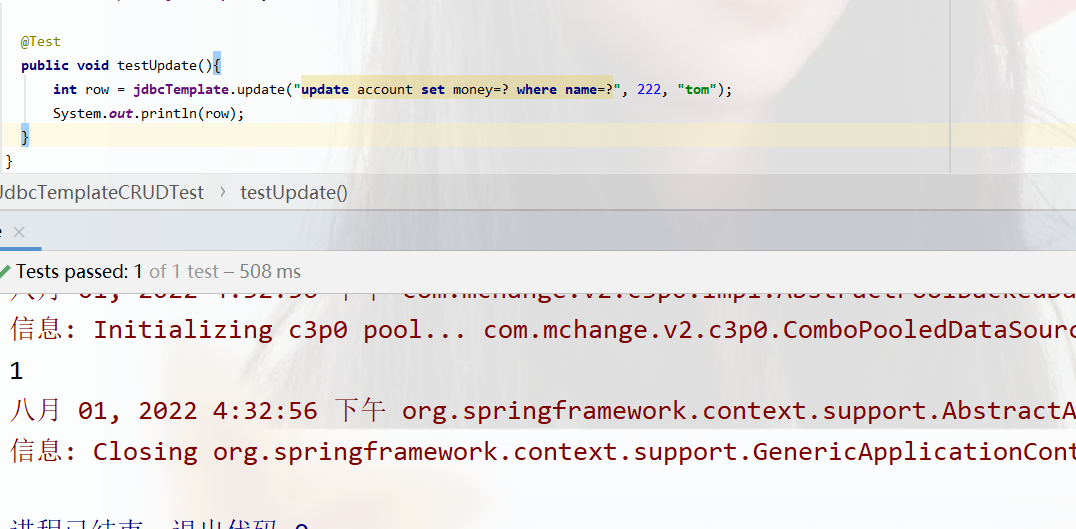
数据库中
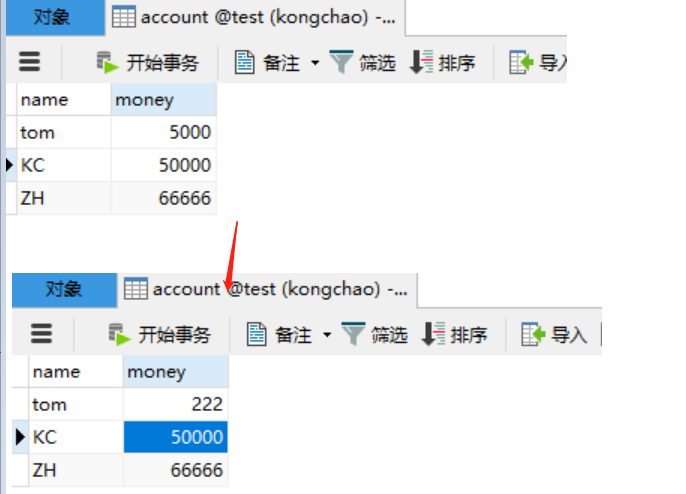
删除的操作
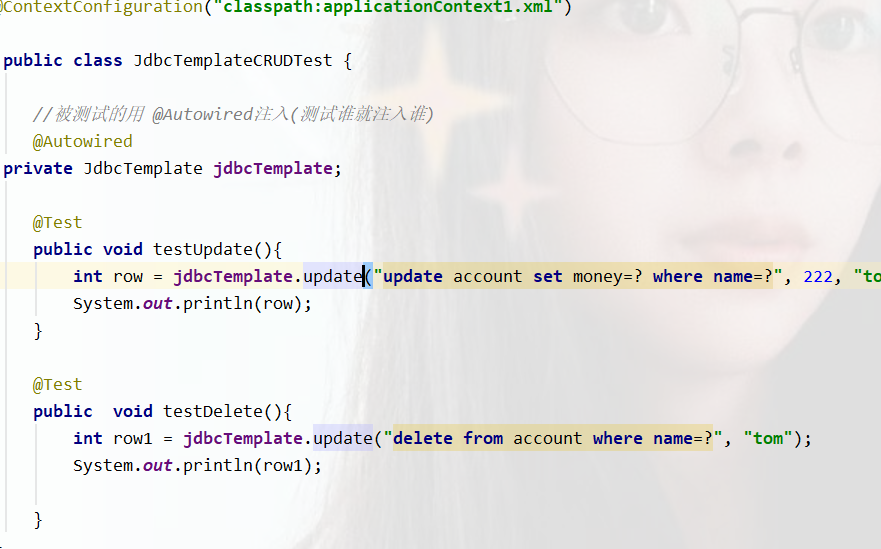
    @Test
    public  void testDelete(){
        int row1 = jdbcTemplate.update("delete from account where name=?", "tom");
        System.out.println(row1);

    }
运行结果
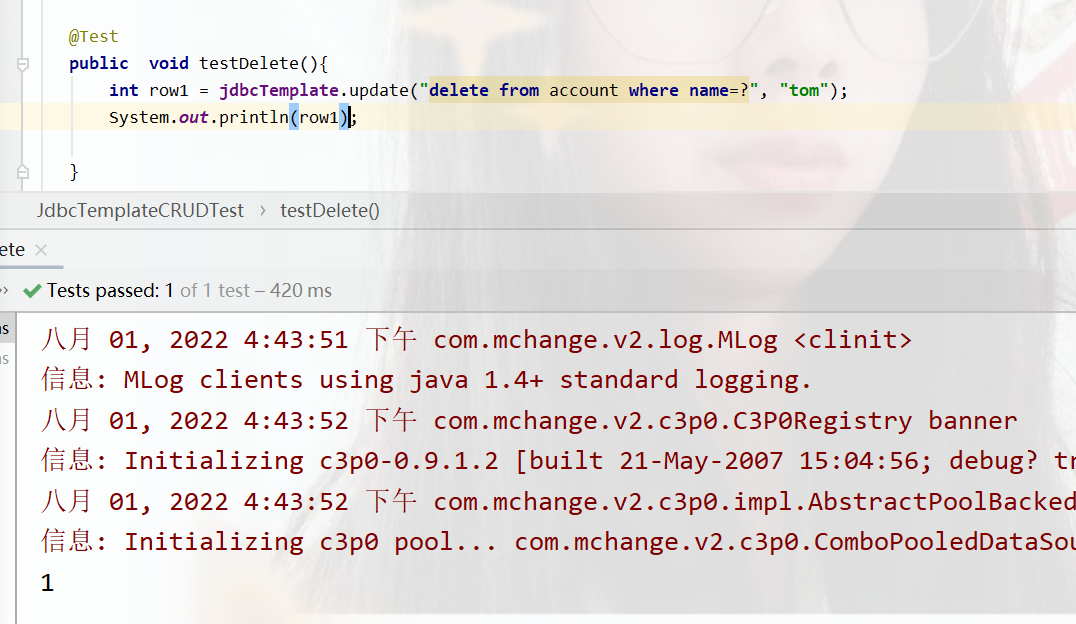
数据库中
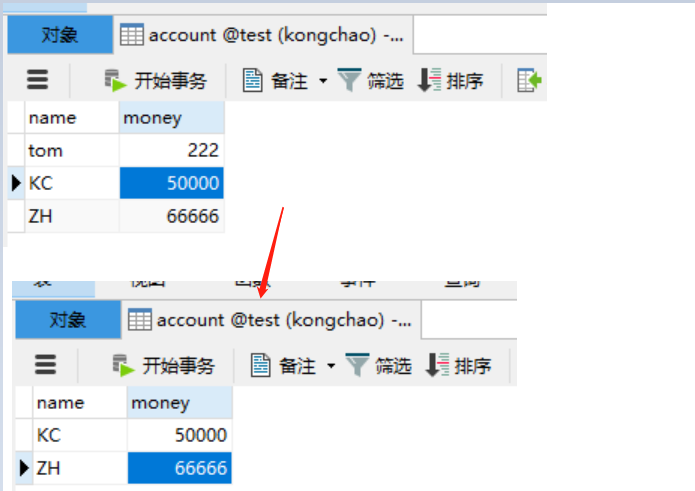
查询操作
查询所有
查询操作需要放入字节码对象.class
    @Test
    public void testQueryAll(){
//后面括号中需要放入字节码对象
        List<Account> accountList = jdbcTemplate.query("select * from account", new BeanPropertyRowMapper<Account>(Account.class));
        System.out.println(accountList);
    }
数据库中
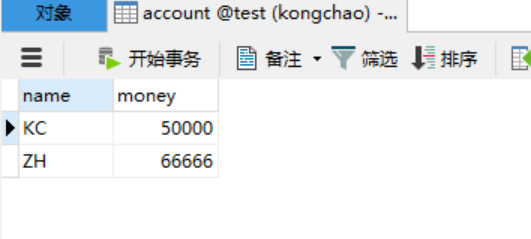
运行结果
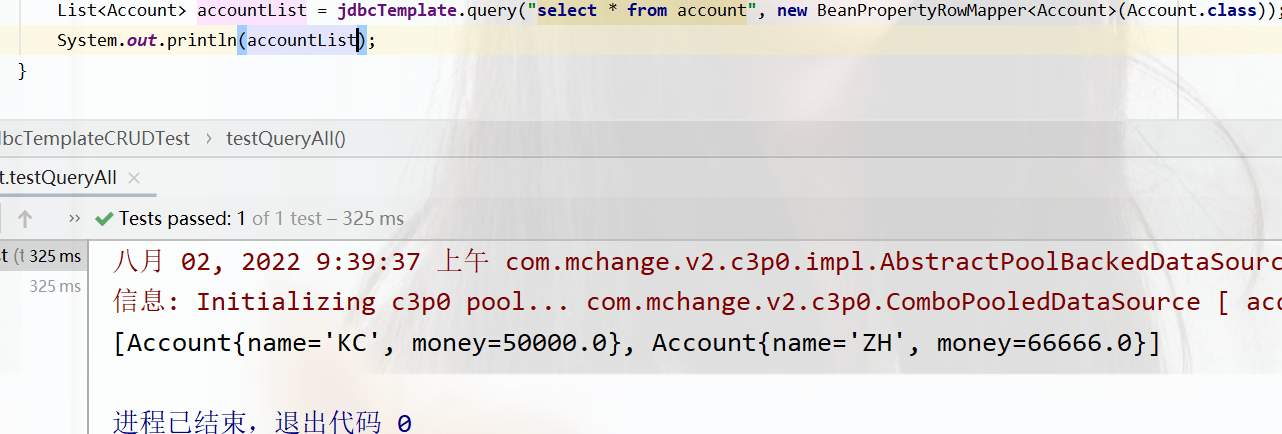
查询单个
  @Test
    public void testQueryOne(){
        Account account = jdbcTemplate.queryForObject("select *from account where name=?", new BeanPropertyRowMapper<Account>(Account.class), "ZH");
        System.out.println(account);
    }
运行结果
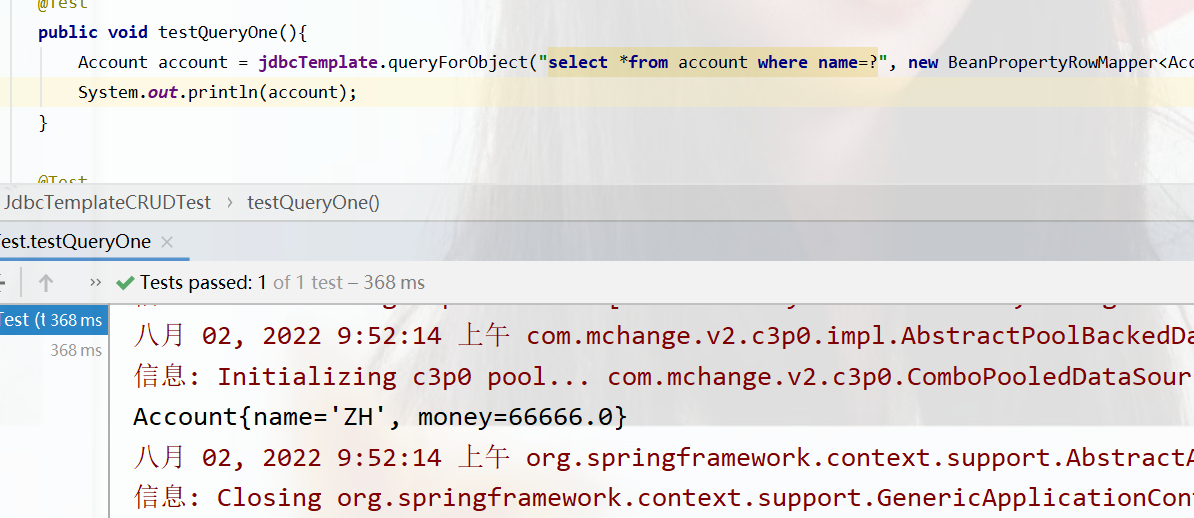
聚合查询
 @Test
    public void testQueryCount(){
//查询数据条数
        Long count = jdbcTemplate.queryForObject("select count(*) from account", Long.class);
        System.out.println(count);
    }
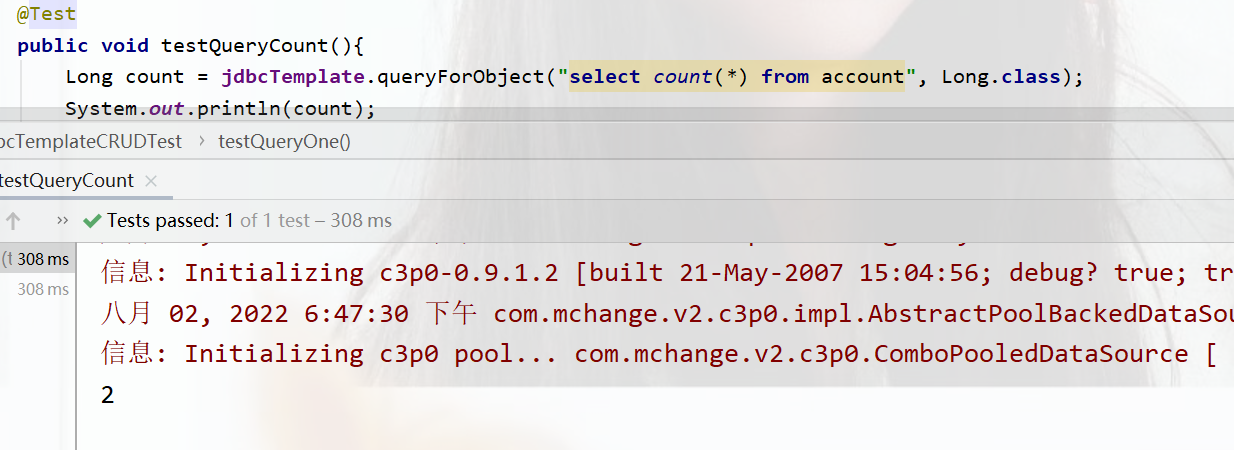
是一个实体就new一个对象,但是一个简单的数据,则创建一个普通的数据
知识要点总结
1导入spring-jdbc和spring-tx坐标

2创建数据库表和实体

3创建JdbcTemplate对象
    JdbcTemplate jdbcTemplate=new JdbcTemplate();
    jdbcTemplate.setDatasource(datasource);

4执行数据库操作
 更新操作:
    jdbcTemplate.update(sql,params)

查询操作:
    jdbcTemplate.query(sql,Mapper,params)
    jdbcTemplate.queryForobject(sql,Mapper,params)
Spring的AOP简介
什么是AOP
AOP为Aspect Oriented Programming的缩写,意思为面向切面编程,是通过预编译方式和运行期动态代理实现程序功能的同一维护的一种技术。
AOP是OOP(面向对象编程)的延续,是软件开发中的一个热点,也是Spring框架中的一个重要内容,是函数式编程的一种衍生范型,利用AOP可以对业务逻辑的各个部分进行隔离,从而使得业务逻辑各部分之间的耦合度降低,提高程序的课重用性,同时提高了开发的效率。
AOP的作用及其优势
作用:在程序运行期间,在不修改源码的情况下对方法进行功能增强
优势:减少重复代码,提高开发效率,并且便于维护
举例示意图:
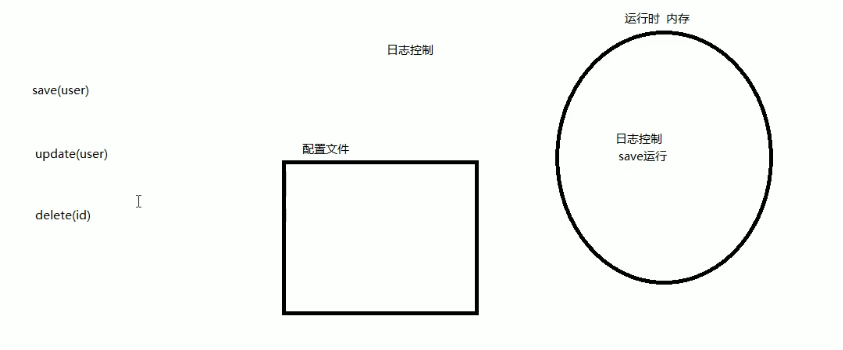
AOP的底层实现
实际上,AOP的底层是通过Spring提供的动态代理技术实现的,在运行期间,Spring通过动态地阿里技术动态的生成代理对象,代理对象方法执行时进行增强功能的介入,在去调用目标对象的方法,从而完成功能增强。
AOP的动态代理技术
常用的动态代理技术
JDK代理:基于接口的动态代理技术(有接口时用)
cglib代理:基于父类的动态代理技术(没接口时用)
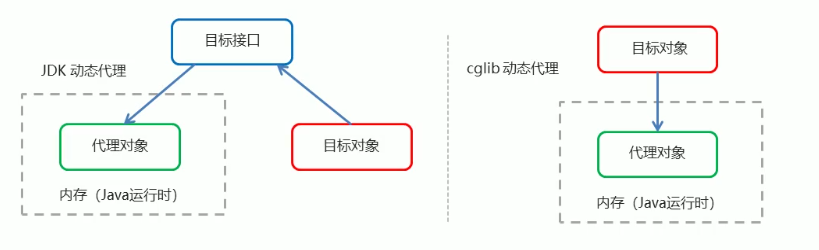
JDK动态代理
总览图
proxy下的jdk包,TargetInterface
package proxy.jdk;

public interface TargetInterface {
    public void save();
}
Target类下
package proxy.jdk;

public class Target implements TargetInterface {
    @Override
    public void save() {
        System.out.println("save running。。。");
    }
}
Advice增强类下
package proxy.jdk;
//增强方法
public class Advice {

    public void before(){
        System.out.println("前置增强。。");
    }

    public void afterReturning(){

        System.out.println("后置增强。。");
    }
}
ProxyTest类下
package proxy.jdk;

import java.lang.reflect.InvocationHandler;
import java.lang.reflect.Method;
import java.lang.reflect.Proxy;

public class ProxyTest {
    public static void main(String[] args) {

        //创建目标对象
      final Target target=new Target();

      //获得增强对象
        final Advice advice=new Advice();

//返回值 就是动态生成的代理对象
   TargetInterface proxy = (TargetInterface)Proxy.newProxyInstance(

                target.getClass().getClassLoader(),//目标对象类加载器
                target.getClass().getInterfaces(),  //目标对象相同的接口字节码对象数组
                new InvocationHandler() {
                    @Override
                    //调用代理对象的任何方法,实质执行的都是invoke方法
                    public Object invoke(Object proxy, Method method, Object[] args) throws Throwable {
                      //执行目标方法有前置增强
                        advice.before();
                        Object invoke = method.invoke(target, args);//执行目标方法
//之后有后置增强
                        advice.afterReturning();
                        return invoke;
                    }
                }
   );
   //调用代理对象的方法
        proxy.save();

    }
}
运行结果

cglib的动态代理
cglib就是引入第三方jar包
导入jar包
   <dependency>

    <groupId>org.springframework</groupId>
    <artifactId>spring-context</artifactId>
    <version>5.0.5.RELEASE</version>
    <scope>compile</scope>
  </dependency>
spring后来版本已经将第三方的cglib给我们集成到spring核心中
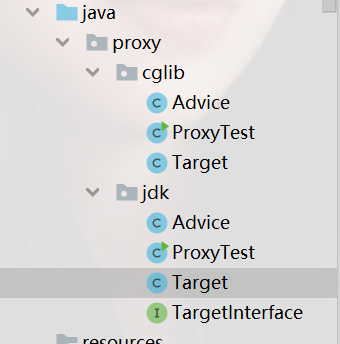
advice和Target和jdk一致,cglib不用接口,在ProxyTest下
package proxy.cglib;

import org.springframework.cglib.proxy.Enhancer;
import org.springframework.cglib.proxy.MethodInterceptor;
import org.springframework.cglib.proxy.MethodProxy;
import proxy.jdk.TargetInterface;

import java.lang.reflect.InvocationHandler;
import java.lang.reflect.Method;
import java.lang.reflect.Proxy;

public class ProxyTest {
    public static void main(String[] args) {

        //创建目标对象
        final Target target = new Target();

        //获得增强对象
        final Advice advice = new Advice();

//返回值 就是动态生成的代理对象 基于cglib
        //1、创建增强器
        Enhancer enhancer=new Enhancer();
        //2、设置父类(目标)
        enhancer.setSuperclass(Target.class);
        //3、设置回调
        enhancer.setCallback(new MethodInterceptor() {
            @Override
            public Object intercept(Object proxy, Method method, Object[] args, MethodProxy methodProxy) throws Throwable {
             advice.before();  //执行前置
                Object invoke = method.invoke(target, args);//执行目标
              advice.afterReturning();//执行后置
                return invoke;
            }
        });

        //创建代理对象
        Target proxy = (Target)enhancer.create();
        proxy.save();
    }
}
运行结果
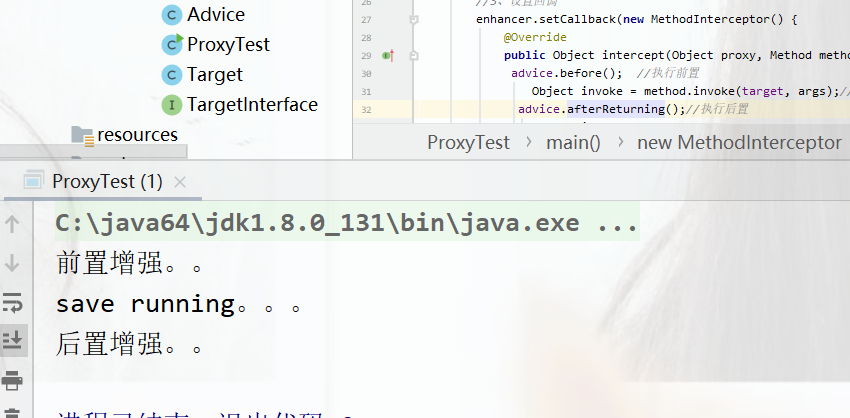
AOP相关概念
Spring的AOP实现底层就是对上面的动态代理的代码进行了封装,封装后我们只需要对需要关注的部分进行代码编写,并通过配置的方式完成指定目标的方法增强。
常用的术语如下:
- Target(目标对象):代理的目标对象
- Proxy(代理):一个类被AOP织入增强后,就产生一个结果代理类
- Joinpoint(连接点):所谓连接点是指那些被拦截到的点。在spring中,这些点指的是方法,因为spring只支持方法类型的连接点
- Pointcut(切入点):所谓切入点是指我们要对哪些Joinpoint进行拦截的定义
- Advice(通知/增强):所谓通知是指拦截到Joinpoint之后所要做的事情就是通知 Aspect(切面):是切入点和通知(引介)的结合
- Weaving(织入):是指把增强应用到目标对象来创建新的代理对象的过程。spring采用动态代理织入,而 Aspect采用编译期织入和类装载期织入
AOP开发明确的事项
1、需要编写的内容
- 编写核心业务代码(目标类的目标方法)
- 编写切面类。切面类中有通知(增强功能方法)
- 在配置文件中,配置织入关系,即将哪些通知与哪些连接点进行结合
2、AOP技术实现的内容
Spring框架监控切入点方法的执行,一旦监控到切入点方法被运行,使用代理机制,动态创建目标对象的代理对象,根据通知类别,在代理对象的对应位置,将通知对应的功能织入,完成完整的代码逻辑运行。
3、AOP底层使用哪种代理方式
在spring中,框架会根据目标类是否实现了接口来决定采用哪种动态代理的方式。
知识要点总结
①aop:面向切面编程
②aop底层实现:基于JDK的动态代理和基于Cglib的动态代理
③aop的重点概念:
Pointcut(切入点):被增强的方法Advice(通知/增强):封装增强业务逻辑的方法Aspect(切面):切点+通知Weaving(织入):将切点与通知结合的过程
④开发明确事项:
谁是切点(切点表达式配置)
谁是通知(切面类中的增强方法)
将切点和通知进行织入配置
基于xml的AOP开发
①导入AOP相关坐标
②创建目标接口和目标类(内部有切点)
③创建切面类(内部有增强方法)
④将目标类和切面类的对象创建权交给spring
⑤在applicationContext.xml中配置织入关系
⑥测试代码
1、导入坐标
  <dependency>
      <groupId>org.aspectj</groupId>
      <artifactId>aspectjweaver</artifactId>
      <version>1.8.4</version>
    </dependency>
spring-context本身有aop的实现,但是aspectj更好,aspectj本身就是一个小框架。

MyAspect切面类(有增强方法)
package aop;

public class MyAspect {
   public void before(){
       System.out.println("前置增强....");
   }
}
applicationContext.xml下
<?xml version="1.0" encoding="UTF-8"?>
<beans xmlns="http://www.springframework.org/schema/beans"
               xmlns:xsi="http://www.w3.org/2001/XMLSchema-instance"
             xmlns:aop="http://www.springframework.org/schema/aop"
       xsi:schemaLocation="http://www.springframework.org/schema/beans http://www.springframework.org/schema/beans/spring-beans.xsd
       http://www.springframework.org/schema/aop http://www.springframework.org/schema/aop/spring-aop.xsd
">

    <!--    目标对象-->
    <bean id="target" class="aop.Target"></bean>

    <!--    切面对象-->
    <bean id="myAspect" class="aop.MyAspect"></bean>

    <!--配置织入 告诉spring框架,哪些方法(切点)需要进行哪些增强(前置、后置...)引入aop命名空间-->
   <aop:config>
<!--  声明切面-->
       <aop:aspect ref="myAspect">
           <!--切面:切点+通知   -->
           <aop:before method="before" pointcut="execution(public void aop.Target.save())"/>
       </aop:aspect>
   </aop:config>
</beans>
AopTest测试类下
package aop;

import org.junit.Test;
import org.junit.runner.RunWith;
import org.springframework.beans.factory.annotation.Autowired;
import org.springframework.test.context.ContextConfiguration;
import org.springframework.test.context.junit4.SpringJUnit4ClassRunner;

@RunWith(SpringJUnit4ClassRunner.class)
@ContextConfiguration("classpath:applicationContext.xml")
public class AopTest {

@Autowired
    private TargetInterface target;

@Test
    public void test1(){
    target.save();
}

}
运行之后报错了
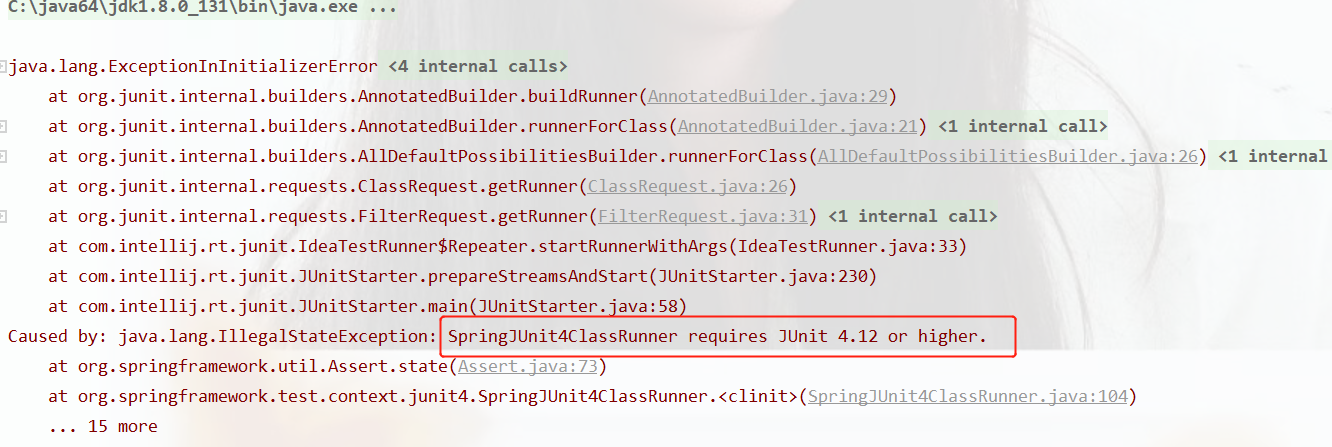
仔细一看需要Junit4.12以上的版本,改完之后,
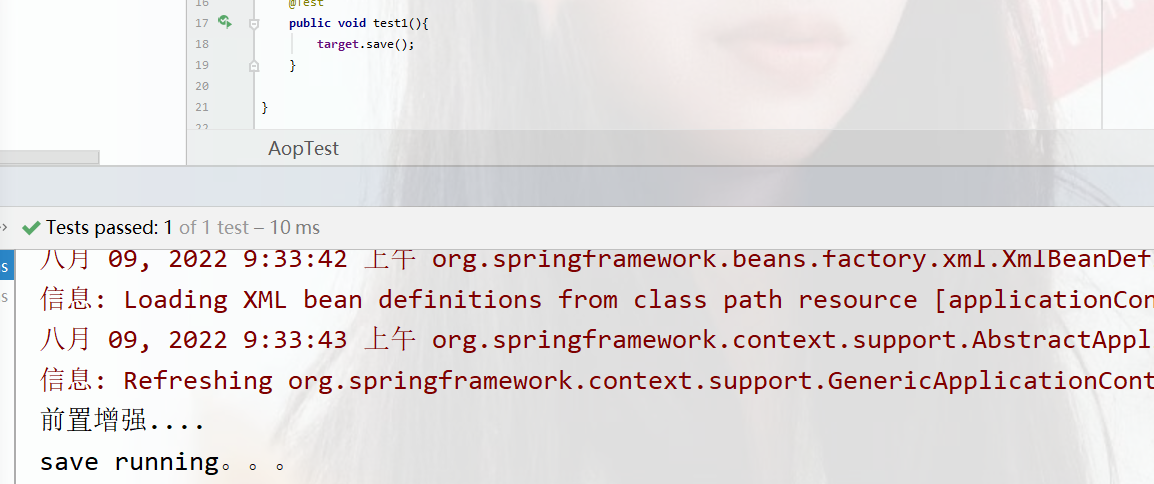
XML配置AOP详解
切点表达式的写法
表达式语法:
execution(修饰符] 返回值类型 包名.类名.方法名(参数))
- 访问修饰符可以省略
- 返回值类型、包名、类名、方法名可以使用星号*代表任意
- 包名与类名之间一个点.代表当前包下的类,两个点..表示当前包及其子包下的类
- 参数列表可以使用两个点..表示任意个数,任意类型的参数列表
例如
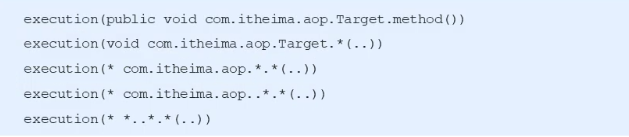
通知/(增强)的类型
通知的配置语法:
<aop:通知类型 method="切面类中的方法名" pointcut="切点表达式"/>
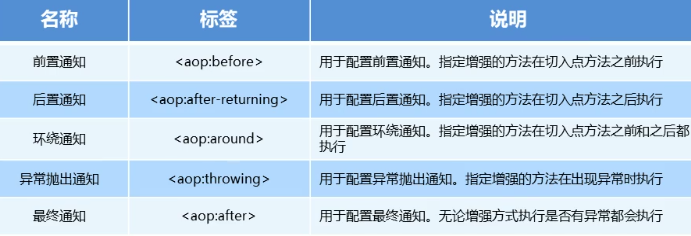
** 前后置增强**
 <!--配置织入 告诉spring框架,哪些方法(切点)需要进行哪些增强(前置、后置...)引入aop命名空间-->
   <aop:config>
<!--  声明切面-->
       <aop:aspect ref="myAspect">
           <!--切面:切点+通知   -->
           <aop:before method="before" pointcut="execution(public void aop.Target.save())"/>
           <aop:after-returning method="afterReturn" pointcut="execution(public void aop.Target.save())"/>
       </aop:aspect>
   </aop:config>
写下前后置增强
public class MyAspect {
   public void before(){
       System.out.println("前置增强....");
   }
   public void afterReturn(){
       System.out.println("后置增强....");
   }
}
运行之后
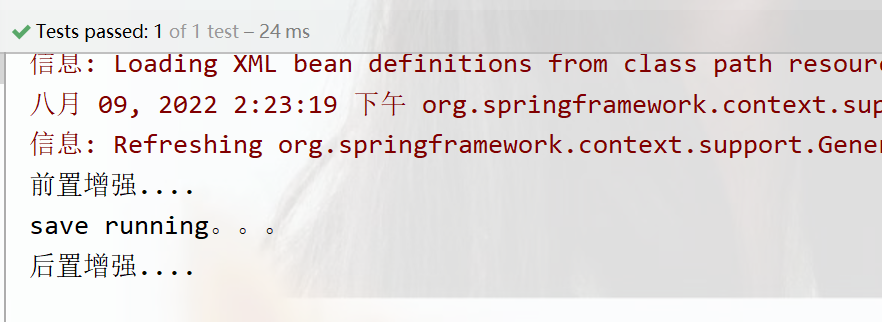
环绕增强
切面类中的方法
import org.aspectj.lang.ProceedingJoinPoint;

public class MyAspect
//ProceedingJoinPoint:正在执行的连接点===切点
  public Object around(ProceedingJoinPoint point) throws Throwable {
      System.out.println("环绕前增强...");
      Object proceed=point.proceed();//切点方法
      System.out.println("环绕后增强...");
      return proceed;
   }
}
applicationContext.xml下
 <aop:config>
<!--  声明切面-->
       <aop:aspect ref="myAspect">
           <!--切面:切点+通知   -->

      <aop:around method="around" pointcut="execution(public void aop.Target.save())"/>
       </aop:aspect>
   </aop:config>
</beans>
运行结果
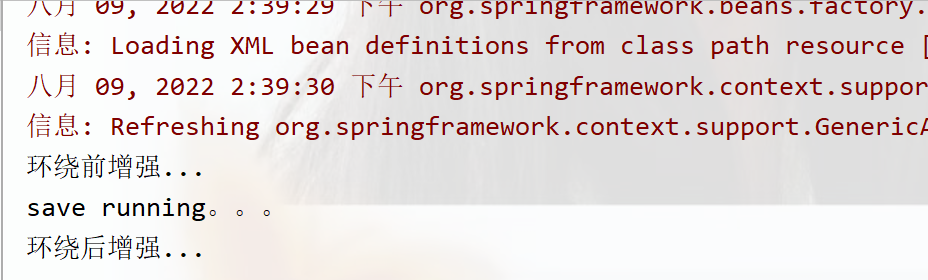
异常抛出增强
切面类下
   public void afterThrows(){
       System.out.println("异常抛出增强");
   }
目标类中需要手动加一个异常
public class Target implements TargetInterface {
    @Override
    public void save() {
        System.out.println("save running。。。");
        int i=1/0;
    }
}
applicationContext.xml中
   <!--配置织入 告诉spring框架,哪些方法(切点)需要进行哪些增强(前置、后置...)引入aop命名空间-->
   <aop:config>
<!--  声明切面-->
       <aop:aspect ref="myAspect">
           <!--切面:切点+通知   -->

      <aop:after-throwing method="afterThrows" pointcut="execution(public void aop.Target.save())"/>
       </aop:aspect>
   </aop:config>
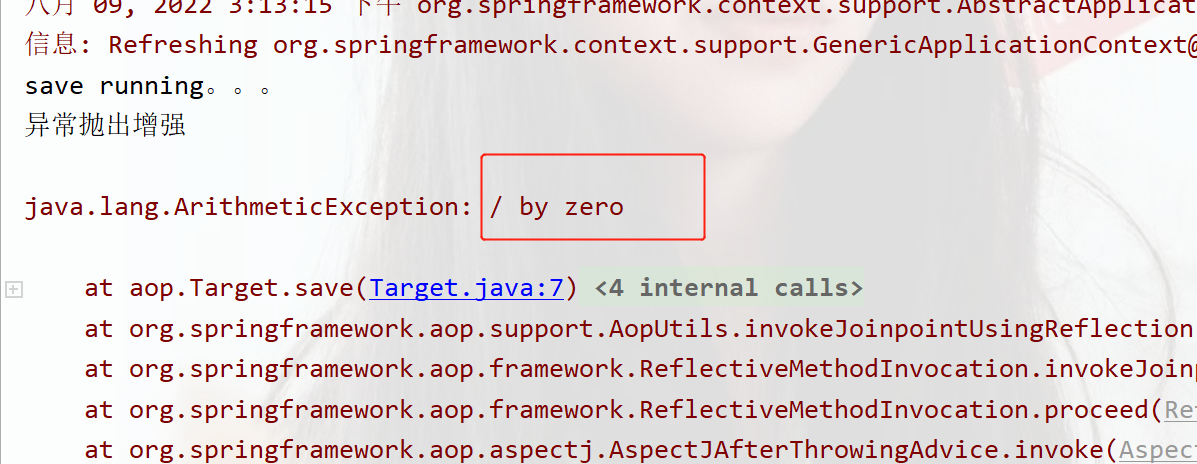
最终增强
最终增强即为无论抛不抛出异常,这个方法都会被执行
   public void after(){
       System.out.println("最终增强...");
   }
   <aop:config>
<!--  声明切面-->
       <aop:aspect ref="myAspect">
           <!--切面:切点+通知   -->

      <aop:after-throwing method="afterThrows" pointcut="execution(public void aop.Target.save())"/>
      <aop:after method="after" pointcut="execution(public void aop.Target.save())"/>
       </aop:aspect>
   </aop:config>
运行结果
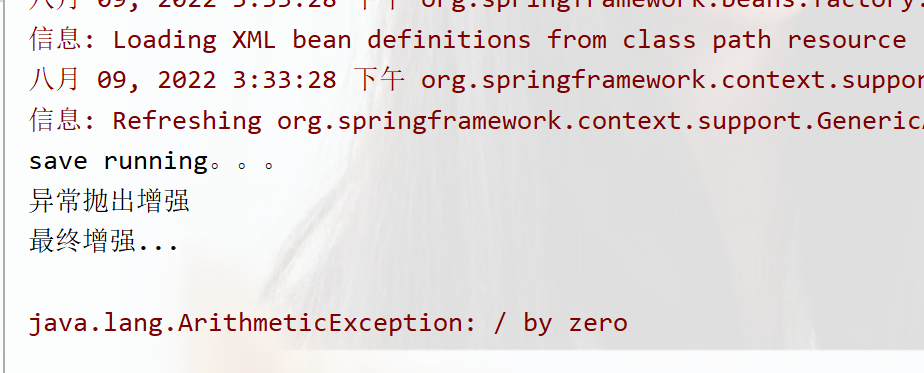
切点表达式的抽取
当多个增强的切点表达式相同时,可以将切点表达式进行抽取,在增强中使用pointcut-ref属性代替pointcut属性来引用抽取后的切点表达式。
<aop:pointcut id="myPointcut" expression="execution(public void aop.Target.save())"/>
applicationContext.xml中
    <!--配置织入 告诉spring框架,哪些方法(切点)需要进行哪些增强(前置、后置...)引入aop命名空间-->
   <aop:config>
<!--   抽取切点表达式    -->
       <aop:pointcut id="myPointcut" expression="execution(public void aop.Target.save())"/>
<!--  声明切面-->
       <aop:aspect ref="myAspect">
           <!--切面:切点+通知   -->
<aop:around method="around" pointcut-ref="myPointcut"/>
           <aop:after-returning method="after" pointcut-ref="myPointcut"/>
       </aop:aspect>
   </aop:config>
运行结果
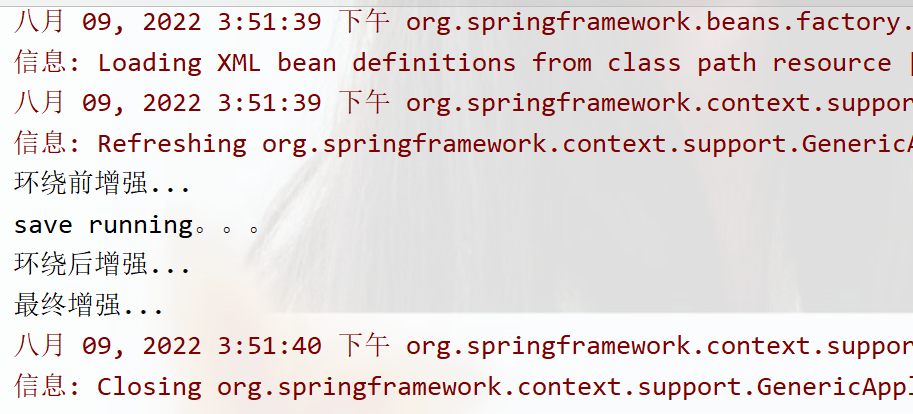
知识要点
aop织入
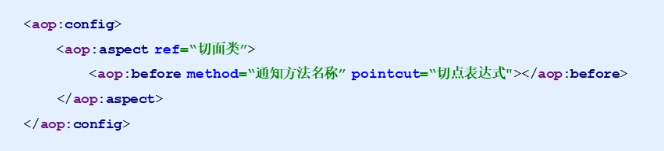
通知的类型:前置通知、后置通知、环绕通知、异常抛出通知、最终通知
点表达式的写法

基于注解的AOP开发
快速入门,基于注解的aop开发步骤
①创建目标接口和目标类(内部有切点)
②创建切面类(内部有增强方法)
③将目标类和切面类的对象创建权交给spring
④在切面类中使用注解配置织入关系
⑤在配置文件中开启组件扫描和AOP的自动代理
⑥测试
编写测试
其中Target类下
package anno;
import org.springframework.stereotype.Component;

//交给spring容器,起个名为target
@Component("target")
public class Target implements TargetInterface {

    public void save() {
        System.out.println("save running。。。");
    }
}
Interface类下
package anno;

public interface TargetInterface {
    public void save();
}
MyAspect切面类下
package anno;

import org.aspectj.lang.annotation.Aspect;
import org.aspectj.lang.annotation.Before;
import org.springframework.stereotype.Component;

//交给spring容器
@Component("myAspect")
@Aspect //标注当前MyAspect是一个切面类
public class MyAspect {
    @Before("execution(* anno.*.*(..))")
   public void before(){
       System.out.println("前置增强....");
   }

}
AnnoTest测试类下
package anno;

import org.junit.Test;
import org.junit.runner.RunWith;
import org.springframework.beans.factory.annotation.Autowired;
import org.springframework.test.context.ContextConfiguration;
import org.springframework.test.context.junit4.SpringJUnit4ClassRunner;

@RunWith(SpringJUnit4ClassRunner.class)
@ContextConfiguration("classpath:applicationContext_anno.xml")
public class AnnoTest {

    @Autowired
    private TargetInterface target;

    @Test
    public void test1(){
        target.save();
    }

}
applicationContext_anno.xml配置文件
<?xml version="1.0" encoding="UTF-8"?>
<beans xmlns="http://www.springframework.org/schema/beans"
               xmlns:xsi="http://www.w3.org/2001/XMLSchema-instance"
             xmlns:aop="http://www.springframework.org/schema/aop"
             xmlns:context="http://www.springframework.org/schema/context"
       xsi:schemaLocation="http://www.springframework.org/schema/beans http://www.springframework.org/schema/beans/spring-beans.xsd
       http://www.springframework.org/schema/aop http://www.springframework.org/schema/aop/spring-aop.xsd
       http://www.springframework.org/schema/context http://www.springframework.org/schema/context/spring-context.xsd
">

<!--组件扫描-->
    <context:component-scan base-package="anno"/>

<!--aop自动代理,加上才会识别这些通知的注解-->
    <aop:aspectj-autoproxy/>

</beans>
运行结果
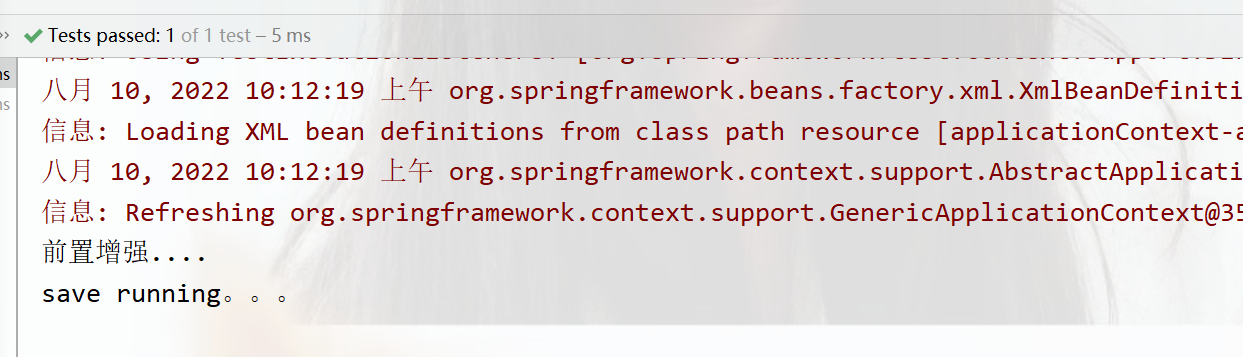
注解配置AOP详解
注解通知的类型
通知的配置语法:@通知注解("切点表达式")

切点表达式的抽取
同xml配置aop一样。我们可以将切点表达式抽取,抽取方式是在切面内定义方法,早该方法上使用**@Pointcut注解**定义切点表达式,然后在在增强注解中进行引用。
切面类中
package anno;

import org.aspectj.lang.annotation.AfterReturning;
import org.aspectj.lang.annotation.Aspect;
import org.aspectj.lang.annotation.Before;
import org.aspectj.lang.annotation.Pointcut;
import org.springframework.stereotype.Component;

//交给spring容器
@Component("myAspect")
@Aspect //标注当前MyAspect是一个切面类
public class MyAspect {
    @Before("execution(* anno.*.*(..))")
   public void before(){
       System.out.println("前置增强....");
   }
   //引入切点表达式方法
   @AfterReturning("pointcut()")//或者写MyAspect.pointcut()
    public void afterReturn(){
        System.out.println("后置增强....");
    }

   //定义切点表达式方法
    @Pointcut("execution(* anno.*.*(..))")
    public void pointcut(){ }

}
运行结果
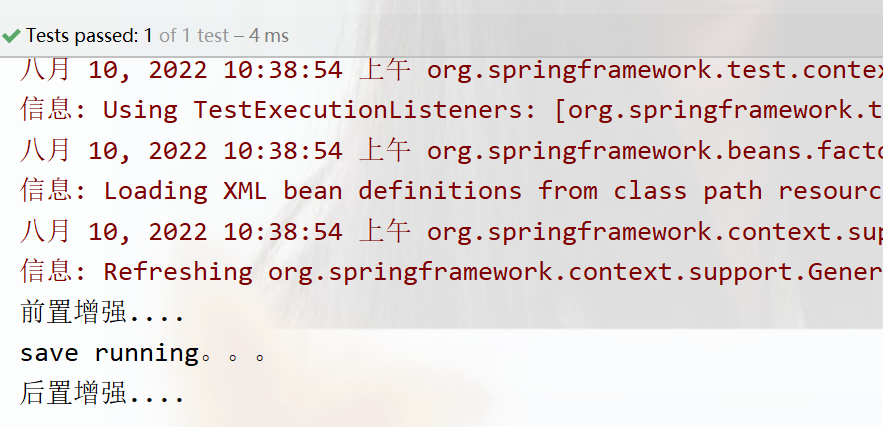
编程式事务控制相关对象
编程式:即使用java的api书写代码
声明式:使用配置去配置
PlatformTransactionManager平台事务管理
PlatformTransactionManager接口时spring的事务管理器,它里面提供来我们常用的操作事务的方法
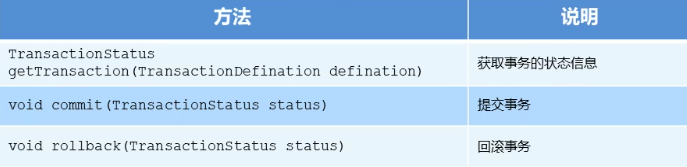
PlatformTransactionManager是接口类型,不同的Dao层技术则有不同的实现类,例如:Dao层技术是jdbc或mybatis时:orqspringframeworkidbcdatasourceDataSourceTransactionManager
Dao层技术是hibernate时:orq.springframework.orm.hibernate5.HibernateTransactionManager
TransactionDefinition事务定义
TransactionDefinition是事务的定义信息对象,里面有如下方法:
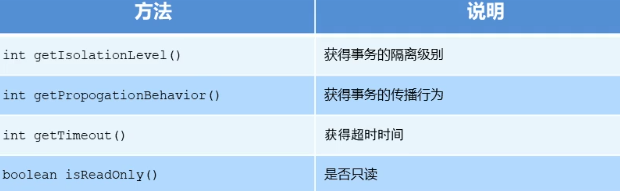
设置隔离级别,可以解决事务并发产生的问题,如
ISOLATION_DEFAULT//默认的
ISOLATION_READ_UNCOMMITTED//读未提交,哪种都不能解决
ISOLATION_READ_COMMITTED//读已提交,解决脏读
ISOLATION_REPEATABLE READ//可重复读,解不可重复读
ISOLATION_SERIALIZABLE//串行化,解决所有,性能最低
事务的传播行为
REQUIRED:如果当前没有事务,就新建一个事务,如果已经存在一个事务中,加入到这个事务中。一般的选择(默认值)

SUPPORTS:支持当前事务,如果当前没有事务,就以非事务方式执行(没有事务)

MANDATORY:使用当前的事务,如果当前没有事务,就抛出异常

RFOUFRS NEW:新增事务,如果当前在事务中,把当前事务挂起

NOT_SUPPORTED:以非事务方式执行操作,如果当前存在事务,就把当前事务挂起

NEVER:以非事务方式运行,如果当前存在事务,抛出异常

NESTED:如果当前存在事务,则在嵌套事务内执行。如果当前没有事务,则执行REOUIRED类似的操作

超时时间:默认值是-1.没有超时限制,如果有,以秒为单位进行设置

是否只读:建议查询时设置为只读,
TransactionStatus事务状态
TransactionStatus接口时提供事务具体运行状态(是被动产生的,不需要自己去设置),方法介绍如下
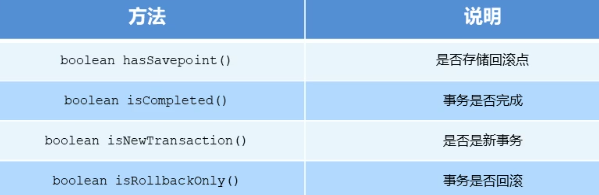
基于XML的声明式事务控制
spring的声明式事务就是指在配置文件中声明,用在spring配置文件中的声明式的处理事务来代替diam式的处理事务
转账业务演示事务
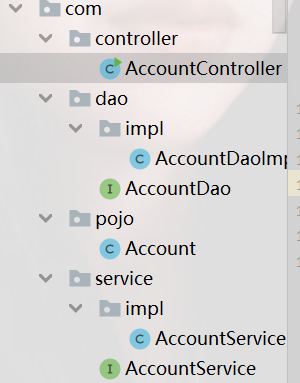
controller包下AccountController类
package com.controller;

import com.service.AccountService;
import org.springframework.context.ApplicationContext;
import org.springframework.context.support.ClassPathXmlApplicationContext;

public class AccountController {

    public static void main(String[] args) {
        ApplicationContext app = new ClassPathXmlApplicationContext("applicationContext1.xml");
        AccountService accountService = app.getBean(AccountService.class);
        accountService.transfer("KC","ZH",500);
    }

}
service包下AccountService接口
package com.service;

public interface AccountService {

    public void transfer(String outMan, String inMan, double money);

}
接口实现类
package com.service.impl;

import com.dao.AccountDao;
import com.service.AccountService;

public class AccountServiceImpl implements AccountService {

    private AccountDao accountDao;
    public void setAccountDao(AccountDao accountDao) {
        this.accountDao = accountDao;
    }

    public void transfer(String outMan, String inMan, double money) {
        accountDao.out(outMan,money);

        accountDao.in(inMan,money);
    }
}
pojo包下Account类
package com.pojo;

public class Account {

    private String name;
    private double money;

    public String getName() {
        return name;
    }

    public void setName(String name) {
        this.name = name;
    }

    public double getMoney() {
        return money;
    }

    public void setMoney(double money) {
        this.money = money;
    }
}
dao包下AccountDao
package com.dao;

public interface AccountDao {

    public void out(String outMan, double money);
    public void in(String inMan, double money);

}
实现类下
package com.dao.impl;

import com.dao.AccountDao;
import org.springframework.jdbc.core.JdbcTemplate;

public class AccountDaoImpl implements AccountDao {

    private JdbcTemplate jdbcTemplate;
    public void setJdbcTemplate(JdbcTemplate jdbcTemplate) {
        this.jdbcTemplate = jdbcTemplate;
    }

    public void out(String outMan, double money) {
        jdbcTemplate.update("update account set money=money-? where name=?",money,outMan);
    }

    public void in(String inMan, double money) {
        jdbcTemplate.update("update account set money=money+? where name=?",money,inMan);
    }
}
配置文件applicationCntext1.xml下
<?xml version="1.0" encoding="UTF-8"?>
<beans xmlns="http://www.springframework.org/schema/beans"
       xmlns:xsi="http://www.w3.org/2001/XMLSchema-instance"
       xmlns:aop="http://www.springframework.org/schema/aop"
       xmlns:tx="http://www.springframework.org/schema/tx"
       xsi:schemaLocation="
       http://www.springframework.org/schema/beans http://www.springframework.org/schema/beans/spring-beans.xsd
       http://www.springframework.org/schema/aop http://www.springframework.org/schema/aop/spring-aop.xsd
       http://www.springframework.org/schema/tx http://www.springframework.org/schema/tx/spring-tx.xsd
">

    <bean id="dataSource" class="com.mchange.v2.c3p0.ComboPooledDataSource">
        <property name="driverClass" value="com.mysql.jdbc.Driver"/>
        <property name="jdbcUrl" value="jdbc:mysql://localhost:3306/test"/>
        <property name="user" value="root"/>
        <property name="password" value="123456"/>
    </bean>

    <bean id="jdbcTemplate" class="org.springframework.jdbc.core.JdbcTemplate">
        <property name="dataSource" ref="dataSource"/>
    </bean>

    <bean id="accountDao" class="com.dao.impl.AccountDaoImpl">
        <property name="jdbcTemplate" ref="jdbcTemplate"/>
    </bean>

    <!--目标对象  内部的方法就是切点-->
    <bean id="accountService" class="com.service.impl.AccountServiceImpl">
        <property name="accountDao" ref="accountDao"/>
    </bean>

    <!--配置平台事务管理器-->
    <bean id="transactionManager" class="org.springframework.jdbc.datasource.DataSourceTransactionManager">
        <property name="dataSource" ref="dataSource"/>
    </bean>

    <!--通知  事务的增强-->
    <tx:advice id="txAdvice" transaction-manager="transactionManager">
        <!--设置事务的属性信息的-->
        <tx:attributes>
            <tx:method name="transfer" isolation="REPEATABLE_READ" propagation="REQUIRED" read-only="false"/>
            <tx:method name="save" isolation="REPEATABLE_READ" propagation="REQUIRED" read-only="false"/>
            <tx:method name="findAll" isolation="REPEATABLE_READ" propagation="REQUIRED" read-only="true"/>
<!--  update*表示只要update...都是这个,*表示通配符         -->
            <tx:method name="update*" isolation="REPEATABLE_READ" propagation="REQUIRED" read-only="true"/>
            <tx:method name="*"/>
        </tx:attributes>
    </tx:advice>

    <!--配置事务的aop织入-->
    <aop:config>
        <aop:pointcut id="txPointcut" expression="execution(* com.service.impl.*.*(..))"/>
<!-- 事务专用advisor,控制事务-->
        <aop:advisor advice-ref="txAdvice" pointcut-ref="txPointcut"/>
    </aop:config>

</beans>
pom.xml下
 <dependencies>
    <dependency>
      <groupId>junit</groupId>
      <artifactId>junit</artifactId>
      <version>4.12</version>

    </dependency>

    <dependency>
      <groupId>org.springframework</groupId>
      <artifactId>spring-test</artifactId>
      <version>5.0.5.RELEASE</version>
    </dependency>

    <dependency>
      <groupId>org.aspectj</groupId>
      <artifactId>aspectjweaver</artifactId>
      <version>1.8.4</version>
    </dependency>

    <dependency>

    <groupId>org.springframework</groupId>
    <artifactId>spring-context</artifactId>
    <version>5.0.5.RELEASE</version>
    <scope>compile</scope>
  </dependency>

    <dependency>
      <groupId>org.springframework</groupId>
      <artifactId>spring-jdbc</artifactId>
      <version>5.0.5.RELEASE</version>
    </dependency>
    <dependency>
      <groupId>org.springframework</groupId>
      <artifactId>spring-test</artifactId>
      <version>5.0.5.RELEASE</version>
    </dependency>
    <dependency>
      <groupId>org.springframework</groupId>
      <artifactId>spring-tx</artifactId>
      <version>5.0.5.RELEASE</version>
    </dependency>
    <dependency>
      <groupId>c3p0</groupId>
      <artifactId>c3p0</artifactId>
      <version>0.9.1.1</version>
    </dependency>
    <dependency>
      <groupId>mysql</groupId>
      <artifactId>mysql-connector-java</artifactId>
      <version>5.1.32</version>
    </dependency>
  </dependencies>
数据库中
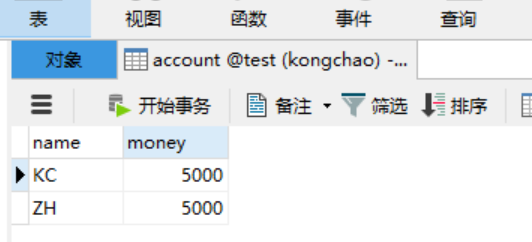
运行结果
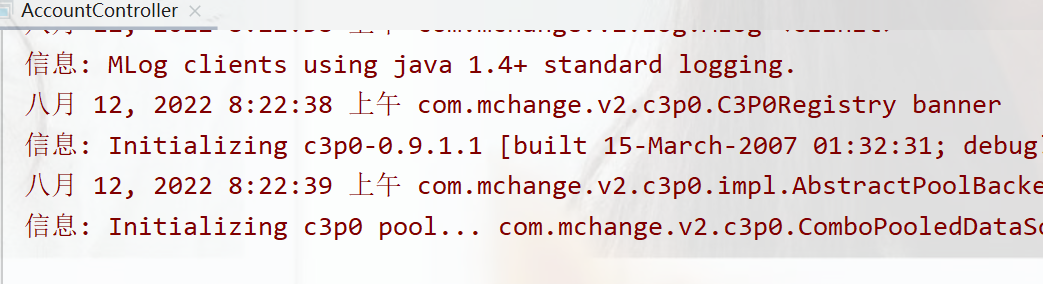
数据库中
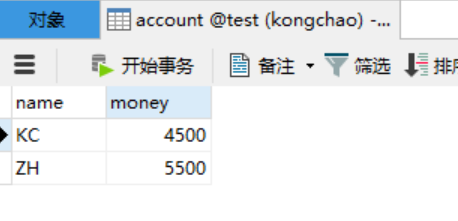
当发生错误时,数据库中的值都不变这就控制住了事务
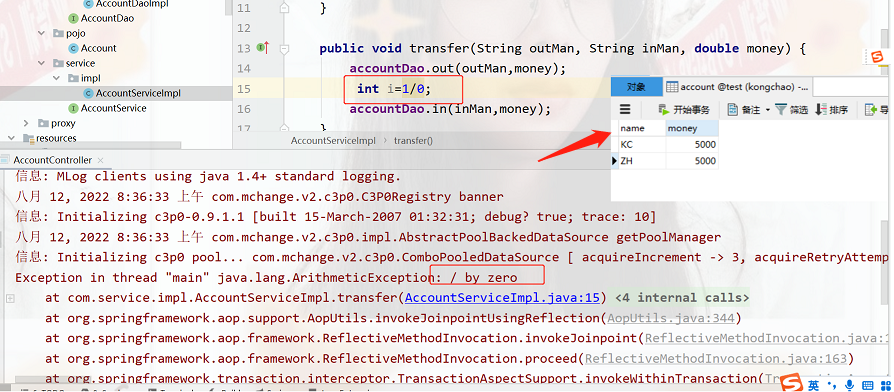
切点方法的事务参数的配置
  <tx:advice id="txAdvice" transaction-manager="transactionManager">
        <!--设置事务的属性信息的-->
        <tx:attributes>
            <tx:method name="transfer" isolation="REPEATABLE_READ" propagation="REQUIRED">

        </tx:attributes>
    </tx:advice>
其中tx:method代表切点方法的事务参数的配置。例如:
<tx:method name="save" isolation="REPEATABLE_READ" propagation="REQUIRED" read-only="false"/>
- name:切点方法名称
- isolation:事务的隔离级别
- propogation:事务的传播行为
- timeout:超时时间
- read-only:是否只读
声明式事务控制的配置要点
- 平台事务管理器配置
- 事通知的配置
- 事务aop织入的配置
基于注解的声明式事务控制
使用注解方式(改动bean,自定义的bean用注解,非自定义的bean配置到配置文件中去),需要改动两个,一个是配置文件applicationContext,另一个是AccountServiceImpl类
package com_1.service.impl;

import com.dao.AccountDao;
import com.service.AccountService;
import org.springframework.beans.factory.annotation.Autowired;
import org.springframework.stereotype.Service;
import org.springframework.transaction.annotation.Isolation;
import org.springframework.transaction.annotation.Propagation;
import org.springframework.transaction.annotation.Transactional;

@Service("accountService")
//在类上使用事务,其中的所有方法都会生效
@Transactional(isolation = Isolation.REPEATABLE_READ)
public class AccountServiceImpl implements AccountService {

    @Autowired
    private AccountDao accountDao;

    @Transactional(isolation = Isolation.READ_COMMITTED,propagation = Propagation.REQUIRED)
    public void transfer(String outMan, String inMan, double money) {
        accountDao.out(outMan,money);

        accountDao.in(inMan,money);
    }


}
applicationContext配置文件
<?xml version="1.0" encoding="UTF-8"?>
<beans xmlns="http://www.springframework.org/schema/beans"
       xmlns:xsi="http://www.w3.org/2001/XMLSchema-instance"
       xmlns:aop="http://www.springframework.org/schema/aop"
       xmlns:context="http://www.springframework.org/schema/context"
       xmlns:tx="http://www.springframework.org/schema/tx"
       xsi:schemaLocation="
       http://www.springframework.org/schema/beans http://www.springframework.org/schema/beans/spring-beans.xsd
       http://www.springframework.org/schema/aop http://www.springframework.org/schema/aop/spring-aop.xsd
       http://www.springframework.org/schema/tx http://www.springframework.org/schema/tx/spring-tx.xsd
       http://www.springframework.org/schema/context http://www.springframework.org/schema/context/spring-context.xsd
">

    <!--组件扫描,才能扫到@Service注解-->
    <context:component-scan base-package="com_1"/>

    <bean id="dataSource" class="com.mchange.v2.c3p0.ComboPooledDataSource">
        <property name="driverClass" value="com.mysql.jdbc.Driver"/>
        <property name="jdbcUrl" value="jdbc:mysql://localhost:3306/test"/>
        <property name="user" value="root"/>
        <property name="password" value="123456"/>
    </bean>

    <bean id="jdbcTemplate" class="org.springframework.jdbc.core.JdbcTemplate">
        <property name="dataSource" ref="dataSource"/>
    </bean>

    <bean id="transactionManager" class="org.springframework.jdbc.datasource.DataSourceTransactionManager">
        <property name="dataSource" ref="dataSource"/>
    </bean>

    <!--事务的注解驱动,不写就没开启事务-->
    <tx:annotation-driven transaction-manager="transactionManager"/>

</beans>
运行结果
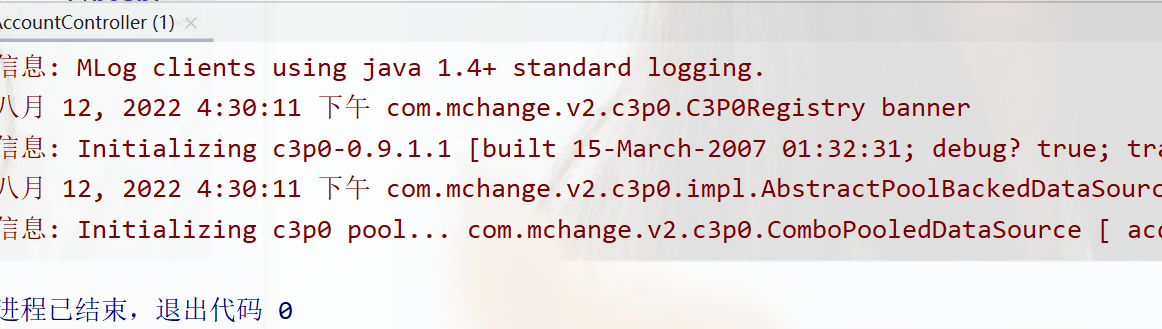
注解配置声明式事务控制解析
①使用@Transactional在需要进行事务控制的类或是方法上修饰,注解可用的属性同xml配置方式,例如隔离级别、传播行为等。
②注解使用在类上,那么该类下的所有方法都使用同一套注解参数配置
③使用在方法上,不同的方法可以采用不同的事务参数配置。
④xml配置文件中要开启事务的注解驱动tx:annotation-driven/
配置要点
平台事务管理器配置(xml方式)
事务通知的配置(@Transactional注解)
事务注解驱动的配置tx:annotation-driven/
MyBatis简介
原始jdbc操作的分析
原始jdbc开发存在的问题如下:
①数据库连接创建、释放频繁造成系统资源浪费从而影响系统性能

③sql语句在代码中硬编码,造成代码不易维护,实际应用sql变化的可能较大,
sql变动需要改变java代码。

③查询操作时,需要手动将结果集中的数据手动封装到实体中。插入操作时,
需要手动将实体的数据设置到sql语句的占位符位置

应对上述问题给出的解决方案:
①使用数据库连接池初始化连接资源

②将sql语句抽取到xml配置文件中

③使用反射、内省等底层技术,自动将实体与表进行属性与字段的自动映射
什么是Mybatis
MyBatis实现了上述的解决方案
①mybatis是一个优秀的基于java的持久层框架,它内部封装了jdbc,
使开发者只需要关注sql语句本身,而不需要花费精力去处理加载驱动、
创建连接、创建statement等繁杂的过程。

②mybatis通过xml或注解的方式将要执行的各种statement配置起来,
并通过java对象和statement中sql的动态参数进行映射生成最终执行的sql语句。

③最后mybatis框架执行sql并将结果映射为java对象并返回。
采用ORM思想解决了实体和数据库映射的问题,对idbc进行了封装,
屏蔽了jdbcapi底层访问细节,使我们不用与jdbcapi打交道,
就可以完成对数据库的持久化操作。
MyBatis开发步骤
①添加MyBatis的坐标
②创建user数据表
③编写User实体类
④编写映射文件UserMapper.xml(主要写sql语句)
⑤编写核心文件SqlMapConfig.xml(配置mybatis核心配置)
⑥编写测试类
①添加pom相应的坐标
<dependency>
      <groupId>mysql</groupId>
      <artifactId>mysql-connector-java</artifactId>
      <version>5.1.32</version>
    </dependency>
    <dependency>
      <groupId>org.mybatis</groupId>
      <artifactId>mybatis</artifactId>
      <version>3.4.6</version>
    </dependency>
    <dependency>
      <groupId>junit</groupId>
      <artifactId>junit</artifactId>
      <version>4.12</version>
    </dependency>
    <dependency>
      <groupId>log4j</groupId>
      <artifactId>log4j</artifactId>
      <version>1.2.17</version>
    </dependency>
②数据库中创建表

③创建pojo下的user类
package com_mybatis.pojo;

public class User {
    private int id;
    private String username;
    private String password;

    public int getId() {
        return id;
    }

    public void setId(int id) {
        this.id = id;
    }

    public String getUsername() {
        return username;
    }

    public void setUsername(String username) {
        this.username = username;
    }

    public String getPassword() {
        return password;
    }

    public void setPassword(String password) {
        this.password = password;
    }

    @Override
    public String toString() {
        return "User{" +
                "id=" + id +
                ", username='" + username + '\'' +
                ", password='" + password + '\'' +
                '}'+"\n";
    }
}
④编写映射文件UserMapper.xml(主要写sql语句)
在resource下的com_mybatis/mapper/UserMapper.xml
<?xml version="1.0" encoding="UTF-8" ?>
<!DOCTYPE mapper PUBLIC "-//mybatis.org//DTD Mapper 3.0//EN" "http://mybatis.org/dtd/mybatis-3-mapper.dtd">
<mapper namespace="userMapper">

    <!--查询操作,resultType为查询出来的结果往哪里封装-->
    <select id="findAll" resultType="com_mybatis.pojo.User">
        select * from user
    </select>

</mapper>
⑤编写核心文件SqlMapConfig.xml(配置mybatis核心配置)
在resource下的SqlMapConfig.xml
<?xml version="1.0" encoding="UTF-8" ?>
<!DOCTYPE configuration PUBLIC "-//mybatis.org//DTD Config 3.0//EN" "http://mybatis.org/dtd/mybatis-3-config.dtd">
<configuration>

    <!--数据源环境-->
    <environments default="development">
        <environment id="development">
            <transactionManager type="JDBC"></transactionManager>
            <dataSource type="POOLED">
                <property name="driver" value="com.mysql.jdbc.Driver"/>
                <property name="url" value="jdbc:mysql://localhost:3306/test"/>
                <property name="username" value="root"/>
                <property name="password" value="123456"/>
            </dataSource>
        </environment>
    </environments>

    <!--加载映射文件-->
    <mappers>
        <mapper resource="com_mybatis/mapper/UserMapper.xml"></mapper>
    </mappers>

</configuration>
⑥编写测试类
在java下新建一个test包下的mybatisTest类
package com_mybatis.test;

import com_mybatis.pojo.User;
import org.apache.ibatis.io.Resources;
import org.apache.ibatis.session.SqlSession;
import org.apache.ibatis.session.SqlSessionFactory;
import org.apache.ibatis.session.SqlSessionFactoryBuilder;
import org.junit.Test;

import java.io.File;
import java.io.IOException;
import java.io.InputStream;
import java.util.List;

public class MybatisTest {

    @Test
    public void test1() throws IOException {
        //获得核心配置文件
      InputStream resourceAsFile = Resources.getResourceAsStream("sqlMapConfig.xml");
       //获得session工厂对象
        SqlSessionFactory sqlSessionFactory = new SqlSessionFactoryBuilder().build(resourceAsFile);
        //获得session会话对象
        SqlSession sqlSession = sqlSessionFactory.openSession();
        //执行操作 参数:namespace+id
        List<User> userList = sqlSession.selectList("userMapper.findAll");
        System.out.println(userList);
        //释放资源
        sqlSession.close();

    }
}
运行结果
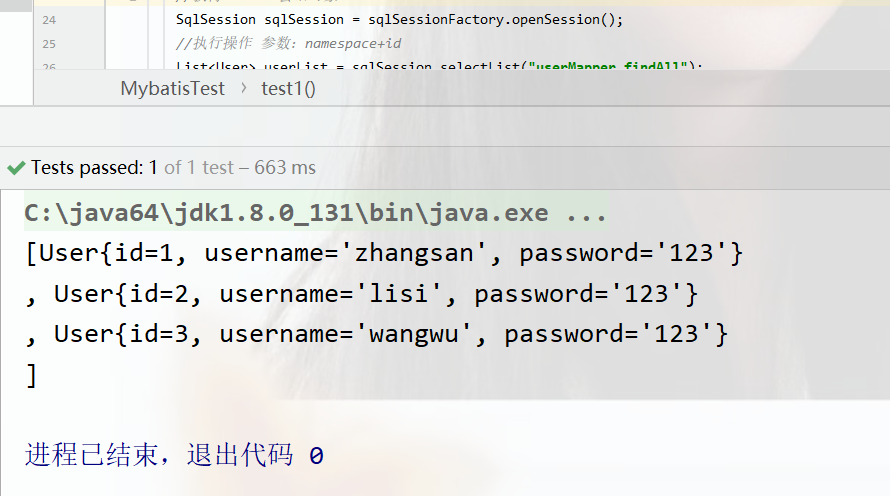
MyBatis的映射文件概述
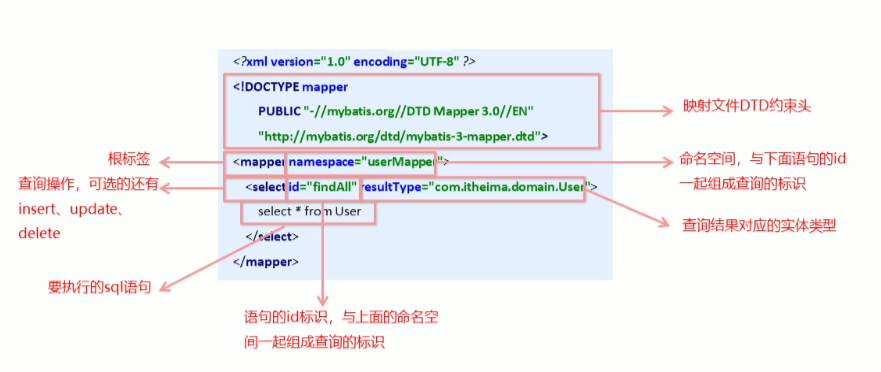
Mybatis增删改查操作
Mybatis的增加/插入操作
mybatisTest下
    @Test
    public void test2() throws IOException {
        //模拟user对象
        User user=new User();
        user.setUsername("ZengHui");
        user.setPassword("1234");

        //获得核心配置文件
        InputStream resourceAsFile = Resources.getResourceAsStream("sqlMapConfig.xml");
        //获得session工厂对象
        SqlSessionFactory sqlSessionFactory = new SqlSessionFactoryBuilder().build(resourceAsFile);
        //获得session会话对象
        SqlSession sqlSession = sqlSessionFactory.openSession();
        //执行操作 参数:namespace+id
        int result= sqlSession.insert("userMapper.insertUser",user);
        //mybatis默认不自动提交事务,提交后才能持久化到数据库中
        sqlSession.commit();
        System.out.println(result);
        //释放资源
        sqlSession.close();

    }
UserMapper.xml下
  <!--插入操作-->
    <insert id="insertUser" parameterType="com_mybatis.pojo.User">
        insert into user values (#{id},#{username},#{password})
    </insert>
运行结果
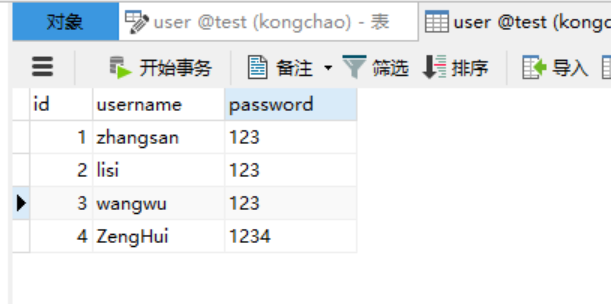
插入操作注意的问题
- 插入语句使用insert标签
- 在映射文件中时而用parameterType属性指定要插入的数据类型
- Sq语句中使用#{实体属性名}方式引用实体中的属性值
- 插入操作使用的ApI是sqlSession.insert(“命名空间.id,实体对象”);
- 插入操作设计数据库变化,所以要使用sqlSession对象显示的提交事务,即sqlSession,commit()
MyBatis的修改数据操作
在UserMapper.xml文件下
<!--   修改操作-->
<update id="update" parameterType="com_mybatis.pojo.User">
    update user  set username=#{username},password=#{password} where id=#{id}
</update>
MybatisTest类下
    @Test
    //修改操作
    public void test3() throws IOException {
        //模拟user对象
        User user=new User();
        user.setId(3);
        user.setUsername("ZhaoLiu");
        user.setPassword("12345");

        //获得核心配置文件
        InputStream resourceAsFile = Resources.getResourceAsStream("sqlMapConfig.xml");
        //获得session工厂对象
        SqlSessionFactory sqlSessionFactory = new SqlSessionFactoryBuilder().build(resourceAsFile);
        //获得session会话对象
        SqlSession sqlSession = sqlSessionFactory.openSession();
        //执行操作 参数:namespace+id
     sqlSession.update("userMapper.update", user);
        //mybatis默认不自动提交事务,提交后才能持久化到数据库中
        sqlSession.commit();

        //释放资源
        sqlSession.close();

    }
运行之后,数据库中变化
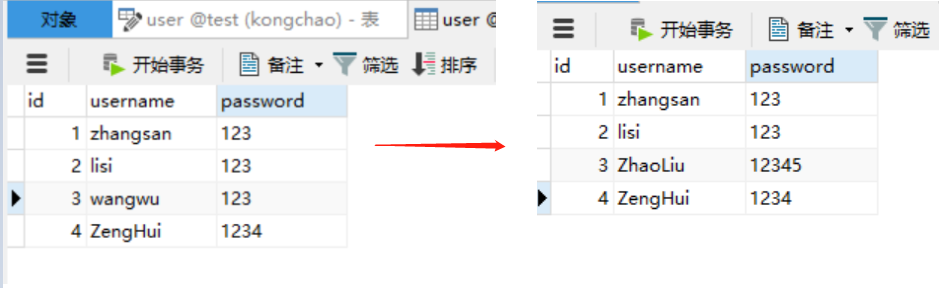
Mybatis 删除数据操作
userMapper.xml
<!--删除操作-->
    <delete id="delete" parameterType="java.lang.Integer">
        delete from user where id=#{id}
    </delete>
mybatisTest类下
    @Test
    //删除
    public void test4() throws IOException {

        //获得核心配置文件
        InputStream resourceAsFile = Resources.getResourceAsStream("sqlMapConfig.xml");
        //获得session工厂对象
        SqlSessionFactory sqlSessionFactory = new SqlSessionFactoryBuilder().build(resourceAsFile);
        //获得session会话对象
        SqlSession sqlSession = sqlSessionFactory.openSession();
        //执行操作 参数:namespace+id
        sqlSession.delete("userMapper.delete", 3);
        //mybatis默认不自动提交事务,提交后才能持久化到数据库中
        sqlSession.commit();

        //释放资源
        sqlSession.close();

    }
运行结果
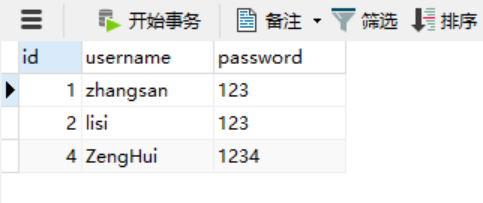
删除操作注意的问题
删除语句使用delete标签
Sql语句中使你#{任意字符串}方式引用传递的单个参数
删除操作使用的API是sqlSession.delete("命名空间.id",Object)
Mybatis常用核心配置文件概述
envrionment标签
数据库环境配置。,支持多环境配置
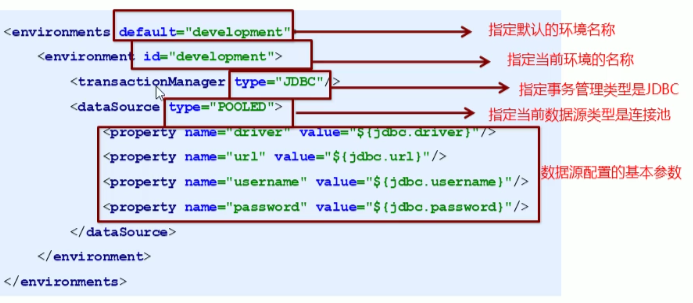
其中,事务管理器(transactionManager)类型有两种:

JDBC:这个配置就是直接使用了JDBC的提交和回滚设置,它依赖干从数据源得到
的连接来管理事务作用域

MANAGED:这个配置几乎没做什么。它从来不提交或回滚一个连接,而是让容器
来管理事务的整个生命周期(比如JEE应用服务器的上下文)。默认情况下它会关
闭连接,然而一些容器并不希望这样,因此需要将closeConnection属性设置为
false来阻止它默认的关闭行为。

其中,数据源(dataSource)类型有三种:
·UNPOOLED:这个数据源的实现只是每次被请求时打开和关闭连接。
·POOLED:这种数据源的实现利用“池”的概念将JDBC连接对象组织起来。
·JNDI:这个数据源的实现是为了能在如EJB或应用服务器这类容器中使用,
容器可以集中或在外部配置数据源,然后放置一个JNDI上下文的引用。
mapper标签
该标签的作用是加载映射的,加载方式有如下几种:
- 使用相对于类路径的资源引用,例如:<mapper resource="org/mybatis/builder/AuthorMapper.xml"/>(常用)
- 使用完全限定资源定位符(URL),例如:<mapper url="file://var/mappers/AuthorMapper.xml"/>
- 使用映射器接口实现类的完全限定类名,例如:<mapper class="org.mybatis.builder.AuthorMapper"/>
- 将包内的映射器接口实现全部注册为映射器,例如:<package name="org.mybatis.builder"/>
Properties标签
实际开发中,习惯将数据源的配置信息单独抽取成一个properties文件,该标签可以加载额外配置的properties文件
jdbc.properties文件下
jdbc.driver=com.mysql.jdbc.Driver
jdbc.url=jdbc:mysql://localhost:3306/test
jdbc.username=root
jdbc.password=123456
sqlMapConfig.xml
  <!--通过properties标签加载外部properties文件-->
    <properties resource="jdbc.properties"></properties>

    <!--数据源环境-->
    <environments default="development">
        <environment id="development">
            <transactionManager type="JDBC"></transactionManager>
            <dataSource type="POOLED">
                <property name="driver" value="${jdbc.driver}"/>
                <property name="url" value="${jdbc.url}"/>
                <property name="username" value="${jdbc.username}"/>
                <property name="password" value="${jdbc.password}"/>
            </dataSource>
        </environment>
    </environments>
执行一个查询操作,运行结果
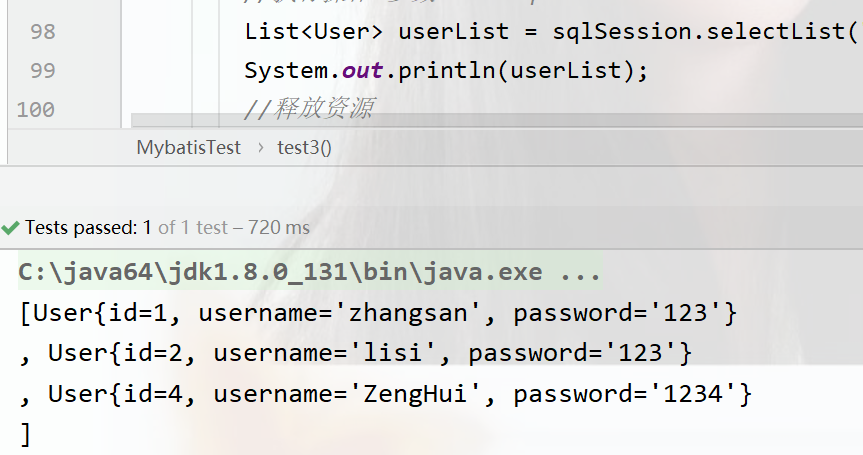
typeAliases标签
类型别名是java类型设置一个短的名字,原来的类型名称配置如下
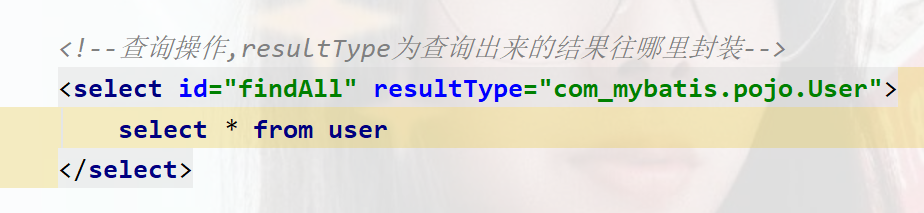
在sqlMapConfig 配置typeAliases,将com_mybatis.pojo.User定义别名为user
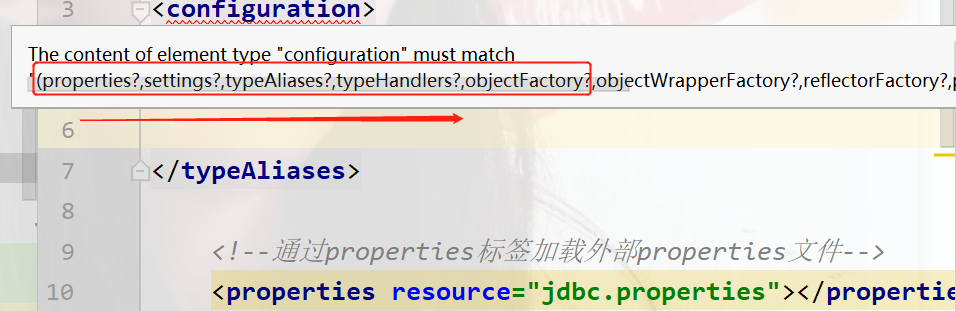
报了一个顺序错误,typeAliases应该放在properties之后
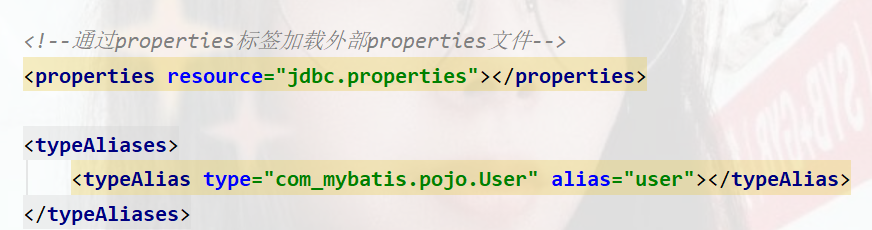
<typeAliases>
        <typeAlias type="com_mybatis.pojo.User" alias="user"></typeAlias>
    </typeAliases>
写sql语句的UserMapper.xml下
<!--查询操作,resultType为查询出来的结果往哪里封装-->
<select id="findAll" resultType="user">
select * from user
</select>
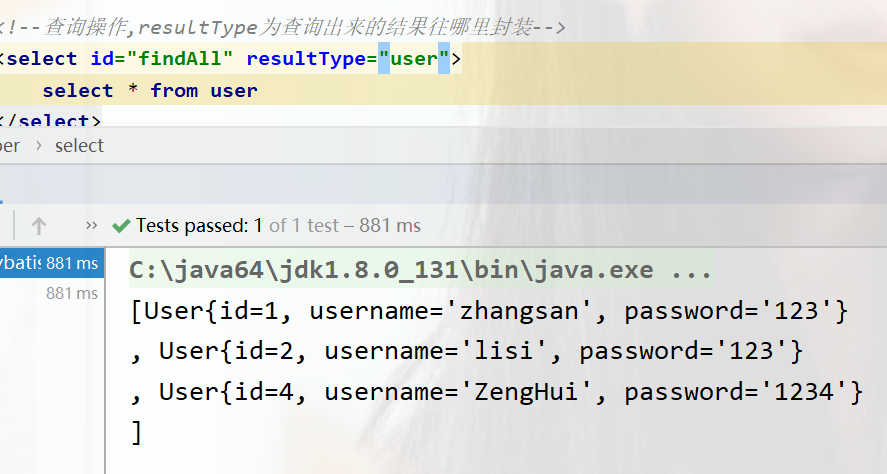
MyBatis的相应API
1、SqlSession工厂构建器SqlSessionFactoryBuilder
常用API:SqlSessionFactory build(InputStream inputStream)
通过加载mybatis的核心文件的输入流的形式构建一个SqlSessionFactory对象

其中,mybatis-config.xml是类加载器的路径,在maven工程下就是resource资源下****,Resources工具类,这个类在org.apache.ibatis.io包中。Resource类帮助你从类路径下、文件系统或一个webURL中加载资源文件。
sqkSessionFactory有多个方法创建SqlSession实例,常用的有两个
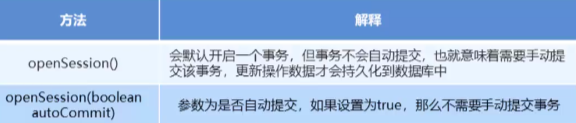
2、SqlSession会话对象
SqlSession实例在MyBatis是非常强大的一个类,在这里会看到所有执行语句、提交或回滚事务和获取映射实例的方法有
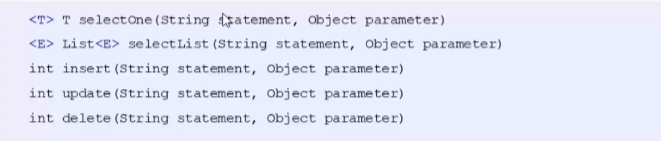
操作事务的方法主要有

Mybatis的Dao层实现
1、传统开发方式-编写UserDao接口
测试编写UserDao接口
controller包下UserController类下
package com_Dao.controller;
import com_Dao.service.Impl.UserServiceImpl;
import com_Dao.service.UserService;
import com_mybatis.pojo.User;
import java.io.IOException;
import java.util.List;
public class UserController {
public static void main(String[] args) throws IOException {
UserService userService=new UserServiceImpl();
List<User> userList = userService.findAll();
System.out.println(userList);
}
}
service包下UserService下
接口
package com_Dao.service;
import com_mybatis.pojo.User;
import java.io.IOException;
import java.util.List;
public interface UserService {
public List<User> findAll() throws IOException;
}
实现类下
package com_Dao.service.Impl;
import com_Dao.Dao.Impl.UserDaoImpl;
import com_Dao.Dao.UserDao;
import com_Dao.service.UserService;
import com_mybatis.pojo.User;
import java.io.IOException;
import java.util.List;
public class UserServiceImpl implements UserService {
UserDao userDao=new UserDaoImpl();
@Override
public List<User> findAll() throws IOException {
return userDao.findAll();
}
}
dao包下的UserDao下
接口下
package com_Dao.Dao;
import com_mybatis.pojo.User;
import java.io.IOException;
import java.util.List;
public interface UserDao {
public List<User> findAll() throws IOException;
}
实现类下
package com_Dao.Dao.Impl;
import com_Dao.Dao.UserDao;
import com_mybatis.pojo.User;
import org.apache.ibatis.io.Resources;
import org.apache.ibatis.session.SqlSession;
import org.apache.ibatis.session.SqlSessionFactory;
import org.apache.ibatis.session.SqlSessionFactoryBuilder;
import java.io.IOException;
import java.io.InputStream;
import java.util.List;
public class UserDaoImpl implements UserDao {
@Override
public List<User> findAll() throws IOException {
//获得核心配置文件
InputStream resourceAsFile = Resources.getResourceAsStream("sqlMapConfig.xml");
//获得session工厂对象
SqlSessionFactory sqlSessionFactory = new SqlSessionFactoryBuilder().build(resourceAsFile);
//获得session会话对象
SqlSession sqlSession = sqlSessionFactory.openSession();
//执行操作 参数:namespace+id
List<User> userList = sqlSession.selectList("userMapper.findAll");
return userList;
}
}
其他文件,如sqlMapConfig.xml和UserMapper.xml等中的配置和之前的一致
运行结果
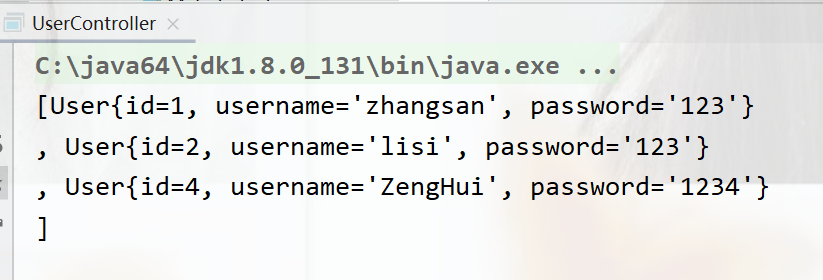
2、 代理开发方式
介绍
采用Mybatis的电路考法方式实现Dao层的开发,这种方式是我们进入企业的主流。
Mapper接口开发方法**只需要程序员编写Mapper接口(相当于Dao接口)**,由Mybatis框架根据接口定义创建接口的动态代理对象,代理对象的方法体同上边Dao接口实现类方法。 Mapper接口开发需要遵循以下规范:
- Mapper.xml文件中的namespace与mapper接口的全限定名相同
- Mapper接口方法名和Mapperxml中定义的每个statement的id相同
- Mapper接口方法的输入参数类型和mapper.xml中定义的每个sql的parameterType的类型相同
- Mapper接口方法的输出参数类型和mapper.xml中定义的每个sql的resultType的类型相同
规范图示对应
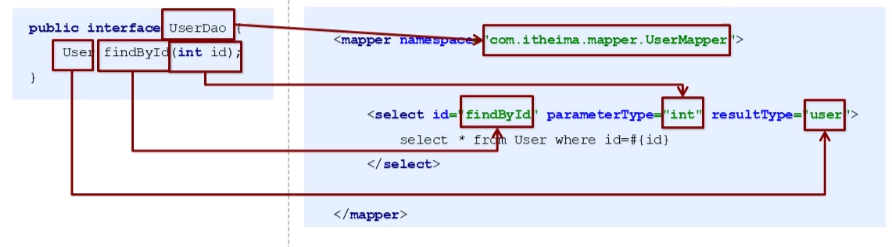
代码测试代理开发
UserDao下
package com_Dao_DaiLi.Dao;
import com_mybatis.pojo.User;
import java.io.IOException;
public interface UserDao {
public User findById(int id) throws IOException;
}
service包下
package com_Dao_DaiLi.service;
import com_Dao_DaiLi.Dao.UserDao;
import com_mybatis.pojo.User;
import org.apache.ibatis.io.Resources;
import org.apache.ibatis.session.SqlSession;
import org.apache.ibatis.session.SqlSessionFactory;
import org.apache.ibatis.session.SqlSessionFactoryBuilder;
import java.io.IOException;
import java.io.InputStream;
public class ServiceTest {
public static void main(String[] args) throws IOException {
InputStream resourceAsStream = Resources.getResourceAsStream("sqlMapConfig.xml");
SqlSessionFactory sqlSessionFactory = new SqlSessionFactoryBuilder().build(resourceAsStream);
SqlSession sqlSession = sqlSessionFactory.openSession();
UserDao mapper = sqlSession.getMapper(UserDao.class);
User user = mapper.findById(1);
System.out.println(user);
}
}
UserMapper1.xml下
<?xml version="1.0" encoding="UTF-8" ?>
<!DOCTYPE mapper PUBLIC "-//mybatis.org//DTD Mapper 3.0//EN" "http://mybatis.org/dtd/mybatis-3-mapper.dtd">
<mapper namespace="com_Dao_DaiLi.Dao.UserDao">
<!--根据id进行查询-->
<select id="findById" parameterType="int" resultType="user">
select *from user where id=#{id}
</select>
</mapper>
还需注意将sqlMapConfig.xml下加载UserMapper1.xml下

运行结果

Mybatis映射文件深入
动态sql语句
概述:Mybatais的映射文件中,前面我们的SQL都是比较简单的,有时候业务逻辑复杂时,我们的sql时动态变化的,此时在其那面学习的sql就不能满足要求了
官方文档中动态sql
MyBatis 的强大特性之一便是它的动态 SQL。如果你有使用 JDBC 或其他类似框架的经验,你就能体会到根据不同条件拼接 SQL 语句有多么痛苦。拼接的时候要确保不能忘了必要的空格,还要注意省掉列名列表最后的逗号。利用动态 SQL 这一特性可以彻底摆脱这种痛苦。
通常使用动态 SQL 不可能是独立的一部分,MyBatis 当然使用一种强大的动态 SQL 语言来改进这种情形,这种语言可以被用在任意的 SQL 映射语句中。
动态 SQL 元素和使用 JSTL 或其他类似基于 XML 的文本处理器相似。在 MyBatis 之前的版本中,有很多的元素需要来了解。MyBatis 3 大大提升了它们,现在用不到原先一半的元素就可以了。MyBatis 采用功能强大的基于 OGNL 的表达式来消除其他元素。
- if
- choose (when, otherwise)
- trim (where, set)
- foreach
动态SQL之if
测试示例if
UserMapper接口下
package com_Mybatis_sql.mapper;
import com_Mybatis_sql.pojo.User;
import java.util.List;
public interface UserMapper {
public List<User> findByCondition(User user);
}
UserMapper2.xml文件下
<?xml version="1.0" encoding="UTF-8" ?>
<!DOCTYPE mapper PUBLIC "-//mybatis.org//DTD Mapper 3.0//EN" "http://mybatis.org/dtd/mybatis-3-mapper.dtd">
<mapper namespace="com_Mybatis_sql.mapper.UserMapper">
<select id="findByCondition" parameterType="user" resultType="user">
select *from user
-- 用where标签保住等价于where 1=1,有条件就进入
<where>
<if test="id!=0">
and id=#{id}
</if>
<if test="username!=null">
and username=#{username}
</if>
<if test="password!=null">
and password=#{password}
</if>
</where>
</select>
</mapper>
test测试下
public class MapperTest {
@Test
public void test1() throws IOException {
InputStream resourceAsStream = Resources.getResourceAsStream("sqlMapConfig.xml");
SqlSessionFactory sqlSessionFactory = new SqlSessionFactoryBuilder().build(resourceAsStream);
SqlSession sqlSession = sqlSessionFactory.openSession();
UserMapper mapper = sqlSession.getMapper(UserMapper.class);
//模拟条件user
User user=new User();
user.setId(1);
user.setUsername("zhangsan");
user.setPassword("123");
List<User> userList = mapper.findByCondition(user);
System.out.println(userList);
}
}
运行结果
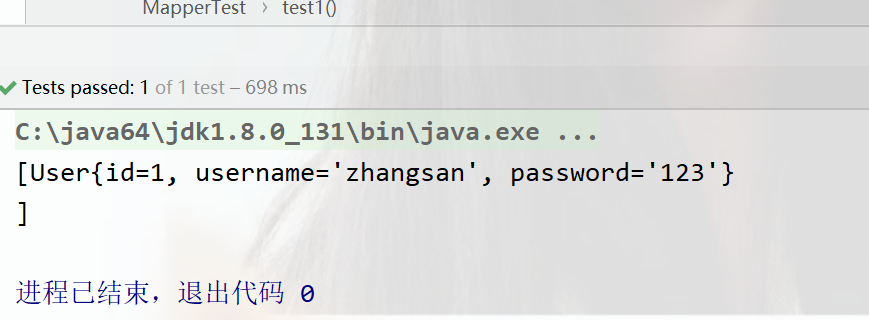
** 当没有写条件时,原来的sql语句就等价于select from user*
<select id="findByIds" parameterType="list" resultType="user">
select *from user
<where>
<foreach collection="list" open="id in(" close=")" item="id" separator=",">
#{id}
</foreach>
</where>
</select>
** 这样的动态查询无论是有没有条件或者是有多个条件都能查询到**
动态sql之foreach
循环执行sql的拼接操作,例如::select *from user where id in(1,2,3)
测试示例foreach
UserMapper接口下
public interface UserMapper {
public List<User> findByIds(List<Integer> ids);
}
配置文件UserMapper2.xml配置文件下
<select id="findByIds" parameterType="list" resultType="user">
select *from user
<where>
<foreach collection="list" open="id in(" close=")" item="id" separator=",">
#{id}
</foreach>
</where>
</select>
MapperTest测试类下
public class MapperTest {
@Test
public void test2() throws IOException {
InputStream resourceAsStream = Resources.getResourceAsStream("sqlMapConfig.xml");
SqlSessionFactory sqlSessionFactory = new SqlSessionFactoryBuilder().build(resourceAsStream);
SqlSession sqlSession = sqlSessionFactory.openSession();
UserMapper mapper = sqlSession.getMapper(UserMapper.class);
//模拟ids的数据
List<Integer> ids=new ArrayList<Integer>();
ids.add(1);
ids.add(2);
List<User> byIds = mapper.findByIds(ids);
System.out.println(byIds);
}
}
运行结果
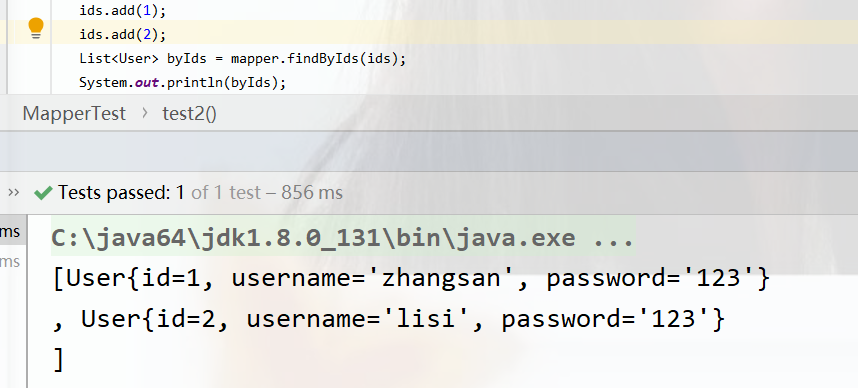
sql片段的抽取
sql中可将重复的sql提取出来,使用include引用即可,最终达到sql重用的目的
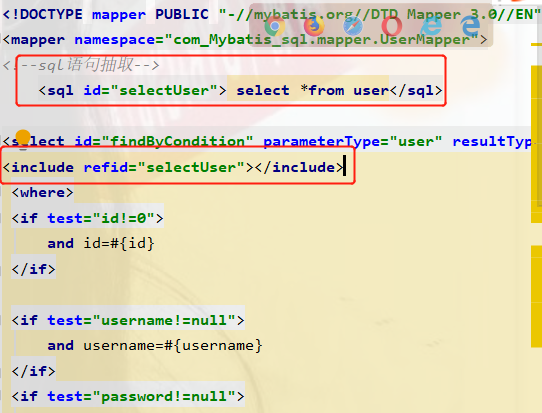
<!--sql语句抽取-->
<sql id="selectUser"> select *from user</sql>
<select id="findByIds" parameterType="list" resultType="user">
<include refid="selectUser"></include>
<where>
<foreach collection="list" open="id in(" close=")" item="id" separator=",">
#{id}
</foreach>
</where>
</select>
Mybatis映射文件深入知识小结
<select>:查询
<insert>:插入
<update>:修改
<delete>:删除
<where>:where条件
<if>:if判断
<foreach>:循环
<sql>:sql片段抽取
Mybatis核心配置文件深入
无论是Mybatis在预处理语句(PreparedStatement)中设置一个参数是,还是从结果集中取出一个值式都会用类型处理器将获取的值以合适的方式转换成java类型,下表描述一些默认的类型处理器(部分)
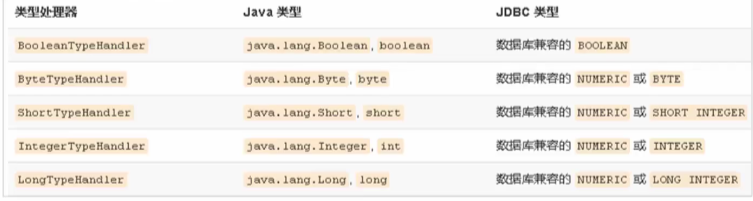
typeHandlers标签
可以重写类型处理器或创建你自己的类型处理器来处理不支持的或非标准的类型。
具体做法为:实现org.apache.ibatis.type.TypeHandler接口,或继承一个很便利的类org.apache.ibatis.type.BaseTypeHandler,然后可以选择性地将它映射到一个JDBC类型。
例如需求:一个Java中的Date数据类型,我想将之存到数据库的时候存成一个1970年至今的毫秒数,取出来时转换成java的Date,即java的Date与数据库的varchar毫秒值之间转换
开发步骤:
- ①定义转换类继承类BaseTypeHandler<T>(这个泛型就是要转化的java类型)
- ②覆盖4个未实现的方法,其中setNonNullParameter为java程序设置数据到数据库的回调方getNullableResul为查询时mysql的字符串类型转换成java的Type类型的方法
- ③在MyBatis核心配置文件中进行注册
- ④ 测试转换是否正确
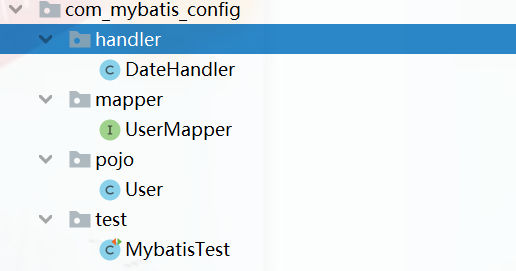
①定义BaseTypeHandler类下和覆盖四个没实现的方法
public class DateHandler extends BaseTypeHandler<Date> {
//将java类型转换成数据库需要的类型
public void setNonNullParameter(PreparedStatement preparedStatement, int i, Date date, JdbcType jdbcType) throws SQLException {
long time = date.getTime();
preparedStatement.setLong(i,time);
}
//将数据库中的类型转换成java类型
//String参数 要转换的字段名称
//ResultSet 查询出的结果集
@Override
public Date getNullableResult(ResultSet resultSet, String s) throws SQLException {
//获得结果集中需要的数据(long)转换成Date类型 返回
long aLong = resultSet.getLong(s);
Date date =new Date(aLong);
return date;
}
//将数据库中的类型转换成java类型
@Override
public Date getNullableResult(ResultSet resultSet, int i) throws SQLException {
long aLong = resultSet.getLong(i);
Date date =new Date(aLong);
return date;
}
//将数据库中的类型转换成java类型
@Override
public Date getNullableResult(CallableStatement callableStatement, int i) throws SQLException {
long aLong = callableStatement.getLong(i);
Date date =new Date(aLong);
return date;
}
}
UserMapper接口下
package com_mybatis_config.mapper;
import com_mybatis_config.pojo.User;
public interface UserMapper {
public void save(User user);
}
user类下一些
package com_mybatis_config.pojo;
import java.util.Date;
public class User {
private int id;
private String username;
private String password;
private Date birthday;
}
//和一些getset方法toString
MybatisTest类下
public class MybatisTest {
@Test
public void test1() throws IOException {
InputStream resourceAsStream = Resources.getResourceAsStream("sqlMapConfig.xml");
SqlSessionFactory sqlSessionFactory=new SqlSessionFactoryBuilder().build(resourceAsStream);
SqlSession sqlSession = sqlSessionFactory.openSession(true);
UserMapper mapper = sqlSession.getMapper(UserMapper.class);
//创建user
User user=new User();
user.setBirthday(new Date());
user.setPassword("kckc");
user.setUsername("ssm");
//执行操作
mapper.save(user);
sqlSession.close();
}
}
UserMapper_config.xml下
<?xml version="1.0" encoding="UTF-8" ?>
<!DOCTYPE mapper PUBLIC "-//mybatis.org//DTD Mapper 3.0//EN" "http://mybatis.org/dtd/mybatis-3-mapper.dtd">
<mapper namespace="com_mybatis_config.mapper.UserMapper">
<insert id="save" parameterType="user">
insert into user values(#{id},#{username},#{password},#{birthday})
</insert>
</mapper>
sqlMapCongif中加上
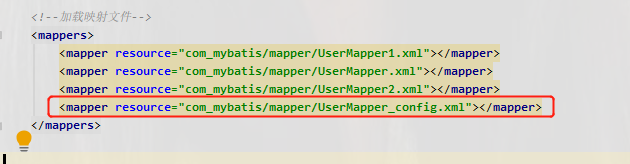
运行结果
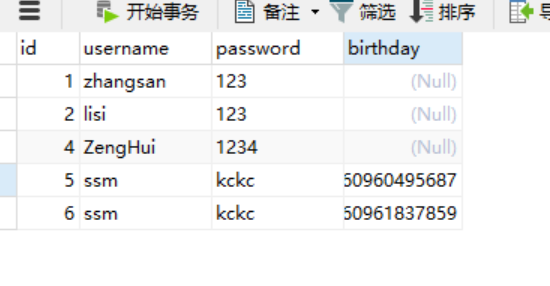
运行时发现 xxx cannot be cast to xxx
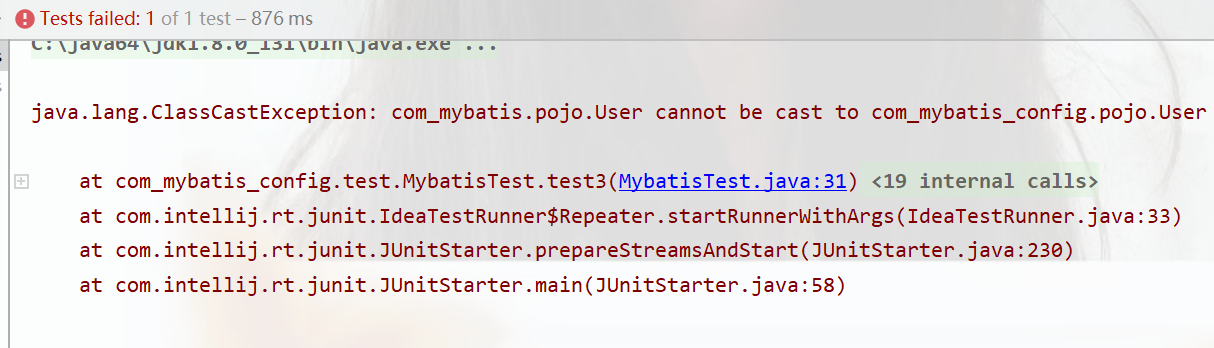
之前在弄的时候因为省时间,将建包代替了建模块,重复利用了之前的配置导致的,这里我检查了好久才发现实在sqlMapConfig.xml中起别名的时候,将之前的包名字重复用了,所以报出不能强行转换
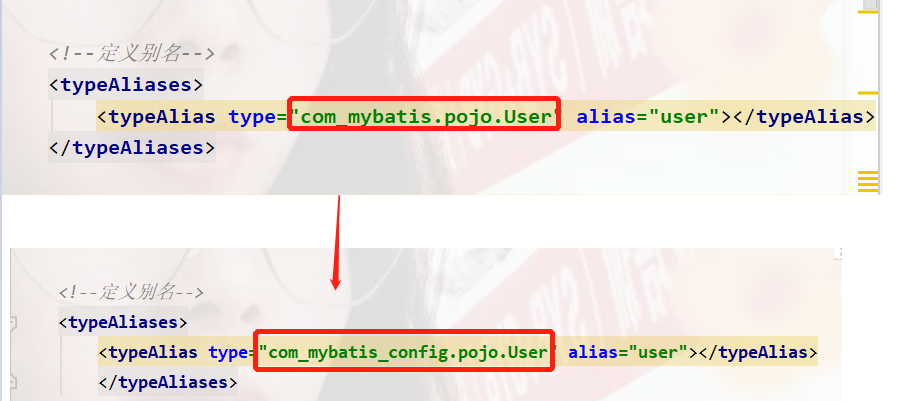
改回来就正常显示了
查询出来取出来可以正常显示
通过在接口类中定义接口,然后在UserMapper_config.xml中进行配置
<select id="findById" parameterType="int" resultType="user">
select *from user where id=#{id}
</select>
@Test
public void test2() throws IOException {
InputStream resourceAsStream = Resources.getResourceAsStream("sqlMapConfig.xml");
SqlSessionFactory sqlSessionFactory=new SqlSessionFactoryBuilder().build(resourceAsStream);
SqlSession sqlSession = sqlSessionFactory.openSession(true);
UserMapper mapper = sqlSession.getMapper(UserMapper.class);
User byId = mapper.findById(5);
System.out.println("id为5的生日是"+byId.getBirthday());
sqlSession.close();
}
运行结果
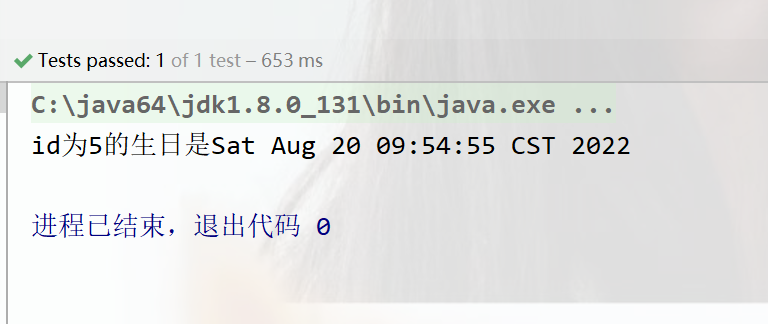
plugins标签
分页助手PageHelper
MyBatis可以使用第三方的插件来对功能进行扩展,分页助手PageHelper是将分页的复杂操作进行封装,使用简单的方式即可过得分页的相关数据
开发步骤:
①导入通用PageHelper的坐标
②在mybatis核心配置文件中配置PageHelper插件
③测试分页数据获取
导入PageHelper的坐标
dependency>
<groupId>com.github.pagehelper</groupId>
<artifactId>pagehelper</artifactId>
<version>3.7.5</version>
</dependency>
<dependency>
<groupId>com.github.jsqlparser</groupId>
<artifactId>jsqlparser</artifactId>
<version>0.9.1</version>
</dependency>
②在mysql的核心配置文件中配置PageHelper插件(这里为sqlMapConfig.xml)
配置分页助手插件-->
<plugins>
<plugin interceptor="com.github.pagehelper.PageHelper">
<property name="dialect" value="mysql"/>
</plugin>
</plugins>
测试
@Test
public void test3() throws IOException {
InputStream resourceAsStream = Resources.getResourceAsStream("sqlMapConfig.xml");
SqlSessionFactory sqlSessionFactory = new SqlSessionFactoryBuilder().build(resourceAsStream);
SqlSession sqlSession = sqlSessionFactory.openSession(true);
UserMapper mapper = sqlSession.getMapper(UserMapper.class);
//设置分页相关参数 当前页+每页显示的条数
PageHelper.startPage(1, 3);
List<User> userList = mapper.findAll();
for (User user : userList) {
System.out.println(user);
}
//执行操作
sqlSession.close();
}
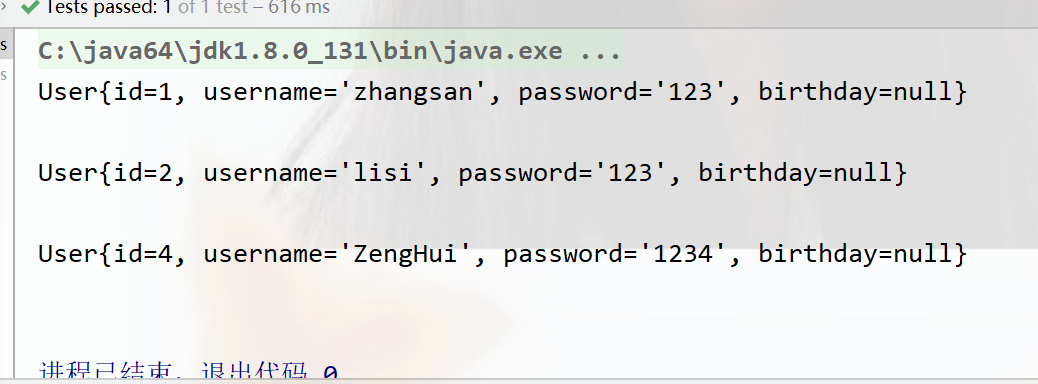
获取分页相关参数测试
//设置分页相关参数 当前页+每页显示的条数
PageHelper.startPage(1, 3);
List<User> userList = mapper.findAll();
for (User user : userList) {
System.out.println(user);
}
//获得与分页相关的参数
PageInfo<User> pageInfo =new PageInfo<User>(userList);
System.out.println("当前页:"+pageInfo.getPageNum());
System.out.println("上一页:"+pageInfo.getPrePage());
System.out.println("下一页:"+pageInfo.getNextPage());
System.out.println("每页显示条数:"+pageInfo.getPageSize());
System.out.println("总条数:"+pageInfo.getTotal());
System.out.println("总页数:"+pageInfo.getPages());
System.out.println("是否是第一页:"+pageInfo.isIsFirstPage());
System.out.println("是否是最后一页:"+pageInfo.isIsLastPage());
//执行操作
sqlSession.close();
}
运行结果
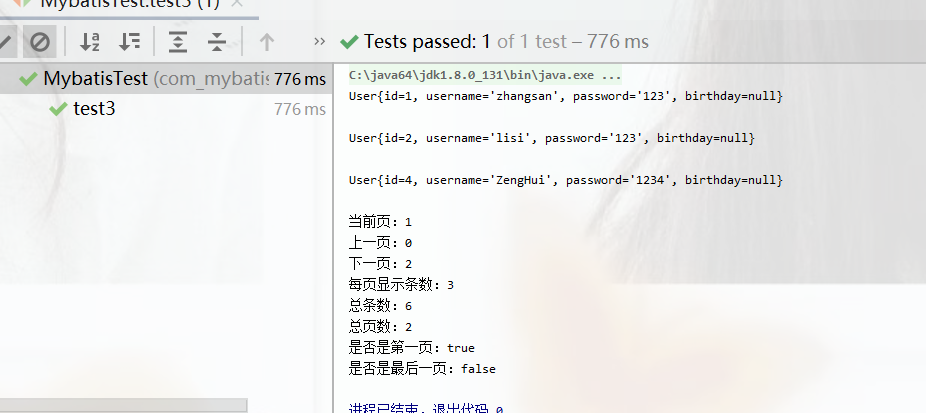
知识小结之Mybatis核心配置文件标签
**properties标签:**该标签可以加载外部的properties文件
typeAliases标签:设置类型别名
**environments标签:**数据源环境配置标签
**typeHandlers标签:**配置自定义类型处理器
plugins标签:配置MyBatis的插件
Mybatis的多表操作
1、一对一查询
一对一查询的模型
用户表和订单标的关系为,一个用户有多个订单,一个订单只属于一个用户
一对一查询的需求:查询一个订单,与此同时查询出该订单所属的用户
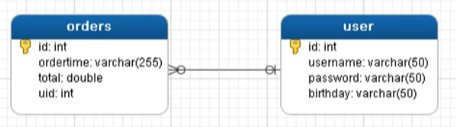
测试订单
数据库中
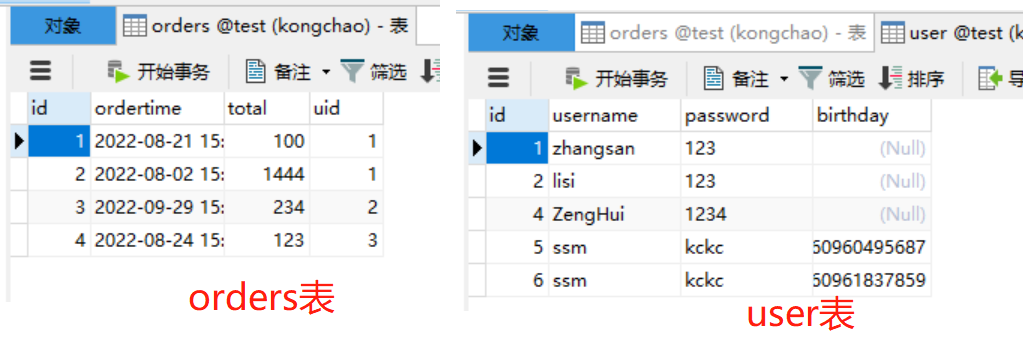
mapper包下orderMapper类下
package com_mybatis_table.mapper;
import com_mybatis_table.pojo.Order;
import java.util.List;
public interface OrderMapper {
//查询全部的方法
public List<Order> findAll();
}
pojo包下的order类下
package com_mybatis_table.pojo;
import java.util.Date;
public class Order {
private int id;
private Date ordertime;
private double total;
//当前订单属于哪一个用户
private User user;
public int getId() {
return id;
}
//对应的get和set方法
@Override
public String toString() {
return "Order{" +
"id=" + id +
", ordertime=" + ordertime +
", total=" + total +
", user=" + user +
'}';
}
}
pojo下user类下
package com_mybatis_table.pojo;
import java.util.Date;
import java.util.List;
public class User {
private int id;
private String username;
private String password;
private Date birthday;
//描述的是当前用户存在哪些订单
private List<Order> orderList;
//对应的get和set方法
@Override
public String toString() {
return "User{" +
"id=" + id +
", username='" + username + '\'' +
", password='" + password + '\'' +
", birthday=" + birthday +
'}';
}
}
OrderMapper.xml下
<?xml version="1.0" encoding="UTF-8" ?>
<!DOCTYPE mapper PUBLIC "-//mybatis.org//DTD Mapper 3.0//EN" "http://mybatis.org/dtd/mybatis-3-mapper.dtd">
<mapper namespace="com_mybatis_table.mapper.OrderMapper">
<resultMap id="orderMap" type="order">
<!--手动指定字段与实体属性的映射关系
column: 数据表的字段名称
property:实体的属性名称
-->
<id column="oid" property="id"></id>
<result column="ordertime" property="ordertime"></result>
<result column="total" property="total"></result>
result column="uid" property="user.id"></result>
<result column="username" property="user.username"></result>
<result column="password" property="user.password"></result>
<result column="birthday" property="user.birthday"></result>
</resultMap>
<select id="findAll" resultMap="orderMap">
SELECT *,o.id oid FROM orders o,USER u WHERE o.uid=u.id
</select>
</mapper>
sqlMapConfig.xml还是一样的配置,多出了引入OrderMapper.xml
<!--加载映射文件-->
<mappers>
<mapper resource="com_mybatis/mapper/UserMapper_config.xml"></mapper>
<mapper resource="com_mybatis/mapper/OrderMapper.xml"></mapper>
</mappers>
MybatisTest测试代码下
public class MybatisTest {
@Test
public void test1() throws IOException {
InputStream resourceAsStream = Resources.getResourceAsStream("sqlMapConfig.xml");
SqlSessionFactory sqlSessionFactory = new SqlSessionFactoryBuilder().build(resourceAsStream);
SqlSession sqlSession = sqlSessionFactory.openSession();
OrderMapper mapper = sqlSession.getMapper(OrderMapper.class);
List<Order> orderList = mapper.findAll();
for (Order order : orderList) {
System.out.println(order);
}
sqlSession.close();
}
}
运行结果
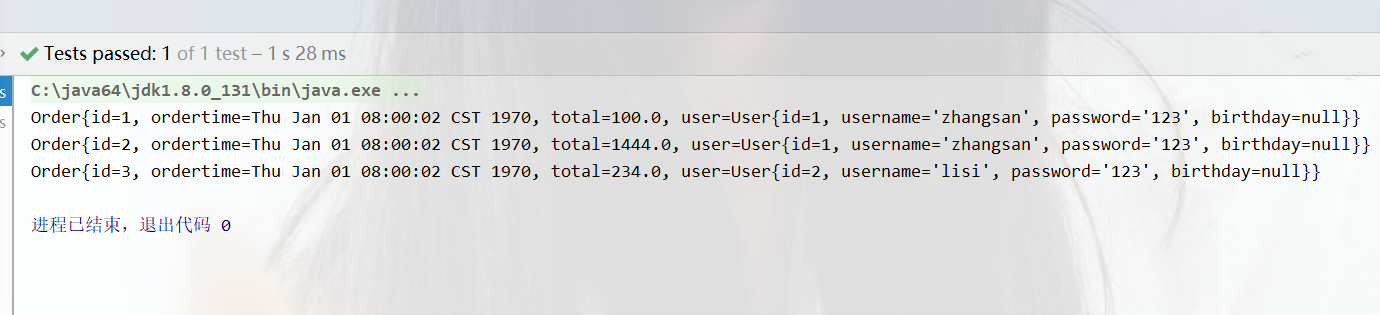
查询操作运行结果
OrderMap.xml中也可使用
<resultMap id="orderMap" type="order">
<!--手动指定字段与实体属性的映射关系
column: 数据表的字段名称
property:实体的属性名称
-->
<id column="oid" property="id"></id>
<result column="ordertime" property="ordertime"></result>
<result column="total" property="total"></result>
<!--<result column="uid" property="user.id"></result>
<result column="username" property="user.username"></result>
<result column="password" property="user.password"></result>
<result column="birthday" property="user.birthday"></result>-->
<!--
property: 当前实体(order)中的属性名称(private User user)
javaType: 当前实体(order)中的属性的类型(User)
-->
<association property="user" javaType="user">
<id column="uid" property="id"></id>
<result column="username" property="username"></result>
<result column="password" property="password"></result>
<result column="birthday" property="birthday"></result>
</association>
</resultMap>
单独的分离出来,结果也是一致的。
2、一对多查询
一对多查询的模型
用户表和订单表的关系为,一个用户有多个订单,一个订单只属于一个用户
一对多查询的需求:查询一个用户,与此同时查询出该用户具有的订单
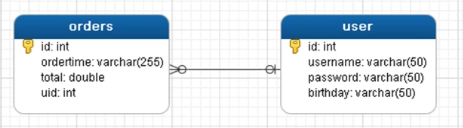
UserMapper接口下
package com_mybatis_table.mapper;
import com_mybatis_table.pojo.User;
import java.util.List;
public interface UserMapper {
public List<User> findAll();
}
UserMapper.xml下
<?xml version="1.0" encoding="UTF-8" ?>
<!DOCTYPE mapper PUBLIC "-//mybatis.org//DTD Mapper 3.0//EN" "http://mybatis.org/dtd/mybatis-3-mapper.dtd">
<mapper namespace="com_mybatis_table.mapper.UserMapper">
<resultMap id="userMap" type="user">
<id column="uid" property="id"></id>
<result column="username" property="username"></result>
<result column="password" property="password"></result>
<result column="birthday" property="birthday"></result>
<!--配置集合信息
property:集合名称
ofType:当前集合中的数据类型
-->
<collection property="orderList" ofType="order">
<!--封装order的数据-->
<id column="oid" property="id"></id>
<result column="ordertime" property="ordertime"></result>
<result column="total" property="total"></result>
</collection>
</resultMap>
<select id="findAll" resultMap="userMap">
SELECT *,o.id oid FROM USER u,orders o WHERE u.id=o.uid
</select>
</mapper>
Mybatis测试下
@Test
public void test2() throws IOException {
InputStream resourceAsStream = Resources.getResourceAsStream("sqlMapConfig.xml");
SqlSessionFactory sqlSessionFactory = new SqlSessionFactoryBuilder().build(resourceAsStream);
SqlSession sqlSession = sqlSessionFactory.openSession();
UserMapper mapper = sqlSession.getMapper(UserMapper.class);
List<User> userList = mapper.findAll();
for (User user : userList) {
System.out.println(user);
}
sqlSession.close();
}
运行结果
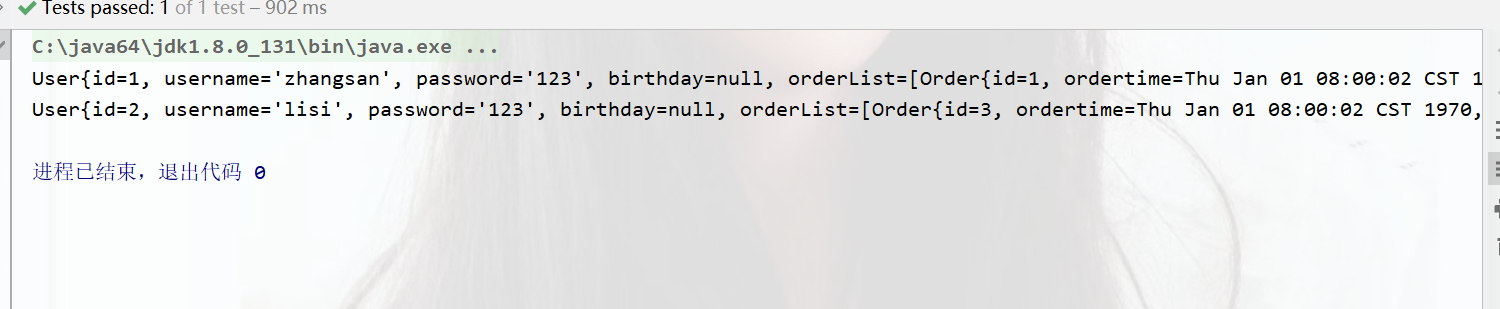
多对多查询
多对多查询模型
用户表和角色表的关系为,一个用户有多个角色,一个角色被多个用户使用
多对多查询的需求:查询用户同时查询出该用户的所有角色
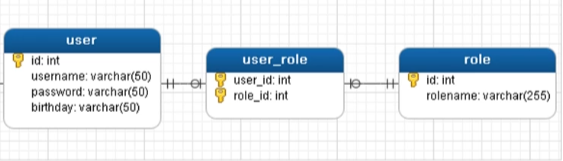
数据库中两张新表
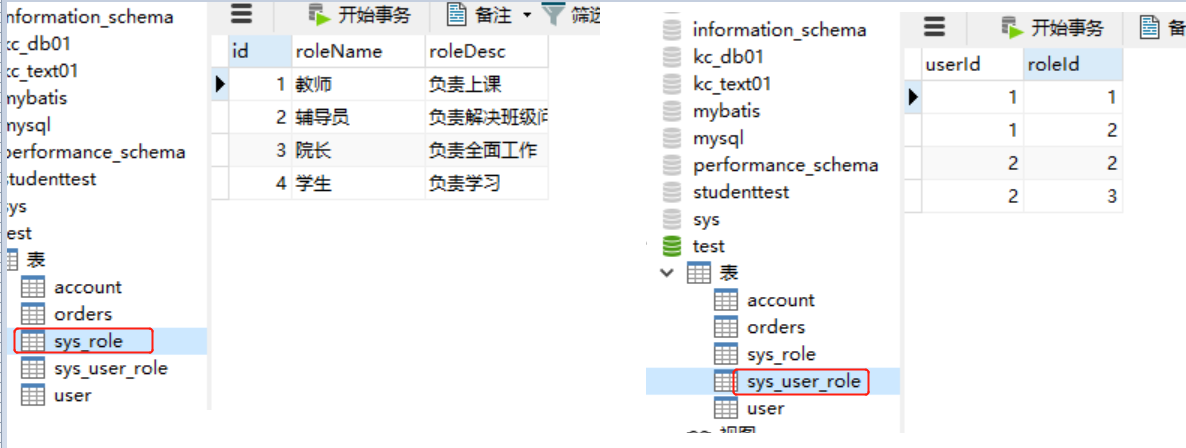
UserMapper接口下
public interface UserMapper {
public List<User> findUserAndRoleAll();
}
pojo下的role类
package com_mybatis_table.pojo;
public class Role {
private int id;
private String roleName;
private String roleDesc;
//外加get和set方法和toString方法
}
pojo下的user类
package com_mybatis_table.pojo;
import java.util.Date;
import java.util.List;
public class User {
private int id;
private String username;
private String password;
private Date birthday;
//描述的是当前用户存在哪些订单
private List<Order> orderList;
//描述的是当前用户具备哪些角色
private List<Role> roleList;
//外加getset方法和toString方法
}
UserMapper.xml文件下(配置sql的文件)
<?xml version="1.0" encoding="UTF-8" ?>
<!DOCTYPE mapper PUBLIC "-//mybatis.org//DTD Mapper 3.0//EN" "http://mybatis.org/dtd/mybatis-3-mapper.dtd">
<mapper namespace="com_mybatis_table.mapper.UserMapper">
<!-- 配置role映射-->
<resultMap id="userRoleMap" type="user">
<!-- 封装user的信息-->
<id column="userId" property="id"></id>
<result column="username" property="username"></result>
<result column="password" property="password"></result>
<result column="birthday" property="birthday"></result>
<!-- 封装user内部的roleList信息
column为数据库中字段名,property是实体中的名字-->
<collection property="roleList" ofType="role">
<id column="roleId" property="id"></id>
<result column="roleName" property="roleName"></result>
<result column="roleDesc" property="roleDesc"></result>
</collection>
</resultMap>
<select id="findUserAndRoleAll" resultMap="userRoleMap">
select * from user u,sys_user_role sr,sys_role r
where u.id=sr.roleId and sr.roleId=r.id
</select>
</mapper>
sqlMapConfig.xml中加入别名和加载映射文件
<!--定义别名-->
<typeAliases>
<typeAlias type="com_mybatis_table.pojo.Role" alias="role"></typeAlias>
</typeAliases>
<!--加载映射文件-->
<mappers>
<mapper resource="com_mybatis/mapper/UserMapper.xml"></mapper>
</mappers>
运行结果

练习册多对多表查询
将orders、role、user三者联系起来
即一个用户,显示他们角色信息,订单信息,
一个用户有多个角色,一个订单属于一个用户,一个用户有多个订单
mapper包下的OrderUserRoleMapper接口下
import java.util.List;
public interface OrderUserRoleMapper {
public List<User> findUserAndRoleAndOderAll();
}
pojo包下的三个实体类基本不变,user类中需要加入订信息和角色信息
package com_mybatis_table.pojo;
import java.util.Date;
import java.util.List;
public class User {
private int id;
private String username;
private String password;
private Date birthday;
//描述的是当前用户存在哪些订单
private List<Order> orderList;
//描述的是当前用户具备哪些角色
private List<Role> roleList;
}
Order_User_RoleMapper.xml下
<?xml version="1.0" encoding="UTF-8" ?>
<!DOCTYPE mapper PUBLIC "-//mybatis.org//DTD Mapper 3.0//EN" "http://mybatis.org/dtd/mybatis-3-mapper.dtd">
<mapper namespace="com_mybatis_table.mapper.OrderUserRoleMapper">
<!--***************************-->
<!-- 配置role映射-->
<resultMap id="userRoleMap" type="user">
<!-- 封装user的信息-->
<id column="userId" property="id"></id>
<result column="username" property="username"></result>
<result column="password" property="password"></result>
<result column="birthday" property="birthday"></result>
<!-- 封装user内部的roleList信息
column为数据库中字段名,property是实体中的名字-->
<collection property="roleList" ofType="role">
<id column="roleId" property="id"></id>
<result column="roleName" property="roleName"></result>
<result column="roleDesc" property="roleDesc"></result>
</collection>
<!-- 封装user内部的orderList信息-->
<collection property="orderList" ofType="order">
<id column="oid" property="id"></id>
<result column="ordertime" property="ordertime"></result>
<result column="total" property="total"></result>
</collection>
</resultMap>
<select id="findUserAndRoleAndOderAll" resultMap="userRoleMap">
select *,o.id oid from user u,sys_user_role sr,sys_role r,orders o
where u.id=sr.roleId and sr.roleId=r.id and o.uid=u.id
</select>
</mapper>
sqlMapConfig.xml下加入此mapper的Order_User_RoleMapper.xml文件
测试类下
@Test
public void findUserAndRoleTest() throws IOException {
InputStream resourceAsStream = Resources.getResourceAsStream("sqlMapConfig.xml");
SqlSessionFactory sqlSessionFactory = new SqlSessionFactoryBuilder().build(resourceAsStream);
SqlSession sqlSession = sqlSessionFactory.openSession();
OrderUserRoleMapper mapper = sqlSession.getMapper(OrderUserRoleMapper.class);
List<User> userAndRoleAndOderAllList = mapper.findUserAndRoleAndOderAll();
for (User user : userAndRoleAndOderAllList) {
System.out.println(user);
}
sqlSession.close();
}
运行结果
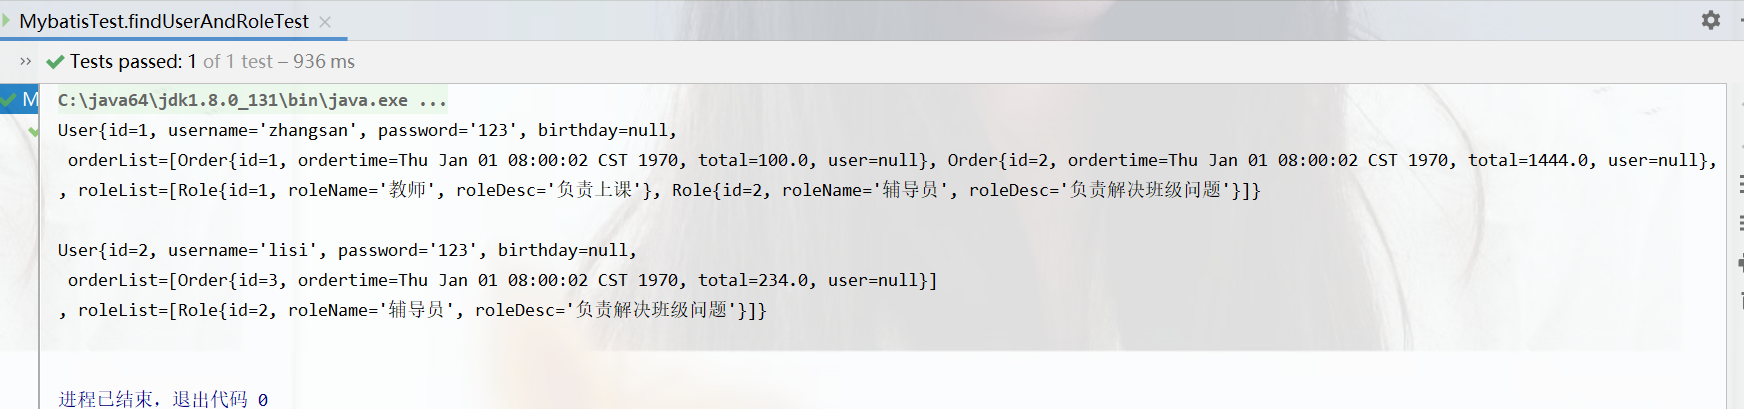
Mybatis的注解开发
mybatis的常用注解
这几年来注解开发越来越流行,Mybatis也可以使用注解开发方式,这样我们就可以减少编写Mapper映射文件了。我们先围绕一些基本的CRUD来学习,再学习复杂映射多表操作。
@Insert:实现新增
@Update:实现更新
@Delete:实现删除
@Select:实现查询
@Result:实现结果集封装
@Results:可以与@Resuit一起使用,封装多个结果集
@One:实现一对一结果集封装
@Many:实现一对多结果集封装
注解完成增删改查操作
在UserMapper接口中
package com_mybatis_ann.mapper;
import com_mybatis_ann.pojo.User;
import org.apache.ibatis.annotations.Delete;
import org.apache.ibatis.annotations.Insert;
import org.apache.ibatis.annotations.Select;
import org.apache.ibatis.annotations.Update;
import java.util.List;
public interface UserMapper {
@Insert("insert into user values(#{id},#{username},#{password},#{birthday})")
public void insert(User user);
@Update("update user set username=#{username},password=#{password} where id=#{id}")
public void update(User user);
@Delete("delete from user where id=#{id}")
public void delete(int id);
@Select("select * from user where id=#{id}")
public User findById(int id);
@Select("select * from user")
public List<User> findAll();
}
在user类中有
package com_mybatis_table.pojo;
import java.util.Date;
import java.util.List;
public class User {
private int id;
private String username;
private String password;
private Date birthday;
//get和set方法和toString方法省略
}
sqlMapConfig配置文件中新增
<mappers>
<package name="com_mybatis_ann.mapper"></package>
</mappers>
测试下
新增操作
public class MybatisTest {
private UserMapper mapper;
// 提前运行,抽取出来
@Before
public void before() throws IOException {
InputStream resourceAsStream = Resources.getResourceAsStream("sqlMapConfig.xml");
SqlSessionFactory sqlSessionFactory = new SqlSessionFactoryBuilder().build(resourceAsStream);
SqlSession sqlSession = sqlSessionFactory.openSession(true);
mapper = sqlSession.getMapper(UserMapper.class);
}
@Test
public void testInsert(){
User user = new User();
user.setUsername("tom");
user.setPassword("abc");
mapper.insert(user);
}
}
修改操作
@Test
public void testUpdate(){
User user = new User();
user.setId(2);
user.setUsername("lucy");
user.setPassword("123");
mapper.update(user);
}
删除操作
@Test
public void testDelete(){
mapper.delete(2);
}
查询操作
@Test
public void testFindById(){
User user = mapper.findById(3);
System.out.println(user);
}
查询全部操作
@Test
public void testFindAll(){
List<User> all = mapper.findAll();
for (User user : all) {
System.out.println(user);
}
}
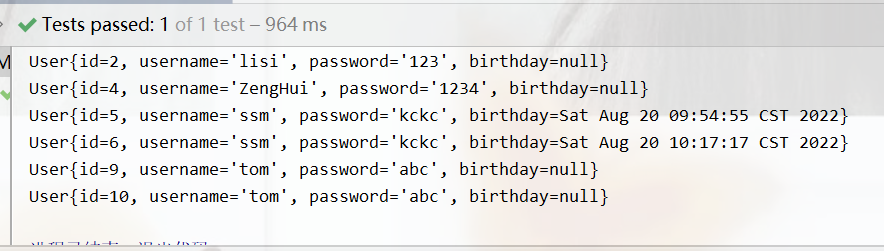
Mybatis的注解实现复杂映射开发
实现复杂关系映射之前哦我们可以在映射文件中通过配置<resultMap>来实现,使用注解来发后,我们可以使用@Results注解,@Result注解,@Many注解组合完成复杂关系的
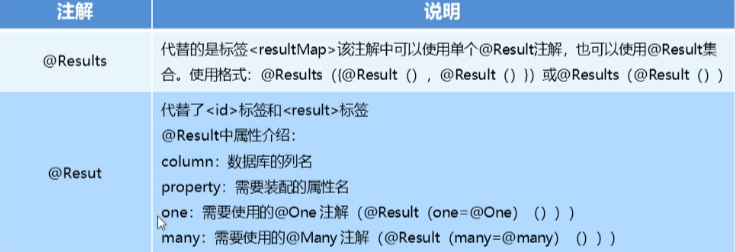
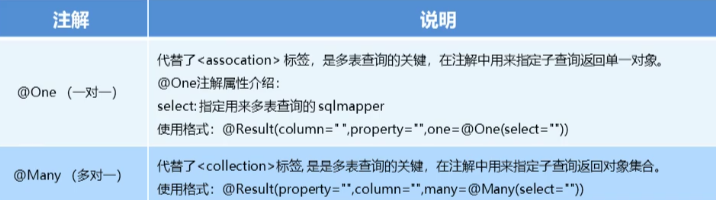
一对一注解查询
查询用户时也查询出订单信息
order类下
public class Order {
private int id;
private Date ordertime;
private double total;
//当前订单属于哪一个用户
private User user;
//get和set、toString方式省略
}
User类下
public class User {
private int id;
private String username;
private String password;
private Date birthday;
//get和set、toString方式省略
}
OrderMapper接口下
public interface OrderMapper {
@Select("select *,o.id oid from orders o,user u where o.uid=u.id")
//配置user的信息
@Results({
@Result(column = "oid",property = "id"),
@Result(column = "ordertime",property = "ordertime"),
@Result(column = "total",property = "total"),
@Result(column = "uid",property = "user.id"),
@Result(column = "username",property = "user.username"),
@Result(column = "password",property = "user.password")
})
public List<Order> findAll();
}
测试类下
public class MybatisTest2 {
private OrderMapper oMapper;
// 提前运行,抽取出来
@Before
public void before() throws IOException {
InputStream resourceAsStream = Resources.getResourceAsStream("sqlMapConfig.xml");
SqlSessionFactory sqlSessionFactory = new SqlSessionFactoryBuilder().build(resourceAsStream);
SqlSession sqlSession = sqlSessionFactory.openSession(true);
oMapper = sqlSession.getMapper(OrderMapper.class);
}
@Test
public void testAll(){
List<Order> all = oMapper.findAll();
for (Order order : all) {
System.out.println(order);
}
}
}
运行结果
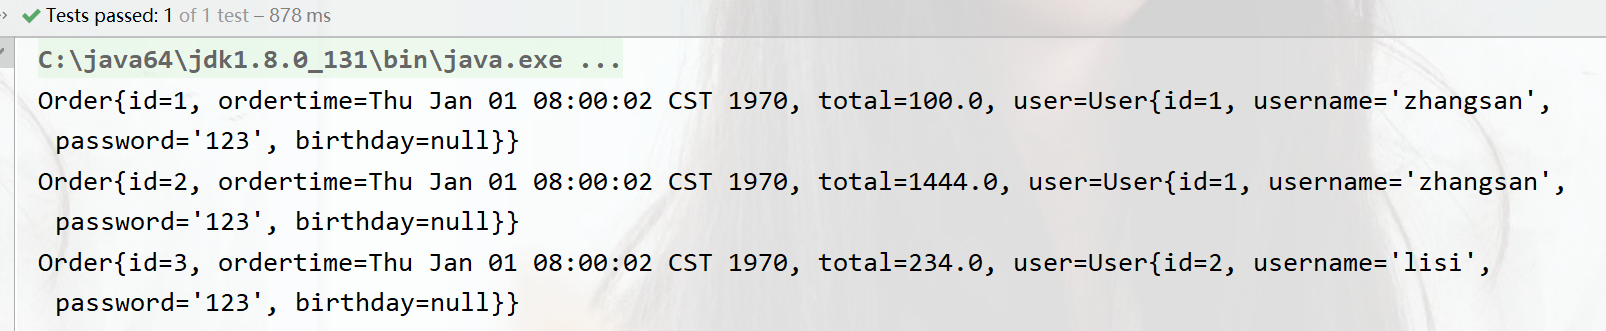
另一种,分两次查询
以下这种格式
select *from orders
select *from user where id=?
orderMapper接口中
public interface OrderMapper {
@Select("select * from orders")
@Results({
@Result(column = "id",property = "id"),
@Result(column = "ordertime",property = "ordertime"),
@Result(column = "total",property = "total"),
@Result(
property = "user", //要封装的属性名称
column = "uid", //根据那个字段去查询user表的数据
javaType = User.class, //要封装的实体类型
//select属性 代表查询那个接口的方法获得数据
one = @One(select = "com_mybatis_ann.mapper.UserMapper.findById")//这个是UserMapper接口中的方法根据id查询
)
})
public List<Order> findAll();
}
运行结果也是一致的
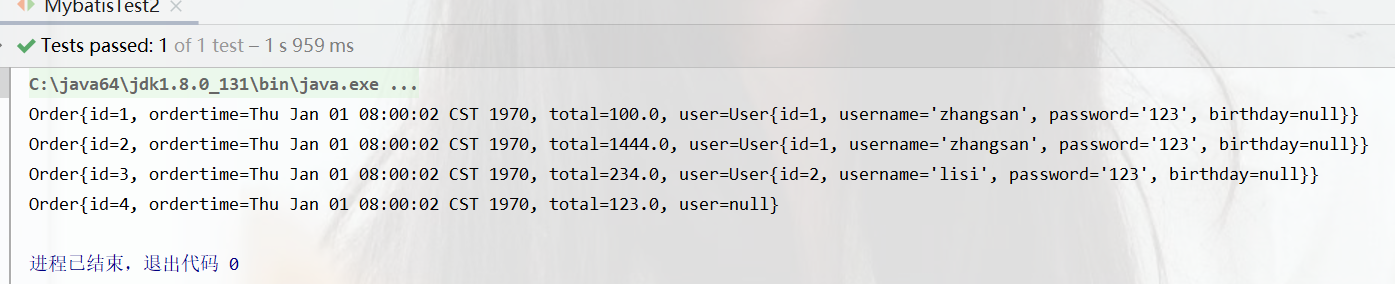
一对多注解查询
用户表和订单表的关系为,一个用户有多个订单,一个订单只属于一个用户
一对多查询的需求:查询一个用户,与此同时查询出该用户具有的订单
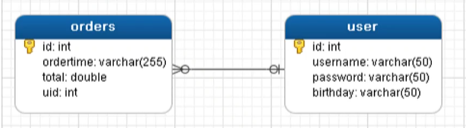
在userMapper接口下
@Select("select *from user")
//给user封数据
@Results({
@Result(column = "id",property = "id"),
@Result(column = "username",property = "username"),
@Result(column = "password",property = "password"),
//给order封数据
@Result(
property = "orderList",
column = "id",
javaType = List.class,
//写对方的根据id查询的方法(先在orderMapper中写一个根据id查询的方法)
many = @Many(select = "com_mybatis_ann.mapper.OrderMapper.findById")
)
})
public List<User> findUserAndOrderAll();
orderMapper加上
@Select("select *from orders where uid=#{uid}")
public List<Order> findById(int id);
user实体类中加上order实体类的信息
public class User {
private int id;
private String username;
private String password;
private Date birthday;
private List<Order> orderList;
}
test包下测试
public class MybatisTest {
private UserMapper mapper;
// 提前运行,抽取出来
@Before
public void before() throws IOException {
InputStream resourceAsStream = Resources.getResourceAsStream("sqlMapConfig.xml");
SqlSessionFactory sqlSessionFactory = new SqlSessionFactoryBuilder().build(resourceAsStream);
SqlSession sqlSession = sqlSessionFactory.openSession(true);
mapper = sqlSession.getMapper(UserMapper.class);
}
@Test
public void testById(){
List<User> userAndOrderAll = mapper.findUserAndOrderAll();
for (User user : userAndOrderAll) {
System.out.println(user);
}
}
}
运行结果
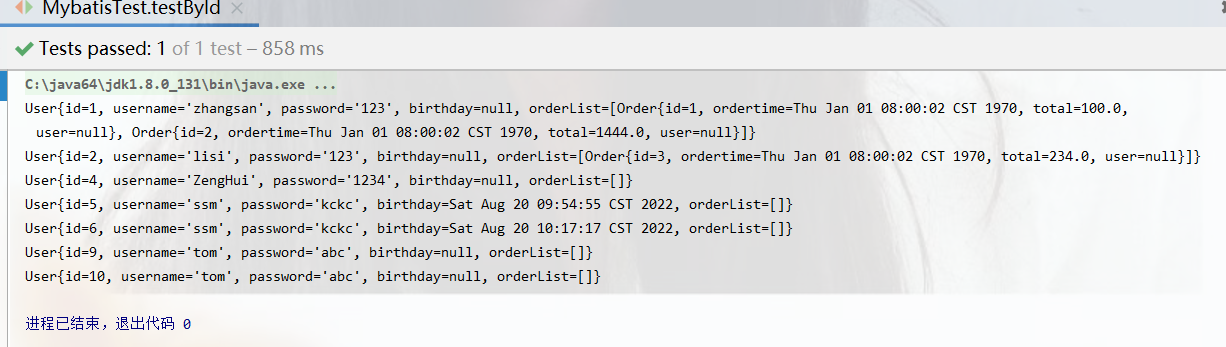
多对多查询
用户表和角色表的关系为,一个用户有多个角色,一个角色被多个用户使用
多对多查询的需求:查询用户同时查询出该用户的所有角色
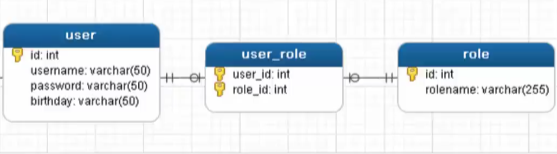
新建一个Role实体类
public class Role {
private int id;
private String roleName;
private String roleDesc;
//get、set、toString省略
}
User实体类下
public class User {
private int id;
private String username;
private String password;
private Date birthday;
private List<Role> roleList;
//get、set、toString省略
}
UserMapper接口下
@Select("Select *from user")
@Results({
@Result(column = "id",property = "id"),
@Result(column = "username",property = "username"),
@Result(column = "password" ,property = "password"),
@Result(
property = "roleList",
column = "id",
javaType = List.class,//对次方法的全限定名
many = @Many(select ="com_mybatis_ann.mapper.RoleMapper.findByUid" )
)
})
public List<User> findUserAndRoleAll();
RoleMapper接口下
public interface RoleMapper {
@Select("select *from sys_user_role ur,sys_role r where ur.roleId=r.id and ur.userId=#{uid}")
public List<Role> findByUid(int uid);
}
test类下的测试下
public class MybatisTest2 {
private OrderMapper oMapper;
@Test
public void testAll(){
List<Order> all = oMapper.findAll();
for (Order order : all) {
System.out.println(order);
}
}
运行结果
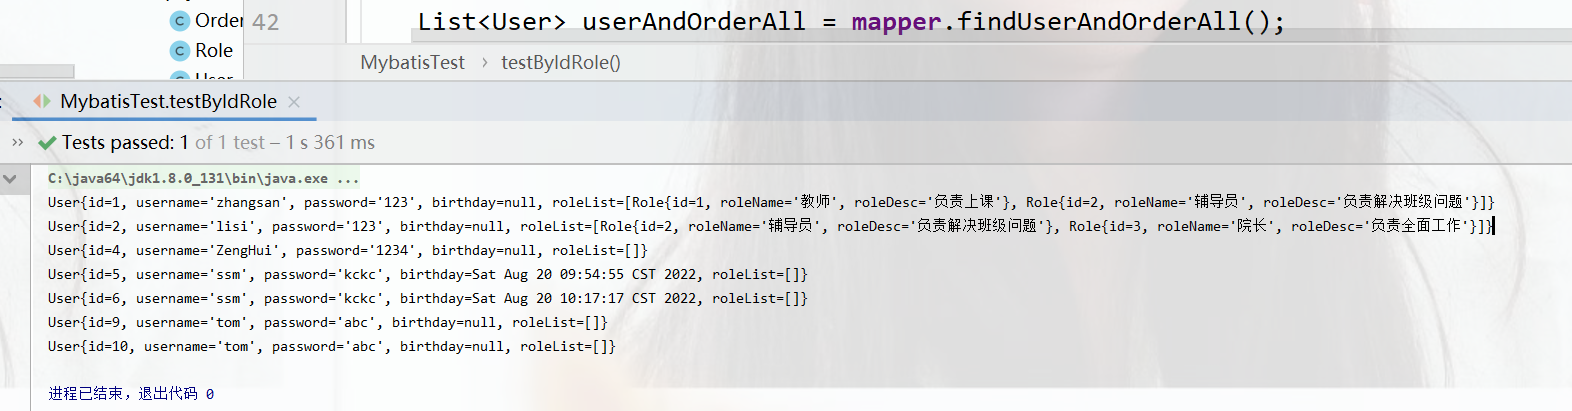
SSM框架整合
原始整合方式
①创建数据库
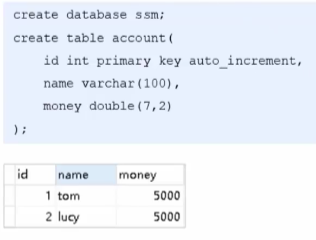 【】
【】
②创建maven工程

③叁导入maven对应坐标
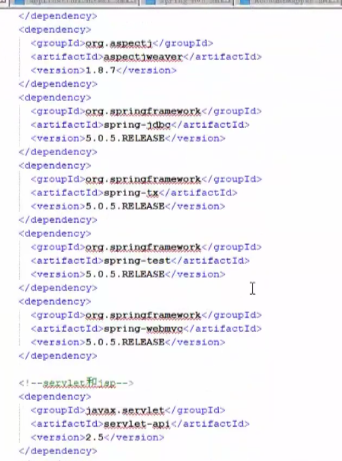
④编写实体类

⑤编写Mapper接口(dao接口)
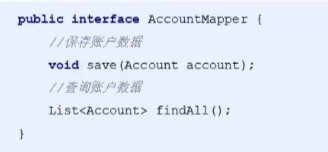
⑥编写service接口
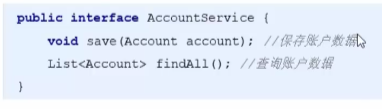
⑦编写Service接口实现
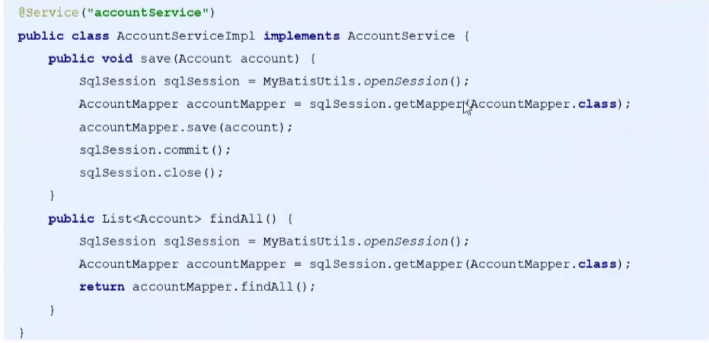
⑧编写Controller
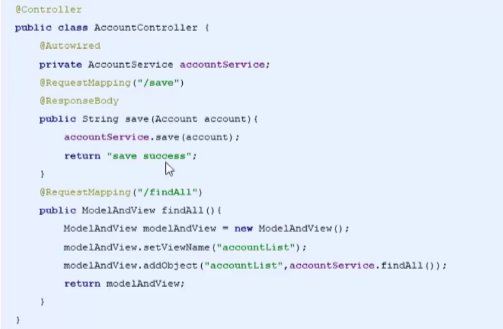
⑨编写jsp添加页面
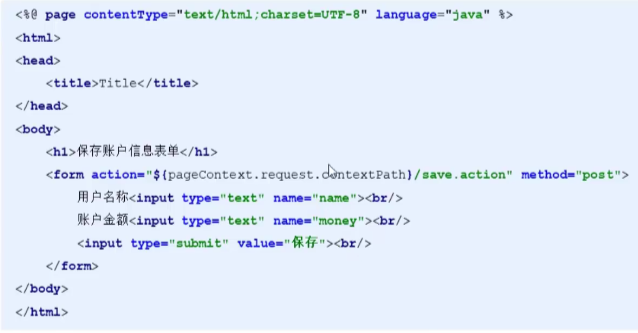
⑩编写列表jsp展示页面
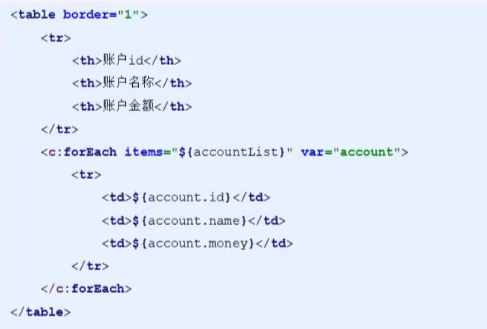
①①编写响应的配置文件
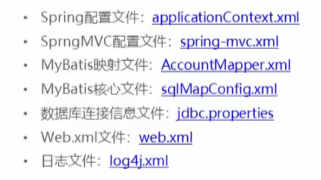
①②测试添加账户
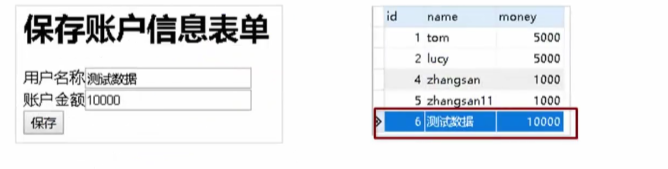
①③测试账户列表
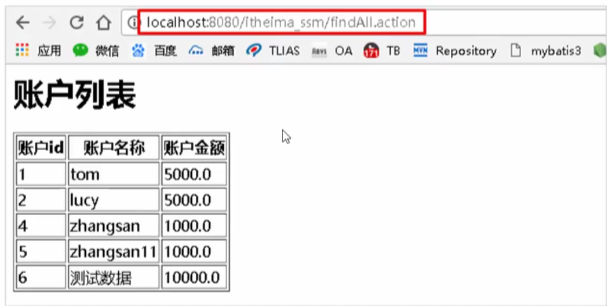
SSM整合测试
①创建数据库
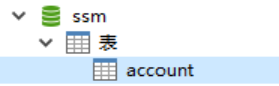
②创建maven工程
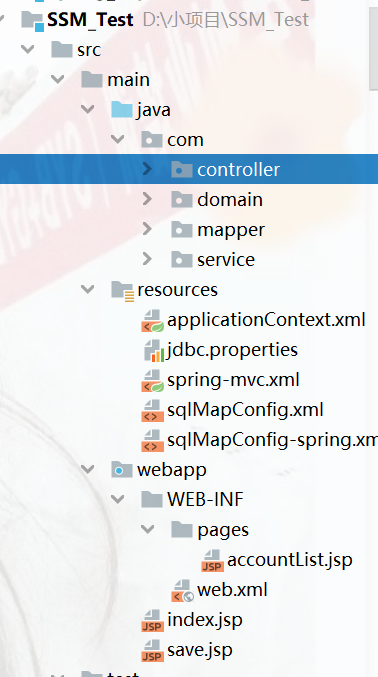
③pom.xml中导入对应的坐标
<dependencies>
<!-- 在pojo实体类对象中可以使用注解,省去getset方式和构造方法-->
<dependency>
<groupId>org.projectlombok</groupId>
<artifactId>lombok</artifactId>
<version>1.18.24</version>
</dependency>
<!--spring相关-->
<dependency>
<groupId>org.springframework</groupId>
<artifactId>spring-context</artifactId>
<version>5.0.5.RELEASE</version>
</dependency>
<dependency>
<groupId>org.aspectj</groupId>
<artifactId>aspectjweaver</artifactId>
<version>1.8.7</version>
</dependency>
<dependency>
<groupId>org.springframework</groupId>
<artifactId>spring-jdbc</artifactId>
<version>5.0.5.RELEASE</version>
</dependency>
<dependency>
<groupId>org.springframework</groupId>
<artifactId>spring-tx</artifactId>
<version>5.0.5.RELEASE</version>
</dependency>
<dependency>
<groupId>org.springframework</groupId>
<artifactId>spring-test</artifactId>
<version>5.0.5.RELEASE</version>
</dependency>
<dependency>
<groupId>org.springframework</groupId>
<artifactId>spring-webmvc</artifactId>
<version>5.0.5.RELEASE</version>
</dependency>
<!--servlet和jsp-->
<dependency>
<groupId>javax.servlet</groupId>
<artifactId>servlet-api</artifactId>
<version>2.5</version>
</dependency>
<dependency>
<groupId>javax.servlet.jsp</groupId>
<artifactId>jsp-api</artifactId>
<version>2.0</version>
</dependency>
<!--mybatis相关-->
<dependency>
<groupId>org.mybatis</groupId>
<artifactId>mybatis</artifactId>
<version>3.4.5</version>
</dependency>
<dependency>
<groupId>org.mybatis</groupId>
<artifactId>mybatis-spring</artifactId>
<version>1.3.1</version>
</dependency>
<dependency>
<groupId>mysql</groupId>
<artifactId>mysql-connector-java</artifactId>
<version>5.1.6</version>
</dependency>
<dependency>
<groupId>c3p0</groupId>
<artifactId>c3p0</artifactId>
<version>0.9.1.2</version>
</dependency>
<dependency>
<groupId>junit</groupId>
<artifactId>junit</artifactId>
<version>4.12</version>
</dependency>
<dependency>
<groupId>jstl</groupId>
<artifactId>jstl</artifactId>
<version>1.2</version>
</dependency>
</dependencies>
④编写实体类
import lombok.AllArgsConstructor;
import lombok.Data;
import lombok.NoArgsConstructor;
@ToString//toString方法
@Data//除了有参构造都有了
@AllArgsConstructor//有参
@NoArgsConstructor//无参
public class Account {
private Integer id;
private String name;
private Double money;
}
/*
<!-- 在pojo实体类对象中可以使用注解,省去getset方式和构造方法-->
<dependency>
<groupId>org.projectlombok</groupId>
<artifactId>lombok</artifactId>
<version>1.18.24</version>
</dependency>
*/
⑤编写Mapper接口(dao接口)
public interface AccountMapper {
@Insert(" insert into account values(#{id},#{name},#{money})")
public void save(Account account);
@Select(" select * from account")
public List<Account> findAll();
}
⑥编写service接口
public interface AccountService {
public void save(Account account);
public List<Account> findAll();
}
⑦编写Service接口实现
@Service("accountService")
public class AccountServiceImpl implements AccountService {
@Autowired
private AccountMapper accountMapper;
@Override
public void save(Account account) {
accountMapper.save(account);
}
@Override
public List<Account> findAll() {
return accountMapper.findAll();
}
}
⑧编写Controller
@Controller
@RequestMapping("/account")
public class AccountController {
@Autowired
private AccountService accountService;
//保存
@RequestMapping(value = "/save",produces = "text/html;charset=UTF-8")
@ResponseBody
public String save(Account account){
accountService.save(account);
return "提交成功";
}
//查询
@RequestMapping("/findAll")
public ModelAndView findAll(){
List<Account> accountList = accountService.findAll();
ModelAndView modelAndView = new ModelAndView();
modelAndView.addObject("accountList",accountList);
modelAndView.setViewName("accountList");
return modelAndView;
}
}
⑨编写jsp添加页面
<%@ page contentType="text/html;charset=UTF-8" language="java" %>
<html>
<head>
<title>Title</title>
</head>
<body>
<h1>添加账户信息表单</h1>
<form name="accountForm" action="${pageContext.request.contextPath}/account/save" method="post">
账户名称:<input type="text" name="name"><br>
账户金额:<input type="text" name="money"><br>
<input type="submit" value="保存"><br>
</form>
</body>
</html>
⑩编写列表jsp展示页面
<%@ page contentType="text/html;charset=UTF-8" language="java" %>
<%@ taglib prefix="c" uri="http://java.sun.com/jsp/jstl/core" %>
<html>
<head>
<title>Title</title>
</head>
<body>
<h1>展示账户数据列表</h1>
<table border="1">
<tr>
<th>账户id</th>
<th>账户名称</th>
<th>账户金额</th>
</tr>
<c:forEach items="${accountList}" var="account">
<tr>
<td>${account.id}</td>
<td>${account.name}</td>
<td>${account.money}</td>
</tr>
</c:forEach>
</table>
</body>
</html>
①①编写响应的配置文件
applicationContext.xml
<?xml version="1.0" encoding="UTF-8" ?>
<beans xmlns="http://www.springframework.org/schema/beans"
xmlns:xsi="http://www.w3.org/2001/XMLSchema-instance"
xmlns:aop="http://www.springframework.org/schema/aop"
xmlns:tx="http://www.springframework.org/schema/tx"
xmlns:context="http://www.springframework.org/schema/context"
xsi:schemaLocation="http://www.springframework.org/schema/beans
http://www.springframework.org/schema/beans/spring-beans.xsd
http://www.springframework.org/schema/tx
http://www.springframework.org/schema/tx/spring-tx.xsd
http://www.springframework.org/schema/aop
http://www.springframework.org/schema/aop/spring-aop.xsd
http://www.springframework.org/schema/context
http://www.springframework.org/schema/context/spring-context.xsd">
<!--组件扫描 扫描service和mapper-->
<context:component-scan base-package="com">
<!--排除controller的扫描-->
<context:exclude-filter type="annotation" expression="org.springframework.stereotype.Controller"></context:exclude-filter>
</context:component-scan>
<!--加载properties文件-->
<context:property-placeholder location="classpath:jdbc.properties"/>
<!--配置数据源信息-->
<bean id="dataSource" class="com.mchange.v2.c3p0.ComboPooledDataSource">
<property name="driverClass" value="${jdbc.driver}"></property>
<property name="jdbcUrl" value="${jdbc.url}"></property>
<property name="user" value="${jdbc.username}"></property>
<property name="password" value="${jdbc.password}"></property>
</bean>
<!--配置sessionFactory-->
<bean id="sqlSessionFactory" class="org.mybatis.spring.SqlSessionFactoryBean">
<property name="dataSource" ref="dataSource"></property>
<!--加载mybatis核心文件-->
<property name="configLocation" value="classpath:sqlMapConfig-spring.xml"></property>
</bean>
<!--扫描mapper所在的包 为mapper创建实现类-->
<bean class="org.mybatis.spring.mapper.MapperScannerConfigurer">
<property name="basePackage" value="com.mapper"></property>
</bean>
<!--声明式事务控制-->
<!--平台事务管理器-->
<bean id="transactionManager" class="org.springframework.jdbc.datasource.DataSourceTransactionManager">
<property name="dataSource" ref="dataSource"></property>
</bean>
<!--配置事务增强-->
<tx:advice id="txAdvice">
<tx:attributes>
<tx:method name="*"/>
</tx:attributes>
</tx:advice>
<!--事务的aop织入-->
<aop:config>
<aop:advisor advice-ref="txAdvice" pointcut="execution(* com.service.impl.*.*(..))"></aop:advisor>
</aop:config>
</beans>
jdbc.properties
jdbc.driver=com.mysql.jdbc.Driver
jdbc.url=jdbc:mysql://localhost:3306/ssm
jdbc.username=root
jdbc.password=123456
spring-mvc.xml
<?xml version="1.0" encoding="UTF-8" ?>
<beans xmlns="http://www.springframework.org/schema/beans"
xmlns:mvc="http://www.springframework.org/schema/mvc"
xmlns:context="http://www.springframework.org/schema/context"
xmlns:xsi="http://www.w3.org/2001/XMLSchema-instance"
xsi:schemaLocation="http://www.springframework.org/schema/beans
http://www.springframework.org/schema/beans/spring-beans.xsd
http://www.springframework.org/schema/mvc
http://www.springframework.org/schema/mvc/spring-mvc.xsd
http://www.springframework.org/schema/context
http://www.springframework.org/schema/context/spring-context.xsd">
<!--组件扫描 主要扫描controller-->
<context:component-scan base-package="com.controller"/>
<!--配置mvc注解驱动-->
<mvc:annotation-driven/>
<!-- 内部资源视图解析器-->
<bean id="resourceViewResolver" class="org.springframework.web.servlet.view.InternalResourceViewResolver">
<property name="prefix" value="/WEB-INF/pages/"/>
<property name="suffix" value=".jsp"/>
</bean>
<!--开发静态资源访问权限-->
<mvc:default-servlet-handler/>
</beans>
sqlMapConfig.xml
<?xml version="1.0" encoding="UTF-8" ?>
<!DOCTYPE configuration
PUBLIC "-//mybatis.org//DTD Config 3.0//EN"
"http://mybatis.org/dtd/mybatis-3-config.dtd">
<configuration>
<!--加载properties文件-->
<properties resource="jdbc.properties"></properties>
<!--环境-->
<environments default="development">
<environment id="development">
<transactionManager type="JDBC"></transactionManager>
<dataSource type="POOLED">
<property name="driver" value="${jdbc.driver}"></property>
<property name="url" value="${jdbc.url}"></property>
<property name="username" value="${jdbc.username}"></property>
<property name="password" value="${jdbc.password}"></property>
</dataSource>
</environment>
</environments>
<!--加载映射-->
<mappers>
<package name="com.mapper"></package>
</mappers>
</configuration>
sqlMapConfig-spring.xml
<?xml version="1.0" encoding="UTF-8" ?>
<!DOCTYPE configuration
PUBLIC "-//mybatis.org//DTD Config 3.0//EN"
"http://mybatis.org/dtd/mybatis-3-config.dtd">
<configuration>
<!--定义别名-->
<typeAliases>
<!--<typeAlias type="com.domain.Account" alias="account"></typeAlias>-->
<package name="com.domain"></package>
</typeAliases>
</configuration>
web.xml
<?xml version="1.0" encoding="UTF-8"?>
<web-app xmlns:xsi="http://www.w3.org/2001/XMLSchema-instance"
xmlns="http://java.sun.com/xml/ns/javaee"
xsi:schemaLocation="http://java.sun.com/xml/ns/javaee http://java.sun.com/xml/ns/javaee/web-app_2_5.xsd" id="WebApp_ID" version="2.5">
<!--spring 监听器-->
<context-param>
<param-name>contextConfigLocation</param-name>
<param-value>classpath:applicationContext.xml</param-value>
</context-param>
<listener>
<listener-class>org.springframework.web.context.ContextLoaderListener</listener-class>
</listener>
<!--springmvc的前端控制器-->
<servlet>
<servlet-name>DispatcherServlet</servlet-name>
<servlet-class>org.springframework.web.servlet.DispatcherServlet</servlet-class>
<init-param>
<param-name>contextConfigLocation</param-name>
<param-value>classpath:spring-mvc.xml</param-value>
</init-param>
<load-on-startup>1</load-on-startup>
</servlet>
<servlet-mapping>
<servlet-name>DispatcherServlet</servlet-name>
<url-pattern>/</url-pattern>
</servlet-mapping>
<!--乱码过滤器-->
<filter>
<filter-name>CharacterEncodingFilter</filter-name>
<filter-class>org.springframework.web.filter.CharacterEncodingFilter</filter-class>
<init-param>
<param-name>encoding</param-name>
<param-value>UTF-8</param-value>
</init-param>
</filter>
<filter-mapping>
<filter-name>CharacterEncodingFilter</filter-name>
<url-pattern>/*</url-pattern>
</filter-mapping>
</web-app>
①②测试添加账户和账户列表
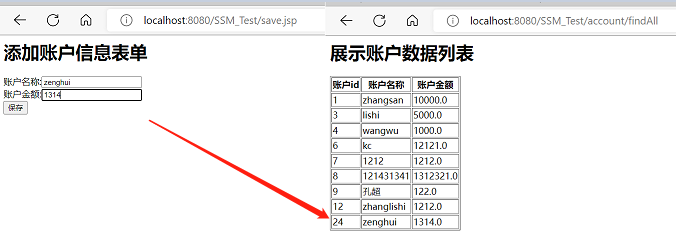
①③数据库中测试
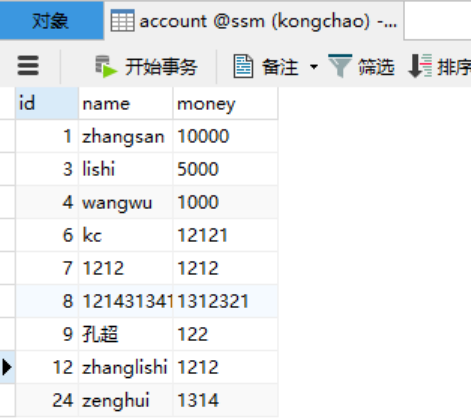
版权归原作者 执久呀 所有, 如有侵权,请联系我们删除。