
一、逻辑删除
曾经我们写的删除代码都是物理删除。
逻辑删除:删除转变为更新
update user set deleted=1 where id = 1 and deleted=0
查找: 追加 where 条件过滤掉已删除数据,如果使用 wrapper.entity 生成的 where 条件也会自动追加该字段
查找:
select id,name,deleted from user where deleted=0
1.修改表结构
- 给 user 表增加 deleted 字段(1代表删除0代表未删除)
CREATE TABLE `user` (
  `id` bigint NOT NULL AUTO_INCREMENT COMMENT '主键ID',
  `name` varchar(30) DEFAULT NULL COMMENT '姓名',
  `age` int DEFAULT NULL COMMENT '年龄',
  `uemail` varchar(128) CHARACTER SET utf8mb4 COLLATE utf8mb4_0900_ai_ci DEFAULT NULL COMMENT '邮箱',
  `deleted` int DEFAULT '0' COMMENT '删除与否',
  PRIMARY KEY (`id`)
) ENGINE=InnoDB AUTO_INCREMENT=8 DEFAULT CHARSET=utf8mb4 COLLATE=utf8mb4_0900_ai_ci;
- 修改字段的方式
ALTER TABLE user ADD column `deleted` int DEFAULT '0' COMMENT '删除与否';
2.开启配置支持
- 配置
com.baomidou.mybatisplus.core.config.GlobalConfig$DbConfig
mybatis-plus:
  global-config:
    db-config:
      logic-delete-value: 1 # 逻辑已删除值(默认为 1)
      logic-not-delete-value: 0 # 逻辑未删除值(默认为 0)
3.
@TableLogic
- 实体类字段上加上
@TableLogic注解
@Data
public class User {
    @TableId(type = IdType.AUTO)
    private Long id;
    private String name;
    @TableField(select = false)
    private Integer age;
    @TableField(value = "uemail")
    private String email;
    @TableLogic
    private Integer deleted;
}
4.测试
- 测试删除
@Test
public void testLogicDeleted(){
    int ret = userMapper.deleteById(3L);
    System.out.println("删除受影响行数为:"+ret);
}
==>  Preparing: UPDATE user SET deleted=1 WHERE id=? AND deleted=0
==> Parameters: 3(Long)
<==    Updates: 1
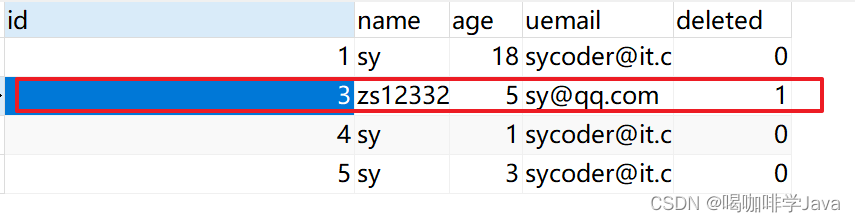
- 测试查询
@Test
public void testLogicDeletedSelect(){
    QueryWrapper<User> wrapper = new QueryWrapper<>();
    List<User> user = userMapper.selectList(wrapper);
    System.out.println(user);
}
==>  Preparing: SELECT id,name,uemail AS email,deleted FROM user WHERE deleted=0
==> Parameters:
<==      Total: 3
- 数据库结果
三、自动填充功能
开发中,比如
- 插入数据的时候需要插入创建时间
- 更新数据的时候需要添加更新时间
1.修改表结构
- 修改表结构
CREATE TABLE `user` (
  `id` bigint NOT NULL AUTO_INCREMENT COMMENT '主键ID',
  `name` varchar(30) DEFAULT NULL COMMENT '姓名',
  `age` int DEFAULT NULL COMMENT '年龄',
  `uemail` varchar(128) CHARACTER SET utf8mb4 COLLATE utf8mb4_0900_ai_ci DEFAULT NULL COMMENT '邮箱',
  `deleted` int DEFAULT '0' COMMENT '删除与否',
  `sex` int DEFAULT '1' COMMENT '性别',
  `create_time` datetime DEFAULT NULL COMMENT '创建时间',
  `update_time` datetime DEFAULT NULL COMMENT '更新时间',
  PRIMARY KEY (`id`)
) ENGINE=InnoDB AUTO_INCREMENT=11 DEFAULT CHARSET=utf8mb4 COLLATE=utf8mb4_0900_ai_ci;
2.@TableField
- FieldFill
public enum FieldFill {
    DEFAULT,//不处理
    INSERT,//插入查出
    UPDATE,//更新处理
    INSERT_UPDATE;//插入和更新处理
}
- 添加字段
@TableField(value = "create_time",fill = FieldFill.INSERT)
private Date createTime;
@TableField(value = "update_time",fill = FieldFill.UPDATE)
private Date updateTime;
3.自定义实现类 MyMetaObjectHandler
- 自定义实现类 MyMetaObjectHandler
@Slf4j
@Component
public class MyMetaObjectHandler implements MetaObjectHandler {
    @Override
    public void insertFill(MetaObject metaObject) {
        log.info("start insert fill ....");
        setFieldValByName("createTime",new Date(),metaObject);
    }

    @Override
    public void updateFill(MetaObject metaObject) {
        log.info("start update fill ....");
        setFieldValByName("updateTime",new Date(),metaObject);
    }
}
4.测试
- 测试插入操作
@Test
public void testFillInsert(){
    User entity = new User();
    entity.setEmail("erew");
    entity.setAge(19);
    entity.setName("小红");
    entity.setSex(SexEnum.MAN);
    int insert = userMapper.insert(entity);
    System.out.println("受影响行数为:"+insert);
}
==>  Preparing: INSERT INTO user ( name, age, uemail, sex, create_time ) VALUES ( ?, ?, ?, ?, ? )
==> Parameters: 小红(String), 19(Integer), erew(String), 1(Integer), 2022-12-03 11:34:41.169(Timestamp)
<==    Updates: 1
- 测试更新操作
@Test
public void testFillUpdate(){
    User entity = new User();
    entity.setId(15L);
    entity.setEmail("erew");
    entity.setAge(19);
    entity.setName("小红");
    entity.setSex(SexEnum.MAN);
    int insert = userMapper.updateById(entity);
    System.out.println("受影响行数为:"+insert);
}
==>  Preparing: UPDATE user SET name=?, age=?, uemail=?, sex=?, update_time=? WHERE id=? AND deleted=0
==> Parameters: 小红(String), 19(Integer), erew(String), 1(Integer), 2022-12-03 11:37:10.716(Timestamp), 15(Long)
<==    Updates: 1

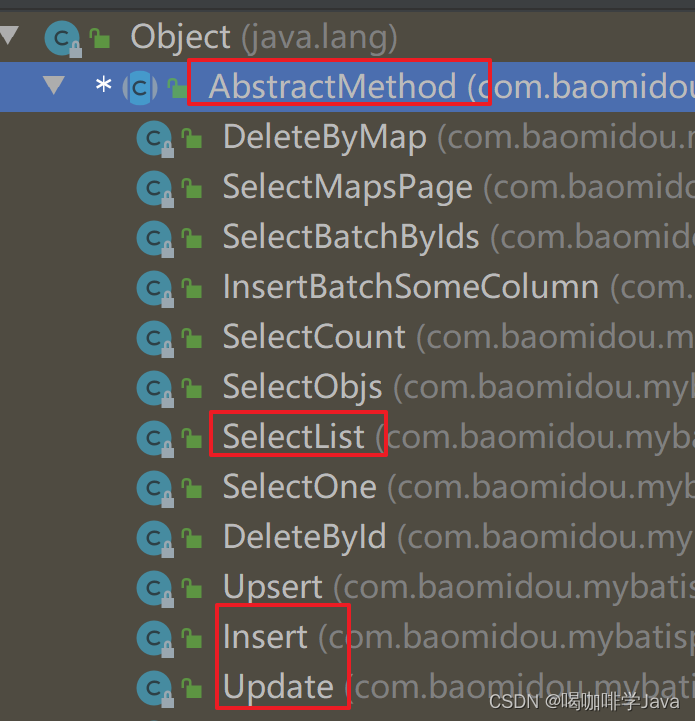
四、SQL注入器
1.SQL注入的原理分析
MyBatisPlus 是使用 ISqlInjector 接口负责SQL注入工作

- 具体实现注入
public void inspectInject(MapperBuilderAssistant builderAssistant, Class<?> mapperClass) {
        Class<?> modelClass = ReflectionKit.getSuperClassGenericType(mapperClass, Mapper.class, 0);
        if (modelClass != null) {
            String className = mapperClass.toString();
            Set<String> mapperRegistryCache = GlobalConfigUtils.getMapperRegistryCache(builderAssistant.getConfiguration());
            if (!mapperRegistryCache.contains(className)) {
                TableInfo tableInfo = TableInfoHelper.initTableInfo(builderAssistant, modelClass);
                List<AbstractMethod> methodList = this.getMethodList(mapperClass, tableInfo);
                if (CollectionUtils.isNotEmpty(methodList)) {
                    methodList.forEach((m) -> {
                        m.inject(builderAssistant, mapperClass, modelClass, tableInfo);
                    });
                } else {
                    this.logger.debug(mapperClass.toString() + ", No effective injection method was found.");
                }

                mapperRegistryCache.add(className);
            }
        }

    }
- 实际的实现代码
methodList.forEach((m) -> {
                        m.inject(builderAssistant, mapperClass, modelClass, tableInfo);
                    });
- m.inject 调用具体方法
this.injectMappedStatement(mapperClass, modelClass, tableInfo);
- 最终具体的执行就是自己定义的类
2.扩充BaseMapper中方法
2.1编写自己的BaseMapper
- 编写MyBaseMapper
public interface MyBaseMapper<T> extends BaseMapper<T> {
    List<T> listAll();
}
- 需要用到的mapper 直接继承即可
@Repository
public interface UserMapper extends MyBaseMapper<User> {

}
2.2编写MySqlInjector
- MySqlInjector
@Component
public class MySqlInjector extends DefaultSqlInjector {
    @Override
    public List<AbstractMethod> getMethodList(Class<?> mapperClass, TableInfo tableInfo) {
        //默认的mybatis-plus 的注入方法
        List<AbstractMethod> methodList = super.getMethodList(mapperClass, tableInfo);
        //添加自己的 listAll 类
        methodList.add(new ListAll());
        return methodList;
    }
}
2.3编写ListAll类
- 创建ListAll 类
public class ListAll extends AbstractMethod {
    @Override
    public MappedStatement injectMappedStatement(Class<?> mapperClass, Class<?> modelClass, TableInfo tableInfo) {
        String sqlMethod = "listAll";
        String sql = "select * from "+tableInfo.getTableName();
        SqlSource sqlSource = this.languageDriver.createSqlSource(this.configuration, sql, modelClass);
        return this.addSelectMappedStatementForTable(mapperClass,sqlMethod,sqlSource,tableInfo);
    }
}
2.4测试
@Test
public void testInjector(){
    List<User> users = userMapper.listAll();
    System.out.println(users);
}
==>  Preparing: select * from user
==> Parameters:
<==      Total: 13
五、插件
1.拦截器核心代码
MybatisPlusInterceptor
该插件是核心插件,目前代理了 Executor#query 和 Executor#update 和StatementHandler#prepare 方法
- 拦截器核心代码
@Intercepts({
        @Signature(type = StatementHandler.class, method = "prepare", args = {Connection.class, Integer.class}),
})
@Component
public class MyInterceptor implements Interceptor {
    @Override
    public Object intercept(Invocation invocation) throws Throwable {
        System.out.println("拦截前操作");
        //做拦截操作
        return invocation.proceed();
    }

    @Override
    public Object plugin(Object target) {
        System.out.println("装配插件");
        //装配插件
        return Plugin.wrap(target, this);
    }

    @Override
    public void setProperties(Properties properties) {
        System.out.println("设置属性");
        //属性设置
    }
}
- 交给容器管理即可实现拦截操作
2.分页插件
@Configuration
@MapperScan("cn.sycoder.mapper")
public class MybatisPlusConfig {
    @Bean
    public MybatisPlusInterceptor mybatisPlusInterceptor() {
        MybatisPlusInterceptor interceptor = new MybatisPlusInterceptor();
        interceptor.addInnerInterceptor(new PaginationInnerInterceptor(DbType.MYSQL));
        return interceptor;
    }
}
3.乐观锁插件
OptimisticLockerInnerInterceptor
当要更新一条记录的时候,希望这条记录没有被别人更新
乐观锁实现方式:
- 取出记录时,获取当前 version
- 更新时,带上这个 version
- 执行更新时, set version = newVersion where version = oldVersion
- 如果 version 不对,就更新失败
3.1乐观锁补充
- 在数据库增加一个 version 字段来管理数据,假设没有其它人操作过这条数据,先读取本条数据的version,然后再修改的时候,判断之前拿出来的version 和现在的version是否一致,如果不一致,则表示被人操作过,不能够正常实现更新
- 演示
update user set age = 123123,version = version+1 where id = 16 and version = 0;

3.2添加乐观锁配置
@Configuration
@MapperScan("cn.wjcoder.mapper")
public class MybatisPlusConfig {
    @Bean
    public MybatisPlusInterceptor mybatisPlusInterceptor() {
        MybatisPlusInterceptor interceptor = new MybatisPlusInterceptor();
        interceptor.addInnerInterceptor(new PaginationInnerInterceptor(DbType.MYSQL));
        interceptor.addInnerInterceptor(new OptimisticLockerInnerInterceptor());
        return interceptor;
    }
}
3.3修改表结构
CREATE TABLE `user` (
  `id` bigint NOT NULL AUTO_INCREMENT COMMENT '主键ID',
  `name` varchar(30) DEFAULT NULL COMMENT '姓名',
  `age` int DEFAULT NULL COMMENT '年龄',
  `uemail` varchar(128) CHARACTER SET utf8mb4 COLLATE utf8mb4_0900_ai_ci DEFAULT NULL COMMENT '邮箱',
  `deleted` int DEFAULT '0' COMMENT '删除与否',
  `sex` int DEFAULT '1' COMMENT '性别',
  `create_time` datetime DEFAULT NULL COMMENT '创建时间',
  `update_time` datetime DEFAULT NULL COMMENT '更新时间',
  `version` int DEFAULT NULL COMMENT '乐观锁控制',
  PRIMARY KEY (`id`)
) ENGINE=InnoDB AUTO_INCREMENT=17 DEFAULT CHARSET=utf8mb4 COLLATE=utf8mb4_0900_ai_ci;
3.4添加 version 字段
- 实体添加字段
@Version
private Integer version;
3.5测试
@Test
public void testVersion(){
    User user = userMapper.selectById(16L);
    user.setName("云哥666");
    int count = userMapper.updateById(user);
    System.out.println("受影响行数:"+count);
}
==>  Preparing: UPDATE user SET name=?, uemail=?, sex=?, create_time=?, update_time=?, version=? WHERE id=? AND version=? AND deleted=0
==> Parameters: 云哥666(String), [email protected](String), 1(Integer), 2022-12-03 11:34:41.0(Timestamp), 2022-12-03 17:44:05.425(Timestamp), 3(Integer), 16(Long), 2(Integer)
<==    Updates: 1
4.防全表更新与删除插件
BlockAttackInnerInterceptor
针对 update 和 delete 语句 作用: 阻止恶意的全表更新删除
4.1配置拦截器
@Configuration
@MapperScan("cn.sycoder.mapper")
public class MybatisPlusConfig {
    @Bean
    public MybatisPlusInterceptor mybatisPlusInterceptor() {
        MybatisPlusInterceptor interceptor = new MybatisPlusInterceptor();
        interceptor.addInnerInterceptor(new PaginationInnerInterceptor(DbType.MYSQL));
        interceptor.addInnerInterceptor(new OptimisticLockerInnerInterceptor());
        interceptor.addInnerInterceptor(new BlockAttackInnerInterceptor());
        return interceptor;
    }
}
4.2测试
- 测试全表删除
@Test
public void testDeleteAll(){
    QueryWrapper<User> wrapper = new QueryWrapper<>();
    int count = userMapper.delete(wrapper);
    System.out.println("受影响行数:"+count);
}
六、代码生成器
简化开发流程,提高开发效率,让程序写很少的代码就能实现开发
1.创建 mybatis-plus-02 模块
2.添加依赖
<parent>
        <groupId>org.springframework.boot</groupId>
        <artifactId>spring-boot-starter-parent</artifactId>
        <version>2.7.5</version>
    </parent>

    <dependencies>
        <dependency>
            <groupId>org.springframework.boot</groupId>
            <artifactId>spring-boot-starter</artifactId>
        </dependency>
        <dependency>
            <groupId>org.springframework.boot</groupId>
            <artifactId>spring-boot-starter-test</artifactId>
            <scope>test</scope>
        </dependency>
        <dependency>
            <groupId>org.projectlombok</groupId>
            <artifactId>lombok</artifactId>
        </dependency>
        <dependency>
            <groupId>mysql</groupId>
            <artifactId>mysql-connector-java</artifactId>
        </dependency>
        <dependency>
            <groupId>com.baomidou</groupId>
            <artifactId>mybatis-plus-boot-starter</artifactId>
            <version>3.5.2</version>
        </dependency>
        <dependency>
            <groupId>com.baomidou</groupId>
            <artifactId>mybatis-plus-generator</artifactId>
            <version>3.5.2</version>
        </dependency>
        <dependency>
            <groupId>org.springframework.boot</groupId>
            <artifactId>spring-boot-starter-freemarker</artifactId>
        </dependency>
        <dependency>
            <groupId>org.springframework.boot</groupId>
            <artifactId>spring-boot-starter-web</artifactId>
        </dependency>
        <dependency>
            <groupId>org.freemarker</groupId>
            <artifactId>freemarker</artifactId>
            <version>2.3.31</version>
        </dependency>
        <dependency>
            <groupId>io.springfox</groupId>
            <artifactId>springfox-swagger-ui</artifactId>
            <version>2.10.1</version>
        </dependency>
        <dependency>
            <groupId>io.springfox</groupId>
            <artifactId>springfox-swagger2</artifactId>
            <version>2.10.1</version>
        </dependency>
    </dependencies>
3.使用
public static void main(String[] args) {
        FastAutoGenerator.create("jdbc:mysql://localhost:3306/mybatis-plus", "root", "123456")
                .globalConfig(builder -> {
                    builder.author("sy") // 设置作者
                            .enableSwagger() // 开启 swagger 模式
                            .fileOverride() // 覆盖已生成文件
                            .outputDir("F:\\03-Spring\\MyBatisPlus\\homework\\mybatis-plus-02\\src\\main\\java\\"); // 指定输出目录
                })
                .packageConfig(builder -> {
                    builder.parent("cn") // 设置父包名
                            .moduleName("sycoder") // 设置父包模块名
                            .pathInfo(Collections.singletonMap(OutputFile.xml, "F:\\03-Spring\\MyBatisPlus\\homework\\mybatis-plus-02\\src\\main\\resources\\cn\\sycoder")); // 设置mapperXml生成路径
                })
                .strategyConfig(builder -> {
                    builder.addInclude("user"); // 设置需要生成的表名
//                            .addTablePrefix("t_", "c_"); // 设置过滤表前缀
                })
                .templateEngine(new FreemarkerTemplateEngine()) // 使用Freemarker引擎模板,默认的是Velocity引擎模板
                .execute();

    }
本文转载自: https://blog.csdn.net/m0_71212413/article/details/129805794
版权归原作者 喝咖啡学Java 所有, 如有侵权,请联系我们删除。
版权归原作者 喝咖啡学Java 所有, 如有侵权,请联系我们删除。