文章目录
前言
vscode作为一款好用的轻量级代码编辑器,不仅支持代码调试,而且还有丰富的插件库,可以说是免费好用,对于初学者来说用来写写python是再合适不过了。下面就推荐几款个人觉得还不错的插件,希望可以帮助大家更好地写代码
安装CPython解释器
https://blog.csdn.net/gsl371/article/details/120148727
配置python虚拟环境
打开vscode终端命令窗口
安装pip
安装python时有选项安装,但版本低些。
安装virtualenvwrapper
virtualenvwrapper,是一个命令集合,便于操作Python虚拟环境。
通过pip安装virtualenvwrapper的命令(会自动安装virtualenv):
pip install virtualenvwrapper
升级pip
python.exe -m pip install--upgrade pip
查看已经安装的模块
C:\Users\gsl>pip3 list
Package    Version
---------- -------
Django     1.11.28
pip        21.0.1
PyMySQL    1.0.2
pytz       2021.1
setuptools 41.2.0
安装虚拟环境创建工具
前面已安装跳过以下
pip3 install virtualenv
pip3 install virtualenvwrapper
查看安装的虚拟环境
C:\Users\gsl>workon

Pass a name to activate one of the following virtualenvs:
==============================================================================
找不到文件
创建虚拟环境
名称为test的虚拟环境
C:\Users\gsl>mkvirtualenv test
 C:\Users\gsl\Envs is not a directory, creating
created virtual environment CPython3.12.1.final.0-64 in 6735ms
  creator CPython3Windows(dest=C:\Users\gsl\Envs\test, clear=False, no_vcs_ignore=False, global=False)
  seeder FromAppData(download=False, pip=bundle, via=copy, app_data_dir=C:\Users\gsl\AppData\Local\pypa\virtualenv)
    added seed packages: pip==23.3.1
  activators BashActivator,BatchActivator,FishActivator,NushellActivator,PowerShellActivator,PythonActivator

(test) C:\Users\gsl>
激活虚拟环境
C:\Users\gsl>workon

Pass a name to activate one of the following virtualenvs:
==============================================================================test

C:\Users\gsl>workon test(test) C:\Users\gsl>
或者
进入虚拟环境目录,ps终端执行如下
C:\Users\gsl\Envs\test\Scripts> ./activate.ps1
结果为:
进入项目目录,安装项目依赖
(wagtailbakerydemo) PS C:\Users\Administrator\Desktop\bakerydemo-main> pip install-r .\requirements.txt
默认是产品版本,如果报错可安装base版本
 pip install-r .\requirements\base.txt
 或开发版本
 pip install-r .\requirements\development.txt
报错
Windows
As of Python 3.9, the official Python installer on Windows already includes the JSON1 extension by default. If you're using an earlier version of Python or unofficial installers, you can do the following:

Download the precompiled DLL that matches your Python installation (32-bit or 64-bit). 下载链接 https://www.sqlite.org/download.html
Locate your Python installation. By default, it should be in %localappdata%\Programs\Python\PythonXX, where XX is the Python version. For example, it's located in C:\Users\<username>\AppData\Local\Programs\Python\Python37. If you added Python installation directory to your PATH environment variable, you can run the command where python on a command prompt to locate it.
Enter the DLLs directory in your Python installation.
Rename (or delete) sqlite3.dll inside the DLLs directory.
Extract sqlite3.dll from the downloaded DLL archive and put it in the DLLs directory.
Now, the JSON1 extension should be ready to be used in Python and Django.
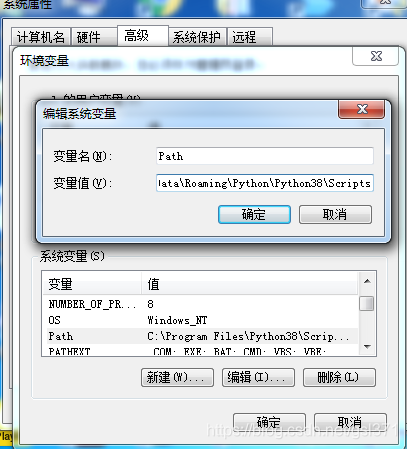
消除安装警告,把virtualenv.exe加入path
或者在vscode中选择
打开VScode编辑器,按下快捷键“Ctrl+Shift+P”,调出全局设置搜索窗口,它会显示在整个编辑器窗口顶部居中的位置,然后输入“Python:Select Interpreter”,就会出现一个相关选项。
点击“Python:Select Interpreter”选项,就会自动在相同位置跳转到Python编辑器配置窗口,在Python编辑器配置窗口会显示正在使用以及已经添加好可以去使用的Python解释器。要再添加新Python解释器,只需要点击第一行的“+ Enter”选项,然后就会进入到下一个窗口中。

或者选择状态栏的解释器,进行修改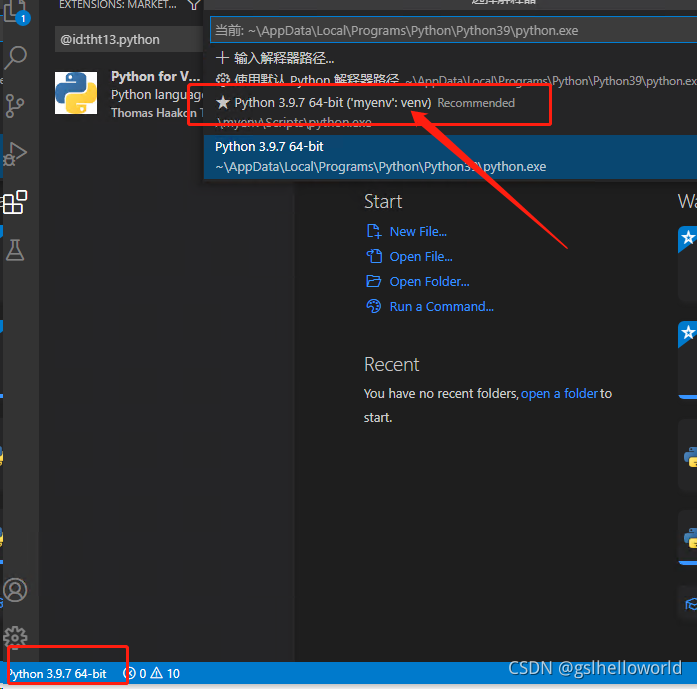
打开命令窗口,直接进入你选择的虚拟环境
python开发环境
安装插件
Python extension for Visual Studio Code

首先当然要推荐这个必备插件python了,提供了代码分析,高亮,规范化等很多基本功能,装好这个就可以开始愉快的写python了。
这个扩展是由微软官方提供的,支持但不仅限于以下功能:
通过Pylint或Flake8支持代码检查
在VS Code编辑器中调试代码
IntelliSense支持自动完成,代码导航和格式化。
支持Jupyter Notebook,Pytest和Unittest
在编辑器中轻松切换Python环境
LiveCode

大家好,在之前的文章中我们说过VSCode的优点就是有许多优秀的插件加持,今天就给大家推荐一款能让你更方便调试Python代码的神器扩展LiveCode先来看看它是如何工作的
图片就像上图展示的一样,我们不需要执行Python脚本,该插件会实时展示你的每一个变量值,且能够识别print()并自动打印,是不是看上去很舒服,这种交互式的体验对于刚接触Python的同学将会更加友好!
安装与启动
和其他的插件安装一样,在商店搜索livecode点击安装即可
但是需要注意的是你必须升级将Python版本升级到Python3.5或者更高才能使用,在安装完毕后只需要在代码编辑页面使用快捷键control+shift+a(Mac下为command+shift+a)即可在当前页面打开一个类似于Matlab工作空间的新页面
使用技巧
其实这款扩展主要基于AREPL。但是AREPL仅显示变量的最终状态。所以如果我们有循环或需要展示一些中间变量状态,就可以使用该插件,LiveCode主要拥有下面四个功能
实时评估:我们不需要运行Python脚本就可以查看各个变量的值
变量显示:每当声明或更改一个变量时,它的新值都会同时改变并显示,例如:当我们写第二个foo时,第一个foo会改变颜色
Python Preview

这个插件很牛皮,能够实时可视化你的代码结果。
不仅如此,还能为VSCode切换各种主题皮肤。
Better Comments

这是一个让你能更好地编写注释的工具,它能根据关键词用不同的颜色高亮代码片段。支持以下类型的高亮:
感叹号 “!” 代码警告。
问号“?”代表存留疑问。
TODO 代码未来将要进行的操作。
@param 参数
此外,它还支持在设置中自定义需要高亮句子的首部关键词。
Python Indent

你有没有觉得VSCode里对Python的自动缩进有点不准确?甚至可以用“丑”来形容。每次我都喜欢强行矫正VSCode给我做的自动缩进。
经过一番查阅,我终于找到了能纠正VSCode缩进错误的扩展,它就是Python Indent,看看下面的示例,相信你也会安装它。
sqlite
安装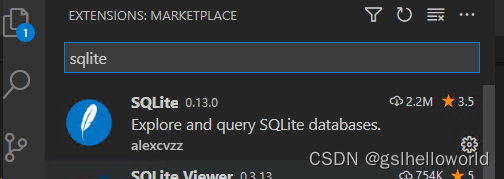
配置使用
如何使用SQLite:
打开命令选项板,
具体操作:如何打开命令选项板:
Windows:Ctrl Shift P
Mac:Command Shift P
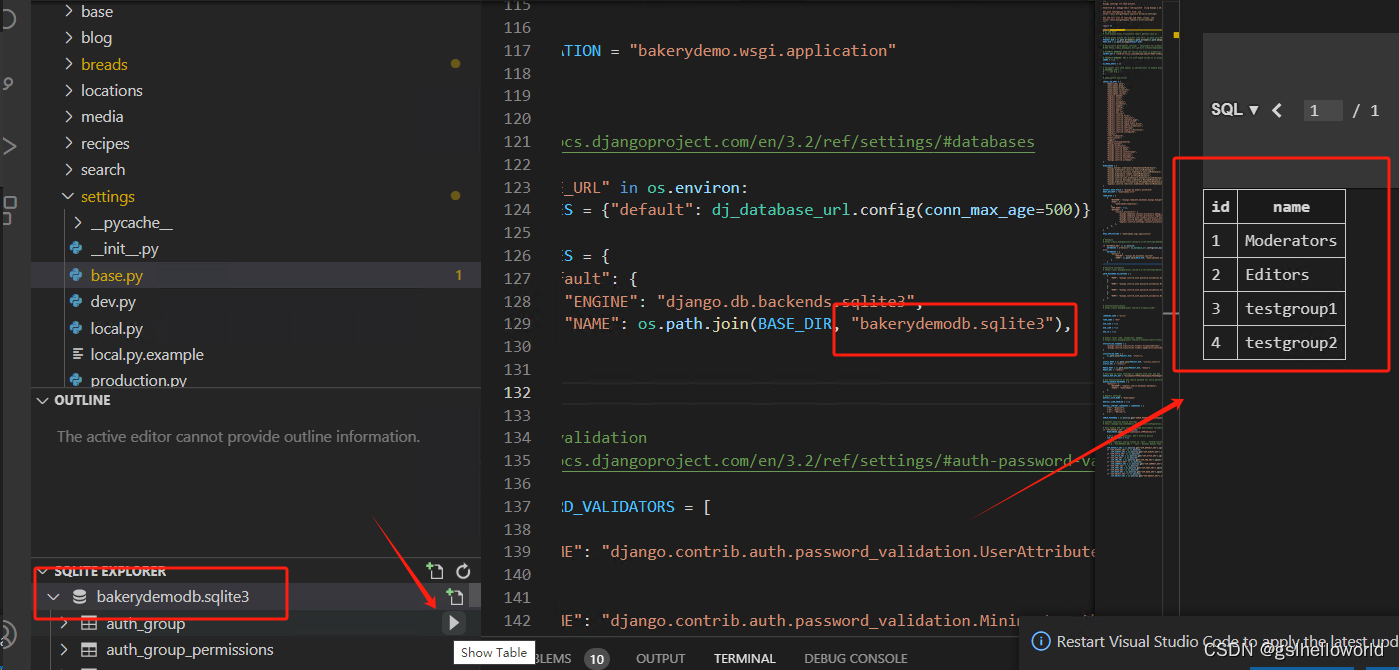
在搜索结果中选择 SQLite:打开数据库,选择sqlite文件,看具体名字,如果不带后缀,需要加上后缀才能识别。
将选择文件:*.sqlite3
屏幕上似乎什么也没有发生:
仔细查看"资源管理器"选项卡
有" SQLITE EXPLORER"项
此处将显示每个表和列。
如果要查看在表中注册的数据,请单击每个表名旁边的"》"。
可以在VS Code上使用SQLite,无需其他工具。
如果vscode是通过远程调试,则需要在远程装sqlite,比如ubuntu
sudoaptinstall sqlite3
sftp和远程主机同步
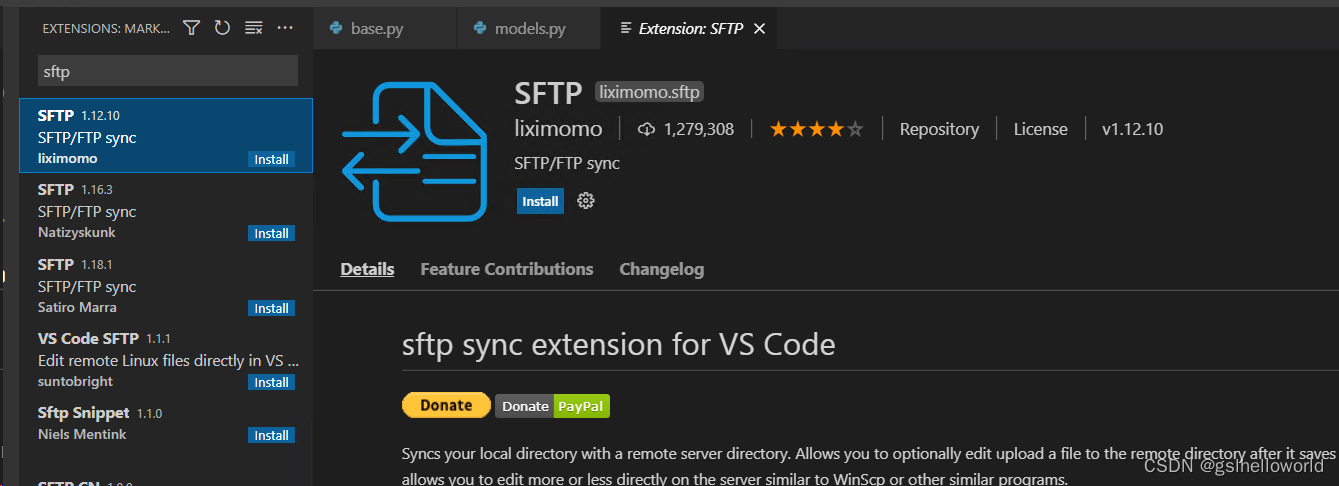
实现本地调试,代码保存后后自动上传到生产服务器,但生产服务器需要重启服务
uwsgi --stop uwsgi.pid
uwsgi --ini uwsgi.ini
或者在uwsgi.ini 增加如下内容
py-autoreload =1
远程调试python
原理

按ctrl+shift+x, 输入remote-ssh ,remote development, 等安装
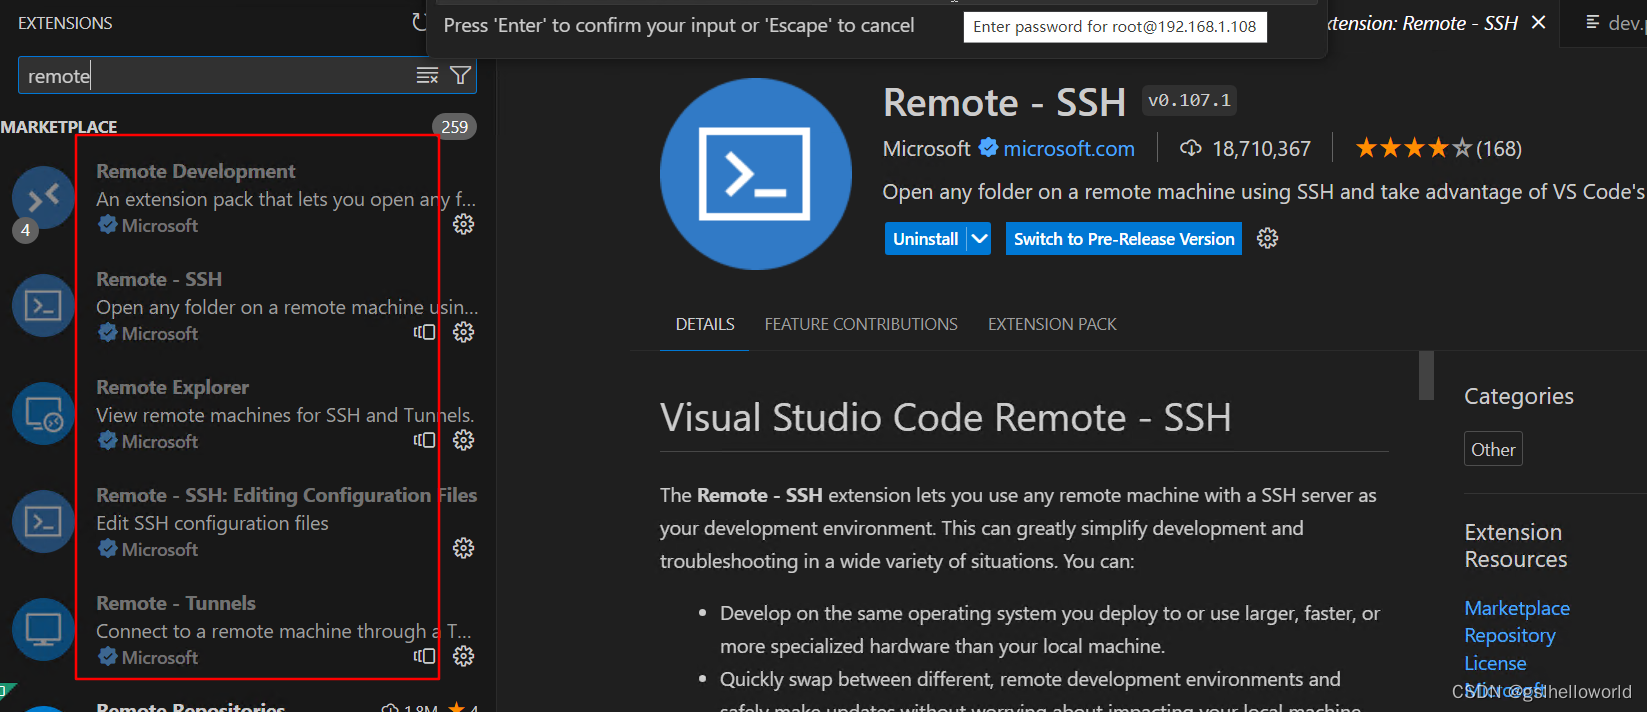
按ctrl+shift+p, 输入remote-ssh, 选择Add New SSH Host, 填写远程服务器用户名及ip地址, 如ssh hinata@123.123.12
最好用root用户,如果是ubuntu,可以开启允许root远程登录,这样方便些,不然可能因为传过去的代码不是同一个用户,或者在远程服务器上建立的python虚拟环境不是同一个用户建的,会有权限问题。
以下是一种启用root用户SSH远程登录的方法:
以普通用户登录到远程服务器:
ssh your_username@your_server_ip
使用sudo命令编辑/etc/ssh/sshd_config文件:
sudonano /etc/ssh/sshd_config
找到以下行(可能在文件中的不同位置):
PermitRootLogin prohibit-password
将其改为:
PermitRootLogin yes
保存并关闭文件。
重启SSH服务以应用更改:
sudo systemctl restart sshd

或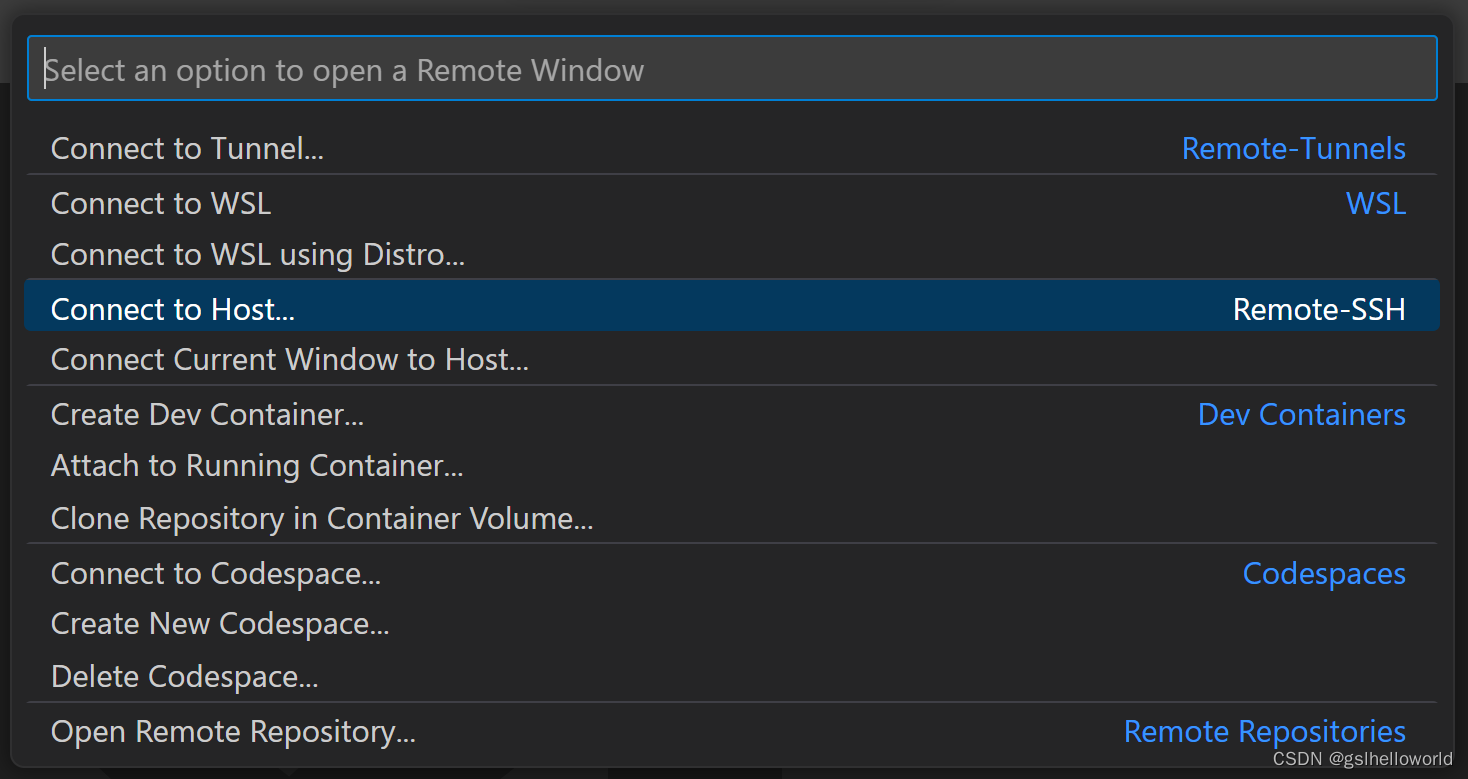
选择配置保存的地点, 选择用户目录下的.ssh/config就行

先点击红框图标, 然后找到刚刚添加的服务器, 点击带加号的小图标就能连接了

提示输入密码

这个过程还是比较长的,需要在远端服务器上安装vscode-server,需要一些时间。期间需要输入几次密码。
以下是output窗口输出信息,可参考
[11:36:44.157] Log Level: 2[11:36:44.177] SSH Resolver called for"ssh-remote+192.168.1.108", attempt 1[11:36:44.178]"remote.SSH.useLocalServer":false[11:36:44.178]"remote.SSH.useExecServer":false[11:36:44.178]"remote.SSH.showLoginTerminal":false[11:36:44.178]"remote.SSH.remotePlatform":{"192.168.1.108":"linux"}[11:36:44.178]"remote.SSH.path": undefined
[11:36:44.179]"remote.SSH.configFile": undefined
[11:36:44.179]"remote.SSH.useFlock":true[11:36:44.179]"remote.SSH.lockfilesInTmp":false[11:36:44.179]"remote.SSH.localServerDownload": auto
[11:36:44.179]"remote.SSH.remoteServerListenOnSocket":false[11:36:44.179]"remote.SSH.showLoginTerminal":false[11:36:44.180]"remote.SSH.defaultExtensions":[][11:36:44.180]"remote.SSH.loglevel":2[11:36:44.180]"remote.SSH.enableDynamicForwarding":true[11:36:44.181]"remote.SSH.enableRemoteCommand":false[11:36:44.181]"remote.SSH.serverPickPortsFromRange":{}[11:36:44.181]"remote.SSH.serverInstallPath":{}[11:36:44.188] VS Code version: 1.85.1
[11:36:44.189] Remote-SSH version: [email protected]
[11:36:44.189] win32 x64
[11:36:44.195] SSH Resolver called for host: 192.168.1.108
[11:36:44.195] Setting up SSH remote "192.168.1.108"[11:36:44.201] Using commit id"0ee08df0cf4527e40edc9aa28f4b5bd38bbff2b2" and quality "stable"for server
[11:36:44.206] Install and start server if needed
[11:36:44.216] Checking ssh with "C:\Program Files\Python38\Scripts\ssh.exe -V"[11:36:44.219] Got error from ssh: spawn C:\Program Files\Python38\Scripts\ssh.exe ENOENT
[11:36:44.220] Checking ssh with "C:\Program Files\Python38\ssh.exe -V"[11:36:44.221] Got error from ssh: spawn C:\Program Files\Python38\ssh.exe ENOENT
[11:36:44.222] Checking ssh with "C:\windows\system32\ssh.exe -V"[11:36:44.223] Got error from ssh: spawn C:\windows\system32\ssh.exe ENOENT
[11:36:44.224] Checking ssh with "C:\windows\ssh.exe -V"[11:36:44.225] Got error from ssh: spawn C:\windows\ssh.exe ENOENT
[11:36:44.225] Checking ssh with "C:\windows\System32\Wbem\ssh.exe -V"[11:36:44.227] Got error from ssh: spawn C:\windows\System32\Wbem\ssh.exe ENOENT
[11:36:44.227] Checking ssh with "C:\windows\System32\WindowsPowerShell\v1.0\ssh.exe -V"[11:36:44.229] Got error from ssh: spawn C:\windows\System32\WindowsPowerShell\v1.0\ssh.exe ENOENT
[11:36:44.229] Checking ssh with "C:\software\mysql-5.7.16-winx64\bin\ssh.exe -V"[11:36:44.230] Got error from ssh: spawn C:\software\mysql-5.7.16-winx64\bin\ssh.exe ENOENT
[11:36:44.230] Checking ssh with "C:\Users\Administrator\AppData\Roaming\Python\Python38\Scripts\ssh.exe -V"[11:36:44.232] Got error from ssh: spawn C:\Users\Administrator\AppData\Roaming\Python\Python38\Scripts\ssh.exe ENOENT
[11:36:44.232] Checking ssh with "C:\Program Files\nodejs\ssh.exe -V"[11:36:44.234] Got error from ssh: spawn C:\Program Files\nodejs\ssh.exe ENOENT
[11:36:44.234] Checking ssh with "C:\OpenSSH\ssh.exe -V"[11:36:44.281]> OpenSSH_for_Windows_8.6p1, LibreSSL 3.3.3
[11:36:44.289] Running script with connection command: "C:\OpenSSH\ssh.exe"-T-D54759"192.168.1.108"bash[11:36:44.294] Terminal shell path: C:\windows\System32\cmd.exe
[11:36:44.591]>[11:36:44.592] Got some output, clearing connection timeout[11:36:44.662]> [email protected]'s password:
[11:36:44.663] Showing password prompt
[11:36:52.065] Got password response
[11:36:52.066]"install" wrote data to terminal: "********"[11:36:52.094]>>[11:36:52.255]> d576f5f9df04: running
>[11:36:52.312]> Acquiring lock on /home/gsl/.vscode-server/bin/0ee08df0cf4527e40edc9aa28f4b5bd38
> bbff2b2/vscode-remote-lock.gsl.0ee08df0cf4527e40edc9aa28f4b5bd38bbff2b2
>[11:36:52.340]> Found existing installation at /home/gsl/.vscode-server/bin/0ee08df0cf4527e40edc
> 9aa28f4b5bd38bbff2b2...
> Checking /home/gsl/.vscode-server/.0ee08df0cf4527e40edc9aa28f4b5bd38bbff2b2.log
> and /home/gsl/.vscode-server/.0ee08df0cf4527e40edc9aa28f4b5bd38bbff2b2.pid for a
>  running server
> Looking for server with pid: 8854>[11:36:52.377]> Found running server...
>> *
> * Visual Studio Code Server
> *
> * By using the software, you agree to
> * the Visual Studio Code Server License Terms (https://aka.ms/vscode-server-lice
> nse) and
> * the Microsoft Privacy Statement (https://privacy.microsoft.com/en-US/privacyst
> atement).
> *
>> Checking server status on port 39741 with wget>[11:36:52.498]> d576f5f9df04: start
>SSH_AUTH_SOCK====>DISPLAY====>webUiAccessToken====>listeningOn==39741==>osReleaseId==ubuntu==>arch==x86_64==>vscodeArch==x64==>bitness==64==>tmpDir==/run/user/1000==>platform==linux==>unpackResult====>didLocalDownload==0==>downloadTime====>installTime====>extInstallTime====>serverStartTime====>connectionToken==a11aa11a-1a11-111a-aaa1-a11a1a11a1a1==> d576f5f9df04: end
>
会在远程服务器,你使用的用户的家目录下创建一个文件夹
.vscode-server

连接远程服务器后, 会弹出一个新的窗口, 先点击左上角红框图表, 再点击Open Folder就会看到此时的目录就行远程服务器上的目录了

centos由于目前停止更新,vscode连接centos没有成功,自动安装不上vscode-server,手动没有测试。
查看源代码
安装必要的插件后,按下ctrl键,然后鼠标指向要查看的引入包即可打开源代码,远程调试需要在远程也安装对应的包。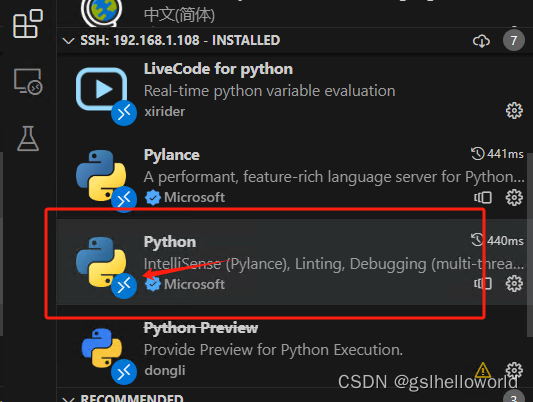
版权归原作者 gslhelloworld 所有, 如有侵权,请联系我们删除。