✨ 目录
🎈 同步原理
- 随着企业的发展,越来越多的公司会用上代码自动化部署
- 这里详细介绍利用
Gitee的WebHooks实现代码自动化部署 - 其实在使用
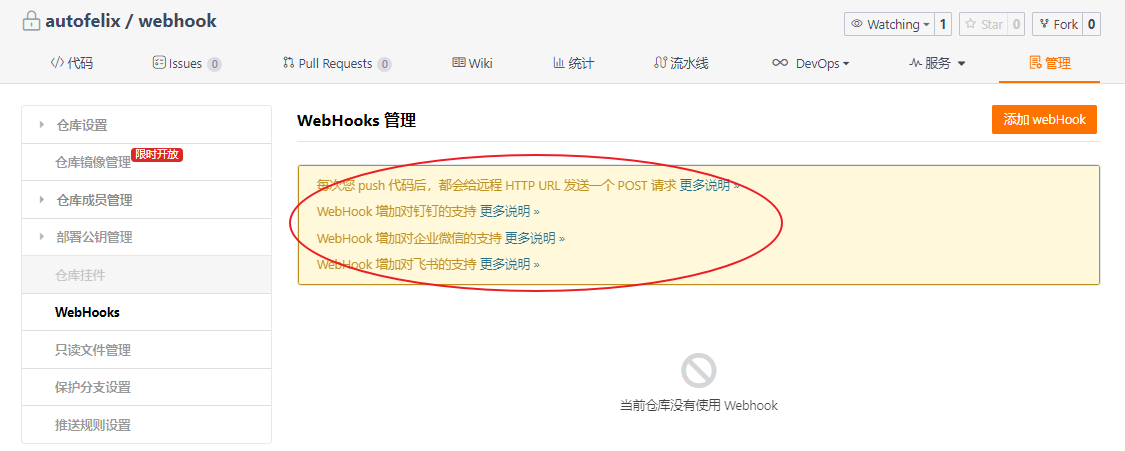
git push推送代码时,都会触发Gitee的WebHooks的回调配置 - 而
Gitee的WebHooks推送不止支持代码自动化同步,而且支持钉钉、企业微信和飞书的实时推送 - 具体配置可进入
WebHooks中查看各板块的 更多说明

🎈 发送数据
- 由帮助文档中可知,
Gitee每次触发WebHooks后,都会向我们配置的WebHooks链接中发送如下数据示例 - 如果你
WebHooks配置了密码,其实就会被携带在password字段中
{"before":"fb32ef5812dc132ece716a05c50c7531c6dc1b4d",
    "after":"ac63b9ba95191a1bf79d60bc262851a66c12cda1",
    "ref":"refs/heads/master",
    "user_id":13,
    "user_name":"123",
    "user":{"name":"123",
      "username":"test123",
      "url":"https://gitee.com/oschina"},
    "repository":{"name":"webhook",
        "url":"http://git.oschina.net/oschina/webhook",
        "description":"",
        "homepage":"https://gitee.com/oschina/webhook"},
    "commits":[{"id":"ac63b9ba95191a1bf79d60bc262851a66c12cda1",
            "message":"1234 bug fix",
            "timestamp":"2016-12-09T17:28:02 08:00",
            "url":"https://gitee.com/oschina/webhook/commit/ac63b9ba95191a1bf79d60bc262851a66c12cda1",
            "author":{"name":"123",
                "email":"[email protected]",
                "time":"2016-12-09T17:28:02 08:00"}}],
    "total_commits_count":1,
    "commits_more_than_ten": false,
    "project":{"name":"webhook",
        "path":"webhook",
        "url":"https://gitee.com/oschina/webhook",
        "git_ssh_url":"[email protected]:oschina/webhook.git",
        "git_http_url":"https://gitee.com/oschina/webhook.git",
        "git_svn_url":"svn://gitee.com/oschina/webhook",
        "namespace":"oschina",
        "name_with_namespace":"oschina/webhook",
        "path_with_namespace":"oschina/webhook",
        "default_branch":"master"},
    "hook_name":"push_hooks",
    "password":"pwd"}
🎈 简单同步
- 由上面原理可以知道,你只要在
WebHooks中配置你的回调地址 - 每次执行
git push的时候,都会调用该回调地址,由此,你可以在回调地址中自己写同步代码的逻辑即可实现同步 - 下面脚本即可实现简单同步,其实就是通过
shell_exec函数执行shell脚本,先切换到项目目录,然后执行git pull拉取代码,即可实现代码与仓库同步 - 要使用该方法,必须要取消禁用
shell_exec函数
<?php//git webhook 自动部署脚本//项目存放物理路径$path="你的项目部署路径";$requestBody=file_get_contents("php://input");if(empty($requestBody)){die('send fail');}$content=json_decode($requestBody,true);//若是主分支且提交数大于0if($content['ref']=='refs/heads/master'&&$content['total_commits_count']>0){$res=shell_exec("cd {$path} && git pull 2>&1");//以www用户运行$res_log='-------------------------'.PHP_EOL;$res_log.=$content['user_name'].' 在'.date('Y-m-d H:i:s').'向'.$content['repository']['name'].'项目的'.$content['ref'].'分支push了'.$content['total_commits_count'].'个commit:'.PHP_EOL;$res_log.=$res.PHP_EOL;file_put_contents("git-webhook.txt",$res_log,FILE_APPEND);//追加写入}echo'很棒:'.date('y-m-d H:i:s');
🎈 验证密码
- 上面代码并没有验证密码和签名密钥,需要是你的代码库是公开
public类型的,在设置WebHooks时,不设置密码,才可以使用 - 如果你设置了密码,如何去验证呢
<?php// 请求密码 你的密码$password='你设置的webhoos密码';// 获取请求参数$body=json_decode(file_get_contents("php://input"),true);// 验证提交密码是否正确if(!isset($body['password'])||$body['password']!==$password){echo'密码错误';exit(0);}// 验证通过后,再执行 git pull 命令
🎈 验证签名密钥
- 如果想要验证签名密钥的话,可以使用如下方法
<?php// 签名验证$headers=getallheaders();$gitee_token=$headers["X-Gitee-Token"];$gitee_timestamp=$headers["X-Gitee-Timestamp"];echo"gitee_token: $gitee_token <br />\n";echo"gitee_timestamp: $gitee_timestamp <br />\n";$sign_key="LEreKhDjwoN8aZ8L";$sec_str="$gitee_timestamp\n$sign_key";$compute_token=base64_encode(hash_hmac('sha256',$sec_str,$sign_key,true));echo"computetoken: $compute_token <br />\n";if($compute_token!=$gitee_token){die('sign is not right');}// 验证通过后,再执行 git pull 命令
🎈 私有仓库配置
- 如果你的仓库并不是公开
public的,而是私有private的 - 你需要设置
git的基本配置,设置账号和邮箱 - 这样你在使用命令的时候,系统就会知道是谁,这个用户有没有操作权限了
git config --global user.name "用户名"git config --global user.email "邮箱"git config --global credential.helper store //会生成.gitconfig 的文件,就不用每次都设置账号和邮箱
🎈 宝塔 webhook 实现同步
- 🎨 安装 git 服务
- 如果你服务器上安装了宝塔,那么可以通过宝塔
webhook服务实现同步功能 - 首先需要安装
git服务,可以在宝塔的终端,运行以下命令
// 查看是否安装了git
git --version

// 如果未安装,执行安装命令
yum installgit

- 🎨 配置公钥
- 首先查看服务器上是否已经存在公钥
id_rsa.pub文件 - 如果存在,直接复制里面的内容,如果不存在,先生成
// 查看是否由公钥文件
ll ~/.ssh/

// 如果存在公钥,则执行
cat ~/.ssh/id_rsa.pub

// 如果不存在,则重新生成
ssh-keygen -t rsa

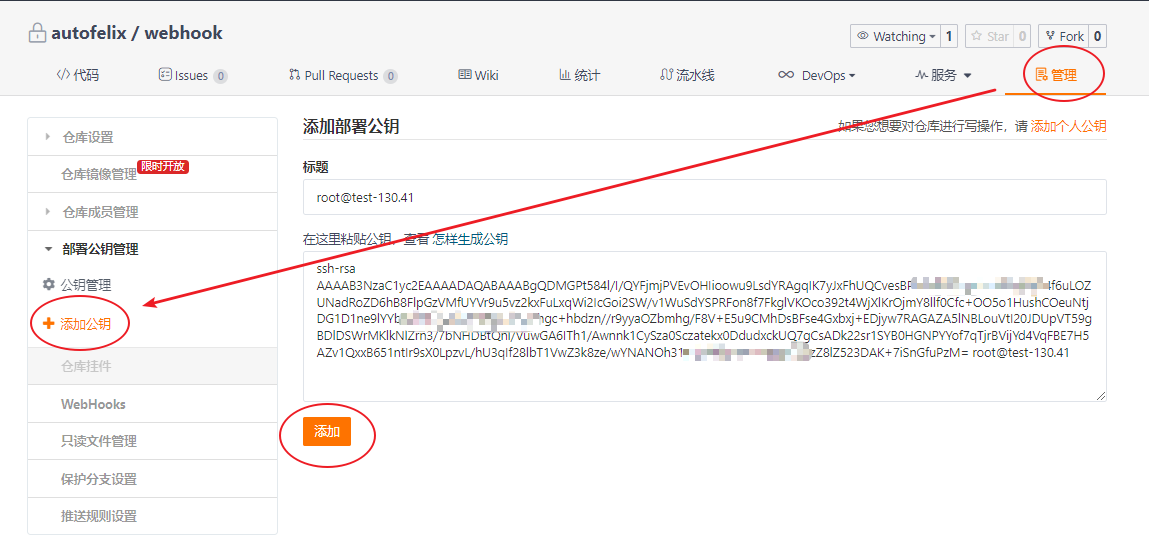
- 🎨 仓库添加公钥
- 在
gitee仓库中添加公钥

- 🎨 安装宝塔 webhook 服务
- 在宝塔商城中,搜索
webhook,点击安装即可

- 🎨 设置同步脚本
- 安装完成后,点击编辑,即可设置同步脚本
- 同步脚本其实也就是判断了服务器是否存在仓库,存在则执行
git pull命令,不存在,则执行git clone命令 - 脚本代码如下:
#!/bin/bashecho""#输出当前时间date --date='0 days ago'"+%Y-%m-%d %H:%M:%S"echo"Start"#判断宝塔WebHook参数是否存在if[! -n "$1"];thenecho"param参数错误"echo"End"exitfi# 服务器上项目的路径,$1是传过来的参数gitPath="/www/wwwroot/$1"# 你自己的仓库 SSH 地址gitHttp="[email protected]:autofelix/webhook.git"echo"Web站点路径:$gitPath"#判断项目路径是否存在if[ -d "$gitPath"];thencd$gitPath#判断是否存在git目录if[! -d ".git"];thenecho"在该目录下克隆 git"git clone $gitHttp gittemp
                mv gittemp/.git .rm -rf gittemp
        fi#拉取最新的项目文件#git reset --hard origin/mastergit pull
        #设置目录权限#chown -R www:www $gitPathecho"End"exitelseecho"该项目路径不存在"echo"End"exitfi


- 🎨 设置宝塔 hook 地址
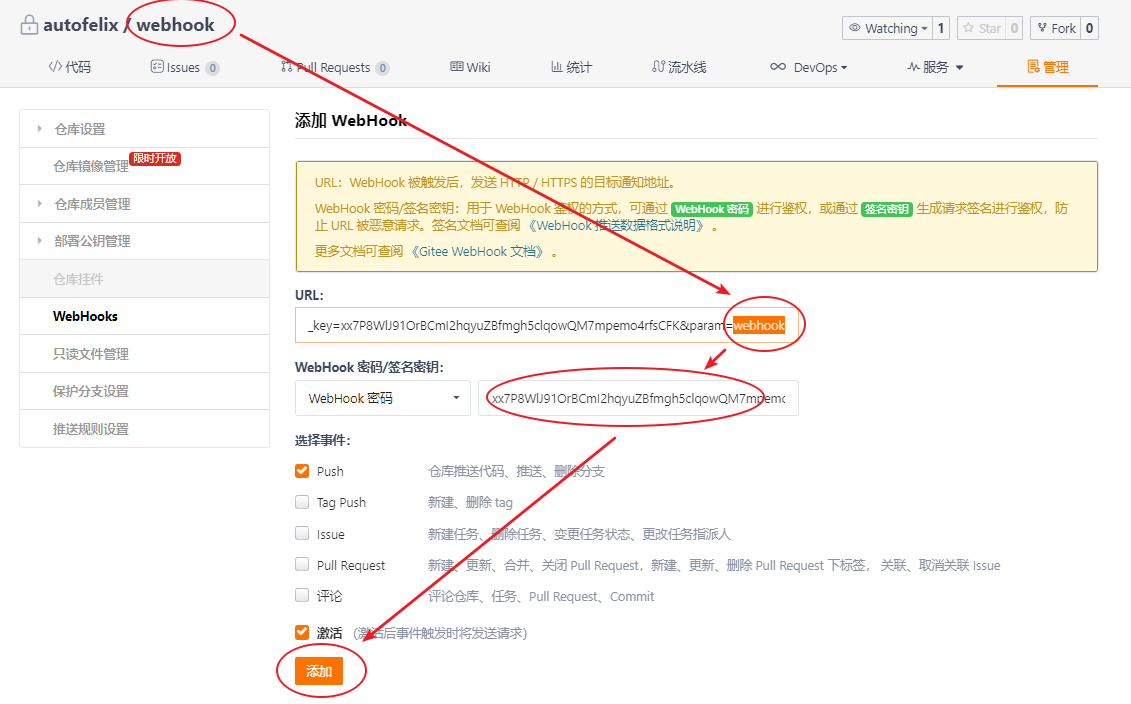
- 设置完脚本之后,我们需要拿到这个脚本的地址,然后配置到
gitee中webhooks中即可 - 点击刚刚设置的脚本,点击
查看密钥即可查看hook地址 - 你的服务器一定要对外开放,也就是
hook的地址要是外网ip,不然gitee是找不到你这台服务器的,如果是内网地址,也是配置不了的哈 - 你会发现
hook地址中带了个参数param,这个参数其实就是上面脚本中的$1,所以这里要改成你自己的仓库名称 - 配置
gitee的webhooks时候,除了修改这个参数和密码外,其他配置默认即可


- 🎨 设置 git 配置
- 在宝塔终端中配置基本的
git配置即可
git config --global user.name "用户名"git config --global user.email "邮箱"git config --global credential.helper store //会生成.gitconfig 的文件,就不用每次都设置账号和邮箱
- 🎨 同步测试
- 修改代码后,执行
git push命令推送到gitee,看是否同步成功 - 可以在
gitee中webhooks查看状态,也可以在宝塔中查看同步日志

本文转载自: https://blog.csdn.net/weixin_41635750/article/details/125536844
版权归原作者 极客飞兔 所有, 如有侵权,请联系我们删除。
版权归原作者 极客飞兔 所有, 如有侵权,请联系我们删除。