
在我之前的文章 “Elasticsearch:Go 客户端简介 - 8.x”,我对 Elasticsearch golang 客户端做了一个简单的介绍。在今天的这篇文章中,我将详细介绍如何使用这个客户端来一步一步地连接到 Elasticsearch,进而创建索引,搜索等。关于 golang 客户端的使用,完整的文档托管在 GitHub 和 PkgGoDev 上。
在我们的展示中,我们将使用 Elastic Stack 8.5.3 来进行展示。
安装
Elasticsearch 及 Kibana
如果你还没有安装好自己的 Elasticsearch 及 Kibana 的话,那么请参考我之前的文章:
- 如何在 Linux,MacOS 及 Windows 上进行安装 Elasticsearch
- Kibana:如何在 Linux,MacOS 及 Windows上安装 Elastic 栈中的 Kibana
在今天的展示中,我将使用 Elastic Stack 8.x 来进行展示。在安装的时候,请参考相应的 Elastic Stack 8.x 的文章来进行安装。
Golang 安装
要安装客户端的 8.x 版本,请将包添加到你的 go.mod 文件中:
require github.com/elastic/go-elasticsearch/v8 8.5
或者,clone 存储库:
git clone --branch 8.5 https://github.com/elastic/go-elasticsearch.git $GOPATH/src/github
要安装另一个版本,请相应地修改路径或分支名称。 客户端主要版本对应于 Elasticsearch 主要版本。
你可以在下面找到完整的安装示例:
mkdir my-elasticsearch-app8 && cd my-elasticsearch-app8

cat > go.mod <<-END
  module my-elasticsearch-app8

  require github.com/elastic/go-elasticsearch/v8 main
END

cat > main.go <<-END
  package main

  import (
    "log"

    "github.com/elastic/go-elasticsearch/v8"
  )

  func main() {
    es, _ := elasticsearch.NewDefaultClient()
    log.Println(elasticsearch.Version)
    log.Println(es.Info())
  }
END
在我的电脑上面,我运行如上的命令:
$ pwd
/Users/liuxg/go
$ mkdir my-elasticsearch-app8 && cd my-elasticsearch-app8
$
$ cat > go.mod <<-END
>   module my-elasticsearch-app8
>
>   require github.com/elastic/go-elasticsearch/v8 main
> END
$
$ cat > main.go <<-END
>   package main
>
>   import (
>     "log"
>
>     "github.com/elastic/go-elasticsearch/v8"
>   )
>
>   func main() {
>     es, _ := elasticsearch.NewDefaultClient()
>     log.Println(elasticsearch.Version)
>     log.Println(es.Info())
>   }
> END
$ ls
go.mod  main.go
$ pwd
/Users/liuxg/go/my-elasticsearch-app8
很显然,它生成了两个文件:go.mod 及 main.go。我们还不能直接运行上面的命令,除非我们按照我之前的文章 “Elastic Stack 8.0 安装 - 保护你的 Elastic Stack 现在比以往任何时候都简单” 进行安装。请参考其中的 “如何配置 Elasticsearch 不带安全性” 章节。这样的配置不需要安全性,索引在连接的时候,我们也不需要任何的验证。一旦我们按照完毕后,我们在 terminal 中打入如下的命令:
$ pwd
/Users/liuxg/go/my-elasticsearch-app8
$ go run main.go
go: updates to go.mod needed; to update it:
    go mod tidy
$ go mod tidy
go: downloading github.com/elastic/go-elasticsearch/v8 v8.4.0-alpha.1.0.20221227164349-c40d762a40ad
go: downloading github.com/elastic/elastic-transport-go/v8 v8.0.0-20211216131617-bbee439d559c
$ go run main.go
2023/01/10 17:27:35 8.7.0-SNAPSHOT
2023/01/10 17:27:35 [200 OK] {
  "name" : "liuxgm.local",
  "cluster_name" : "elasticsearch",
  "cluster_uuid" : "c7GQIJYaQ-yeesPYys24fw",
  "version" : {
    "number" : "8.5.3",
    "build_flavor" : "default",
    "build_type" : "tar",
    "build_hash" : "4ed5ee9afac63de92ec98f404ccbed7d3ba9584e",
    "build_date" : "2022-12-05T18:22:22.226119656Z",
    "build_snapshot" : false,
    "lucene_version" : "9.4.2",
    "minimum_wire_compatibility_version" : "7.17.0",
    "minimum_index_compatibility_version" : "7.0.0"
  },
  "tagline" : "You Know, for Search"
}
 <nil>
上面显示我们已经成功地连接到 Elasticsearch 了。Hooray! 小试牛刀,我们对如何连接到 Elasticsearch 有一个基本的印象。
在默认的情况下,我们可以通过设置环境变量 ELASTICSEARCH_URL 来配置 Elasticsearch 的端点地址:
export ELASTICSEARCH_URL="https://localhost:9200"
如果你有多个 Elasticsearch 端点地址,请用逗号分隔它们。
警告:不建议在未启用安全性的情况下运行 Elasticsearch。
Elasticsearch 版本兼容性
语言客户端向前兼容; 这意味着客户端支持与更大或相等的次要版本的 Elasticsearch 进行通信。 Elasticsearch 语言客户端仅向后兼容默认发行版,并且不作任何保证。
Elasticsearch server 8.0 版本引入了新的兼容模式,让你从 7.x 到 8x 的升级体验更流畅。简而言之,你可以将最新的 7.x go-elasticsearch Elasticsearch 客户端与 8.x Elasticsearch 服务器一起使用,提供更多协调将代码库升级到下一个主要版本的空间。
如果你想利用此功能,请确保你使用的是最新的 7.x go-elasticsearch 客户端,并将环境变量 ELASTIC_CLIENT_APIVERSIONING 设置为 true 或在客户端配置中设置配置选项 config.EnableCompatibilityMode。 客户端在内部处理其余部分。 对于每个 8.0 及更高版本的 go-elasticsearch 客户端,你都准备好了! 默认情况下启用兼容模式。
使用 Go 模块时,在导入路径中包含版本,并指定显式版本或分支:
require github.com/elastic/go-elasticsearch/v8 v8.0.0
require github.com/elastic/go-elasticsearch/v7 7.17
可以在一个项目中使用多个版本的客户端:
// go.mod
github.com/elastic/go-elasticsearch/v7 v7.17.0
github.com/elastic/go-elasticsearch/v8 v8.0.0

// main.go
import (
  elasticsearch7 "github.com/elastic/go-elasticsearch/v7"
  elasticsearch8 "github.com/elastic/go-elasticsearch/v8"
)
// ...
es7, _ := elasticsearch7.NewDefaultClient()
es8, _ := elasticsearch8.NewDefaultClient()
客户端的 main 分支兼容当前 Elasticsearch 的 master 分支。
连接到 Elasticsearch
在今天的文章中,我主要来讲述如何连接到自托管的 Elasticsearch 集群。
连接到没有设置安全的集群
在上面,我们已经显示了如何连接到没有设置安全的集群。在上面,它默认连接的是 http://localhost:9200。在实际的部署中,你可能并不是使用的默认的地址。这个时候我们需要对连接进行配置:
main.go
package main

import (
    "log"

    "github.com/elastic/go-elasticsearch/v8"
)

func main() {
    cfg := elasticsearch.Config{
        Addresses: []string{
            "http://localhost:9200",
        },
    }
    es, err := elasticsearch.NewClient(cfg)
    log.Println(err)
    if err == nil {
        log.Println(elasticsearch.Version)
        log.Println(es.Info())
    } else {
        log.Println("Something wrong with connection to Elasticsearch")
    }
}
$ pwd
/Users/liuxg/go/my-elasticsearch-app8
$ ls
go.mod  go.sum  main.go
$ go run main.go
2023/01/10 19:21:49 <nil>
2023/01/10 19:21:49 8.7.0-SNAPSHOT
2023/01/10 19:21:49 [200 OK] {
  "name" : "liuxgm.local",
  "cluster_name" : "elasticsearch",
  "cluster_uuid" : "c7GQIJYaQ-yeesPYys24fw",
  "version" : {
    "number" : "8.5.3",
    "build_flavor" : "default",
    "build_type" : "tar",
    "build_hash" : "4ed5ee9afac63de92ec98f404ccbed7d3ba9584e",
    "build_date" : "2022-12-05T18:22:22.226119656Z",
    "build_snapshot" : false,
    "lucene_version" : "9.4.2",
    "minimum_wire_compatibility_version" : "7.17.0",
    "minimum_index_compatibility_version" : "7.0.0"
  },
  "tagline" : "You Know, for Search"
}
 <nil>
从上面,我们可以看出来,我们成功地连接到 Elasticsearch。此外,由于 Addresses 是一个 slice,它可以由多个 Elasticsearch 的端点组成。比如,我们可以有一下的格式:
cfg := elasticsearch.Config{
        Addresses: []string{
            "http://localhost:9200",
            "http://localhost:9201",
        },
}
es, err := elasticsearch.NewClient(cfg)
注意:如果你的 Elasticsearch 集群位于负载均衡器后面,就像在使用 Elastic Cloud 时一样,你将不需要配置多个节点。 而是使用负载平衡器主机和端口。
连接到带有基本安全的集群
我们可以连接到带有基本安全的集群。针对 Elastic Stack 8.x,在默认的安装下,集群是带有 HTTPS 的访问。我们可以通过参考文章 “Elastic Stack 8.0 安装 - 保护你的 Elastic Stack 现在比以往任何时候都简单” 中的 “如何配置 Elasticsearch 只带有基本安全” 章节来进行安装。
基本认证
要以编程方式设置集群端点、用户名和密码,请将配置对象传递给 elasticsearch.NewClient() 函数。
main.go
package main

import (
    "log"

    "github.com/elastic/go-elasticsearch/v8"
)

func main() {
    cfg := elasticsearch.Config{
        Addresses: []string{
            "https://localhost:9200",
        },
        Username: "elastic",
        Password: "password",
    }

    es, err := elasticsearch.NewClient(cfg)
    log.Println(err)
    if err == nil {
        log.Println(elasticsearch.Version)
        log.Println(es.Info())
    } else {
        log.Println("Something wrong with connection to Elasticsearch")
    }
}
在上面,我使用了超级用户 elastic 来进行验证,尽管在实际的使用中,我们并不建议这么做。你可以使用一个带有一定权限的用户来进行连接。运行上面的代码:
go run main.go
$ go run main.go
2023/01/10 19:44:29 <nil>
2023/01/10 19:44:29 8.7.0-SNAPSHOT
2023/01/10 19:44:29 [200 OK] {
  "name" : "liuxgm.local",
  "cluster_name" : "elasticsearch",
  "cluster_uuid" : "jBt9oXsxT4y_2YOWOw8QRQ",
  "version" : {
    "number" : "8.5.3",
    "build_flavor" : "default",
    "build_type" : "tar",
    "build_hash" : "4ed5ee9afac63de92ec98f404ccbed7d3ba9584e",
    "build_date" : "2022-12-05T18:22:22.226119656Z",
    "build_snapshot" : false,
    "lucene_version" : "9.4.2",
    "minimum_wire_compatibility_version" : "7.17.0",
    "minimum_index_compatibility_version" : "7.0.0"
  },
  "tagline" : "You Know, for Search"
}
 <nil>
很显然,我们的连接是成功的。
你还可以在端点 URL 中包含用户名和密码:
main.go
package main

import (
    "log"

    "github.com/elastic/go-elasticsearch/v8"
)

func main() {
    cfg := elasticsearch.Config{
        Addresses: []string{
            "http://elastic:password@localhost:9200",
        },
    }

    es, err := elasticsearch.NewClient(cfg)
    log.Println(err)
    if err == nil {
        log.Println(elasticsearch.Version)
        log.Println(es.Info())
    } else {
        log.Println("Something wrong with connection to Elasticsearch")
    }
}
连接到带有 HTTPS 的集群
在 Elastic Stack 8.x 的默认安装中,Elasticsearch 是带有 HTTPS 的访问权限的。特别是针对自签名证书的安装,我们需要使用证书来进行连接。请按照如下的文档进行安装:
- 如何在 Linux,MacOS 及 Windows 上进行安装 Elasticsearch
- Kibana:如何在 Linux,MacOS 及 Windows上安装 Elastic 栈中的 Kibana
在 Elasticsearch 第一次启动的时候:
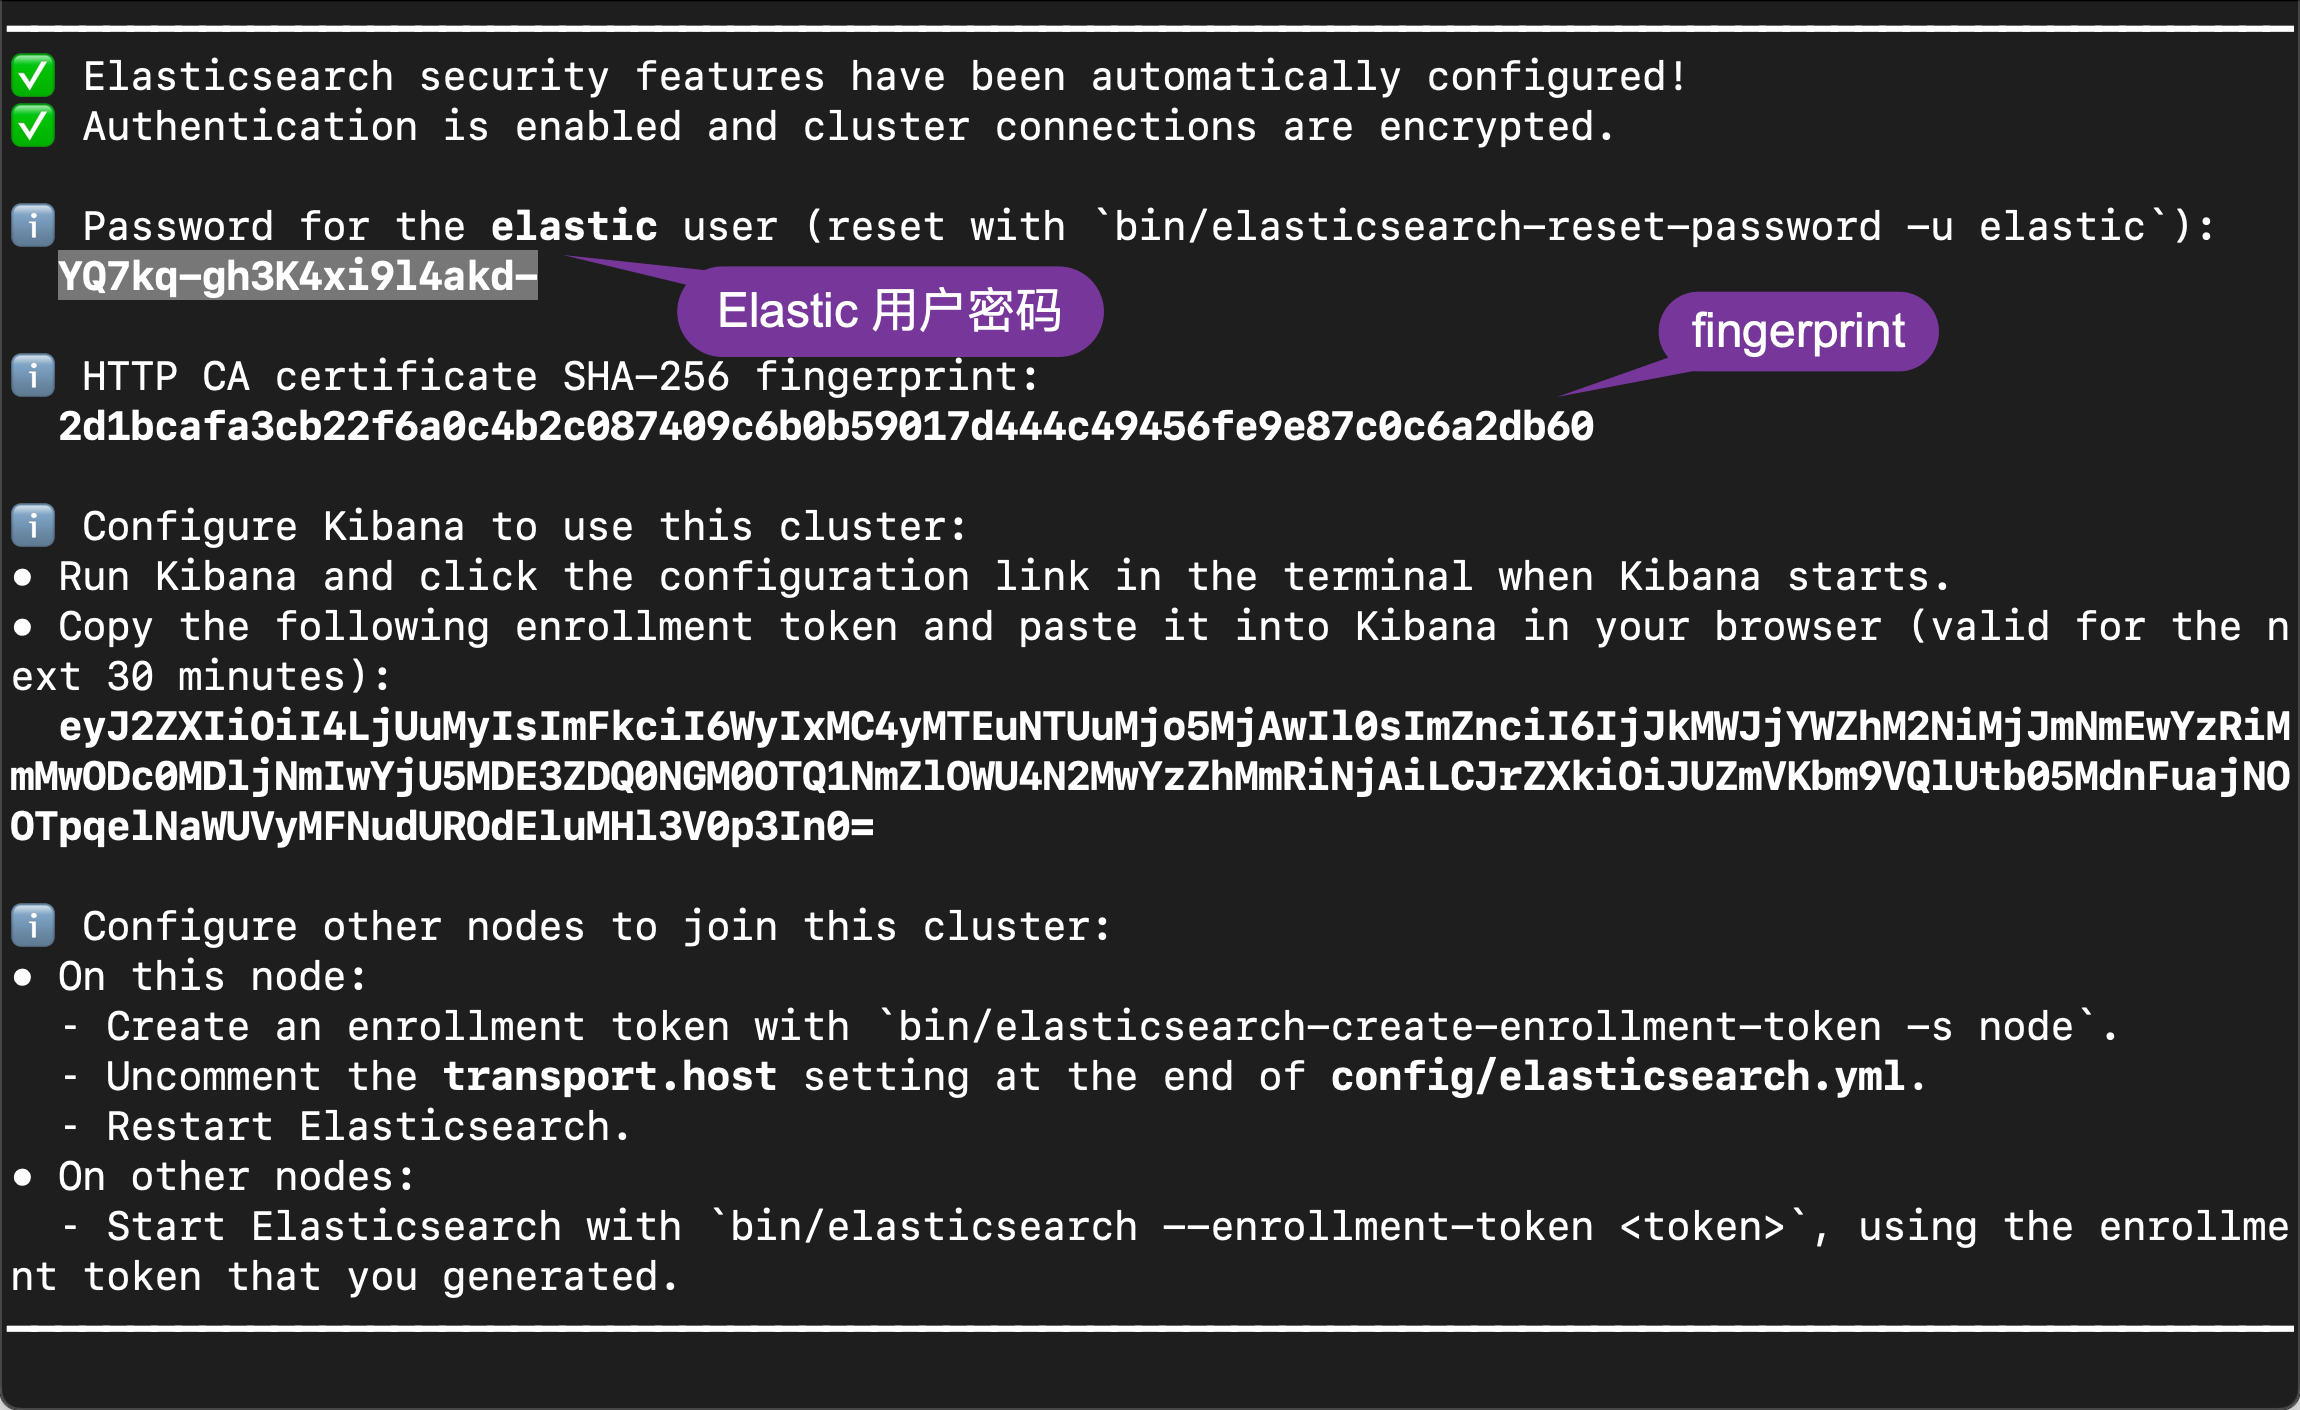
我们从上面可以看到超级用户 elastic 的信息。记下 elastic 用户密码和 HTTP CA 指纹。我们在下面的示例中将使用到。
根据具体情况,有两种验证 HTTPS 连接的选项,要么使用 CA 证书本身进行验证,要么通过 HTTP CA 证书指纹进行验证。
使用 CA 证书来验证 HTTPS
生成的根 CA 证书可以在 Elasticsearch 配置位置 ($ES_CONF_PATH/certs/http_ca.crt) 的 certs 目录中找到。 如果你在 Docker 中运行 Elasticsearch,则还有用于检索 CA 证书的其他文档。一旦你在某个地方获得了 http_ca.crt 文件,就可以通过 CACert 将文件的内容传递给客户端:
我们可以在 Elasticsearch 的安装目录中查看到证书的信息:
$ pwd
/Users/liuxg/elastic/elasticsearch-8.5.3/config/certs
$ ls
http.p12      http_ca.crt   transport.p12
我们可以通过如下的方式来连接到 Elasticsearch:
main.go
package main

import (
    "io/ioutil"
    "log"

    "github.com/elastic/go-elasticsearch/v8"
)

func main() {
    cert, _ := ioutil.ReadFile("/Users/liuxg/elastic/elasticsearch-8.5.3/config/certs/http_ca.crt")

    cfg := elasticsearch.Config{
        Addresses: []string{
            "https://localhost:9200",
        },
        Username: "elastic",
        Password: "YQ7kq-gh3K4xi9l4akd-",
        CACert:   cert,
    }

    es, err := elasticsearch.NewClient(cfg)
    log.Println(err)

    if err == nil {
        log.Println(elasticsearch.Version)
        log.Println(es.Info())
    } else {
        log.Println("Something wrong with connection to Elasticsearch")
    }
}
运行上面的代码,我们可以看到和上面一样的运行结果。
使用证书 fingerprint 来验证 HTTPS
这种验证 HTTPS 连接的方法利用了前面记下的证书指纹值。 获取此 SHA256 指纹值并通过 ca_fingerprint 将其传递给 Go Elasticsearch 客户端:
main.go
package main

import (
    "log"

    "github.com/elastic/go-elasticsearch/v8"
)

func main() {
    cfg := elasticsearch.Config{
        Addresses: []string{
            "https://localhost:9200",
        },
        Username:               "elastic",
        Password:               "YQ7kq-gh3K4xi9l4akd-",
        CertificateFingerprint: "2d1bcafa3cb22f6a0c4b2c087409c6b0b59017d444c49456fe9e87c0c6a2db60",
    }

    es, err := elasticsearch.NewClient(cfg)
    log.Println(err)

    if err == nil {
        log.Println(elasticsearch.Version)
        log.Println(es.Info())
    } else {
        log.Println("Something wrong with connection to Elasticsearch")
    }
}
我们运行上面的代码,我们可以看到和之前输出一样的结果。
可以使用带有证书文件的 openssl x509 计算证书指纹:
openssl x509 -fingerprint -sha256 -noout -in /path/to/http_ca.crt
$ pwd
/Users/liuxg/elastic/elasticsearch-8.5.3/config/certs
$ ls
http.p12      http_ca.crt   transport.p12
$ openssl x509 -fingerprint -sha256 -noout -in http_ca.crt
sha256 Fingerprint=2D:1B:CA:FA:3C:B2:2F:6A:0C:4B:2C:08:74:09:C6:B0:B5:90:17:D4:44:C4:94:56:FE:9E:87:C0:C6:A2:DB:60
如果你无权访问 Elasticsearch 生成的 CA 文件,你可以使用以下脚本通过 openssl s_client 输出 Elasticsearch 实例的根 CA 指纹:
# Replace the values of 'localhost' and '9200' to the
# corresponding host and port values for the cluster.
openssl s_client -connect localhost:9200 -servername localhost -showcerts </dev/null 2>/dev/null \
  | openssl x509 -fingerprint -sha256 -noout -in /dev/stdin
$ openssl s_client -connect localhost:9200 -servername localhost -showcerts </dev/null 2>/dev/null \
>   | openssl x509 -fingerprint -sha256 -noout -in /dev/stdin
sha256 Fingerprint=92:54:07:A7:BF:FE:AA:6C:A9:4C:17:7E:A8:E7:7D:F9:B7:27:2E:99:BF:DC:9C:D0:51:D1:9F:F2:2E:D7:9A:4A
在上面的代码中,千万要注意的是我们代码中的 fingerprint 是没有冒号的。我们可以使用如下的命令来直接进行获得:
$ pwd
/Users/liuxg/elastic/elasticsearch-8.5.3/config/certs
$ ls
http.p12      http_ca.crt   transport.p12
$ openssl x509 -in http_ca.crt -sha256 -fingerprint | grep sha256 | sed 's/://g'
sha256 Fingerprint=2D1BCAFA3CB22F6A0C4B2C087409C6B0B59017D444C49456FE9E87C0C6A2DB60
HTTP Bearer 认证
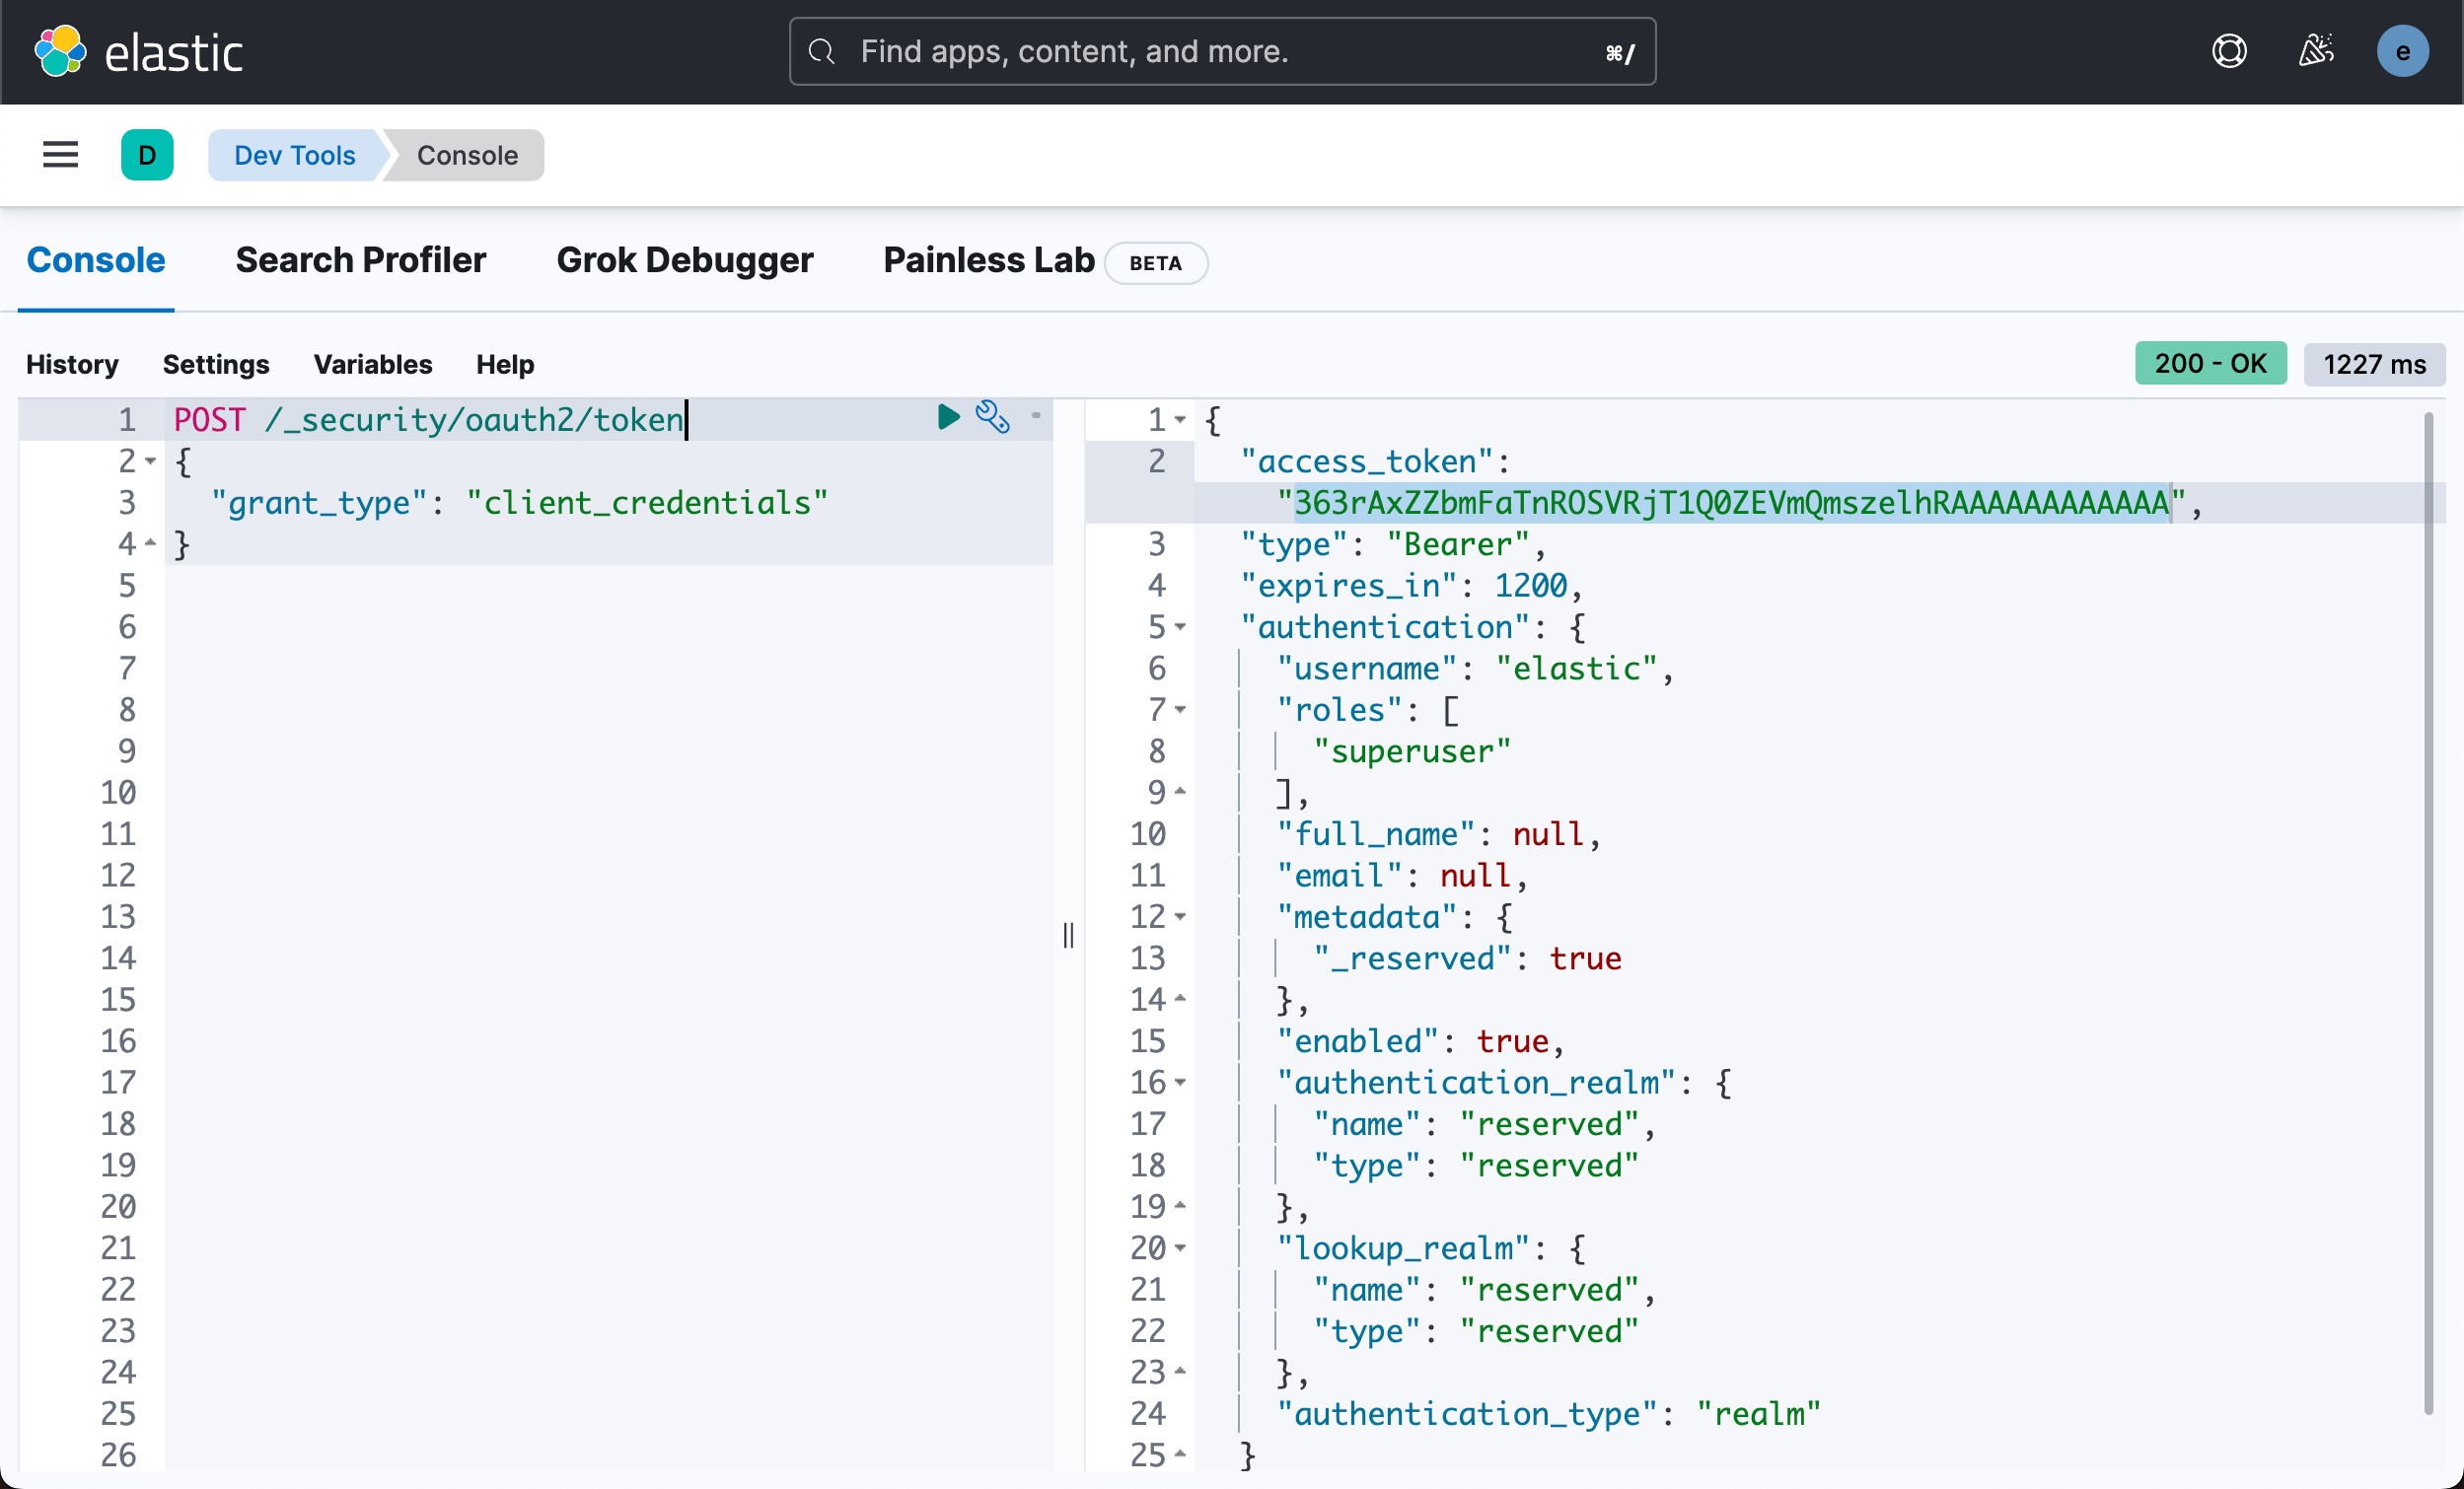
HTTP Bearer 身份验证通过将令牌作为字符串传递来使用 ServiceToken 参数。 此身份验证方法由 Service Account Tokens 和 Bearer Tokens 使用。关于如何生成 service token,请参考我之前的文章 “Elasticsearch:无需基本身份验证即可创建用于访问的不记名令牌”。
POST /_security/oauth2/token
{
  "grant_type": "client_credentials"
}
main.go
package main

import (
    "log"

    "github.com/elastic/go-elasticsearch/v8"
)

func main() {
    cfg := elasticsearch.Config{
        Addresses: []string{
            "https://localhost:9200",
        },
        CertificateFingerprint: "d293735f339412c738c5a258fe950fb2fcdaa33f772365a948abbb332a7c58b4",
        ServiceToken:           "363rAxZZbmFaTnROSVRjT1Q0ZEVmQmszelhRAAAAAAAAAAAA",
    }

    es, err := elasticsearch.NewClient(cfg)
    log.Println(err)

    if err == nil {
        log.Println(elasticsearch.Version)
        log.Println(es.Info())
    } else {
        log.Println("Something wrong with connection to Elasticsearch")
    }
}
我们运行上面的代码,它会输出和上面一样的结果。我们或者使用如下的格式:
package main

import (
    "log"
    "net/http"

    "github.com/elastic/go-elasticsearch/v8"
)

func main() {
    cfg := elasticsearch.Config{
        Addresses: []string{
            "https://localhost:9200",
        },
        CertificateFingerprint: "d293735f339412c738c5a258fe950fb2fcdaa33f772365a948abbb332a7c58b4",
        Header: http.Header(map[string][]string{
            "Authorization": {"Bearer 363rAxZsR0Q0RDMzb1MtaXU1alJPMnFHMjZ3AAAAAAAAAAAA"},
        }),
    }

    es, err := elasticsearch.NewClient(cfg)
    log.Println(err)

    if err == nil {
        log.Println(elasticsearch.Version)
        log.Println(es.Info())
    } else {
        log.Println("Something wrong with connection to Elasticsearch")
    }
}
在上面,我们使用 Bearer 在 header 中的定义来实现请求。
API key 验证
我们也可以使用 API key 的方法来进行验证。我们可以参考文章 “Elasticsearch:创建 API key 接口访问 Elasticsearch” 来获取 API key。我们也可以使用如下的方法来获取 API key:
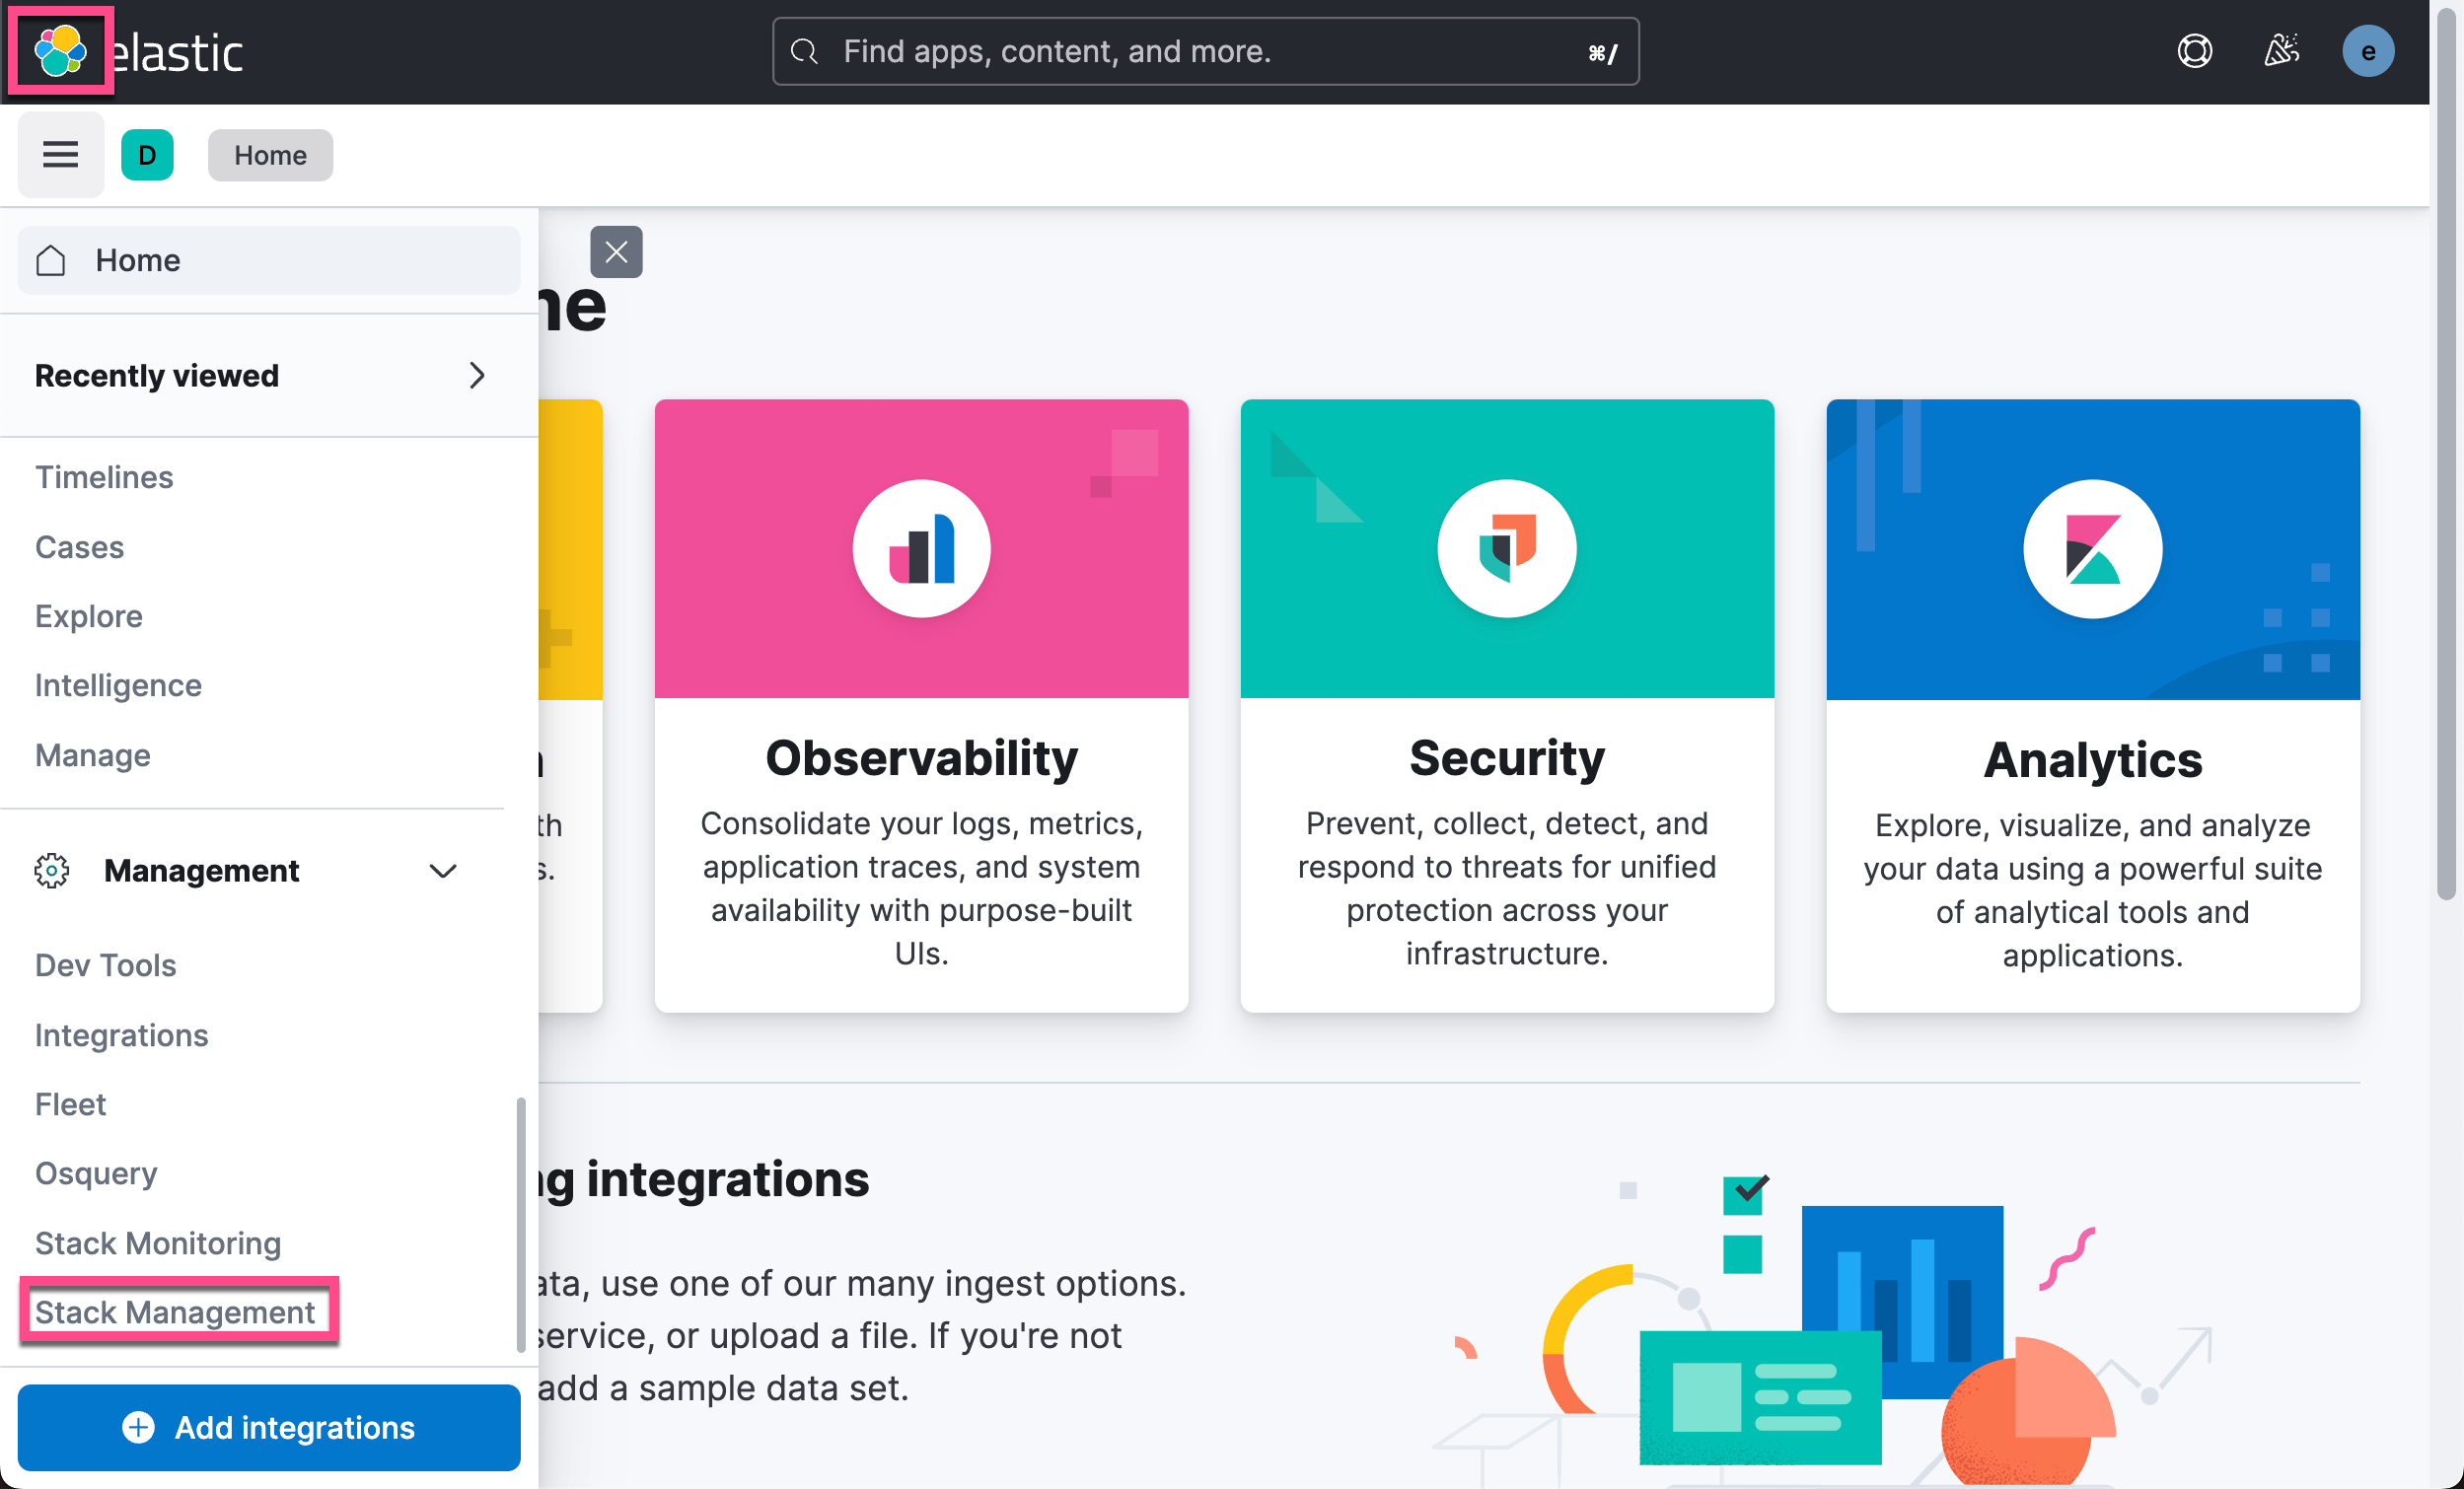
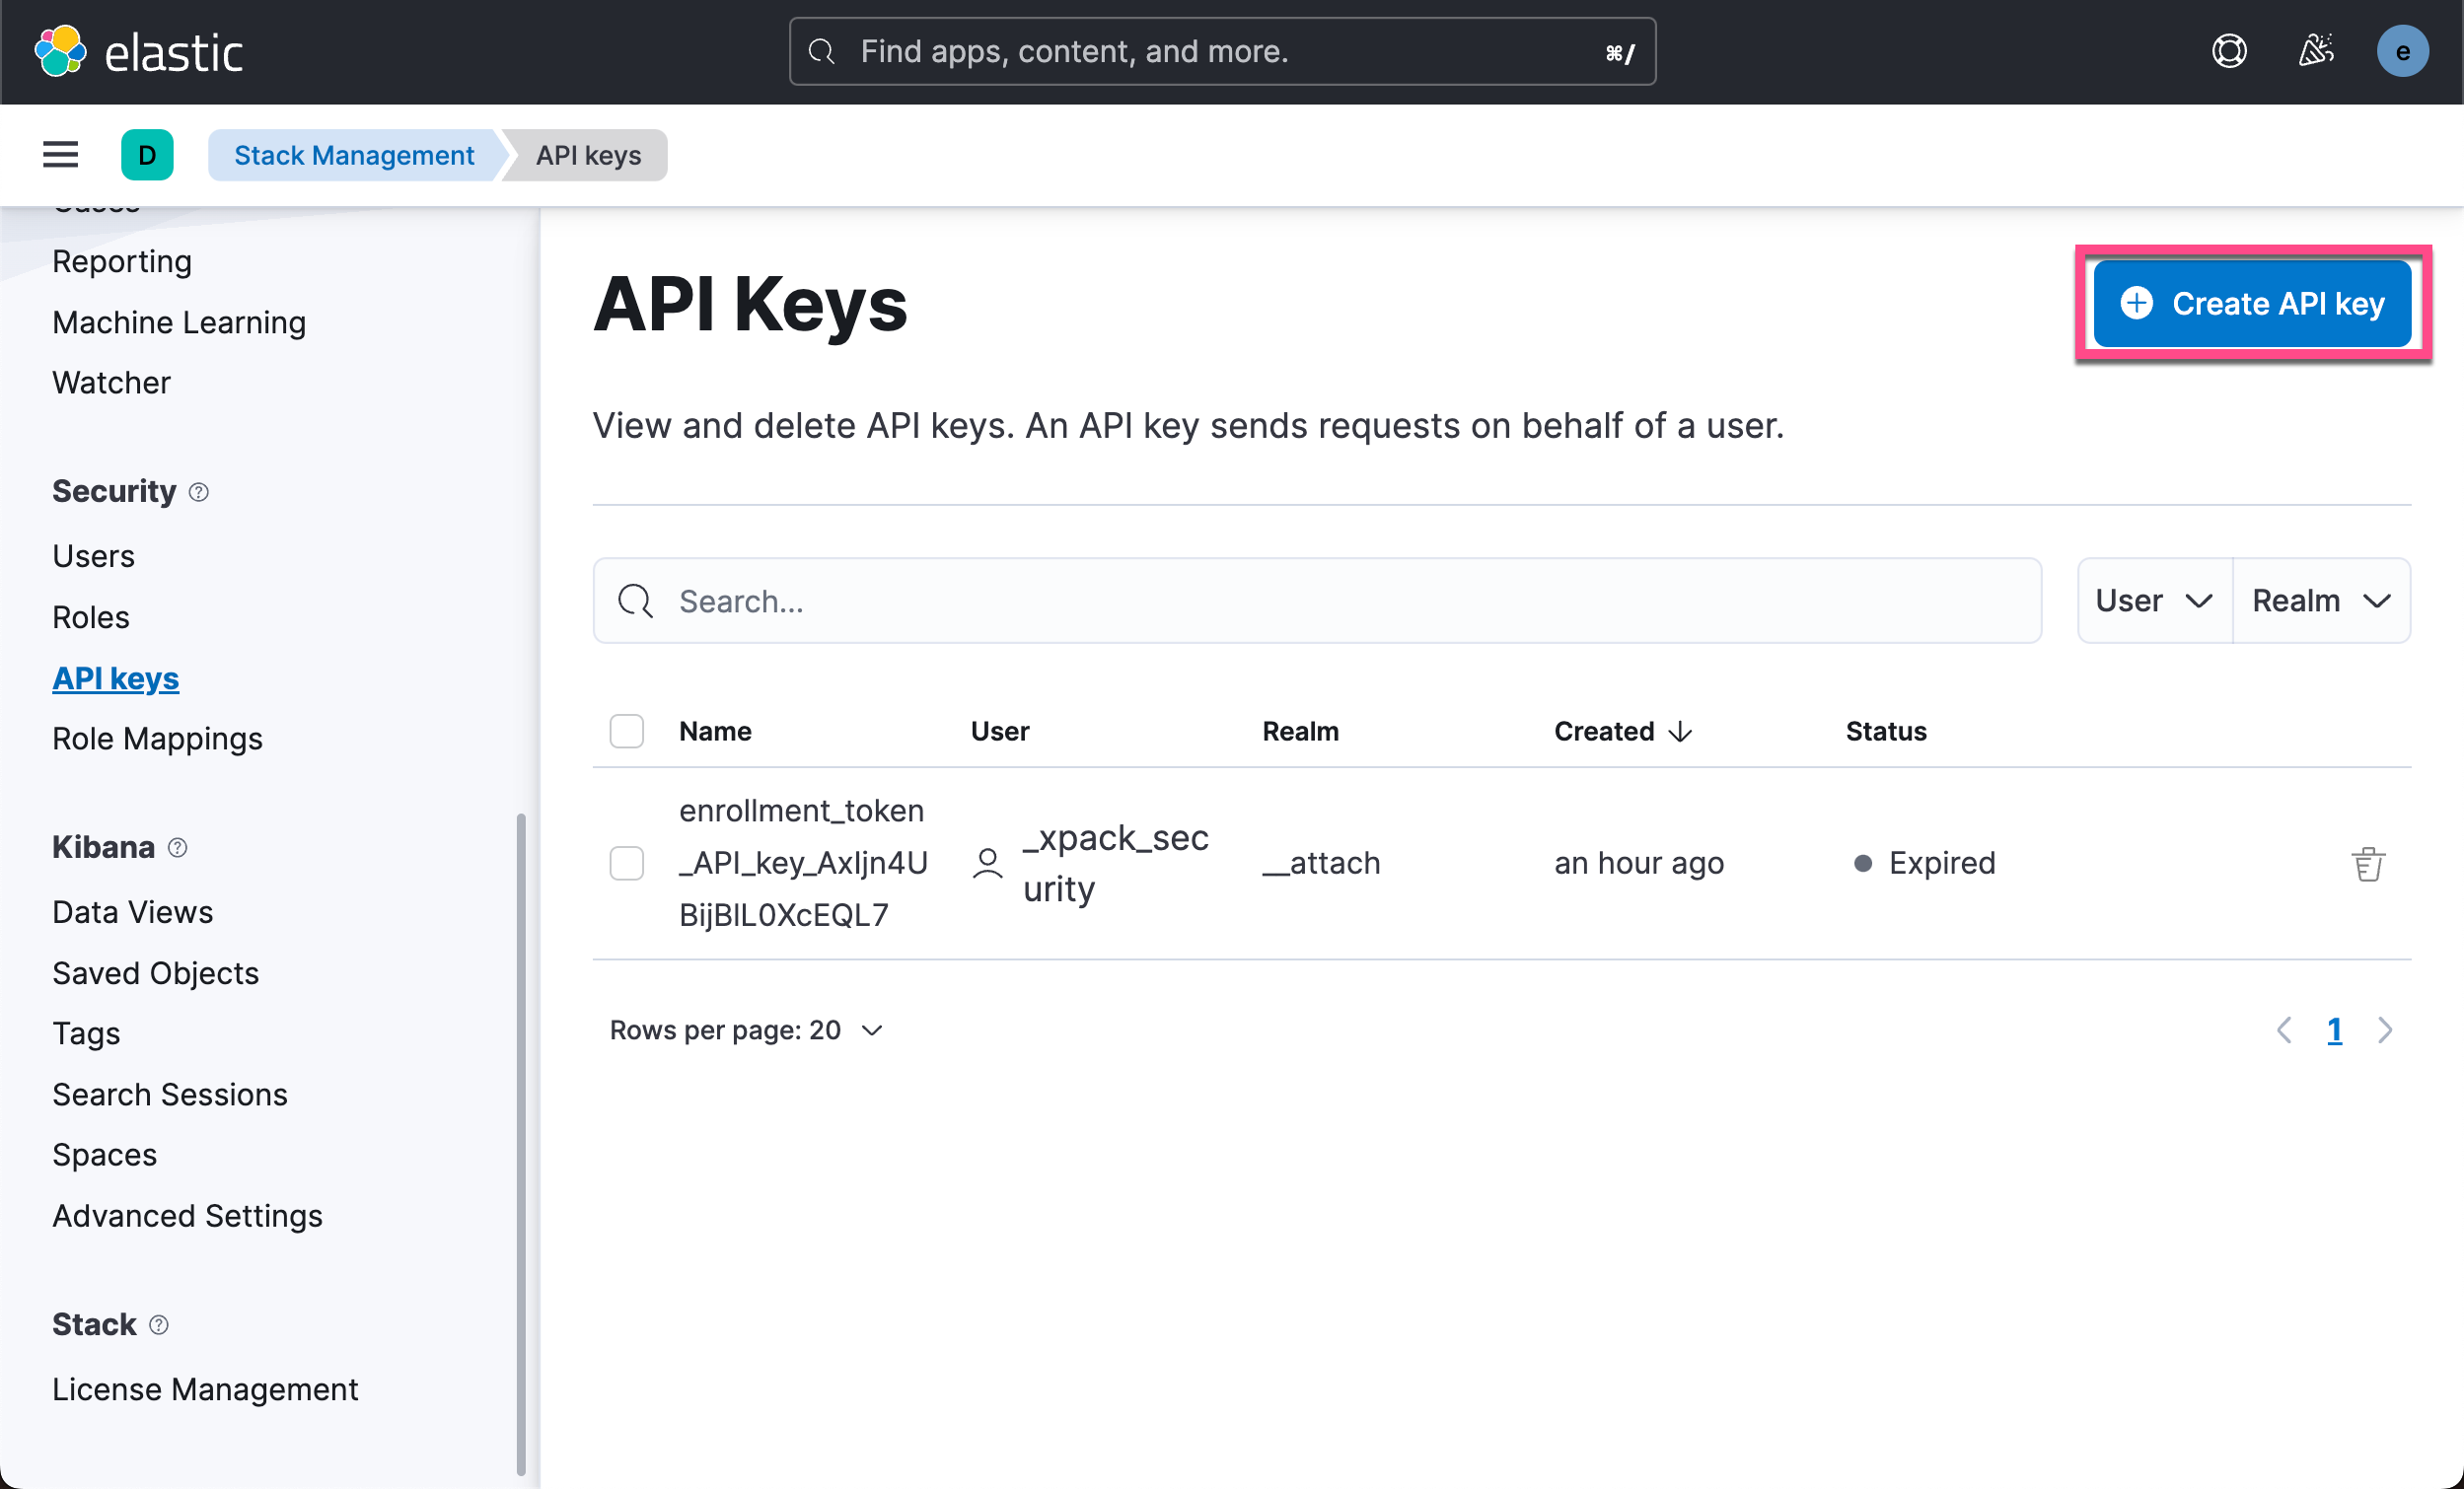
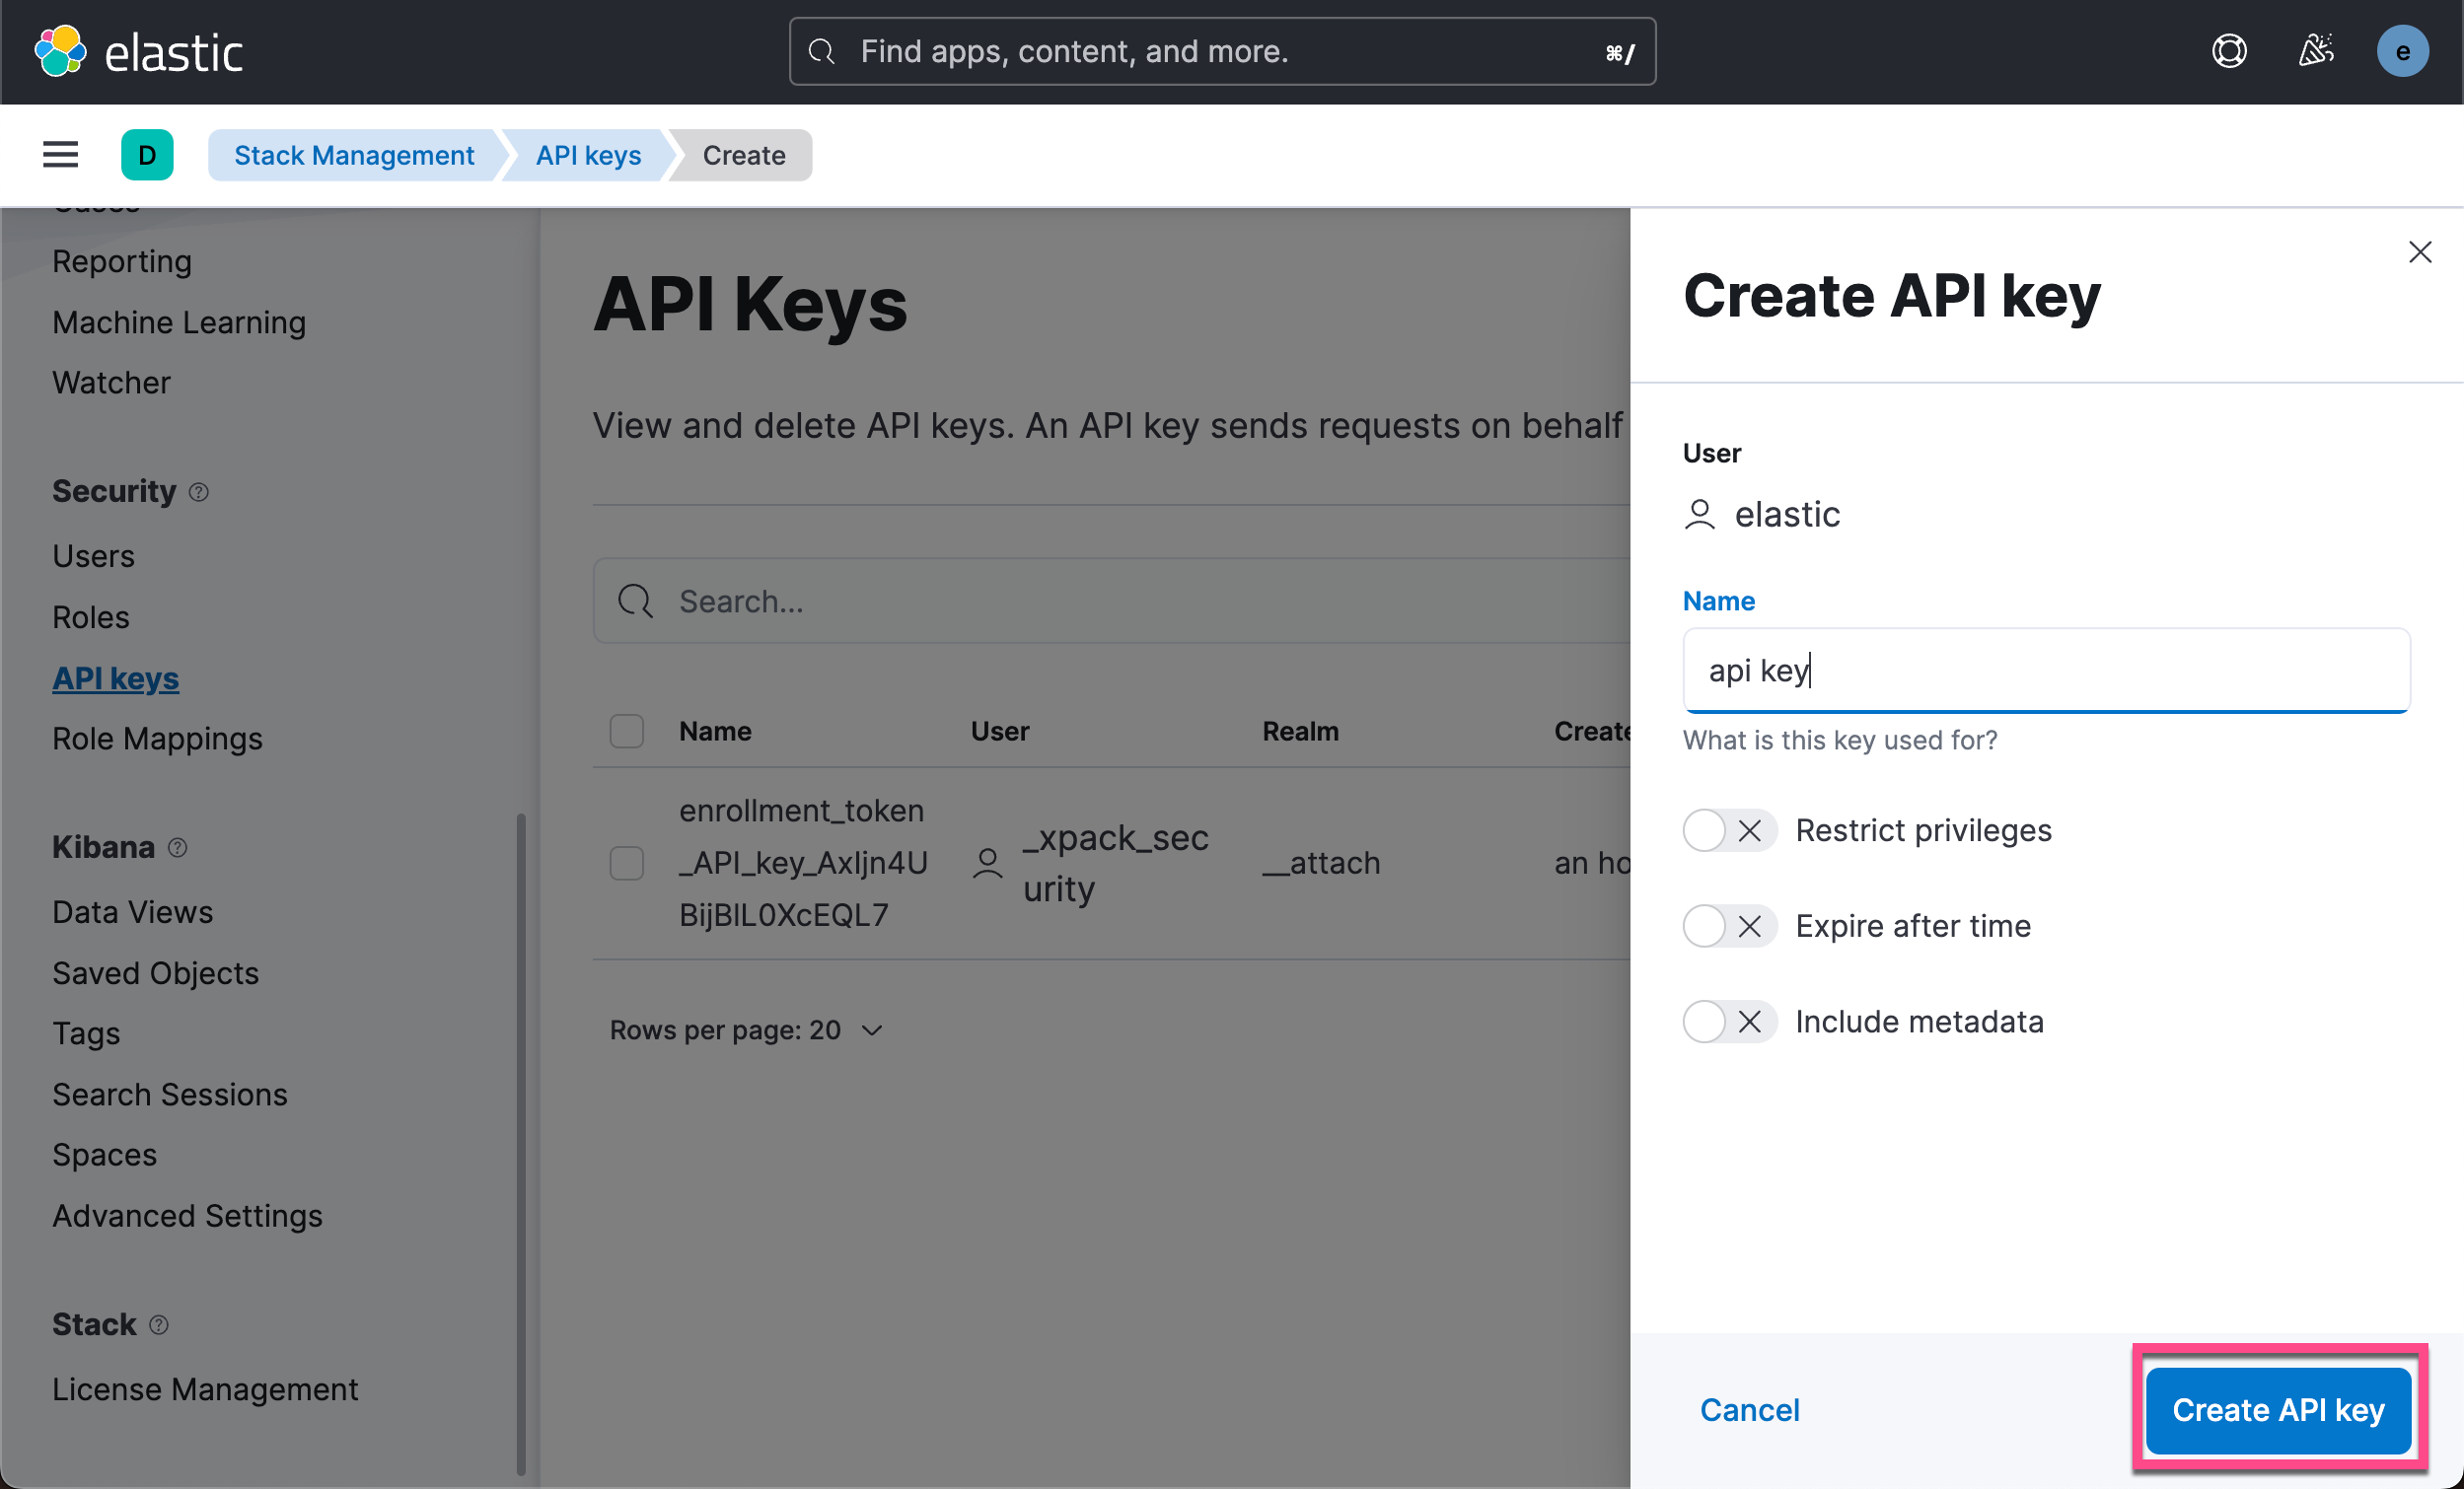
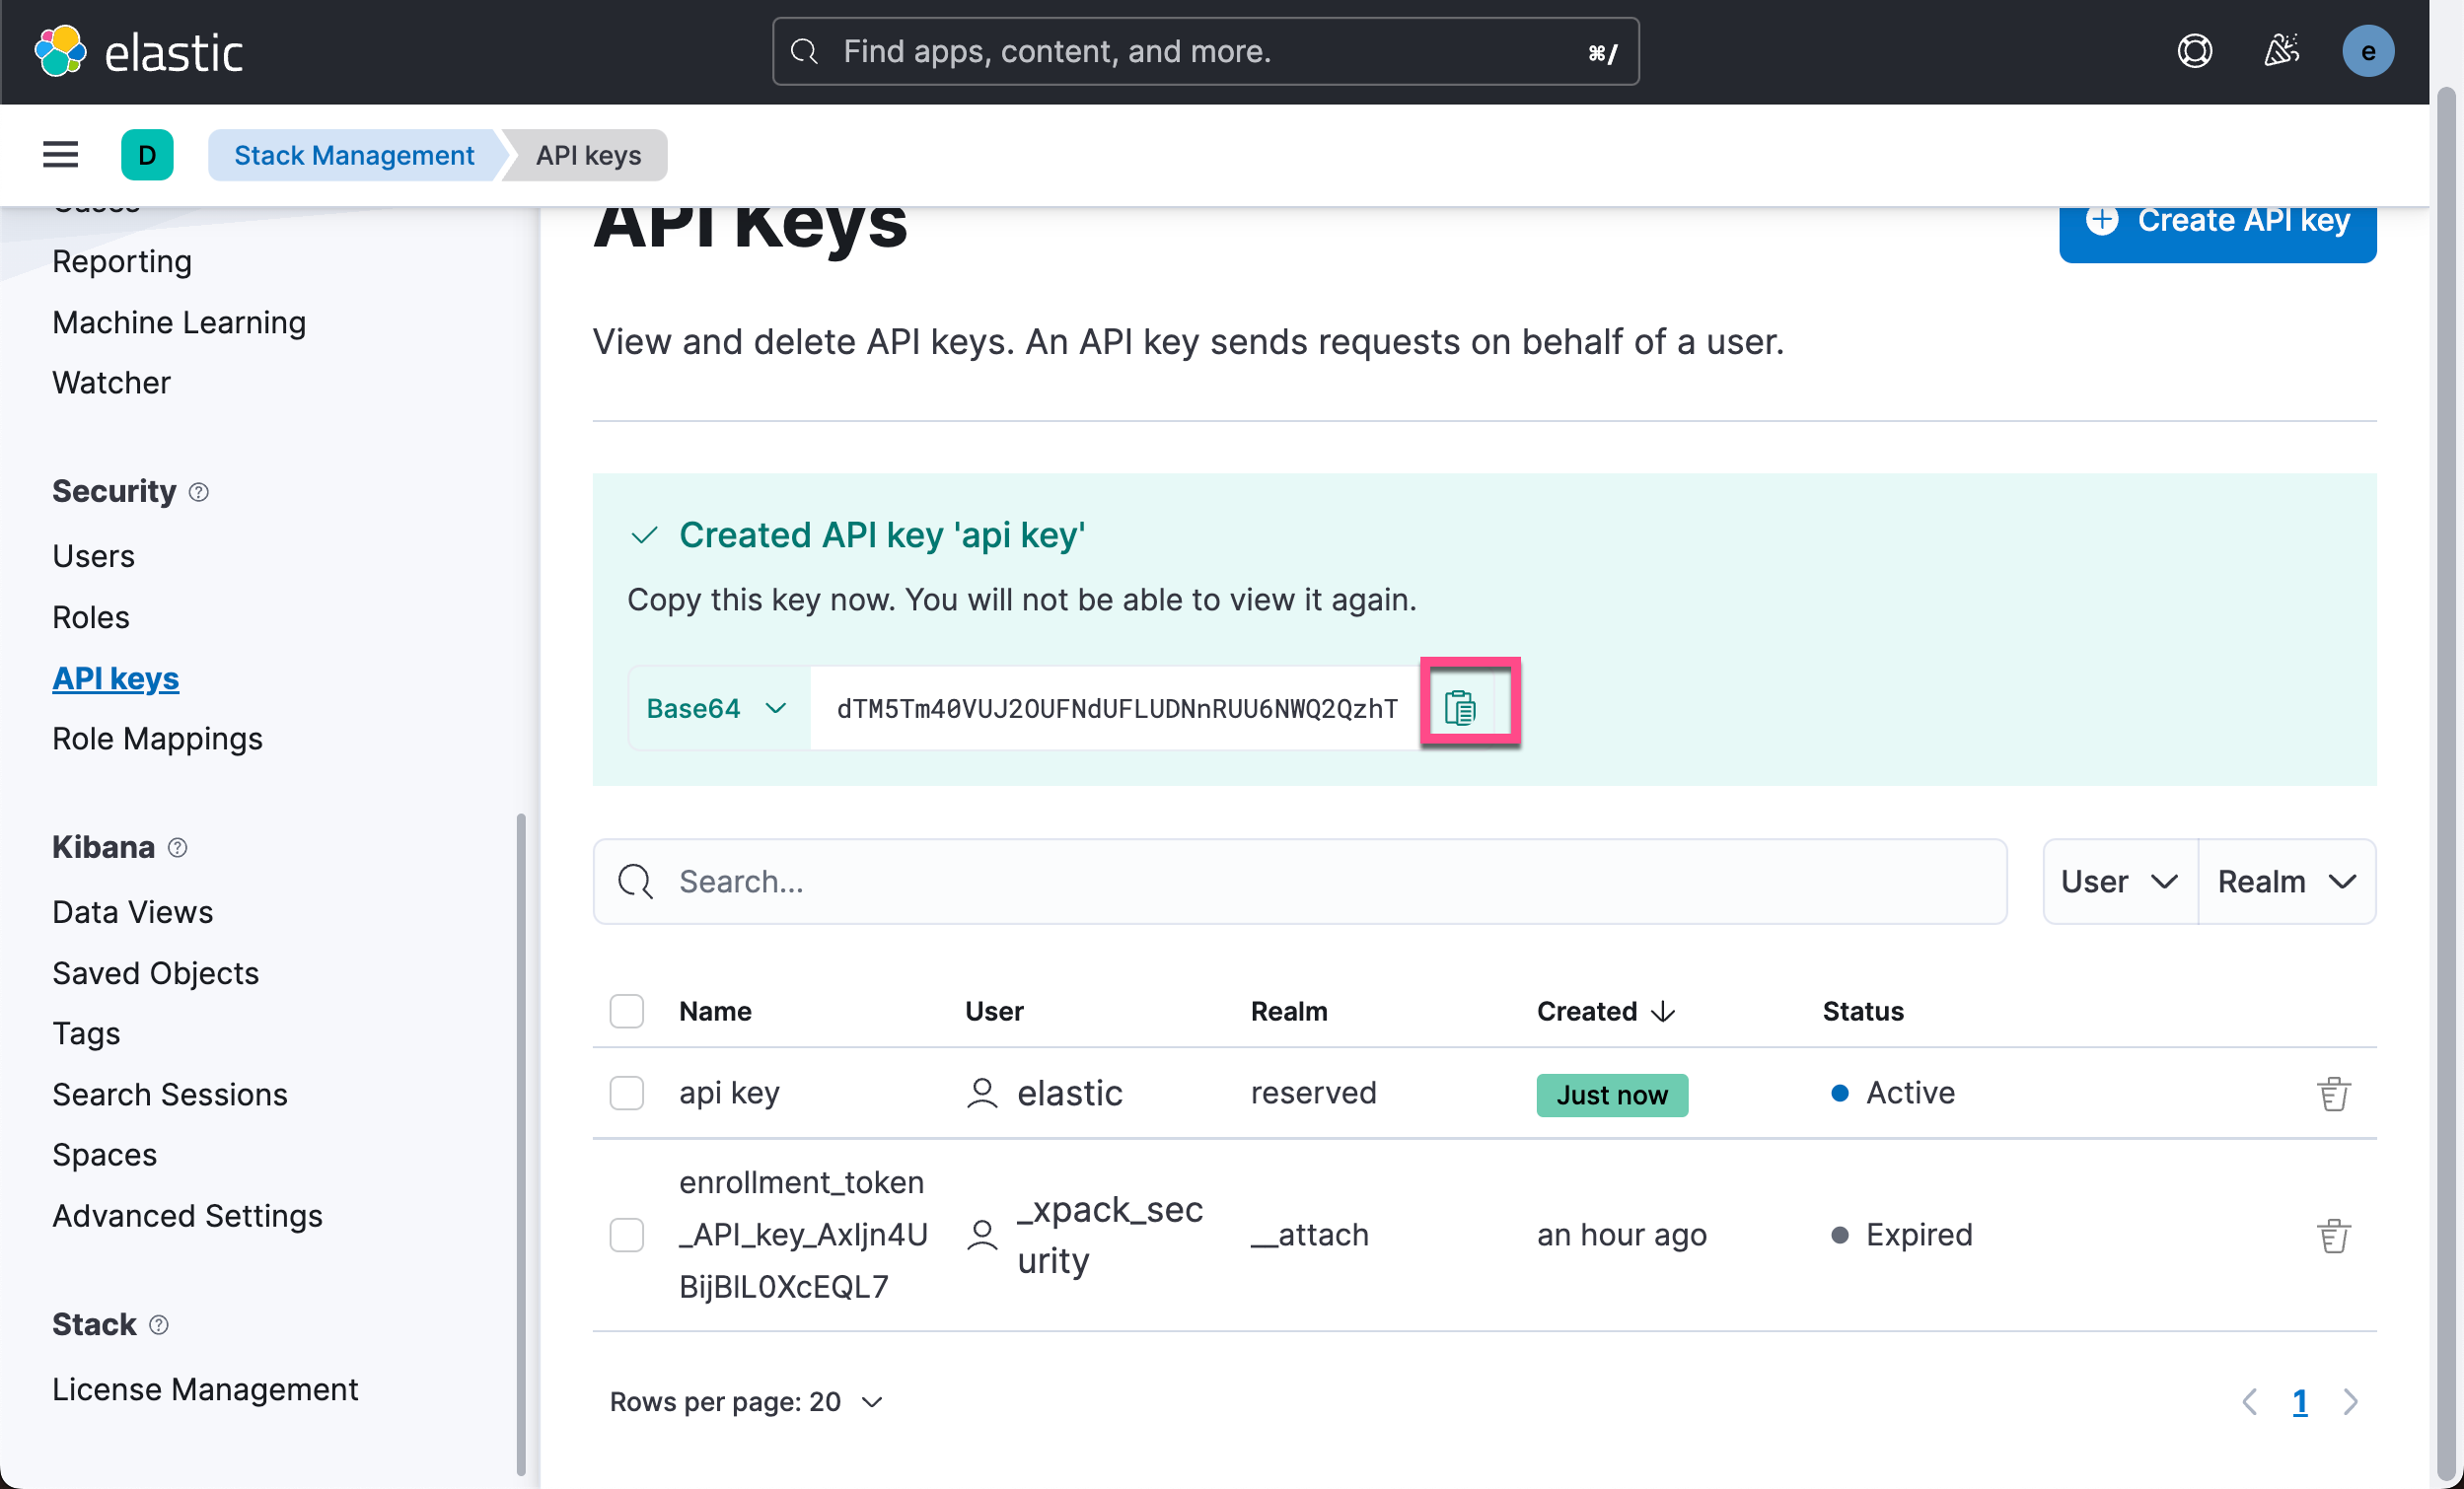
点击上面的 copy 按钮。拷贝生成的 API key。我们把这个 API key 应用到如下的代码中:
main.go
package main

import (
    "log"

    "github.com/elastic/go-elasticsearch/v8"
)

func main() {
    cfg := elasticsearch.Config{
        Addresses: []string{
            "https://localhost:9200",
        },
        CertificateFingerprint: "d293735f339412c738c5a258fe950fb2fcdaa33f772365a948abbb332a7c58b4",
        APIKey:                 "dTM5Tm40VUJ2OUFNdUFLUDNnRUU6NWQ2QzhTZmhURk82MUFsUFE0a2ltUQ==",
    }

    es, err := elasticsearch.NewClient(cfg)
    log.Println(err)

    if err == nil {
        log.Println(elasticsearch.Version)
        log.Println(es.Info())
    } else {
        log.Println("Something wrong with connection to Elasticsearch")
    }
}
运行上面的代码。它将成功地连接到 Elasticsearch 集群。
Retries
我们已经了解了客户端如何管理连接并针对特定条件重试请求。 现在让我们看看相关的配置选项。
默认情况下,客户端最多重试请求 3 次; 要设置不同的限制,请使用 MaxRetries 字段。 要更改应重试的响应状态代码列表,请使用 RetryOnStatus 字段。 与 RetryBackoff 选项一起,您可以使用它在服务器发送 429 Too Many Requests 响应时重试请求:
main.go
package main

import (
    "log"
    "math"
    "time"

    "github.com/elastic/go-elasticsearch/v8"
)

func main() {
    cfg := elasticsearch.Config{
        Addresses: []string{
            "https://localhost:9200",
        },
        CertificateFingerprint: "d293735f339412c738c5a258fe950fb2fcdaa33f772365a948abbb332a7c58b4",
        APIKey:                 "dTM5Tm40VUJ2OUFNdUFLUDNnRUU6NWQ2QzhTZmhURk82MUFsUFE0a2ltUQ==",
        RetryOnStatus:          []int{429, 502, 503, 504},
        RetryBackoff: func(i int) time.Duration {
            // A simple exponential delay
            d := time.Duration(math.Exp2(float64(i))) * time.Second
            log.Printf("Attempt: %d | Sleeping for %s...\n", i, d)
            return d
        },
    }

    es, err := elasticsearch.NewClient(cfg)
    log.Println(err)

    if err == nil {
        log.Println(elasticsearch.Version)
        log.Println(es.Info())
    } else {
        log.Println("Something wrong with connection to Elasticsearch")
    }
}
配置其它 HTTP 设置
要配置其他 HTTP 设置,请在配置对象中传递一个 http.Transport 对象。
cfg := elasticsearch.Config{
  Transport: &http.Transport{
    MaxIdleConnsPerHost:   10,
    ResponseHeaderTimeout: time.Second,
    TLSClientConfig: &tls.Config{
      MinVersion: tls.VersionTLS12,
      // ...
    },
    // ...
  },
}
有关客户端配置和自定义的更多示例,请参阅 _examples/configuration.go 和 _examples/customization.go 文件。 有关安全配置的示例,请参阅 _examples/security。
完整例子
以下示例演示了更复杂的用法。 它从集群中获取 Elasticsearch 版本,同时索引几个文档,并使用响应主体周围的轻量级包装器打印搜索结果。我们从上面的代码作为基础进行编码:
main.go
package main

import (
    "encoding/json"
    "log"
    "math"
    "time"

    "github.com/elastic/go-elasticsearch/v8"
)

func main() {
    cfg := elasticsearch.Config{
        Addresses: []string{
            "https://localhost:9200",
        },
        CertificateFingerprint: "d293735f339412c738c5a258fe950fb2fcdaa33f772365a948abbb332a7c58b4",
        APIKey:                 "dTM5Tm40VUJ2OUFNdUFLUDNnRUU6NWQ2QzhTZmhURk82MUFsUFE0a2ltUQ==",
        RetryOnStatus:          []int{429, 502, 503, 504},
        RetryBackoff: func(i int) time.Duration {
            // A simple exponential delay
            d := time.Duration(math.Exp2(float64(i))) * time.Second
            log.Printf("Attempt: %d | Sleeping for %s...\n", i, d)
            return d
        },
    }

    log.SetFlags(0)

    var (
        r map[string]interface{}
        // wg sync.WaitGroup
    )

    es, err := elasticsearch.NewClient(cfg)
    log.Println(err)
    if err == nil {
        log.Println("Successfully connected to Elasticsearch!")
    }
    // 1. Get cluster info
    //
    res, err := es.Info()
    if err != nil {
        log.Fatalf("Error getting response: %s", err)
    }
    defer res.Body.Close()

    // Check response status
    if res.IsError() {
        log.Fatalf("Error: %s", res.String())
    }

    // Deserialize the response into a map.
    if err := json.NewDecoder(res.Body).Decode(&r); err != nil {
        log.Fatalf("Error parsing the response body: %s", err)
    }
}
运行上面的代码:
go run main.go
上面的代码运行的结果为:
$ go run main.go
<nil>
Successfully connected to Elasticsearch!
它显示我们的连接到 Elasticsearch 是成功的。
我们接下来打印运行的结果:
  // Print client and server version numbers.
  log.Printf("Client: %s", elasticsearch.Version)
  log.Printf("Server: %s", r["version"].(map[string]interface{})["number"])
  log.Println(strings.Repeat("~", 37))
$ go run main.go
<nil>
Successfully connected to Elasticsearch!
Client: 8.7.0-SNAPSHOT
Server: 8.5.3
~~~~~~~~~~~~~~~~~~~~~~~~~~~~~~~~~~~~~
我们接下来运行如下的命令来下载 esapi 包:
go get github.com/elastic/go-elasticsearch/v8/esapi
main.go
package main

import (
    "bytes"
    "context"
    "encoding/json"
    "log"
    "math"
    "strconv"
    "strings"
    "sync"
    "time"

    "github.com/elastic/go-elasticsearch/v8"
    "github.com/elastic/go-elasticsearch/v8/esapi"
)

func main() {
    cfg := elasticsearch.Config{
        Addresses: []string{
            "https://localhost:9200",
        },
        CertificateFingerprint: "d293735f339412c738c5a258fe950fb2fcdaa33f772365a948abbb332a7c58b4",
        APIKey:                 "dTM5Tm40VUJ2OUFNdUFLUDNnRUU6NWQ2QzhTZmhURk82MUFsUFE0a2ltUQ==",
        RetryOnStatus:          []int{429, 502, 503, 504},
        RetryBackoff: func(i int) time.Duration {
            // A simple exponential delay
            d := time.Duration(math.Exp2(float64(i))) * time.Second
            log.Printf("Attempt: %d | Sleeping for %s...\n", i, d)
            return d
        },
    }

    log.SetFlags(0)

    var (
        r map[string]interface{}
        // wg sync.WaitGroup
    )

    es, err := elasticsearch.NewClient(cfg)
    log.Println(err)
    if err == nil {
        log.Println("Successfully connected to Elasticsearch!")
    }
    // 1. Get cluster info
    //
    res, err := es.Info()
    if err != nil {
        log.Fatalf("Error getting response: %s", err)
    }
    defer res.Body.Close()

    // Check response status
    if res.IsError() {
        log.Fatalf("Error: %s", res.String())
    }

    // Deserialize the response into a map.
    if err := json.NewDecoder(res.Body).Decode(&r); err != nil {
        log.Fatalf("Error parsing the response body: %s", err)
    }

    // Print client and server version numbers.
    log.Printf("Client: %s", elasticsearch.Version)
    log.Printf("Server: %s", r["version"].(map[string]interface{})["number"])
    log.Println(strings.Repeat("~", 37))

    var wg sync.WaitGroup
    for i, title := range []string{"Test One", "Test Two"} {
        wg.Add(1)

        go func(i int, title string) {
            defer wg.Done()

            // Build the request body.
            data, err := json.Marshal(struct{ Title string }{Title: title})
            if err != nil {
                log.Fatalf("Error marshaling document: %s", err)
            }

            // Set up the request object.
            req := esapi.IndexRequest{
                Index:      "test",
                DocumentID: strconv.Itoa(i + 1),
                Body:       bytes.NewReader(data),
                Refresh:    "true",
            }

            // Perform the request with the client.
            res, err := req.Do(context.Background(), es)
            if err != nil {
                log.Fatalf("Error getting response: %s", err)
            }
            defer res.Body.Close()

            if res.IsError() {
                log.Printf("[%s] Error indexing document ID=%d", res.Status(), i+1)
            } else {
                // Deserialize the response into a map.
                var r map[string]interface{}
                if err := json.NewDecoder(res.Body).Decode(&r); err != nil {
                    log.Printf("Error parsing the response body: %s", err)
                } else {
                    // Print the response status and indexed document version.
                    log.Printf("[%s] %s; version=%d", res.Status(), r["result"], int(r["_version"].(float64)))
                }
            }
        }(i, title)
    }
    wg.Wait()
    log.Println(strings.Repeat("-", 37))

}
运行上面的代码:
<nil>
Successfully connected to Elasticsearch!
Client: 8.7.0-SNAPSHOT
Server: 8.5.3
~~~~~~~~~~~~~~~~~~~~~~~~~~~~~~~~~~~~~
[201 Created] created; version=1
[201 Created] created; version=1
-------------------------------------
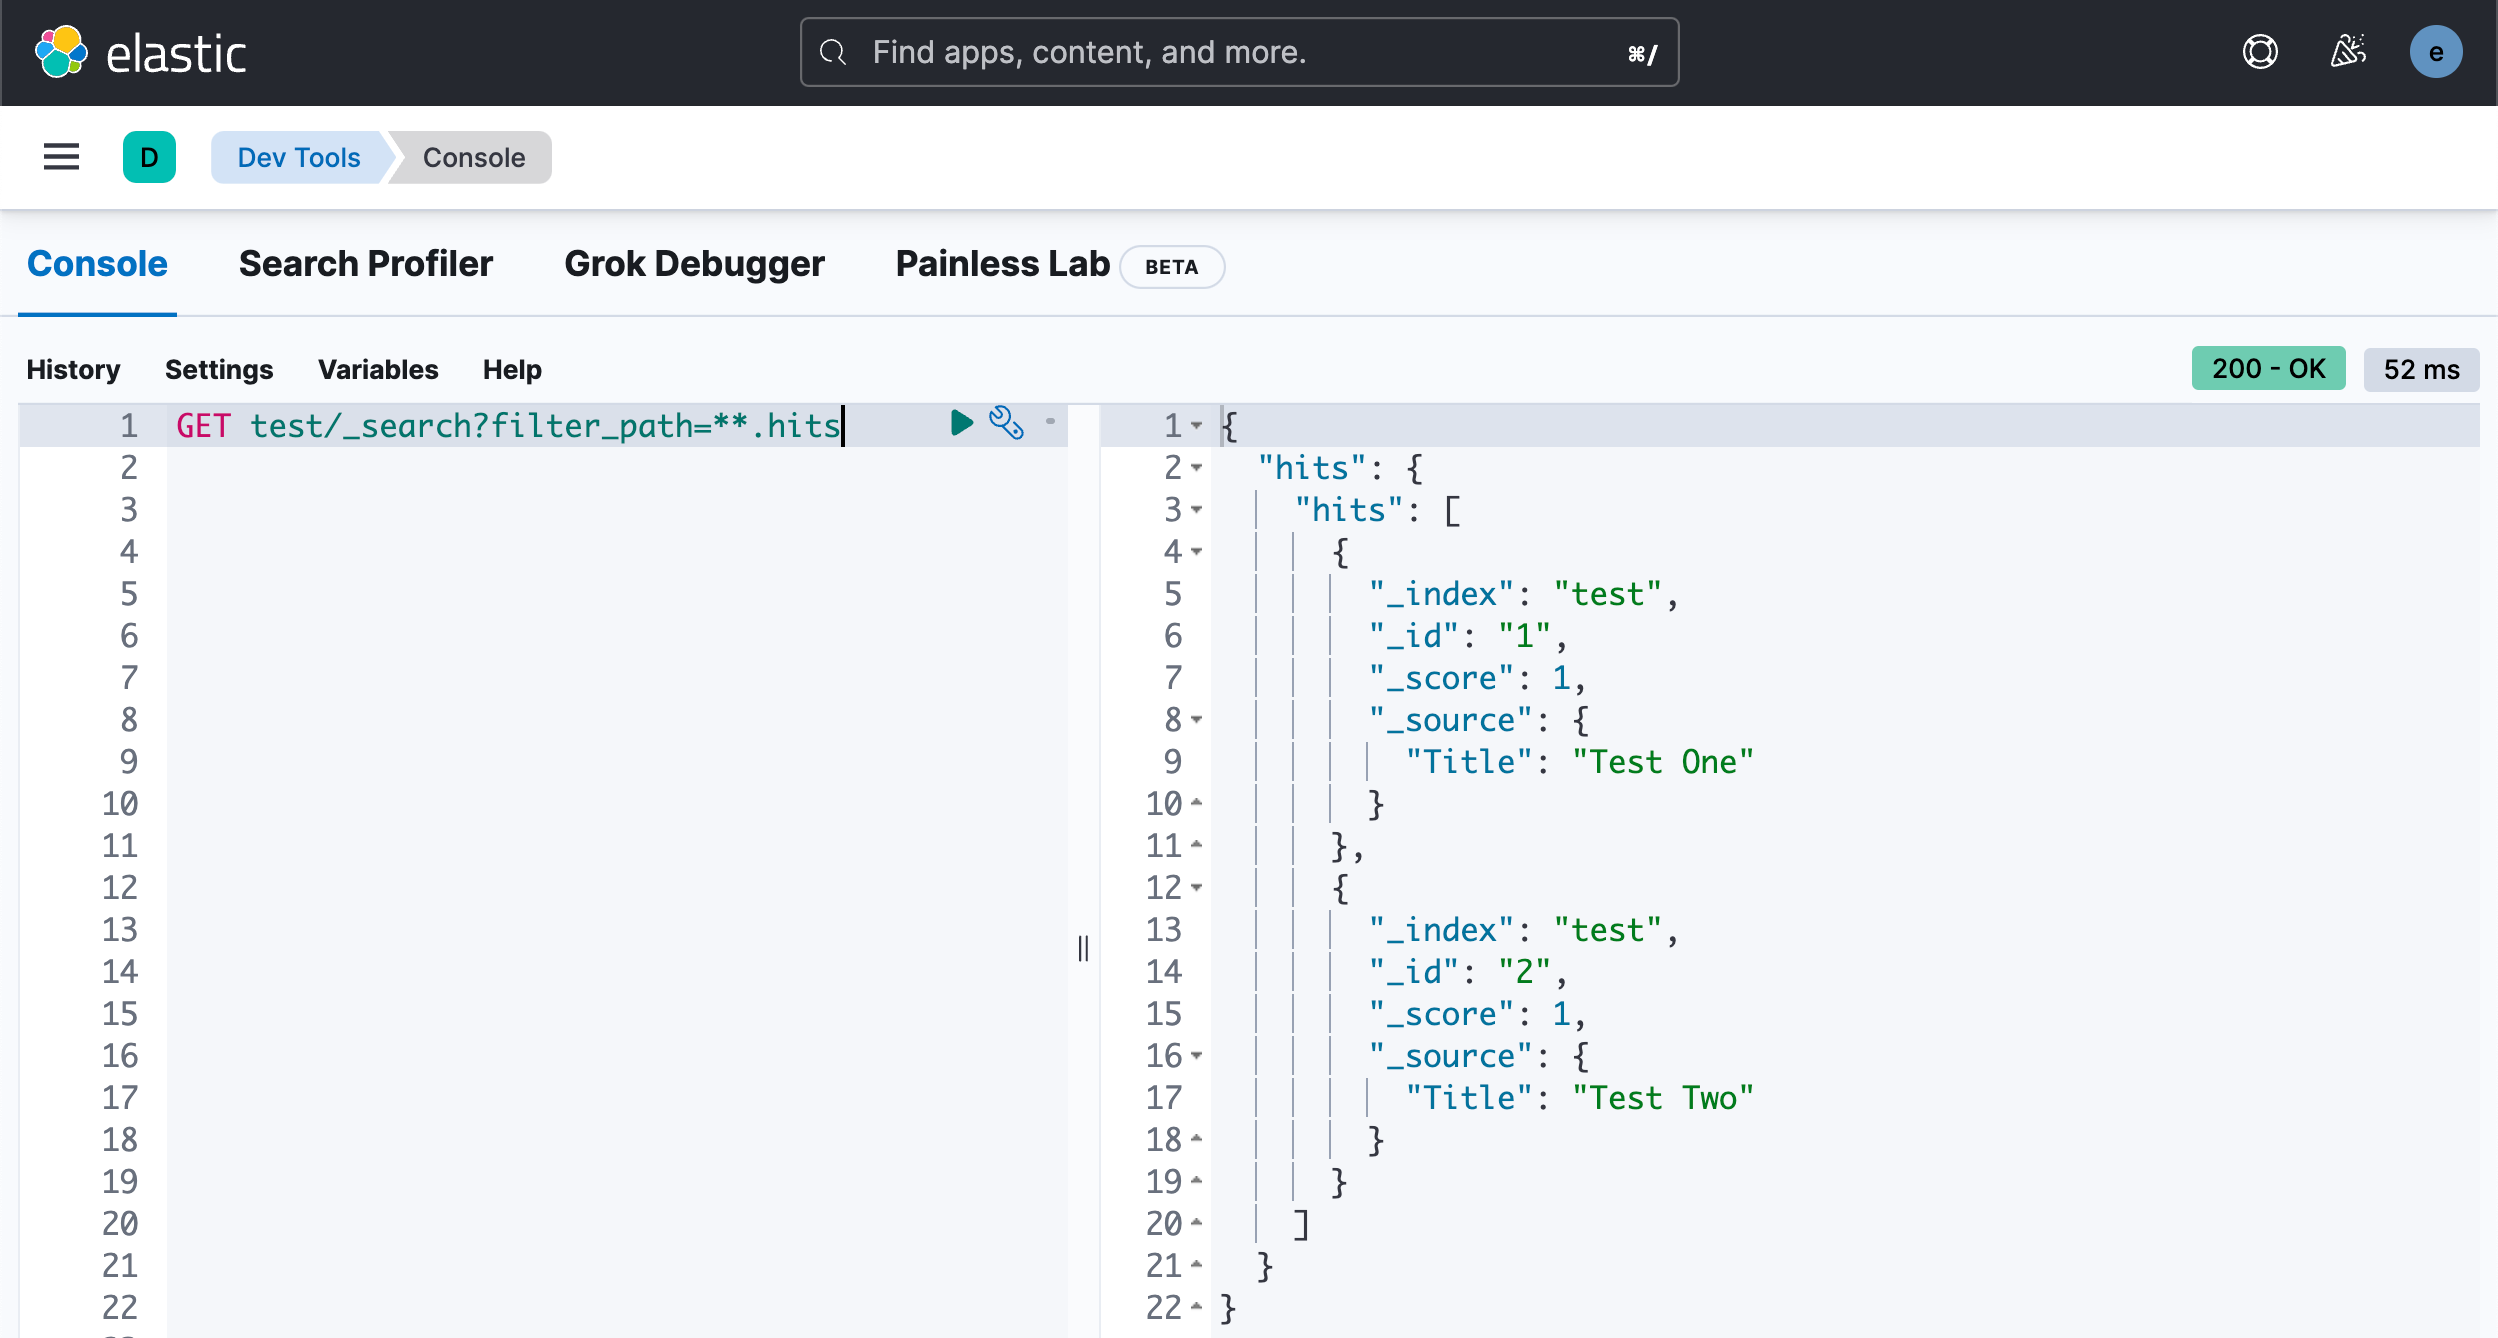
上面的代码在 Elasticsearch 中创建一个叫做 test 的索引,并向里面写入两个文档。我们可以在 Kibana 中进行查看:
GET test/_search?filter_path=**.hits
接下来,我们添加如下的代码来进行搜索:
  // 3. Search for the indexed documents
  //
  // Build the request body.
  var buf bytes.Buffer
  query := map[string]interface{}{
    "query": map[string]interface{}{
      "match": map[string]interface{}{
        "Title": "test",
      },
    },
  }
  if err := json.NewEncoder(&buf).Encode(query); err != nil {
    log.Fatalf("Error encoding query: %s", err)
  }

  // Perform the search request.
  res, err = es.Search(
    es.Search.WithContext(context.Background()),
    es.Search.WithIndex("test"),
    es.Search.WithBody(&buf),
    es.Search.WithTrackTotalHits(true),
    es.Search.WithPretty(),
  )
  if err != nil {
    log.Fatalf("Error getting response: %s", err)
  }
  defer res.Body.Close()

  if res.IsError() {
    var e map[string]interface{}
    if err := json.NewDecoder(res.Body).Decode(&e); err != nil {
      log.Fatalf("Error parsing the response body: %s", err)
    } else {
      // Print the response status and error information.
      log.Fatalf("[%s] %s: %s",
        res.Status(),
        e["error"].(map[string]interface{})["type"],
        e["error"].(map[string]interface{})["reason"],
      )
    }
  }

  if err := json.NewDecoder(res.Body).Decode(&r); err != nil {
    log.Fatalf("Error parsing the response body: %s", err)
  }
  // Print the response status, number of results, and request duration.
  log.Printf(
    "[%s] %d hits; took: %dms",
    res.Status(),
    int(r["hits"].(map[string]interface{})["total"].(map[string]interface{})["value"].(float64)),
    int(r["took"].(float64)),
  )
  // Print the ID and document source for each hit.
  for _, hit := range r["hits"].(map[string]interface{})["hits"].([]interface{}) {
    log.Printf(" * ID=%s, %s", hit.(map[string]interface{})["_id"], hit.(map[string]interface{})["_source"])
  }

  log.Println(strings.Repeat("=", 37))
运行上面的结果:
$ go run main.go
<nil>
Successfully connected to Elasticsearch!
Client: 8.7.0-SNAPSHOT
Server: 8.5.3
~~~~~~~~~~~~~~~~~~~~~~~~~~~~~~~~~~~~~
[200 OK] updated; version=4
[200 OK] updated; version=4
-------------------------------------
[200 OK] 2 hits; took: 0ms
 * ID=1, map[Title:Test One]
 * ID=2, map[Title:Test Two]
=====================================
上面的搜索相当于如下的搜索:
GET test/_search
{
  "query": {
    "match": {
      "Title": "test"
    }
  }
}
它显示的搜索结果为:
{
  "took": 0,
  "timed_out": false,
  "_shards": {
    "total": 1,
    "successful": 1,
    "skipped": 0,
    "failed": 0
  },
  "hits": {
    "total": {
      "value": 2,
      "relation": "eq"
    },
    "max_score": 0.074107975,
    "hits": [
      {
        "_index": "test",
        "_id": "1",
        "_score": 0.074107975,
        "_source": {
          "Title": "Test One"
        }
      },
      {
        "_index": "test",
        "_id": "2",
        "_score": 0.074107975,
        "_source": {
          "Title": "Test Two"
        }
      }
    ]
  }
}
最终的代码为:
main.go
package main

import (
    "bytes"
    "context"
    "encoding/json"
    "log"
    "math"
    "strconv"
    "strings"
    "sync"
    "time"

    "github.com/elastic/go-elasticsearch/v8"
    "github.com/elastic/go-elasticsearch/v8/esapi"
)

func main() {
    cfg := elasticsearch.Config{
        Addresses: []string{
            "https://localhost:9200",
        },
        CertificateFingerprint: "d293735f339412c738c5a258fe950fb2fcdaa33f772365a948abbb332a7c58b4",
        APIKey:                 "dTM5Tm40VUJ2OUFNdUFLUDNnRUU6NWQ2QzhTZmhURk82MUFsUFE0a2ltUQ==",
        RetryOnStatus:          []int{429, 502, 503, 504},
        RetryBackoff: func(i int) time.Duration {
            // A simple exponential delay
            d := time.Duration(math.Exp2(float64(i))) * time.Second
            log.Printf("Attempt: %d | Sleeping for %s...\n", i, d)
            return d
        },
    }

    log.SetFlags(0)

    var (
        r map[string]interface{}
        // wg sync.WaitGroup
    )

    es, err := elasticsearch.NewClient(cfg)
    log.Println(err)
    if err == nil {
        log.Println("Successfully connected to Elasticsearch!")
    }
    // 1. Get cluster info
    //
    res, err := es.Info()
    if err != nil {
        log.Fatalf("Error getting response: %s", err)
    }
    defer res.Body.Close()

    // Check response status
    if res.IsError() {
        log.Fatalf("Error: %s", res.String())
    }

    // Deserialize the response into a map.
    if err := json.NewDecoder(res.Body).Decode(&r); err != nil {
        log.Fatalf("Error parsing the response body: %s", err)
    }

    // Print client and server version numbers.
    log.Printf("Client: %s", elasticsearch.Version)
    log.Printf("Server: %s", r["version"].(map[string]interface{})["number"])
    log.Println(strings.Repeat("~", 37))

    var wg sync.WaitGroup
    for i, title := range []string{"Test One", "Test Two"} {
        wg.Add(1)

        go func(i int, title string) {
            defer wg.Done()

            // Build the request body.
            data, err := json.Marshal(struct{ Title string }{Title: title})
            if err != nil {
                log.Fatalf("Error marshaling document: %s", err)
            }

            // Set up the request object.
            req := esapi.IndexRequest{
                Index:      "test",
                DocumentID: strconv.Itoa(i + 1),
                Body:       bytes.NewReader(data),
                Refresh:    "true",
            }

            // Perform the request with the client.
            res, err := req.Do(context.Background(), es)
            if err != nil {
                log.Fatalf("Error getting response: %s", err)
            }
            defer res.Body.Close()

            if res.IsError() {
                log.Printf("[%s] Error indexing document ID=%d", res.Status(), i+1)
            } else {
                // Deserialize the response into a map.
                var r map[string]interface{}
                if err := json.NewDecoder(res.Body).Decode(&r); err != nil {
                    log.Printf("Error parsing the response body: %s", err)
                } else {
                    // Print the response status and indexed document version.
                    log.Printf("[%s] %s; version=%d", res.Status(), r["result"], int(r["_version"].(float64)))
                }
            }
        }(i, title)
    }
    wg.Wait()
    log.Println(strings.Repeat("-", 37))

    // 3. Search for the indexed documents
    //
    // Build the request body.
    var buf bytes.Buffer
    query := map[string]interface{}{
        "query": map[string]interface{}{
            "match": map[string]interface{}{
                "Title": "test",
            },
        },
    }
    if err := json.NewEncoder(&buf).Encode(query); err != nil {
        log.Fatalf("Error encoding query: %s", err)
    }

    // Perform the search request.
    res, err = es.Search(
        es.Search.WithContext(context.Background()),
        es.Search.WithIndex("test"),
        es.Search.WithBody(&buf),
        es.Search.WithTrackTotalHits(true),
        es.Search.WithPretty(),
    )
    if err != nil {
        log.Fatalf("Error getting response: %s", err)
    }
    defer res.Body.Close()

    if res.IsError() {
        var e map[string]interface{}
        if err := json.NewDecoder(res.Body).Decode(&e); err != nil {
            log.Fatalf("Error parsing the response body: %s", err)
        } else {
            // Print the response status and error information.
            log.Fatalf("[%s] %s: %s",
                res.Status(),
                e["error"].(map[string]interface{})["type"],
                e["error"].(map[string]interface{})["reason"],
            )
        }
    }

    if err := json.NewDecoder(res.Body).Decode(&r); err != nil {
        log.Fatalf("Error parsing the response body: %s", err)
    }
    // Print the response status, number of results, and request duration.
    log.Printf(
        "[%s] %d hits; took: %dms",
        res.Status(),
        int(r["hits"].(map[string]interface{})["total"].(map[string]interface{})["value"].(float64)),
        int(r["took"].(float64)),
    )
    // Print the ID and document source for each hit.
    for _, hit := range r["hits"].(map[string]interface{})["hits"].([]interface{}) {
        log.Printf(" * ID=%s, %s", hit.(map[string]interface{})["_id"], hit.(map[string]interface{})["_source"])
    }

    log.Println(strings.Repeat("=", 37))
}
关于 7.x 的文章:Elasticsearch:Elasticsearch 开发入门 - Golang
更多例子:go-elasticsearch/_examples at main · elastic/go-elasticsearch · GitHub
版权归原作者 Elastic 中国社区官方博客 所有, 如有侵权,请联系我们删除。