
1 环境说明
Ubuntu18.04
Docker version 20.10.21
部署版本 Authelia 4.37.2
2 Authelia介绍
官方站点:https://www.authelia.com/
3 样例部署步骤
3.1 一些说明
Note: 部署过程踩了很多坑,由于英文水平不太行,所以看官方文档稍微有点费力,过程中基本上是按照官方文档来的,如果有不清楚的地方,可以查阅原版文档。
在https://www.authelia.com/integration/deployment/docker/中,提供了三种模式的部署方式:
- Unbundled Example 👉 非绑定版本
- Bundle:lite 👉 绑定版本
- Bundle:local 👉 绑定版本
其中
lite
跟
local
可以理解为在线部署和离线部署,都提供了三个演示站点。
lite
版本根据docker-compsoe.yml文件中的内容去pull镜像,
local
版本则适用于已提前准备好镜像的情况。
本次部署使用Bundle:lite版本,基本上就是按照提供的docker-compose文件进行部署。
3.2 部署步骤
3.2.1 准备docker-compose.yml
在github中提供了
docker-compose.yml
文件,https://github.com/authelia/authelia/tree/master/examples/compose/lite
version:'3.3'networks:net:driver: bridge

services:authelia:image: authelia/authelia
    container_name: authelia
    volumes:- ./authelia:/config
    networks:- net
    labels:-'traefik.enable=true'-'traefik.http.routers.authelia.rule=Host(`authelia.example.com`)'-'traefik.http.routers.authelia.entrypoints=https'-'traefik.http.routers.authelia.tls=true'-'traefik.http.routers.authelia.tls.certresolver=letsencrypt'-'traefik.http.middlewares.authelia.forwardauth.address=http://authelia:9091/api/verify?rd=https://authelia.example.com'# yamllint disable-line rule:line-length-'traefik.http.middlewares.authelia.forwardauth.trustForwardHeader=true'-'traefik.http.middlewares.authelia.forwardauth.authResponseHeaders=Remote-User,Remote-Groups,Remote-Name,Remote-Email'# yamllint disable-line rule:line-lengthexpose:-9091restart: unless-stopped
    healthcheck:## In production the healthcheck section should be commented.disable:trueenvironment:- TZ=Australia/Melbourne

  redis:image: redis:alpine
    container_name: redis
    volumes:- ./redis:/data
    networks:- net
    expose:-6379restart: unless-stopped
    environment:- TZ=Australia/Melbourne

  traefik:image: traefik:v2.9.5
    container_name: traefik
    volumes:- ./traefik:/etc/traefik
      - /var/run/docker.sock:/var/run/docker.sock
    networks:- net
    labels:-'traefik.enable=true'-'traefik.http.routers.api.rule=Host(`traefik.example.com`)'-'traefik.http.routers.api.entrypoints=https'-'traefik.http.routers.api.service=api@internal'-'traefik.http.routers.api.tls=true'-'traefik.http.routers.api.tls.certresolver=letsencrypt'-'traefik.http.routers.api.middlewares=authelia@docker'ports:-80:80- 443:443command:-'--api'-'--providers.docker=true'-'--providers.docker.exposedByDefault=false'-'--entrypoints.http=true'-'--entrypoints.http.address=:80'-'--entrypoints.http.http.redirections.entrypoint.to=https'-'--entrypoints.http.http.redirections.entrypoint.scheme=https'-'--entrypoints.https=true'-'--entrypoints.https.address=:443'-'--certificatesResolvers.letsencrypt.acme.email=your-email@your-domain.com'-'--certificatesResolvers.letsencrypt.acme.storage=/etc/traefik/acme.json'-'--certificatesResolvers.letsencrypt.acme.httpChallenge.entryPoint=http'-'--log=true'-'--log.level=DEBUG'secure:image: traefik/whoami
    container_name: secure
    networks:- net
    labels:-'traefik.enable=true'-'traefik.http.routers.secure.rule=Host(`secure.example.com`)'-'traefik.http.routers.secure.entrypoints=https'-'traefik.http.routers.secure.tls=true'-'traefik.http.routers.secure.tls.certresolver=letsencrypt'-'traefik.http.routers.secure.middlewares=authelia@docker'expose:-80restart: unless-stopped

  public:image: traefik/whoami
    container_name: public
    networks:- net
    labels:-'traefik.enable=true'-'traefik.http.routers.public.rule=Host(`public.example.com`)'-'traefik.http.routers.public.entrypoints=https'-'traefik.http.routers.public.tls=true'-'traefik.http.routers.public.tls.certresolver=letsencrypt'-'traefik.http.routers.public.middlewares=authelia@docker'expose:-80restart: unless-stopped
对于以上文件,没有要修改的内容。其中
redis
用于构建authelia时存储相关数据,
public
、
traefik
和
secure
为验证站点,在之后的配置文件中会提及。关于
traefik
,是一个负载均衡设备。
3.2.2 准备配置文件
在docker-compose.yml文件中,authelia镜像设置了卷映射
- ./authelia:/config
,所以接下来准备相关的配置文件。
在docker-compose.yml同级目录下创建文件夹
authelia
,文件夹名任意,只要在其他文件中同步修改即可。
创建文件configuration.yml
###############################################################
#                   Authelia configuration                    #
###############################################################

jwt_secret: eyJhbGciOiJIUzI1NiIsInR5cCI6IkpXVCJ9.eyIiOltdLCJpYXQiOjE2Njk3MDU4MjAsImV4cCI6NDEwMjMyOTU5OSwiYXVkIjoiIiwiaXNzIjoiIiwic3ViIjoiIn0.m6l1XlodI_N4Yz9P5p57tbsPuSOmDiFfbTLRKMCrDy8
default_redirection_url: https://public.example.com

server:
  host: 0.0.0.0
  port: 9091

log:
  level: debug
# This secret can also be set using the env variables AUTHELIA_JWT_SECRET_FILE

totp:
  issuer: authelia.com

# duo_api:
#  hostname: api-123456789.example.com
#  integration_key: ABCDEF
#  # This secret can also be set using the env variables AUTHELIA_DUO_API_SECRET_KEY_FILE
#  secret_key: 1234567890abcdefghifjkl

authentication_backend:
  file:
    path: /config/users_database.yml

access_control:
  default_policy: deny
  rules:
    # Rules applied to everyone
    - domain: public.example.com
      policy: bypass
    - domain: traefik.example.com
      policy: one_factor
    - domain: secure.example.com
      policy: two_factor

session:
  name: authelia_session
  # This secret can also be set using the env variables AUTHELIA_SESSION_SECRET_FILE
  secret: 481F2EN0L2RQJHT882OSM
  expiration: 3600  # 1 hour
  inactivity: 300  # 5 minutes
  domain: example.com  # Should match whatever your root protected domain is

  redis:
    host: redis
    port: 6379
    # This secret can also be set using the env variables AUTHELIA_SESSION_REDIS_PASSWORD_FILE
    # password: authelia

regulation:
  max_retries: 3
  find_time: 120
  ban_time: 300

storage:
  encryption_key: 481F2EN0L2RQJHT882OSM
  local:
    path: /config/db.sqlite3

notifier:
  disable_startup_check: false
  filesystem:
    filename: /config/notification.txt
相比于github中提供的文件,修改的字段有:
- 所有路径换成了容器中的绝对路径
jwt_secret:使用一些在线站点生成就可以,但是没发现有什么用- session中的
secret:生成随机字符串作为密钥 encryption_key:生成随机字符串作为密钥,不要求和上面的secret相同notifier:github中还需要SMTP服务,还需要配置用户名密码,所以直接使用了最简单的方式notifier: disable_startup_check: false filesystem: filename: /config/notification.txt
在配置文件中,可以看到
access_control
选项,其中
public.example.com
站点对应
bypass
,表示不需要验证;
traefik.example.com
为
one_factor
,表示单次验证;
secure.example.com
对应
one_factor
,表示双重验证。
创建文件users_database.yml
users:
  john:
    displayname: "John Doe"
    password: "$argon2id$v=19$m=65536,t=3,p=4$U3/ys5gEgJ8kc89NUQwejg$KmJOz070CCDn2L19sVD+9woheCJ2T9PEOcnZXoP5hrU"
    email: [email protected]
    groups:
      - admins
      - dev
  harry:
    displayname: "Harry Potter"
    password: "$argon2id$v=19$m=65536,t=3,p=2$BpLnfgDsc2WD8F2q$o/vzA4myCqZZ36bUGsDY//8mKUYNZZaR0t4MFFSs+iM"
    email: [email protected]
    groups: []
  bob:
    displayname: "Bob Dylan"
    password: "$argon2id$v=19$m=65536,t=3,p=2$BpLnfgDsc2WD8F2q$o/vzA4myCqZZ36bUGsDY//8mKUYNZZaR0t4MFFSs+iM"
    email: [email protected]
    groups:
      - dev
  james:
    displayname: "James Dean"
    password: "$argon2id$v=19$m=65536,t=3,p=2$BpLnfgDsc2WD8F2q$o/vzA4myCqZZ36bUGsDY//8mKUYNZZaR0t4MFFSs+iM"
    email: [email protected]
在同级目录下创建用户密码文件
users_databases.yml
,以如上文件为例:
- 登录使用的用户名为john、harry、bob、james
- john在管理组和开发组,bob在开发组
- 登录使用的密码采用
argon2id加密后存储在对应字段中,生成密码字符串的方法:- 在github的release中下载可执行程序包,解压后得到可执行程序authelia-linux-amd64``````wget https://github.com/authelia/authelia/releases/download/v4.37.2/authelia-v4.37.2-linux-amd64.tar.gztar xvzf authelia-v4.37.2-linux-amd64.tar.gz- 添加可执行权限chmod +x authelia-linux-amd64- 生成密码./authelia-linux-amd64 hash-password -- '<password>' - 将生成的密码写入文件即可
3.2.3 配置域名解析
在Linux的
/etc/hosts
文件中加入如下域名解析内容:
127.0.0.1 authelia.example.com public.example.com traefik.example.com secure.example.com
在Windows主机的hosts文件中也加入域名解析:
10.2.4.36 authelia.example.com public.example.com traefik.example.com secure.example.com
3.2.4 docker-compose
执行
docker-compose up -d

3.3 验证
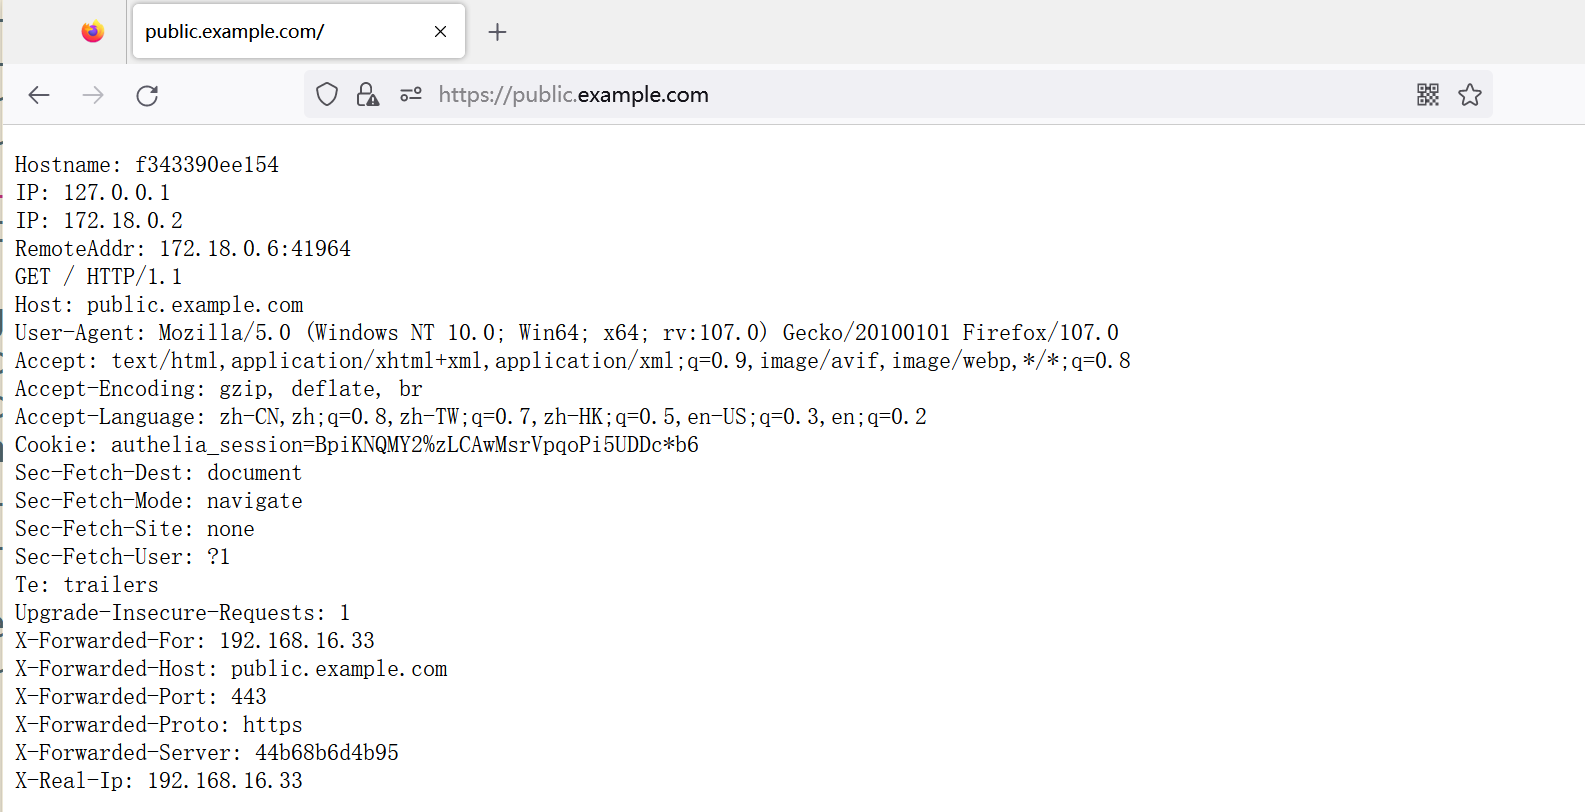
不需要验证
访问
https://public.example.com/
,不需要验证
单次验证
访问
https://traefik.example.com/
,跳转到
https://authelia.example.com
,要求输入用户名密码进行验证
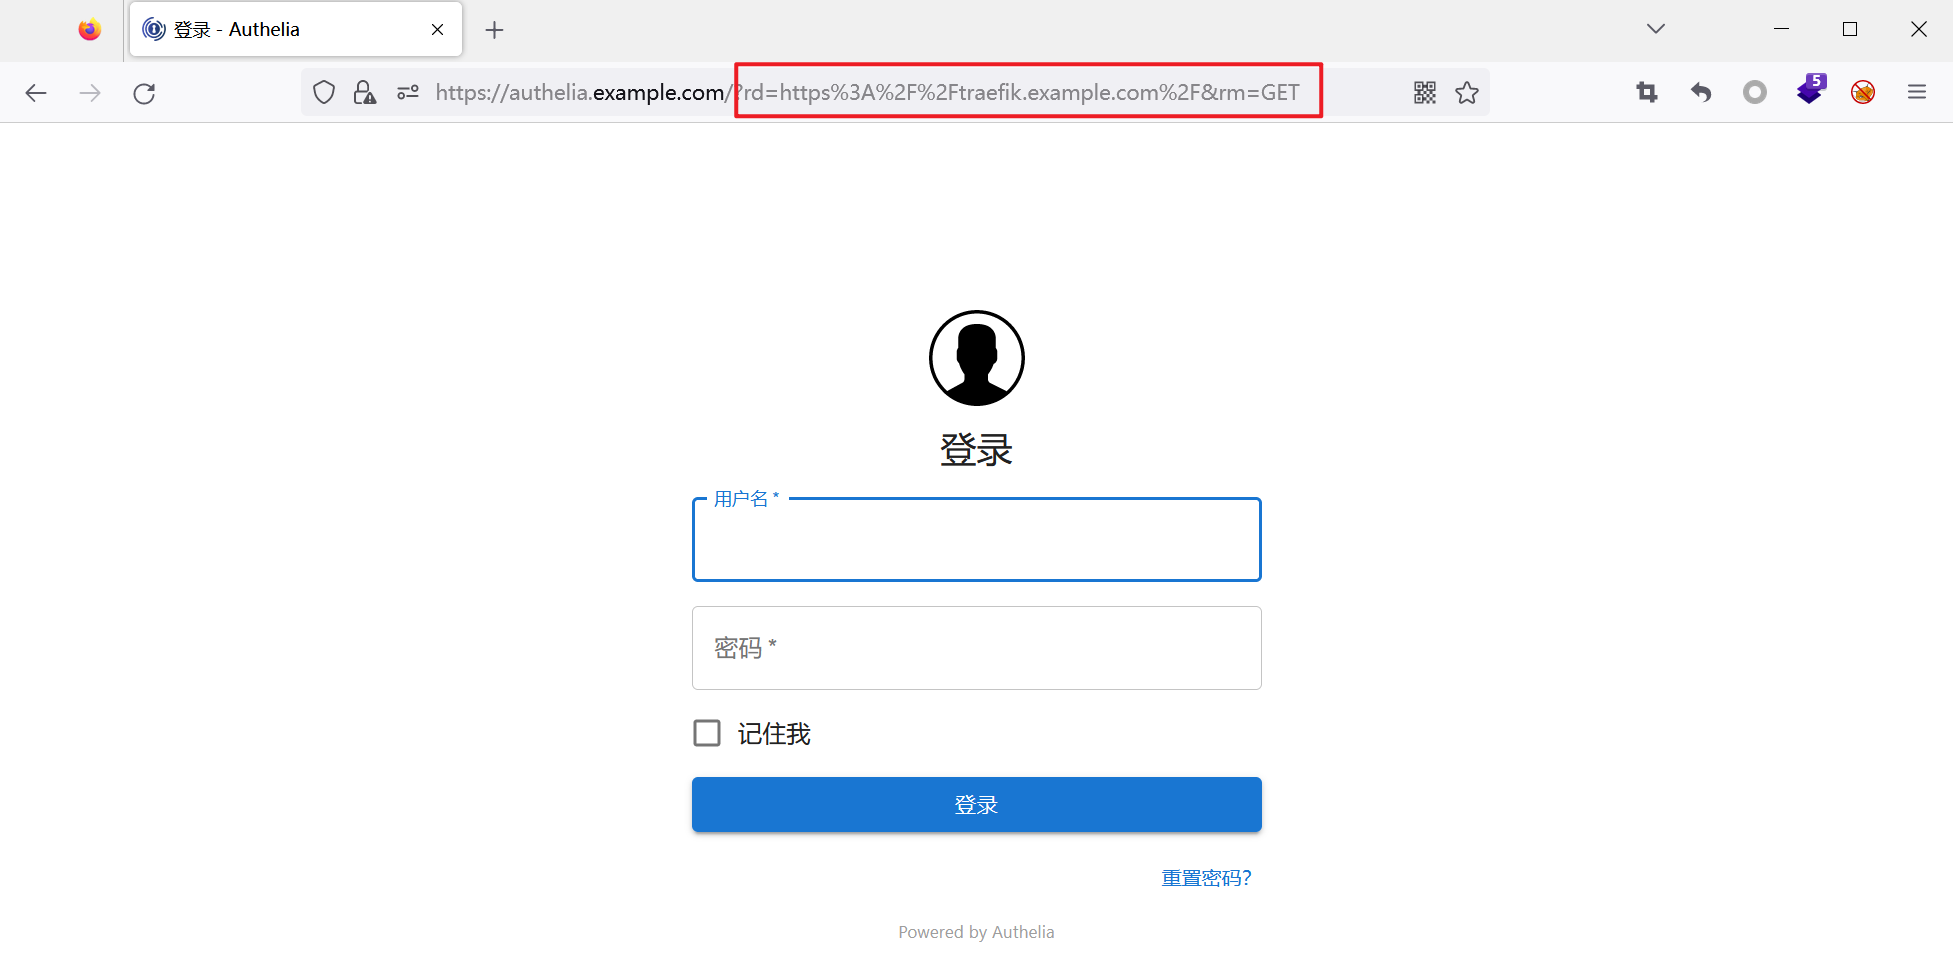
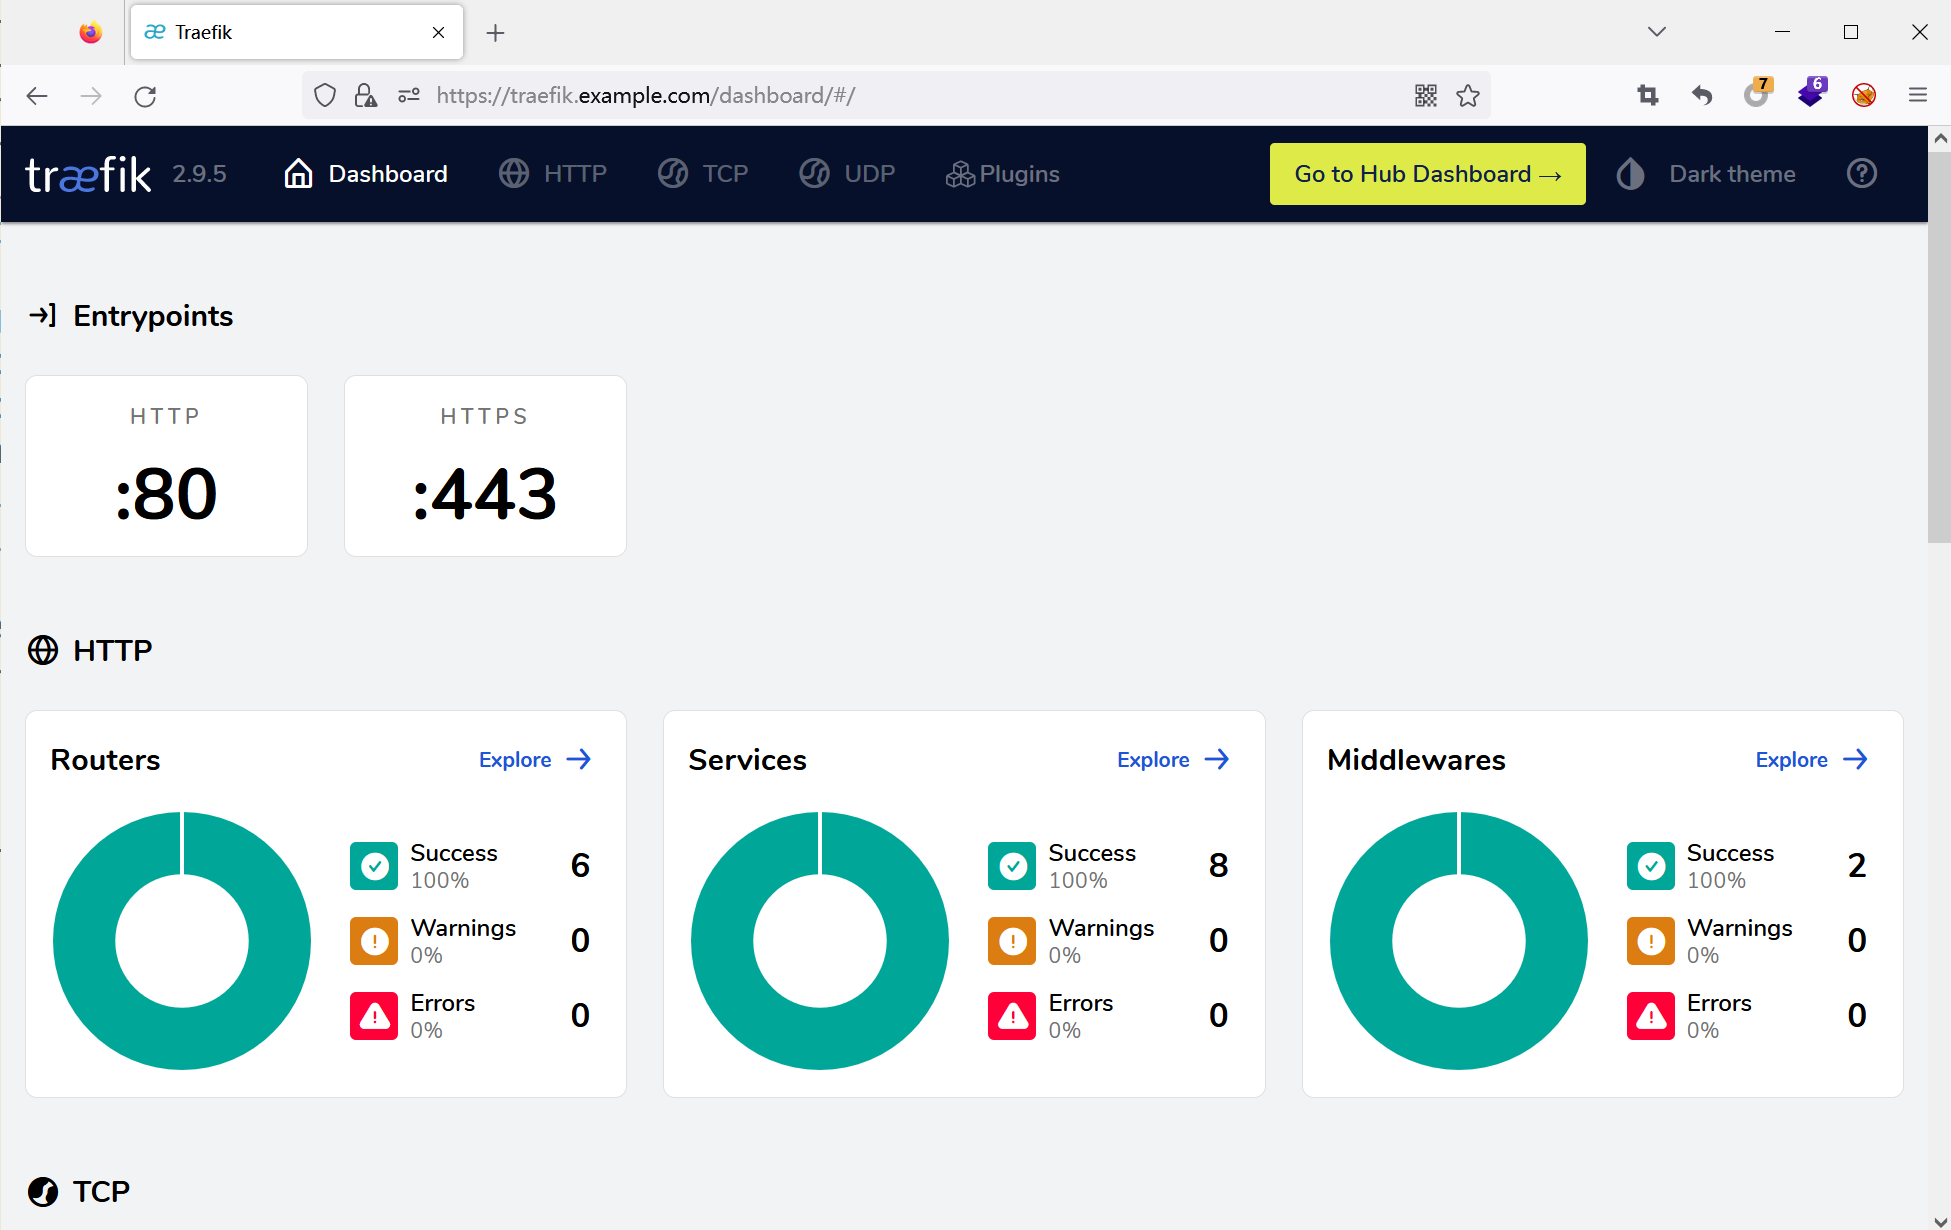
输入用户名和密码(
john/john@123
)后访问到traefik的dashboard
双重验证
访问
https://secure.example.com
,提示需要双重验证,要求注册设备。

4 总结
在样例环境的部署中,通过
configuration.yml
文件指定要保护的站点,可以根据需求选择需要几次验证;验证的用户名和密码当前存储在文件中,更为保险和规范的方式是使用数据库,官方推荐的是Postgresql。此外,可以使用Nginx做反向负载,网上也有相关的文章。
由于在刚开始研究的时候只使用了单个镜像,所以没法验证是否生效,并且当时有点困,就被一些配置搞迷糊了,所以最终还是使用了官方的lite样例。实际上在单个镜像部署时,由于不会发生跳转,所以不太好验证,但是不代表不可行。
下班了,886~
5 参考
《官方文档》https://www.authelia.com/integration/deployment/docker/
《官方github》https://github.com/authelia/authelia
《Authelia统一认证服务部署》https://xubiaosunny.top/post/authelia_deploy_gsc0.html
版权归原作者 xxL7- 所有, 如有侵权,请联系我们删除。