
文章目录
1. 定义Spring Bean篇
1.1 定义Spring Bean的几种方式
1.1.1 XML文件定义Spring Bean
基本类型注册
@Data@NoArgsConstructor@AllArgsConstructorpublicclassStudent{privateString name;privateAddress address;privateString[] books;privateList<String> hobbys;privateMap<StringString> card;privateSet<String> games;privateString wife;privateProperties info;}
setter方法注入:property的name属性,填写的不是属性的名称,而是set方法去除set,然后将第一个字符小写后的结果
<beanid="student"class="com.kuang.pojo.Student"><!--1. 普通注入--><propertyname="name"value="狂神说"/><!--2. 数组注入--><propertyname="books"><array><value>红楼梦</value><value>西游记</value><value>水浒传</value></array></property><!--3. List注入--><propertyname="hobbys"><list><value>看书</value><value>听歌</value><value>打球</value></list></property><!--4. Map注入--><propertyname="card"><map><entrykey=“身份证”value=“12315454512312”/><entrykey=“银行卡”value=“15465415123156”/></map></property><!--5. 数组注入--><propertyname="games"><set><value>红楼梦</value><value>西游记</value><value>水浒传</value></set></property><!--6. 空值注入--><propertyname="wife"><null/></property><!--7. Properties注入--><propertyname="info"><props><propkey="driver">20190525</prop><propkey="url">男/prop>
            <propkey="username">root</prop><propkey="password">123456</prop></props></property></bean>
类装配
<!--csBean类有两个属性:title和author--><beanname="cdBean"class="com.my.spring.bean.CDBean"><propertyname="title"value="The World!!"/><propertyname="author"value="Mr.D"/></bean><!--csPlayer类有一个属性:cdBean--><!--对csPlayer的属性csBean进行依赖注入,称为Bean装配,或者依赖关系注入--><beanname="cdPlayer"class="com.my.spring.service.impl.CDPlayerImpl"><propertyname="cdBean"ref="cdBean"/></bean>
有参构造方法注入
<!--有参构造方法1--><beanid="hello"class="com.kuang.pojo.Hello"><constructor-argindex="0"value="方法1"/></bean><!--有参构造方法2--><beanid="hello"class="com.kuang.pojo.Hello"><constructor-argtype="java.lang.String"value="方法2"/></bean><!--有参构造方法3--><beanid="hello"class="com.kuang.pojo.Hello"><constructor-argname="name"value="方法3"/></bean>
扩展注入
<!--p命名空间注入--><!--先在beans框架中加入支持:xmlns:p="http://www/springframework.org/schema/p"--><!--p命名空间注入,可以直接注入属性的值,property--><beanid="user"class="com.kuang.pojo.User"p:name="小李"p:age="10"/><!--c命名空间注入--><!--先在beans框架中加入支持:xmlns:c="http://www/springframework.org/schema/c"--><!--其次使用c注入的Bean必须存在有参构造器--><!--c命名空间注入,通过构造器注入,construct-args--><beanid="user"class="com.kuang.pojo.User"c:name="小李"c:age="10"/>
Bean的作用域
- 单例模式(Spring默认机制):从Spring容器中get的每个对象都是同一个对象。
// <bean id="user" class="com.kuang.pojo.User" scope="singleton"/>ApplicationContext context =newClassPathXmlApplicationContext("userbeans.xml");User user1 = context.getBean("user");User user2 = context.getBean("user");System.out.println(user1==user2);//true
- 原型模式:每次从容器中get的时候,都会产生一个新对象
// <bean id="user" class="com.kuang.pojo.User" scope="prototype"/>ApplicationContext context =newClassPathXmlApplicationContext("userbeans.xml");User user1 = context.getBean("user");User user2 = context.getBean("user");System.out.println(user1==user2);//false
别名
<!--别名,如果添加了别名,我们可以使用别名获取这个对象--><aliasname="user"alias="userNew"><!--
    id:bean的唯一标识符,也就是相当于我们学的对象名
    class:bean对象所对应的全限定名:包名+类型
    name:也是别名,而且那么可以同时取多个别名
--><beanid="user"class="com.kuang.pojo.user"name="user1,user2,user3"><propertyname="name"value="狂神说"/></bean>
Import
如果导入的文件中,bean重名了,那么就会把重名的bean合并成一个,所以不会因为不同的bean.xml存在重名而发生冲突
<importresource="beans1.xml"/><importresource="beans2.xml"/><importresource="beans3.xml"/>
1.1.2 JavaConfig定义Spring Bean
@Data@NoArgsConstructor@AllArgsConstructorpublicclassUser{@Value("测试名字")publicString name;}
@ConfigurationpublicclassJavaConfig{@BeanpublicUsergetUser(){returnnewUser();}}
1.1.3 @Component注解定义SpringBean
通过@Component、@Repository、@Service、@Controller等注解定义bean,在启动类上加上@ComponentScan注解,在项目启动时@ComponentScan扫描指定路径下的包,包内含有@Component、@Repository、@Service、@Controller等注解的类会被注册成Bean,放到BeanDefinitionMap中,并创建实例到单例池。
@Data@NoArgsConstructor@AllArgsConstructor@ComponentpublicclassUser{publicString name;}
这里使用了xml配置了componentScan,到了SpringBoot就完全使用注解@ComponentScan
<?xml version="1.0" encoding="UTF-8"?><beansxmlns="http://www.springframework.org/schema/beans"xmlns:xsi="http://www.w3.org/2001/XMLSchema-instance"xmlns:context="http://www.springframework.org/schema/context"xsi:schemaLocation="http://www.springframework.org/schema/beans
                https://www.springframework.org/schema/beans/spring-beans.xsd
                http://www.springframework.org/schema/context
                https://www.springframework.org/schema/context/spring-context.xsd"><!--指定要扫描的包,这个包下的注解就会生效--><context:component-scanbase-package="com.kuang.pojo"/><!--开启注解的支持    --><context:annotation-config/></beans>
1.2 装配Spring Bean的四种常用方式
1.2.1 手动装配 + XML文件
packagecom.javastudyway.pojo;publicclassCat{publicvoidshout(){System.out.println("我是猫");}}
packagecom.javastudyway.pojo;
publicclass Dog{publicvoidshout(){System.out.println("我是狗");}}
@Data@NoArgsConstructor@AllArgsConstructorpublicclassPerson{/* 人有猫和狗 */privateCat cat;privateDog dog;privateString name;}
<beanid="cat"class="com.javastudyway.pojo.Cat"/><beanid="dog"class="com.javastudyway.pojo.Dog"/><beanid="person"class="com.javastudyway.pojo.Person"><propertyname="name"value="Java学习之道"/><propertyname="cat"ref="cat"/><propertyname="dog"ref="dog"/></bean>
1.2.2 自动装配 + XML文件
<beanid="cat"class="com.javastudyway.pojo.Cat"/><beanid="dog"class="com.javastudyway.pojo.Dog"/><!--byType--><beanid="person"class="com.javastudyway.pojo.Person"autowire="byType"><propertyname="name"value="Java学习之道"/></bean><!--byName--><beanid="person"class="com.javastudyway.pojo.Person"autowire="byName"><propertyname="name"value="Java学习之道"/></bean>
1.2.3 手动装配 + JavaConfig文件
@Configuration//标明配置publicclassPeopleConfig{@BeanpublicCatcatBean(){returnnewCat();}@BeanpublicCDPlayerdogBean(){returnnewDog();}@BeanpublicPeoplepeopleBean(){returnnewPeople(catBean(),dogBean(),"Java学习之道");}}
1.2.4 自动装配 + 注解
<?xml version="1.0" encoding="UTF-8"?><beans xmlns="http://www.springframework.org/schema/beans"
    xmlns:xsi="http://www.w3.org/2001/XMLSchema-instance"
    xmlns:context="http://www.springframework.org/schema/context"
    xsi:schemaLocation="http://www.springframework.org/schema/beans
        https://www.springframework.org/schema/beans/spring-beans.xsd
        http://www.springframework.org/schema/context
        https://www.springframework.org/schema/context/spring-context.xsd"><!-- 开启注解支持 --><context:annotation-config/><bean id="cat"class="com.javastudyway.pojo.Cat"/><bean id="dog"class="com.javastudyway.pojo.Dog"/><bean id="person"class="com.javastudyway.pojo.Person"/></beans>
Field注入
publicclassPepole{@AutowiredprivateCat cat;@AutowiredprivateDog dog;privateString name;
Setter方法注入
@ControllerpublicclassHelloController{privateAlphaService alphaService;privateBetaService betaService;@AutowiredpublicvoidsetAlphaService(AlphaService alphaService){this.alphaService = alphaService;}@AutowiredpublicvoidsetBetaService(BetaService betaService){this.betaService = betaService;}}
Constructor 注入
@ControllerpublicclassHelloController{privatefinalAlphaService alphaService;privatefinalBetaService betaService;@AutowiredpublicHelloController(AlphaService alphaService,BetaService betaService){this.alphaService = alphaService;this.betaService = betaService;}}
2. Spring Bean注册到容器中
以UserService讲解Bean注册到容器中的过程。
@mapperpublicclassUserService{@AutowiredprivateOrderService orderService;publicvoidtest(){System.out.println(orderService);}}
2.1 实例化,生成普通对象
2.1.1 通过反射机制获取构造器,通过构造器创建普通对象
创建Bean过程中,推断所使用的构造器方法
- 如果没有重写构造方法,那么创建Bean对象就会用无参构造方法;
- 如果重写了一个有参构造方法,那么创建Bean对象就会用该有参构造方法;
- 如果重写了两个有参构造方法,那么创建Bean对象不知道用哪个有参构造方法,就会去寻找无参构造方法,如果没有无参构造方法就报错。如果存在无参构造方法就执行无参构造方法。
- 可以通过@Autowired,指定使用该构造方法,即使存在无参构造器,也要使用这个有参构造器
谁向有参构造器public UserService(OrderService orderService)中传入参数?
- 当我们创建Bean对象userService时,需要用到有参构造方法,Spring就会在单例池中找到OrderService对象,并注入到构造方法的参数orderService
如何在单例池中找到自己想要的实例呢?
- 如果通过类型
OrderService找出beanName唯一,那就直接将Bean对象注入orderService。- 如果通过参数的类OrderService找出beanName不唯一,那就通过参数名orderService找出唯一的beanName,然后将Bean对象注入orderService参数
- 如果这样都找不到,那就报错!
2.1.2 属性注入
2.1.3 初始化
这里通过执行invoke()方法,将普通对象初始化
2.1.4 初始化后,生成代理对象
这里就是我们常说的AOP,如果这里进行了AOP切面编程,那么就会生成代理对象
- 创建普通对象UserService
@ComponentpublicclassUserService{@AutowiredprivateOrderService orderService;publicvoidtest(){System.out.println(orderService);}}
- 创建代理对象UserServiceProxy,对test()方法进行切面编程
@Aspect@ComponentpublicclassUserServiceProxy{@Before("execution(public void com.zhouyu.service.UserService.test())")publicvoidzhouyuBefore(JoinPoint joinPoint){System.out.println("zhouyuBefore");}}
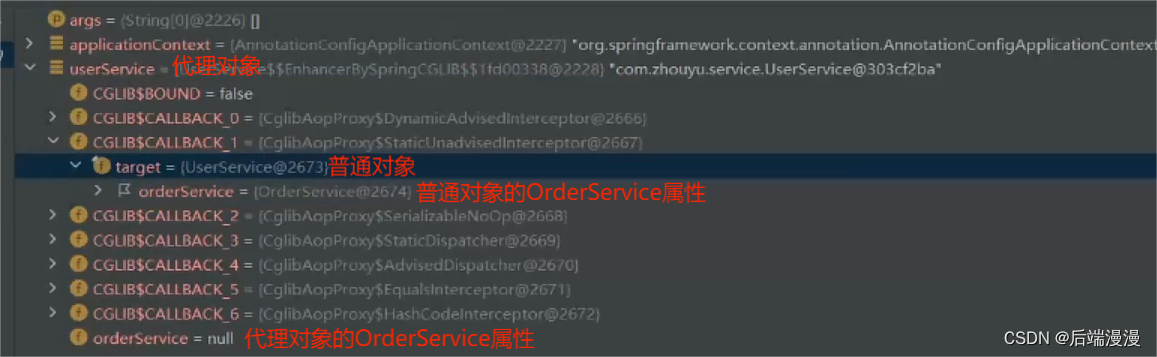
现在来思考一个问题,在普通对象userService的属性orderService,有@Autowired进行依赖注入,那么orderService是有值的。但是在初始化后,进行了AOP生成了代理对象userServiceProxy,userServiceProxy的属性orderService并没有注入依赖,是null,这就来问题了。
- 其实第3点的伪代码应该改成如下,这样就解决了null值得问题了,下面说说为什么。
- 试想一下,生成普通对象userService,并为普通对象userService的属性orderService依赖注入,那么为什么生成代理对象userServiceProxy,不为代理对象userServiceProxy的属性orderService进行依赖注入呢?Spring认为是没必要的,就像下面的伪代码一样,除了执行AOP切面编程的代码之外,还是用回普通对象userService属性和方法
- 所以一句话说完:UserServiceProxy代理对象做Bean对象,除了切面编程@Before会执行代理对象,其他的方法和属性可以认为是在执行普通对象
@Aspect@ComponentpublicclassUserServiceProxy{@AutowiredprivateUserService target;@Before("execution(public void com.zhouyu.service.UserService.test())")publicvoidzhouyuBefore(JoinPoint joinPoint){System.out.println("zhouyuBefore");}}
2.1.5 注册销毁
实现了销毁接口DisposableBean,在registerDisposableBean方法注册指定的Bean在销毁时可以直接执行destroy方法销毁Bean
2.1.6 将普通对象或者代理对象加入单例池中
3. Spring注解开发
3.1 使用注解开发前,需要做的配置
3.1.1 使用注解开发,必须要保证导入aop包

3.1.2 使用注解需要导入context约束、增加注解的支持!
<?xml version="1.0" encoding="UTF-8"?><beansxmlns="http://www.springframework.org/schema/beans"xmlns:xsi="http://www.w3.org/2001/XMLSchema-instance"xmlns:context="http://www.springframework.org/schema/context"xsi:schemaLocation="http://www.springframework.org/schema/beans
                https://www.springframework.org/schema/beans/spring-beans.xsd
                http://www.springframework.org/schema/context
                https://www.springframework.org/schema/context/spring-context.xsd"><!--开启注解的支持    --><context:annotation-config/></beans>
3.2 了解常用的@注解
3.2.1 @ Component、@Mapper、@Service、@Controller
3.2.2 @Bean
用于JavaConfig配置类,充当xml的
<bean>
标签
3.2.3 @ComponentScan
- 通过属性basePackages或basePackageClasses,来指定要进行扫描的package
- 如果未指定package,则默认扫描当前@ComponentScan所修饰的类所在的package
3.2.4 @Import
提供了一种显式地从其他地方加载配置类的方式,这里的其他地方一般是指第三方jar
//1. 创建普通Java类publicclassConfigA{@BeanpublicAa(){publicnewA();}}publicclassA{}//2. 创建一个配置类,直接将刚才创建的ConfigA导入@Configuration@Import(ConfigA.class)publicclassConfigB{}//3. 测试并运行publicstaticvoidmain(String[] args){ApplicationContext ctx =newAnnotationCconfigApplicationContext(ConfigB.class);//现在Bean ConfigA和A都在IOC容器中,是可用的ConfigA ca = ctx.getBean(ConfigA.class);A a = ctx.getBean(A.class);System.out.println(ca.getClass.getSimpleName());System.out,println(a.getClass.getSimpleName());}
结果:ConfigA、A
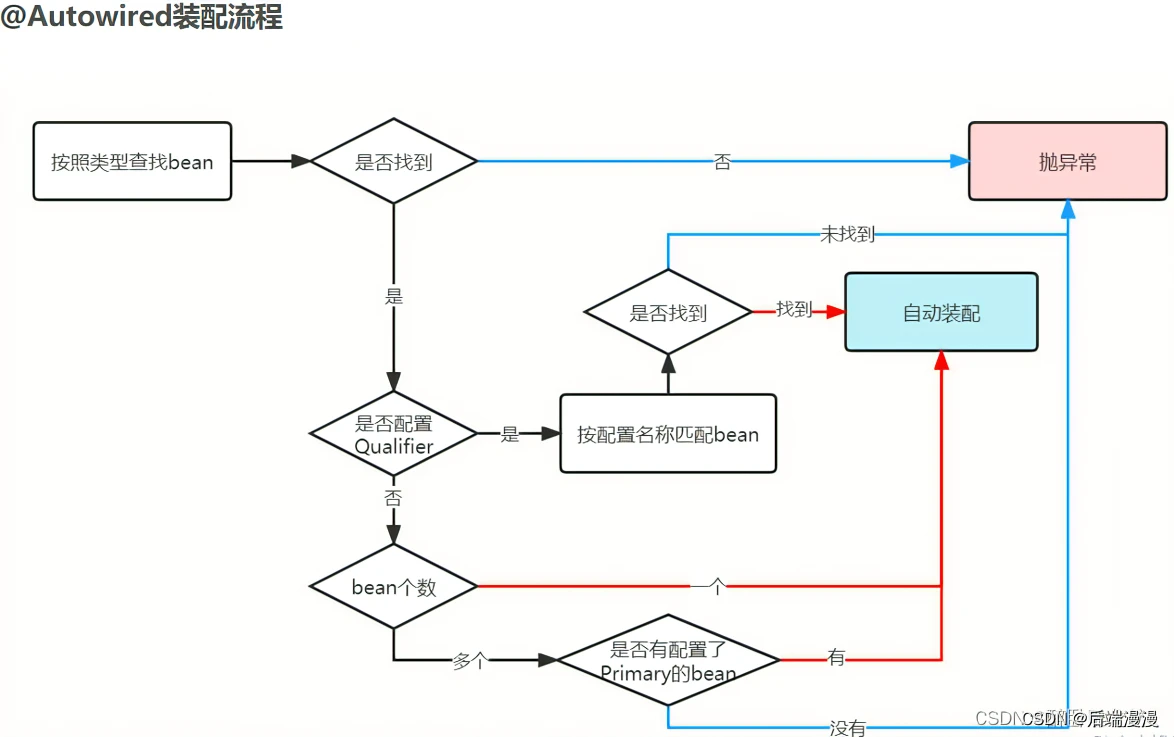
3.2.5 @Autowired和@Qualifier
publicclassPepole{privateString name;//1. 通过名字装配@Autowired@Qualifier("books1")privateBooks books;//2. 通过类型装配@AutowiredprivateHobbies hobbies;}
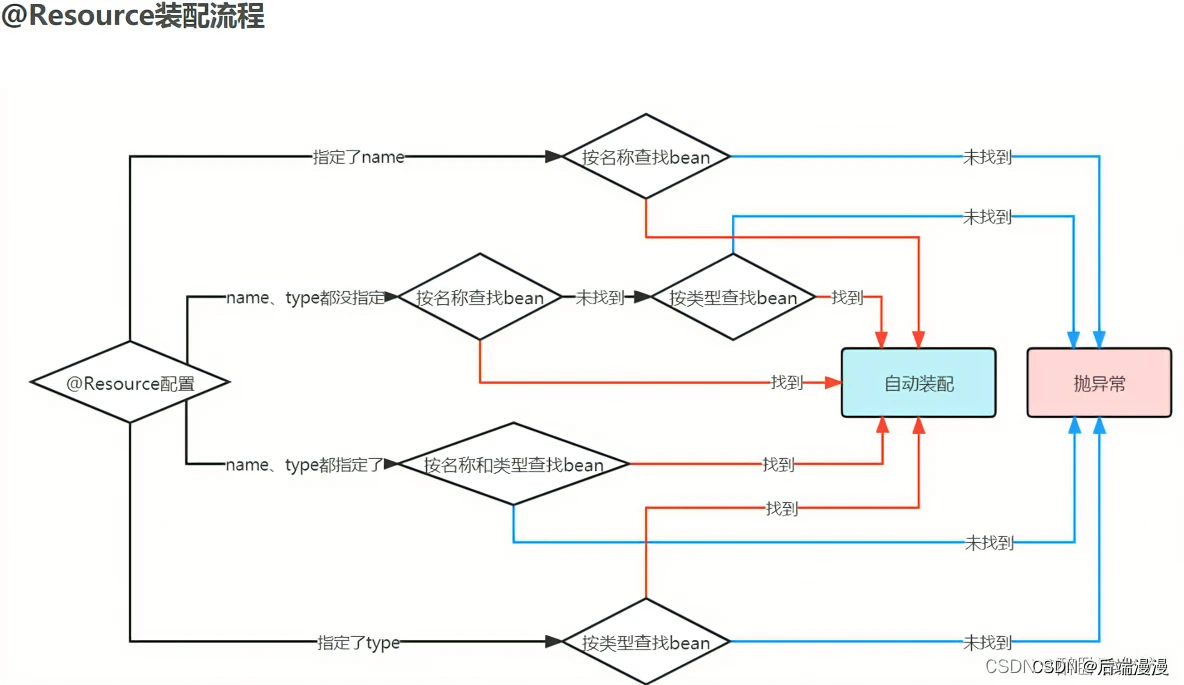
3.2.6 @Resource
// @Resource指定按type自动装配@Resource(type =Books.class)privateBooks books;// @Resource指定按name自动装配@Resource(name = books)privateBooks books;
3.2.7 @Value
- 基于配置文件application.yml
<!--application.yml-->
server:
    port: 9090
    tools: car,train,airplane
@Value("${server.port}")privateString port;@Value("${server.tools}")privateString[] tools
- 基于非配置文件
// 直接将字符串赋值给 str 属性@Value("hello world")privateString str;// 注入系统变量@Value("#{systemProperties['os.name']}")privateString osName;// 结果:Windows 10// 使用在setter方法上@Value("Windows")publicvoidsetName(String name){this.name = name;}
4. Spring事务
4.1 本质与原理讲解:
Spring事务是基于AOP实现的,AOP是基于继承原理的。
1. Spring事务是基于AOP实现的
- 现在对UserService的test方法开启MySQL事务
publicclassUserService{@AutowiredOrderService ordserService;@Transactional//回滚——Spring事务publicvoidtest(){
        jdbcTemplate.execute("insert into t1 values(1,1,1,1,'1')");thrownewNullPointerException();}}
- @Transaction修饰test()方法对应的伪代码
publicclassUserServiceProxyextendsUserService{UserService target;//不难看出来1.2.3.4.6都是对test做一个切面,由UserServiceProxy代理对象执行;//test方法由普通对象执行publicvoidtest(){1. 事务逻辑
        2. 开启事务
        3. 事务管理器去创建数据库连接conn并放入了ThreadLocal4. conn.autocommit =false5. target.test();//UserService普通对象.test() jdbcTemplate conn sql语句6. SQL没问题就conn.commit(),否则就conn.rollback();}}
- autocommit = true对应的功能
- 如果数据库由jdbcTemplate连接,autocommit默认为true,则执行完SQL语句之后就会自动提交
- 如果数据库由Spring连接,那么Spring就会把autocommit改成false,则执行完SQL语句之后还不会自动提交
- 所以数据库创建必须由Spring来进行,但是如果由Spring创建数据库,那么Spring一启动就要连接数据库,万一我们不用数据库呢?不用就不用呗,哈哈哈哈!
2. AOP是基于继承原理的
publicclassUserService{@Transactionprivatevoidtest(){System.out.println("测试数据库回滚事务");}}

执行结果:报错
分析
- 事务的实质是AOP,AOP的实质是继承,所以事务的实质是继承
- 父类private修饰的方法,子类无法访问重写
- 所以父类private修饰的方法,无法进行AOP,也无法进行事务
- 那么@Transaction就会报错
4.2 事务失效场景
什么是事务失效呢?其实就是事务不会正常工作,可以发生如下情况
- 事务没有启动
- 事务启动了,但是无法回滚,或者回滚了很多
- …
4.2.1 访问权限问题private
把某些方法或者变量定义为private,对其开启事务时,会导致事务失效。因为事务基于继承,private修饰的父类方法和变量,子类无法继承。
4.2.2 final修饰
如果某个方法用 final 修饰了,那么在它的代理类中,就无法重写该方法,所以无法添加事务功能
4.2.3 未被Spring管理
如果有一天,你匆匆忙忙地开发了一个 Service 类,但忘了加 @Service 注解,比如:
//@ServicepublicclassUserService{@Transactionalpublicvoidadd(UserModel userModel){saveData(userModel);updateData(userModel);}}
从上面的例子,我们可以看到 UserService 类没有加@Service注解,那么该类不会交给 spring 管理,所以它的 add 方法也不会生成事务。
4.2.4 表不支持事务
众所周知,在 mysql5 之前,默认的数据库引擎是myisam。myisam 好用,但有个很致命的问题是:不支持事务。如果只是单表操作还好,不会出现太大的问题。但如果需要跨多张表操作,由于其不支持事务,数据极有可能会出现不完整的情况。此外,myisam 还不支持行锁和外键。所以在实际业务场景中,myisam 使用的并不多。在 mysql5 以后,myisam 已经逐渐退出了历史的舞台,取而代之的是 innodb。
4.2.5 未开启事务
如果你使用的是 springboot 项目,那么你很幸运。因为 springboot 通过DataSourceTransactionManagerAutoConfiguration类,已经默默地帮你开启了事务。
你所要做的事情很简单,只需要配置spring.datasource相关参数即可。
但如果你使用的还是传统的 spring 项目,则需要在 applicationContext.xml 文件中,手动配置事务相关参数。如果忘了配置,事务肯定是不会生效的。
具体配置信息如下:
<!-- 配置事务管理器 --><beanclass="org.springframework.jdbc.datasource.DataSourceTransactionManager"id="transactionManager"><propertyname="dataSource"ref="dataSource"></property></bean><tx:adviceid="advice"transaction-manager="transactionManager"><tx:attributes><tx:methodname="*"propagation="REQUIRED"/></tx:attributes></tx:advice><!-- 用切点把事务切进去 --><aop:config><aop:pointcutexpression="execution(* com.susan.*.*(..))"id="pointcut"/><aop:advisoradvice-ref="advice"pointcut-ref="pointcut"/></aop:config>
4.2.6 方法内部调用
来看两个示例
@ServicepublicclassOrderServiceImplimplementsOrderService{publicvoidupdate(Order order){updateOrder(order);}@TransactionalpublicvoidupdateOrder(Order order){// update order}}
@ServicepublicclassOrderServiceImplimplementsOrderService{@Transactionalpublicvoidupdate(Order order){updateOrder(order);}@Transactional(propagation =Propagation.REQUIRES_NEW)publicvoidupdateOrder(Order order){// update order}}
上面两个例子的updateOrder(Order order) 都不会生成事务:因为它们发生了自身调用,就调该类自己的方法,而没有经过 Spring 的代理类,默认只有在外部调用事务才会生效,这也是老生常谈的经典问题了。
解决办法
@ServicepublicclassServiceA{@AutowiredprivateServiceB serviceB;@Transactionalpublicvoidupdate(Order order){updateOrder(order);}}@ServicepublicclassServiceB{@Transactional(propagation =Propagation.REQUIRES_NEW)publicvoidupdateOrder(Order order){// update order}}
4.2.7 错误的传播特性
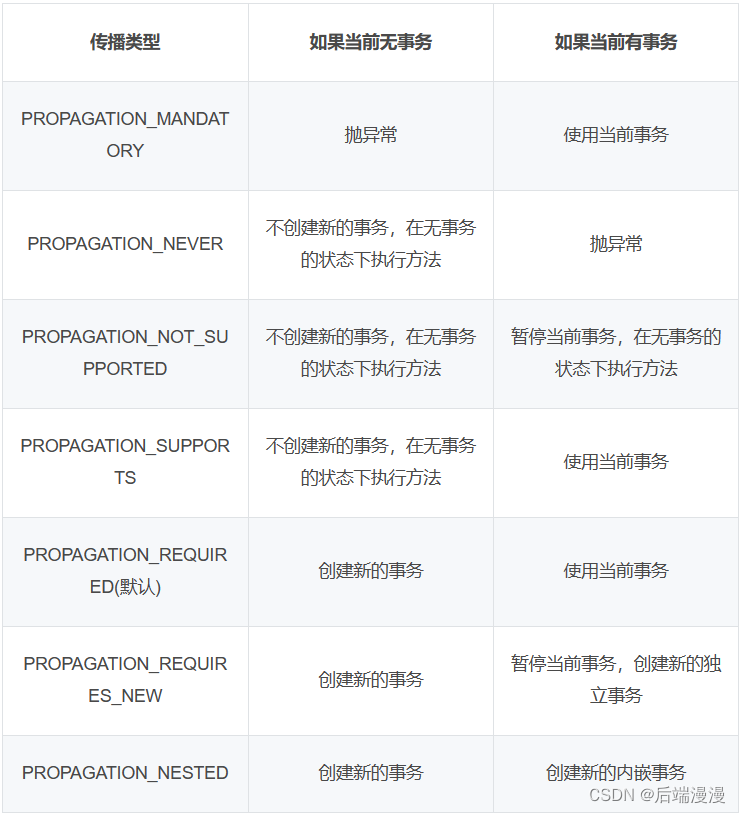
我们在使用@Transactional注解时,是可以指定propagation参数的:该参数的作用是指定事务的传播特性,spring 目前支持 7 种传播特性:
- REQUIRED 如果当前上下文中存在事务,则加入该事务,如果不存在事务,则创建一个事务,这是
默认的传播属性值。- SUPPORTS 如果当前上下文中存在事务,则支持事务加入事务,如果不存在事务,则使用非事务的方式执行。
- MANDATORY 当前上下文中必须存在事务,否则抛出异常。
- REQUIRES_NEW 每次都会新建一个事务,并且同时将上下文中的事务挂起,执行当前新建事务完成以后,上下文事务恢复再执行。
- NOT_SUPPORTED 如果当前上下文中存在事务,则挂起当前事务,然后新的方法在没有事务的环境中执行。
- NEVER 如果当前上下文中存在事务,则抛出异常,否则在无事务环境上执行代码。
- NESTED 如果当前上下文中存在事务,则嵌套事务执行,如果不存在事务,则新建事务。
目前只有这三种传播特性才会创建新事务:REQUIRED,REQUIRES_NEW,NESTED。
如果我们在手动设置 propagation 参数的时候,把传播特性设置错了,比如:
@ServicepublicclassUserService{@Transactional(propagation =Propagation.NEVER)publicvoidadd(UserModel userModel){saveData(userModel);updateData(userModel);}}
我们可以看到 add 方法的事务传播特性定义成了 Propagation.NEVER,这种类型的传播特性不支持事务,如果有事务则会抛异常。
4.2.8 自己吞了异常
@Slf4j@ServicepublicclassUserService{@Transactionalpublicvoidadd(UserModel userModel){try{saveData(userModel);updateData(userModel);}catch(Exception e){
            log.error(e.getMessage(), e);}}}
这种情况下 spring 事务当然不会回滚,因为开发者自己捕获catch了异常,又没有手动抛出throw,换句话说就是把异常吞掉了。
如果想要 spring 事务能够正常回滚,必须抛出它能够处理的异常。如果没有抛异常,则 spring 认为程序是正常的。
4.2.9 手动抛了别的异常
因为 spring 事务,默认情况下只会回滚RuntimeException(运行时异常)和Error(错误),对于普通的 Exception(非运行时异常),它不会回滚。
@Slf4j@ServicepublicclassUserService{@Transactionalpublicvoidadd(UserModel userModel)throwsException{try{saveData(userModel);updateData(userModel);}catch(Exception e){
            log.error(e.getMessage(), e);thrownewException(e);}}}
4.2.10 事务嵌套回滚多了
publicclassUserService{@AutowiredprivateUserMapper userMapper;@AutowiredprivateRoleService roleService;@Transactionalpublicvoidadd(UserModel userModel)throwsException{
        userMapper.insertUser(userModel);
        roleService.doOtherThing();}}@ServicepublicclassRoleService{@Transactional(propagation =Propagation.NESTED)publicvoiddoOtherThing(){System.out.println("保存role表数据");}}
这种情况使用了嵌套的内部事务,原本是希望调用 roleService.doOtherThing 方法时,如果出现了异常,只回滚 doOtherThing 方法里的内容,不回滚 userMapper.insertUser 里的内容,即回滚保存点。但事实是,insertUser 也回滚了。
why?
因为 doOtherThing 方法出现了异常,没有手动捕获,会继续往上抛,到外层 add 方法的代理方法中捕获了异常。所以,这种情况是直接回滚了整个事务,不只回滚单个保存点。
怎么样才能只回滚保存点呢?可以将内部嵌套事务放在 try/catch 中,并且不继续往上抛异常。这样就能保证,如果内部嵌套事务中出现异常,只回滚内部事务,而不影响外部事务。
@Slf4j@ServicepublicclassUserService{@AutowiredprivateUserMapper userMapper;@AutowiredprivateRoleService roleService;@Transactionalpublicvoidadd(UserModel userModel)throwsException{

        userMapper.insertUser(userModel);try{
            roleService.doOtherThing();}catch(Exception e){
            log.error(e.getMessage(), e);}}}
4.2.11 大事务
在使用 spring 事务时,有个让人非常头疼的问题,就是大事务问题。
通常情况下,我们会在方法上加@Transactional注解,添加事务功能,比如:
@ServicepublicclassUserService{@AutowiredprivateRoleService roleService;@Transactionalpublicvoidadd(UserModel userModel)throwsException{query1();query2();query3();
       roleService.save(userModel);update(userModel);}}
但@Transactional注解,如果被加到方法上,有个缺点就是整个方法都包含在事务当中了。
上面的这个例子中,在 UserService 类中,其实只有这两行才需要事务:
roleService.save(userModel);update(userModel);
现在的这种写法,会导致所有的 query 方法也被包含在同一个事务当中。
如果 query 方法非常多,调用层级很深,而且有部分查询方法比较耗时的话,会造成整个事务非常耗时,而从造成大事务问题。
4.3 编程式事务
上面聊的这些内容都是基于@Transactional注解的,主要说的是它的事务问题,我们把这种事务叫做:声明式事务。
其实,spring 还提供了另外一种创建事务的方式,即通过手动编写代码实现的事务,我们把这种事务叫做:编程式事务。例如:
@AutowiredprivateTransactionTemplate transactionTemplate;...publicvoidsave(finalUser user){queryData1();queryData2();
         transactionTemplate.execute((status)=>{addData1();updateData2();returnBoolean.TRUE;})}
在 spring 中为了支持编程式事务,专门提供了一个类:TransactionTemplate,在它的 execute 方法中,就实现了事务的功能。
相较于@Transactional注解声明式事务,我更建议大家使用基于TransactionTemplate的编程式事务。主要原因如下:
- 避免由于 spring aop 问题导致事务失效的问题。
- 能够更小粒度地控制事务的范围,更直观。
建议在项目中少使用 @Transactional 注解开启事务。但并不是说一定不能用它,如果项目中有些业务逻辑比较简单,而且不经常变动,使用 @Transactional 注解开启事务也无妨,因为它更简单,开发效率更高,但是千万要小心事务失效的问题。
4.4 Spring对事务隔离级别提供了支持
版权归原作者 后端漫漫 所有, 如有侵权,请联系我们删除。