Python Flask开发笔记
参考文档:https://dormousehole.readthedocs.io/en/latest/
https://flask.net.cn/
一、创建flask项目
1.开发环境:
操作系统:windows10
python版本:python-3.7.9
flask版本:flask-2.2.2
2.安装Flask
# 查看python版本 ==》 版本3.7.9
C:\Users\Administrators>python -v
    Python 3.7.9 (tags/v3.7.9:13c94747c7, Aug 17 2020, 18:58:18)[MSC v.1900 64 bit (AMD64)] on win32
    Type"help","copyright","credits" or "license"for more information.
    import 'atexit'# <class '_frozen_importlib.BuiltinImporter'>
    >>> exit()# 安装flask
C:\Users\Administrators>python -m pip install flask==2.2.2
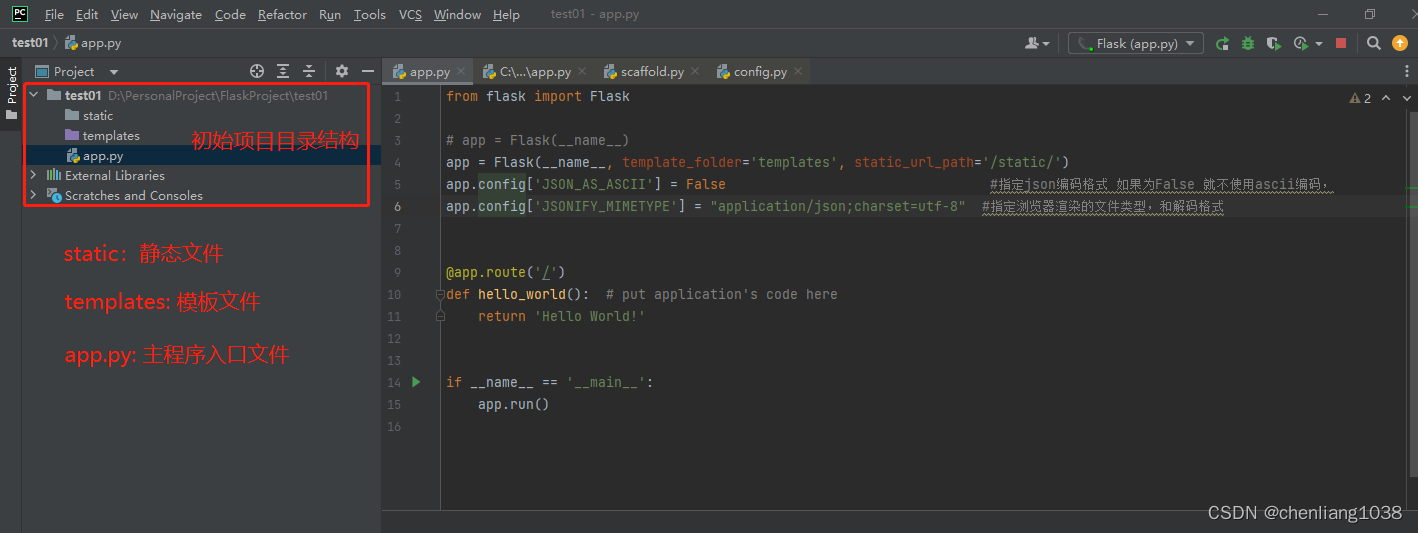
3.使用pycharm,创建flask项目


4. 项目布局
/home/user/Projects/flask-tutorial
├── flaskr/ --------------------------------- 项目根目录
│ ├── init.py
│ ├── db.py --------------------------------- 数据模型文件
│ ├── schema.sql
│ ├── auth.py --------------------------------- 用户认证文件(登录,注册等)
│ ├── blog.py --------------------------------- app程序入口文件
│ ├── templates/ --------------------------------- 模板文件目录
│ │ ├── base.html
│ │ ├── auth/
│ │ │ ├── login.html
│ │ │ └── register.html
│ │ └── blog/
│ │ ├── create.html
│ │ ├── index.html
│ │ └── update.html
│ └── static/ --------------------------------- 静态文件目录
│ └── style.css
├── tests/ --------------------------------- 测试文件目录
│ ├── conftest.py
│ ├── data.sql
│ ├── test_factory.py
│ ├── test_db.py
│ ├── test_auth.py
│ └── test_blog.py
├── venv/ --------------------------------- 虚拟环境目录
├── setup.py --------------------------------- 安装文件
└── MANIFEST.ini ---------------------------------扩展库信息文件
二、flask介绍
1.介绍初始flask主程序接口文件
from flask import Flask  # 引用flask架构

app = Flask(__name__)# 创建Flask对象@app.route('/')# 路由分发defhello_world():# 接口函数return'Hello World!'# 返回的页面;返回的数据if __name__ =='__main__':
    app.run()# 运行flask
2.Flask() 类
1.Flask参数解释
# 必选参数
import_name: str,# 应用程序包的名称,通过它来拼接静态文件或者模板文件路径# 可选参数
static_url_path: t.Optional[str] = None,
static_folder: t.Optional[t.Union[str, os.PathLike]] = "static",
static_host: t.Optional[str] = None,
host_matching: bool = False,
subdomain_matching: bool = False,
template_folder: t.Optional[str] = "templates",
instance_path: t.Optional[str] = None,
instance_relative_config: bool = False,
root_path: t.Optional[str] = None,
0.sys.modules用于缓存程序导入模块名
程序在导入某个模块时,会首先查找sys.modules中是否包含此模块名,若存在,则只需将模块的名字加入到当前模块的Local名字空间中;若不存在,则需要从sys.path目录中按照模块名称查找模块文件,
1.import_name 主程序模块名
app = Flask(import_name=__name__)print('is __name__ %s'% __name__)print(app.import_name,'ssss')
输出:
is __name__ app
app ssss
# 通过sys.modules.get(import_name) 获取模块的路径
2.static_url_path 浏览器url访问路径
如果
static_url_path=/test/url/
浏览器访问:
https://127.0.0.1:8080/test/url/js/index.js
static_url_path=None
浏览器访问:
https://127.0.0.1:8080/js/index.js
3.static_folder 静态文件存储目录
如js,css,图片等文件存储目录,浏览器访问时,如果static_url_path 存在,加上该url+文件名,浏览器访问:
https://127.0.0.1:8080/static_url_path路径/js/index.js
;
如果static_url_path 不存在 浏览器访问:
https://127.0.0.1:8080/js/index.js
4.static_host 静态文件主机地址
指定主机与host_matching=True一起使用才有效
5.host_matching
当host_matching=True时,须指定static_host=主机地址:端口号,默认localhost:5000
6.template_folder 模板存储目录
一般存储
.html
等页面文件
7.instance_path 指定配置文件存储目录
instance_path和instance_relative_config是配合来用的、
这两个参数是用来找配置文件的,当用
app.config.from_pyfile('settings.py')
这种方式导入配置文件的时候会用到
实例文件夹与默认的跟文件夹分离,降低耦合度。方便后期修改实例的时候不影响到跟文件夹
from flask import Flask

app = Flask(__name__)print(app.instance_path,'instance_path')print(app.root_path,'root_path')
输出:
D:\PersonalProject\FlaskProject\test01\instance instance_path
D:\PersonalProject\FlaskProject\test01 root_path
# 根目录与实例目录只多了\instance# 实例:指定配置文件路径from flask import Flask
import os
settings_dir = os.path.dirname(os.path.abspath(__file__))#获取当前文件所在目录

app = Flask(__name__, instance_path=settings_dir+'/conf/', instance_relative_config=True)# instance_path指定配置文件目录(必须是绝对路径),instance_relative_config启用相对路径配置文件目录,instance_path和instance_relative_config一般一起使用print(app.auto_find_instance_path())print(app.instance_path)

app.config.from_pyfile('settings.py')print(app.config)
输出:
D:\PersonalProject\FlaskProject\test01\instance
D:\PersonalProject\FlaskProject\test01/conf/<Config {'ENV':'production','DEBUG':True,'TESTING':False,...}>

8.instance_relative_config
- instance_relative_config=True告诉应用配置文件是相对于 instance folder 的相对路径。实例文件 夹在 flaskr 包的外面,用于存放本地数据(例如配置密钥和数据 库),不应当提交到版本控制系统
- 与instance_path 一起使用,当为True时,会在instance_path指定的目录中查找配置文件,默认是在根目录下查找
9.root_path 项目的根目录
Flask类
root_path: t.Optional[str] = None
Flask继承自Scaffold类,Scaffold类构造函数中root_path, 是调用
get_root_path(self.import_name)
;如下代码:
if root_path isNone:
       root_path = get_root_path(self.import_name)
get_root_path(import_name: str)
defget_root_path(import_name:str)->str:
    mod = sys.modules.get(import_name)#模块路径对象; sys.modules是获取系统modules的路径如:{'app': <module 'app' from 'D:\\PersonalProject\\FlaskProject\\test01\\app.py'>}if mod isnotNoneandhasattr(mod,"__file__")and mod.__file__ isnotNone:return os.path.dirname(os.path.abspath(mod.__file__))
    loader = pkgutil.get_loader(import_name)if loader isNoneor import_name =="__main__":return os.getcwd()# 用于返回当前工作目录D:\PersonalProject\FlaskProject\test01ifhasattr(loader,"get_filename"):
        filepath = loader.get_filename(import_name)# type: ignoreelse:__import__(import_name)
        mod = sys.modules[import_name]
        filepath =getattr(mod,"__file__",None)if filepath isNone:raise RuntimeError("No root path can be found for the provided module"f" {import_name!r}. This can happen because the module"" came from an import hook that does not provide file"" name information or because it's a namespace package."" In this case the root path needs to be explicitly"" provided.")return os.path.dirname(os.path.abspath(filepath))
3.Config类及配置参数含义
这是flask基础配置Config类
"ENV":None,"DEBUG":None,# 是否开启debug模式,如果代码有修改随时自动重启"TESTING":False,# 是否开启测试模式"PROPAGATE_EXCEPTIONS":None,# 异常传播(是否在控制台打印日志log),当debug或testing开启,自动为true"SECRET_KEY":None,# 在启用session时,一定会使用它"PERMANENT_SESSION_LIFETIME": timedelta(days=31),# session的生命周期,默认为31天"USE_X_SENDFILE":False,#是否弃用x_sendfile"SERVER_NAME":None,# 服务器访问域名"APPLICATION_ROOT":"/",# 项目完整路径"SESSION_COOKIE_NAME":"session",# 在cookie中存放session时的key"SESSION_COOKIE_DOMAIN":None,"SESSION_COOKIE_PATH":None,"SESSION_COOKIE_HTTPONLY":True,"SESSION_COOKIE_SECURE":False,"SESSION_COOKIE_SAMESITE":None,"SESSION_REFRESH_EACH_REQUEST":True,"MAX_CONTENT_LENGTH":None,# 如果设置为字节数,flask会拒绝内容长度大于此值的请求进入,并返回“413”状态码"SEND_FILE_MAX_AGE_DEFAULT":None,"TRAP_BAD_REQUEST_ERRORS":None,"TRAP_HTTP_EXCEPTIONS":False,"EXPLAIN_TEMPLATE_LOADING":False,"PREFERRED_URL_SCHEME":"http","JSON_AS_ASCII":None,"JSON_SORT_KEYS":None,"JSONIFY_PRETTYPRINT_REGULAR":None,"JSONIFY_MIMETYPE":None,"TEMPLATES_AUTO_RELOAD":None,"MAX_COOKIE_SIZE":4093,
4.url_for()
test_request_context() 告诉 Flask 正在处理一个请求,而实际上也许我们正处在交互 Python shell 之中, 并没有真正的请求
@app.route('/')defindex():return'index'@app.route('/login/')@app.route('/login/<name>')deflogin(name):returnf'{name} login '@app.route('/user/<username>')defprofile(username):returnf'{username}\'s profile'with app.test_request_context():print(url_for('index'))print(url_for('login', name='userl',next='/'))print(url_for('login',next='/'))print(url_for('profile', username='John Doe',next='/user/jacky', t='ddddd'))# 如上 url_for()第一个参数:路由处理函数名,如果关键字参数在路由中存在静态数据,如果不存在就是动态数据# /user/John Doe?next=/user/jacky&t=ddddd  # %20表示空格,%2F表示/
结果:
//login/userl?next=%2F
/login/?next=%2F
/user/John%20Doe?next=%2Fuser%2Fjacky&t=ddddd
三、数据模型
1. 数据模型
import os
from flask import make_response
from flask import Flask
from flask_sqlalchemy import SQLAlchemy
from flask_migrate import Migrate

# 配置文件目录
BASE_DIR = os.path.dirname(os.path.abspath(__file__))
INSTANCE_PATH = os.path.join(BASE_DIR,'conf')
app = Flask(__name__, instance_path=INSTANCE_PATH, instance_relative_config=True)
app.config.from_pyfile('live.py')
db = SQLAlchemy(app)# 创建SQL关联对象
migrate = Migrate(app, db)# 创建迁移对象classUser(db.Model):# 数据模型
    __tablename__ ='user'id= db.Column(db.Integer, primary_key=True)
    email = db.Column(db.String(64), unique=True, index=True)
    password = db.Column(db.String(128))@app.route('/')defhello_world():# put application's code hereprint("服务器接收了这次请求")# 对数据的操作
    user = User(email='2232323', password='qaz123', job='student')
    db1.session.add(user)
    db1.session.commit()

    response = make_response("hello world")
    response.headers["Access-Control-Allow-Origin"]="http://127.0.0.1:8000"# 服务器告诉浏览器,允许5000端口进行数据传输。return response
if __name__ =='__main__':
    app.run()
2. 执行迁移命令
(py39_env)PS D:\PersonalProject\FlaskProject\test01>flask db init # 数据库初始化
    Creating directory D:\PersonalProject\FlaskProject\test01\migrations ...  done
    Creating directory D:\PersonalProject\FlaskProject\test01\migrations\versions ...  done
    Generating D:\PersonalProject\FlaskProject\test01\migrations\alembic.ini ...  done
    Generating D:\PersonalProject\FlaskProject\test01\migrations\env.py ...  done
    Generating D:\PersonalProject\FlaskProject\test01\migrations\README ...  done
    Please edit configuration/connection/logging settings in 'D:\\PersonalProject\\FlaskProject\\test01\\migrations\\alembic.ini' before proceeding.(py39_env)PS D:\PersonalProject\FlaskProject\test01>flask db migrate # 数据库迁移
    INFO  [alembic.runtime.migration] Context impl PostgresqlImpl.
    INFO  [alembic.runtime.migration] Will assume transactional DDL.
    INFO  [alembic.autogenerate.compare] Detected added table 'user'
    INFO  [alembic.autogenerate.compare] Detected added index 'ix_user_email' on '['email']'
    Generating D:\PersonalProject\FlaskProject\test01\migrations\versions\544120ec4ede_.py ...  done
# 假设模型类新加减字段,执行次命令进行数据更新(py39_env)PS D:\PersonalProject\FlaskProject\test01>flask db upgrade # 数据库更新
    INFO  [alembic.runtime.migration] Context impl PostgresqlImpl.
    INFO  [alembic.runtime.migration] Will assume transactional DDL.
    INFO  [alembic.runtime.migration] Running upgrade  -> 544120ec4ede, empty message
3. 数据库的增删改查
# 增加一条记录
user = User(email='2232323', password='qaz123', job='student')
db1.session.add(user)
db1.session.commit()# 查找数据
users = User.query.all()print(users)

user = User.query.filter(User.id==1).first()print(user)

user = User.query.get(5)# 如果查找该id记录不存在返回Noneprint(user)
4. 查询条件语句
与(and_)
userdd = User.query.filter(User.name.startswith("2"),User.email.startswith("2")).all()print(userdd)

userdd = User.query.filter(and_(User.name.startswith("2"),User.email.startswith("2"))).all()print(userdd)
非(!= / not_)
notpwd = User.query.filter(User.pwd!="qaz123").all()# 最常用print(notpwd)

notpwd = User.query.filter(not_(User.pwd=="qaz123")).all()print(notpwd)
或(or_)
user = User.query.filter(or_(User.password =="qaz123",User.email.startswith("2"))).all()print(user)
四、模版
@app.route('/')defhello_world():
    response = render_template("index.html")# 返回一个html页面return response

@app.route('/')defhello_world():
    user = User.query.get(1)
    response = render_template("index.html", user=user)# 向前端传递数据return response
@app.route('/')defhello_world():
    user = User.query.get(1)
    context ={"user": user
    }
    response = render_template("index.html",**context)# 向前端传递数据return response
版权归原作者 Jacky-008 所有, 如有侵权,请联系我们删除。