
Mockito
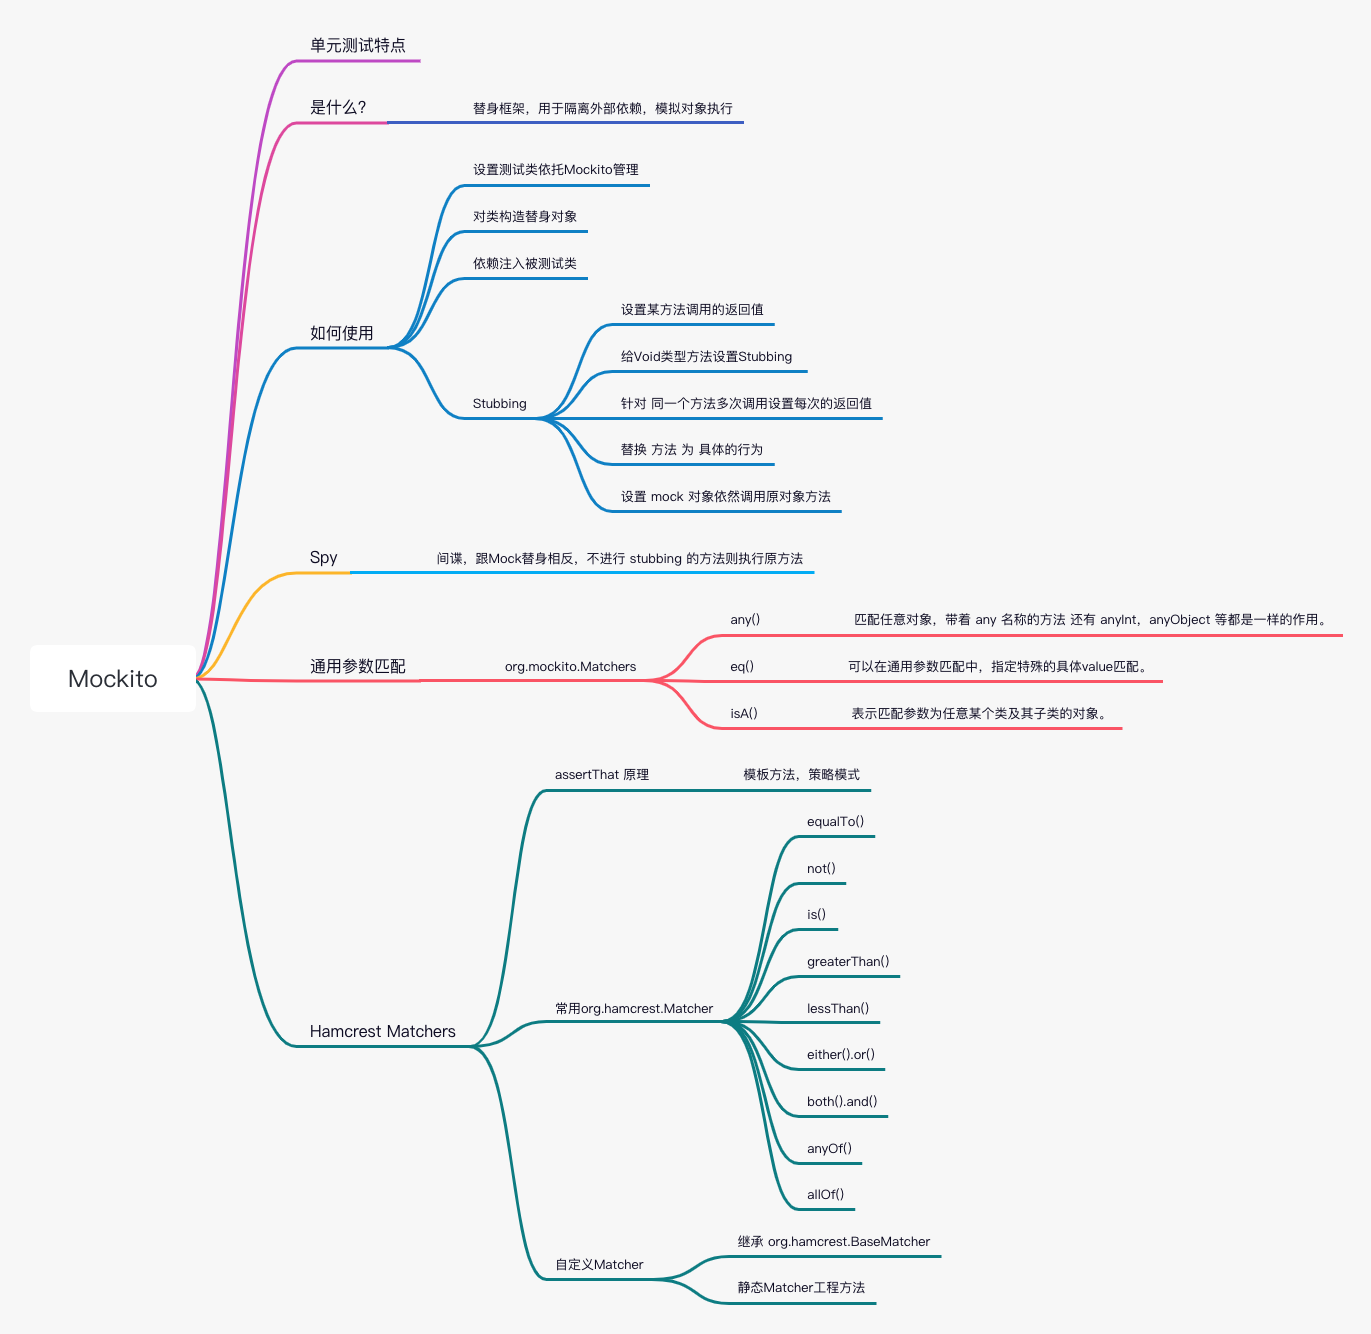
一张思维导图鸟瞰全文
单元测试
一个单元测试应该有如下特点
- 应该是自动化的
- 应该可以快速运行
- 每个单元测试不应该依赖其它测试的结果和执行顺序,单元测试框架可以按任意的顺序执行每个测试
- 每个单元测试不应该依赖数据库,外部文件,或者任何长时间运行的任务。单元测试应该是独立的,不应该依赖于任何外部环境
- 单元测试应该在任何时间任何环境都可以任意执行,不该依赖外部环境
- 测试应该是有意义的,具有表达性,可以表达出这个测试是测什么,也可以从侧面反推这个被测试的方法的能力
- 测试代码应该跟生产代码拥有同等标准要求
Mockito 是什么
为了满足单元测试的隔离性,隔离外部环境,我们需要将外部依赖,通过替身的方式,模拟出一个可以满足我们测试的假对象。
Mockito 就是可以制作假替身,代替外部依赖,模拟我们自定义的返回操作的替身测试框架。
mock替身,很像电影中的替身演员,在某些场景中我们需要替身来处理某些问题。
Mockito 如何使用
1. 设置测试类依托Mockito管理
Mock 需要先设置测试类被 Mockito 管理。有两种方式。
- 在测试类上添加注解 @RunWith(MockitoJUnitRunner.class)
- 在@Before方法中,调用 MockitoAnnotations.initMocks(this)
上述两种方法使用其一都可,效果一样。
@Before 注解是 Junit 提供的,在每个@Test测试执行前执行一次。
方式1代码示例:
@RunWith(MockitoJUnitRunner.class)publicclassMockDemo{@TestpublicvoidtestMock(){// 处理测试}}
方式2代码示例:
@Beforepublicvoidinit(){MockitoAnnotations.initMocks(this);}
2.对类构造替身对象
对类构造替身对象有如下几种方式
- 在测试用例中直接使用 Mockito.mock(Class) 方法,生成替身对象
- 在测试类中声明需生成替身的依赖类,使用 @Mock 注解。
第二种方式是该测试类中所有单元测试唯一的对象,为了防止每个单元测试 stubbing 的先后顺序对其他单元测试的影响,最好写一个 @After 方法,在该方法中使用 Mockito.reset() 方法清空 stubbing 规则。
@After 注解是 Junit 提供的,在每个@Test测试执行后执行一次。
方法1代码示例:
@RunWith(MockitoJUnitRunner.class)publicclassMockDemo{@TestpublicvoidtestMock(){// 处理测试ArrayList mock =mock(ArrayList.class);}}
方法2代码示例:
@RunWith(MockitoJUnitRunner.class)publicclassMockDemo{@MockprivateList<String> list;... 具体测试 ...// @After 每个单元测试方法结束后执行,重置 stubbing @Afterpublicvoiddestory(){Mockito.reset(list);}}
Mockito 底层是对被Mock的对象使用 cglib 生成一个代理类。
3. 依赖注入被测试类
Mock 是对被测试类的依赖对象构造替身操作,还需将替身注入到被测试类。注入可以使用 @InjectMocks 注解标识需要被注入的类。依赖的其他类 就用@Mock 注解标识,Mockito 自动将替身注入到被测试类。
代码示例:
@RunWith(MockitoJUnitRunner.class)publicclassMockTest{@InjectMocksprivateOrderService orderService;@MockprivateOrderMapper orderMapper;}
4. Stubbing
通过 Mock 构造出替身对象后,我们还需要设置替身对象的行为。有点类似录制与播放。比方说设置替身对象调用某方法的返回值。
设置某方法调用的返回值
最常用的一种方式,就是设置某种方法根据某个入参的返回值是什么。或者设置抛出什么异常。
- 设置返回对象方式一 when().thenReturn();
- 设置返回对象方式二 doReturn().when(对象).对象方法;
- 设置抛出异常 when().thenThrow();
设置正常返回代码示例:
@TestpublicvoidtestMock(){// 处理测试
    list =mock(ArrayList.class);// 设置当调用 list.get(0) 的时候,返回 “first value”when(list.get(0)).thenReturn("first value");assertThat(list.get(0),equalTo("first value"));}
设置正常返回方式二代码示例:
@TestpublicvoidtestMock(){// 处理测试
    list =mock(ArrayList.class);// 设置当调用 list.get(0) 的时候,返回 “first value”Mockito.doReturn("first value").when(list).get(0);assertThat(list.get(0),equalTo("first value"));}
设置抛出异常返回代码示例:
@TestpublicvoidtestMock(){// 设置当调用 list.get(0) 的时候,抛出异常when(list.get(0)).thenThrow(newRuntimeException());try{
        list.get(0);fail();}catch(Exception e){assertThat(e,instanceOf(RuntimeException.class));}}
针对抛出异常的单元测试 Junit 有更优雅的使用方式,ExpectedException。优点就是减少缩进,代码可读性高。
使用方法很简单,具体见如下Junit异常校验代码示例。都是 org.junit 包下。
- 声明 ExpectedException ,并添加 @Rule 注解
- 在 @Test 测试中,设置 expect 期望抛出什么异常,设置 expect 要在抛出异常的代码之前。
Junit异常校验代码示例:
@RunWith(MockitoJUnitRunner.class)publicclassMockDemo{@MockprivateList<String> list;@RulepublicExpectedException thrown =ExpectedException.none();@TestpublicvoidtestMock(){
        thrown.expect(RuntimeException.class);when(list.get(0)).thenThrow(newRuntimeException());
        list.get(0);}}
给Void类型方法设置Stubbing
void 方法,没有返回值,我们也可以设置其什么都不做,也可设置抛出异常。
- Void方法什么都不做,执行空逻辑Mockito.doNothing().when(对象).对象的方法
- Void方法抛出异常
执行空逻辑代码示例:
@TestpublicvoidtestMockVoid(){// 设置 list 对象 执行 clear 的时候 不执行实际逻辑,执行空逻辑Mockito.doNothing().when(list).clear();
    list.clear();// 验证 list 对象 对 clear 方法只执行了一次Mockito.verify(list,times(1)).clear();}
抛出异常代码示例:
@TestpublicvoidtestMockVoid2(){
    thrown.expect(RuntimeException.class);// 设置 list 对象 执行 clear 的时候 不执行实际逻辑,抛出异常Mockito.doThrow(newRuntimeException()).when(list).clear();
    list.clear();}
针对 同一个方法多次调用设置每次的返回值
有时候我们需要设置每一次调用的返回值,比方说某个方法第一次调用返回和第二次调用返回不一样。只要按顺序,只要在 thenReturn() 方法中 用逗号分隔即可,或者执行多次 thenReturn(),链式调用。
逗号分隔代码示例:
@TestpublicvoidtestMockReturnMultiple(){Mockito.when(list.size()).thenReturn(1,2,3,4);assertThat(list.size(),equalTo(1));assertThat(list.size(),equalTo(2));assertThat(list.size(),equalTo(3));assertThat(list.size(),equalTo(4));}
链式调用代码示例:
@TestpublicvoidtestMockReturnMultiple2(){Mockito.when(list.size()).thenReturn(1).thenReturn(2).thenReturn(3).thenReturn(4);assertThat(list.size(),equalTo(1));assertThat(list.size(),equalTo(2));assertThat(list.size(),equalTo(3));assertThat(list.size(),equalTo(4));}
替换 方法 为 具体的行为
我们可以给替身对象的方法替换具体的行为,也就是修改其方法实现。
代码示例:
@TestpublicvoidtestMockByAnswer(){// anyInt 表示任意 int 类型入参,都处理为 answer 中的行为Mockito.when(list.get(anyInt())).thenAnswer(invocation ->{Integer index = invocation.getArgumentAt(0,Integer.class);returnString.valueOf(index *200);});assertThat(list.get(1),equalTo("200"));assertThat(list.get(5),equalTo("1000"));}
设置 mock 对象依然调用原对象方法
默认mock 的对象的所有方法如果不 stubbing 处理,都是空方法。我们可以指定替身对象依然执行对象本身的实现。
代码示例:
@TestpublicvoidtestMockCallRealMethod(){// anyInt 表示任意 int 类型入参,都处理为 answer 中的行为ArrayList<Object> arrayList =mock(ArrayList.class);Mockito.when(arrayList.size()).thenReturn(1).thenCallRealMethod();assertThat(arrayList.size(),equalTo(1));assertThat(arrayList.size(),equalTo(0));}
Spying 间谍对象
经过 spy 方法构造的对象,跟 mock 是相反的,spy 构造的方法,如果不设置 stubbing,则依然执行代理的对象的真正方法。使用方式跟 mock 一致。
spying 英文是间谍的意思,说明这不是替身,而是真正对象中一个特殊的对象,大部分方法都跟正常方法一样,只是某些方法有自己的特殊想法。
使用代码示例:
@RunWith(MockitoJUnitRunner.class)publicclassSpyDemo{@TestpublicvoidtestSpy(){// 处理测试ArrayList mock =Mockito.spy(ArrayList.class);}}
WILDCARD MATCHERS 通用参数匹配
通用匹配。就是 any()这种任意的。有的时候我们不关注入参的值,只关心返回值,传进去什么都可以,那我们就可以选择使用 wildcard matchers 。
- Matchers.any() 匹配任意对象,带着 any 名称的方法 还有 anyInt,anyObject 等都是一样的作用。
- Matchers.eq() when(list.get(eq(0)) 跟 when(list.get(0) 没区别。提供这个主要是可以在通用参数匹配中,指定特殊的具体value匹配。
- Matchers.isA() 表示匹配参数为任意某个类及其子类的对象。
值得注意的事使用通用匹配的话 需要都用通用匹配函数,如果想指定某个参数是特殊值 用eq() 包装一下,示例如下:
@TestpublicvoidtestMock(){// anyInt 表示任意 int 类型入参,都处理为 answer 中的行为ArrayList<Object> arrayList =mock(ArrayList.class);// 如下 直接使用会报错,因为后边有 anyObject() 通用匹配// Mockito.when(arrayList.set(1, anyObject())).thenReturn("1");// 改写成 eq(1) 则可正常运行Mockito.when(arrayList.set(eq(1),anyObject())).thenReturn("1");assertThat(arrayList.set(1,newObject()),equalTo("1"));}
Hamcrest Matchers
Hamcrest Matchers 是更优雅的断言,就是上述例子中的 assertThat() 系列方法,不同于 Junit 直接写的 Assert.assertEquals() 大量静态方法,hamcrest matchers 提供了类似函数式编程的可自定义策略的断言方式,允许通过函数的组合搭建出具有表达性的断言。其表达性,可扩展性更强。
assertThat 本质是提供了一个骨架,其实现是调用 Matcher 接口的方法。所以我们可以通过扩展 Matcher接口来扩展各种断言方法。
三个参数的 assertThat() 方法 第一个参数表示 reason 字符串,可以描述一下这个断言。在断言不通过时,会打印该描述。
assertThat 的源码如下,其本质是策略模式和模板方法模式:
publicstatic<T>voidassertThat(T actual,Matcher<T> matcher){assertThat("", actual, matcher);}publicstatic<T>voidassertThat(String reason,T actual,Matcher<T> matcher){if(!matcher.matches(actual)){Description description=newStringDescription();
        description.appendText(reason);
        description.appendText("\nExpected: ");
        description.appendDescriptionOf(matcher);
        description.appendText("\n     got: ");
        description.appendValue(actual);
        description.appendText("\n");thrownewjava.lang.AssertionError(description.toString());}}
示例中的类全路径 org.junit.assertThat,org.hamcrest.Matchers
常用Matcher
- equalTo() 实际值等于期望对象
- not() 不如何如何 可以组装 equalTo() 例如 not(equalTo()) 表示实际值不等于期望对象
- is() 跟 equalTo() 一样
- greaterThan() 实际值大于期望对象
- lessThan() 实际值小于期望对象
- either().or() 或关系,满足其一即可
- both().and() 且关系,两个条件都得满足
- anyOf() 满足其中之一即可,相当于IN
- allOf() 所有都满足 相当于一堆 AND
@TestpublicvoidtestMatcher(){int i =10;assertThat(i,equalTo(10));assertThat(i,not(equalTo(20)));assertThat(i,is(10));assertThat(i,is(not(20)));assertThat(i,greaterThan(0));assertThat(i,lessThan(20));assertThat(i,either(equalTo(10)).or(equalTo(20)));assertThat(i,both(equalTo(10)).and(equalTo(10)));assertThat(i,anyOf(is(10),equalTo(30),equalTo(20)));assertThat(i,allOf(is(10),equalTo(30),equalTo(20)));}
自定义 matchers
Hamcrest Matchers 的扩展性强,如果其默认实现的 matcher 无法满足我们的需要,我们可以自行定义 matcher。方法如下。
- 创建自定义Matcher类,继承 org.hamcrest.BaseMatcher 类,并声明入参类型的泛型。
- 实现 matches() 方法,该方法是assertThat 的回调方法,模板方法,实际的断言逻辑。
- 实现 describeTo() 方法,该方法控制断言失败时的文本提示信息。
- 自行创建静态工厂方法,用于创建Matcher类,类似于 equalTo() 这种方法。
代码示例如下:
publicclassStringEqualTo<TextendsString>extendsBaseMatcher<T>{privateString value;publicStringEqualTo(String value){this.value = value;}// 这个是assertThat 的回调方法,模板方法,实际的断言逻辑@Overridepublicbooleanmatches(Object item){returnStringUtils.equals(value,(String)item);}// @Factory 注解标识该静态方法 是 创建 matcher 的工程方法,只是标识,没有别的作用@Factorypublicstatic<TextendsString>StringEqualTo<T>stringEqualTo(T t){returnnewStringEqualTo<>(t);}// 该方法控制断言失败时的文本提示信息@OverridepublicvoiddescribeTo(Description description){
        description.appendText("字符串不匹配");}}
使用方法跟其默认实现的一样,示例如下:
@TestpublicvoidtestMatcher(){String testValue ="hello";assertThat(testValue,StringEqualTo.stringEqualTo("hello"));}
版权归原作者 疯狂敲代码的小黑 所有, 如有侵权,请联系我们删除。