概述
本篇博客说明如何将SpringBoot项目开启Https协议提供访问。
博文以步骤【申请/下载证书】,【部署证书】,【本地测试访问】,【服务器部署访问】 ,【扩展】展开说明。
废话:当我们有类似需求:“小程序上线”后,请求的后端服务必须使用https协议,那么我们就需要去将http协议升级为https协议了。
https协议?大致可以看成:
https协议 = http协议 + ssl协议
所以,要想将http升级成https很简单,只需要有一个ssl证书,然后部署到项目即可。
前提准备:IPC备案过的域名
那么,如下就开始我们的说明。
申请/下载证书
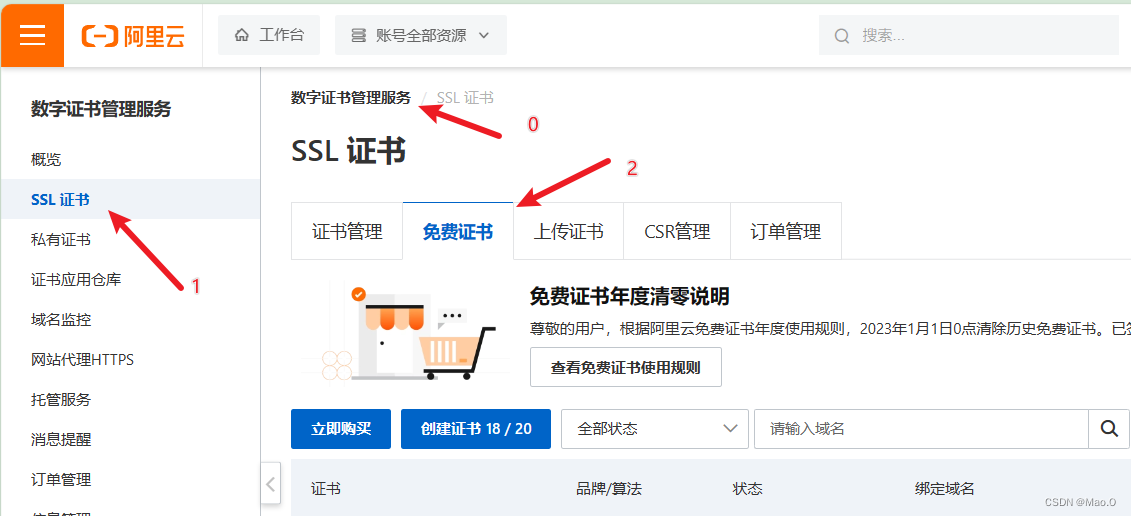
我使用的是阿里云的服务器和域名,因此可以到阿里云官网搜索【ssl证书】进入【数字证书管理服务】控制台。

我们点击【免费证书】--->【创建证书】--->【证书申请】
 输入自己备案好的域名,其他基本默认,点击【提交审核】。
审核基本上几分钟就可以下发证书,会有短信提示。
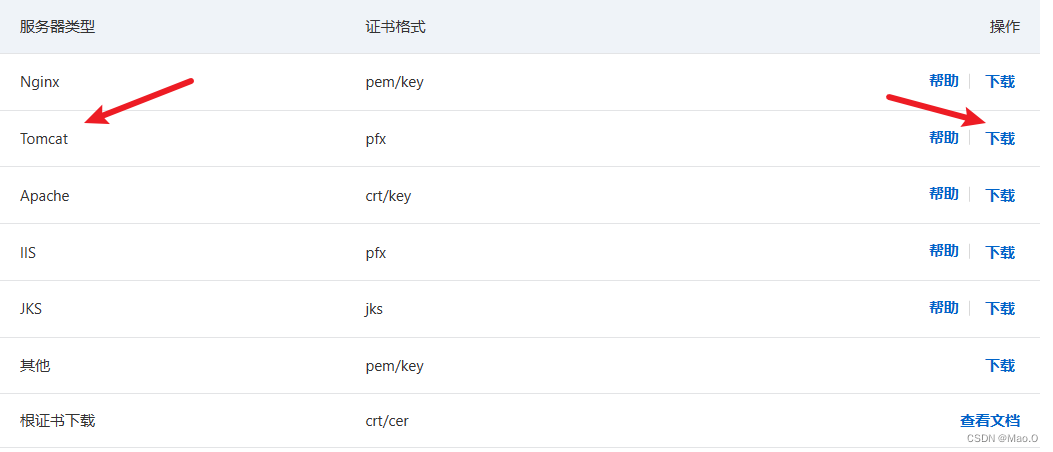
审核好后,我们就可以点击【下载】,获取我们的证书。

我使用的是SpringBoot项目做的测试,使用内置服务器Tomcat,因此直接下载Tomcat对应证书。
下载的压缩包内容:

第一个是我们的证书,第二个是密码文本文件(存储密码)。
部署证书
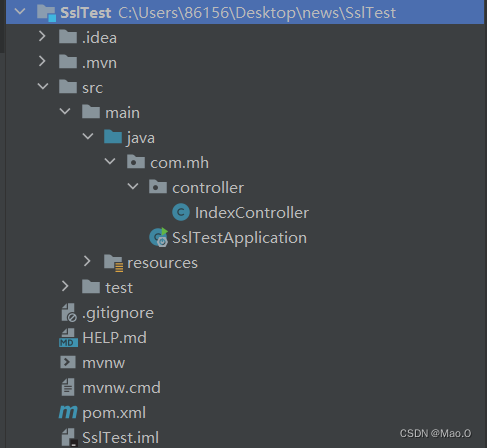
我创建了一个空的SpringBoot项目来做演示,写了一个简单的接口来测试:
** 项目结构 **

** IndexController(测试接口)**

1.将证书放到resources目录下

** 2.编写配置文件application.yml**

***key-store声明证书的放置的路径
** *请注意key-store-password填写自己下载的压缩包.txt文件里面的密码
到此,我们启动项目即可。

本地测试访问
我们使用Postman进行测试。
ps:当我们使用本地进行测试的时候,由于本地的IP与我们申请证书时添加的IP不一致,那么Postman会报错IP不匹配,我们可以不用理会,点击【Disable SSL Verification】关掉SSL验证即可。

成功。
服务器部署访问
我们将SpringBoot项目打包,上传到服务器, java -jar运行,然后Postman测试:


当然,我们也可以使用域名(申请证书时填写的域名)进行访问。

最后/扩展
我们可能会有这样的需求:
我们也许不是一开始做项目就部署了SSL证书,而是后期再部署SSL证书,那么我们在此之前前端项目使用的是http协议进行后端服务访问,那么我们能不能不修改前端的代码,想要http协议和https协议都能访问呢?
这是可以的,我们可以将http协议的访问重定向到https协议进行访问即可。
这样做后,我们后端服务跑起来的时候就会开启两个端口,一个http的端口,一个https的端口。
在启动类中进行配置:
package com.mh;

import org.apache.catalina.Context;
import org.apache.catalina.connector.Connector;
import org.apache.tomcat.util.descriptor.web.SecurityCollection;
import org.apache.tomcat.util.descriptor.web.SecurityConstraint;
import org.springframework.boot.SpringApplication;
import org.springframework.boot.autoconfigure.SpringBootApplication;
import org.springframework.boot.web.embedded.tomcat.TomcatServletWebServerFactory;
import org.springframework.context.annotation.Bean;

@SpringBootApplication
public class SslTestApplication {

    public static void main(String[] args) {
        SpringApplication.run(SslTestApplication.class, args);
    }

    @Bean
    public TomcatServletWebServerFactory tomcatServletWebServerFactory() {
        TomcatServletWebServerFactory factory = new TomcatServletWebServerFactory() {
            @Override
            protected void postProcessContext(Context context) {
                SecurityConstraint securityConstraint = new SecurityConstraint();
                securityConstraint.setUserConstraint("CONFIDENTIAL");
                SecurityCollection securityCollection = new SecurityCollection();
                securityCollection.addPattern("/*");
                securityConstraint.addCollection(securityCollection);
                context.addConstraint(securityConstraint);
            }
        };
        factory.addAdditionalTomcatConnectors(httpConnector());
        return factory;
    }

    @Bean
    public Connector httpConnector() {
        Connector connector = new Connector("org.apache.coyote.http11.Http11NioProtocol");
        connector.setScheme("http");
        // http的端口
        connector.setPort(8080);
        connector.setSecure(false);
        // http的端口后转向到的https的端口
        connector.setRedirectPort(443);
        return connector;
    }
}
当然,你也可以做配置类,我这里直接放到启动类了,只要能将他们加到IOC容器即可生效。
配置好后,我们再打包,重新放到服务器运行,浏览器测试:

回车后,自动跳转访问https

总结
开启Https很简单,总的来说只需要下载一个SSL证书进行部署即可。
版权归原作者 Mao.O 所有, 如有侵权,请联系我们删除。