
Vue2项目总结-电商后台管理系统
去年做的项目,拖了很久,总算是打起精力去做这个项目的总结,并对Vue2的相关知识进行回顾与复习
各个功能模块如果有过多重复冗杂的部分,将会抽取部分值得记录复习的地方进行记录
一:项目简介
前端技术栈
Vue2
vue-router
Element-ui
Axios
Echarts
项目构架
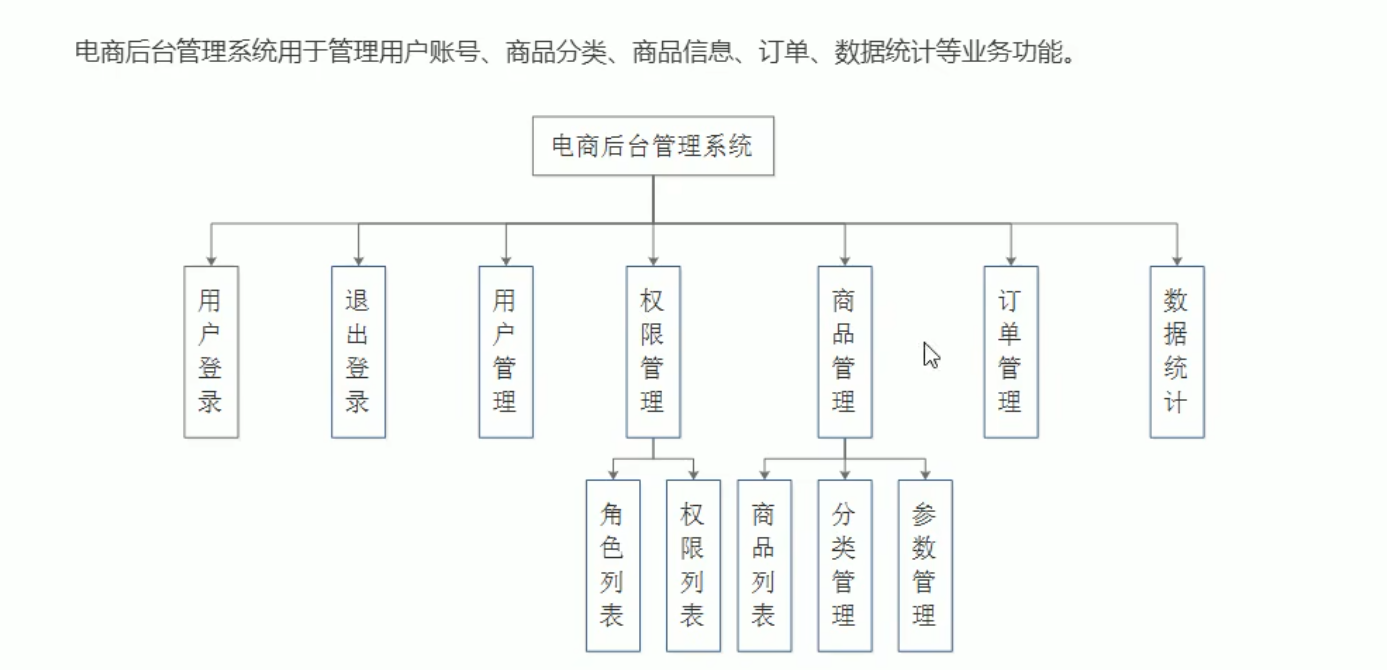
功能模块
- 用户登录/退出模块
- 用户管理模块
- 权限管理模块角色列表模块权限列表模块
- 商品管理模块商品列表模块分类管理模块参数管理模块
- 订单管理模块
- 数据统计模块
二:各个功能模块
1:项目初始化
通过vue-cli脚手架进行配置安装
vue2配置
配置vue-router
配置axios
后端接口:http://43.143.0.76:8889/api/private/v1/
在main.js文件配置根路径: axios.defaults.baseURL = ‘http://43.143.0.76:8889/api/private/v1/’
1.1:路由器的配置
配置路由器,通过login登录之后会优先跳转到home父组件(Element-ui的布局模式),redirect重定向路由到welcome欢迎组件
const router =newRouter({routes:[{path:'/',redirect:'/login'},{path:'/login',component:()=>import('@/components/Login.vue')},{path:'/home',component:()=>import('@/components/Home.vue'),redirect:'/welcome',children:[{path:'/welcome',component:()=>import('@/components/Welcome.vue')},{path:'/users',component:()=>import('@/components/user/Users.vue')},{path:'/rights',component:()=>import('@/components/power/Rights.vue')},{path:'/roles',component:()=>import('@/components/power/Roles.vue')},{path:'/categories',component:()=>import('@/components/goods/Cate.vue')},{path:'/params',component:()=>import('@/components/goods/Params.vue')},{path:'/goods',component:()=>import('@/components/goods/List.vue')},{path:'/goods/add',component:()=>import('@/components/goods/Add.vue')},{path:'/orders',component:()=>import('@/components/order/Order.vue')},{path:'/reports',component:()=>import('@/components/report/Report.vue')}]}]})
2:用户登录/退出模块
相关技术点
- http是无状态的
- 通过cookie在客户端记录状态
- 通过session在服务器端记录状态
- 通过token方式维持状态
如果前端和后台不存在
跨域问题,可以通过cookie和session来记录登录状态,如果存在
跨域问题,通过token方式来维持登录状态
2.1:登录token原理分析
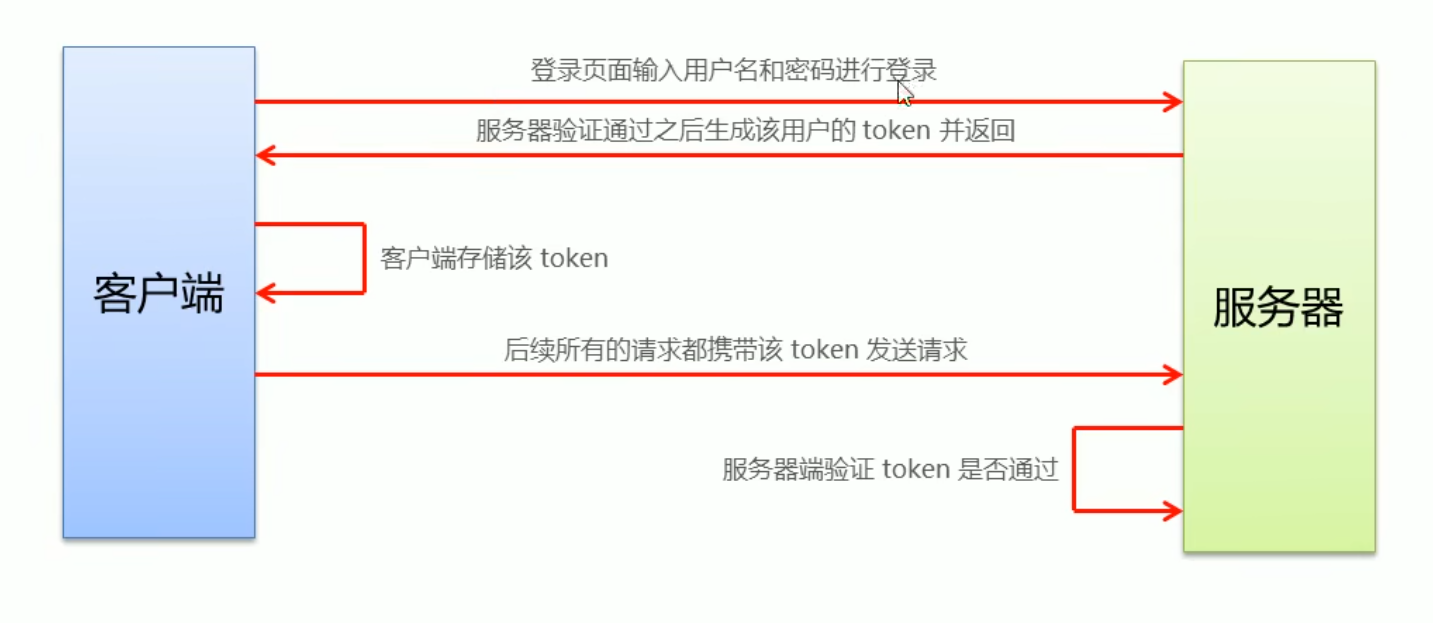
如果不通过登录来获取服务器的
token值,直接通过路由跳转对应页面,
服务器无法验证token通过,有些接口功能将无法实现,由此还需要配置
路由守卫来防止用户直接通过路由跳转对应页面
2.2:登录login函数逻辑代码
这里是使用了 async 和 await 来解析对应的promise对象。async 函数返回一个 Promise 对象,可以使用 then 方法添加回调函数。当函数执行的时候,一旦遇到 await 就会先返回,等到触发的异步操作完成,再接着执行函数体内后面的语句。
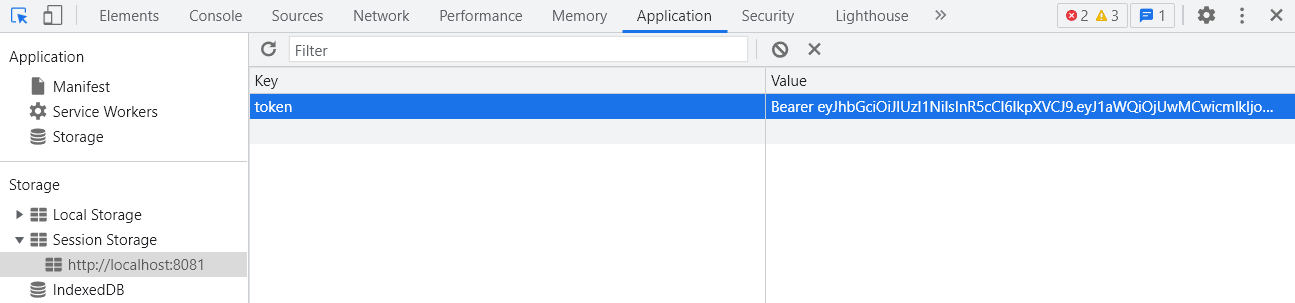
如果登录成功,将服务器的token值保存到客户端的
sessionStorage中,利用seiItem属性键值对的方法存储,以便之后的后续请求都
携带token认证
login(){this.$refs.loginFormRef.validate(async(valid)=>{// console.log(valid)if(!valid){return}else{const{data: res }=awaitthis.$http.post('login',this.loginForm)// console.log(data)if(res.meta.status !=200){this.$message.error('登录失败!')}else{this.$message.success('登录成功!')//将token值保存到客户端中
            window.sessionStorage.setItem('token', res.data.token)//并且跳转路由this.$router.push('/home')}}})},
2.3:路由守卫
在router.js中配置路由守卫,目的是为了防止用户未通过登录,而是选择更改路由跳转到对应页面。
//挂载路由守卫
router.beforeEach((to , from , next)=>{//to 表示将要跳转的页面//from 表示从哪个页面来的//next() 表示放行  next('/login')表示强制跳转到登录页面if(to.path ==='/login'){// console.log(to)next()}else{//获取用户当前客户端的token值const tokenStr = window.sessionStorage.getItem('token')//如果没有token值,强制跳转到登录页面//如果存在token,就放行if(!tokenStr){next('/login')}else{next()}}})
2.4:Element-ui的表单验证和表单重置
表单验证
:rules属性绑定,data中的表单验证对象
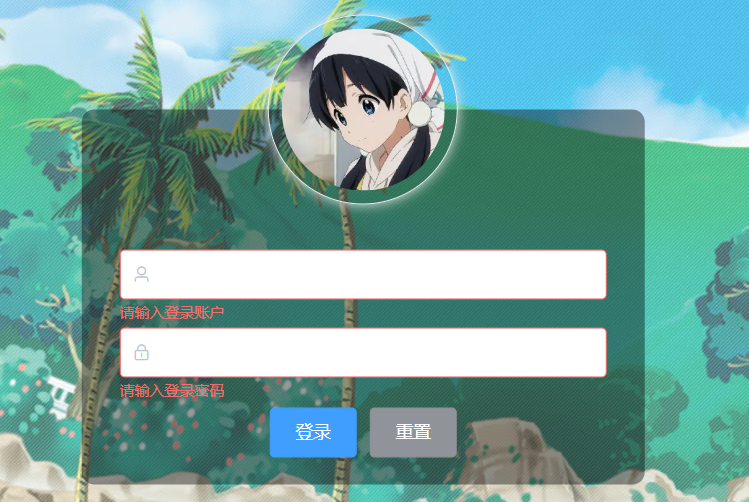
<!-- 表单部分 --><el-formref="loginFormRef":model="loginForm"label-width="0px":rules="loginFormRules"class="login_form"><!-- 用户名 --><el-form-itemprop="username"><el-inputv-model="loginForm.username"prefix-icon="el-icon-user"></el-input></el-form-item><!-- 密码 --><el-form-itemprop="password"><el-inputv-model="loginForm.password"type="password"prefix-icon="el-icon-lock"></el-input></el-form-item><!-- 按钮 --><el-form-itemclass="login_form_login"><el-buttontype="primary"@click="login">登录</el-button><el-buttontype="info"@click="reset">重置</el-button></el-form-item></el-form>
//登录时的校验对象loginFormRules:{username:[{required:true,message:'请输入登录账户',trigger:'blur'},{min:3,max:10,message:'长度在 3 到 10 个字符',trigger:'blur',},],password:[{required:true,message:'请输入登录密码',trigger:'blur'},{min:3,max:15,message:'长度在 3 到 15 个字符',trigger:'blur',},],},
表单重置
this指向vue的原型对象,通过原型对象绑定对应的resetFields函数
reset(){// console.log(this)//实现表单的重置功能this.$refs.loginFormRef.resetFields()},
2.5:退出登录
直接调用sessionStorage.clear()函数清空存储的token即可,同时跳转到/login页面即可
exit(){
      window.sessionStorage.clear()this.$router.push('/login')},
3:用户管理模块
3.1:Element-ui侧边栏
在回顾具体功能模块前提不得不提一下element-ui的侧边栏组件
<!-- 修改折叠展开的宽度样式 --><el-aside:width="closeValue ? '64px' : '200px'"><!-- 左侧菜单导航栏 --><el-menu:default-active="activePath"class="el-menu-vertical-demo"unique-opened:collapse="closeValue":collapse-transition="false"router><divclass="size"@click="menuClose">| | |</div><!-- 一级菜单导航 --><el-submenu:index="item.id + ''"v-for="item in menuList":key="item.id"><templateslot="title"><i:class="iconList[item.id]"></i><span>{{item.authName}}</span></template><!-- 二级菜单导航 --><el-menu-item:index="'/' + subitem.path"v-for="subitem in item.children":key="subitem.id"@click="saveNavState('/' + subitem.path)"><iclass="el-icon-menu"></i><span>{{subitem.authName}}</span></el-menu-item></el-submenu></el-menu></el-aside>
- 在el-menu标签中,:default-active=""属性值是激活菜单的值,并没有设死,我们数据绑定到data中的activePath中
- 在el-submenu标签中,:index值是通过父级的v-for属性将menuList的所有item通过l插值语法(两个花括号)显示到模板上,需要注意的一点是,v-for属性同时需要,key属性的同时存在,否则会报错
data(){return{menuList:[],iconList:{125:'el-icon-s-custom',103:'el-icon-lock',101:'el-icon-shopping-cart-1',102:'el-icon-s-order',145:'el-icon-s-data',},closeValue:false,activePath:'',}},
   created(){this.getMenuList()this.activePath = window.sessionStorage.getItem('activePath')},//保存链接的激活状态saveNavState(activePath){
      window.sessionStorage.setItem('activePath', activePath)this.activePath = activePath
    },
savNavState函数,解决了图标在当前选项高亮,但当重进还是会选择上一高亮位置,但内容则是welcome组件内容
通过sessionStorage存储当前的activePath,在
created()组件被创建的时候再从sessionStorage中取出
//保存链接的激活状态saveNavState(activePath){
      window.sessionStorage.setItem('activePath', activePath)this.activePath = activePath
    },
3.2:作用域插槽

其余的element-ui界面布局组件没什么难度,跟着文档走就可以了,需要回顾的就是slot-scope
作用域插槽这里是想实现一个按钮来切换状态的效果,element-ui提供了这个组件,但是我们同时还要实现,
点击切换状态还要修改数据库中的数据作用域插槽可以理解为:父传子,传结构,根据子组件的中的数据传结构。
<!-- 使用插槽来实现切换效果 --><templateslot-scope="scope"><el-switchv-model="scope.row.mg_state"@change="userStateChange(scope.row)"></el-switch></template>
//监听用户状态修改的事件asyncuserStateChange(userInfo){// console.log(userInfo)const{data: res }=awaitthis.$http.put(`users/${userInfo.id}/state/${userInfo.mg_state}`)if(res.meta.status !==200){
        userInfo.mg_state =!userInfo.mg_state
        this.$message.error('更新用户状态失败!')}this.$message.success('更新用户状态成功!')},
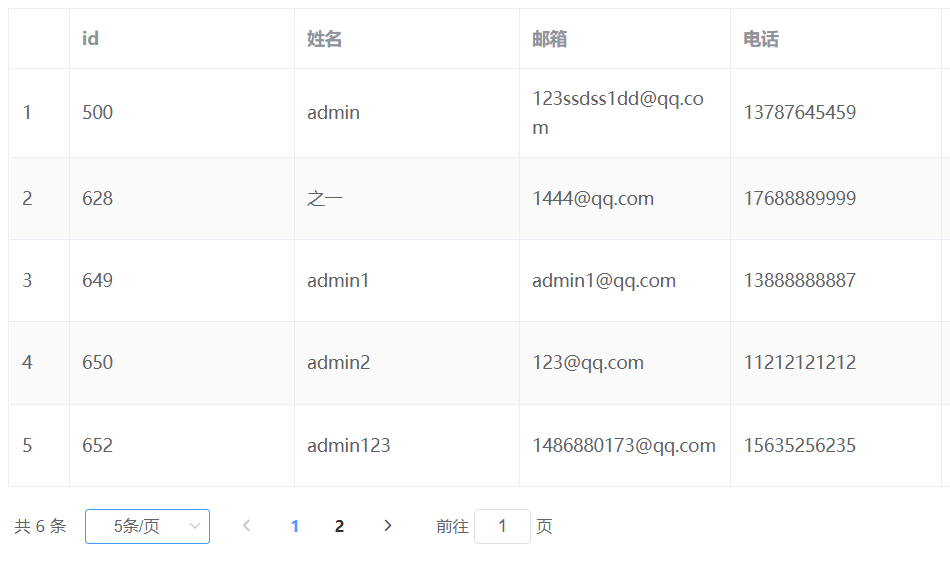
3.3:Pagination 分页
还是利用element-ui组件实现
<!-- 分页区域 --><el-pagination@size-change="handleSizeChange"@current-change="handleCurrentChange":current-page="queryInfo.pagenum":page-sizes="[1, 2, 5, 10]":page-size="queryInfo.pagesize"layout="total, sizes, prev, pager, next, jumper":total="total"></el-pagination>
分页功能不仅仅这里需要,以后的项目一些业务都是需要分页功能的。
首先需要创建分页数据对象,
pagenum(当前页数),pagesize(每页显示数据条数),total(总条数)。将其返回给后端,后端返回对应数据。
queryInfo:{query:'',//当前的页数pagenum:1,//当前每页显示多少条数据pagesize:2,},// 页码总数数据total:0,
3.4:dialog对话框
点击编辑按钮会弹出一个对话框来实现我们的编辑功能
逻辑如下:
- 点击编辑按钮,触发点击事件。展示dialog同时通过id搜索该用户的个人信息,将其展现。
- 用户通过更改本文内容,双向数据绑定到editform表单对象中
- 点击取消,修改visible属性(布尔值)来隐藏该对话框
- 点击确定,通过请求修改对应数据库中信息,同时列表需要刷新,再次调用获取用户数据函数,也修改visible属性隐藏对话框
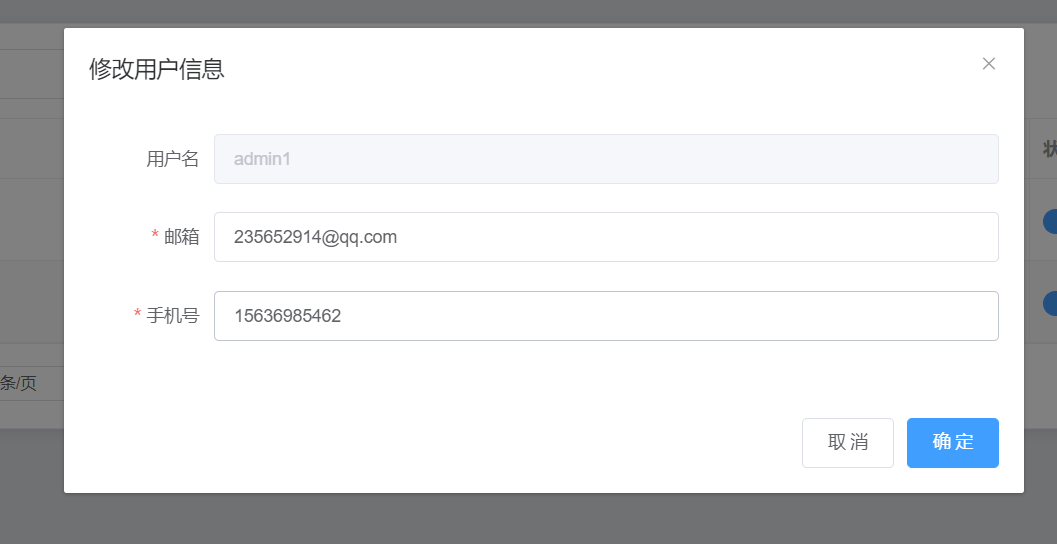
html结构
<!-- 修改用户信息区域 --><el-dialogtitle="修改用户信息":visible.sync="editDialogVisible"width="50%"@close="editFormClose"><el-form:model="editForm":rules="editFormRules"ref="editFormRef"label-width="100px"><!-- 1.用户名 --><el-form-itemlabel="用户名"><el-inputv-model="editForm.username"disabled></el-input></el-form-item><!-- 2.邮箱 --><el-form-itemlabel="邮箱"prop="email"><el-inputv-model="editForm.email"></el-input></el-form-item><!-- 3. 手机号码 --><el-form-itemlabel="手机号"prop="mobile"><el-inputv-model="editForm.mobile"></el-input></el-form-item></el-form><spanslot="footer"class="dialog-footer"><el-button@click="editDialogVisible = false">取 消</el-button><el-buttontype="primary"@click="editUser">确 定</el-button></span></el-dialog>
编辑按钮结构
<!-- 修改按钮 --><el-buttontype="primary"icon="el-icon-edit"circle@click="showEditDialog(scope.row.id)"></el-button>
点击确定修改信息逻辑
//修改用户editUser(){//预校验this.$refs.editFormRef.validate(async(valid)=>{if(!valid)return//发起修改用户信息请求const{data: res }=awaitthis.$http.put('users/'+this.editForm.id,{email:this.editForm.email,mobile:this.editForm.mobile,})if(res.meta.status !=200){returnthis.$message.error('更新用户信息失败!')}//关闭对话框this.editDialogVisible =false//刷新数据列表this.getUserList()//提示修改成功this.$message.success('更新用户信息成功!')})},
4:权限管理模块
4.1:展开表格列
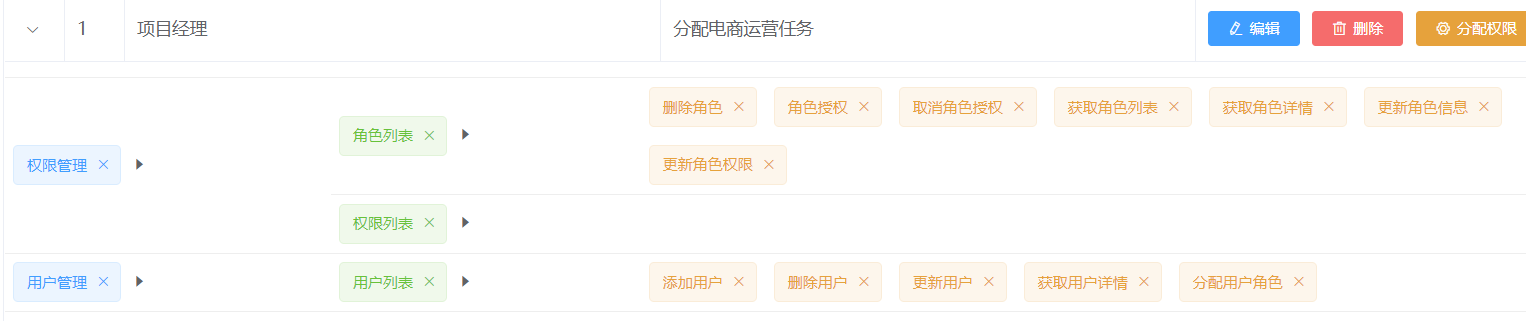
主要还是通过作用域插槽和v-for,还有嵌套的权限属性实现,当然还有tag标签
el-row标签中利用v-for渲染出父级元素,蓝色标签,通过作用域插槽传数据,同时el-tag将该值渲染成蓝色标签- 叉叉移除函数,removeRightById,由于每个权限都有对应的id,所以
通过id来删除数据库中数据- 嵌套
html结构
<!-- 展开列 --><el-table-columntype="expand"><!-- 使用作用域插槽 --><templateslot-scope="scope"><el-row:class="['bottom' , i1 === 0 ? 'top' : '','vcenter']"v-for="(item1 ,i1) in scope.row.children":key="item1.id"><!-- 一级权限渲染 --><el-col:span="5"><el-tagclosable@close="removeRightById(scope.row , item1.id)">{{item1.authName}}</el-tag><iclass="el-icon-caret-right"></i></el-col><!-- 渲染二级和三级权限 --><el-col:span="19"><!-- 通过for循环 嵌套渲染二级权限 --><el-row:class="[i2 === 0 ? '' : 'top','vcenter']"v-for="(item2 , i2) in item1.children":key="item2.id"><el-col:span="6"><el-tagtype="success"closable@close="removeRightById(scope.row , item2.id)">{{item2.authName}}</el-tag><iclass="el-icon-caret-right"></i></el-col><el-col:span="18"><el-tagtype="warning"v-for="(item3) in item2.children":key="item3.id "closable@close="removeRightById(scope.row , item3.id)">{{item3.authName}}</el-tag></el-col></el-row></el-col></el-row><el-row:span="19"></el-row></template></el-table-column>
removeRightById()函数
- 利用了confirm弹窗组件,全局挂载,
promise对象,需要.then().catch()来解析发送delete请求的参数,利用到了es6模板字符串用法
//删除权限asyncremoveRightById(role, roleId){//弹框提示用户是否要删除const confirmResult =awaitthis.$confirm('此操作将永久删除该文件, 是否继续?','提示',{confirmButtonText:'确定',cancelButtonText:'取消',type:'warning',}).catch((err)=> err)if(confirmResult !=='confirm'){returnthis.$message.info('取消了删除!')}else{//向服务器发送请求删除const{data: res }=awaitthis.$http.delete(`roles/${role.id}/rights/${roleId}`)if(res.meta.status !==200){returnthis.$message.error('删除权限失败!')}else{
          role.children = res.data
        }}},
5:商品管理模块
5.1:级联选择器
element-ui提供的级联选择器,有时候会出现bug,element-ui的版本不断地更新也在修正
- v-model = "selectedCateKeys"数据双向绑定数组
- @change事件,当选中节点变化时触发
- :options绑定商品列表
- :props绑定对象的某个值,实现多级级联选择器
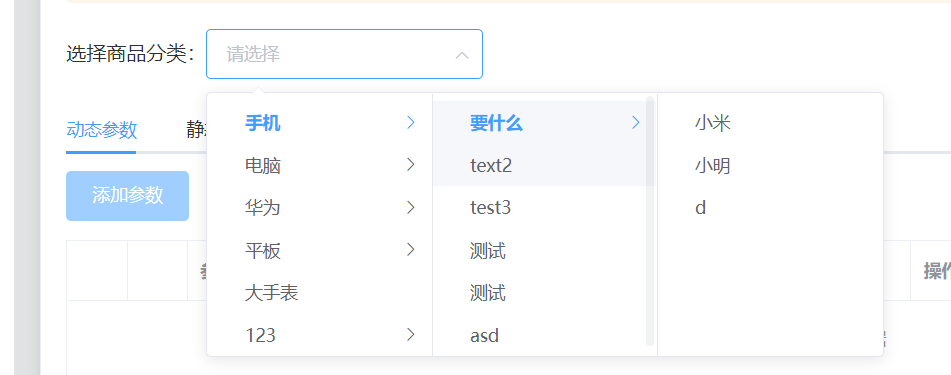
html结构
<el-col><span>选择商品分类:</span><!-- 选择分类的级联选择框 --><el-cascaderv-model="selectedCateKeys":options="cateList"@change="handleChange":props="cateProps"></el-cascader></el-col>
@change事件函数
//监听级联选择器选中框变换asynchandleChange(){this.getParamsData()},
//指定级联选择器的配置对象cateProps:{value:'cat_id',label:'cat_name',chidren:'children',},
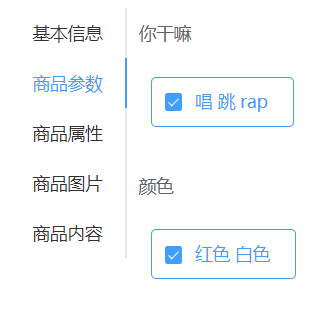
5.2:tabs标签页
tabs标签页
- v-model双向数据绑定对应active选中的数据,这里是many和only
- @tab-click事件监听标签页改变触发
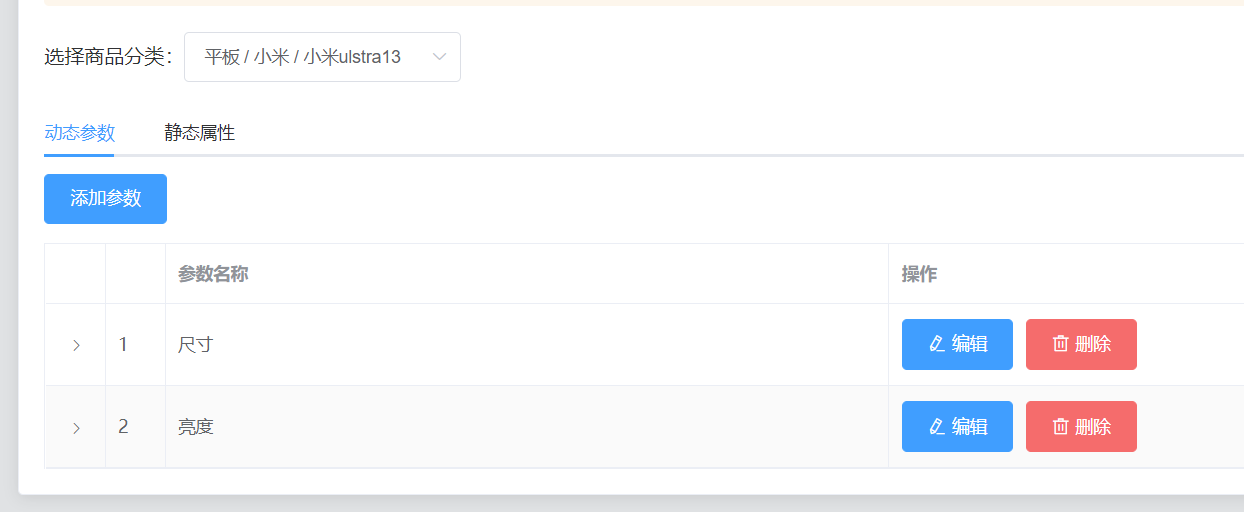
实现选择级联选择器的商品时候,展示对应的动态参数逻辑如下
- 通过级联选择器的handleChange和tabs标签页的handleTabClick两个事件,都调用getParamsData()获取商品参数函数
- 通过每个商品的特定id获取对应的参数信息
结构
<!-- Tabs标签页部分 --><el-tabsv-model="activeName"@tab-click="handleTabClick">
data(){//Tabs标签页的双向绑定数据activeName:'many',}
- 首先级联选择器的长度如果不是3,即选中的只是一二级菜单就清空,不展示
- 第三级菜单,根据所选分类的ID,和当前所处的面板,获取对应的参数
getParamsData()函数
//获取参数列表数据asyncgetParamsData(){//如果选中的不是三级菜单,数组长度就为1或2,就清空数组if(this.selectedCateKeys.length !==3){this.selectedCateKeys =[]this.manyTableData =[]this.onlyTableData =[]return}else{//根据所选分类的ID,和当前所处的面板,获取对应的参数const{data: res }=awaitthis.$http.get(`categories/${this.cateId}/attributes`,{params:{sel:this.activeName,},})if(res.meta.status !==200){this.$message.error('获取参数列表失败!')}else{//成功// console.log(res.data)//存储动态参数数据和静态属性数据
          res.data.forEach((item)=>{
            item.attr_vals = item.attr_vals
            item.attr_vals = item.attr_vals ? item.attr_vals.split(','):[]//控制文本框的显示与隐藏// item.inputVisible = falsethis.$set(item,'inputVisible',false)//文本框中输入的值
            item.inputValue =''})// console.log(res.data)if(this.activeName ==='many'){this.manyTableData = res.data
          }else{this.onlyTableData = res.data
          }}}},
将后台返回的数据,进行forEach遍历存储,还利用了split()分割函数
//存储动态参数数据和静态属性数据
          res.data.forEach((item)=>{
            item.attr_vals = item.attr_vals
            item.attr_vals = item.attr_vals ? item.attr_vals.split(','):[]//控制文本框的显示与隐藏// item.inputVisible = falsethis.$set(item,'inputVisible',false)//文本框中输入的值
            item.inputValue =''})
5.3: Tree 树形控件
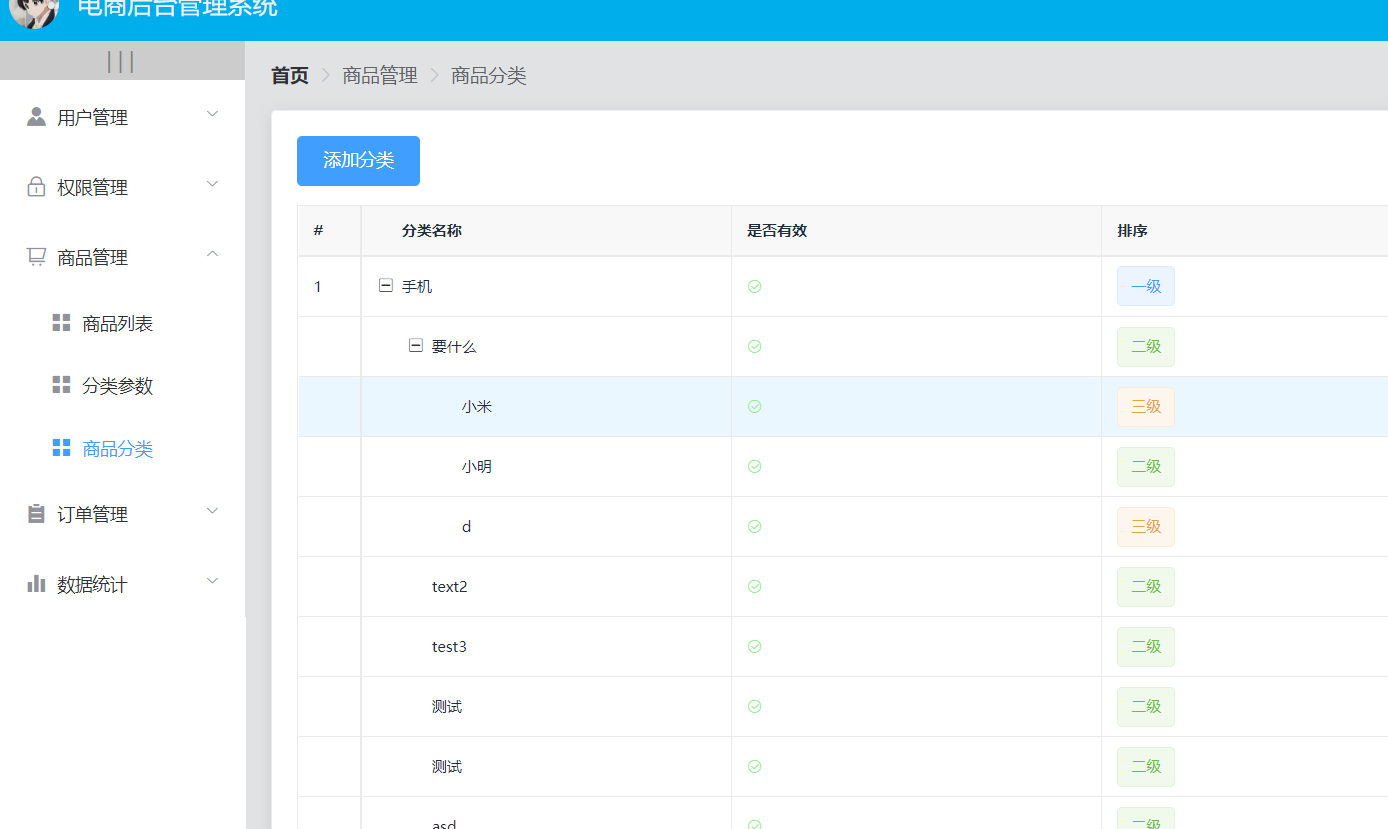
在商品分类模块中,对于分类名称利用到了tree树形控件,用清晰的层级结构展示信息,可展开或折叠。
- :data数据绑定刀catelist,商品分类列表。
- :columns属性columns纵列分布
- 依旧使用作用域插槽,同时利用了
v-if来控制对应的显示与隐藏,利用表达式的值
结构
<tree-tablestyle="margin-top: 15px":data="catelist":columns="columns":selection-type="false":expand-type="false"show-indexindex-text="#"border><!-- 是否有效插槽 --><templateslot="isok"slot-scope="scope"><iclass="el-icon-circle-check"v-if="scope.row.cat_deleted === false"style="color: lightgreen"></i><iclass="el-icon-circle-close"v-elsestyle="color:red"></i></template><!-- 排序插槽 --><templateslot="order"slot-scope="scope"><el-tagv-if="scope.row.cat_level === 0">一级</el-tag><el-tagtype="success"v-else-if="scope.row.cat_level === 1">二级</el-tag><el-tagtype="warning"v-else>三级</el-tag></template><!-- 操作插槽 --><templateslot="opt"slot-scope="scope"><!-- 编辑 --><el-buttontype="primary"icon="el-icon-edit"size="mini"@click="showEditDialog(scope.row.cat_id)">编辑</el-button><!-- 删除 --><el-buttontype="danger"icon="el-icon-delete"size="mini"@click="removeUserById(scope.row.cat_id)">删除</el-button></template></tree-table>
5.4:添加商品信息模块
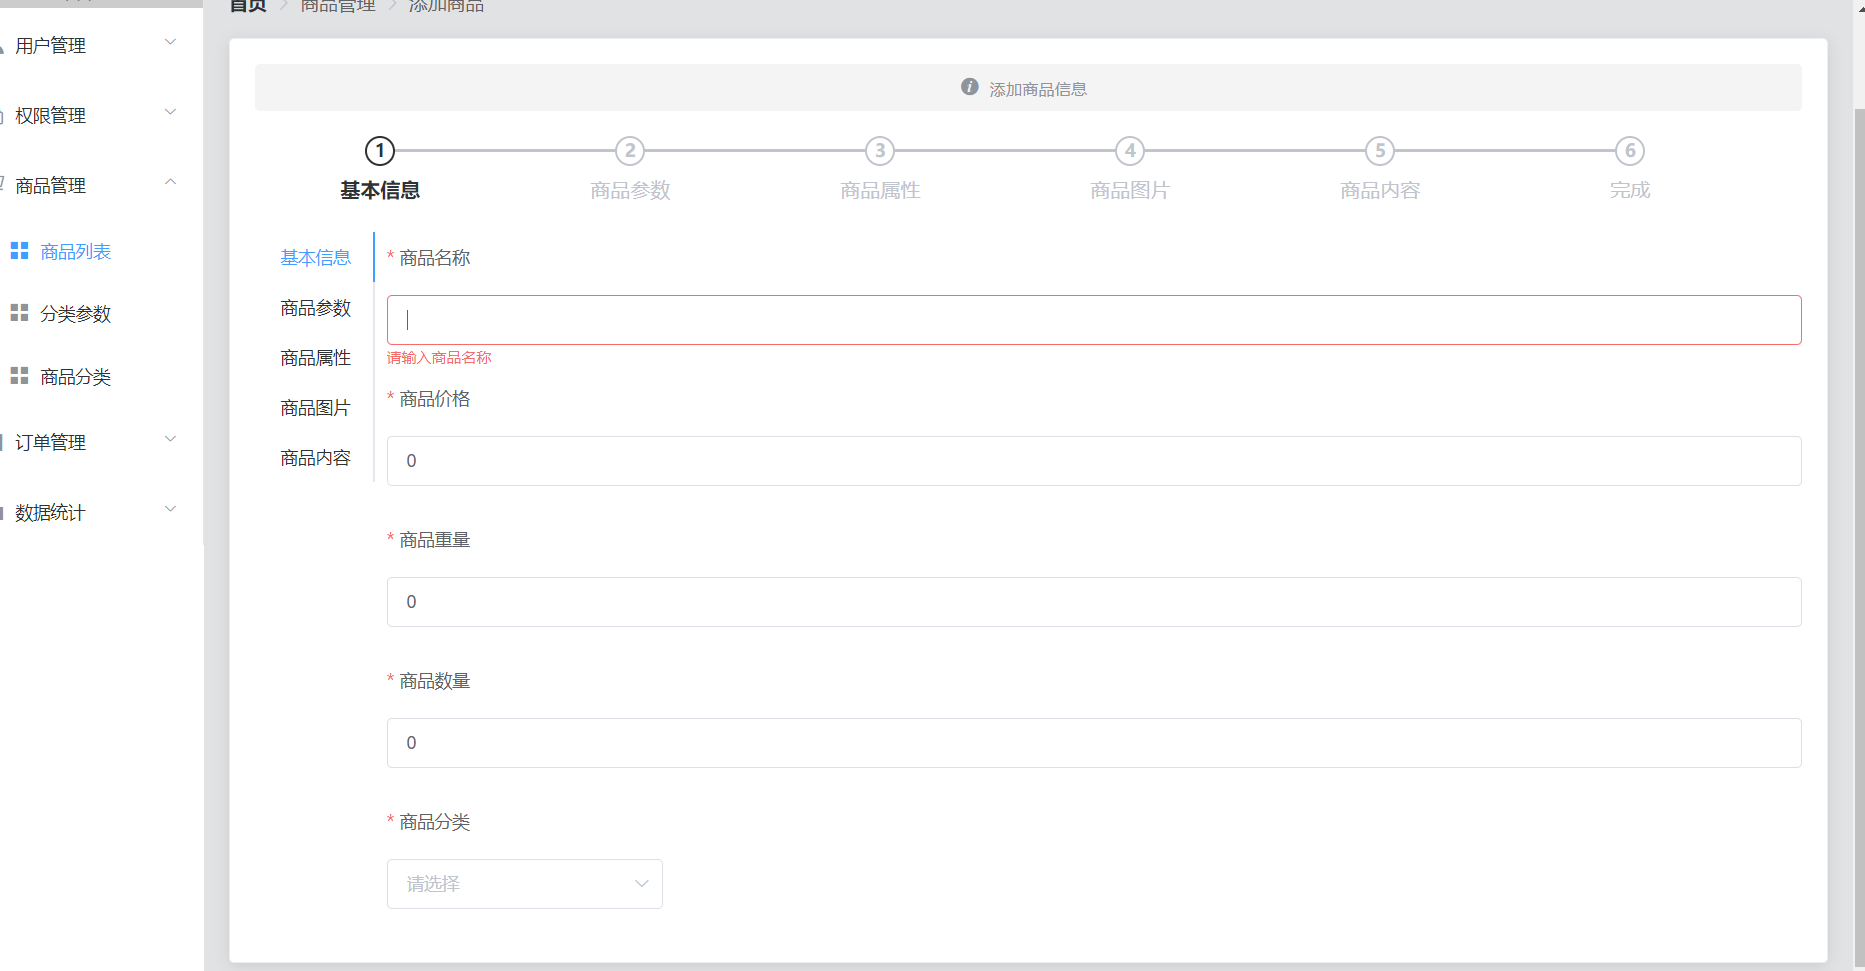
5.4.1:el-steps步骤展示信息

<!-- 要将string转换为number , -0 --><el-steps:space="200":active="activeIndex - 0"finish-status="success"align-center><el-steptitle="基本信息"></el-step><el-steptitle="商品参数"></el-step><el-steptitle="商品属性"></el-step><el-steptitle="商品图片"></el-step><el-steptitle="商品内容"></el-step><el-steptitle="完成"></el-step></el-steps>
5.4.2:el-tabs左侧标签页
- @tab-click,当tab标签页被选中时触发事件
结构
<el-tabsv-model="activeIndex":tab-position="'left'":before-leave="beforeTabLeave"@tab-click="tabClicked">
@tab-click函数
//当tab标签页被选中时触发事件asynctabClicked(){// console.log(this.activeIndex)//访问的是商品参数面板if(this.activeIndex ==='1'){//发起请求获取参数const{data: res }=awaitthis.$http.get(`categories/${this.cateId}/attributes`,{params:{sel:'many'},})if(res.meta.status !==200){this.$message.error('获取商品参数失败!')}else{
          res.data.forEach((item)=>{
            item.attr_vals =
              item.attr_vals.length ===0?[]: item.attr_vals.split(',')})// this.$message.success('成功!')this.manyTableData = res.data
          // console.log(this.manyTableDate)}}elseif(this.activeIndex ==='2'){//发起请求获取参数const{data: res }=awaitthis.$http.get(`categories/${this.cateId}/attributes`,{params:{sel:'only'},})if(res.meta.status !==200){this.$message.error('获取商品参数失败!')}else{this.onlyTableData = res.data
          // console.log(this.onlyTableData)}}},
5.4.3:upload上传图片
- :preview:”handlePreview“,处理图片预览函数
- :on-preview=“handlePreview”,处理图片移除函数
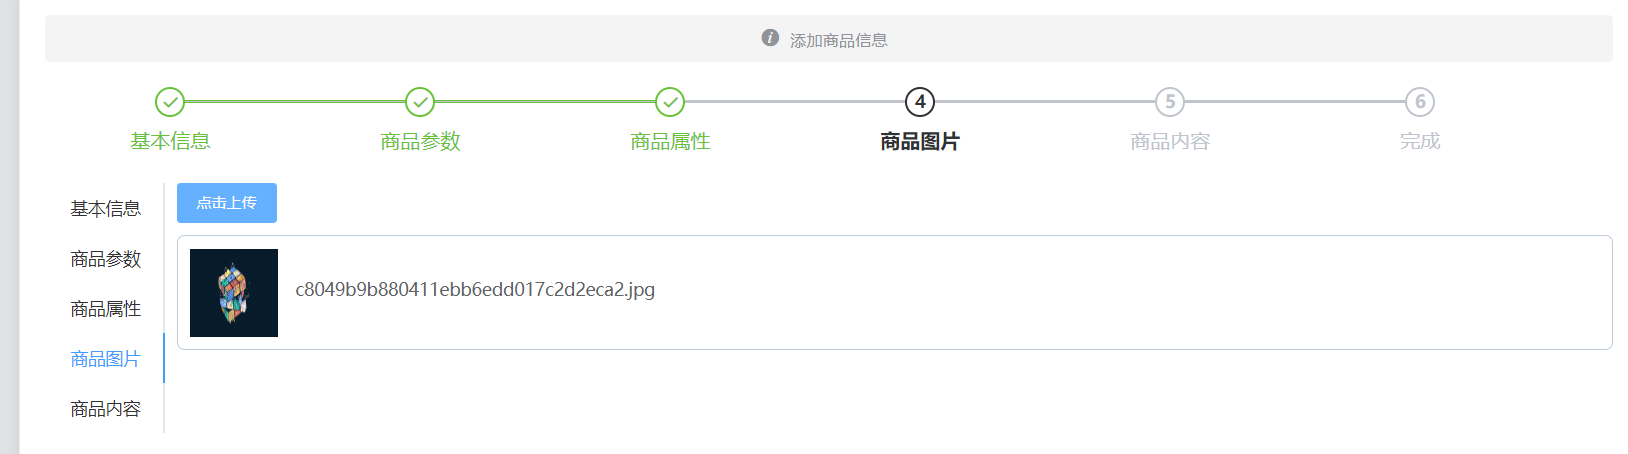
<el-tab-panelabel="商品图片"name="3"><!-- 上传图片 --><!-- action表示图片要上传到的后台API地址 --><el-uploadclass="upload-demo"action="http://43.143.0.76:8889/api/private/v1/upload":on-preview="handlePreview":on-remove="handleRemove"list-type="picture":headers="headerObj":on-success="handleSuccess"><el-buttonsize="small"type="primary">点击上传</el-button></el-upload></el-tab-pane>
handlePreview()图片预览函数
//处理图片预览handlePreview(file){// console.log(file)this.previewPath = file.response.data.url
      this.previewVisible =true},
handlePreview()图片移除函数
//处理图片移除handleRemove(file){//1.获取将要删除的图片的临时路径const filePath = file.response.data.tmp_path
      //2.从pics数组中,找到该图片的索引值const i =this.addForm.pics.findIndex((x)=>{
        x.pic === filePath
      })//3.调用数组的splice方法,从pics数组中移除this.addForm.pics.splice(i,1)},
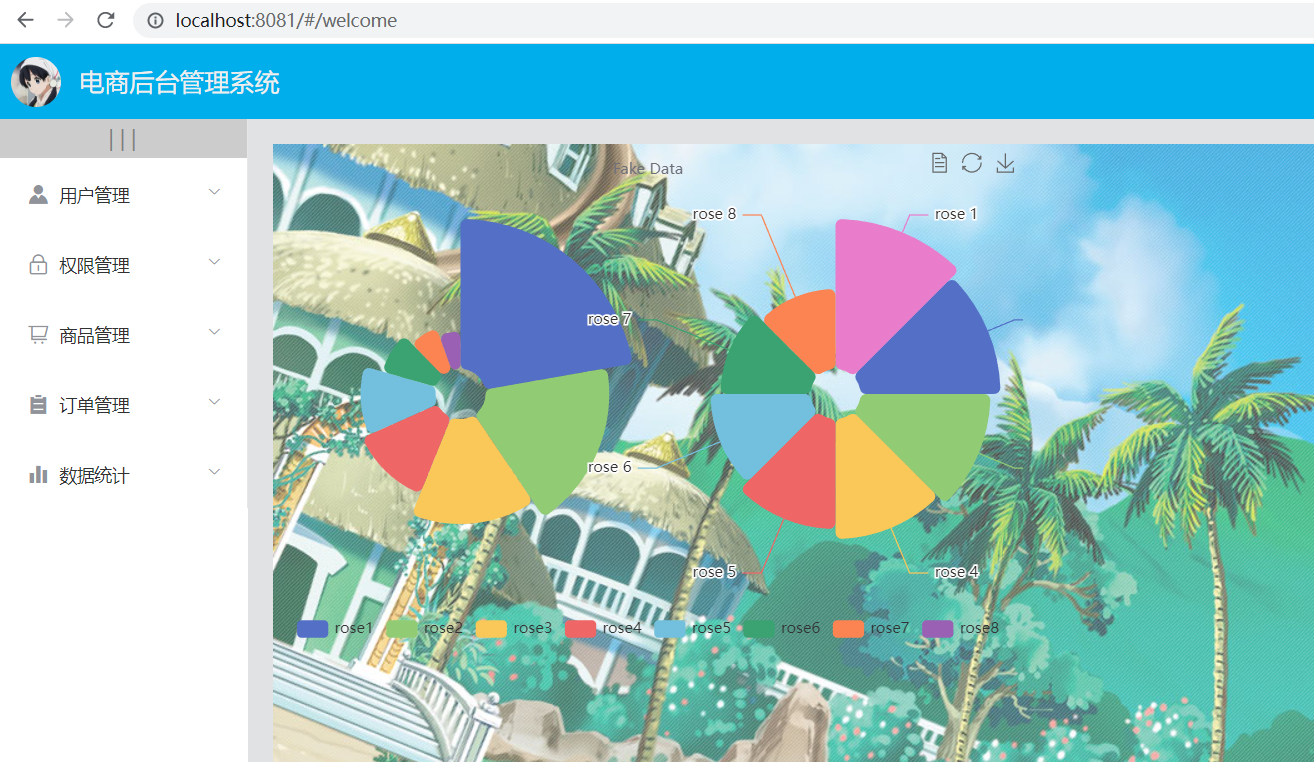
6:数据统计模块
6.1:echarts数据报表
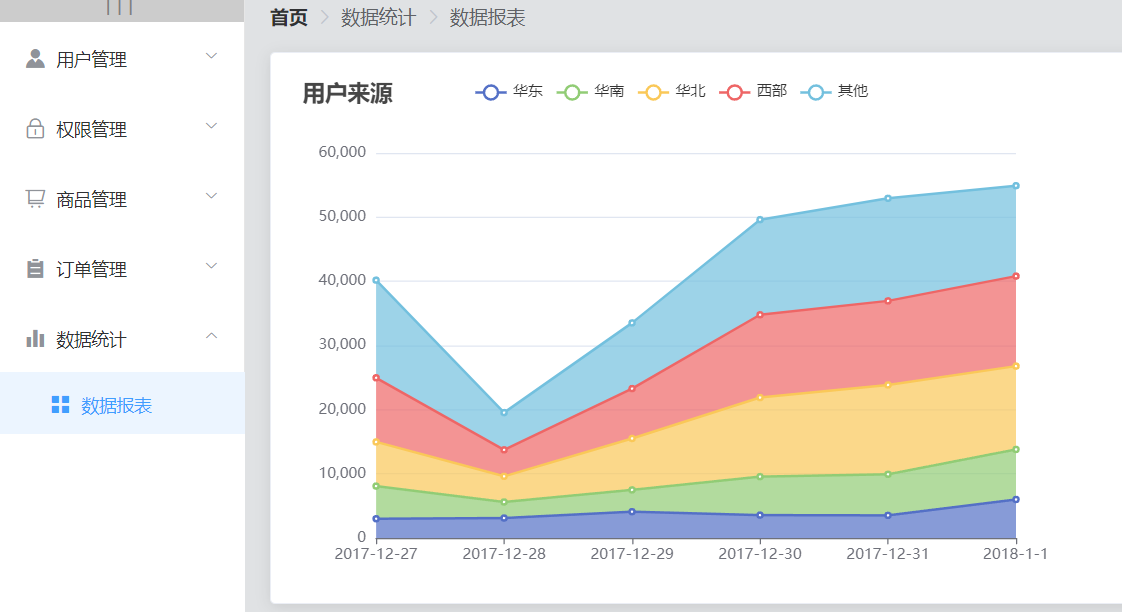
// 基于准备好的dom,初始化echarts实例var myChart = echarts.init(this.$refs.main)const{data: res }=awaitthis.$http.get('reports/type/1')if(res.meta.status !==200)returnthis.$message.error('初始化折线图失败!')const data = _.merge(res.data,this.options)// 绘制图表
 myChart.setOption(data)
6.2:NProgress的使用
NProgress 是前端轻量级 web 进度条插件
- 导入NProgress包
- 配合axios请求拦截器使用
//导入NProgress包import NProgress from'nprogress'import'nprogress/nprogress.css'//配置axios请求拦截器//在requst 拦截器中,展示进度条,NProgress.start()
axios.interceptors.request.use(config=>{
  NProgress.start()//为请求头对象,添加token验证的Authorization字段
  config.headers.Authorization = window.sessionStorage.getItem('token')return config
})//在response中 隐藏进度条NProgress.done()
axios.interceptors.response.use(config=>{
  NProgress.done()return config
})
三:总结
总算把一直拖着的项目知识点整理整理完了,ohYeah!!!
回想看完成这个项目,用自己学的vue的知识一步一步的完成,其中有许多相同的部分,但还是自己一步一步的完成了,期间遇到许许多多的error报错但还是上网不断的搜索搜索,debug。
对于路由的掌握更加得心应手了,包括登录的token认证,路由守卫,请求拦截器等等。
但也看过别人的大型项目,是将请求同一封装到一个request,js文件中,这样的好处更多是避免一个请求的方式出错减少更多的修改,以后要还有项目一定尝试尝试。
回想看最头疼的也是最有收获的部分就是分类参数模块的级联选择器配合tabs标签页的使用,添加参数等等。
通过这次的整理也算是对vue2的一个整体复习,要开始步入vue3和ts的学习了。
加油吧!
版权归原作者 追梦杰尼龟 所有, 如有侵权,请联系我们删除。