
需求和场景说明
最近要部署数据采集平台到生成环境上去。需要两个docker容器,一个运行采集脚本,一个是运行vnc+chrome的远程x11 server,也是跑在容器中。这个X11 server可以完成模拟登录,自动上传,自动发布的功能,包括自动idle以保持会话。之前在单机上正确运行无误,所以迁移到两个容器中也无碍。
基本需求:
- chrome要跑在docker容器中,以headless或headful方式运行。headful是因为有些自动化操作无法在headless下进行。
- 支持多个client同时访问chrome,也就是多个爬虫并行
认识Selenium
selenium remote sever 其实就是通过webdriver Json与浏览器交互,这也就介绍了为什么selenium能够实现支持各种语言,
不管是java python 等,都是通过selenium API翻译成Json 与浏览器进行交互。掌握了webdriver protocol 可以通过自己直接写request来实现与浏览器交互。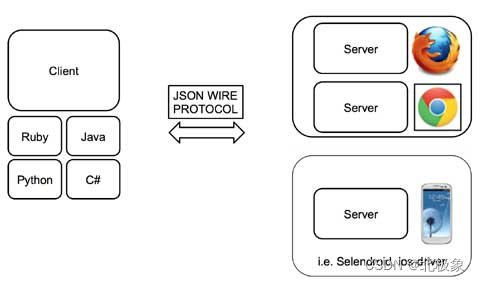
以开发者视角认识Chrome
Chrome在网民手中不过是一个浏览器而已,但在开发者手中就是神兵利器。自动化测试、爬虫、抓包、调试诊断、逆向、以及自动化运维都少不了它。搭配一些可编程的代理工具,如mitmproxy,更是如有神助。
连接远程容器中的Headless Chrome
这种场景最好采用别人制作好的镜像,否则各种安装依赖会让你深陷泥潭。服务器端,root用户是不能直接运行chrome的。不然无法启动chrome。可行的方法是切换用户,或者在启动chrome时添加‘–no-sandbox’参数。
目前普遍采用的镜像是:
docker pull selenium/standalone-chrome
运行方式:
docker run -d--cpus6-m 12GB --name my-chrome -p4444:4444 -p9898:80 -eSE_NODE_MAX_SESSIONS=8 --shm-size="2g" selenium/standalone-chrome
这个standalone-chrome镜像其实是把selenium grid的基本组件都集成在一起了。
注意:SE_NODE_MAX_SESSIONS如果不设置的话,只支持一个会话,就无法多个爬虫并发执行了。
连接selenium的代码示例如下:
defconnect_remote_chrome(url_str):print(f'Conencting to {url_str} ...')
    time.sleep(5)
    options = webdriver.ChromeOptions()

    driver = webdriver.Remote(
        command_executor="http://10.10.10.10:4444/wd/hub",
        options=options
    )

    driver.get(url_str)
    content = driver.title.split("_")[0]print(content)
    driver.close()
hub是selenium的一个组件,起到转发请求的作用。
制作一个自己的chrome容器
当然,如果你有更多的定制化需求,也完全可以打造一个自己的chrome容器。下面是一个简单的例子。
FROM node:10-slim

LABEL maintainer="Eric Bidelman <ebidel@>"# Install utilities
RUN apt-get update --fix-missing &&apt-get-y upgrade

# Install latest chrome dev package.
RUN wget-q-O - https://dl-ssl.google.com/linux/linux_signing_key.pub | apt-key add - \&&sh-c'echo "deb [arch=amd64] http://dl.google.com/linux/chrome/deb/ stable main" >> /etc/apt/sources.list.d/google.list'\&&apt-get update \&&apt-getinstall-y google-chrome-unstable --no-install-recommends \&&rm-rf /var/lib/apt/lists/* \&&rm-rf /src/*.deb

ADD https://github.com/Yelp/dumb-init/releases/download/v1.2.0/dumb-init_1.2.0_amd64 /usr/local/bin/dumb-init
RUN chmod +x /usr/local/bin/dumb-init

# Download latest Lighthouse from npm.# cache bust so we always get the latest version of LH when building the image.
ARG CACHEBUST=1
RUN npm i lighthouse -g# Install express.
COPY package.json .
RUN npm i --production# Add the simple server.
COPY server.js /
RUN chmod +x /server.js

COPY entrypoint.sh /
RUN chmod +x /entrypoint.sh

# Add a chrome user and setup home dir.
RUN groupadd--system chrome &&\useradd--system --create-home --gid chrome --groups audio,video chrome &&\mkdir--parents /home/chrome/reports &&\chown--recursive chrome:chrome /home/chrome

USER chrome

#VOLUME /home/chrome/reports#WORKDIR /home/chrome/reports# Disable Lighthouse error reporting to prevent prompt.
ENV CI=true

EXPOSE 8080

ENTRYPOINT ["dumb-init", "--", "/entrypoint.sh"]#CMD ["lighthouse", "--help"]
远程启动的参数说明:
chrome.exe --remote-debugging-port=9222 --user-data-dir=remote-profile
- chrome.exe: Chrome Browser Binary ( This is will different in all other operating systems like Unix, Mac, Linux)
- –remote-debugging-port: This is Chrome Preference to launch the browser in remote debug mode on a certain port, We can also use –remote-debugging-address.
- –user-date-dir: this is a directory where the browser stores the user profile, So we should always provide a new profile directory to save your default browser profile preferences.
连接远程容器中的headful Chrome
可以采用现有的镜像,如https://github.com/MeiK2333/headful-chrome-launch.git。
首先,在远程容器中启动chrome:
chrome --remote-debugging-port=9222 --user-data-dir=/root/chrome-data --no-sandbox
注意:笔者是以root身份启动的。
然后,在python中采用selenium连接远程chrome:
defget_remote_chrome():
    options = webdriver.ChromeOptions()

    options.add_argument("user-agent=Mozilla/5.0 (Windows NT 10.0; Win64; x64) AppleWebKit/537.36 (KHTML, like Gecko) Chrome/100.0.4896.127 Safari/537.36")## 此处的100.100.100.100请换成真实的主机地址
    options.add_experimental_option("debuggerAddress",f"100.100.100.100:9222")

    options.add_argument('disable-infobars')# options.add_argument("--headless")
    options.add_argument("--disable-gpu")# 针对反爬虫的设置
    options.add_argument("--disable-blink-features")
    options.add_argument("--disable-blink-features=AutomationControlled")

    driver = webdriver.Chrome(chrome_options=options)
    driver.maximize_window()return driver

deftest_remote():
    driver = get_remote_chrome()
    driver.get("https://www.csdn.net")
    title = driver.title.split("_")[0]print(title)
    driver.close()
Chrome调试模式的安全限制
当我们运行上述python代码时,会报错。原因是以调试方式运行chrome时,由于chrome的安全限制,不允许我们通过chrome浏览器以外的机器去连接它的调试端口。通常遇到下面报错信息:
[0526/132024.480654:ERROR:socket_posix.cc(137)]bind() returned an error, errno=49: Can't assign requested address
[0526/132024.480766:ERROR:devtools_http_handler.cc(226)] Cannot start http server for devtools. Stop devtools.
即使你通过–remote-debugging-address 参数指定0.0.0.0也不行。不过这点好办,写个代理,跑在和chrome同一个台机器上,做转发不就完事了?没错,这几乎是对付这种场景的万能方案。
下面是一个Python写的端口转发程序:
import time
import socket
import threading

deflog(strLog):
    strs = time.strftime("%Y-%m-%d %H:%M:%S")print(strs  +" -> "+strLog)classpipethread(threading.Thread):'''
    classdocs
    '''def__init__(self,source,sink):'''
        Constructor
        '''
        threading.Thread.__init__(self)
        self.source = source
        self.sink = sink
        log("New Pipe create:%s->%s"%(self.source.getpeername(),self.sink.getpeername()))defrun(self):whileTrue:try:
                data = self.source.recv(1024)ifnot data:break
                self.sink.send(data)except Exception as ex:
                log("redirect error:"+str(ex))break

        self.source.close()
        self.sink.close()classportmap(threading.Thread):def__init__(self, port, newhost, newport, local_ip =''):
        threading.Thread.__init__(self)
        self.newhost = newhost
        self.newport = newport
        self.port = port
        self.local_ip = local_ip
        self.protocol ='tcp'
        self.sock = socket.socket(socket.AF_INET,socket.SOCK_STREAM)
        self.sock.bind((self.local_ip, port))
        self.sock.listen(5)
        log("start listen protocol:%s,port:%d "%(self.protocol, port))defrun(self):whileTrue:
            newsock, address = self.sock.accept()
            log("new connection->protocol:%s,local port:%d,remote address:%s"%(self.protocol, self.port,address[0]))
            fwd = socket.socket(socket.AF_INET,socket.SOCK_STREAM)try:
                fwd.connect((self.newhost,self.newport))except Exception as ex:
                log("connet newhost error:"+str(ex))break
            p1 = pipethread(newsock, fwd)
            p1.start()
            p2 = pipethread(fwd, newsock)
            p2.start()classpipethreadUDP(threading.Thread):def__init__(self, connection, connectionTable, table_lock):
        threading.Thread.__init__(self)
        self.connection = connection
        self.connectionTable = connectionTable
        self.table_lock = table_lock
        log('new thread for new connction')defrun(self):whileTrue:try:
                data,addr = self.connection['socket'].recvfrom(4096)#log('recv from addr"%s' % str(addr))except Exception as ex:
                log("recvfrom error:"+str(ex))breaktry:
                self.connection['lock'].acquire()
                self.connection['Serversocket'].sendto(data,self.connection['address'])#log('sendto address:%s' % str(self.connection['address']))except Exception as ex:
                log("sendto error:"+str(ex))breakfinally:self.connection['lock'].release()
            self.connection['time']= time.time()
        self.connection['socket'].close()
        log("thread exit for: %s"%str(self.connection['address']))
        self.table_lock.acquire()
        self.connectionTable.pop(self.connection['address'])
        self.table_lock.release()
        log('Release udp connection for timeout:%s'%str(self.connection['address']))classportmapUDP(threading.Thread):def__init__(self, port, newhost, newport, local_ip =''):
        threading.Thread.__init__(self)
        self.newhost = newhost
        self.newport = newport
        self.port = port
        self.local_ip = local_ip
        self.sock = socket.socket(socket.AF_INET,socket.SOCK_DGRAM)
        self.sock.bind((self.local_ip,port))
        self.connetcTable ={}
        self.port_lock = threading.Lock()
        self.table_lock = threading.Lock()
        self.timeout =300#ScanUDP(self.connetcTable,self.table_lock).start()
        log('udp port redirect run->local_ip:%s,local_port:%d,remote_ip:%s,remote_port:%d'%(local_ip,port,newhost,newport))defrun(self):whileTrue:
            data,addr = self.sock.recvfrom(4096)
            connection =None
            newsock =None
            self.table_lock.acquire()
            connection = self.connetcTable.get(addr)
            newconn =Falseif connection isNone:
                connection ={}
                connection['address']= addr
                newsock = socket.socket(socket.AF_INET,socket.SOCK_DGRAM)
                newsock.settimeout(self.timeout)
                connection['socket']= newsock
                connection['lock']= self.port_lock
                connection['Serversocket']= self.sock
                connection['time']= time.time()
                newconn =True

                log('new connection:%s'%str(addr))
            self.table_lock.release()try:
                connection['socket'].sendto(data,(self.newhost,self.newport))except Exception as ex:
                log("sendto error:"+str(ex))#breakif newconn:
                self.connetcTable[addr]= connection
                t1=pipethreadUDP(connection,self.connetcTable,self.table_lock)
                t1.start()
        log('main thread exit')for key in self.connetcTable.keys():
            self.connetcTable[key]['socket'].close()if __name__=='__main__':
    myp = portmap(9223,'127.0.0.1',9222)
    myp.start()
在chrome所在的docker容器运行它:
python ./portmap.py
即可将进入容器的9223端口上的请求转发到chrome上去。再次执行selenium访问代码即可正常操作浏览器了。
Headful chrome Dockerfile参考
FROM mcr.microsoft.com/playwright:focal

ENV TZ=Asia/Shanghai
ENV DEBIAN_FRONTEND=noninteractive

RUN apt-getinstall-y locales

RUN sed-i-e's/# zh_CN.UTF-8 UTF-8/zh_CN.UTF-8 UTF-8/' /etc/locale.gen &&\
    dpkg-reconfigure --frontend=noninteractive locales &&\
    update-locale LANG=zh_CN.UTF-8

ENV LANG=zh_CN.UTF-8
ENV LC_ALL=zh_CN.UTF-8
ENV LANGUAGE=zh_CN:zh:en

# Install front and others
RUN apt-getinstall-yq\
    ca-certificates \curl\
    dumb-init \
    ffmpeg \
    fontconfig \
    fonts-indic \
    fonts-liberation \
    fonts-noto-cjk \
    fonts-noto-color-emoji \
    fonts-thai-tlwg \
    gconf-service \
    libappindicator1 \
    libappindicator3-1 \
    libatk-bridge2.0-0 \
    libatk1.0-0 \
    libc6 \
    libcairo2 \
    libcups2 \
    libdbus-1-3 \
    libexpat1 \
    libfontconfig1 \
    libgbm1 \
    libgcc1 \
    libgconf-2-4 \
    libgl1 \
    libglib2.0-0 \
    libgtk-3-0 \
    libnspr4 \
    libpango-1.0-0 \
    libpangocairo-1.0-0 \
    libstdc++6 \
    libx11-6 \
    libx11-xcb1 \
    libxcb1 \
    libxcomposite1 \
    libxcursor1 \
    libxdamage1 \
    libxext6 \
    libxfixes3 \
    libxi6 \
    libxrandr2 \
    libxrender1 \
    libxt6 \
    libxtst6 \
    locales \
    lsb-release \unzip\wget\
    x11-apps \
    x11-xkb-utils \
    x11vnc \
    xdg-utils \
    xfonts-100dpi \
    xfonts-75dpi \
    xfonts-cyrillic \
    xfonts-scalable \
    xvfb \
    fvwm \
    xterm

# Download Chrome
RUN cd /tmp &&\wget-q-O - https://dl-ssl.google.com/linux/linux_signing_key.pub | apt-key add - &&\sh-c'echo "deb [arch=amd64] https://dl-ssl.google.com/linux/chrome/deb/ stable main" >> /etc/apt/sources.list.d/google-chrome.list'&&\apt-get update &&\apt-getinstall-yq google-chrome-stable

RUN apt-get-qq clean &&rm-rf /var/lib/apt/lists/* /tmp/* /var/tmp/*

RUN mkdir /app

WORKDIR /app

COPY . /app

RUN npminstall&&\npminstall-g ts-node typescript

# RUN chown -R pwuser:pwuser /app# Run everything after as non-privileged user.# USER pwuser

CMD ["./start.sh"]
关于Selenium Grid
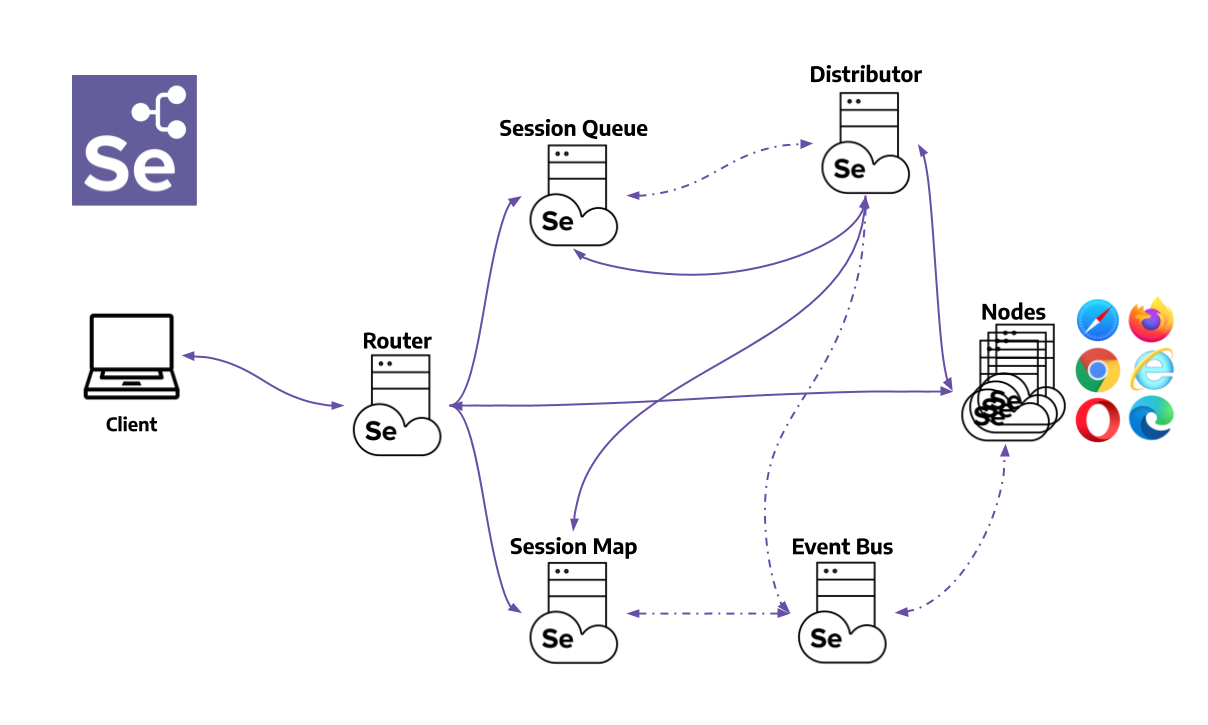
Grid的适用场景是多个node,每个node上运行一个浏览器,而且可以是不同类型的浏览器。这对提高并发,和做兼容性测试是非常有好处的。
MacOS下命令行运行chrome
直接在容器中运行headless chrome,会由于安全的限制,提示报错:
Failed to move to newnamespace:PID namespaces supported, Network namespace supported, but failed: errno = Operation not permitted
采用open命令:
open -a Google\ Chrome –args -disable-web-security
或者直接运行(zsh下):
/Applications/Google\ Chrome.app/Contents/MacOS/Google\ Chrome --remote-debugging-port=9222--user-data-dir=/opt/tmp/chrome
Chrome命令行参数简介
chrome \--headless\# Runs Chrome in headless mode.
--disable-gpu \# Temporarily needed if running on Windows.
--remote-debugging-port=9222\
https://www.baidu.com   # URL to open. Defaults to about:blank.
If you’re on the stable channel of Chrome and cannot get the Beta, I recommend using chrome-canary:
Download Chrome Canary here. https://www.google.com/chrome/canary/,每日构建版本
aliaschrome="/Applications/Google\ Chrome.app/Contents/MacOS/Google\ Chrome"alias chrome-canary="/Applications/Google\ Chrome\ Canary.app/Contents/MacOS/Google\ Chrome\ Canary"aliaschromium="/Applications/Chromium.app/Contents/MacOS/Chromium"
Print the DOM:
chrome --headless --disable-gpu --dump-dom https://www.chromestatus.com/
The --print-to-pdf flag creates a PDF of the page:
chrome --headless --disable-gpu --print-to-pdf https://www.chromestatus.com/
To capture a screenshot of a page, use the --screenshot flag:
chrome --headless --disable-gpu --screenshot https://www.chromestatus.com/

# Size of a standard letterhead.
chrome --headless --disable-gpu --screenshot --window-size=1280,1696 https://www.chromestatus.com/

# Nexus 5x
chrome --headless --disable-gpu --screenshot --window-size=412,732 https://www.chromestatus.com/
The --repl flag runs Headless in a mode where you can evaluate JS expressions in the browser, right from the command line:
$ chrome --headless --disable-gpu --repl --crash-dumps-dir=./tmp https://www.chromestatus.com/
[0608/112805.245285:INFO:headless_shell.cc(278)] Type a Javascript expression to evaluate or "quit" to exit.
>>> location.href
{"result":{"type":"string","value":"https://www.chromestatus.com/features"}}>>> quit
$
chrome实例池
只采用一个chrome实例往往不能满足需求,这时就需要用到实例池了。下面的脚本创建了一个chrome实例池。
let pool = genericPool.createPool({create(){return puppeteer.launch()},validate(browser){return Promise.race([newPromise(res=>setTimeout(()=>res(false),1500)),
      browser.version().then(_=>true).catch(_=>false)])},destroy(browser){return browser.close();}},{min:2,max:10,testOnBorrow:true,acquireTimeoutMillis:15000})
结论
本文简要介绍了在容器中运行chrome,以及在容器外采用selenium库远程操纵chrome的两种模式:
- chrome以headless方式运行,这时用standalone selenium镜像既可解决
- chrome以headful方式运行,这是采用一个代理转发程序即可解决
版权归原作者 北极象 所有, 如有侵权,请联系我们删除。