
前言
Hello,我是小黄。众所周知,Spring是一个开源的Java应用程序框架,其中包括许多通过注解实现依赖注入的功能。Spring提供了多种注入方式,可以满足不同的需求和场景。常见的注入方式包括构造函数注入、Setter方法注入和属性注入。不同的注入方式有不同的适用场景和优缺点。选择正确的注入方式可以提高应用程序的可维护性和性能。 本文以Spring的常见注解以及不同注入方式的优缺点为切入点进行深入讨论。 话不多说,正文开始~
文章目录
*操作准备
要想将对象成功存储到 Spring 中,就需要配置存储对象的扫描包路径,只有被配置的包下的所有类,添加了注解才能被正确的识别并保存到 Spring 中。这里采用 xml 文件的形式进行配置(有兴趣的小伙伴可以查阅笔者之前的Spring文章,采用配置类的形式进行纯注解的开发配置):
spring-config.xml
<?xml version="1.0" encoding="UTF-8"?><beansxmlns="http://www.springframework.org/schema/beans"xmlns:xsi="http://www.w3.org/2001/XMLSchema-instance"xmlns:content="http://www.springframework.org/schema/context"xsi:schemaLocation="http://www.springframework.org/schema/beans http://www.springframework.org/schema/beans/spring-beans.xsd http://www.springframework.org/schema/context https://www.springframework.org/schema/context/spring-context.xsd"><!-- 配置扫描路径 --><content:component-scanbase-package="com.hxh"/></beans>
另外,Spring 操作需要的相关依赖,这里采用 Maven 的方式实现,相关依赖的配置如下:
pom.xml
<?xml version="1.0" encoding="UTF-8"?><projectxmlns="http://maven.apache.org/POM/4.0.0"xmlns:xsi="http://www.w3.org/2001/XMLSchema-instance"xsi:schemaLocation="http://maven.apache.org/POM/4.0.0 http://maven.apache.org/xsd/maven-4.0.0.xsd"><modelVersion>4.0.0</modelVersion><groupId>org.example</groupId><artifactId>Spring_demo03</artifactId><version>1.0-SNAPSHOT</version><!-- Spring相关的配置 --><dependencies><dependency><groupId>org.springframework</groupId><artifactId>spring-context</artifactId><version>5.2.3.RELEASE</version></dependency><dependency><groupId>org.springframework</groupId><artifactId>spring-beans</artifactId><version>5.2.3.RELEASE</version></dependency></dependencies></project>
1 什么是注解?
注解是代码中特殊的标记,格式如下:
@注解名称(属性名称=属性值,属性名称=属性值......)
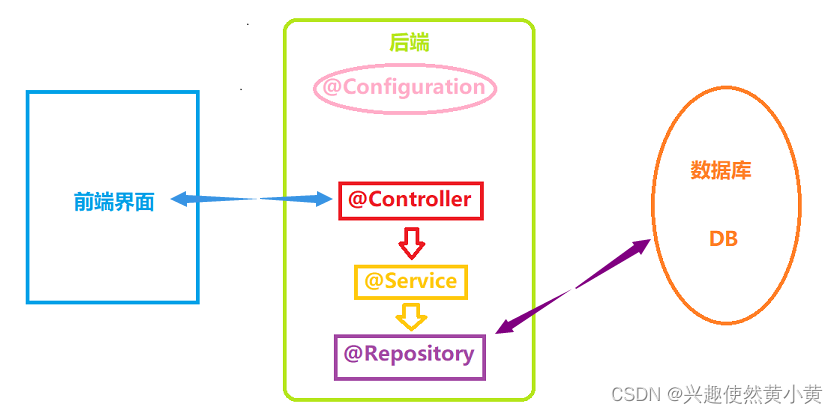
注解可以作用在类、方法、属性上。Spring针对Bean管理中创建对象提供注解,在 Spring 中,注解可以分为两大类:
- 类注解: 以下四个注解都可以用来创建bean实例,只是为了便于开发者清晰区分当前层。
@Configuration,@Service,@Controller,@Repository,@Component - 方法注解:
@Bean
为什么需要这么多个类注解?
对于其余四个类注解,它们本身就是属于 @Component 的“⼦类”。五个类注解的功能是一致的,命名上将其区分,是为了让程序员看到类注解之后,就能直接了解当前类的用途:
- @Controller:表示的是业务逻辑层;
- @Servie:服务层;
- @Repository:持久层;
- @Configuration:配置层。
2 基于注解存储 Bean 对象
2.1 类注解方式
2.1.1 如何存储 Bean?
@Configuration 配置存储
@Configuration// 将对象存储到 Spring 中publicclassUserConfiguration{publicvoidsayHello(){System.out.println("Hello, I'm userConfiguration !");}}
@Service 服务存储
@Service// 将对象存储到 Spring 中publicclassUserService{publicvoidsayHello(){System.out.println("Hello, I'm userService!");}}
@Controller 控制器存储
@Controller// 将对象存储到 Spring 中publicclassUserController{publicvoidsayHello(){System.out.println("Hello, I'm userController!");}}
@Repository 仓库存储
@Repository// 将对象存储到 Spring 中publicclassUserRepository{publicvoidsayHello(){System.out.println("Hello, I'm userRepository!");}}
@Component 组件存储
@Component// 将对象存储到 Spring 中publicclassUserComponent{publicvoidsayHello(){System.out.println("Hello, I'm userComponent!");}}
2.1.2 如何读取 Bean?
这里以读取 StudentController 对象为例,由于我们采用的是标准的大驼峰命名法,因此,读取的时候将首字母小写, 就可以读取到相应的 JavaBean 了。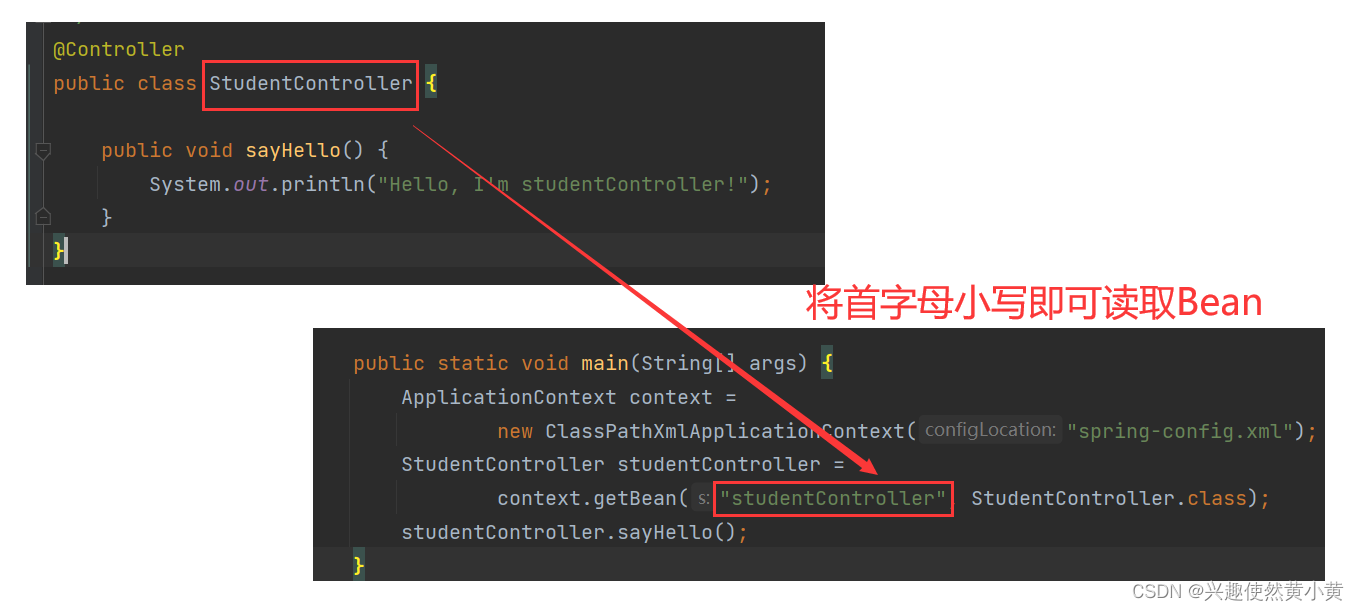
2.1.3 读取时的常见问题及 Bean 命名规则
倘若我们不按照标准的大驼峰命名法对类进行命名读取Bean时会有区别吗?
首先我们尝试创建类 IService,并通过首字母小写的方式读取 Bean:无法正常读取 Bean!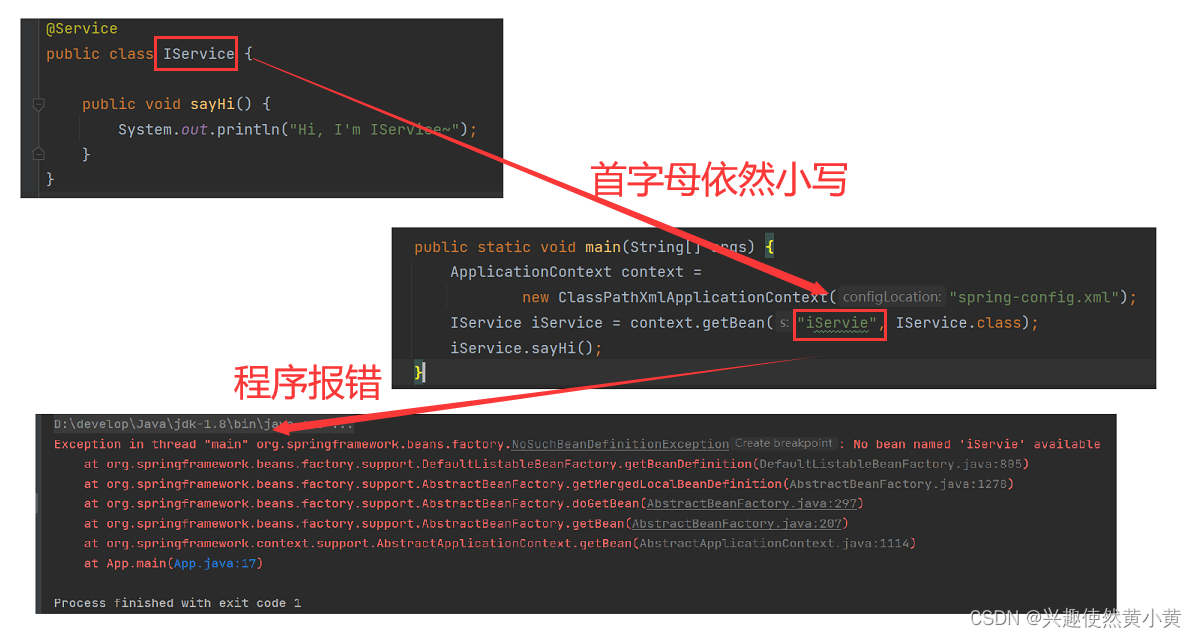
为了探究异常发生的原因,我们需要深入 Spring 的源码,看看 Bean 的命名规则:AnnotationBeanNameGenerator.class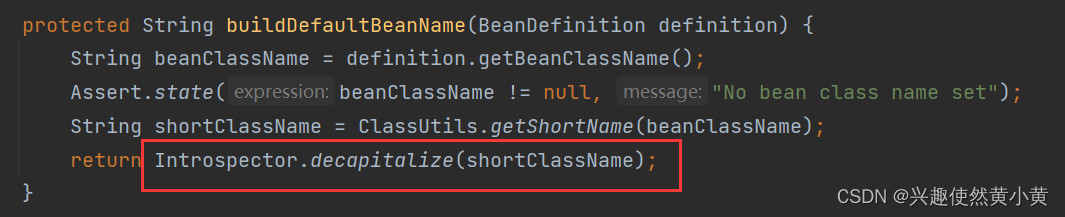
bean 对象的命名规则使用方法是
JDK Introspector
中的
decapitalize
⽅法,其源码如下:
publicstaticStringdecapitalize(String name){if(name ==null|| name.length()==0){return name;}if(name.length()>1&&Character.isUpperCase(name.charAt(1))&&Character.isUpperCase(name.charAt(0))){return name;}char chars[]= name.toCharArray();
      chars[0]=Character.toLowerCase(chars[0]);returnnewString(chars);}
通过阅读源码,可以看出 bean 的命名规则: 如果第⼀个字⺟和第⼆个字⺟都为⼤写的情况,是把 bean 的⾸字⺟也⼤写存储了~ 否则,就将首字母小写~ 这通常意味着将第一个字符从大写转换为小写,但在(不寻常的)特殊情况下,当有多个字符并且第一个和第二个字符都是大写时,我们不处理它。
2.2 方法注解方式
类注解用于标记类为Spring Bean,使用@ComponentScan扫描时,每个注解只会创建一个Bean对象,因此在同一个ApplicationContext容器中,获得的对象是同一个。
那么如果想要获取不同的对象怎么办呢? 下面我们就来聊一聊方法注解~
顾名思义,⽅法注解就是是放到某个⽅法上的,以下是简单的代码实现:需要注意的是 ⽅法注解 @Bean 要配合类注解才能将对象正常的存储到 Spring 容器中
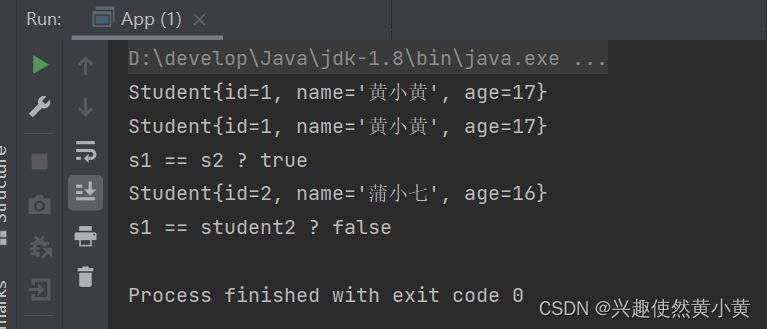
@ControllerpublicclassStudentBeans{@Bean(name ={"s1","s2"})// 可以通过设置 name 属性给 Bean 对象进⾏重命名操作publicStudentstudent(){Student student =newStudent();
        student.setId(1);
        student.setName("黄小黄");
        student.setAge(17);return student;}@BeanpublicStudentstudent02(){Student student =newStudent();
        student.setId(2);
        student.setName("蒲小七");
        student.setAge(16);return student;}}
读取 Bean 的代码如下:
publicstaticvoidmain(String[] args){ApplicationContext context =newClassPathXmlApplicationContext("spring-config.xml");Student s1 = context.getBean("s1",Student.class);Student s2 = context.getBean("s2",Student.class);// 打印 s1 和 s2 信息System.out.println(s1);System.out.println(s2);System.out.println("s1 == s2 ? "+(s1 == s2));// 尝试获取 student 不同对象Student student02 = context.getBean("student02",Student.class);System.out.println(student02);System.out.println("s1 == student2 ? "+(s1 == student02));}
3 基于注解获取 Bean 对象(对象装配)
在Spring中,获取 Bean 对象即把对象取出来放到某个类中,有三种方式来实现对象装配:
- 属性注入
- Setter 注入
- 构造方法注入
不同的注入方式有不同的适用场景和优缺点。以下案例则以将 Service 类注⼊到 Controller 类中为切入点,帮助大家了解三种注入方式的优缺点和区别~
3.1 属性注入
属性注入主要通过
@Autowired
实现,相关代码如下:
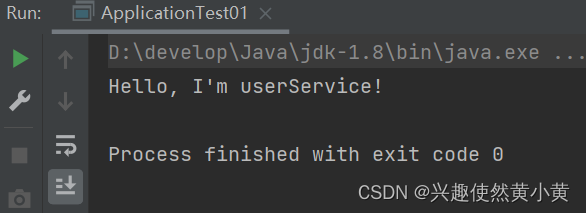
UserService
@ServicepublicclassUserService{publicvoidsayHello(){System.out.println("Hello, I'm userService!");}}
UserController
@ControllerpublicclassUserController{// 1. 使用属性注入的方式  不能注入不可变对象且违背单一设计原则@AutowiredprivateUserService userService;publicvoidsayHello(){// 调用 service 的方法
        userService.sayHello();}}
此时,通过如下的代码,即可通过 userController 的 sayHello() 方法调用 service 中的 sayHello() 方法。其余两种装配实现方式,该部分代码等同,Service 也等同,就不再赘述了。
publicclassApplicationTest01{privatestaticfinalString URL ="spring-config.xml";publicstaticvoidmain(String[] args){ApplicationContext context =newClassPathXmlApplicationContext(URL);UserController userController = context.getBean("userController",UserController.class);
        userController.sayHello();}}
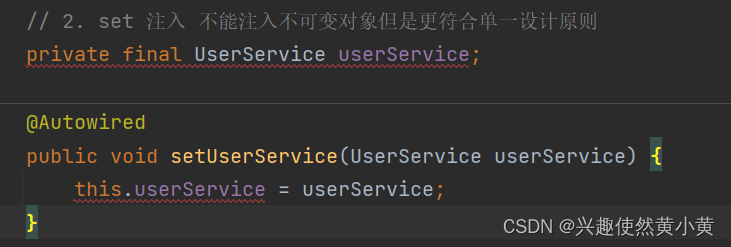
3.2 Setter 注入
即,在 setter 方法前加上 @Autowired 注解。
核心代码
// 2. set 注入 不能注入不可变对象但是更符合单一设计原则privateUserService userService;@AutowiredpublicvoidsetUserService(UserService userService){this.userService = userService;}
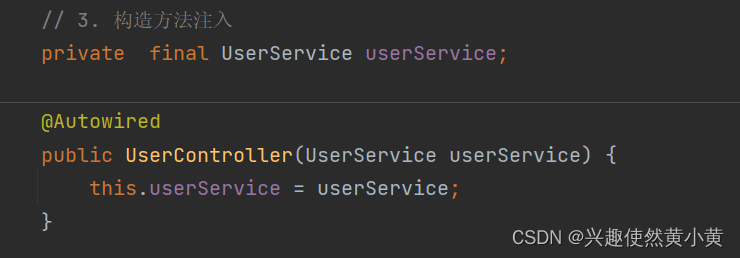
3.3 构造方法注入
构造⽅法注⼊是在类的构造⽅法中实现注⼊。在类中添加带有参数的构造方法,Spring会根据参数类型和名称,在容器中找到相应的Bean进行注入。特别地,如果只有⼀个构造⽅法,那么 @Autowired 注解可以省略~
核心代码
// 3. 构造方法注入privateUserService userService;@AutowiredpublicUserController(UserService userService){this.userService = userService;}
3.4 三种不同注入方式的优劣分析
Spring的三种注入方式分别是属性注入、Setter 注入与构造方法注入,其区别如下:
- 属性注入:在类的属性上添加@Autowired注解,Spring会自动在容器中查找符合该属性类型的Bean进行注入。优点是简洁,使⽤⽅便;缺点是只能⽤于 IoC 容器,如果是⾮ IoC 容器不可⽤,并且只有在使⽤的时候才会出现 NPE(空指针异常)。同时,属性注入的方式不可注入不可变对象,且违背单一设计原则:

- Setter注入:在类中添加setter方法,Spring会根据方法名称和参数类型,在容器中找到相应的Bean进行注入。主要特点是注入后对象的属性是可变的,可以随时修改。虽然在一定程度上相对符合了单一设计原则,但依然不可注入不可变对象:
- 构造器注入:在类中添加带有参数的构造方法,Spring会根据参数类型和名称,在容器中找到相应的Bean进行注入。主要特点是注入后对象的属性是不可变的,一旦注入完成后就不能再改变,是 Spring 推荐的注⼊⽅式。解决了以上两种方式不可注入不可变对象的问题:
📖 补充:单一设计原则
单一职责原则(Single Responsibility Principle)是一种设计原则,它建议一个类或模块只应该负责一项职责。这个原则通常被认为是最基本的设计原则之一。
使用单一职责原则可以带来如下好处:
- 降低模块的复杂度,使其更易于理解和修改。
- 提高模块的可复用性和可测试性,因为它们只关注一项职责。
- 降低系统的耦合性,因为每个模块都是独立的,不会依赖于其他模块。
- 更好地支持面向对象设计的原则,例如开放封闭原则。
3.5 @Resource 注解
在进⾏类注⼊时,除了可以使⽤ @Autowired 关键字之外,我们还可以使⽤ @Resource 进⾏注⼊:
@ResourceprivateUserService userService;
@Resource 与 @Autowired 的区别:
- @Autowired 来自于 Spring,而 @Resource 来自 JDK,后者相较前者支持更多的参数设置;
- @Resource 只能用于 Setter 注入和 属性注入。
3.6 常见错误:非唯一的 Bean 对象
当出现以下多个 Bean,返回同⼀对象类型时程序会报错,参考代码如下:
@ComponentpublicclassBookBeans{@BeanpublicBookbook01(){Book book =newBook();
        book.setName("计算机网络");return book;}@BeanpublicBookbook02(){Book book =newBook();
        book.setName("计算机操作系统");return book;}}
Controller
@ControllerpublicclassBookController{@AutowiredprivateBook book;publicBookgetBook(){return book;}}
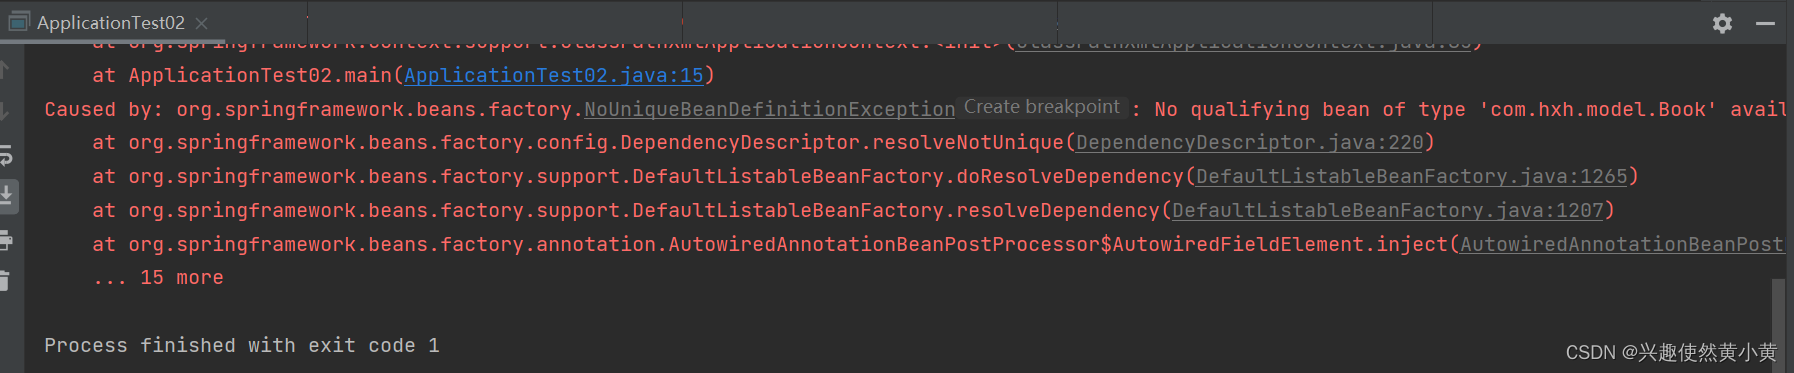
这是由于 **Bean 对象不是唯一的导致的~**, 解决方案如下:
- 使用
@Resource(name = "xxx")来指定~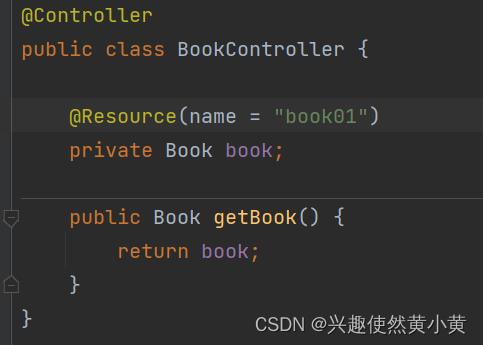
- 使用
@Qualifier注解定义名称~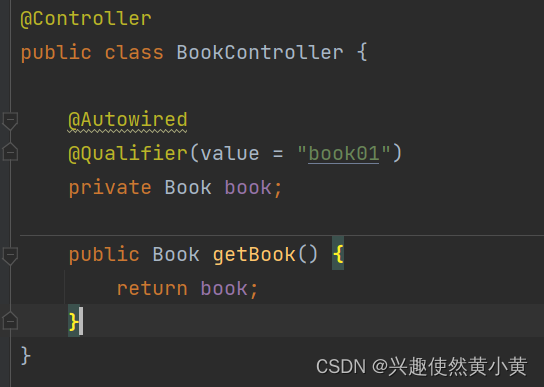
写在最后
本文就如何将对象存储到 Spring 中分类注解与方法注解进行了阐述,同时,对 Bean 对象的命名规则进行了说明。从 Spring 中获取对象有三种方式,不同的注入方式有不同的适用场景,或更加简便,或有独有的特性。总的来说,Spring 的出现的确为我们开发提高了效率,但我们需要明确的是,任何一个工具的出现都要求我们在熟悉的基础上使用,才能事半功倍。
本文被 JavaEE编程之路 收录点击订阅专栏 , 持续更新中。
以上便是本文的全部内容啦!创作不易,如果你有任何问题,欢迎私信,感谢您的支持!
版权归原作者 兴趣使然黄小黄 所有, 如有侵权,请联系我们删除。