文章目录
🌕博客x主页:己不由心王道长🌕!
🌎文章说明:SpringBoot🌎
✅系列专栏:spring
🌴本篇内容:基于SpringBoot整合Mybatis、druid🌴
☕️每日一语:有时候,没有下一次,没有机会重来,没有暂停继续。有时候,错过了现在,就永远永远的没机会了。☕️
🕤作者详情:作者是一名双非大三在校生,喜欢Java,欢迎大家探讨学习,喜欢的话请给博主一个三连鼓励。🕤
🚩 交流社区:己不由心王道长(优质编程社区)
🚩 SpringBoot整合junit
🏴☠️SpringBoot整合junit
①还是一样,我们首先创建一个SpringBoot模块。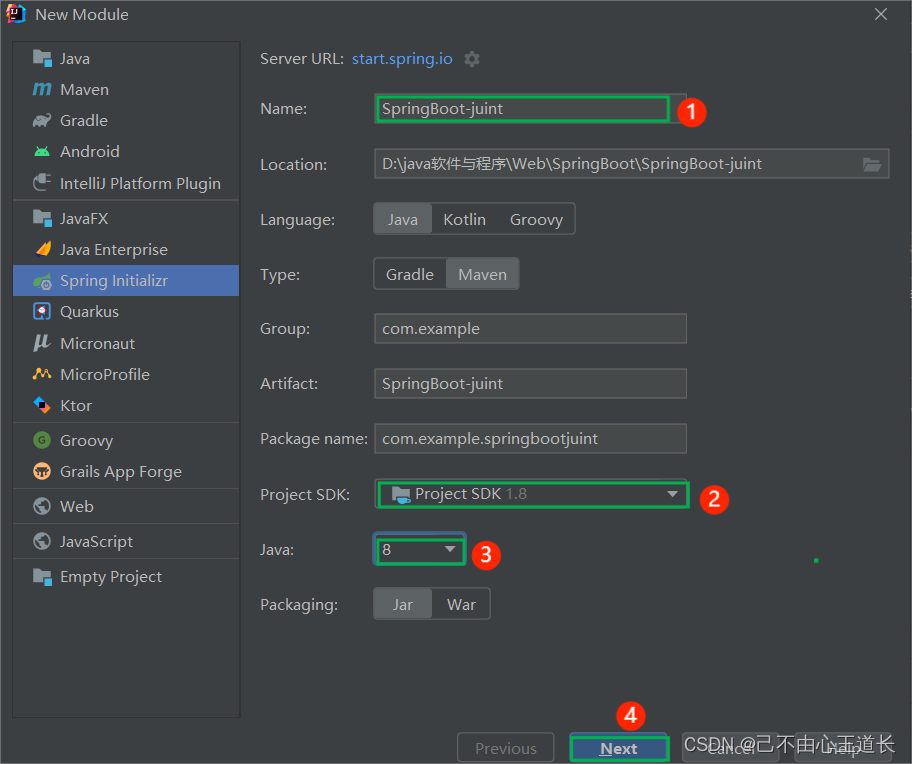
由于我们并不测试前端,而只是整合junit,所以不用选择模板,选择其中的web即可。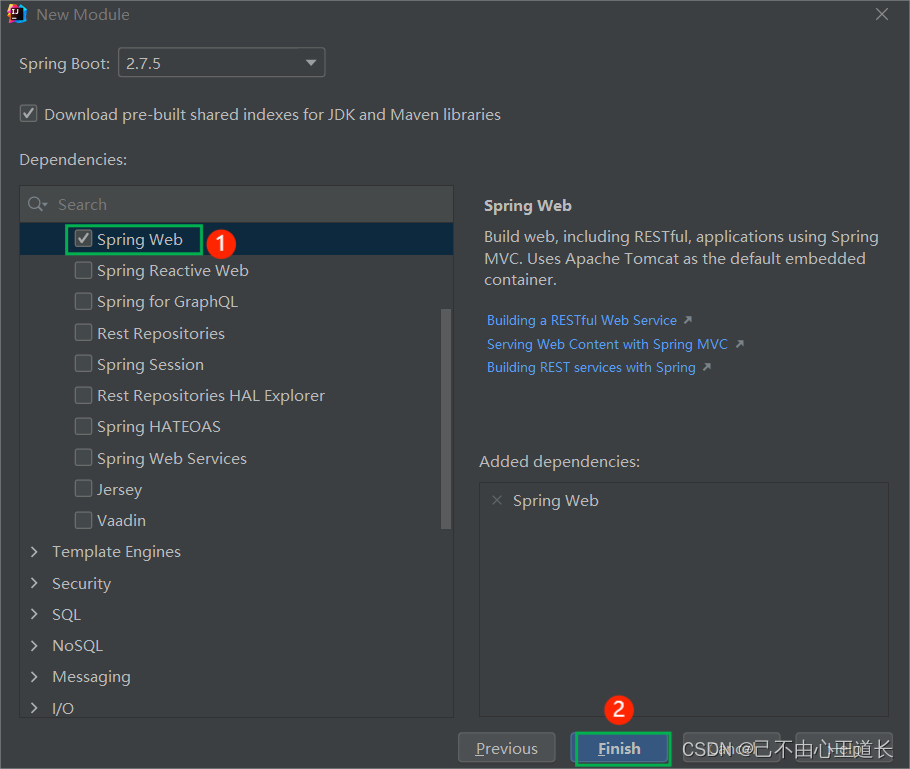
完成以后我们打开Pom.xml,会发现报错,这里我的版本不能到2.7.5,降版本。
②导入对应的starter
查看Pom.xml文件:我们发现已经有了一个Spring-Boot-stater-test,这其实就是SpringBoot已经自己整合了junit
<?xml version="1.0" encoding="UTF-8"?><project xmlns="http://maven.apache.org/POM/4.0.0" xmlns:xsi="http://www.w3.org/2001/XMLSchema-instance"
         xsi:schemaLocation="http://maven.apache.org/POM/4.0.0 https://maven.apache.org/xsd/maven-4.0.0.xsd"><modelVersion>4.0.0</modelVersion><parent><groupId>org.springframework.boot</groupId><artifactId>spring-boot-starter-parent</artifactId><version>2.7.4</version><relativePath/><!-- lookup parent from repository --></parent><groupId>com.example</groupId><artifactId>SpringBoot-juint</artifactId><version>0.0.1-SNAPSHOT</version><name>SpringBoot-juint</name><description>SpringBoot-juint</description><properties><java.version>1.8</java.version></properties><dependencies><dependency><groupId>org.springframework.boot</groupId><artifactId>spring-boot-starter-web</artifactId></dependency><dependency><groupId>org.springframework.boot</groupId><artifactId>spring-boot-starter-test</artifactId><scope>test</scope></dependency></dependencies><build><plugins><plugin><groupId>org.springframework.boot</groupId><artifactId>spring-boot-maven-plugin</artifactId></plugin></plugins></build></project>
问题随之而来,既然SpringBoot已经整合了junit,那我们还整合啥?答案是不用整合!
因为SpringBoot项目在创建的时候已经默认整合了junit,至于为什么是这样,是因为SpringBoot是一个maven项目,而maven在执行它的生命周期的时候测试是跳不过去的,它必须执行测试。
③测试类添加@SpringBootTest注解修饰
packagecom.example;importorg.junit.jupiter.api.Test;importorg.springframework.boot.test.context.SpringBootTest;@SpringBootTestclassSpringBootJuintApplicationTests{@TestvoidcontextLoads(){}}
④ 使用自动装配添加要测试的对象
这里测试啥呢?测试一下dao层
一、编写Dao层接口:
packagecom.example.Dao;/**
 * @author 不止于梦想
 * @date 2022/10/23 12:54
 */publicinterfaceUserDao{publicvoidselectAll();}
二、编写Dao层接口的实现类:值得说明的是,一般情况下,因为Dao层的mapper需要用到反射,一般是没有实现类的,这里只是为了测试方便!!!
packagecom.example.Dao.impl;importcom.example.Dao.UserDao;importorg.springframework.stereotype.Repository;/**
 * @author 不止于梦想
 * @date 2022/10/23 12:54
 */@Repository//把这个类交给Spring容器管理publicclassImplUserDaoimplementsUserDao{@OverridepublicvoidselectAll(){System.out.println("selectAll.......");}}
三、在测试类中使用@Autowired进行注入
packagecom.example;importcom.example.Dao.UserDao;importorg.junit.jupiter.api.Test;importorg.springframework.beans.factory.annotation.Autowired;importorg.springframework.boot.test.context.SpringBootTest;@SpringBootTestclassSpringBootJuintApplicationTests{@AutowiredUserDao userDao;@TestvoidcontextLoads(){
        userDao.selectAll();}}
四、执行测试
🏴☠️SpringBoot整合junit的classes
在上面整合的junit并不完整,为什么这样说,请看: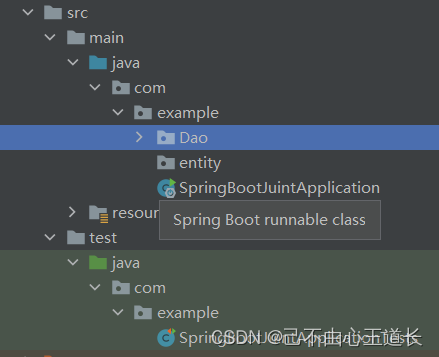
现在SpringBoot的引导类和测试类的引导类都在同级目录下,现在我要把测试类的引导类移动到com包下
执行测试,输出:Unable to find a @SpringBootConfiguration, you need to use @ContextConfiguration or @SpringBootTest(classes=...) with your test
:说的是它找不到SpringBoot的配置类,需要你使用@ContextConfiguration或者@SpringBootTest为你的测试类指定SpringBoot的配置类
为什么出现以下情况,原来是@SpringBootTest会默认从当前包及其子包下寻找SpringBoot的配置类,当我们把测试类中的SpringBootJuintApplicationTests移动到com包下时,它就找不到对应的SpringBoot的配置类,因为它这时不在引导类包及其子包下,也就无法从spring容器中获取对应bean,则无法进行注入。
解决方法:在@SpringBootTest注解中指定引导类或者使用@ContextConfiguration
@SpringBootTest(classes =SpringBootJuintApplication.class)@ContextConfiguration(classes =SpringBootJuintApplication.class)

🚩SpringBoot整合Mybatis
🏴☠️整合前的准备
值得说明的是,这里整合Mybatis用的是注解的方式
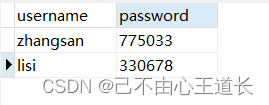
一、创建数据库数据
DROP TABLE IF EXISTS `user`;
CREATE TABLE `user`  (
  `username` varchar(20) CHARACTER SET utf8 COLLATE utf8_esperanto_ci NULL DEFAULT NULL,
  `password` varchar(20) CHARACTER SET utf8 COLLATE utf8_esperanto_ci NULL DEFAULT NULL
) ENGINE =InnoDBCHARACTER SET = utf8 COLLATE = utf8_esperanto_ci ROW_FORMAT =Dynamic;

INSERT INTO `user` VALUES ('zhangsan', '775033');
INSERT INTO `user` VALUES ('lisi','330678');SET FOREIGN_KEY_CHECKS =1;
二、创建工程、新建对应实体类
SpringBoot方便的一部分原因就是,用什么导入就勾选什么技术。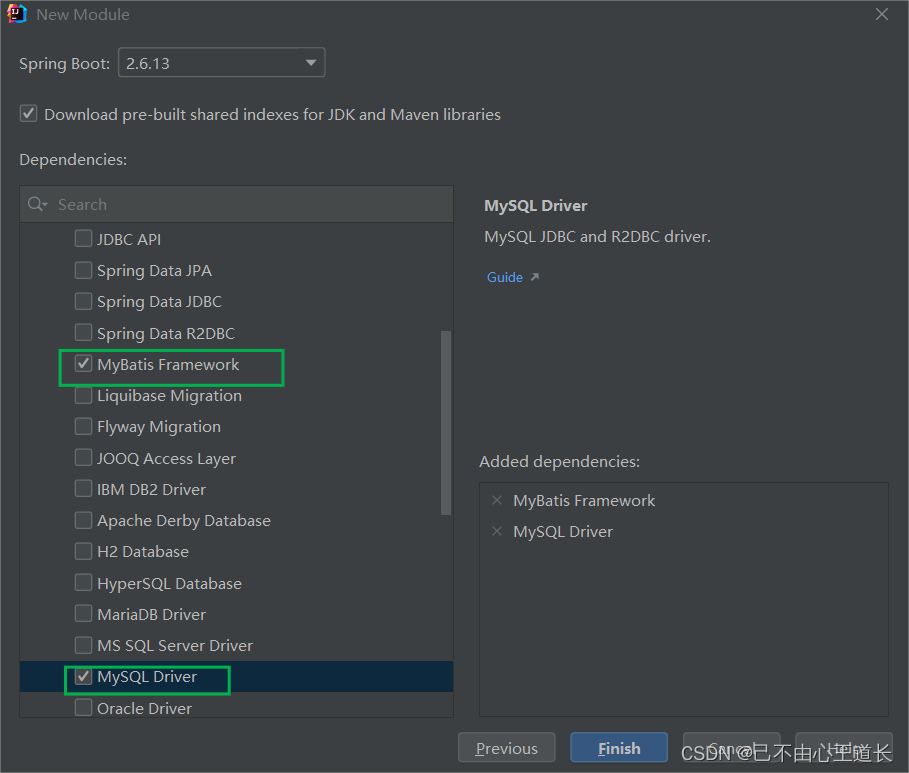
或者手动加入:
<?xml version="1.0" encoding="UTF-8"?><project xmlns="http://maven.apache.org/POM/4.0.0" xmlns:xsi="http://www.w3.org/2001/XMLSchema-instance"
         xsi:schemaLocation="http://maven.apache.org/POM/4.0.0 https://maven.apache.org/xsd/maven-4.0.0.xsd"><modelVersion>4.0.0</modelVersion><parent><groupId>org.springframework.boot</groupId><artifactId>spring-boot-starter-parent</artifactId><version>2.7.4</version><relativePath/><!-- lookup parent from repository --></parent><groupId>com.example</groupId><artifactId>SpringBoot-Mybatis</artifactId><version>0.0.1-SNAPSHOT</version><name>SpringBoot-Mybatis</name><description>SpringBoot-Mybatis</description><properties><java.version>1.8</java.version></properties><dependencies><dependency><groupId>org.mybatis.spring.boot</groupId><artifactId>mybatis-spring-boot-starter</artifactId><version>2.2.2</version></dependency><!-- https://mvnrepository.com/artifact/mysql/mysql-connector-java --><dependency><groupId>mysql</groupId><artifactId>mysql-connector-java</artifactId><version>8.0.21</version></dependency><dependency><groupId>org.springframework.boot</groupId><artifactId>spring-boot-starter-test</artifactId><scope>test</scope></dependency></dependencies><build><plugins><plugin><groupId>org.springframework.boot</groupId><artifactId>spring-boot-maven-plugin</artifactId></plugin></plugins></build></project>
创建实体类对象:
packagecom.example.entity;/**
 * @author 不止于梦想
 * @date 2022/10/23 14:26
 */publicclassUser{privateString username;privateString password;@OverridepublicStringtoString(){return"User{"+"username='"+ username +'\''+", password='"+ password +'\''+'}';}publicStringgetUsername(){return username;}publicvoidsetUsername(String username){this.username = username;}publicStringgetPassword(){return password;}publicvoidsetPassword(String password){this.password = password;}publicUser(){}publicUser(String username,String password){this.username = username;this.password = password;}}
🏴☠️整合Mybatis
一、上面已经导入了对应技术用到的坐标,现在要配置数据源,在哪配置呢,在SpringBoot的配置文件:
spring:
  datasource:
    driver-class-name:com.mysql.jdbc.Driver
    url: jdbc:mysql://localhost:3306/springboot
    username: root
    password:******
二、编写dao层接口()
packagecom.example.dao;importcom.example.entity.User;importorg.apache.ibatis.annotations.Mapper;importorg.apache.ibatis.annotations.Select;importjava.util.List;/**
 * @author 不止于梦想
 * @date 2022/10/23 14:26
 */@MapperpublicinterfaceUserDao{@Select("select username,password from user")publicList<User>selectAll();}
三、编写测试
packagecom.example.springbootmybatis;importcom.example.dao.UserDao;importorg.junit.jupiter.api.Test;importorg.springframework.beans.factory.annotation.Autowired;importorg.springframework.boot.test.context.SpringBootTest;@SpringBootTestclassSpringBootMybatisApplicationTests{@AutowiredUserDao userDao;@TestvoidcontextLoads(){System.out.println(userDao.selectAll());}}
测试:


报了以上两个错误,这是我们希望看到的,为什么?
原因:在上面的驱动中我们使用的是MySQL 8.X版本的,在8及以上的MySQL驱动中,SpringBoot强制我们进行时区设置,并且要用:com.mysql.cj.jdbc.Driver
解决:这里我们只需要在配置文件中添加失去设置和更改Driver即可
spring:
  datasource:
    driver-class-name:com.mysql.cj.jdbc.Driver
    url: jdbc:mysql://localhost:3306/springboot?serverTimezone=UTC
    username: root
    password:******
测试:
值得注意的是:在MySQL8才需要设置时区和使用cj.jdbc.
🚩SpringBoot 整合druid
🏴☠️配置前置知识小点
因为druid是一个连接池,需要提供数据源,测试也还是那一套,这里直接复制上边的模块进行重新开发。
🏴☠️整合druid
首先,我们应该知道的是,SpringBoot之所以好用,就是因为它可以很好的整合其他的第三方资源和技术,核心就是:导入对应的stater,根据配置格式,编写非默认值对应的配置项
一、导入对应druid的stater
<!-- https://mvnrepository.com/artifact/com.alibaba/druid-spring-boot-starter --><dependency><groupId>com.alibaba</groupId><artifactId>druid-spring-boot-starter</artifactId><version>1.2.8</version></dependency>
二、在配置文件中配置数据源
spring:
  datasource:
    druid:
      driver-class-name:com.mysql.cj.jdbc.Driver
      url: jdbc:mysql://localhost:3306/springboot?serverTimezone=UTC
      username: root
      password:******
三、测试
测试?配置完成了?完成了,SpringBoot就是这么好用
✅总结
SpringBoot是一项十分重要的技术,希望我们大家可以把它学好,这一章讲解的是SpringBoot如何整合Mybatis、druid。由于Mybatis-plus也是一项重要的技术,下一次会讲Mybatis及与SpringBoot的整合,喜欢的小伙伴可以订阅专栏
版权归原作者 己不由心王道长 所有, 如有侵权,请联系我们删除。