
文章目录
find指令:-name
Linux下find命令在目录结构中搜索文件,并执行指定的操作。
Linux下find命令提供了相当多的查找条件,功能很强大。由于find具有强大的功能,所以它的选项也很多。这里我们只说了-name选项
在运行一个非常消耗资源的find命令时,很多人都倾向于把它放在后台执行,因为遍历一个大的文件系统可能会花费很长的时间(这里是指30G字节以上的文件系统)
语法: find pathname -options
功能: 用于在文件树种查找文件,并作出相应的处理(可能访问磁盘)
常用选项:-name 按照文件名查找文件。
这里我们说的就是find -name的功能用法
[hwc@VM-8-3-centos test]$ pwd
/home/hwc/106/test
[hwc@VM-8-3-centos test]$ ll
total 0
[hwc@VM-8-3-centos test]$ ls
[hwc@VM-8-3-centos test]$ touch test.c
[hwc@VM-8-3-centos test]$ find /home/hwc -name test.c
/home/hwc/106/test/test.c
[hwc@VM-8-3-centos test]$
当我们进行find搜索的时候,可能需要访问磁盘,进而导致效率低下
查找除了find之外。还有which
which指令
which指令不是在系统中搜索所有的文件,而是只搜索命令
[root@VM-8-3-centos test]# which pwd
/usr/bin/pwd
[root@VM-8-3-centos test]# which man
/usr/bin/man
[root@VM-8-3-centos test]# which rm
alias rm='rm -i'
    /usr/bin/rm
[root@VM-8-3-centos test]# which which
alias which='alias | /usr/bin/which --tty-only --read-alias --show-dot --show-tilde'
    /usr/bin/alias
    /usr/bin/which
[root@VM-8-3-centos test]#
这里还存在一个细节:
[root@VM-8-3-centos test]# which ls
alias ls='ls --color=auto'
    /usr/bin/ls
[root@VM-8-3-centos test]# which ll
alias ll='ls -l --color=auto'
    /usr/bin/ls
这里解释了ls/ll为什么能带颜色的问题

因为带了-- color = auto的选项。
这里的alias的意思是对指令进行重命名
[root@VM-8-3-centos test]# alias zhangsan='ls -l --color=auto'
[root@VM-8-3-centos test]# which zhangsan
alias zhangsan='ls -l --color=auto'
    /usr/bin/ls
[root@VM-8-3-centos test]# zhangsan
total 0
[root@VM-8-3-centos test]#
查找范围:which<whereis<find
[root@VM-8-3-centos test]# whereis ls
ls: /usr/bin/ls /usr/share/man/man1/ls.1.gz /usr/share/man/man1p/ls.1p.gz
grep指令
grep对应文本的行过滤工具。默认,会匹配文本中的关键字。匹配上的进行行显示
语法: grep [选项] 搜寻字符串 文件
功能: 在文件中搜索字符串,将找到的行打印出来
grep的选项也很多,我们学习一下几个比较常见的:
常用选项:
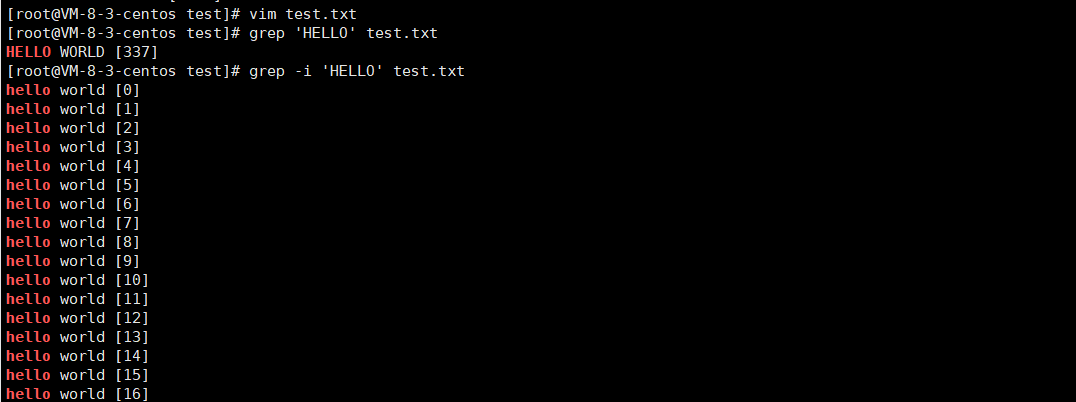
-i :忽略大小写的不同,所以大小写视为相同
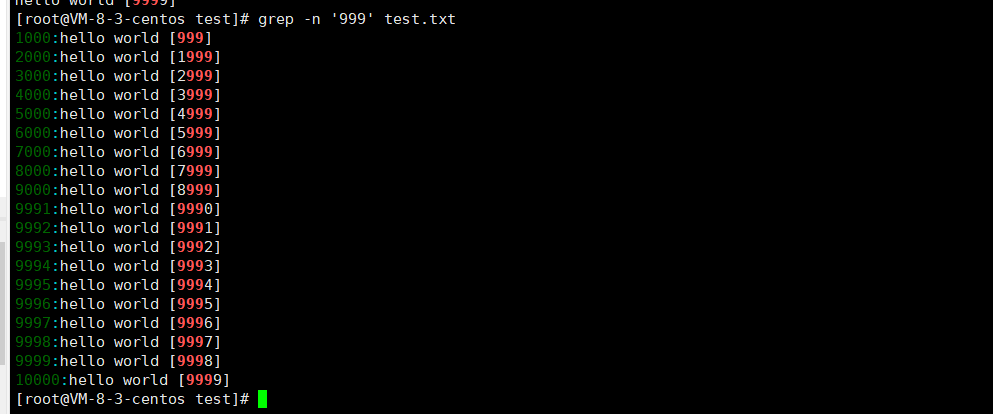
-n :顺便输出行号
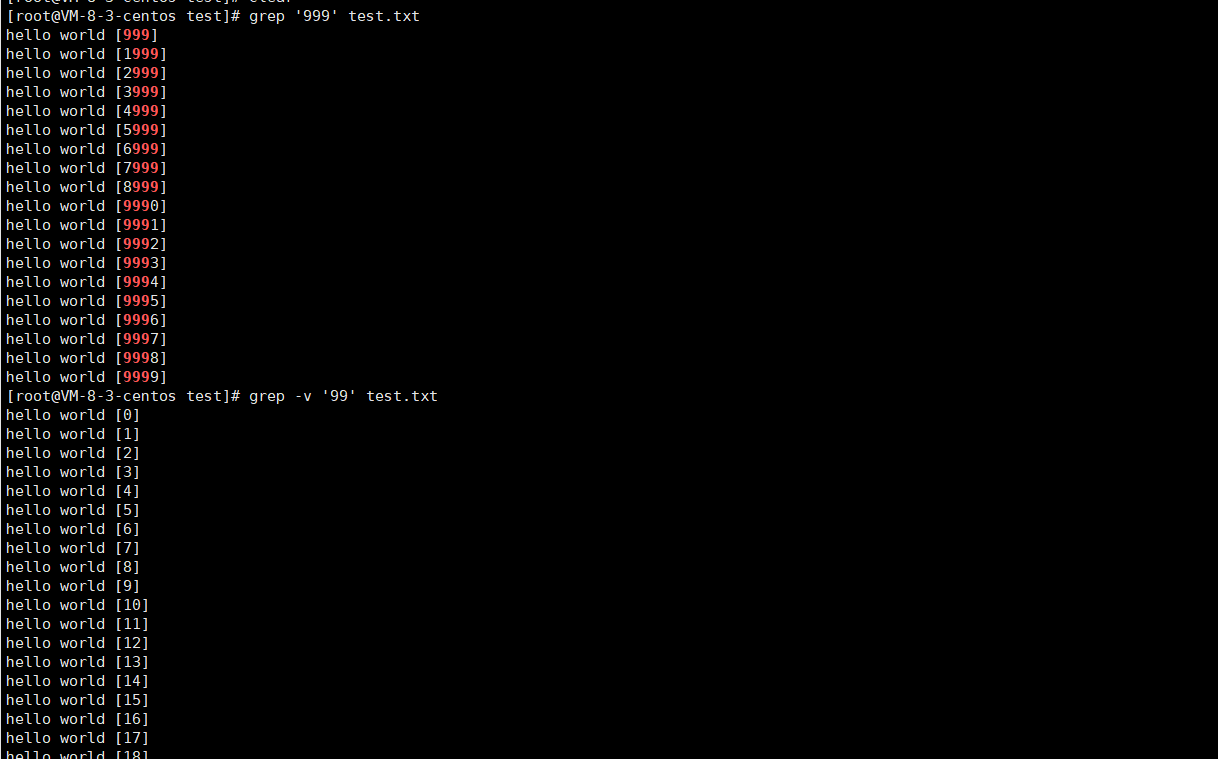
-v :反向选择,亦即显示出没有 ‘搜寻字符串’ 内容的那一行
选项当然可以进行组合。
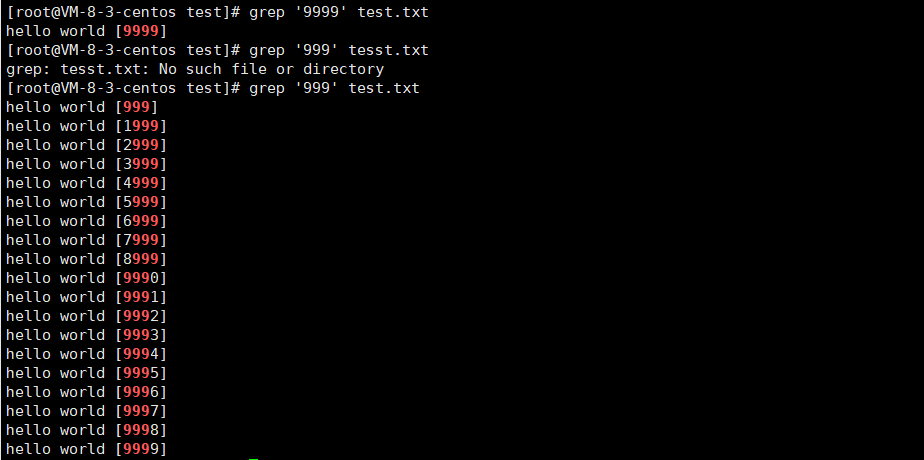
[root@VM-8-3-centos test]# grep '999' test.txt
hello world [999]
hello world [1999]
hello world [2999]
hello world [3999]
hello world [4999]
hello world [5999]
hello world [6999]
hello world [7999]
hello world [8999]
hello world [9990]
hello world [9991]
hello world [9992]
hello world [9993]
hello world [9994]
hello world [9995]
hello world [9996]
hello world [9997]
hello world [9998]
hello world [9999]
    //wc可以统计行数
[root@VM-8-3-centos test]# grep '999' test.txt | wc -l
19
除此之外,这里还有一个sort命令:
[root@VM-8-3-centos test]# touch file.txt
[root@VM-8-3-centos test]# vim file.txt
[root@VM-8-3-centos test]# cat file.txt
11111111
5555
3333
444
222
[root@VM-8-3-centos test]# sort file.txt
11111111
222
3333
444
5555
[root@VM-8-3-centos test]#
+uniq可以进行去重:
[root@VM-8-3-centos test]# vim file.txt
[root@VM-8-3-centos test]# cat file.txt
11111111
5555
3333
444
222
5555
5555
444
222
222
555
555
[root@VM-8-3-centos test]# uniq file.txt
11111111
5555
3333
444
222
5555
444
222
555
[root@VM-8-3-centos test]# sort file.txt | uniq
11111111
222
3333
444
555
5555
[root@VM-8-3-centos test]#
zip/unzip指令
zip默认对一个目录进行打包压缩的时候,只会对目录文件打包压缩
[root@VM-8-3-centos test]# pwd
/root/Test/test
[root@VM-8-3-centos test]# tree .
.
|-- file1.c
|-- file.c
|-- file.txt
`-- test.txt

[root@VM-8-3-centos Test]# pwd
/root/Test

[root@VM-8-3-centos Test]# zip my.zip test
  adding: test/ (stored 0%)
[root@VM-8-3-centos Test]# mkdir tmp
[root@VM-8-3-centos Test]# ll
total 12
-rw-r--r-- 1 root root  160 Sep 28 08:33 my.zip
drwxr-xr-x 2 root root 4096 Sep 28 08:31 test
-rw-r--r-- 1 root root    0 Sep 27 23:08 test.c
drwxr-xr-x 2 root root 4096 Sep 28 08:33 tmp
[root@VM-8-3-centos Test]# cd tmp
[root@VM-8-3-centos tmp]# mv ../my.zip .
[root@VM-8-3-centos tmp]# ll
total 4
-rw-r--r-- 1 root root 160 Sep 28 08:33 my.zip

[root@VM-8-3-centos tmp]# unzip my.zip
Archive:  my.zip
   creating: test/
[root@VM-8-3-centos tmp]# ll
total 8
-rw-r--r-- 1 root root  160 Sep 28 08:33 my.zip
drwxr-xr-x 2 root root 4096 Sep 28 08:31 test
[root@VM-8-3-centos tmp]# tree test
test

0 directories, 0 files
[root@VM-8-3-centos tmp]# tree test/
test/

0 directories, 0 files
[root@VM-8-3-centos tmp]#
那怎么办呢❓
语法: zip 压缩文件.zip 目录或文件
功能: 将目录或文件压缩成zip格式
常用选项:-r 递 归处理,将指定目录下的所有文件和子目录一并处理
zip -r 你定义的压缩包 dir(要打包压缩的目录)
unzip 你定义的压缩包 -完成在当前目录下进行解包解压的功能(-d选项可以解压到指定路径)
加上-r进行处理即可(注意你当前的路径)
[root@VM-8-3-centos tmp]# ll
total 8
-rw-r--r-- 1 root root 160 Sep 28 08:33 my.zip
drwxr-xr-x 2 root root 4096 Sep 28 08:31 test
[root@VM-8-3-centos tmp]# rm * -rf
[root@VM-8-3-centos tmp]# ll
total 0
[root@VM-8-3-centos tmp]# cd ..
[root@VM-8-3-centos Test]# pwd
/root/Test
[root@VM-8-3-centos Test]# tree test
test
|-- file1.c
|-- file.c
|-- file.txt
`-- test.txt
0 directories, 4 files
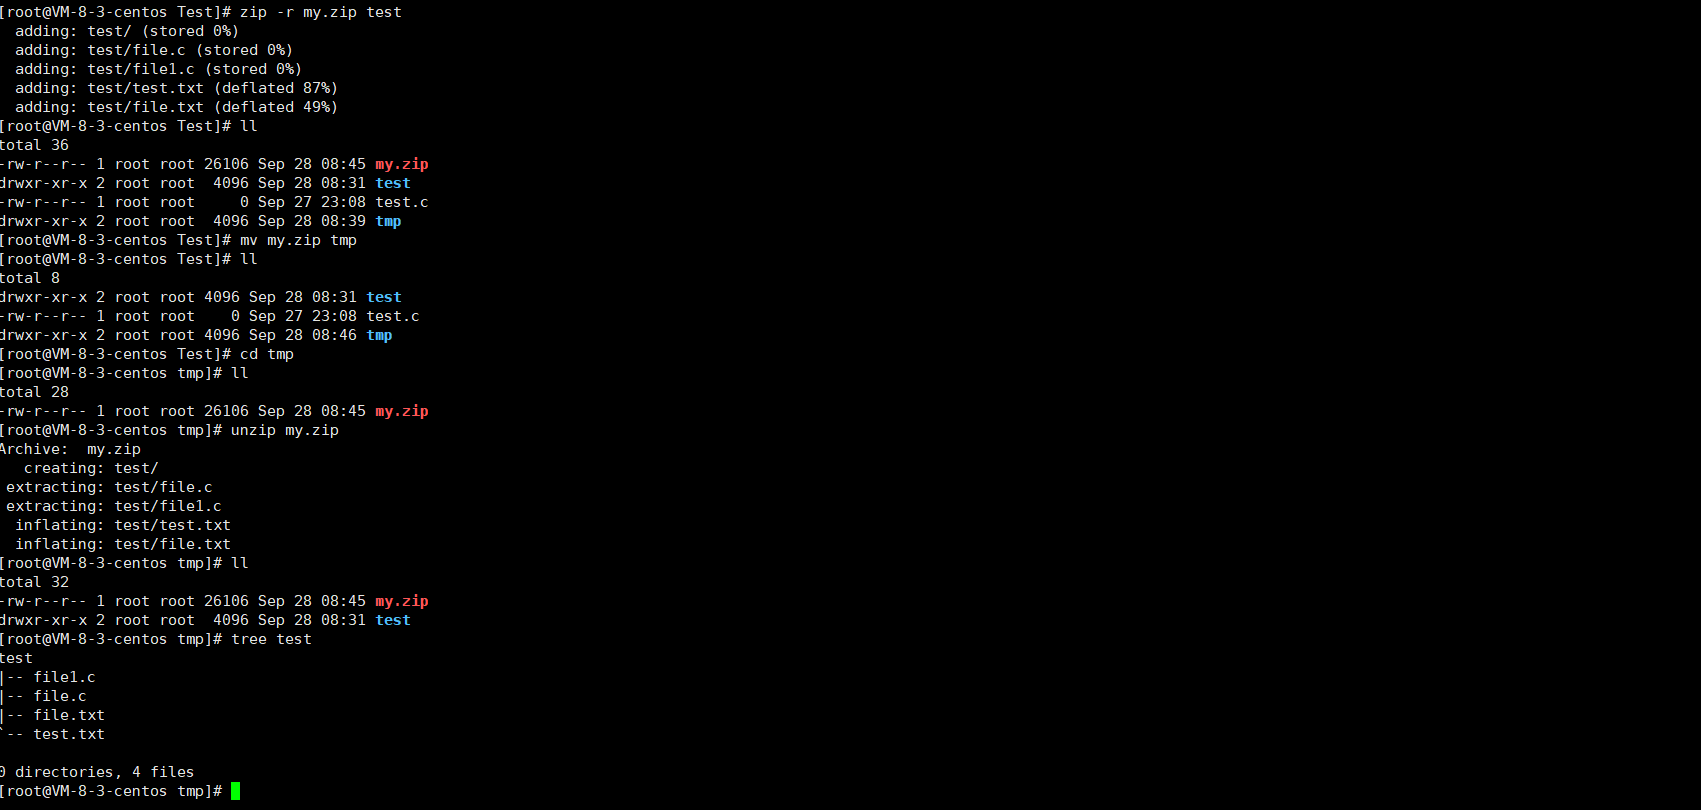
[root@VM-8-3-centos Test]# zip -r my.zip test
adding: test/ (stored 0%)
adding: test/file.c (stored 0%)
adding: test/file1.c (stored 0%)
adding: test/test.txt (deflated 87%)
adding: test/file.txt (deflated 49%)
[root@VM-8-3-centos Test]# ll
total 36
-rw-r--r-- 1 root root 26106 Sep 28 08:45 my.zip
drwxr-xr-x 2 root root 4096 Sep 28 08:31 test
-rw-r--r-- 1 root root 0 Sep 27 23:08 test.c
drwxr-xr-x 2 root root 4096 Sep 28 08:39 tmp
[root@VM-8-3-centos Test]# mv my.zip tmp
[root@VM-8-3-centos Test]# ll
total 8
drwxr-xr-x 2 root root 4096 Sep 28 08:31 test
-rw-r--r-- 1 root root 0 Sep 27 23:08 test.c
drwxr-xr-x 2 root root 4096 Sep 28 08:46 tmp
[root@VM-8-3-centos Test]# cd tmp
[root@VM-8-3-centos tmp]# ll
total 28
-rw-r--r-- 1 root root 26106 Sep 28 08:45 my.zip
[root@VM-8-3-centos tmp]# unzip my.zip
Archive: my.zip
creating: test/
extracting: test/file.c
extracting: test/file1.c
inflating: test/test.txt
inflating: test/file.txt
[root@VM-8-3-centos tmp]# ll
total 32
-rw-r--r-- 1 root root 26106 Sep 28 08:45 my.zip
drwxr-xr-x 2 root root 4096 Sep 28 08:31 test
[root@VM-8-3-centos tmp]# tree test
test
|-- file1.c
|-- file.c
|-- file.txt
`-- test.txt
0 directories, 4 files
[root@VM-8-3-centos tmp]#
进行打包和压缩,便于传输和保存。
tar指令
打包/解包,不打开它,直接看内容
tar的指令同样太多了。
-x :解开一个压缩文件的参数指令!
-t :查看 tarfile 里面的文件!
-v :压缩的过程中显示文件!这个常用,但不建议用在背景执行过程!
-C : 解压到指定目录
话不多说,我们直接来进行操作:
[root@VM-8-3-centos Test]# ll
total 8
drwxr-xr-x 2 root root 4096 Sep 28 08:56 test
-rw-r--r-- 1 root root    0 Sep 27 23:08 test.c
drwxr-xr-x 3 root root 4096 Sep 28 09:02 tmp

[root@VM-8-3-centos Test]# tar -czf  my.tgz test
[root@VM-8-3-centos Test]# ll
total 36
-rw-r--r-- 1 root root 25693 Sep 28 09:07 my.tgz
drwxr-xr-x 2 root root  4096 Sep 28 08:56 test
-rw-r--r-- 1 root root     0 Sep 27 23:08 test.c
drwxr-xr-x 3 root root  4096 Sep 28 09:02 tmp
[root@VM-8-3-centos Test]# mv my.tgz tmp
[root@VM-8-3-centos Test]# ll
total 8
drwxr-xr-x 2 root root 4096 Sep 28 08:56 test
-rw-r--r-- 1 root root    0 Sep 27 23:08 test.c
drwxr-xr-x 3 root root 4096 Sep 28 09:07 tmp
[root@VM-8-3-centos Test]# cd tmp
[root@VM-8-3-centos tmp]# ll
total 32
-rw-r--r-- 1 root root 25693 Sep 28 09:07 my.tgz
drwxr-xr-x 2 root root  4096 Sep 28 08:31 test

[root@VM-8-3-centos tmp]# tar -xzf my.tgz
[root@VM-8-3-centos tmp]# ll
total 32
-rw-r--r-- 1 root root 25693 Sep 28 09:07 my.tgz
drwxr-xr-x 2 root root  4096 Sep 28 08:56 test
[root@VM-8-3-centos tmp]# tree test
test
|-- file1.c
|-- file.c
|-- file.txt
`-- test.txt

0 directories, 4 files
[root@VM-8-3-centos tmp]#
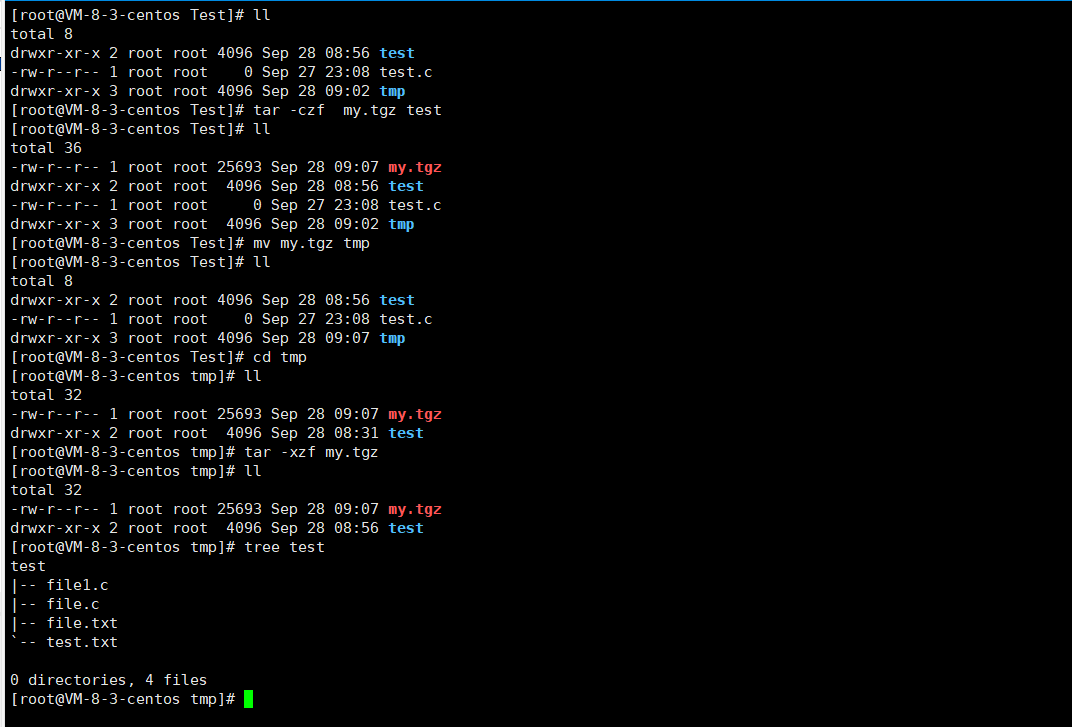
tar -czf my.tgz test 打包并压缩
tar -xzf my.tgz 解包并解压
注意:tar命令可以带- 也可以不带 -
当然带上v可以显示过程:
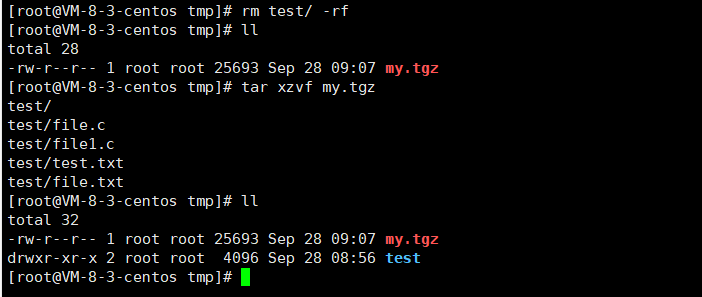
-t :不打开压缩文件,直接查看里面的文件内容!
-v:解压/压缩的时候,同步显示压缩文件列表
解压到指定路径下:
[root@VM-8-3-centos tmp]# tar xzvf my.tgz -C /root/Test/ST
test/
test/file.c
test/file1.c
test/test.txt
test/file.txt
[root@VM-8-3-centos tmp]# ls /root/Test/ST
test
[root@VM-8-3-centos tmp]#
bc指令
bc命令可以很方便的进行浮点运算
[root@VM-8-3-centos test]# bc
bc 1.06.95
Copyright 1991-1994, 1997, 1998, 2000, 2004, 2006 Free Software Foundation, Inc.
This is free software with ABSOLUTELY NO WARRANTY.
For details type `warranty'.
1+1
2
quit
[root@VM-8-3-centos test]#

[root@VM-8-3-centos test]# echo "1+2+3+4+5" | bc
15
uname –r指令
语法: uname [选项]
功能: uname用来获取电脑和操作系统的相关信息。
补充说明: uname可显示linux主机所用的操作系统的版本、硬件的名称等基本信息。
常用选项:
-a或–all 详细输出所有信息,依次为内核名称,主机名,内核版本号,内核版本,硬件名,处理器类型,硬件平台类型,操作系统名称
[root@VM-8-3-centos test]# uname
Linux
[root@VM-8-3-centos test]# uname -a
Linux VM-8-3-centos 3.10.0-1160.71.1.el7.x86_64 #1 SMP Tue Jun 28 15:37:28 UTC 2022 x86_64 x86_64 x86_64 GNU/Linux
[root@VM-8-3-centos test]# uname -r
3.10.0-1160.71.1.el7.x86_64
[root@VM-8-3-centos test]#
几个热键
[Tab]按键—具有『命令补全』和『档案补齐』的功能
[Ctrl]-c按键—让当前的程序『停掉』。终止前台的异常程序。
[Ctrl]-d按键—通常代表着:『键盘输入结束(End Of File, EOF 戒 End OfInput)』的意思;退出当前用户,退出一层另外,也可以用来取代exit
关机
语法: shutdown [选项] 常见选项:
-h :将系统的服务停掉后,立即关机
-r: 在将系统的服务停掉之后就重新启动
-t sec : -t 后面加秒数,亦即『过几秒后关机』的
补充指令:
查看CPU:
[root@VM-8-3-centos ~]# lscpu
Architecture:          x86_64
CPU op-mode(s):        32-bit, 64-bit
Byte Order:            Little Endian
CPU(s):                2
On-line CPU(s) list:   0,1
Thread(s) per core:    1
Core(s) per socket:    2
Socket(s):             1
NUMA node(s):          1
Vendor ID:             GenuineIntel
CPU family:            6
Model:                 85
Model name:            Intel(R) Xeon(R) Platinum 8255C CPU @ 2.50GHz
Stepping:              5
CPU MHz:               2494.134
BogoMIPS:              4988.26
Hypervisor vendor:     KVM
Virtualization type:   full
L1d cache:             32K
L1i cache:             32K
L2 cache:              4096K
L3 cache:              36608K
NUMA node0 CPU(s):     0,1
Flags:                 fpu vme de pse tsc msr pae mce cx8 apic sep mtrr pge mca cmov pat pse36 clflush mmx fxsr sse sse2 ss ht syscall nx pdpe1gb rdtscp lm constant_tsc rep_good nopl eagerfpu pni pclmulqdq ssse3 fma cx16 pcid sse4_1 sse4_2 x2apic movbe popcnt tsc_deadline_timer aes xsave avx f16c rdrand hypervisor lahf_lm abm 3dnowprefetch invpcid_single fsgsbase bmi1 hle avx2 smep bmi2 erms invpcid rtm mpx avx512f avx512dq rdseed adx smap clflushopt clwb avx512cd avx512bw avx512vl xsaveopt xsavec xgetbv1 arat avx512_vnni
[root@VM-8-3-centos ~]#
查看内存:
[root@VM-8-3-centos ~]# lsmem
RANGE                                  SIZE  STATE REMOVABLE BLOCK
0x0000000000000000-0x000000003fffffff    1G online        no   0-7
0x0000000040000000-0x0000000047ffffff  128M online       yes     8
0x0000000048000000-0x000000006fffffff  640M online        no  9-13
0x0000000070000000-0x0000000077ffffff  128M online       yes    14
0x0000000078000000-0x000000007fffffff  128M online        no    15

Memory block size:       128M
Total online memory:       2G
Total offline memory:      0B
[root@VM-8-3-centos ~]#
who(当前Linux系统的在线用户)
shell命令以及运行原理
Linux严格意义上说的是一个操作系统,我们称之为“核心(kernel) “ ,但我们一般用户,不能直接使用kernel。而是通过kernel的“外壳”程序,也就是所谓的shell,来与kernel沟通。如何理解?为什么不能直接使用kernel
从技术角度, Shell的最简单定义:命令行解释器(command Interpreter),表现:你看到的命令行提示符,以及可以输入指令并且可以执行。
主要包含
将使用者的命令翻译给核心(kernel)处理。
同时,将核心的处理结果翻译给使用者
shell存在的意义,变相的在保护操作系统
对比windows GUI,我们操作windows 不是直接操作windows内核,而是通过图形接口,点击,从而完成我们的操作(比如进入D盘的操作,我们通常是双击D盘盘符.或者运行起来一个应用程序 )
shell 对于Linux,有相同的作用,主要是对我们的指令进行解析,解析指令给Linux内核。反馈结果在通过内核运行出结果,通过shell解析给用户。
Linux权限的概念
Linux下有两种用户:超级用户(root)、普通用户
超级用户:可以再linux系统下做任何事情,不受限制
普通用户:在linux下做有限的事情。
超级用户的命令提示符是“#”,普通用户的命令提示符是“$ ”
命令: su [用户名]
功能:切换用户。
例如,要从root用户切换到普通用户user,则使用 su user。 要从普通用户user切换到root用户则使用 su root(root可以省略),此时系统会提示输入root用户的口令
版权归原作者 平凡的人1 所有, 如有侵权,请联系我们删除。