注:本文基于
Spring Boot 3.2.1以及
Spring Security 6.2.1
Spring Security 使用起来非常简单,只要引入相关依赖包,然后增加注解
@EnableWebSecurity
就可以。同时提供了丰富的扩展点,可以让你自定义权限校验策略。
常见的使用场景分两类:
- 有session模式,通常是前端不分离的项目,使用cookie + session 模式存储以及校验用户权限;
- 无session模式,通常是前后端分离项目,使用Jwt形式的Token校验权限
示例一:基本使用
1、添加jar包依赖
<dependencies><!-- ... other dependency elements ... --><dependency><groupId>org.springframework.boot</groupId><artifactId>spring-boot-starter-security</artifactId></dependency></dependencies>
Spring Boot和Spring Security的默认配置在运行时提供了以下行为:
- 对于任何端点(包括Boot的/error端点),需要经过身份验证的用户。
- 在启动时,使用生成的密码注册默认用户user(密码记录到控制台;如 8e557245-73e2-4286-969a-ff57fe326336)。> 可以通过如下配置修改:> spring.security.user.name=admin> spring.security.user.password=admin
- 保护密码存储使用BCrypt以及其他方法。
- 提供基于表单的登录和注销流程。(分别是
/login和/logout) - 身份验证基于表单登录和HTTP Basic。
- 提供内容协商;对于Web请求,重定向到登录页面;对于服务请求,返回401未授权。
- 缓解CSRF攻击。
- 缓解Session fixation攻击。
- 写入Strict-Transport-Security以确保HTTPS。
- 写入X-Content-Type-Options以减少嗅探攻击。
- 写入缓存控制头以保护已认证的资源。
- 写入X-Frame-Options以减少点击劫持。
- 与HttpServletRequest的认证方法集成。
- 发布身份验证成功和失败事件。
了解Spring Boot如何与Spring Security协调以实现这一点是有帮助的。看一下Boot的安全自动配置,它做了以下事情(为了说明而简化):
@EnableWebSecurity@ConfigurationpublicclassDefaultSecurityConfig{@Bean@ConditionalOnMissingBean(UserDetailsService.class)InMemoryUserDetailsManagerinMemoryUserDetailsManager(){String generatedPassword =// ...;returnnewInMemoryUserDetailsManager(User.withUsername("user").password(generatedPassword).roles("USER").build());}@Bean@ConditionalOnMissingBean(AuthenticationEventPublisher.class)DefaultAuthenticationEventPublisherdefaultAuthenticationEventPublisher(ApplicationEventPublisher delegate){returnnewDefaultAuthenticationEventPublisher(delegate);}}
- 添加了
@EnableWebSecurity注解。 (除此之外,这还将Spring Security的默认过滤器链发布为@Bean)- 发布一个用户详细服务
@Bean,用户名为user,并使用随机生成的密码记录到控制台- 发布一个
AuthenticationEventPublisher@Bean用于发布身份验证事件
2、配置Spring Security
只要添加注解
@EnableWebSecurity
就可以开启权限校验
@EnableWebSecurity@ConfigurationpublicclassBasicSecurityConfig{}
配置登录账号密码:
spring.security.user.name=admin
spring.security.user.password=admin
3、登录测试
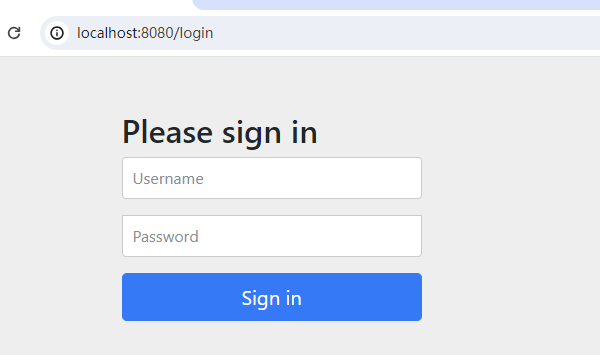
1)启动工程,会自动打开默认的登录页面
输入账号密码即可登录。
登录成功后,通过
SecurityContextHolder.getContext().getAuthentication();
获取当前用户信息
2)输入地址 http://localhost:8080/logout 打开默认的退出页面,点击按钮 Log Out 退出

4、配置自定义登录页面(可选)
这里以thymeleaf模板为例,制作登录页面。
1)添加 thymeleaf 依赖
<dependency><groupId>org.springframework.boot</groupId><artifactId>spring-boot-starter-thymeleaf</artifactId></dependency>
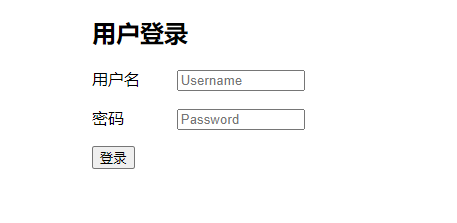
2)分别添加登录页面 login.html 和首页 index.html,放在目录 resources/templates 中
登录页面 login.html ,发送
post
请求到
/login
地址
<!DOCTYPEhtml><htmllang="en"><head><metacharset="UTF-8"><title>Login</title><style>.sr-only{width:80px;display:inline-block;text-align: match-parent}.form-control{width: 120px}.form-signin{margin: 0 auto;width:220px;}</style></head><body><divclass="container"style=""><formclass="form-signin"method="post"th:action="@{/login}"><h2>用户登录</h2><p><labelfor="username"class="sr-only">用户名</label><inputtype="text"id="username"name="username"class="form-control"placeholder="Username"></p><p><labelfor="password"class="sr-only">密码</label><inputtype="password"id="password"name="password"class="form-control"placeholder="Password"></p><buttontype="submit">登录</button></form></div></body></html>
首页 index.html,退出功能发送
post
请求到
/logout
地址
<!DOCTYPEhtml><htmllang="en"><head><metacharset="UTF-8"><title>index</title><style>.form-signin{margin: 0 auto;width:220px;}</style></head><body><formclass="form-signin"method="post"th:action="@{/logout}"><h2>确认退出?</h2><buttonclass="btn btn-lg btn-primary btn-block"type="submit">退出</button></form></body></html>
3)配置 HttpSecurity
@EnableWebSecurity@ConfigurationpublicclassBasicSecurityConfig{@BeanpublicSecurityFilterChainsecurityFilterChain(HttpSecurity http)throwsException{
        http
                .authorizeHttpRequests((authorize)-> authorize
                        // 放行登录页面.requestMatchers("/login").permitAll()// 拦截其他所有请求.anyRequest().authenticated())// 退出时,让session失效.logout(logout -> logout.invalidateHttpSession(true))// 配置登录页面 和 登录成功后页面.formLogin(form -> form.loginPage("/login").permitAll().loginProcessingUrl("/login").defaultSuccessUrl("/index"));// 开启csrf 保护
        http.csrf(Customizer.withDefaults());return http.build();}}
4)启动工程测试
登录页面
首页,包含退出按钮
示例二:基于JWT的前后端分离项目
用户登录成功时,返回token,后续每次请求都带上token。token设置过期时间,提供token刷新功能。
后台服务端解析token,判断是否有效,如果有效取得token中存储的用户信息,并调用
SecurityContextHolder.getContext().setAuthentication(authentication)
存储用户信息。
1、引入 JWT 依赖
JWT 和相关jar包有很多,这里直接使用 hutool 的工具类
<dependency><groupId>cn.hutool</groupId><artifactId>hutool-all</artifactId><version>5.8.25</version></dependency>
2、自定义登录接口
创建 自定义登录接口服务类,实现接口
UserDetailsService
即可
@ServicepublicclassMyUserDetailsServiceImplimplementsUserDetailsService{@OverridepublicUserDetailsloadUserByUsername(String username)throwsUsernameNotFoundException{UserEntity entity =newUserEntity();
        entity.setId(100L);
        entity.setPassword("{noop}123456");
        entity.setUsername("admin");
        entity.setAuthorities(AuthorityUtils.createAuthorityList("ROLE_ADMIN"));return entity;}}
创建自定义的UserEntity类,实现接口
UserDetails
,可以根据情况增加自己需要的属性
@DatapublicclassUserEntityimplementsUserDetails{privateLong id;privateString password;privateString username;privateList<GrantedAuthority> authorities;privateboolean accountNonExpired =true;privateboolean accountNonLocked =true;privateboolean credentialsNonExpired =true;privateboolean enabled =true;}
在httpSecurity中配置 userDetailsService
http.userDetailsService(userDetailService)
这样在登录的时候,就会调用
MyUserDetailsServiceImpl.loadUserByUsername()
方法
3、用户登录返回token
配置用户登录成功时逻辑处理,返回需要的token
http.formLogin(form -> form.loginPage("/login").permitAll().loginProcessingUrl("/login").successHandler((request, response, authentication)->{
           log.info("登录成功:{}", authentication);
           UserEntity principal =(UserEntity) authentication.getPrincipal();
           String secret ="0123456789";
           Map<String, Object> payload =newHashMap<>();
           payload.put("id", principal.getId());
           payload.put("username", principal.getUsername());
           String token = JWTUtil.createToken(payload, secret.getBytes());
           response.setContentType("application/json;charset=UTF-8");
           Map<String, Object> map =newHashMap<>();
           map.put("token", token);
           response.getWriter().write(JSONUtil.toJsonStr(map));}).failureHandler((request, response, authentication)->{
           log.info("登录失败:{}", authentication);}));
4、增加Jwt验证过滤器
配置禁用session
// CSRF 禁用,因为不使用 Session
http.csrf(AbstractHttpConfigurer::disable);// 基于 token 机制,所以不需要 Session
http.sessionManagement(c -> c.sessionCreationPolicy(SessionCreationPolicy.STATELESS));
创建自定义Jwt验证过滤器,并配置
@ComponentpublicclassJwtTokenFilterextendsOncePerRequestFilter{@AutowiredprivateMyUserDetailsServiceImpl userDetailsService;@OverrideprotectedvoiddoFilterInternal(HttpServletRequest request,HttpServletResponse response,FilterChain filterChain)throwsServletException,IOException{// 验证token是否有效String token = request.getHeader("token");if(StrUtil.isNotEmpty(token)){String secret ="0123456789";boolean verify =JWTUtil.verify(token, secret.getBytes());if(!verify){
                response.setContentType("application/json;charset=utf-8");
                response.getWriter().write("{\"code\":401,\"msg\":\"token无效\"}");return;}else{//认证成功,设置用户信息UserEntity user =JWTUtil.parseToken(token).getPayloads().toBean(UserEntity.class);// 模拟获取用户信息,实际情况应该是从数据库查询UserDetails userDetails = userDetailsService.loadUserByUsername(user.getUsername());UsernamePasswordAuthenticationToken authenticationToken =newUsernamePasswordAuthenticationToken(userDetails.getUsername(),
                        userDetails.getPassword(),
                        userDetails.getAuthorities());//设置用户信息SecurityContextHolder.getContext().setAuthentication(authenticationToken);}}
        filterChain.doFilter(request, response);}}
配置执行位置,在UsernamePasswordAuthenticationFilter之前
http.addFilterBefore(jwtTokenFilter,UsernamePasswordAuthenticationFilter.class);
5、测试
至此,基于Jwt的spring security 配置完成,实际项目应该是从数据库查询用户以及角色权限
1)用postman测试,先用login方法(post请求),获取token
2)然后复制token当作header参数传给其他接口
**
JwtSecurityConfig
配置类完整代码如下:**
@EnableWebSecurity@Configuration@Slf4jpublicclassJwtSecurityConfig{@AutowiredprivateMyUserDetailsServiceImpl userDetailService;@AutowiredprivateJwtTokenFilter jwtTokenFilter;@BeanpublicSecurityFilterChainsecurityFilterChain(HttpSecurity http)throwsException{
        http
                .authorizeHttpRequests((authorize)-> authorize
                        .requestMatchers("/login").permitAll().anyRequest().authenticated()).userDetailsService(userDetailService).exceptionHandling(ex -> ex.authenticationEntryPoint((request, response, authException)->{
                    log.error("[commence][访问 URL({}) 时,没有登录]", request.getRequestURI(), authException);ServletUtils.writeJSON(response, authException.getMessage());}).accessDeniedHandler((request, response, accessDeniedException)->{
                    log.warn("[commence][访问 URL({}) 时,用户({}) 权限不够]", request.getRequestURI(),"", accessDeniedException);})).logout(logout -> logout.invalidateHttpSession(true))// 配置登录页面.httpBasic(Customizer.withDefaults()).formLogin(form -> form.loginPage("/login").permitAll().loginProcessingUrl("/login").successHandler((request, response, authentication)->{
                            log.info("登录成功:{}", authentication);UserEntity principal =(UserEntity) authentication.getPrincipal();// 登录成功,返回token给前端String secret ="0123456789";Map<String,Object> payload =newHashMap<>();
                            payload.put("id", principal.getId());
                            payload.put("username", principal.getUsername());String token =JWTUtil.createToken(payload, secret.getBytes());
                            response.setContentType("application/json;charset=UTF-8");Map<String,Object> map =newHashMap<>();
                            map.put("token", token);
                            response.getWriter().write(JSONUtil.toJsonStr(map));}).failureHandler((request, response, authentication)->{
                            log.info("登录失败", authentication);}));// CSRF 禁用,因为不使用 Session
        http.csrf(AbstractHttpConfigurer::disable);// 基于 token 机制,所以不需要 Session
        http.sessionManagement(c -> c.sessionCreationPolicy(SessionCreationPolicy.STATELESS));
        http.addFilterBefore(jwtTokenFilter,UsernamePasswordAuthenticationFilter.class);return http.build();}@BeanpublicPasswordEncoderpasswordEncoder(){returnPasswordEncoderFactories.createDelegatingPasswordEncoder();}}
参考
版权归原作者 顽石九变 所有, 如有侵权,请联系我们删除。