
概览(算子集)
数据流转换
Map
输入一个元素同时输出一个元素。下面是将输入流中元素数值加倍的 map function:
DataStream<Integer> dataStream = //...
dataStream.map(new MapFunction<Integer, Integer>() {
    @Override
    public Integer map(Integer value) throws Exception {
        return 2 * value;
    }
});
FlatMap
输入一个元素同时产生零个、一个或多个元素。下面是将句子拆分为单词的 flatmap function
dataStream.flatMap(new FlatMapFunction<String, String>() {
    @Override
    public void flatMap(String value, Collector<String> out)
        throws Exception {
        for(String word: value.split(" ")){
            out.collect(word);
        }
    }
});
Filter
为每个元素执行一个布尔 function,并保留那些 function 输出值为 true 的元素。下面是过滤掉零值的 filter:
dataStream.filter(new FilterFunction<Integer>() {
    @Override
    public boolean filter(Integer value) throws Exception {
        return value != 0;
    }
});
KeyBy
在逻辑上将流划分为不相交的分区。具有相同 key 的记录都分配到同一个分区。在内部, keyBy() 是通过哈希分区实现的。有多种指定 key 的方式。
dataStream.keyBy(value -> value.getSomeKey());
dataStream.keyBy(value -> value.f0);
以下情况,一个类不能作为 key:
- 它是一种 POJO 类,但没有重写 hashCode() 方法而是依赖于 Object.hashCode() 实现。
- 它是任意类的数组。
Reduce
在相同 key 的数据流上“滚动”执行 reduce。将当前元素与最后一次 reduce 得到的值组合然后输出新值。
下面是创建局部求和流的 reduce function:
keyedStream.reduce(new ReduceFunction<Integer>() {
    @Override
    public Integer reduce(Integer value1, Integer value2)
    throws Exception {
        return value1 + value2;
    }
});
Window
可以在已经分区的 KeyedStreams 上定义 Window。Window 根据某些特征(例如,最近 5 秒内到达的数据)对每个 key Stream 中的数据进行分组。
dataStream
  .keyBy(value -> value.f0)
  .window(TumblingEventTimeWindows.of(Time.seconds(5)));
WindowAll
可以在普通 DataStream 上定义 Window。 Window 根据某些特征(例如,最近 5 秒内到达的数据)对所有流事件进行分组。
dataStream
  .windowAll(TumblingEventTimeWindows.of(Time.seconds(5)));
Window Apply
WindowedStream → DataStream
AllWindowedStream → DataStream
将通用 function 应用于整个窗口。下面是一个手动对窗口内元素求和的 function。
windowedStream.apply(new WindowFunction<Tuple2<String,Integer>, Integer, Tuple, Window>() {
public void apply (Tuple tuple,
Window window,
Iterable<Tuple2<String, Integer>> values,
Collector<Integer> out) throws Exception {
int sum = 0;
for (value t: values) {
sum += t.f1;
}
out.collect (new Integer(sum));
}
});
// 在 non-keyed 窗口流上应用 AllWindowFunction
allWindowedStream.apply (new AllWindowFunction<Tuple2<String,Integer>, Integer, Window>() {
public void apply (Window window,
Iterable<Tuple2<String, Integer>> values,
Collector<Integer> out) throws Exception {
int sum = 0;
for (value t: values) {
sum += t.f1;
}
out.collect (new Integer(sum));
}
});
WindowReduce
WindowedStream → DataStream
对窗口应用 reduce function 并返回 reduce 后的值。
windowedStream.reduce (new ReduceFunction<Tuple2<String,Integer>>() {
    public Tuple2<String, Integer> reduce(Tuple2<String, Integer> value1, Tuple2<String, Integer> value2) throws Exception {
        return new Tuple2<String,Integer>(value1.f0, value1.f1 + value2.f1);
    }
});
Union
DataStream* → DataStream
将两个或多个数据流联合来创建一个包含所有流中数据的新流。注意:如果一个数据流和自身进行联合,这个流中的每个数据将在合并后的流中出现两次。
dataStream.union(otherStream1, otherStream2, ...);
Window Join
DataStream,DataStream → DataStream
根据指定的 key 和窗口 join 两个数据流。
dataStream.join(otherStream)
    .where(<key selector>).equalTo(<key selector>)
    .window(TumblingEventTimeWindows.of(Time.seconds(3)))
    .apply (new JoinFunction () {...});
Interval Join
KeyedStream,KeyedStream → DataStream
根据 key 相等并且满足指定的时间范围内(
e1.timestamp + lowerBound <= e2.timestamp <= e1.timestamp + upperBound
)的条件将分别属于两个 keyed stream 的元素 e1 和 e2 Join 在一起
// this will join the two streams so that
// key1 == key2 && leftTs - 2 < rightTs < leftTs + 2
keyedStream.intervalJoin(otherKeyedStream)
    .between(Time.milliseconds(-2), Time.milliseconds(2)) // lower and upper bound
    .upperBoundExclusive(true) // optional
    .lowerBoundExclusive(true) // optional
    .process(new IntervalJoinFunction() {...});
Window CoGroup
DataStream,DataStream → DataStream
根据指定的 key 和窗口将两个数据流组合在一起。
dataStream.coGroup(otherStream)
    .where(0).equalTo(1)
    .window(TumblingEventTimeWindows.of(Time.seconds(3)))
    .apply (new CoGroupFunction () {...});
Connect
DataStream,DataStream → ConnectedStream
“连接” 两个数据流并保留各自的类型。connect 允许在两个流的处理逻辑之间共享状态。
DataStream<Integer> someStream = //...
DataStream<String> otherStream = //...
ConnectedStreams<Integer, String> connectedStreams = someStream.connect(otherStream);
CoMap, CoFlatMap
ConnectedStream → DataStream
connectedStreams.map(new CoMapFunction<Integer, String, Boolean>() {
@Override
public Boolean map1(Integer value) {
return true;
}
@Override
public Boolean map2(String value) {
return false;
}
});
connectedStreams.flatMap(new CoFlatMapFunction<Integer, String, String>() {
@Override
public void flatMap1(Integer value, Collector<String> out) {
out.collect(value.toString());
}
@Override
public void flatMap2(String value, Collector<String> out) {
for (String word: value.split(" ")) {
out.collect(word);
}
}
});
Iterate
DataStream → IterativeStream → ConnectedStream
通过将一个算子的输出重定向到某个之前的算子来在流中创建“反馈”循环。这对于定义持续更新模型的算法特别有用。下面的代码从一个流开始,并不断地应用迭代自身。大于 0 的元素被发送回反馈通道,其余元素被转发到下游。
IterativeStream<Long> iteration = initialStream.iterate();
DataStream<Long> iterationBody = iteration.map (/*do something*/);
DataStream<Long> feedback = iterationBody.filter(new FilterFunction<Long>(){
    @Override
    public boolean filter(Long value) throws Exception {
        return value > 0;
    }
});
iteration.closeWith(feedback);
DataStream<Long> output = iterationBody.filter(new FilterFunction<Long>(){
    @Override
    public boolean filter(Long value) throws Exception {
        return value <= 0;
    }
});
Cache
DataStream → CachedDataStream
把算子的结果缓存起来。目前只支持批执行模式下运行的作业。算子的结果在算子第一次执行的时候会被缓存起来,之后的 作业中会复用该算子缓存的结果。如果算子的结果丢失了,它会被原来的算子重新计算并缓存。
DataStream<Integer> dataStream = //...
CachedDataStream<Integer> cachedDataStream = dataStream.cache();
cachedDataStream.print(); // Do anything with the cachedDataStream
...
env.execute(); // Execute and create cache.

cachedDataStream.print(); // Consume cached result.
env.execute();
物理分区
Flink 也提供以下方法让用户根据需要在数据转换完成后对数据分区进行更细粒度的配置。
自定义分区
DataStream → DataStream
使用用户定义的 Partitioner 为每个元素选择目标任务。
dataStream.partitionCustom(partitioner, "someKey");
dataStream.partitionCustom(partitioner, 0);
随即分区
DataStream → DataStream
将元素随机地均匀划分到分区。
dataStream.shuffle();
Rescaling
DataStream → DataStream
将元素以 Round-robin 轮询的方式分发到下游算子。如果你想实现数据管道,这将很有用,例如,想将数据源多个并发实例的数据分发到多个下游 map 来实现负载分配,但又不想像 rebalance() 那样引起完全重新平衡。该算子将只会到本地数据传输而不是网络数据传输,这取决于其它配置值,例如 TaskManager 的 slot 数量
dataStream.rescale();
广播
DataStream → DataStream
dataStream.broadcast();
算子链和资源组
将两个算子链接在一起能使得它们在同一个线程中执行,从而提升性能。Flink 默认会将能链接的算子尽可能地进行链接(例如, 两个 map 转换操作)。此外, Flink 还提供了对链接更细粒度控制的 API 以满足更多需求:
如果想对整个作业禁用算子链,可以调用
StreamExecutionEnvironment.disableOperatorChaining()
。下列方法还提供了更细粒度的控制。需要注意的是,这些方法只能在
DataStream
转换操作后才能被调用,因为它们只对前一次数据转换生效。例如,可以
someStream.map(...).startNewChain()
这样调用,而不能
someStream.startNewChain()
这样。
创建新链
基于当前算子创建一个新的算子链。 后面两个 map 将被链接起来,而 filter 和第一个 map 不会链接在一起。
someStream.filter(...).map(...).startNewChain().map(...);
禁用链接
禁止和 map 算子链接在一起。
someStream.map(...).disableChaining();
配置 Slot 共享组
为某个算子设置 slot 共享组。Flink 会将同一个 slot 共享组的算子放在同一个 slot 中,而将不在同一 slot 共享组的算子保留在其它 slot 中。这可用于隔离 slot 。如果所有输入算子都属于同一个 slot 共享组,那么 slot 共享组从将继承输入算子所在的 slot。slot 共享组的默认名称是 “default”,可以调用 slotSharingGroup(“default”) 来显式地将算子放入该组。
someStream.filter(...).slotSharingGroup("name");
名字和描述
Flink里的算子和作业节点会有一个名字和一个描述。名字和描述。名字和描述都是用来介绍一个算子或者节点是在做什么操作,但是他们会被用在不同地方。
名字会用在用户界面、线程名、日志、指标等场景。节点的名字会根据节点中算子的名字来构建。 名字需要尽可能的简洁,避免对外部系统产生大的压力
someStream.filter(...).name("filter").setDescription("x in (1, 2, 3, 4) and y > 1");
窗口
窗口(Window)是处理无界流的关键所在。窗口可以将数据流装入大小有限的“桶”中,再对每个“桶”加以处理。 本文的重心将放在 Flink 如何进行窗口操作以及开发者如何尽可能地利用 Flink 所提供的功能。
下面展示了 Flink 窗口在 keyed streams 和 non-keyed streams 上使用的基本结构。 我们可以看到,这两者唯一的区别仅在于:keyed streams 要调用
keyBy(...)
后再调用
window(...)
, 而 non-keyed streams 只用直接调用
windowAll(...)
。留意这个区别,它能帮我们更好地理解后面的内容。
Keyed Windows
Java/Scala
stream
       .keyBy(...)               <-  仅 keyed 窗口需要
       .window(...)              <-  必填项:"assigner"
      [.trigger(...)]            <-  可选项:"trigger" (省略则使用默认 trigger)
      [.evictor(...)]            <-  可选项:"evictor" (省略则不使用 evictor)
      [.allowedLateness(...)]    <-  可选项:"lateness" (省略则为 0)
      [.sideOutputLateData(...)] <-  可选项:"output tag" (省略则不对迟到数据使用 side output)
       .reduce/aggregate/apply()      <-  必填项:"function"
      [.getSideOutput(...)]      <-  可选项:"output tag"
Python
Non-Keyed Windows
Java/Scala
stream
       .windowAll(...)           <-  必填项:"assigner"
      [.trigger(...)]            <-  可选项:"trigger" (else default trigger)
      [.evictor(...)]            <-  可选项:"evictor" (else no evictor)
      [.allowedLateness(...)]    <-  可选项:"lateness" (else zero)
      [.sideOutputLateData(...)] <-  可选项:"output tag" (else no side output for late data)
       .reduce/aggregate/apply()      <-  必填项:"function"
      [.getSideOutput(...)]      <-  可选项:"output tag"
Python
上面方括号([…])中的命令是可选的。也就是说,Flink 允许你自定义多样化的窗口操作来满足你的需求。
窗口的生命周期
简单来说,一个窗口在第一个属于它的元素到达时就会被创建,然后在时间(event 或 processing time) 超过窗口的“结束时间戳 + 用户定义的
allowed lateness
(详见 Allowed Lateness)”时 被完全删除。Flink 仅保证删除基于时间的窗口,其他类型的窗口不做保证, 比如全局窗口(详见 Window Assigners)。 例如,对于一个基于 event time 且范围互不重合(滚动)的窗口策略, 如果窗口设置的时长为五分钟、可容忍的迟到时间(allowed lateness)为 1 分钟, 那么第一个元素落入
12:00
至
12:05
这个区间时,Flink 就会为这个区间创建一个新的窗口。 当 watermark 越过
12:06
时,这个窗口将被摧毁。
另外,每个窗口会设置自己的
Trigger
(详见 Triggers)和 function (
ProcessWindowFunction
、
ReduceFunction
、或
AggregateFunction
, 详见 Window Functions)。该 function 决定如何计算窗口中的内容, 而
Trigger
决定何时窗口中的数据可以被 function 计算。 Trigger 的触发(fire)条件可能是“当窗口中有多于 4 条数据”或“当 watermark 越过窗口的结束时间”等。 Trigger 还可以在 window 被创建后、删除前的这段时间内定义何时清理(purge)窗口中的数据。 这里的数据仅指窗口内的元素,不包括窗口的 meta data。也就是说,窗口在 purge 后仍然可以加入新的数据。
除此之外,你也可以指定一个
Evictor
(详见 Evictors),在 trigger 触发之后,Evictor 可以在窗口函数的前后删除数据。
接下来我们会更详细地介绍上面提到的内容。开头的例子中有必填项和可选项。 我们先从必填项开始(详见 Keyed vs Non-Keyed Windows、 Window Assigners、Window Functions)。
Keyed 和 Non-Keyed Windows
首先必须要在定义窗口前确定的是你的 stream 是 keyed 还是 non-keyed。
keyBy(...)
会将你的无界 stream 分割为逻辑上的 keyed stream。 如果
keyBy(...)
没有被调用,你的 stream 就不是 keyed。
对于 keyed stream,其中数据的任何属性都可以作为 key (详见此处)。 使用 keyed stream 允许你的窗口计算由多个 task 并行,因为每个逻辑上的 keyed stream 都可以被单独处理。 属于同一个 key 的元素会被发送到同一个 task。
对于 non-keyed stream,原始的 stream 不会被分割为多个逻辑上的 stream, 所以所有的窗口计算会被同一个 task 完成,也就是 parallelism 为 1。
Window Assigners
指定了你的 stream 是否为 keyed 之后,下一步就是定义 window assigner。
Window assigner 定义了 stream 中的元素如何被分发到各个窗口。 你可以在
window(...)
(用于 keyed streams)或
windowAll(...)
(用于 non-keyed streams)中指定一个
WindowAssigner
。
WindowAssigner
负责将 stream 中的每个数据分发到一个或多个窗口中。 Flink 为最常用的情况提供了一些定义好的 window assigner,也就是 tumbling windows、 sliding windows、 session windows 和 global windows。 你也可以继承
WindowAssigner
类来实现自定义的 window assigner。 所有内置的 window assigner(除了 global window)都是基于时间分发数据的,processing time 或 event time 均可。 请阅读我们对于 event time 的介绍来了解这两者的区别, 以及 timestamp 和 watermark 是如何产生的。
基于时间的窗口用 start timestamp(包含)和 end timestamp(不包含)描述窗口的大小。 在代码中,Flink 处理基于时间的窗口使用的是
TimeWindow
, 它有查询开始和结束 timestamp 以及返回窗口所能储存的最大 timestamp 的方法
maxTimestamp()
。
接下来我们会说明 Flink 内置的 window assigner 如何工作,以及他们如何用在 DataStream 程序中。 下面的图片展示了每种 assigner 如何工作。 紫色的圆圈代表 stream 中按 key 划分的元素(本例中是按 user 1、user 2 和 user 3 划分)。 x 轴表示时间的进展。
滚动窗口(Tumbling Windows)
滚动窗口的 assigner 分发元素到指定大小的窗口。滚动窗口的大小是固定的,且各自范围之间不重叠。 比如说,如果你指定了滚动窗口的大小为 5 分钟,那么每 5 分钟就会有一个窗口被计算,且一个新的窗口被创建(如下图所示)。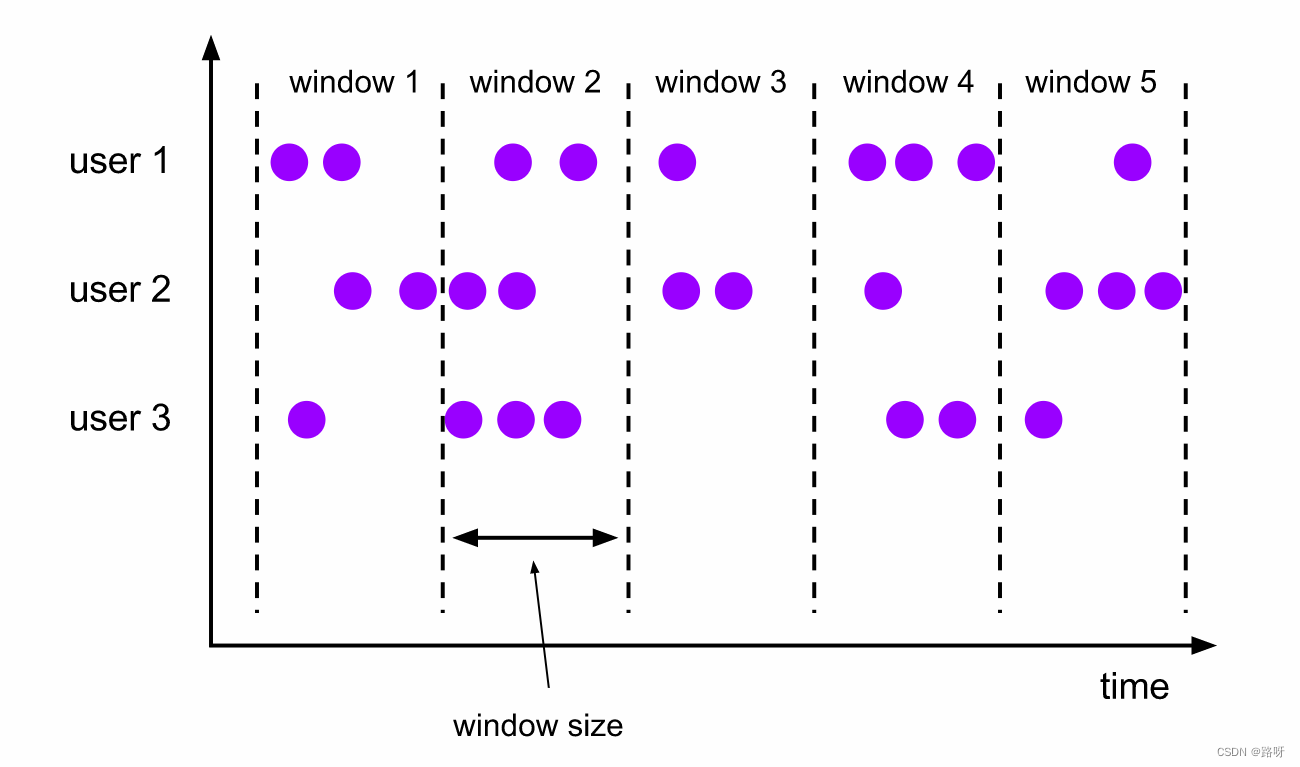
下面的代码展示了如何使用滚动窗口。
Java
DataStream<T> input = ...;
// 滚动 event-time 窗口
input
.keyBy(<key selector>)
.window(TumblingEventTimeWindows.of(Time.seconds(5)))
.<windowed transformation>(<window function>);
// 滚动 processing-time 窗口
input
.keyBy(<key selector>)
.window(TumblingProcessingTimeWindows.of(Time.seconds(5)))
.<windowed transformation>(<window function>);
// 长度为一天的滚动 event-time 窗口, 偏移量为 -8 小时。
input
.keyBy(<key selector>)
.window(TumblingEventTimeWindows.of(Time.days(1), Time.hours(-8)))
.<windowed transformation>(<window function>);
时间间隔可以用
Time.milliseconds(x)
、
Time.seconds(x)
、
Time.minutes(x)
等来指定。
如上一个例子所示,滚动窗口的 assigners 也可以传入可选的
offset
参数。这个参数可以用来对齐窗口。 比如说,不设置 offset 时,长度为一小时的滚动窗口会与 linux 的 epoch 对齐。 你会得到如
1:00:00.000 - 1:59:59.999
、
2:00:00.000 - 2:59:59.999
等。 如果你想改变对齐方式,你可以设置一个 offset。如果设置了 15 分钟的 offset, 你会得到
1:15:00.000 - 2:14:59.999
、
2:15:00.000 - 3:14:59.999
等。 一个重要的 offset 用例是根据 UTC-0 调整窗口的时差。比如说,在中国你可能会设置 offset 为
Time.hours(-8)
。
滑动窗口(Sliding Windows)
与滚动窗口类似,滑动窗口的 assigner 分发元素到指定大小的窗口,窗口大小通过 window size 参数设置。 滑动窗口需要一个额外的滑动距离(window slide)参数来控制生成新窗口的频率。 因此,如果 slide 小于窗口大小,滑动窗口可以允许窗口重叠。这种情况下,一个元素可能会被分发到多个窗口。
比如说,你设置了大小为 10 分钟,滑动距离 5 分钟的窗口,你会在每 5 分钟得到一个新的窗口, 里面包含之前 10 分钟到达的数据(如下图所示)。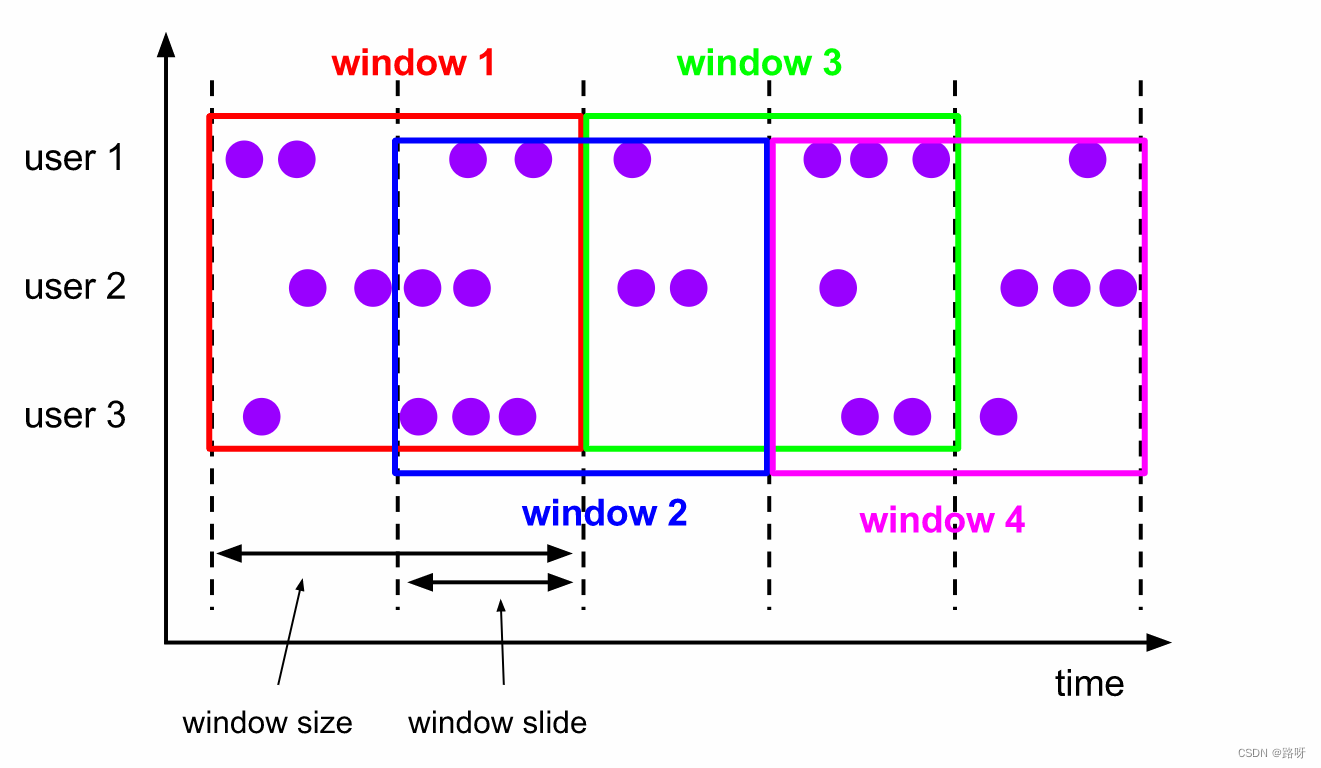
下面的代码展示了如何使用滑动窗口。
Java
DataStream<T> input = ...;
// 滑动 event-time 窗口
input
.keyBy(<key selector>)
.window(SlidingEventTimeWindows.of(Time.seconds(10), Time.seconds(5)))
.<windowed transformation>(<window function>);
// 滑动 processing-time 窗口
input
.keyBy(<key selector>)
.window(SlidingProcessingTimeWindows.of(Time.seconds(10), Time.seconds(5)))
.<windowed transformation>(<window function>);
// 滑动 processing-time 窗口,偏移量为 -8 小时
input
.keyBy(<key selector>)
.window(SlidingProcessingTimeWindows.of(Time.hours(12), Time.hours(1), Time.hours(-8)))
.<windowed transformation>(<window function>);
时间间隔可以使用
Time.milliseconds(x)
、
Time.seconds(x)
、
Time.minutes(x)
等来指定。
如上一个例子所示,滚动窗口的 assigners 也可以传入可选的
offset
参数。这个参数可以用来对齐窗口。 比如说,不设置 offset 时,长度为一小时、滑动距离为 30 分钟的滑动窗口会与 linux 的 epoch 对齐。 你会得到如
1:00:00.000 - 1:59:59.999
,
1:30:00.000 - 2:29:59.999
等。 如果你想改变对齐方式,你可以设置一个 offset。 如果设置了 15 分钟的 offset,你会得到
1:15:00.000 - 2:14:59.999
、
1:45:00.000 - 2:44:59.999
等。 一个重要的 offset 用例是根据 UTC-0 调整窗口的时差。比如说,在中国你可能会设置 offset 为
Time.hours(-8)
。
会话窗口(Session Windows)
会话窗口的 assigner 会把数据按活跃的会话分组。 与滚动窗口和滑动窗口不同,会话窗口不会相互重叠,且没有固定的开始或结束时间。 会话窗口在一段时间没有收到数据之后会关闭,即在一段不活跃的间隔之后。 会话窗口的 assigner 可以设置固定的会话间隔(session gap)或 用 session gap extractor 函数来动态地定义多长时间算作不活跃。 当超出了不活跃的时间段,当前的会话就会关闭,并且将接下来的数据分发到新的会话窗口。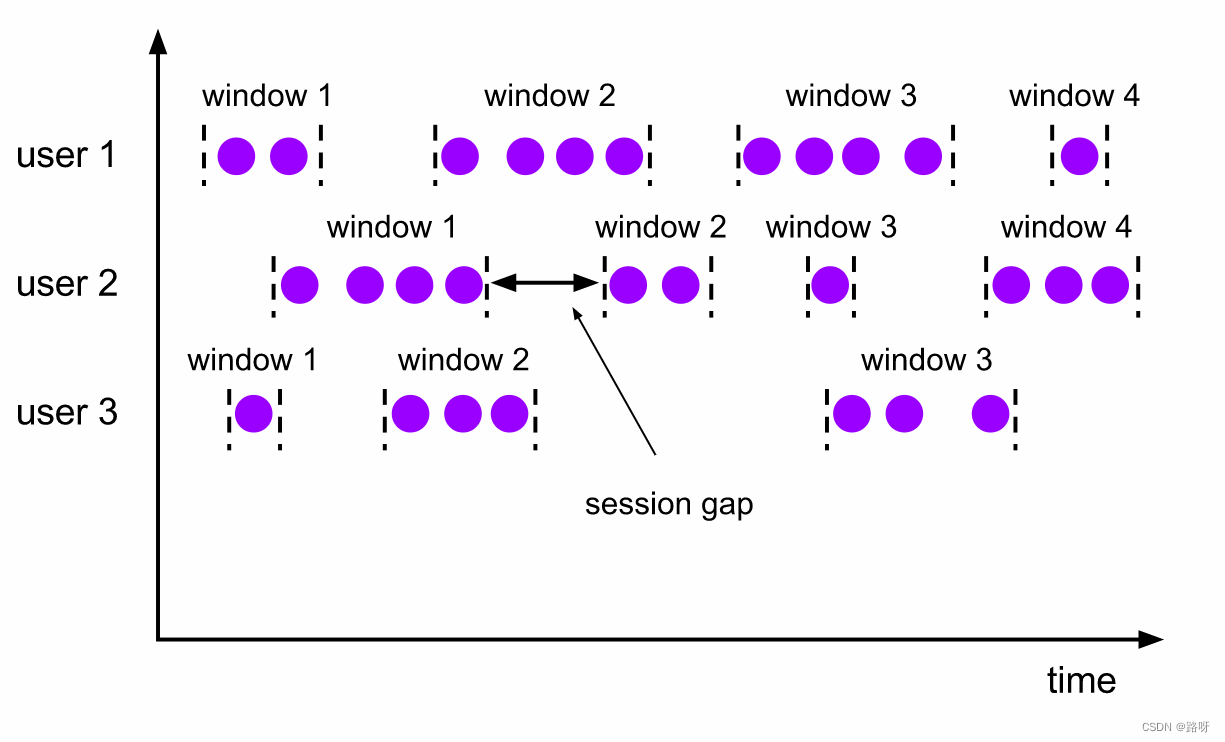
下面的代码展示了如何使用会话窗口。
Java
DataStream<T> input = ...;
// 设置了固定间隔的 event-time 会话窗口
input
.keyBy(<key selector>)
.window(EventTimeSessionWindows.withGap(Time.minutes(10)))
.<windowed transformation>(<window function>);
// 设置了动态间隔的 event-time 会话窗口
input
.keyBy(<key selector>)
.window(EventTimeSessionWindows.withDynamicGap((element) -> {
// 决定并返回会话间隔
}))
.<windowed transformation>(<window function>);
// 设置了固定间隔的 processing-time session 窗口
input
.keyBy(<key selector>)
.window(ProcessingTimeSessionWindows.withGap(Time.minutes(10)))
.<windowed transformation>(<window function>);
// 设置了动态间隔的 processing-time 会话窗口
input
.keyBy(<key selector>)
.window(ProcessingTimeSessionWindows.withDynamicGap((element) -> {
// 决定并返回会话间隔
}))
.<windowed transformation>(<window function>);
固定间隔可以使用
Time.milliseconds(x)
、
Time.seconds(x)
、
Time.minutes(x)
等来设置。
动态间隔可以通过实现
SessionWindowTimeGapExtractor
接口来指定。
会话窗口并没有固定的开始或结束时间,所以它的计算方法与滑动窗口和滚动窗口不同。在 Flink 内部,会话窗口的算子会为每一条数据创建一个窗口, 然后将距离不超过预设间隔的窗口合并。 想要让窗口可以被合并,会话窗口需要拥有支持合并的 Trigger 和 Window Function, 比如说
ReduceFunction、
AggregateFunction或
ProcessWindowFunction。
全局窗口(Global Windows)
全局窗口的 assigner 将拥有相同 key 的所有数据分发到一个全局窗口。 这样的窗口模式仅在你指定了自定义的 trigger 时有用。 否则,计算不会发生,因为全局窗口没有天然的终点去触发其中积累的数据。
下面的代码展示了如何使用全局窗口。
Java
DataStream<T> input = ...;
input
.keyBy(<key selector>)
.window(GlobalWindows.create())
.<windowed transformation>(<window function>);
窗口函数(Window Functions)
定义了 window assigner 之后,我们需要指定当窗口触发之后,我们如何计算每个窗口中的数据, 这就是 window function 的职责了。关于窗口如何触发,详见 triggers。
窗口函数有三种:
ReduceFunction
、
AggregateFunction
或
ProcessWindowFunction
。 前两者执行起来更高效(详见 State Size)因为 Flink 可以在每条数据到达窗口后 进行增量聚合(incrementally aggregate)。 而
ProcessWindowFunction
会得到能够遍历当前窗口内所有数据的
Iterable
,以及关于这个窗口的 meta-information。
使用
ProcessWindowFunction
的窗口转换操作没有其他两种函数高效,因为 Flink 在窗口触发前必须缓存里面的所有数据。
ProcessWindowFunction
可以与
ReduceFunction
或
AggregateFunction
合并来提高效率。 这样做既可以增量聚合窗口内的数据,又可以从
ProcessWindowFunction
接收窗口的 metadata。 我们接下来看看每种函数的例子。
ReduceFunction
ReduceFunction
指定两条输入数据如何合并起来产生一条输出数据,输入和输出数据的类型必须相同。 Flink 使用
ReduceFunction
对窗口中的数据进行增量聚合。
ReduceFunction
可以像下面这样定义:
Java
DataStream<Tuple2<String, Long>> input = ...;
input
.keyBy(<key selector>)
.window(<window assigner>)
.reduce(new ReduceFunction<Tuple2<String, Long>>() {
public Tuple2<String, Long> reduce(Tuple2<String, Long> v1, Tuple2<String, Long> v2) {
return new Tuple2<>(v1.f0, v1.f1 + v2.f1);
}
});
上面的例子是对窗口内元组的第二个属性求和。
AggregateFunction
ReduceFunction
是
AggregateFunction
的特殊情况。
AggregateFunction
接收三个类型:输入数据的类型(
IN
)、累加器的类型(
ACC
)和输出数据的类型(
OUT
)。 输入数据的类型是输入流的元素类型,
AggregateFunction
接口有如下几个方法: 把每一条元素加进累加器、创建初始累加器、合并两个累加器、从累加器中提取输出(
OUT
类型)。我们通过下例说明。
与
ReduceFunction
相同,Flink 会在输入数据到达窗口时直接进行增量聚合。
AggregateFunction
可以像下面这样定义:
Java
/**
* The accumulator is used to keep a running sum and a count. The {@code getResult} method
* computes the average.
*/
private static class AverageAggregate
implements AggregateFunction<Tuple2<String, Long>, Tuple2<Long, Long>, Double> {
@Override
public Tuple2<Long, Long> createAccumulator() {
return new Tuple2<>(0L, 0L);
}
@Override
public Tuple2<Long, Long> add(Tuple2<String, Long> value, Tuple2<Long, Long> accumulator) {
return new Tuple2<>(accumulator.f0 + value.f1, accumulator.f1 + 1L);
}
@Override
public Double getResult(Tuple2<Long, Long> accumulator) {
return ((double) accumulator.f0) / accumulator.f1;
}
@Override
public Tuple2<Long, Long> merge(Tuple2<Long, Long> a, Tuple2<Long, Long> b) {
return new Tuple2<>(a.f0 + b.f0, a.f1 + b.f1);
}
}
DataStream<Tuple2<String, Long>> input = ...;
input
.keyBy(<key selector>)
.window(<window assigner>)
.aggregate(new AverageAggregate());
上例计算了窗口内所有元素第二个属性的平均值。
ProcessWindowFunction
ProcessWindowFunction 有能获取包含窗口内所有元素的 Iterable, 以及用来获取时间和状态信息的 Context 对象,比其他窗口函数更加灵活。 ProcessWindowFunction 的灵活性是以性能和资源消耗为代价的, 因为窗口中的数据无法被增量聚合,而需要在窗口触发前缓存所有数据。
ProcessWindowFunction
的签名如下:
Java
public abstract class ProcessWindowFunction<IN, OUT, KEY, W extends Window> implements Function {
/**
* Evaluates the window and outputs none or several elements.
*
* @param key The key for which this window is evaluated.
* @param context The context in which the window is being evaluated.
* @param elements The elements in the window being evaluated.
* @param out A collector for emitting elements.
*
* @throws Exception The function may throw exceptions to fail the program and trigger recovery.
*/
public abstract void process(
KEY key,
Context context,
Iterable<IN> elements,
Collector<OUT> out) throws Exception;
/**
* Deletes any state in the {@code Context} when the Window expires (the watermark passes its
* {@code maxTimestamp} + {@code allowedLateness}).
*
* @param context The context to which the window is being evaluated
* @throws Exception The function may throw exceptions to fail the program and trigger recovery.
*/
public void clear(Context context) throws Exception {}
/**
* The context holding window metadata.
*/
public abstract class Context implements java.io.Serializable {
/**
* Returns the window that is being evaluated.
*/
public abstract W window();
/** Returns the current processing time. */
public abstract long currentProcessingTime();
/** Returns the current event-time watermark. */
public abstract long currentWatermark();
/**
* State accessor for per-key and per-window state.
*
* <p><b>NOTE:</b>If you use per-window state you have to ensure that you clean it up
* by implementing {@link ProcessWindowFunction#clear(Context)}.
*/
public abstract KeyedStateStore windowState();
/**
* State accessor for per-key global state.
*/
public abstract KeyedStateStore globalState();
}
}
key
参数由
keyBy()
中指定的
KeySelector
选出。 如果是给出 key 在 tuple 中的 index 或用属性名的字符串形式指定 key,这个 key 的类型将总是
Tuple
, 并且你需要手动将它转换为正确大小的 tuple 才能提取 key。
ProcessWindowFunction
可以像下面这样定义:
Java
DataStream<Tuple2<String, Long>> input = ...;
input
.keyBy(t -> t.f0)
.window(TumblingEventTimeWindows.of(Time.minutes(5)))
.process(new MyProcessWindowFunction());
/* ... */
public class MyProcessWindowFunction
extends ProcessWindowFunction<Tuple2<String, Long>, String, String, TimeWindow> {
@Override
public void process(String key, Context context, Iterable<Tuple2<String, Long>> input, Collector<String> out) {
long count = 0;
for (Tuple2<String, Long> in: input) {
count++;
}
out.collect("Window: " + context.window() + "count: " + count);
}
}
上例使用
ProcessWindowFunction
对窗口中的元素计数,并且将窗口本身的信息一同输出。
注意,使用
ProcessWindowFunction完成简单的聚合任务是非常低效的。 下一章会说明如何将
ReduceFunction或
AggregateFunction与
ProcessWindowFunction组合成既能 增量聚合又能获得窗口额外信息的窗口函数。
增量聚合的 ProcessWindowFunction
ProcessWindowFunction
可以与
ReduceFunction
或
AggregateFunction
搭配使用, 使其能够在数据到达窗口的时候进行增量聚合。当窗口关闭时,
ProcessWindowFunction
将会得到聚合的结果。 这样它就可以增量聚合窗口的元素并且从 ProcessWindowFunction` 中获得窗口的元数据。
你也可以对过时的
WindowFunction
使用增量聚合。
使用 ReduceFunction 增量聚合
下例展示了如何将
ReduceFunction
与
ProcessWindowFunction
组合,返回窗口中的最小元素和窗口的开始时间。
Java
DataStream<SensorReading> input = ...;
input
.keyBy(<key selector>)
.window(<window assigner>)
.reduce(new MyReduceFunction(), new MyProcessWindowFunction());
// Function definitions
private static class MyReduceFunction implements ReduceFunction<SensorReading> {
public SensorReading reduce(SensorReading r1, SensorReading r2) {
return r1.value() > r2.value() ? r2 : r1;
}
}
private static class MyProcessWindowFunction
extends ProcessWindowFunction<SensorReading, Tuple2<Long, SensorReading>, String, TimeWindow> {
public void process(String key,
Context context,
Iterable<SensorReading> minReadings,
Collector<Tuple2<Long, SensorReading>> out) {
SensorReading min = minReadings.iterator().next();
out.collect(new Tuple2<Long, SensorReading>(context.window().getStart(), min));
}
}
使用 AggregateFunction 增量聚合
下例展示了如何将
AggregateFunction
与
ProcessWindowFunction
组合,计算平均值并与窗口对应的 key 一同输出。
Java
DataStream<Tuple2<String, Long>> input = ...;
input
.keyBy(<key selector>)
.window(<window assigner>)
.aggregate(new AverageAggregate(), new MyProcessWindowFunction());
// Function definitions
/**
* The accumulator is used to keep a running sum and a count. The {@code getResult} method
* computes the average.
*/
private static class AverageAggregate
implements AggregateFunction<Tuple2<String, Long>, Tuple2<Long, Long>, Double> {
@Override
public Tuple2<Long, Long> createAccumulator() {
return new Tuple2<>(0L, 0L);
}
@Override
public Tuple2<Long, Long> add(Tuple2<String, Long> value, Tuple2<Long, Long> accumulator) {
return new Tuple2<>(accumulator.f0 + value.f1, accumulator.f1 + 1L);
}
@Override
public Double getResult(Tuple2<Long, Long> accumulator) {
return ((double) accumulator.f0) / accumulator.f1;
}
@Override
public Tuple2<Long, Long> merge(Tuple2<Long, Long> a, Tuple2<Long, Long> b) {
return new Tuple2<>(a.f0 + b.f0, a.f1 + b.f1);
}
}
private static class MyProcessWindowFunction
extends ProcessWindowFunction<Double, Tuple2<String, Double>, String, TimeWindow> {
public void process(String key,
Context context,
Iterable<Double> averages,
Collector<Tuple2<String, Double>> out) {
Double average = averages.iterator().next();
out.collect(new Tuple2<>(key, average));
}
}
在 ProcessWindowFunction 中使用 per-window state
除了访问 keyed state (任何富函数都可以),
ProcessWindowFunction
还可以使用作用域仅为 “当前正在处理的窗口”的 keyed state。在这种情况下,理解 per-window 中的 window 指的是什么非常重要。 总共有以下几种窗口的理解:
- 在窗口操作中定义的窗口:比如定义了长一小时的滚动窗口或长两小时、滑动一小时的滑动窗口。
- 对应某个 key 的窗口实例:比如 以 user-id xyz 为 key,从 12:00 到 13:00 的时间窗口。 具体情况取决于窗口的定义,根据具体的 key 和时间段会产生诸多不同的窗口实例。
Per-window state 作用于后者。也就是说,如果我们处理有 1000 种不同 key 的事件, 并且目前所有事件都处于 [12:00, 13:00) 时间窗口内,那么我们将会得到 1000 个窗口实例, 且每个实例都有自己的 keyed per-window state。
process()
接收到的
Context
对象中有两个方法允许我们访问以下两种 state:
globalState(),访问全局的 keyed statewindowState(), 访问作用域仅限于当前窗口的 keyed state
如果你可能将一个 window 触发多次(比如当你的迟到数据会再次触发窗口计算, 或你自定义了根据推测提前触发窗口的 trigger),那么这个功能将非常有用。 这时你可能需要在 per-window state 中储存关于之前触发的信息或触发的总次数。
当使用窗口状态时,一定记得在删除窗口时清除这些状态。他们应该定义在
clear()
方法中。
WindowFunction(已过时)
在某些可以使用
ProcessWindowFunction
的地方,你也可以使用
WindowFunction
。 它是旧版的
ProcessWindowFunction
,只能提供更少的环境信息且缺少一些高级的功能,比如 per-window state。 这个接口会在未来被弃用。
WindowFunction
的签名如下:
Java
public interface WindowFunction<IN, OUT, KEY, W extends Window> extends Function, Serializable {
/**
* Evaluates the window and outputs none or several elements.
*
* @param key The key for which this window is evaluated.
* @param window The window that is being evaluated.
* @param input The elements in the window being evaluated.
* @param out A collector for emitting elements.
*
* @throws Exception The function may throw exceptions to fail the program and trigger recovery.
*/
void apply(KEY key, W window, Iterable<IN> input, Collector<OUT> out) throws Exception;
}
它可以像下例这样使用:
Java
DataStream<Tuple2<String, Long>> input = ...;
input
.keyBy(<key selector>)
.window(<window assigner>)
.apply(new MyWindowFunction());
Triggers
Trigger
决定了一个窗口(由 window assigner 定义)何时可以被 window function 处理。 每个
WindowAssigner
都有一个默认的
Trigger
。 如果默认 trigger 无法满足你的需要,你可以在
trigger(...)
调用中指定自定义的 trigger。
Trigger 接口提供了五个方法来响应不同的事件:
onElement()方法在每个元素被加入窗口时调用。onEventTime()方法在注册的 event-time timer 触发时调用。onProcessingTime()方法在注册的 processing-time timer 触发时调用。onMerge()方法与有状态的 trigger 相关。该方法会在两个窗口合并时, 将窗口对应 trigger 的状态进行合并,比如使用会话窗口时。- 最后,
clear()方法处理在对应窗口被移除时所需的逻辑。
有两点需要注意:
- 前三个方法通过返回
TriggerResult来决定 trigger 如何应对到达窗口的事件。应对方案有以下几种:
CONTINUE: 什么也不做FIRE: 触发计算PURGE: 清空窗口内的元素FIRE_AND_PURGE: 触发计算,计算结束后清空窗口内的元素
- 上面的任意方法都可以用来注册 processing-time 或 event-time timer。
触发(Fire)与清除(Purge)
当 trigger 认定一个窗口可以被计算时,它就会触发,也就是返回
FIRE
或
FIRE_AND_PURGE
。 这是让窗口算子发送当前窗口计算结果的信号。 如果一个窗口指定了
ProcessWindowFunction
,所有的元素都会传给
ProcessWindowFunction
。 如果是
ReduceFunction
或
AggregateFunction
,则直接发送聚合的结果。
当 trigger 触发时,它可以返回
FIRE
或
FIRE_AND_PURGE
。
FIRE
会保留被触发的窗口中的内容,而
FIRE_AND_PURGE
会删除这些内容。 Flink 内置的 trigger 默认使用
FIRE
,不会清除窗口的状态。
Purge 只会移除窗口的内容, 不会移除关于窗口的 meta-information 和 trigger 的状态。
WindowAssigner 默认的 Triggers
WindowAssigner
默认的
Trigger
足以应付诸多情况。 比如说,所有的 event-time window assigner 都默认使用
EventTimeTrigger
。 这个 trigger 会在 watermark 越过窗口结束时间后直接触发。
GlobalWindow
的默认 trigger 是永远不会触发的
NeverTrigger
。因此,使用
GlobalWindow
时,你必须自己定义一个 trigger。
当你在
trigger()中指定了一个 trigger 时, 你实际上覆盖了当前
WindowAssigner默认的 trigger。 比如说,如果你指定了一个
CountTrigger给
TumblingEventTimeWindows,你的窗口将不再根据时间触发, 而是根据元素数量触发。如果你希望即响应时间,又响应数量,就需要自定义 trigger 了。
内置 Triggers 和自定义 Triggers
Flink 包含一些内置 trigger。
- 之前提到过的
EventTimeTrigger根据 watermark 测量的 event time 触发。 ProcessingTimeTrigger根据 processing time 触发。CountTrigger在窗口中的元素超过预设的限制时触发。PurgingTrigger接收另一个 trigger 并将它转换成一个会清理数据的 trigger。
如果你需要实现自定义的 trigger,你应该看看这个抽象类 Trigger 。 请注意,这个 API 仍在发展,所以在之后的 Flink 版本中可能会发生变化。
Evictors
Flink 的窗口模型允许在
WindowAssigner
和
Trigger
之外指定可选的
Evictor
。 如本文开篇的代码中所示,通过
evictor(...)
方法传入
Evictor
。 Evictor 可以在 trigger 触发后、调用窗口函数之前或之后从窗口中删除元素。
Evictor
接口提供了两个方法实现此功能:
/**
* Optionally evicts elements. Called before windowing function.
*
* @param elements The elements currently in the pane.
* @param size The current number of elements in the pane.
* @param window The {@link Window}
* @param evictorContext The context for the Evictor
*/
void evictBefore(Iterable<TimestampedValue<T>> elements, int size, W window, EvictorContext evictorContext);
/**
* Optionally evicts elements. Called after windowing function.
*
* @param elements The elements currently in the pane.
* @param size The current number of elements in the pane.
* @param window The {@link Window}
* @param evictorContext The context for the Evictor
*/
void evictAfter(Iterable<TimestampedValue<T>> elements, int size, W window, EvictorContext evictorContext);
evictBefore()
包含在调用窗口函数前的逻辑,而
evictAfter()
包含在窗口函数调用之后的逻辑。 在调用窗口函数之前被移除的元素不会被窗口函数计算。
Flink 内置有三个 evictor:
CountEvictor: 仅记录用户指定数量的元素,一旦窗口中的元素超过这个数量,多余的元素会从窗口缓存的开头移除DeltaEvictor: 接收DeltaFunction和threshold参数,计算最后一个元素与窗口缓存中所有元素的差值, 并移除差值大于或等于threshold的元素。TimeEvictor: 接收interval参数,以毫秒表示。 它会找到窗口中元素的最大 timestampmax_ts并移除比max_ts - interval小的所有元素。
默认情况下,所有内置的 evictor 逻辑都在调用窗口函数前执行。
指定一个 evictor 可以避免预聚合,因为窗口中的所有元素在计算前都必须经过 evictor。
Note:
Evictor在 Python DataStream API 中还不支持.
Flink 不对窗口中元素的顺序做任何保证。也就是说,即使 evictor 从窗口缓存的开头移除一个元素,这个元素也不一定是最先或者最后到达窗口的。
Allowed Lateness
在使用 event-time 窗口时,数据可能会迟到,即 Flink 用来追踪 event-time 进展的 watermark 已经 越过了窗口结束的 timestamp 后,数据才到达。对于 Flink 如何处理 event time, event time 和 late elements 有更详细的探讨。
默认情况下,watermark 一旦越过窗口结束的 timestamp,迟到的数据就会被直接丢弃。 但是 Flink 允许指定窗口算子最大的 allowed lateness。 Allowed lateness 定义了一个元素可以在迟到多长时间的情况下不被丢弃,这个参数默认是 0。 在 watermark 超过窗口末端、到达窗口末端加上 allowed lateness 之前的这段时间内到达的元素, 依旧会被加入窗口。取决于窗口的 trigger,一个迟到但没有被丢弃的元素可能会再次触发窗口,比如
EventTimeTrigger
。
为了实现这个功能,Flink 会将窗口状态保存到 allowed lateness 超时才会将窗口及其状态删除 (如 Window Lifecycle 所述)。
默认情况下,allowed lateness 被设为
0
。即 watermark 之后到达的元素会被丢弃。
你可以像下面这样指定 allowed lateness:
Java
DataStream<T> input = ...;
input
.keyBy(<key selector>)
.window(<window assigner>)
.allowedLateness(<time>)
.<windowed transformation>(<window function>);
使用
GlobalWindows时,没有数据会被视作迟到,因为全局窗口的结束 timestamp 是
Long.MAX_VALUE。
从旁路输出(side output)获取迟到数据
通过 Flink 的 旁路输出 功能,你可以获得迟到数据的数据流。
首先,你需要在开窗后的 stream 上使用
sideOutputLateData(OutputTag)
表明你需要获取迟到数据。 然后,你就可以从窗口操作的结果中获取旁路输出流了。
Java
final OutputTag<T> lateOutputTag = new OutputTag<T>("late-data"){};
DataStream<T> input = ...;
SingleOutputStreamOperator<T> result = input
.keyBy(<key selector>)
.window(<window assigner>)
.allowedLateness(<time>)
.sideOutputLateData(lateOutputTag)
.<windowed transformation>(<window function>);
DataStream<T> lateStream = result.getSideOutput(lateOutputTag);
迟到数据的一些考虑
当指定了大于 0 的 allowed lateness 时,窗口本身以及其中的内容仍会在 watermark 越过窗口末端后保留。 这时,如果一个迟到但未被丢弃的数据到达,它可能会再次触发这个窗口。 这种触发被称作
late firing
,与表示第一次触发窗口的
main firing
相区别。 如果是使用会话窗口的情况,late firing 可能会进一步合并已有的窗口,因为他们可能会连接现有的、未被合并的窗口。
你应该注意:late firing 发出的元素应该被视作对之前计算结果的更新,即你的数据流中会包含一个相同计算任务的多个结果。你的应用需要考虑到这些重复的结果,或去除重复的部分。
Working with window results
窗口操作的结果会变回
DataStream
,并且窗口操作的信息不会保存在输出的元素中。 所以如果你想要保留窗口的 meta-information,你需要在
ProcessWindowFunction
里手动将他们放入输出的元素中。 输出元素中保留的唯一相关的信息是元素的 timestamp。 它被设置为窗口能允许的最大 timestamp,也就是 end timestamp - 1,因为窗口末端的 timestamp 是排他的。 这个情况同时适用于 event-time 窗口和 processing-time 窗口。 也就是说,在窗口操作之后,元素总是会携带一个 event-time 或 processing-time timestamp。 对 Processing-time 窗口来说,这并不意味着什么。 而对于 event-time 窗口来说,“输出携带 timestamp” 以及 “watermark 与窗口的相互作用” 这两者使建立窗口大小相同的连续窗口操作(consecutive windowed operations) 变为可能。我们先看看 watermark 与窗口的相互作用,然后再来讨论它。
Interaction of watermarks and windows
继续阅读这个章节之前,你可能想要先了解一下我们介绍 event time 和 watermarks 的内容。
当 watermark 到达窗口算子时,它触发了两件事:
- 这个 watermark 触发了所有最大 timestamp(即 end-timestamp - 1)小于它的窗口
- 这个 watermark 被原封不动地转发给下游的任务。
通俗来讲,watermark 将当前算子中那些“一旦这个 watermark 被下游任务接收就肯定会就超时”的窗口全部冲走。
Consecutive windowed operations
如之前提到的,窗口结果的 timestamp 如何计算以及 watermark 如何与窗口相互作用使串联多个窗口操作成为可能。 这提供了一种便利的方法,让你能够有两个连续的窗口,他们即能使用不同的 key, 又能让上游操作中某个窗口的数据出现在下游操作的相同窗口。参考下例:
Java
DataStream<Integer> input = ...;
DataStream<Integer> resultsPerKey = input
.keyBy(<key selector>)
.window(TumblingEventTimeWindows.of(Time.seconds(5)))
.reduce(new Summer());
DataStream<Integer> globalResults = resultsPerKey
.windowAll(TumblingEventTimeWindows.of(Time.seconds(5)))
.process(new TopKWindowFunction());
这个例子中,第一个操作中时间窗口
[0, 5)
的结果会出现在下一个窗口操作的
[0, 5)
窗口中。 这就可以让我们先在一个窗口内按 key 求和,再在下一个操作中找出这个窗口中 top-k 的元素。
关于状态大小的考量
窗口可以被定义在很长的时间段上(比如几天、几周或几个月)并且积累下很大的状态。 当你估算窗口计算的储存需求时,可以铭记几条规则:
- Flink 会为一个元素在它所属的每一个窗口中都创建一个副本。 因此,一个元素在滚动窗口的设置中只会存在一个副本(一个元素仅属于一个窗口,除非它迟到了)。 与之相反,一个元素可能会被拷贝到多个滑动窗口中,就如我们在 Window Assigners 中描述的那样。 因此,设置一个大小为一天、滑动距离为一秒的滑动窗口可能不是个好想法。
ReduceFunction和AggregateFunction可以极大地减少储存需求,因为他们会就地聚合到达的元素, 且每个窗口仅储存一个值。而使用ProcessWindowFunction需要累积窗口中所有的元素。- 使用
Evictor可以避免预聚合, 因为窗口中的所有数据必须先经过 evictor 才能进行计算(详见 Evictors)。
Joining
Window Join
Window join 作用在两个流中有相同 key 且处于相同窗口的元素上。这些窗口可以通过 window assigner 定义,并且两个流中的元素都会被用于计算窗口的结果。
两个流中的元素在组合之后,会被传递给用户定义的
JoinFunction
或
FlatJoinFunction
,用户可以用它们输出符合 join 要求的结果。
常见的用例可以总结为以下代码:
stream.join(otherStream)
    .where(<KeySelector>)
    .equalTo(<KeySelector>)
    .window(<WindowAssigner>)
    .apply(<JoinFunction>);
语义上有一些值得注意的地方:
- 从两个流中创建成对的元素与 inner-join 类似,即一个流中的元素在与另一个流中对应的元素完成 join 之前不会被输出。
- 完成 join 的元素会将他们的 timestamp 设为对应窗口中允许的最大 timestamp。比如一个边界为
[5, 10)窗口中的元素在 join 之后的 timestamp 为 9。
接下来我们会用例子说明各种 window join 如何运作。
滚动 Window Join
使用滚动 window join 时,所有 key 相同且共享一个滚动窗口的元素会被组合成对,并传递给
JoinFunction
或
FlatJoinFunction
。因为这个行为与 inner join 类似,所以一个流中的元素如果没有与另一个流中的元素组合起来,它就不会被输出!
如图所示,我们定义了一个大小为 2 毫秒的滚动窗口,即形成了边界为
[0,1], [2,3], ...
的窗口。图中展示了如何将每个窗口中的元素组合成对,组合的结果将被传递给
JoinFunction
。注意,滚动窗口
[6,7]
将不会输出任何数据,因为绿色流当中没有数据可以与橙色流的 ⑥ 和 ⑦ 配对。
Java
import org.apache.flink.api.java.functions.KeySelector;
import org.apache.flink.streaming.api.windowing.assigners.TumblingEventTimeWindows;
import org.apache.flink.streaming.api.windowing.time.Time;
...
DataStream<Integer> orangeStream = ...;
DataStream<Integer> greenStream = ...;
orangeStream.join(greenStream)
.where(<KeySelector>)
.equalTo(<KeySelector>)
.window(TumblingEventTimeWindows.of(Time.milliseconds(2)))
.apply (new JoinFunction<Integer, Integer, String> (){
@Override
public String join(Integer first, Integer second) {
return first + "," + second;
}
});
滑动 Window Join
当使用滑动 window join 时,所有 key 相同且处于同一个滑动窗口的元素将被组合成对,并传递给
JoinFunction
或
FlatJoinFunction
。当前滑动窗口内,如果一个流中的元素没有与另一个流中的元素组合起来,它就不会被输出!注意,在某个滑动窗口中被 join 的元素不一定会在其他滑动窗口中被 join。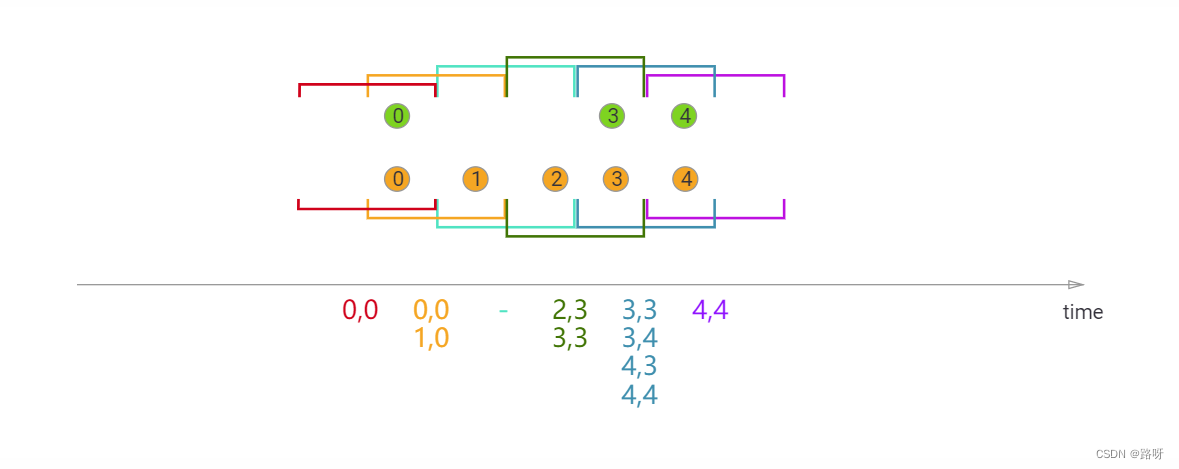
本例中我们定义了长度为两毫秒,滑动距离为一毫秒的滑动窗口,生成的窗口实例区间为
[-1, 0],[0,1],[1,2],[2,3], …
。 X 轴下方是每个滑动窗口中被 join 后传递给
JoinFunction
的元素。图中可以看到橙色 ② 与绿色 ③ 在窗口
[2,3]
中 join,但没有与窗口
[1,2]
中任何元素 join。
Java
import org.apache.flink.api.java.functions.KeySelector;
import org.apache.flink.streaming.api.windowing.assigners.SlidingEventTimeWindows;
import org.apache.flink.streaming.api.windowing.time.Time;
...
DataStream<Integer> orangeStream = ...;
DataStream<Integer> greenStream = ...;
orangeStream.join(greenStream)
.where(<KeySelector>)
.equalTo(<KeySelector>)
.window(SlidingEventTimeWindows.of(Time.milliseconds(2) /* size */, Time.milliseconds(1) /* slide */))
.apply (new JoinFunction<Integer, Integer, String> (){
@Override
public String join(Integer first, Integer second) {
return first + "," + second;
}
});
会话 Window Join
使用会话 window join 时,所有 key 相同且组合后符合会话要求的元素将被组合成对,并传递给
JoinFunction
或
FlatJoinFunction
。这个操作同样是 inner join,所以如果一个会话窗口中只含有某一个流的元素,这个窗口将不会产生输出!
这里我们定义了一个间隔为至少一毫秒的会话窗口。图中总共有三个会话,前两者中两个流都有元素,它们被 join 并传递给
JoinFunction
。而第三个会话中,绿流没有任何元素,所以 ⑧ 和 ⑨ 没有被 join!
Java
import org.apache.flink.api.java.functions.KeySelector;
import org.apache.flink.streaming.api.windowing.assigners.EventTimeSessionWindows;
import org.apache.flink.streaming.api.windowing.time.Time;
...
DataStream<Integer> orangeStream = ...;
DataStream<Integer> greenStream = ...;
orangeStream.join(greenStream)
.where(<KeySelector>)
.equalTo(<KeySelector>)
.window(EventTimeSessionWindows.withGap(Time.milliseconds(1)))
.apply (new JoinFunction<Integer, Integer, String> (){
@Override
public String join(Integer first, Integer second) {
return first + "," + second;
}
});
Interval Join
Interval join 组合元素的条件为:两个流(我们暂时称为 A 和 B)中 key 相同且 B 中元素的 timestamp 处于 A 中元素 timestamp 的一定范围内。
这个条件可以更加正式地表示为
b.timestamp ∈ [a.timestamp + lowerBound; a.timestamp + upperBound]
或
a.timestamp + lowerBound <= b.timestamp <= a.timestamp + upperBound
这里的 a 和 b 为 A 和 B 中共享相同 key 的元素。上界和下界可正可负,只要下界永远小于等于上界即可。 Interval join 目前仅执行 inner join。
当一对元素被传递给
ProcessJoinFunction
,他们的 timestamp 会从两个元素的 timestamp 中取最大值 (timestamp 可以通过
ProcessJoinFunction.Context
访问)。
Interval join 目前仅支持 event time。

上例中,我们 join 了橙色和绿色两个流,join 的条件是:以 -2 毫秒为下界、+1 毫秒为上界。 默认情况下,上下界也被包括在区间内,但
.lowerBoundExclusive()
和
.upperBoundExclusive()
可以将它们排除在外。
图中三角形所表示的条件也可以写成更加正式的表达式:
orangeElem.ts + lowerBound <= greenElem.ts <= orangeElem.ts + upperBound
Java
import org.apache.flink.api.java.functions.KeySelector;
import org.apache.flink.streaming.api.functions.co.ProcessJoinFunction;
import org.apache.flink.streaming.api.windowing.time.Time;
...
DataStream<Integer> orangeStream = ...;
DataStream<Integer> greenStream = ...;
orangeStream
.keyBy(<KeySelector>)
.intervalJoin(greenStream.keyBy(<KeySelector>))
.between(Time.milliseconds(-2), Time.milliseconds(1))
.process (new ProcessJoinFunction<Integer, Integer, String>(){
@Override
public void processElement(Integer left, Integer right, Context ctx, Collector<String> out) {
out.collect(left + "," + right);
}
});
Process Function
The ProcessFunction
The
ProcessFunction
is a low-level stream processing operation, giving access to the basic building blocks of all (acyclic) streaming applications:
- events (stream elements)
- state (fault-tolerant, consistent, only on keyed stream)
- timers (event time and processing time, only on keyed stream)
The
ProcessFunction
can be thought of as a
FlatMapFunction
with access to keyed state and timers. It handles events by being invoked for each event received in the input stream(s).
For fault-tolerant state, the
ProcessFunction
gives access to Flink’s keyed state, accessible via the
RuntimeContext
, similar to the way other stateful functions can access keyed state.
The timers allow applications to react to changes in processing time and in event time. Every call to the function
processElement(...)
gets a
Context
object which gives access to the element’s event time timestamp, and to the TimerService. The
TimerService
can be used to register callbacks for future event-/processing-time instants. With event-time timers, the
onTimer(...)
method is called when the current watermark is advanced up to or beyond the timestamp of the timer, while with processing-time timers,
onTimer(...)
is called when wall clock time reaches the specified time. During that call, all states are again scoped to the key with which the timer was created, allowing timers to manipulate keyed state.
If you want to access keyed state and timers you have to apply the
ProcessFunctionon a keyed stream:
stream.keyBy(...).process(new MyProcessFunction());
Low-level Joins
To realize low-level operations on two inputs, applications can use
CoProcessFunction
or
KeyedCoProcessFunction
. This function is bound to two different inputs and gets individual calls to
processElement1(...)
and
processElement2(...)
for records from the two different inputs.
Implementing a low level join typically follows this pattern:
- Create a state object for one input (or both)
- Update the state upon receiving elements from its input
- Upon receiving elements from the other input, probe the state and produce the joined result
For example, you might be joining customer data to financial trades, while keeping state for the customer data. If you care about having complete and deterministic joins in the face of out-of-order events, you can use a timer to evaluate and emit the join for a trade when the watermark for the customer data stream has passed the time of that trade.
Example
In the following example a
KeyedProcessFunction
maintains counts per key, and emits a key/count pair whenever a minute passes (in event time) without an update for that key:
- The count, key, and last-modification-timestamp are stored in a
ValueState, which is implicitly scoped by key. - For each record, the
KeyedProcessFunctionincrements the counter and sets the last-modification timestamp - The function also schedules a callback one minute into the future (in event time)
- Upon each callback, it checks the callback’s event time timestamp against the last-modification time of the stored count and emits the key/count if they match (i.e., no further update occurred during that minute)
This simple example could have been implemented with session windows. We use
KeyedProcessFunctionhere to illustrate the basic pattern it provides.
Java
import org.apache.flink.api.common.state.ValueState;
import org.apache.flink.api.common.state.ValueStateDescriptor;
import org.apache.flink.api.java.tuple.Tuple;
import org.apache.flink.api.java.tuple.Tuple2;
import org.apache.flink.configuration.Configuration;
import org.apache.flink.streaming.api.functions.KeyedProcessFunction;
import org.apache.flink.streaming.api.functions.KeyedProcessFunction.Context;
import org.apache.flink.streaming.api.functions.KeyedProcessFunction.OnTimerContext;
import org.apache.flink.util.Collector;
// the source data stream
DataStream<Tuple2<String, String>> stream = ...;
// apply the process function onto a keyed stream
DataStream<Tuple2<String, Long>> result = stream
.keyBy(value -> value.f0)
.process(new CountWithTimeoutFunction());
/**
* The data type stored in the state
*/
public class CountWithTimestamp {
public String key;
public long count;
public long lastModified;
}
/**
* The implementation of the ProcessFunction that maintains the count and timeouts
*/
public class CountWithTimeoutFunction
extends KeyedProcessFunction<Tuple, Tuple2<String, String>, Tuple2<String, Long>> {
/** The state that is maintained by this process function */
private ValueState<CountWithTimestamp> state;
@Override
public void open(Configuration parameters) throws Exception {
state = getRuntimeContext().getState(new ValueStateDescriptor<>("myState", CountWithTimestamp.class));
}
@Override
public void processElement(
Tuple2<String, String> value,
Context ctx,
Collector<Tuple2<String, Long>> out) throws Exception {
// retrieve the current count
CountWithTimestamp current = state.value();
if (current == null) {
current = new CountWithTimestamp();
current.key = value.f0;
}
// update the state's count
current.count++;
// set the state's timestamp to the record's assigned event time timestamp
current.lastModified = ctx.timestamp();
// write the state back
state.update(current);
// schedule the next timer 60 seconds from the current event time
ctx.timerService().registerEventTimeTimer(current.lastModified + 60000);
}
@Override
public void onTimer(
long timestamp,
OnTimerContext ctx,
Collector<Tuple2<String, Long>> out) throws Exception {
// get the state for the key that scheduled the timer
CountWithTimestamp result = state.value();
// check if this is an outdated timer or the latest timer
if (timestamp == result.lastModified + 60000) {
// emit the state on timeout
out.collect(new Tuple2<String, Long>(result.key, result.count));
}
}
}
Before Flink 1.4.0, when called from a processing-time timer, the
ProcessFunction.onTimer()
method sets the current processing time as event-time timestamp. This behavior is very subtle and might not be noticed by users. Well, it’s harmful because processing-time timestamps are indeterministic and not aligned with watermarks. Besides, user-implemented logic depends on this wrong timestamp highly likely is unintendedly faulty. So we’ve decided to fix it. Upon upgrading to 1.4.0, Flink jobs that are using this incorrect event-time timestamp will fail, and users should adapt their jobs to the correct logic.
The KeyedProcessFunction
KeyedProcessFunction
, as an extension of
ProcessFunction
, gives access to the key of timers in its
onTimer(...)
method.
Java
@Override
public void onTimer(long timestamp, OnTimerContext ctx, Collector<OUT> out) throws Exception {
    K key = ctx.getCurrentKey();
    // ...
}
Timers
Both types of timers (processing-time and event-time) are internally maintained by the
TimerService
and enqueued for execution.
The
TimerService
deduplicates timers per key and timestamp, i.e., there is at most one timer per key and timestamp. If multiple timers are registered for the same timestamp, the
onTimer()
method will be called just once.
Flink synchronizes invocations of
onTimer()
and
processElement()
. Hence, users do not have to worry about concurrent modification of state.
Fault Tolerance
Timers are fault tolerant and checkpointed along with the state of the application. In case of a failure recovery or when starting an application from a savepoint, the timers are restored.
Checkpointed processing-time timers that were supposed to fire before their restoration, will fire immediately. This might happen when an application recovers from a failure or when it is started from a savepoint.
Timers are always asynchronously checkpointed, except for the combination of RocksDB backend / with incremental snapshots / with heap-based timers (will be resolved with
FLINK-10026). Notice that large numbers of timers can increase the checkpointing time because timers are part of the checkpointed state. See the “Timer Coalescing” section for advice on how to reduce the number of timers.
Timer Coalescing
Since Flink maintains only one timer per key and timestamp, you can reduce the number of timers by reducing the timer resolution to coalesce them.
For a timer resolution of 1 second (event or processing time), you can round down the target time to full seconds. Timers will fire at most 1 second earlier but not later than requested with millisecond accuracy. As a result, there are at most one timer per key and second.
Java
long coalescedTime = ((ctx.timestamp() + timeout) / 1000) * 1000;
ctx.timerService().registerProcessingTimeTimer(coalescedTime);
Java
long coalescedTime = ctx.timerService().currentWatermark() + 1;
ctx.timerService().registerEventTimeTimer(coalescedTime);
Java
long timestampOfTimerToStop = ...;
ctx.timerService().deleteProcessingTimeTimer(timestampOfTimerToStop);
Java
long timestampOfTimerToStop = ...;
ctx.timerService().deleteEventTimeTimer(timestampOfTimerToStop);
Stopping a timer has no effect if no such timer with the given timestamp is registered.
版权归原作者 路呀 所有, 如有侵权,请联系我们删除。