
背景
公司开发用微服务SpringCloud生态,采用nacos进行服务注册和管理,最近希望通过自己搭建一套,体会nacos技术栈在其中的作用及原理。
简介
nacos中文网站
内容来自官网:
Nacos /nɑ:kəʊs/ 是 Dynamic Naming and Configuration Service的首字母简称,一个更易于构建云原生应用的动态服务发现、配置管理和服务管理平台。
Nacos 致力于帮助您发现、配置和管理微服务。Nacos 提供了一组简单易用的特性集,帮助您快速实现动态服务发现、服务配置、服务元数据及流量管理。
Nacos 帮助您更敏捷和容易地构建、交付和管理微服务平台。 Nacos 是构建以“服务”为中心的现代应用架构 (例如微服务范式、云原生范式) 的服务基础设施。
Nacos 地图

- 特性大图:要从功能特性,非功能特性,全面介绍我们要解的问题域的特性诉求
- 架构大图:通过清晰架构,让您快速进入 Nacos 世界
- 业务大图:利用当前特性可以支持的业务场景,及其最佳实践
- 生态大图:系统梳理 Nacos 和主流技术生态的关系
- 优势大图:展示 Nacos 核心竞争力
- 战略大图:要从战略到战术层面讲 Nacos 的宏观优势
Nacos服务部署
参见我之前的文章:
Windows下Nacos安装
部署成果之后登录页面如下:

SpirngBoot应用使用Nacos作为注册中心
SpringBoot应用使用Nacos作为注册中心需要引入依赖nacos-discovery-spring-boot-starter,依赖的版本为0.2.4,对应于SpringBoot的版本为2.0.3.RELEASE,引入如下依赖:
<dependencyManagement>
    <dependencies>
        <dependency>
            <groupId>org.springframework.boot</groupId>
            <artifactId>spring-boot-dependencies</artifactId>
            <version>2.0.3.RELEASE</version>
            <type>pom</type>
            <scope>import</scope>
        </dependency>
    </dependencies>
</dependencyManagement>
<dependencies>
    <dependency>
        <groupId>org.springframework.boot</groupId>
        <artifactId>spring-boot-starter-web</artifactId>
    </dependency>
    <dependency>
        <groupId>com.alibaba.boot</groupId>
        <artifactId>nacos-discovery-spring-boot-starter</artifactId>
        <version>0.2.4</version>
    </dependency>
</dependencies>
下面以一个简单的生产者和消费者服务的例子进行演示:
生产者:
为了方便起见,把控制器、服务注册的代码都写在启动类
ProvideApplication
中:
import com.alibaba.nacos.api.annotation.NacosInjected;
import com.alibaba.nacos.api.naming.NamingService;
import org.springframework.beans.factory.annotation.Value;
import org.springframework.boot.CommandLineRunner;
import org.springframework.boot.SpringApplication;
import org.springframework.boot.autoconfigure.SpringBootApplication;
import org.springframework.web.bind.annotation.GetMapping;
import org.springframework.web.bind.annotation.RequestParam;
import org.springframework.web.bind.annotation.RestController;

/**
 * @author ase
 * @version v1.0
 * @description
 * @since 2022/8/21 22:46
 */
@RestController
@SpringBootApplication(scanBasePackages = "com.springboot.nacosdemo.provide")
public class ProvideApplication implements CommandLineRunner {

    @NacosInjected
    private NamingService namingService;

    @Value("${spring.application.name}")
    private String applicationName;

    @Value("${server.port}")
    private Integer serverPort;

    public static void main(String[] args) {
        SpringApplication.run(ProvideApplication.class, args);
    }

    @GetMapping(path = "/hello")
    public String hello(@RequestParam(name = "name") String name) {
        return String.format("%s say hello!", name);
    }

    @Override
    public void run(String... args) throws Exception {
        // 通过Naming服务注册实例到注册中心
        namingService.registerInstance(applicationName, "127.0.0.1", serverPort);
    }
}
配置文件
application-provide.properties
内容如下:
spring.application.name=provide-service
server.port=9092
nacos.discovery.server-addr=127.0.0.1:8848
使用
spring.profiles.active=provide
启动
ProvideApplication

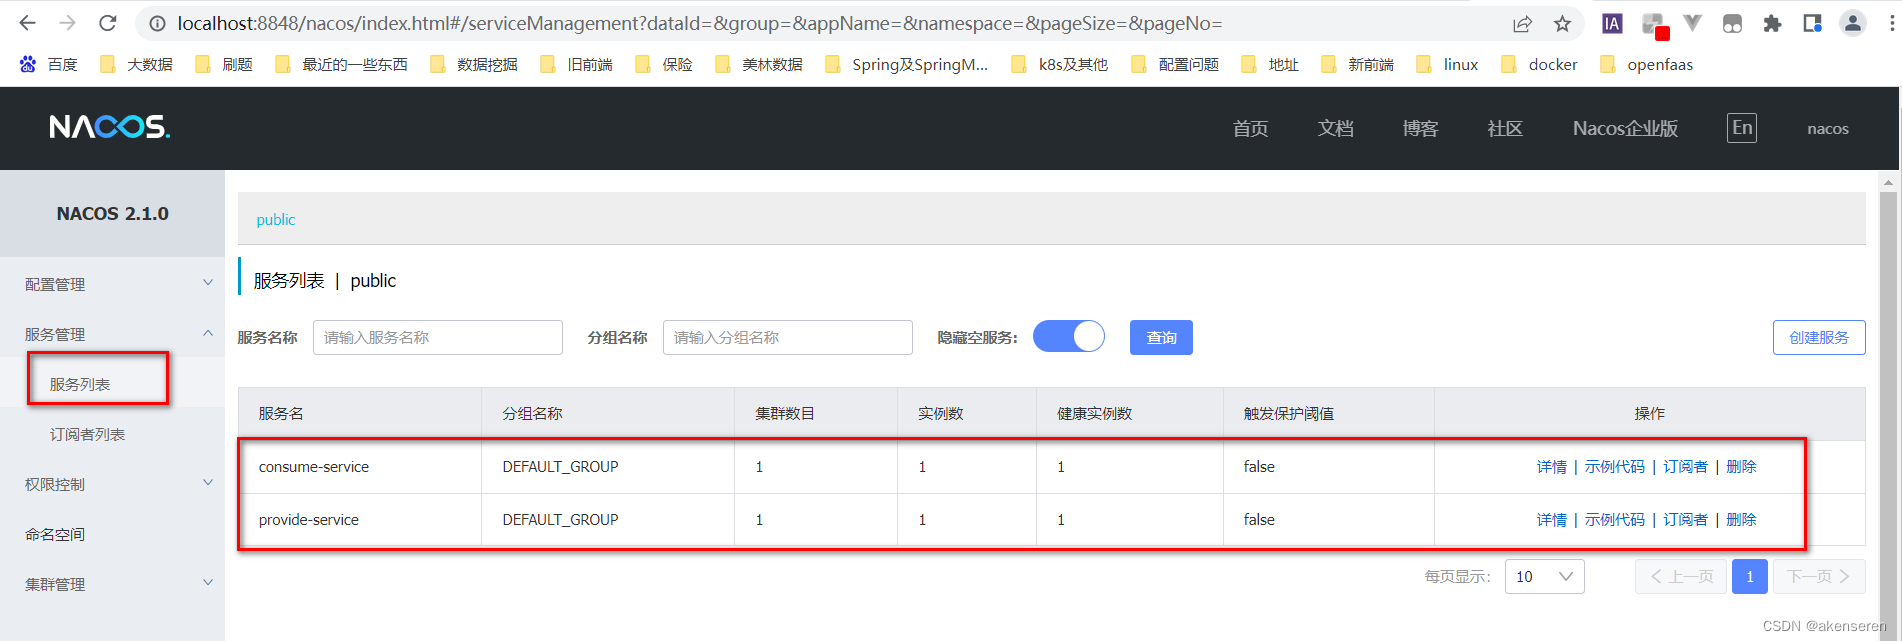
启动成功后用浏览器打开
Nacos-Console
:

暂时可知服务的提供方已经注册成功。
接着编写服务的消费方代码,引入的最小依赖和服务提供方完全一致,编写启动类
ConsumeApplication
如下:
import com.alibaba.nacos.api.annotation.NacosInjected;
import com.alibaba.nacos.api.naming.NamingService;
import com.alibaba.nacos.api.naming.pojo.Instance;
import org.springframework.beans.factory.annotation.Value;
import org.springframework.boot.CommandLineRunner;
import org.springframework.boot.SpringApplication;
import org.springframework.boot.autoconfigure.SpringBootApplication;
import org.springframework.web.client.RestTemplate;

/**
 * @author ase
 * @version v1.0
 * @description
 * @since 2022/8/21 22:46
 */
@SpringBootApplication(scanBasePackages = "com.springboot.nacosdemo.consume")
public class ConsumeApplication implements CommandLineRunner {

    @NacosInjected
    private NamingService namingService;

    @Value("${spring.application.name}")
    private String applicationName;

    @Value("${server.port}")
    private Integer serverPort;

    public static void main(String[] args) {
        SpringApplication.run(ConsumeApplication.class, args);
    }

    @Override
    public void run(String... args) throws Exception {
        // 通过Naming服务注册实例到注册中心
        namingService.registerInstance(applicationName, "127.0.0.1", serverPort);
        // 根据服务名从注册中心获取一个健康的服务实例
        Instance instance = namingService.selectOneHealthyInstance("provide-service");
        // 这里只是为了方便才新建RestTemplate实例
        RestTemplate template = new RestTemplate();
        String url = String.format("http://%s:%d/hello?name=throwable", instance.getIp(), instance.getPort());
        String result = template.getForObject(url, String.class);
        System.out.println(String.format("请求URL:%s,响应结果:%s", url, result));
    }
}
配置文件
application-provide.properties
内容如下:
spring.application.name=consume-service
server.port=9091
nacos.discovery.server-addr=127.0.0.1:8848
使用
spring.profiles.active=consume
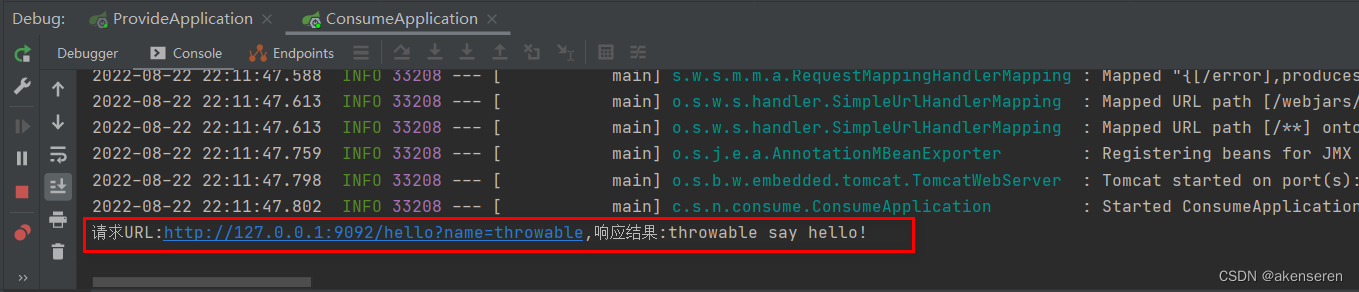
启动ConsumeApplication

启动成功后用浏览器打开
Nacos-Console
:
查看consumer服务控制台输出:
SpirngBoot应用使用Nacos管理配置
如果使用
Nacos
进行配置管理,则需要引入
nacos-config-spring-boot-starter
依赖:
    <!--  只声明依赖,不引入依赖 -->
    <dependencyManagement>
        <dependencies>
            <!-- 声明springBoot版本 -->
            <dependency>
                <groupId>org.springframework.boot</groupId>
                <artifactId>spring-boot-dependencies</artifactId>
                <version>2.0.3.RELEASE</version>
                <type>pom</type>
                <scope>import</scope>
            </dependency>
        </dependencies>
    </dependencyManagement>
    <dependencies>
        <dependency>
            <groupId>org.springframework.boot</groupId>
            <artifactId>spring-boot-starter-web</artifactId>
        </dependency>
        <!-- 添加 nacos 配置中心的 maven 依赖-->
        <dependency>
            <groupId>com.alibaba.boot</groupId>
            <artifactId>nacos-config-spring-boot-starter</artifactId>
            <version>0.2.4</version>
        </dependency>
    </dependencies>
新建一个启动类
ConfigApplication
如下:
import com.alibaba.nacos.api.config.annotation.NacosValue;
import com.alibaba.nacos.spring.context.annotation.config.NacosPropertySource;
import org.springframework.boot.SpringApplication;
import org.springframework.boot.autoconfigure.SpringBootApplication;
import org.springframework.web.bind.annotation.GetMapping;
import org.springframework.web.bind.annotation.RestController;

/**
 * @author ase
 * @version v1.0
 * @description
 * @since 2022/8/21 22:46
 */
@RestController
@NacosPropertySource(dataId = "example", autoRefreshed = true)
@SpringBootApplication(scanBasePackages = "com.springboot.nacosdemo.config")
public class ConfigApplication {

    @NacosValue(value = "${counter:0}", autoRefreshed = true)
    public Long counter;

    public static void main(String[] args) {
        SpringApplication.run(ConfigApplication.class, args);
    }

    @GetMapping(path = "/get")
    public String get() {
        return String.format("Counter value:%d", counter);
    }
}
代码中定义了一个长整型的计数器,设置了
autoRefreshed
(自动刷新)为
true
。
新建一个配置文件
application-config.properties
:
spring.application.name=config-service
server.port=9093
nacos.config.server-addr=127.0.0.1:8848
使用
spring.profiles.active=config
启动
ConfigApplication
,启动成功后通过
CURL
调用下面的接口:
curl -X GET http://127.0.0.1:9093/get
Counter value:0

接着通过
Nacos-Console
添加一个DataID为example的配置:


点击发布按钮后再次调用接口:
curl -X GET http://127.0.0.1:9093/get
Counter value:54321

可见计数器的值已经动态刷新。
小结
本文只是简单介绍了
SpringBoot
中使用
Nacos
作为注册中心以及进行配置管理。nacos在多服务下的配置使用及其他知识,未来将逐步深入探究。
参考:
SpringBoot使用Nacos进行服务注册发现与配置管理
版权归原作者 akenseren 所有, 如有侵权,请联系我们删除。