[版权申明] 非商业目的注明出处可自由转载
出自:shusheng007
文章目录
概述
在你刚接触SpringBoot的时候有没有对它提供的Profile有些许不适应,经过摸索后才领悟到它的强大。今天我就对Profile进行一点归纳总结,留作互联网记忆。
Profile是什么
Profile翻译成中国话就是:简介,档案… 。例如王二狗和牛翠花两人各有一套自己的profile
翠花的Profile:
姓名:牛翠花
性别:女
爱好:逛街
王二狗的Profile:
姓名:王二狗
性别:男
爱好:编程,看美女
对应到Spring中也是一样的。在实际开发中会同时存在dev、uat、prod等多套环境,这些环境共用一套代码逻辑,但却需要不同的配置。例如dev环境要连接测试数据库,而prod则需要连接生产数据库等等。
如何使用
前面已经说了,profile最主要的目的就是可以区分不同的环境,进而对不同环境进行配置。那么如何使用呢,在SpringBoot中有两种使用方式。
配置文件
SpringBoot中通过对
application.properties
/
application.yaml
配置文件的命名规则进行约定,然后依据当前激活的profile来加载相应的配置文件。
application-{你的profile}.properties/application-{你的profile}.yaml
下面是当前demo项目结构,可见在
resources
文件夹下存在3个配置文件:
├── src
│   ├── main
│   │   ├── java
│   │   └── resources
│   │       ├── application-dev.yaml
│   │       ├── application-prod.yaml
│   │       ├── application.yaml
application-dev.yaml
server:
  port: 8081
application-prod.yaml
server:
  port: 8082
application.yaml
#空白
当profile为default时,只使用
application.yaml
,SpringBoot默认Server端口为8080。将当前profile激活为dev时, SpringBoot就会额外加载
application-dev.yaml
后合并到
application.yaml
中,若其中有相同的配置则覆盖掉。
下面是不激活profile时启动项目时的输出,可以看到profile为default,server的port为8080
2021-09-22 22:55:31.505  INFO 78078 --- [  restartedMain] t.s.s.SpringProfilesApplication  : No active profile set, falling back to default profiles: default
...
2021-09-22 22:55:33.056  INFO 78078 --- [  restartedMain] o.s.b.w.embedded.tomcat.TomcatWebServer  : Tomcat initialized with port(s): 8080 (http)
代码配置
通过配置文件使用profile最为常用,除此之外,Spring还提供了一个
@Profile
注解,通过它可以通过代码的方式使用profile。
假设我们有一个接口
public interface Speaker {
    String speak();
}
我需要在不同的环境中使用不同的bean,在dev环境中使用如下bean
@Service
@Profile(value = {"dev","default"})
public class DevSpeaker implements Speaker{
    @Override
    public String speak() {
        return "I am dev speaker";
    }
}
在prod环境中使用如下bean
@Service
@Profile("prod")
public class ProdSpeaker implements Speaker{
    @Override
    public String speak() {
        return "I am prod speaker";
    }
}
注意这两个文件的注解
@Profile
在使用的地方直接注入接口的实例即可
@RestController
public class SpeakerController {
    private final Speaker speaker;

    public SpeakerController(Speaker speaker) {
        this.speaker = speaker;
    }

    @RequestMapping(method = RequestMethod.GET,path = "/speak")
    public String speaking(){
       return speaker.speak();
    }
}
如何激活
上面讲的都是如何使用,但是我们如何将我们当前的profile切换到dev/prod等profile呢?SpringBoot支持非常多种方式,我们简单介绍几种简单而常用的方式。
使用启动参数
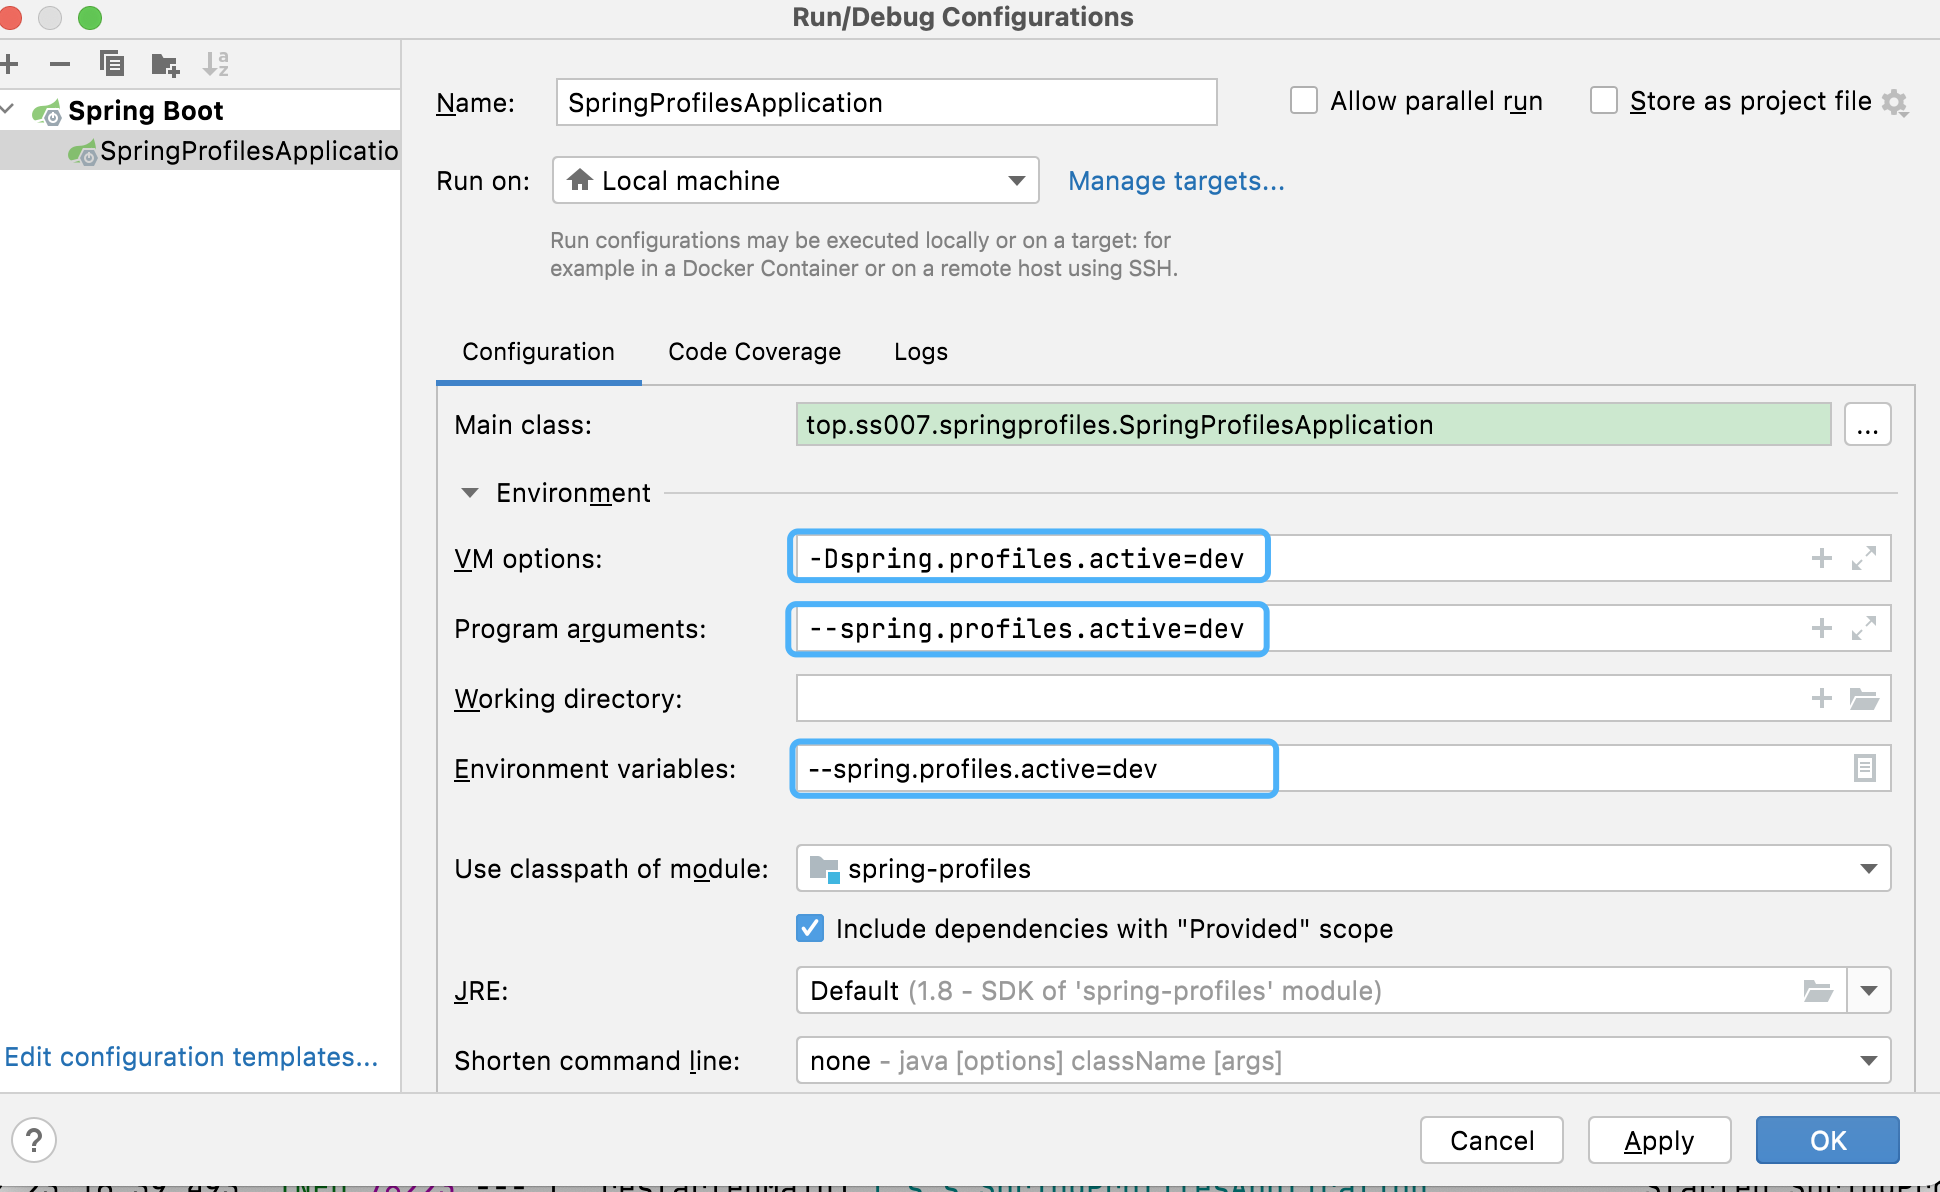
我们可以在SpringBoot项目启动时传入参数,这种参数分3种,这里使用任意一种就可以。
如果我们使用Intellij IDEA的话,可以点击Edit Configuration,然后打开Configurations配置框,在下面蓝色框中,任意选择一个填入即可。
使用application配置文件
可以将profile配置到项目的
application
文件中
spring:
  profiles:
    active: dev
使用maven的profile
maven本身也支持profile,用来控制编译打包等流程。SpringBoot的
application
文件可以读取
pom.xml
中定义的profile,从而激活相应的profile。
- 在
pom.xml文件中添加profiles
<project ...>
   ...
    <profiles>
        <profile>
            <id>dev</id>
            <properties>
                <evn>dev</evn>
            </properties>
        </profile>
        <profile>
            <id>prod</id>
            <properties>
                <evn>prod</evn>
            </properties>
            <activation>
                <activeByDefault>true</activeByDefault>
            </activation>
        </profile>
    </profiles>
    ...
 </project>
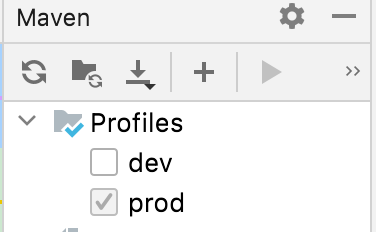
我们建立了dev和prod两个profile,然后将prod作为默认执行的profile。添加完后刷新maven,可以看到IDE右上角maven的窗口出现了一个Profiles的条目。我们可以勾选激活哪一个profile,记得reload。

- 在
application.yaml中读取
spring:
  profiles:
    active: @evn@
注意
@evn@
,其中evn是我们在
pom.xml
中的profiles定义的
<evn>你的profile</evn>
,而前后两个
@
是SpringBoot 读取maven的profile的语法。
正常情况下经过以上两步就OK了,我测试的时候也只需要上面两步就成功了,但是有人反映需要添加如下配置。
<build>
    <resources>
        <resource>
            <directory>src/main/resources</directory>
            <filtering>true</filtering>
        </resource>
    </resources>
    ...
</build>
如何获取激活的Profiles
有两种方法获取当前激活的profile,通过Environment 或者
@Value
@RestController
public class SpeakerController {
    @Value("${spring.profiles.active:}")
    private String activeProfile;

    private final Environment environment;

    public SpeakerController(Environment environment) {
        this.environment = environment;
    }

    @GetMapping("/profiles")
    public String getCurrentProfiles(){
       return String.format("通过Environment获取:%s | 通过@Value获取:%s",
               Arrays.toString(environment.getActiveProfiles()),
               activeProfile);
    }
}
总结
暂时就说这么多吧,有什么问题留言,没有问题就点赞,睡觉去咯。。。
文章首发及源码地址
版权归原作者 ShuSheng007 所有, 如有侵权,请联系我们删除。