
文章目录
首先,我们将探讨一些
Spring
框架中
IOC
(
Inversion of Control
)的高级特性,特别是组件扫描的相关知识。组件扫描是
Spring
框架中一个重要的特性,它可以自动检测并实例化带有特定注解(如
@Component
,
@Service
,
@Controller
等)的类,并将它们注册为
Spring
上下文中的
bean
。这里,我们会通过一些详细的例子来阐明这些概念,并且展示如何在实际的代码中使用这些特性。
1. 组件扫描路径
@ComponentScan
注解是用于指定
Spring
在启动时需要扫描的包路径,从而自动发现并注册组件。
我们设置组件扫描路径包括两种方式:
- 直接指定包名:如
@ComponentScan("com.example.demo"),等同于@ComponentScan(basePackages = {"com.example.demo"}),Spring会扫描指定包下的所有类,并查找其中带有@Component、@Service、@Repository等注解的组件,然后将这些组件注册为Spring容器的bean。 - 指定包含特定类的包:如
@ComponentScan(basePackageClasses = {ExampleService.class}),Spring会扫描ExampleService类所在的包以及其所有子包。
接下来,给出了一个完整的例子,说明如何使用第二种方式来设置组件扫描路径。这可以通过设置
@ComponentScan的basePackageClasses
属性来实现。例如:
@Configuration@ComponentScan(basePackageClasses ={ExampleService.class})publicclassBasePackageClassConfiguration{}
以上代码表示,
Spring
会扫描
ExampleService
类所在的包以及其所有子包。
全部代码如下:
首先,我们创建一个名为
ExampleService
的服务类
packagecom.example.demo.service;importorg.springframework.stereotype.Service;@ServicepublicclassExampleService{}
接着在
bean
目录下创建
DemoDao
packagecom.example.demo.bean;importorg.springframework.stereotype.Component;@ComponentpublicclassDemoDao{}
然后在配置类中设置组件扫描路径
packagecom.example.demo.configuration;importcom.example.demo.service.ExampleService;importorg.springframework.context.annotation.ComponentScan;importorg.springframework.context.annotation.Configuration;@Configuration@ComponentScan(basePackageClasses =ExampleService.class)publicclassBasePackageClassConfiguration{}
我们还会创建一个名为
DemoApplication
的类,这个类的作用是启动
Spring
上下文并打印所有注册的
bean
的名称。
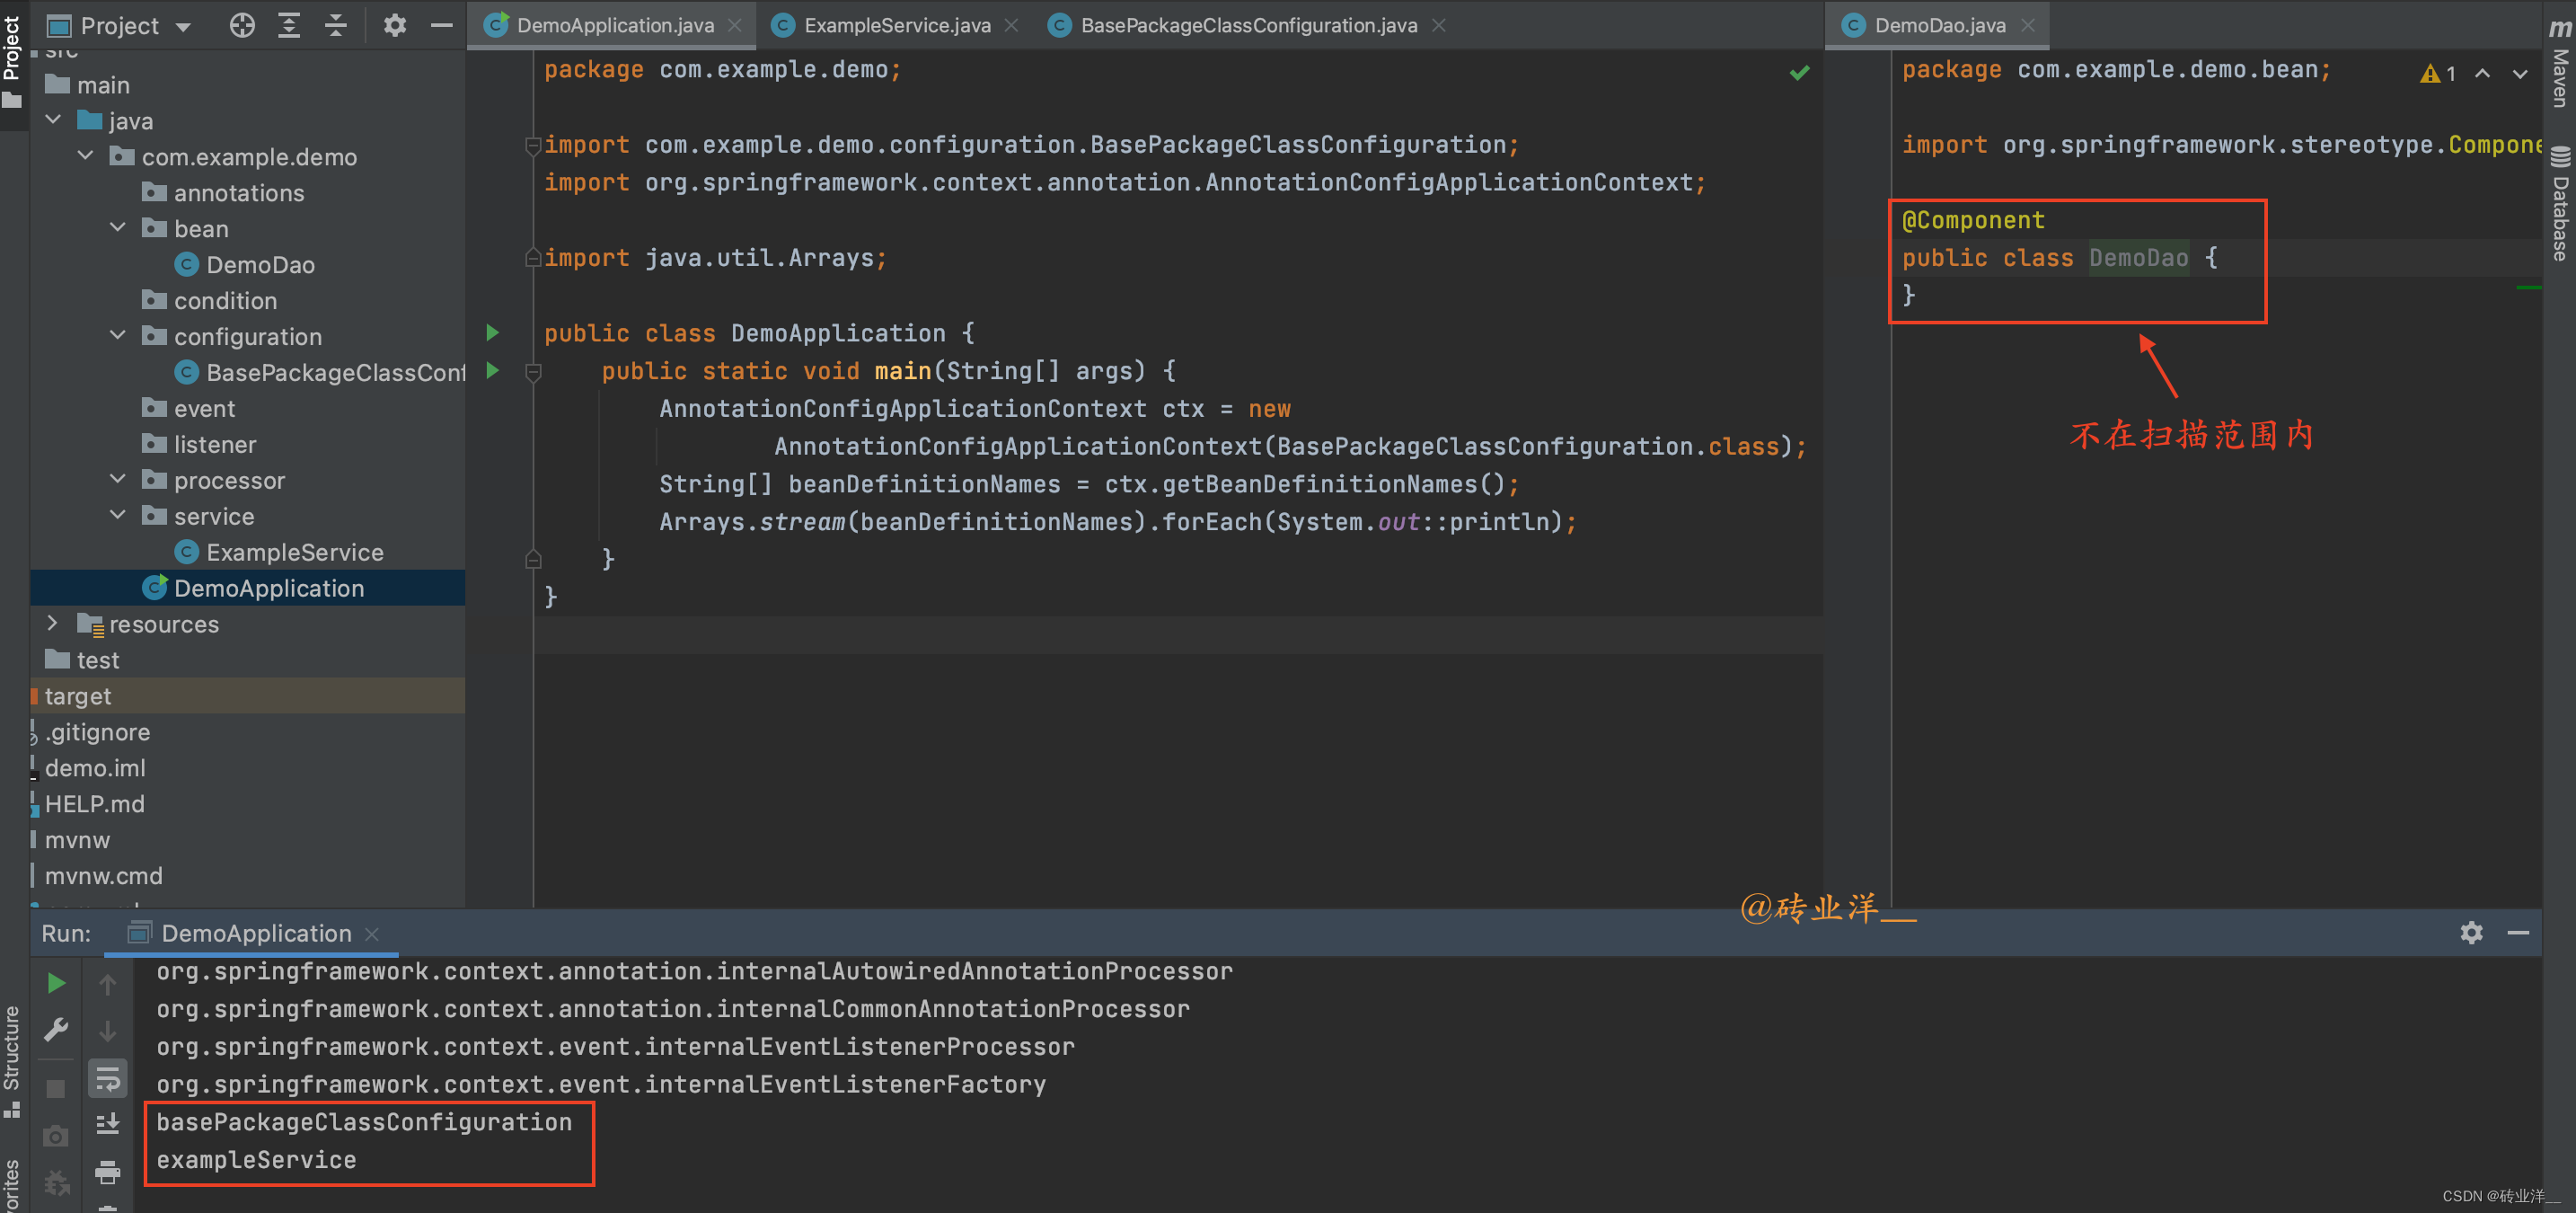
packagecom.example.demo;importcom.example.demo.configuration.BasePackageClassConfiguration;importorg.springframework.context.annotation.AnnotationConfigApplicationContext;importjava.util.Arrays;publicclassDemoApplication{publicstaticvoidmain(String[] args){AnnotationConfigApplicationContext ctx =newAnnotationConfigApplicationContext(BasePackageClassConfiguration.class);String[] beanDefinitionNames = ctx.getBeanDefinitionNames();Arrays.stream(beanDefinitionNames).forEach(System.out::println);}}
运行上述
DemoApplication
类的
main
方法,就会在控制台上看到所有注册的
bean
的名称,包括我们刚刚创建的
ExampleService
。
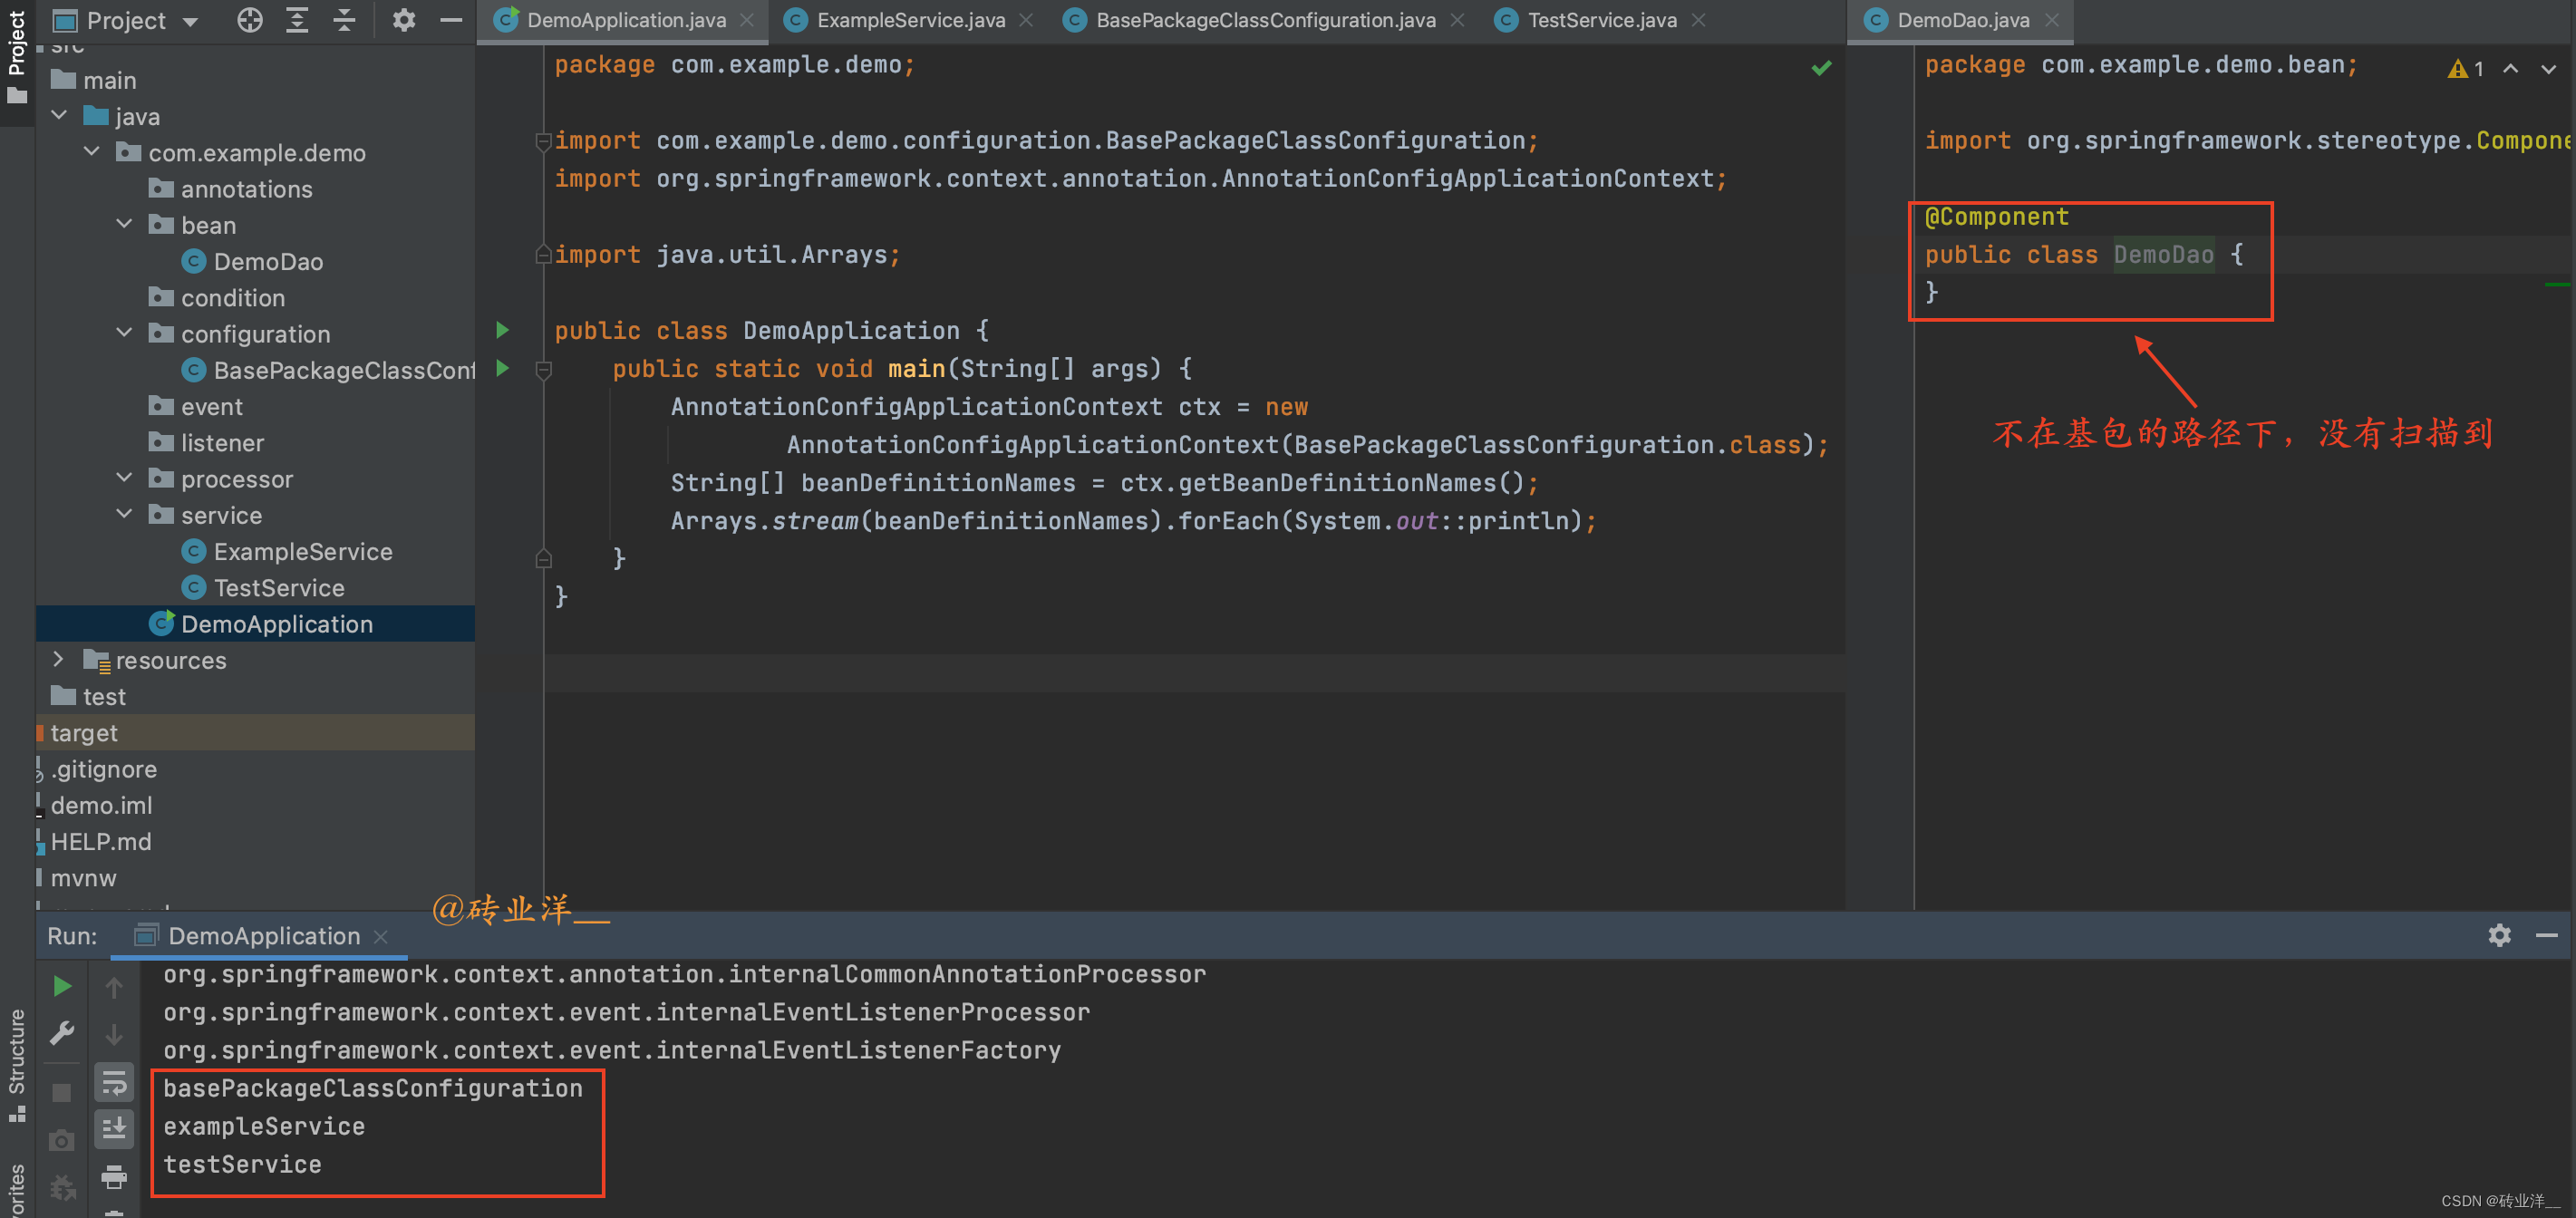
现在,如果我们在
ExampleService
类所在的包或者其任意子包下创建一个新的类(例如
TestService
),那么这个组件类也会被自动注册为一个
bean
。这就是
basePackageClasses
属性的作用:它告诉
Spring
要扫描哪些包以及其子包。
packagecom.example.demo.service;importorg.springframework.stereotype.Service;@ServicepublicclassTestService{}
如果再次运行
DemoApplication
类的
main
方法,就会看到
TestService
也被打印出来,说明它也被成功注册为了一个
bean
。
我们可以看到这个
DemoDao
始终没有被扫描到,我们看一下
@ComponentScan
注解的源码
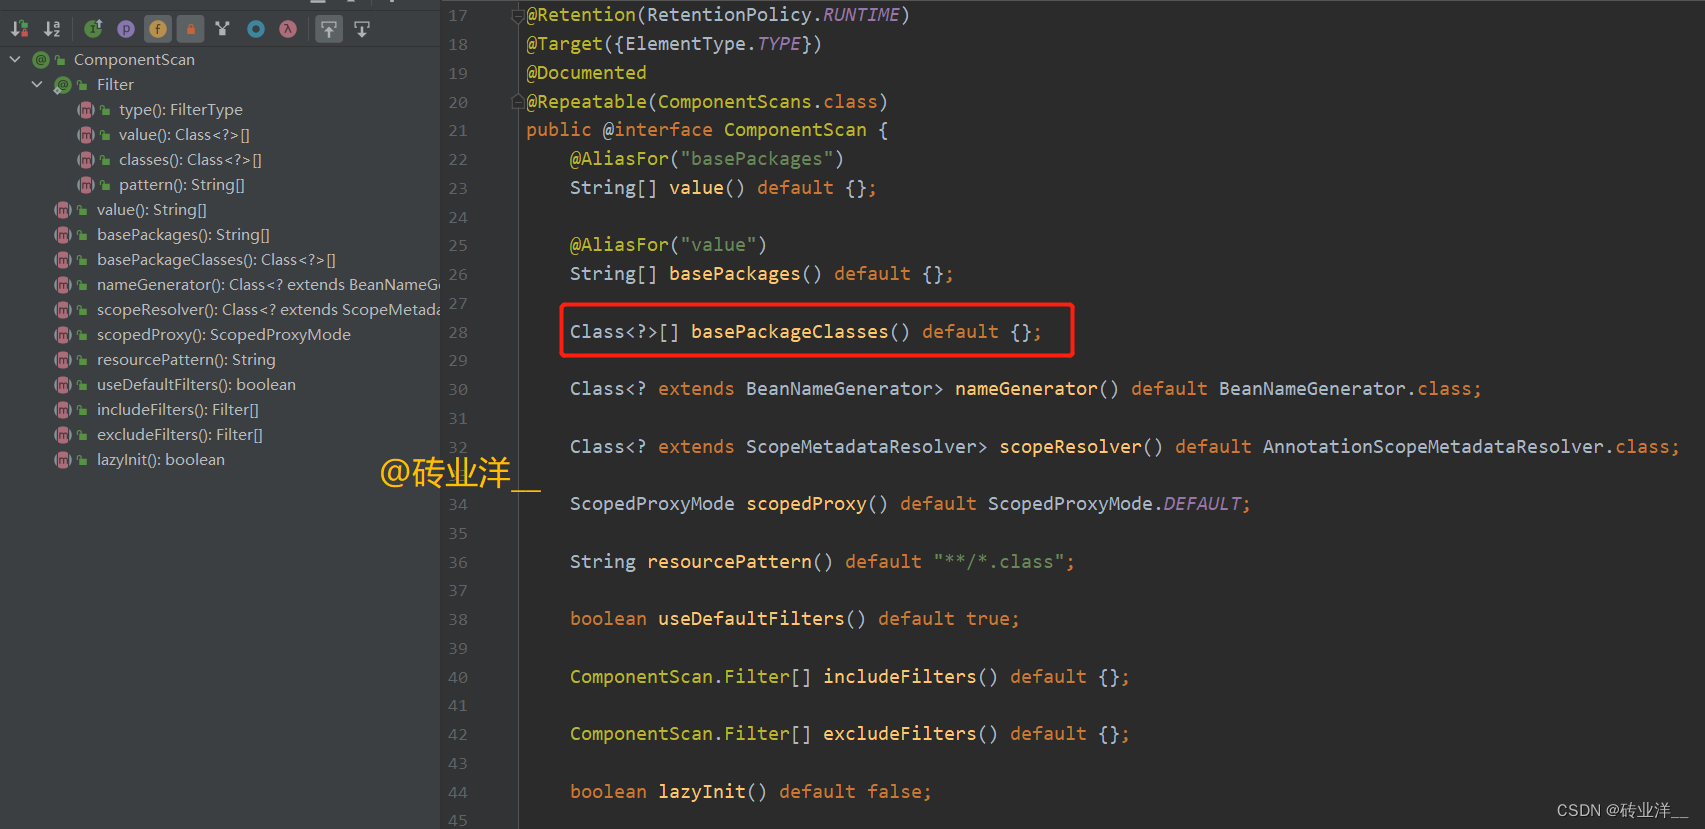
可以看到
basePackageClasses
属性这是一个数组类型的,有人会疑问了,刚刚我们写的
@ComponentScan(basePackageClasses = ExampleService.class)
,这没有用到数组啊,为什么这里还能正常运行呢?
如果数组只包含一个元素,可以在赋值时省略数组的大括号
{}
,这是
Java
的一种语法糖。在这种情况下,编译器会自动把该元素包装成一个数组。
例如,以下两种写法是等价的:
@ComponentScan(basePackageClasses ={ExampleService.class})
和
@ComponentScan(basePackageClasses =ExampleService.class)
在上面两种情况下,
ExampleService.class
都会被包装成一个只包含一个元素的数组。这是
Java
语法的一个便利特性,使得代码在只有一个元素的情况下看起来更加简洁。
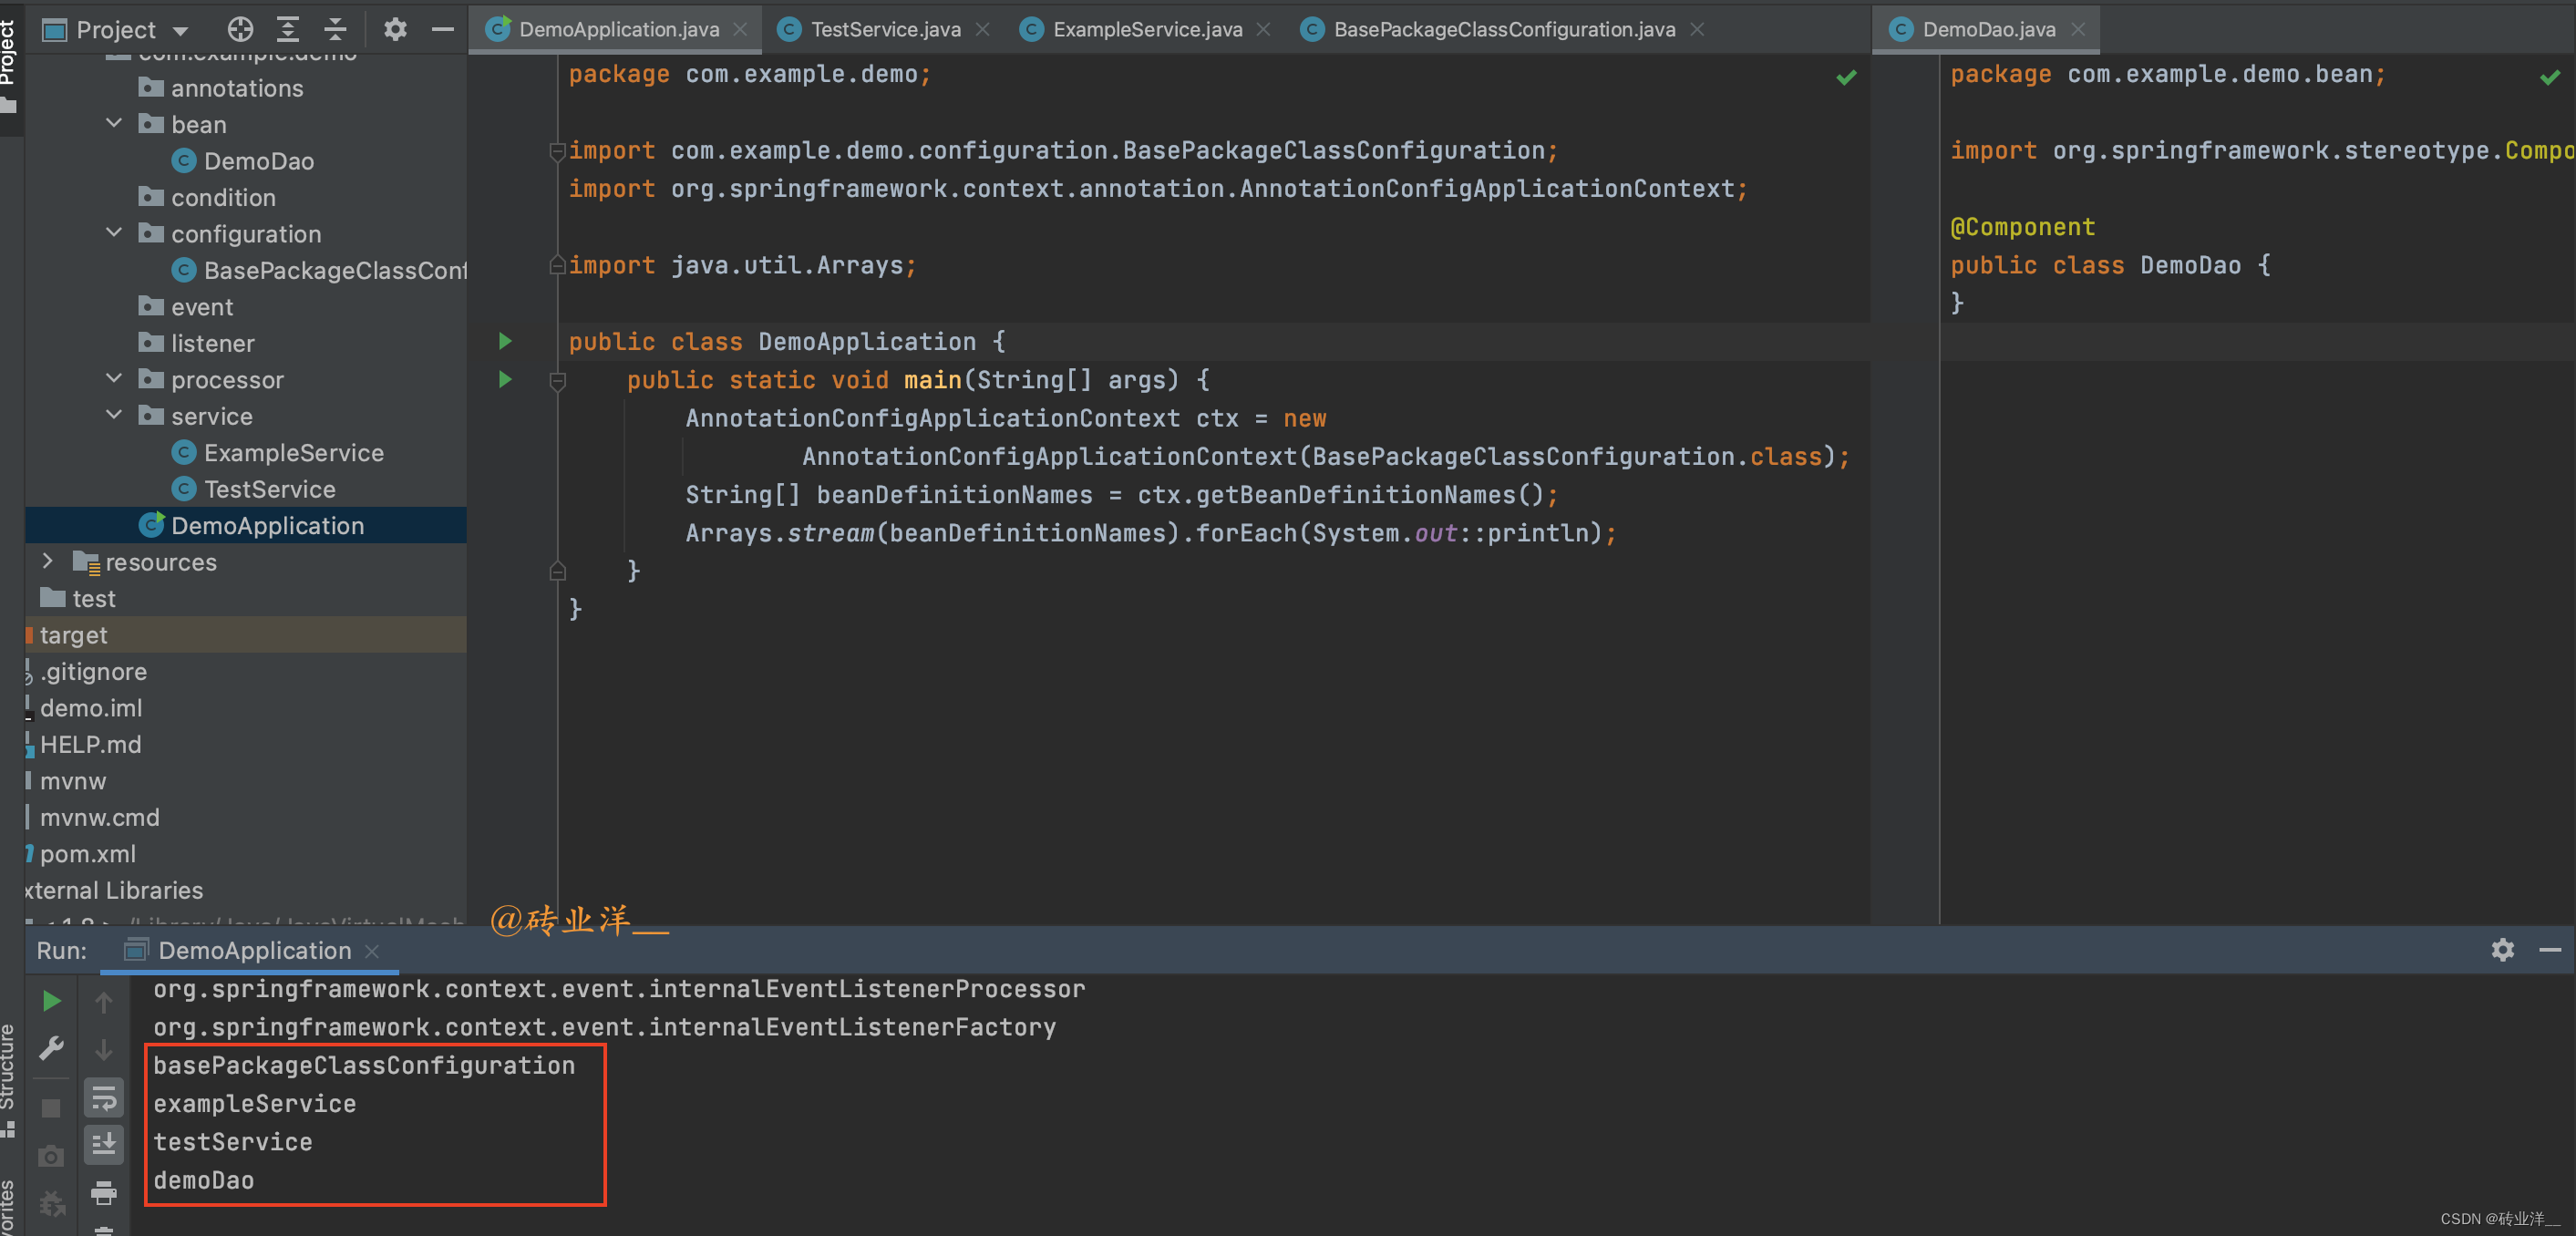
那么为了
DemoDao
组件被扫描到,我们可以在
basePackageClasses
属性加上
DemoDao
类,这样就可以扫描
DemoDao
组件所在的包以及它的子包。
packagecom.example.demo.configuration;importcom.example.demo.bean.DemoDao;importcom.example.demo.service.ExampleService;importorg.springframework.context.annotation.ComponentScan;importorg.springframework.context.annotation.Configuration;@Configuration@ComponentScan(basePackageClasses ={ExampleService.class,DemoDao.class})publicclassBasePackageClassConfiguration{}
运行结果
@ComponentScan
注解的源码还有不少,后面我们用到再说
2. 按注解过滤组件(包含)
除了基本的包路径扫描,
Spring
还提供了过滤功能,允许我们通过设定过滤规则,只包含或排除带有特定注解的类。这个过滤功能对于大型项目中的模块划分非常有用,可以精细控制
Spring
的组件扫描范围,优化项目启动速度。
在
Spring
中可以通过
@ComponentScan
的
includeFilters
属性来实现注解包含过滤,只包含带有特定注解的类。
在下面这个例子中,我们将创建一些带有特定注解的组件,并设置一个配置类来扫描它们。
全部代码如下:
创建一个新的注解
Species
:
packagecom.example.demo.annotation;importjava.lang.annotation.ElementType;importjava.lang.annotation.Retention;importjava.lang.annotation.RetentionPolicy;importjava.lang.annotation.Target;@Retention(RetentionPolicy.RUNTIME)@Target(ElementType.TYPE)public@interfaceSpecies{}
接下来,我们将创建三个不同的组件,其中两个包含
Species
注解:
packagecom.example.demo.bean;importcom.example.demo.annotation.Species;importorg.springframework.stereotype.Component;@SpeciespublicclassElephant{}
Elephant
类被
@Species
修饰,没有
@Component
修饰。
packagecom.example.demo.bean;importorg.springframework.stereotype.Component;@ComponentpublicclassMonkey{}
Monkey
只被
@Component
修饰
packagecom.example.demo.bean;importcom.example.demo.annotation.Species;importorg.springframework.stereotype.Component;@Component@SpeciespublicclassTiger{}
如上所示,
Tiger
有
@Component
和
@Species
修饰。
接着,我们需要创建一个配置类,用于扫描和包含有
Species
注解的组件:
packagecom.example.demo.configuration;importcom.example.demo.annotation.Species;importorg.springframework.context.annotation.ComponentScan;importorg.springframework.context.annotation.ComponentScan.Filter;importorg.springframework.context.annotation.Configuration;importorg.springframework.context.annotation.FilterType;@Configuration@ComponentScan(basePackages ="com.example.demo",
        includeFilters =@Filter(type =FilterType.ANNOTATION, classes =Species.class),
        useDefaultFilters =false)publicclassFilterConfiguration{}
在这个配置类中,我们设置了
@ComponentScan
注解的
includeFilters
属性,
FilterType.ANNOTATION
代表按注解过滤,这里用于扫描包含所有带有
Species
注解的组件。注意,
useDefaultFilters = false
表示禁用了默认的过滤规则,只会包含标记为
Species
的组件。
**有人可能会疑问了,
useDefaultFilters = false
表示禁用了默认的过滤规则,什么是默认的过滤规则?**
在
Spring
中,当使用
@ComponentScan
注解进行组件扫描时,
Spring
提供了默认的过滤规则。这些默认规则包括以下几种类型的注解:
- @Component
- @Repository
- @Service
- @Controller
- @RestController
- @Configuration
默认不写
useDefaultFilters
属性的情况下,
useDefaultFilters
属性的值为
true
,
Spring
在进行组件扫描时会默认包含以上注解标记的组件,如果将
useDefaultFilters
设置为
false
,
Spring
就只会扫描明确指定过滤规则的组件,不再包括以上默认规则的组件。所以,
useDefaultFilters = false
是在告诉
Spring
我们只想要自定义组件扫描规则。
最后,我们创建一个主程序,来实例化应用上下文并列出所有的
Bean
名称:
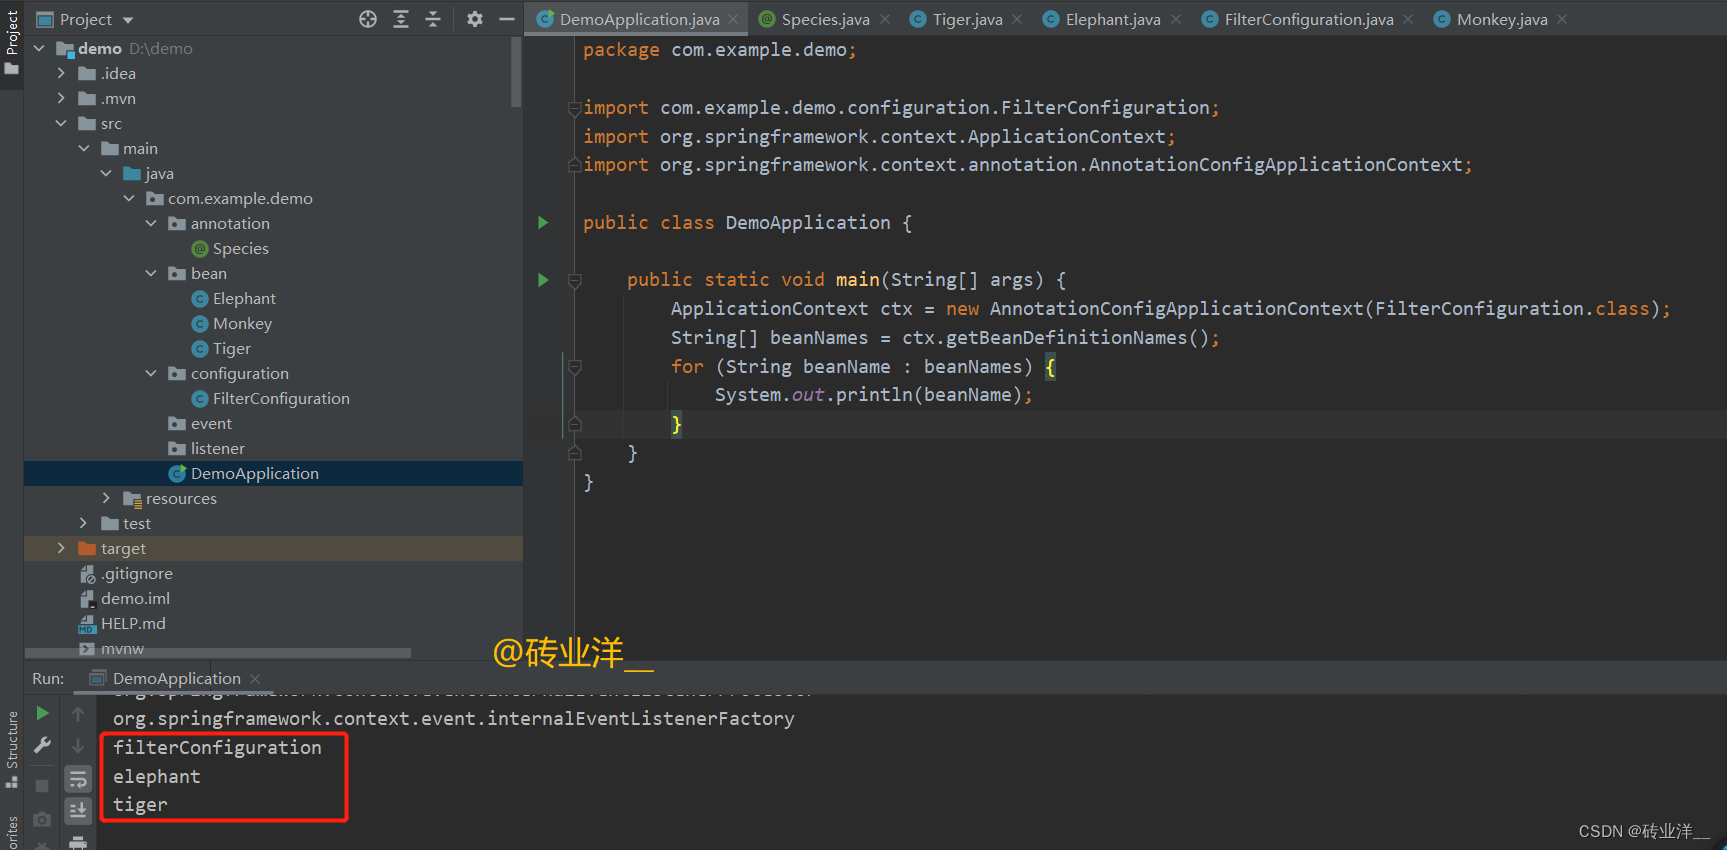
packagecom.example.demo;importcom.example.demo.configuration.FilterConfiguration;importorg.springframework.context.ApplicationContext;importorg.springframework.context.annotation.AnnotationConfigApplicationContext;publicclassDemoApplication{publicstaticvoidmain(String[] args){ApplicationContext ctx =newAnnotationConfigApplicationContext(FilterConfiguration.class);String[] beanNames = ctx.getBeanDefinitionNames();for(String beanName : beanNames){System.out.println(beanName);}}}
当我们运行这个程序时,会看到输出的
Bean
名字只包括被
Species
注解标记的类。在这个例子中会看到
Tiger
和
Elephant
,但不会看到
Monkey
,因为我们的配置只包含了被
Species
注解的类。
运行结果:
如果
useDefaultFilters
属性设置为
true
,那么运行程序时输出的
Bean
名字将会包括
Monkey
。
总结:上面介绍了如何使用
Spring
的
@ComponentScan
注解中的
includeFilters
属性和
useDefaultFilters
属性来过滤并扫描带有特定注解的类。通过自定义注解和在配置类中设置相关属性,可以精确地控制哪些类被
Spring
容器扫描和管理。如果设置
useDefaultFilters
为
false
,则
Spring
只扫描被明确指定过滤规则的组件,不再包含默认规则(如
@Component
、
@Service
等)的组件。
3. 按注解过滤组件(排除)
在
Spring
框架中,我们不仅可以通过
@ComponentScan
注解的
includeFilters
属性设置包含特定注解的类,还可以通过
excludeFilters
属性来排除带有特定注解的类。这个功能对于我们自定义模块的加载非常有用,我们可以通过这种方式,精确控制哪些组件被加载到
Spring
的
IOC
容器中。下面我们将通过一个具体的示例来说明如何使用
@ComponentScan
的
excludeFilters
属性来排除带有特定注解的类。
全部代码如下:
首先,创建一个注解
Exclude
:
packagecom.example.demo.annotation;importjava.lang.annotation.ElementType;importjava.lang.annotation.Retention;importjava.lang.annotation.RetentionPolicy;importjava.lang.annotation.Target;@Target({ElementType.TYPE})@Retention(RetentionPolicy.RUNTIME)public@interfaceExclude{}
定义三个类
Elephant
、
Monkey
、
Tiger
packagecom.example.demo.bean;importcom.example.demo.annotation.Exclude;importorg.springframework.stereotype.Component;@Component@ExcludepublicclassElephant{}
packagecom.example.demo.bean;importorg.springframework.stereotype.Component;@ComponentpublicclassMonkey{}
packagecom.example.demo.bean;importorg.springframework.stereotype.Component;@ComponentpublicclassTiger{}
注意,这几个类都标记为
@Component
,
Elephant
类上有
@Exclude
注解。
接下来,我们创建配置类
FilterConfiguration
,在其中使用
@ComponentScan
注解,并通过
excludeFilters
属性排除所有标记为
@Exclude
的类:
packagecom.example.demo.configuration;importcom.example.demo.annotation.Exclude;importorg.springframework.context.annotation.ComponentScan;importorg.springframework.context.annotation.Configuration;importorg.springframework.context.annotation.FilterType;@Configuration@ComponentScan(basePackages ="com.example.demo",
        excludeFilters [email protected](type =FilterType.ANNOTATION, classes =Exclude.class))publicclassFilterConfiguration{}
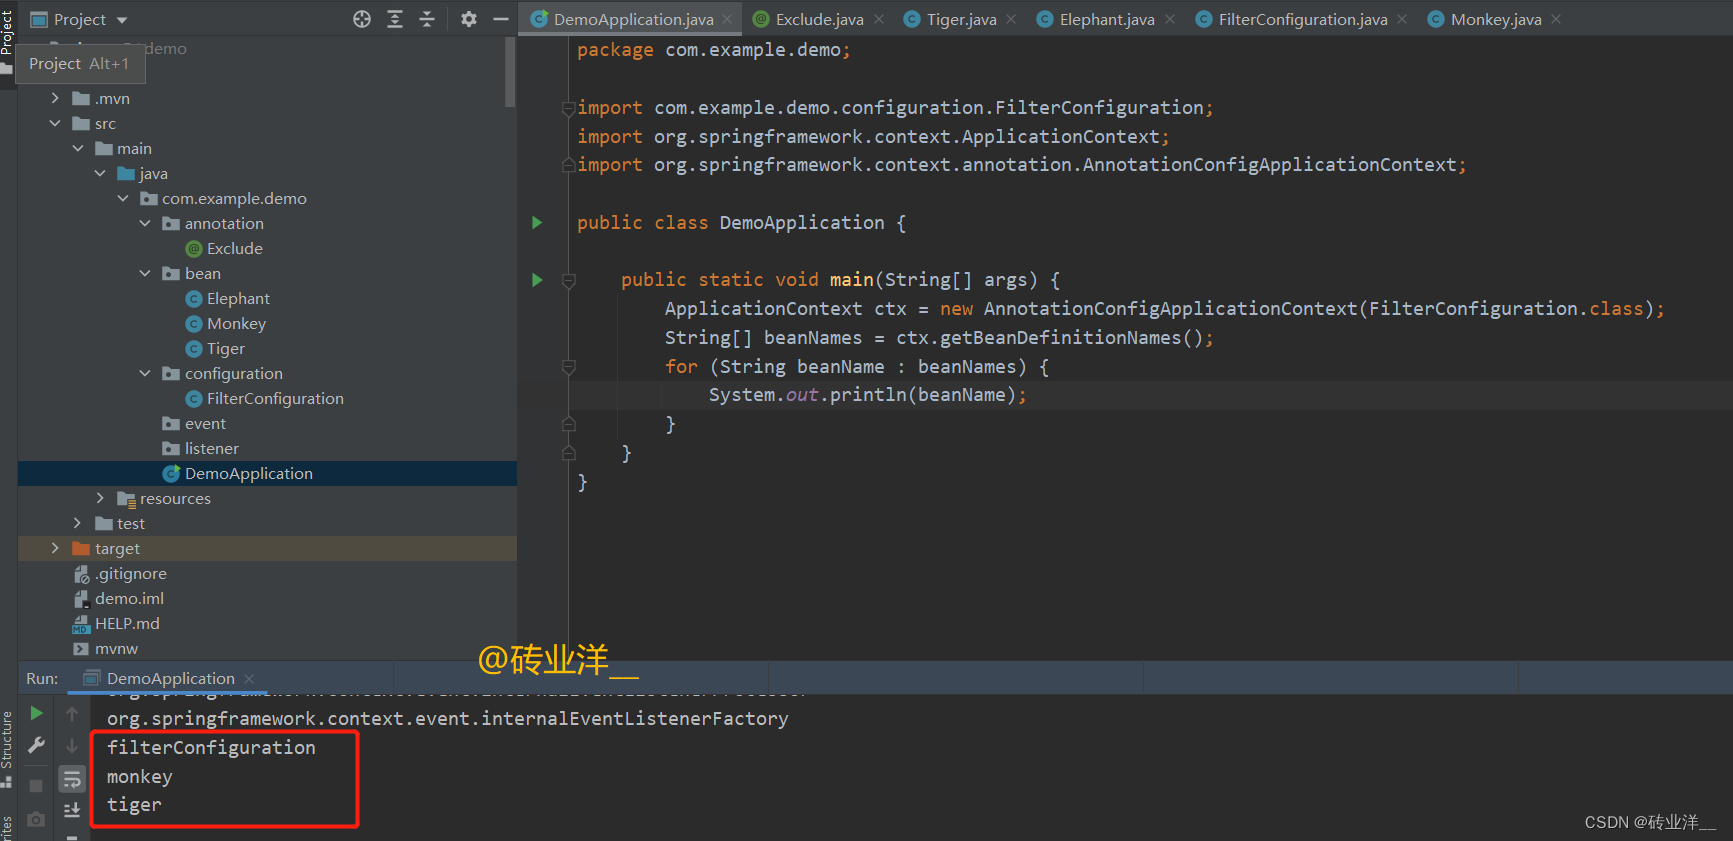
这样,在
Spring IOC
容器中,只有
Tiger
和
Monkey
类会被扫描并实例化,因为
Elephant
类被
@Exclude
注解标记,而我们在
FilterConfiguration
类中排除了所有被
@Exclude
注解标记的类。
主程序为:
packagecom.example.demo;importcom.example.demo.configuration.FilterConfiguration;importorg.springframework.context.ApplicationContext;importorg.springframework.context.annotation.AnnotationConfigApplicationContext;publicclassDemoApplication{publicstaticvoidmain(String[] args){ApplicationContext ctx =newAnnotationConfigApplicationContext(FilterConfiguration.class);String[] beanNames = ctx.getBeanDefinitionNames();for(String beanName : beanNames){System.out.println(beanName);}}}
运行结果:
总结:这小节主要讲解了如何在
Spring
框架中通过
@ComponentScan
注解的
excludeFilters
属性进行注解过滤,以精确控制加载到
Spring IOC
容器中的组件。在本小节的示例中,我们首先创建了一个名为
Exclude
的注解,然后定义了三个类
Elephant
、
Monkey
、和
Tiger
,它们都被标记为
@Component
,其中
Elephant
类上还有一个
@Exclude
注解。接下来,我们创建了一个配置类
FilterConfiguration
,其中使用了
@ComponentScan
注解,并通过
excludeFilters
属性排除了所有标记为
@Exclude
的类。因此,当程序运行时,
Spring IOC
容器中只有
Tiger
和
Monkey
类会被扫描并实例化,因为
Elephant
类被
@Exclude
注解标记,所以被排除了。
4. 通过正则表达式过滤组件
在
Spring
框架中,除了可以通过指定注解来进行包含和排除类的加载,我们还可以利用正则表达式来对组件进行过滤。这种方式提供了一种更灵活的方式来选择需要被
Spring IOC
容器管理的类。具体来说,可以利用正则表达式来包含或者排除名称符合某个特定模式的类。下面,我们将通过一个具体的例子来展示如何使用正则表达式过滤来只包含类名以特定字符串结尾的类。
下面的例子将演示如何只包含类名以
Tiger
结尾的类。
全部代码如下:
定义三个类
Tiger
、
Elephant
、
Monkey
packagecom.example.demo.bean;importorg.springframework.stereotype.Component;@ComponentpublicclassElephant{}
packagecom.example.demo.bean;importorg.springframework.stereotype.Component;@ComponentpublicclassMonkey{}
packagecom.example.demo.bean;importorg.springframework.stereotype.Component;@ComponentpublicclassTiger{}
接着我们创建配置类
FilterConfiguration
,使用
@ComponentScan
注解,并通过
includeFilters
属性来包含类名以
Tiger
结尾的类:
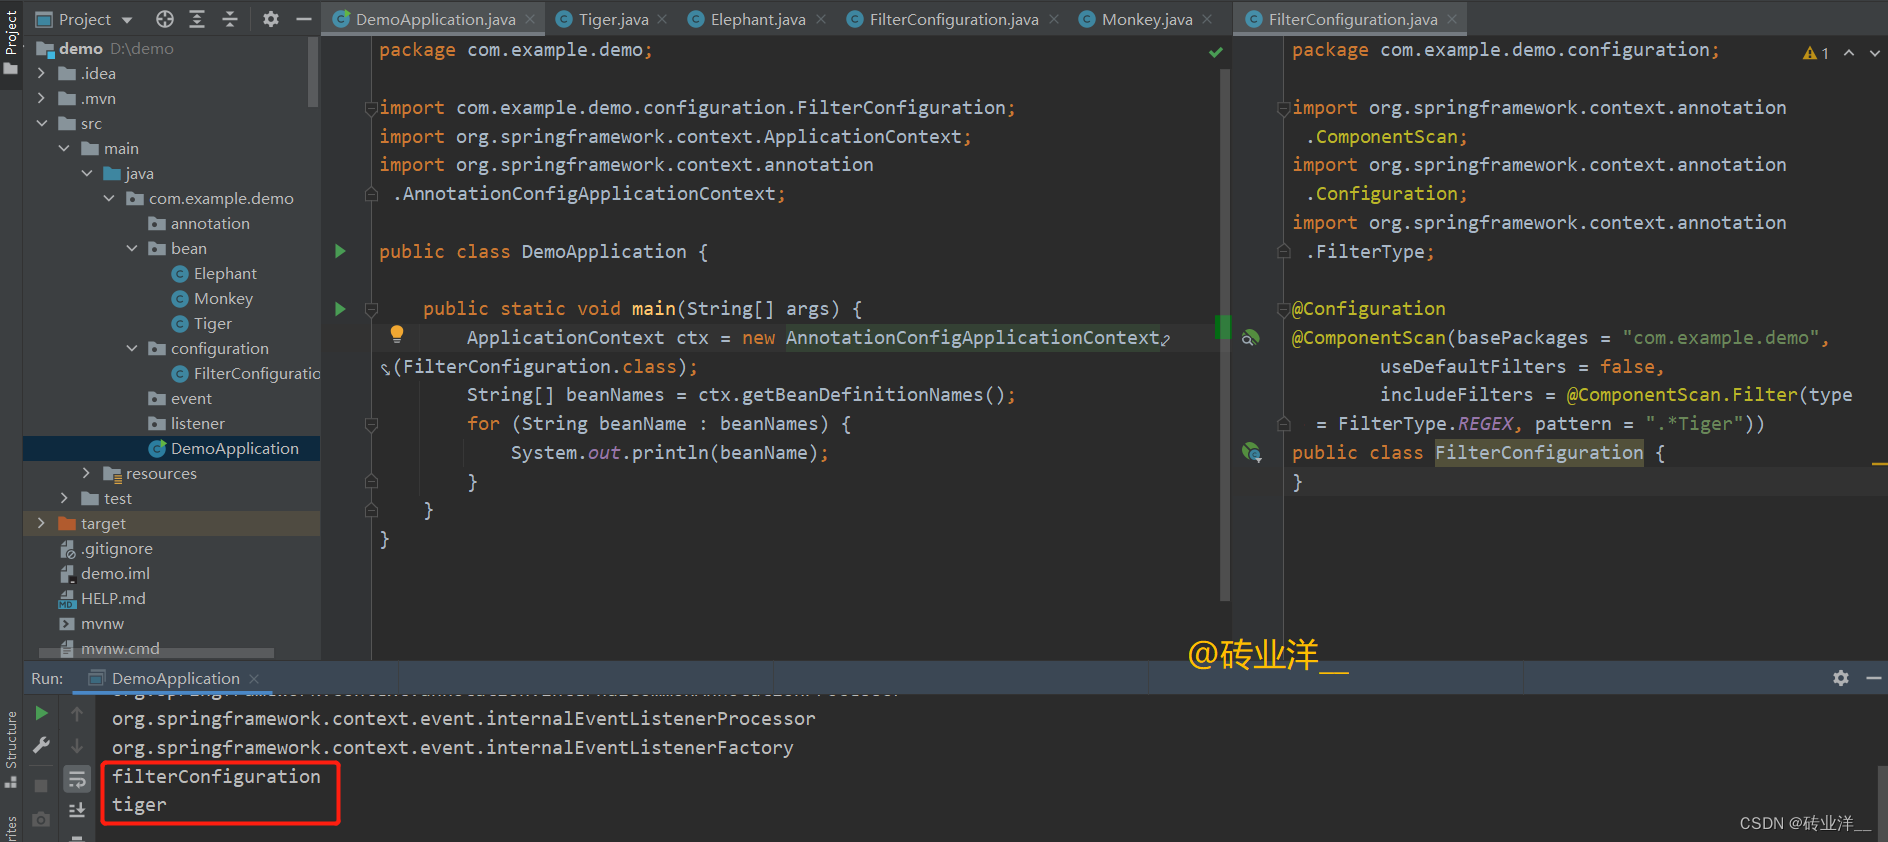
packagecom.example.demo.configuration;importorg.springframework.context.annotation.ComponentScan;importorg.springframework.context.annotation.Configuration;importorg.springframework.context.annotation.FilterType;@Configuration@ComponentScan(basePackages ="com.example.demo",
        useDefaultFilters =false,
        includeFilters [email protected](type =FilterType.REGEX, pattern =".*Tiger"))publicclassFilterConfiguration{}
在上述示例中,我们使用
FilterType.REGEX
过滤类型,并指定要包含的正则表达式模式
".*Tiger"
。结果只会有
Tiger
类会被
Spring的IOC
容器扫描并实例化,因为只有
Tiger
类的类名满足正则表达式
".*Tiger"
。这里
.
代表任意单个字符(除了换行符),
*
代表前一个字符重复任意次,
.*
组合起来表示匹配任意个任意字符。
主程序:
packagecom.example.demo;importcom.example.demo.configuration.FilterConfiguration;importorg.springframework.context.ApplicationContext;importorg.springframework.context.annotation.AnnotationConfigApplicationContext;publicclassDemoApplication{publicstaticvoidmain(String[] args){ApplicationContext ctx =newAnnotationConfigApplicationContext(FilterConfiguration.class);String[] beanNames = ctx.getBeanDefinitionNames();for(String beanName : beanNames){System.out.println(beanName);}}}
运行结果
总结:本小节介绍了如何在
Spring
框架中使用正则表达式对组件进行过滤,以选择哪些类应被
Spring IOC
容器管理。在所给示例中,首先定义了三个类
Elephant
、
Monkey
和
Tiger
。然后创建了一个配置类
FilterConfiguration
,使用了
@ComponentScan
注解,并通过
includeFilters
属性设置了一个正则表达式
" .*Tiger"
,用于选择类名以
"Tiger"
结尾的类。所以在运行主程序时,
Spring
的
IOC
容器只会扫描并实例化
Tiger
类,因为只有
Tiger
类的类名满足正则表达式
" .*Tiger"
。
5. Assignable类型过滤组件
"
Assignable
类型过滤"是
Spring
框架在进行组件扫描时的一种过滤策略,该策略允许我们指定一个或多个类或接口,然后
Spring
会包含或排除所有可以赋值给这些类或接口的类。如果我们指定了一个特定的接口,那么所有实现了这个接口的类都会被包含(或者排除)。同样,如果指定了一个具体的类,那么所有继承自这个类的类也会被包含(或者排除)。
在下面的例子中,我们将使用 “
Assignable
类型过滤” 来包含所有实现了
Animal
接口的类。
全部代码如下:
首先,我们定义一个
Animal
接口
packagecom.example.demo.bean;publicinterfaceAnimal{}
接着定义三个类:
Elephant
、
Monkey
和
Tiger
,其中
Tiger
没有实现
Animal
接口
packagecom.example.demo.bean;importorg.springframework.stereotype.Component;@ComponentpublicclassElephantimplementsAnimal{}
packagecom.example.demo.bean;importorg.springframework.stereotype.Component;@ComponentpublicclassMonkeyimplementsAnimal{}
packagecom.example.demo.beanimportorg.springframework.stereotype.Component;@ComponentpublicclassTiger{}
然后,我们创建一个
FilterConfiguration
类并使用
@ComponentScan
来扫描所有实现了
Animal
接口的类。
packagecom.example.demo.configuration;importcom.example.demo.bean.Animal;importorg.springframework.context.annotation.ComponentScan;importorg.springframework.context.annotation.Configuration;importorg.springframework.context.annotation.FilterType;@Configuration@ComponentScan(basePackages ="com.example.demo",
        useDefaultFilters =false,
        includeFilters [email protected](type =FilterType.ASSIGNABLE_TYPE, classes =Animal.class))publicclassFilterConfiguration{}
这种过滤方式在
@ComponentScan
注解中通过
FilterType.ASSIGNABLE_TYPE
来使用,这里
Spring
将只扫描并管理所有实现了
Animal
接口的类。
最后,我们创建一个主程序来测试:
packagecom.example.demo;importcom.example.demo.configuration.FilterConfiguration;importorg.springframework.context.ApplicationContext;importorg.springframework.context.annotation.AnnotationConfigApplicationContext;publicclassDemoApplication{publicstaticvoidmain(String[] args){ApplicationContext ctx =newAnnotationConfigApplicationContext(FilterConfiguration.class);String[] beanNames = ctx.getBeanDefinitionNames();for(String beanName : beanNames){System.out.println(beanName);}}}
运行结果:
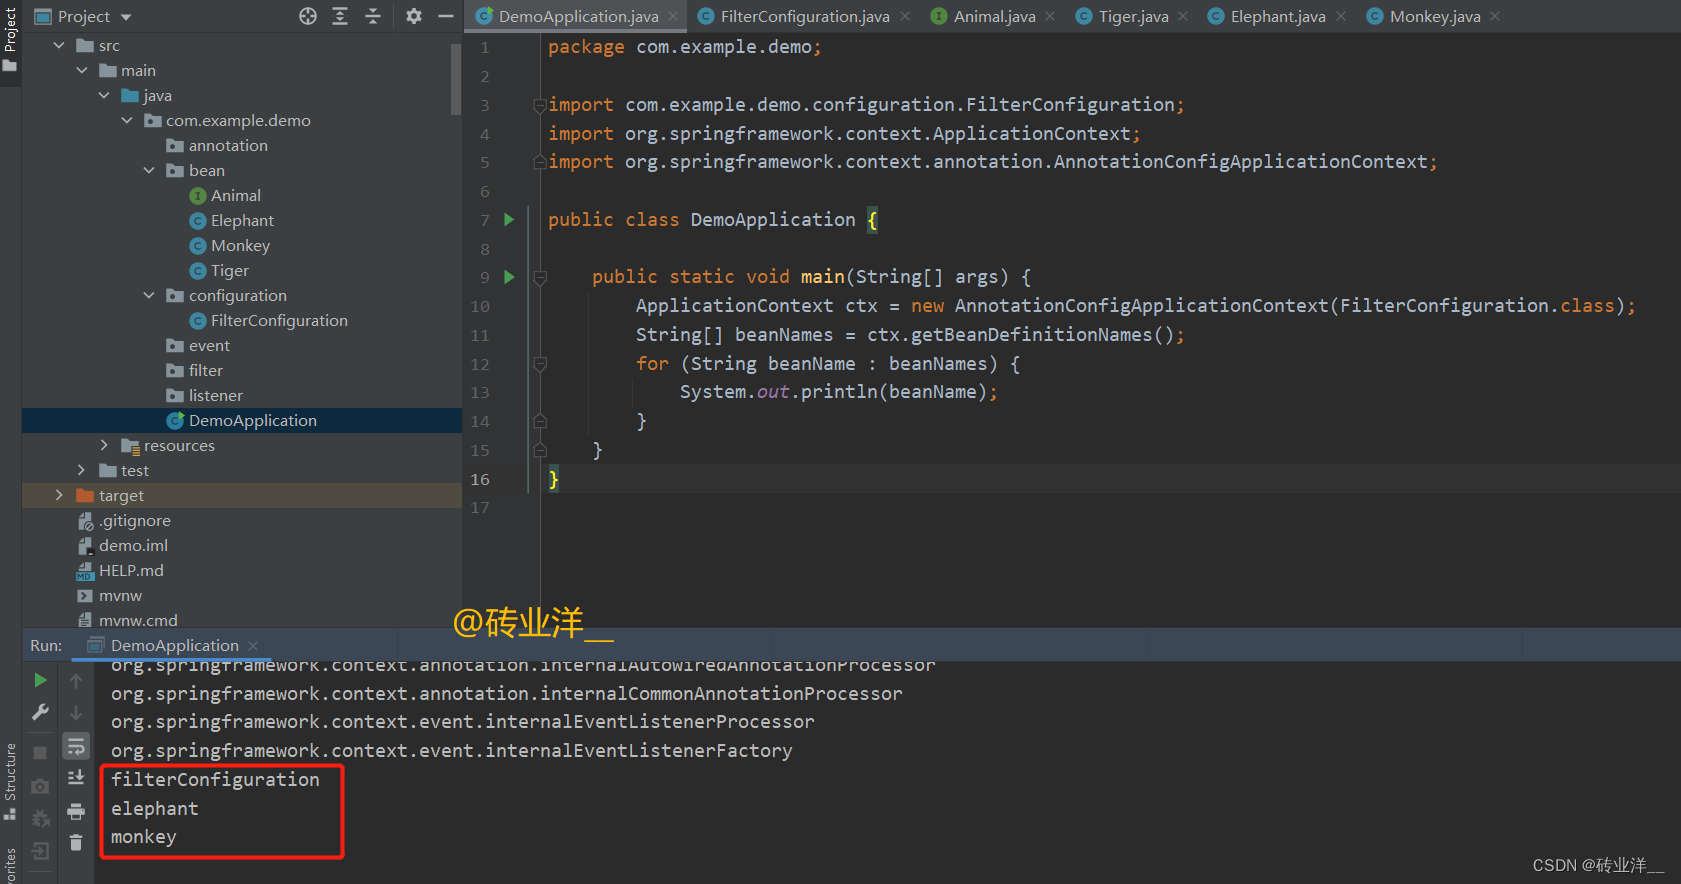
这里也可以看到,只有实现了
Animal
接口的类才会被
Spring
的
IoC
容器扫描并实例化,其他的
@Component
类没有实现
Animal
接口的
bean
将不会被扫描和实例化。
总结:本小节介绍了
Spring
框架中的"
Assignable
类型过滤",这是一种可以指定一个或多个类或接口进行组件扫描的过滤策略。
Spring
会包含或排除所有可以赋值给这些类或接口的类。在本小节的例子中,首先定义了一个
Animal
接口,然后定义了三个类
Elephant
、
Monkey
和
Tiger
,其中
Elephant
和
Monkey
实现了
Animal
接口,而
Tiger
没有。然后创建了一个
FilterConfiguration
类,使用了
@ComponentScan
注解,并通过
includeFilters
属性和
FilterType.ASSIGNABLE_TYPE
类型来指定扫描所有实现了
Animal
接口的类。因此,当运行主程序时,
Spring
的
IOC
容器只会扫描并实例化实现了
Animal
接口的
Elephant
和
Monkey
类,未实现
Animal
接口的
Tiger
类不会被扫描和实例化。
6. 自定义组件过滤器
Spring
也允许我们定义自己的过滤器来决定哪些组件将被
Spring IoC
容器扫描。为此,我们需要实现
TypeFilter
接口,并重写
match()
方法。在
match()
方法中,我们可以自定义选择哪些组件需要被包含或者排除。
全部代码如下:
新增一个接口
Animal
packagecom.example.demo.bean;publicinterfaceAnimal{StringgetType();}
定义几个类,实现
Animal
接口
packagecom.example.demo.bean;importorg.springframework.stereotype.Component;@ComponentpublicclassElephantimplementsAnimal{publicStringgetType(){return"This is a Elephant.";}}
packagecom.example.demo.bean;importorg.springframework.stereotype.Component;@ComponentpublicclassMonkeyimplementsAnimal{publicStringgetType(){return"This is an Monkey.";}}
packagecom.example.demo.bean;importorg.springframework.stereotype.Component;@ComponentpublicclassTigerimplementsAnimal{publicStringgetType(){return"This is a Tiger.";}}
packagecom.example.demo.bean;importorg.springframework.stereotype.Component;@ComponentpublicclassTiger2{publicStringgetType(){return"This is a Tiger2.";}}
Tiger2
没实现
Animal
接口,后面用来对比。
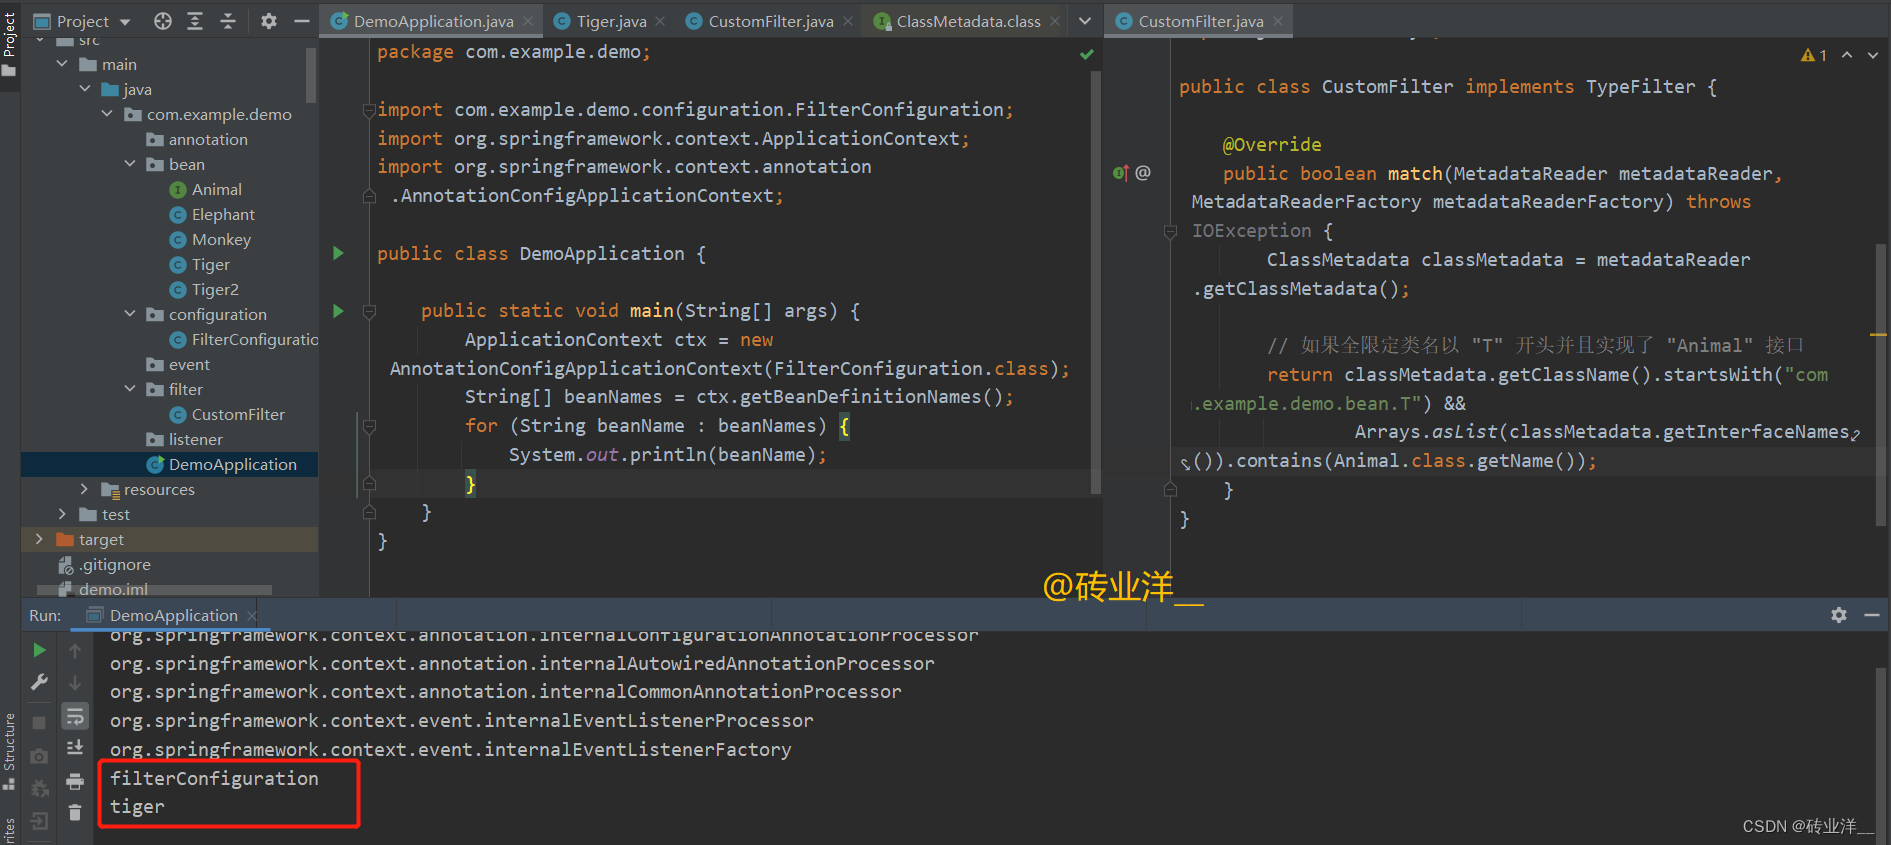
下面我们先个自定义一个过滤器
CustomFilter
,它实现了
TypeFilter
接口,这个过滤器会包含所有实现了
Animal
接口并且类名以
"T"
开头的类:
packagecom.example.demo.filter;importcom.example.demo.bean.Animal;importorg.springframework.core.type.ClassMetadata;importorg.springframework.core.type.classreading.MetadataReader;importorg.springframework.core.type.classreading.MetadataReaderFactory;importorg.springframework.core.type.filter.TypeFilter;importjava.io.IOException;importjava.util.Arrays;publicclassCustomFilterimplementsTypeFilter{@Overridepublicbooleanmatch(MetadataReader metadataReader,MetadataReaderFactory metadataReaderFactory)throwsIOException{ClassMetadata classMetadata = metadataReader.getClassMetadata();// 如果全限定类名以 "T" 开头并且实现了 "Animal" 接口return classMetadata.getClassName().startsWith("com.example.demo.bean.T")&&Arrays.asList(classMetadata.getInterfaceNames()).contains(Animal.class.getName());}}
如果
match
方法返回
true
,那么
Spring
将把这个类视为候选组件,还需满足其他条件才能创建
bean
,如果这个类没有使用
@Component
、
@Service
等注解,那么即使过滤器找到了这个类,
Spring
也不会将其注册为
bean
。因为
Spring
依然需要识别类的元数据(如:
@Component
、
@Service
等注解)来确定如何创建和管理
bean
。反之,如果
match
方法返回
false
,那么
Spring
将忽略这个类。
在
match
方法中
metadataReader.getClassMetadata()返回一个ClassMetadata对象,它包含了关于当前类的一些元数据信息,例如类名、是否是一个接口、父类名等。classMetadata.getClassName()返回当前类的全限定类名,也就是包括了包名的类名。
在
match
方法中,我们检查了当前类的全限定名是否以
"com.example.demo.bean.T"
开头,并且当前类是否实现了
"Animal"
接口。如果满足这两个条件,
match
方法就返回
true
,
Spring
会将这个类视为候选组件。如果这两个条件有任何一个不满足,
match
方法就返回
false
,
Spring
就会忽略这个类,不会将其视为候选组件。
然后,在我们的
FilterConfiguration
中,使用
FilterType.CUSTOM
类型,并且指定我们刚才创建的
CustomFilter
类:
packagecom.example.demo.configuration;importcom.example.demo.filter.CustomFilter;importorg.springframework.context.annotation.ComponentScan;importorg.springframework.context.annotation.Configuration;importorg.springframework.context.annotation.FilterType;@Configuration@ComponentScan(basePackages ="com.example.demo",
        useDefaultFilters =false,
        includeFilters [email protected](type =FilterType.CUSTOM, classes =CustomFilter.class))publicclassFilterConfiguration{}
这样,当
Spring IoC
容器进行扫描的时候,只有类名以
"T"
开头并且实现了
Animal
接口的组件才会被包含。在我们的例子中,只有
Tiger
类会被包含,
Tiger2
、
Elephant
和
Monkey
类将被排除。
主程序:
packagecom.example.demo;importcom.example.demo.configuration.FilterConfiguration;importorg.springframework.context.ApplicationContext;importorg.springframework.context.annotation.AnnotationConfigApplicationContext;publicclassDemoApplication{publicstaticvoidmain(String[] args){ApplicationContext ctx =newAnnotationConfigApplicationContext(FilterConfiguration.class);String[] beanNames = ctx.getBeanDefinitionNames();for(String beanName : beanNames){System.out.println(beanName);}}}
运行结果:
调试会发现,
match
方法在不停的回调。其实
match
方法的调用次数和
Spring
应用上下文中的
Bean
定义数量是相关的,当我们使用
@ComponentScan
进行包扫描时,
Spring
会遍历指定包(及其子包)下的所有类,对每个类进行分析以决定是否需要创建对应的
Bean
。
当我们使用
@ComponentScan.Filter
定义自定义的过滤器时,
Spring
会为每个遍历到的类调用过滤器的
match
方法,以决定是否需要忽略这个类。因此,
match
方法被调用的次数等于
Spring
扫描到的类的数量,不仅包括最终被创建为
Bean
的类,也包括被过滤器忽略的类。
这个行为可能受到一些其他配置的影响。例如,如果
Spring
配置中使用了懒加载 (
@Lazy
),那么
match
方法的调用可能会被延迟到
Bean
首次被请求时。
总结:本小节介绍了如何在
Spring
框架中创建和使用自定义过滤器,以决定哪些组件将被
Spring IoC
容器视为候选组件。通过实现
TypeFilter
接口并重写其
match()
方法,可以根据自定义的条件决定哪些类会被包含在候选组件的列表中。在这个例子中,我们创建了一个自定义过滤器,只有以
"T"
开头且实现了
Animal
接口的类才会被标记为候选组件。当
Spring
进行包扫描时,会遍历所有的类,并对每个类调用过滤器的
match()
方法,这个方法的调用次数等于
Spring
扫描到的类的数量。然后,只有那些同时满足过滤器条件并且被
Spring
识别为组件的类(例如,使用了
@Component
或
@Service
等注解),才会被实例化为
Bean
并被
Spring IoC
容器管理。如果配置了懒加载,那么
Bean
的实例化可能会被延迟到
Bean
首次被请求时。
7. 组件扫描的其他特性
Spring
的组件扫描机制提供了一些强大的特性,我们来逐一讲解。
7.1 组合使用组件扫描
Spring
提供了
@ComponentScans
注解,让我们能够组合多个
@ComponentScan
使用,这样可以让我们在一次操作中完成多次包扫描。
@ComponentScans
的主要使用场景是当需要对
Spring
的组件扫描行为进行更精细的控制时,可以在同一个应用程序中扫描两个完全独立的包,也可以在应用多个独立的过滤器来排除或包含特定的组件。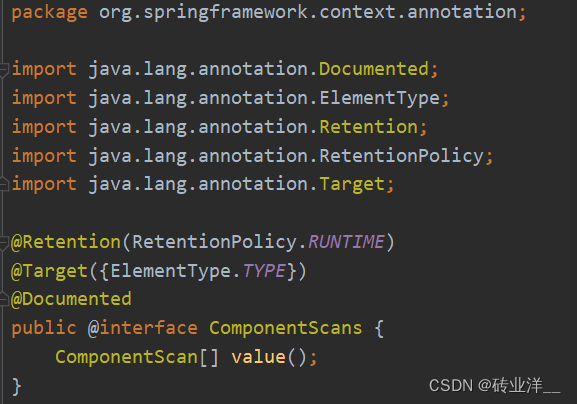
可以看到
@ComponentScans
注解接收了一个
ComponentScan
数组,也就是一次性组合了一堆
@ComponentScan
注解。
让我们通过一个例子来看看如何使用
@ComponentScans
来组合多个
@ComponentScan
。
全部代码如下:
首先,我们定义两个简单的类,分别在
com.example.demo.bean1
和
com.example.demo.bean2
包中:
packagecom.example.demo.bean1;importorg.springframework.stereotype.Component;@ComponentpublicclassBeanA{}
packagecom.example.demo.bean2;importorg.springframework.stereotype.Component;@ComponentpublicclassBeanB{}
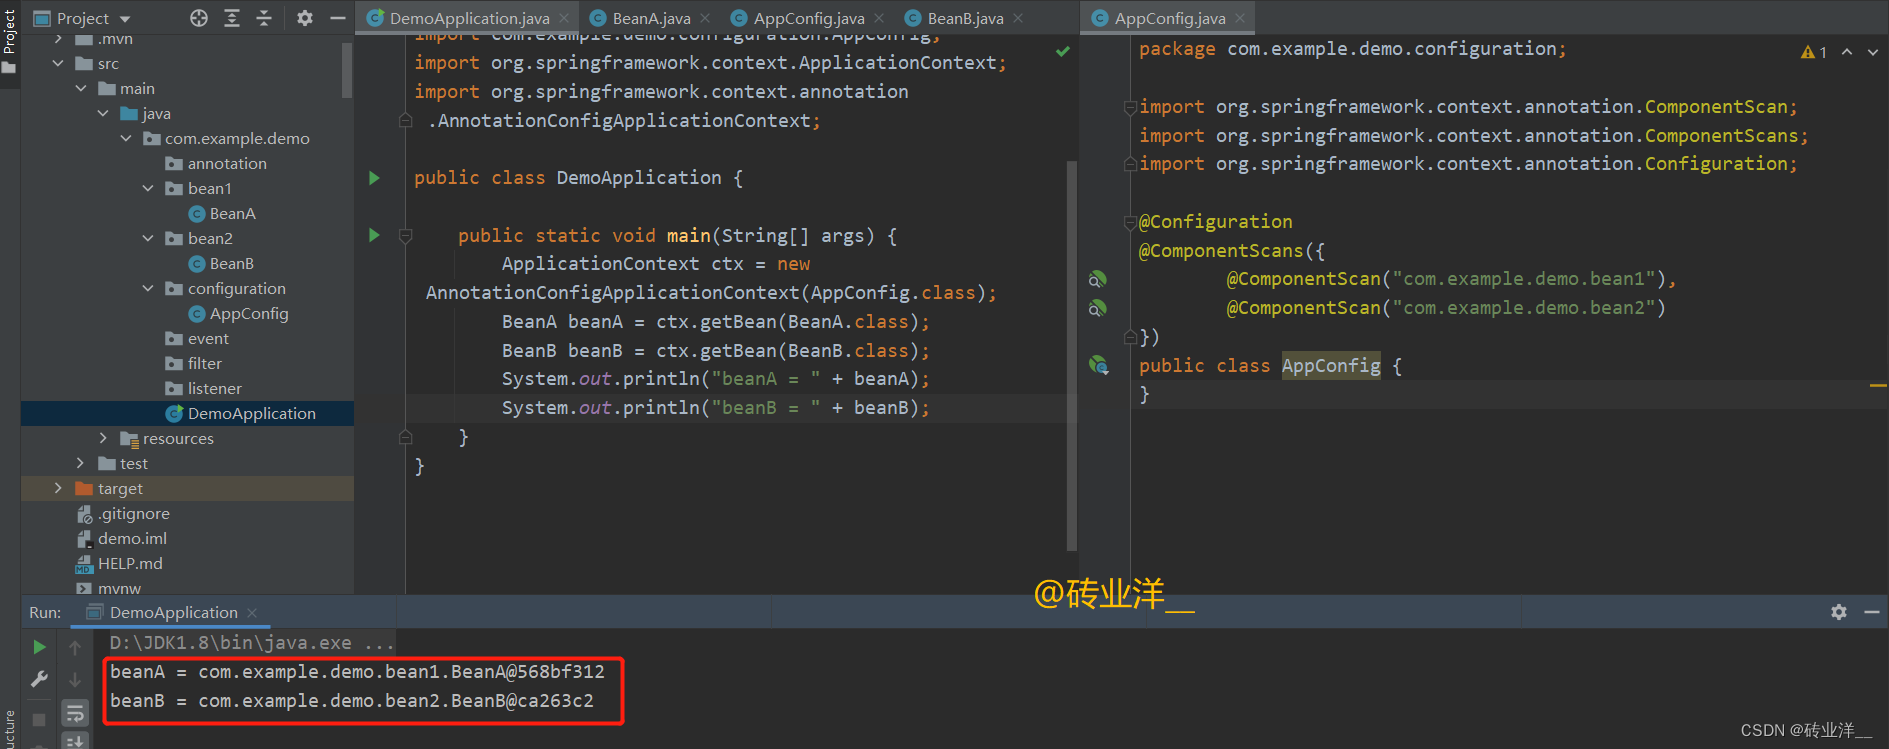
然后,我们在配置类中使用
@ComponentScans
来一次性扫描这两个包:
packagecom.example.demo.configuration;importorg.springframework.context.annotation.ComponentScan;importorg.springframework.context.annotation.ComponentScans;importorg.springframework.context.annotation.Configuration;@Configuration@ComponentScans({@ComponentScan("com.example.demo.bean1"),@ComponentScan("com.example.demo.bean2")})publicclassAppConfig{}
最后,我们可以测试一下是否成功地扫描到了这两个类:
packagecom.example.demo;importcom.example.demo.bean1.BeanA;importcom.example.demo.bean2.BeanB;importcom.example.demo.configuration.AppConfig;importorg.springframework.context.ApplicationContext;importorg.springframework.context.annotation.AnnotationConfigApplicationContext;publicclassDemoApplication{publicstaticvoidmain(String[] args){ApplicationContext ctx =newAnnotationConfigApplicationContext(AppConfig.class);BeanA beanA = ctx.getBean(BeanA.class);BeanB beanB = ctx.getBean(BeanB.class);System.out.println("beanA = "+ beanA);System.out.println("beanB = "+ beanB);}}
运行上述
main
方法,
BeanA
和
BeanB
就成功地被扫描并注入到了
Spring
的
ApplicationContext
中。
运行结果:
总结:本小节介绍了
Spring
包扫描机制的一个重要特性,即能够使用
@ComponentScans
注解进行组合包扫描。这个特性允许在一次操作中完成多次包扫描,实现对
Spring
组件扫描行为的精细控制。例如,可以同时扫描两个完全独立的包,或者应用多个独立的过滤器来排除或包含特定的组件。在本小节的示例中,使用
@ComponentScans
一次性扫描了
com.example.demo.bean1
和
com.example.demo.bean2
两个包,成功地将
BeanA
和
BeanB
扫描并注入到
Spring
的
ApplicationContext
中。
8. 组件扫描的组件名称生成
当我们在
Spring
中使用注解进行
bean
的定义和管理时,通常会用到
@Component
,
@Service
,
@Repository
,
@Controller
等注解。在使用这些注解进行
bean
定义的时候,如果我们没有明确指定
bean
的名字,那么
Spring
会根据一定的规则为我们的
bean
生成一个默认的名字。
这个默认的名字一般是类名的首字母小写。例如,对于一个类名为
MyService
的类,如果我们像这样使用
@Service
注解:
@ServicepublicclassMyService{}
那么
Spring
会为我们的
bean
生成一个默认的名字
myService
。我们可以在应用的其他地方通过这个名字来引用这个
bean
。例如,我们可以在其他的
bean
中通过
@Autowired
注解和这个名字来注入这个
bean
:
@AutowiredprivateMyService myService;
这个默认的名字是通过
BeanNameGenerator
接口的实现类
AnnotationBeanNameGenerator
来生成的。
AnnotationBeanNameGenerator
会检查我们的类是否有明确的指定了
bean
的名字,如果没有,那么它就会按照类名首字母小写的规则来生成一个默认的名字。
8.1 Spring是如何生成默认bean名称的(源码分析)
为了解释这个过程,让我们看一下
AnnotationBeanNameGenerator
类的源码,以下源码对应的
Spring
版本是
5.3.7
。
先给出源码图片,后面给出源码分析
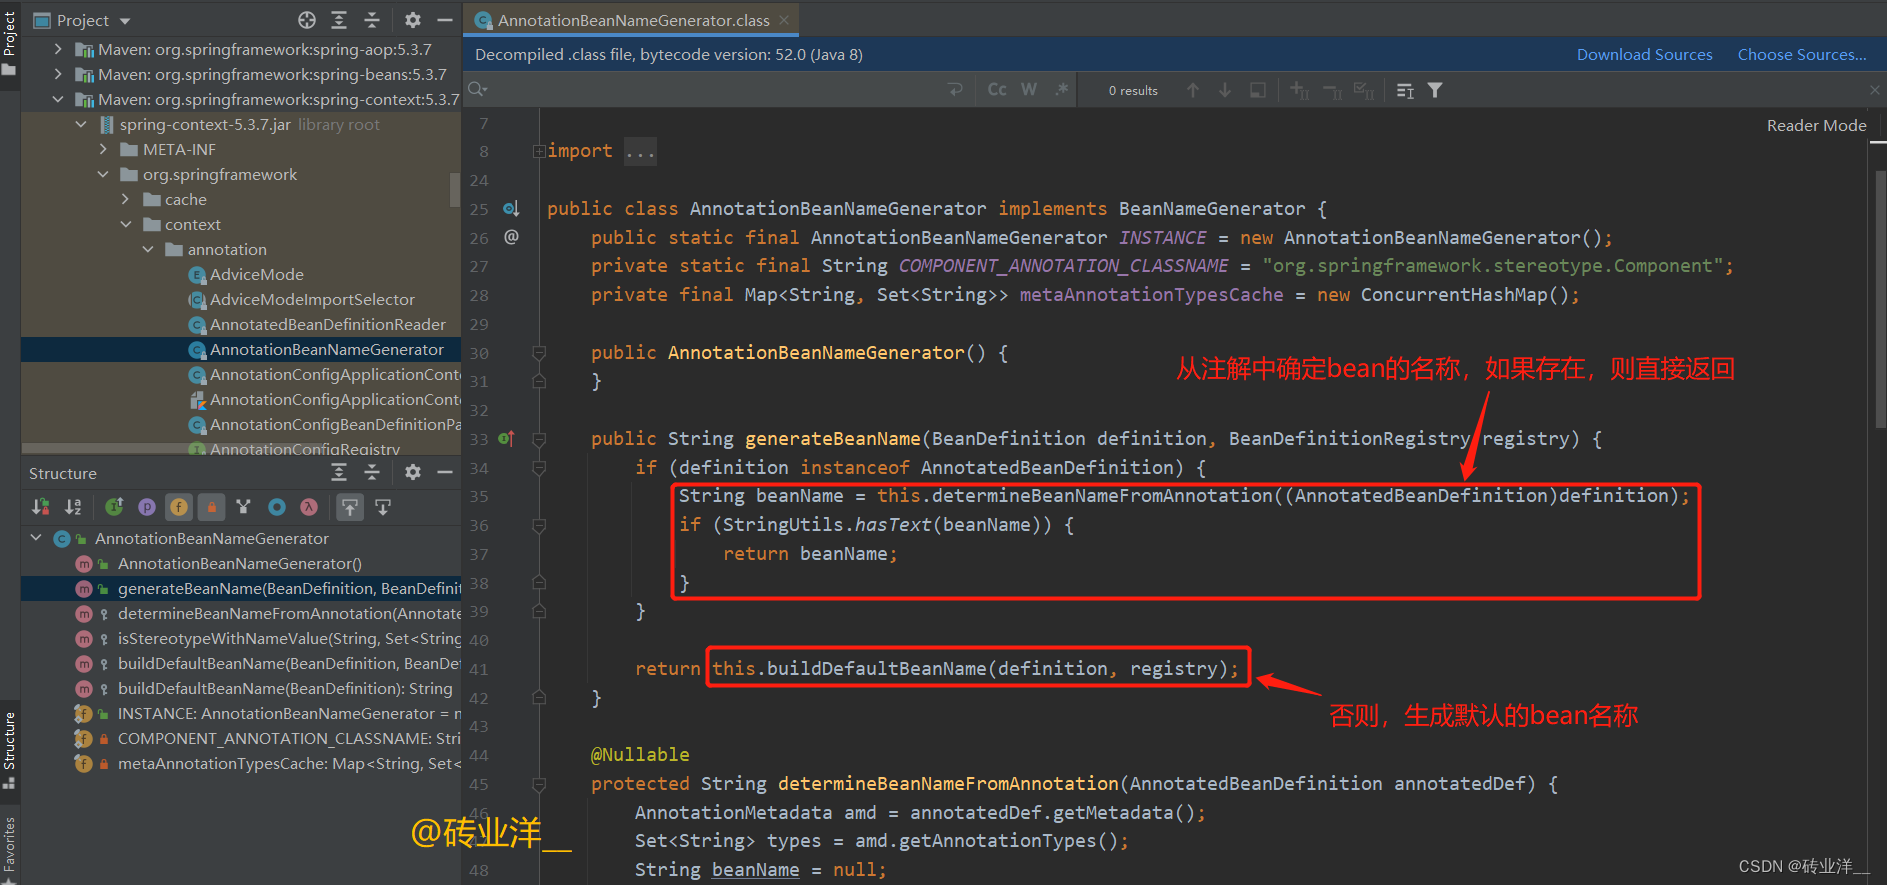
代码块提出来分析:
publicStringgenerateBeanName(BeanDefinition definition,BeanDefinitionRegistry registry){if(definition instanceofAnnotatedBeanDefinition){// 该行检查BeanDefinition是否为AnnotatedBeanDefinitionString beanName =this.determineBeanNameFromAnnotation((AnnotatedBeanDefinition)definition);// 该行调用方法来从注解获取bean名称if(StringUtils.hasText(beanName)){// 检查是否获取到了有效的bean名称return beanName;// 如果有,返回这个名称}}returnthis.buildDefaultBeanName(definition, registry);// 如果没有从注解中获取到有效的名称,调用方法生成默认的bean名称}
再看看
determineBeanNameFromAnnotation
方法
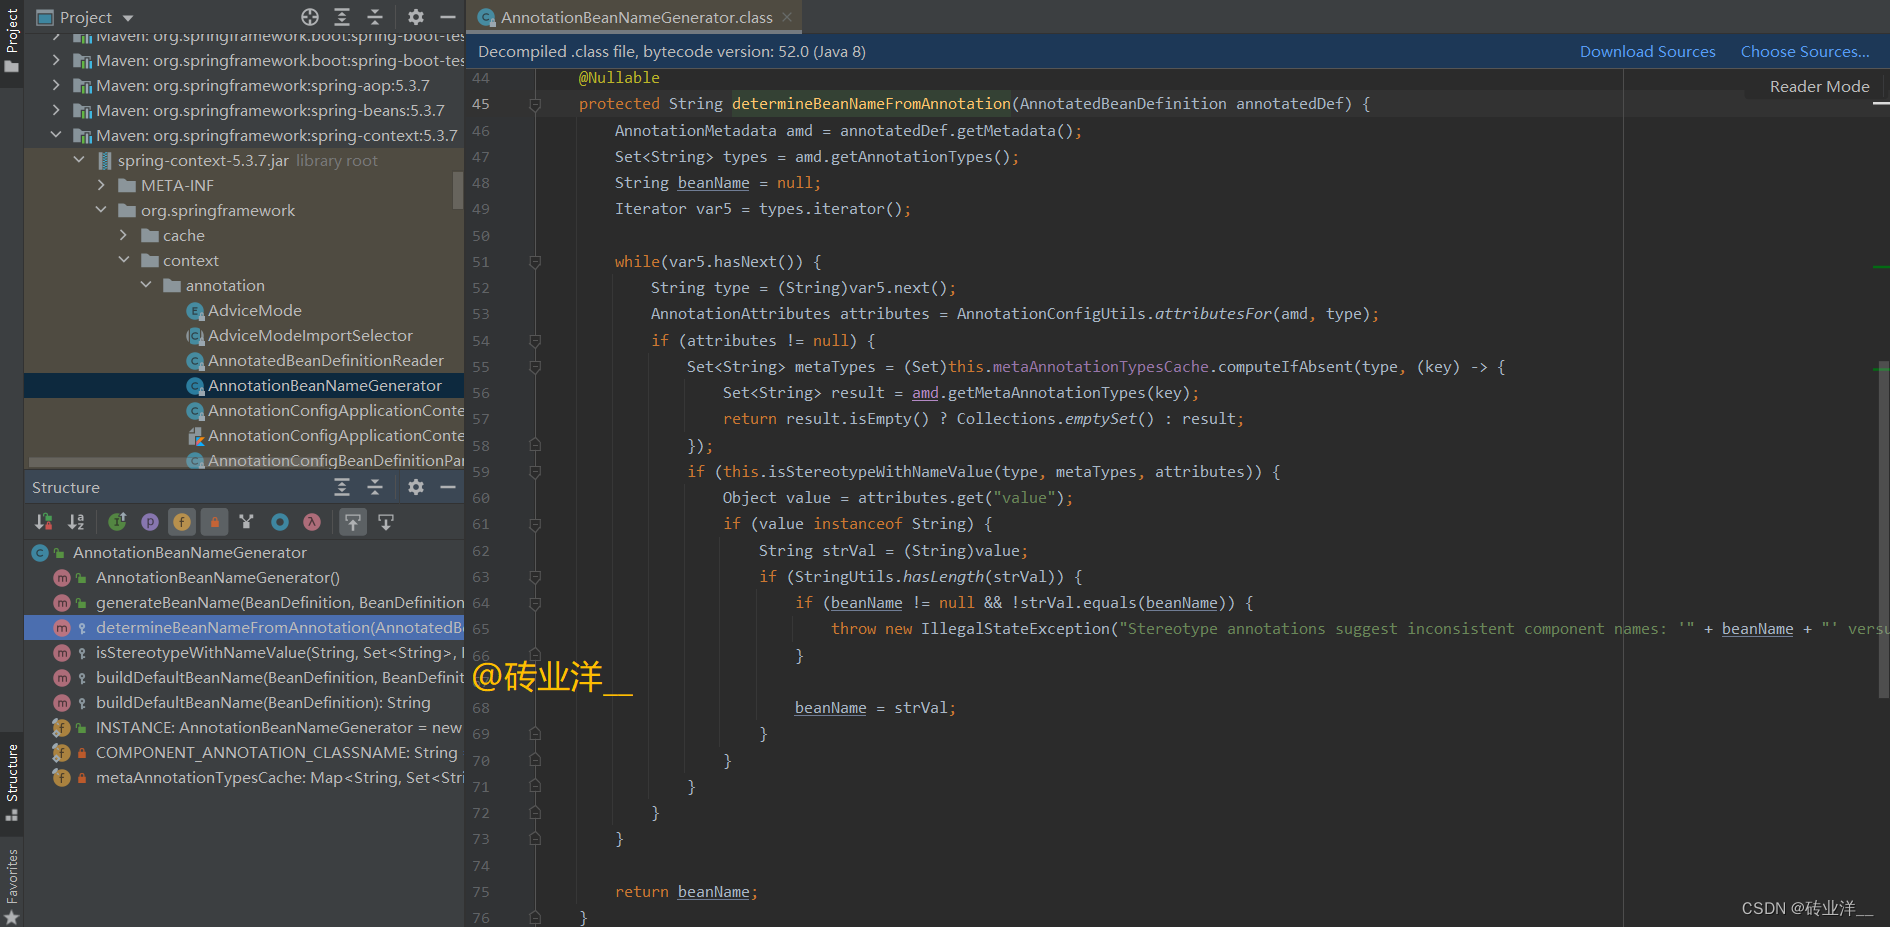
这段代码很长,我们直接将代码块提出来分析:
@NullableprotectedStringdetermineBeanNameFromAnnotation(AnnotatedBeanDefinition annotatedDef){// 1. 获取bean定义的元数据,包括所有注解信息AnnotationMetadata amd = annotatedDef.getMetadata();// 2. 获取所有注解类型Set<String> types = amd.getAnnotationTypes();// 3. 初始化bean名称为nullString beanName =null;// 4. 遍历所有注解类型Iterator var5 = types.iterator();while(var5.hasNext()){// 4.1 获取当前注解类型String type =(String)var5.next();// 4.2 获取当前注解的所有属性AnnotationAttributes attributes =AnnotationConfigUtils.attributesFor(amd, type);// 4.3 只有当前注解的属性不为null时,才会执行以下代码if(attributes !=null){Set<String> metaTypes =(Set)this.metaAnnotationTypesCache.computeIfAbsent(type,(key)->{Set<String> result = amd.getMetaAnnotationTypes(key);return result.isEmpty()?Collections.emptySet(): result;});// 4.4 检查当前注解是否为带有名称的元注解if(this.isStereotypeWithNameValue(type, metaTypes, attributes)){// 4.5 尝试从注解的"value"属性中获取bean名称Object value = attributes.get("value");if(value instanceofString){String strVal =(String)value;// 4.6 检查获取到的名称是否为有效字符串if(StringUtils.hasLength(strVal)){// 4.7 如果已经存在bean名称并且与当前获取到的名称不一致,则抛出异常if(beanName !=null&&!strVal.equals(beanName)){thrownewIllegalStateException("Stereotype annotations suggest inconsistent component names: '"+ beanName +"' versus '"+ strVal +"'");}// 4.8 设置bean名称为获取到的名称
                        beanName = strVal;}}}}}// 5. 返回获取到的bean名称,如果没有找到有效名称,则返回nullreturn beanName;}
最后看看
buildDefaultBeanName
方法,
Spring
是如何生成
bean
的默认名称的。
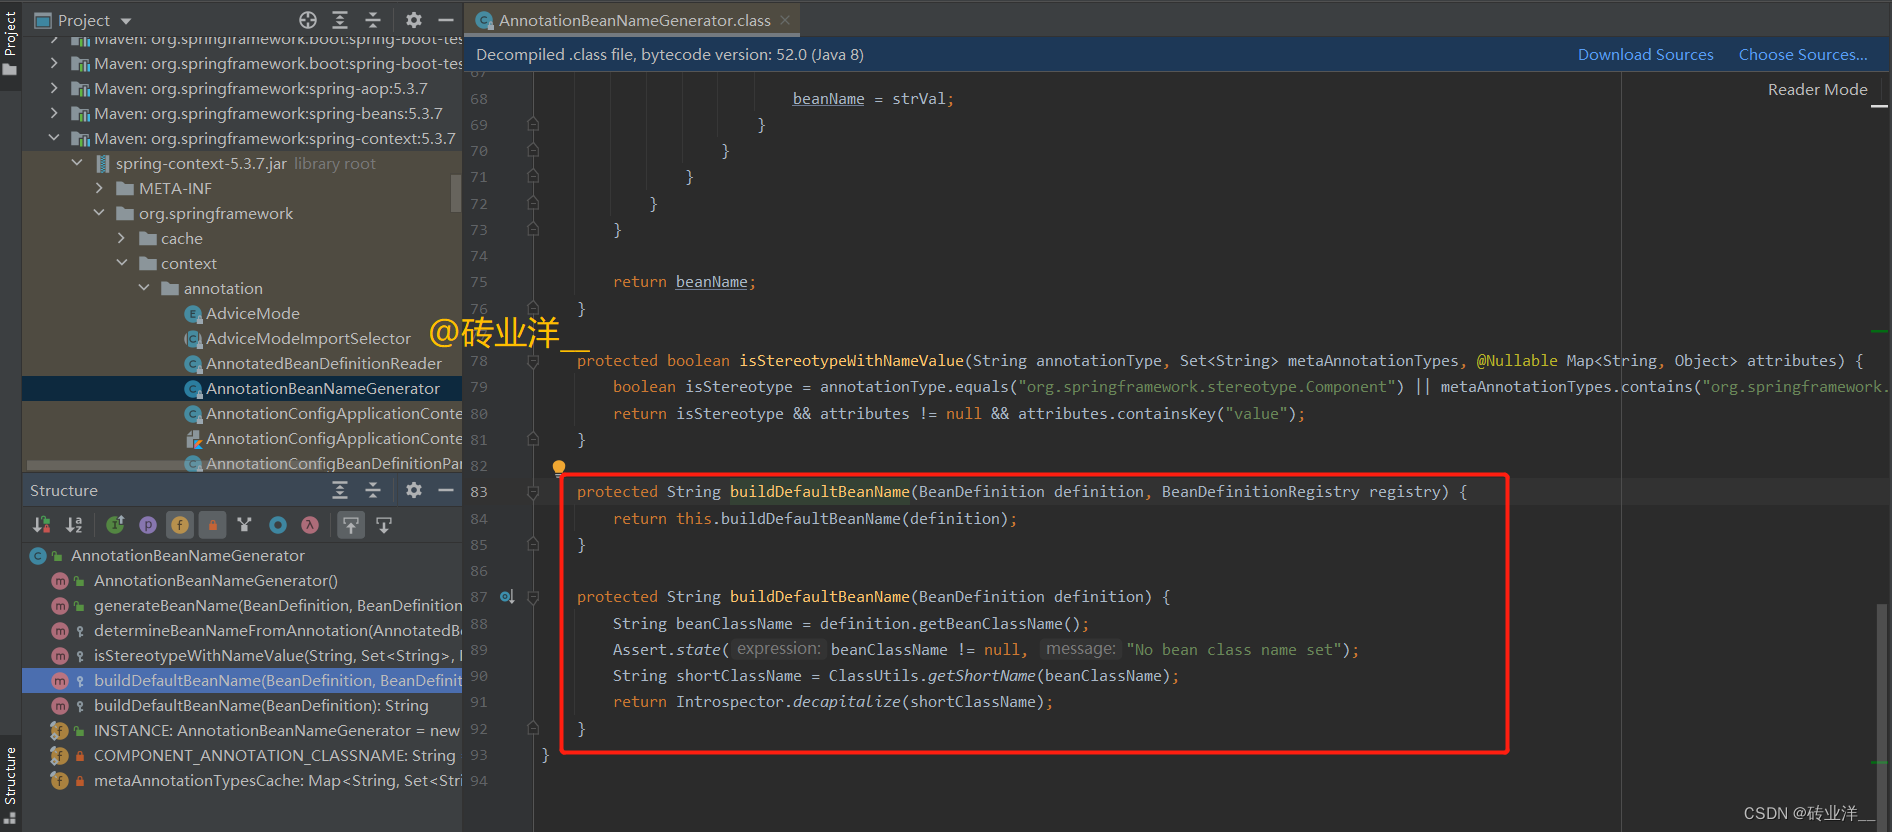
拆成代码块分析:
protectedStringbuildDefaultBeanName(BeanDefinition definition){// 1. 从bean定义中获取bean的类名String beanClassName = definition.getBeanClassName();// 2. 确保bean类名已设置,否则会抛出异常Assert.state(beanClassName !=null,"No bean class name set");// 3. 使用Spring的ClassUtils获取类的简单名称,即不带包名的类名String shortClassName =ClassUtils.getShortName(beanClassName);// 4. 使用Java内省工具(Introspector)将类名首字母转换为小写// 这就是Spring的默认bean命名策略,如果用户没有通过@Component等注解显式指定bean名,// 则会使用该类的非限定类名(即不带包名的类名),并将首字母转换为小写作为bean名。returnIntrospector.decapitalize(shortClassName);}
8.2 生成默认bean名称的特殊情况
大家肯定知道
UserService
默认
bean
名称为
userService
,但如果类名为
MService
,
bean
名称还是
MService
,不会首字母小写。具体原因,我们来分析一下。
我们上面分析
buildDefaultBeanName
方法生成默认
bean
名称的时候,发现里面有调用
decapitalize
方法后再返回,我们来看看
decapitalize
方法。

提出代码块分析一下
/**
 * 将字符串转换为正常的 Java 变量名规则的形式。
 * 这通常意味着将第一个字符从大写转换为小写,
 * 但在(不常见的)特殊情况下,当有多个字符并且第一个和第二个字符都是大写时,我们将保持原样。
 * 因此,“FooBah”变为“fooBah”,“X”变为“x”,但“URL”保持为“URL”。
 * 这是 Java 内省机制的一部分,因为它涉及 Java 对类名和变量名的默认命名规则。
 * 根据这个规则,我们可以从类名自动生成默认的变量名。
 *
 * @param name 要小写的字符串。
 * @return 小写版本的字符串。
 */publicstaticStringdecapitalize(String name){if(name ==null|| name.length()==0){return name;}// 如果字符串的前两个字符都是大写,那么保持原样if(name.length()>1&&Character.isUpperCase(name.charAt(1))&&Character.isUpperCase(name.charAt(0))){return name;}char chars[]= name.toCharArray();// 将第一个字符转为小写
    chars[0]=Character.toLowerCase(chars[0]);returnnewString(chars);}
根据
Java
的命名规则,类名的首字母应该大写,而变量名的首字母应该小写,它告诉内省机制如何从类名生成默认的变量名(或者说
bean
名)。
这里可以看到, **
decapitalize
方法接收一个字符串参数,然后将这个字符串的首字母转为小写,除非这个字符串的前两个字符都是大写,这种情况下,字符串保持不变。**
所以,在
Java
内省机制中,如果类名的前两个字母都是大写,那么在进行首字母小写的转换时,会保持原样不变。也就是说,对于这种情况,
bean
的名称和类名是一样的。
这种设计是为了遵守
Java
中的命名约定,即当一个词作为类名的开始并且全部大写时(如
URL
,
HTTP
),应保持其全部大写的格式。
9. Java的内省机制在生成默认bean名称中的应用
Java
内省机制(
Introspection
)是
Java
语言对
Bean
类的一种自我检查的能力,它属于
Java
反射的一个重要补充。它允许
Java
程序在运行时获取
Bean
类的类型信息以及
Bean
的属性和方法的信息。注意:“内省”发音是
"nèi xǐng"
。
内省机制的目的在于提供一套统一的
API
,可以在运行时动态获取类的各种信息,主要涵盖以下几个方面:
- 获取类的类型信息:可以在运行时获取任意一个
Bean对象所属的类、接口、父类、修饰符等信息。 - 属性信息:可以获取
Bean类的属性的各种信息,如类型、修饰符等。 - 获取方法信息:可以获取
Bean类的方法信息,如返回值类型、参数类型、修饰符等。 - 调用方法:可以在运行时调用任意一个
Bean对象的方法。 - 修改属性值:可以在运行时修改
Bean的属性值。
通过这些反射
API
,我们可以以一种统一的方式来操作任意一个对象,无需对对象的具体类进行硬编码。
在命名规则上,当我们获取一个
Bean
的属性名时,如果相应的
getter
或
setter
方法的名称除去
"get"/"set"
前缀后,剩余部分的第一个字母是大写的,那么在转换成属性名时,会将这个字母变为小写。如果剩余部分的前两个字母都是大写的,属性名会保持原样不变,不会将它们转换为小写。
这个规则主要是为了处理一些类名或方法名使用大写字母缩写的情况。例如,对于一个名为"
getURL
"的方法,我们会得到"
URL
"作为属性名,而不是"
uRL
"。
虽然在日常开发中我们可能不会直接频繁使用到
Java
的内省机制,但在一些特定的场景和工具中,内省机制却发挥着重要作用:
- IDE和调试工具:这些工具需要利用内省机制来获取类的信息,如类的层次结构、方法和属性信息等,以便提供代码补全、代码检查等功能。
- 测试框架:例如
JUnit这样的测试框架需要通过内省机制来实例化测试类,获取测试方法等信息以进行测试的运行。 - 依赖注入框架:比如
Spring等依赖注入框架需要利用内省机制来扫描类,获取类中的依赖关系定义,并自动装配bean。 - 序列化/反序列化:序列化需要获取对象的类型信息和属性信息来实现对象状态的持久化;反序列化需要利用类型信息来还原对象。
- 日志框架:很多日志框架可以通过内省机制自动获取日志方法所在类、方法名等上下文信息。
- 访问权限判断:一些安全相关的框架需要通过内省判断一个成员的访问权限是否合法。
- 面向接口编程:内省机制使得在面向接口编程的时候可以不需要
hardcode接口的实现类名,而是在运行时定位。
简言之,内省机制的目的是实现跨类的动态操作和信息访问,提高运行时的灵活性。这也使得框架在不知道具体类的情况下,可以进行一些有用的操作。
欢迎一键三连~
有问题请留言,大家一起探讨学习
----------------------Talk is cheap, show me the code-----------------------
版权归原作者 砖业洋__ 所有, 如有侵权,请联系我们删除。