
Spring AOP目录
Spring AOP
主要内容

代理模式
学习AOP就要先学习代理模式,这样AOP的学习就简单了。
代理模式是Java常见的设计模式之一,包含:静态代理和动态代理。
静态代理
通过案例感受静态代理:租房子问题。
房东需要将房子出租,如果都亲力亲为太麻烦了:房东要自己出去贴广告,带租客看房,讨价还价,签合同,收租金,定期检查房子,定期保洁。
这时候就需要中介代理了,房东就是要租房拿钱,额外的功能:签合同,讨价还价,定期检查房子 ,定期保洁都由中介代理去做,所以 代理 简化了 业主的功能,同时对房东的功能做了一个扩展。
找中介的好处:
(1)保护真实对象 (房东)
(2)真实对象只需要专注主要的业务逻辑(收租),额外事情代理完成
代理模式中涉及的角色:
(1)标准 (接口) —》租房子规范 ,房东,代理 都要遵循这套规范,提前定义好,保证真实对象和代理有同样的标准
(2)目标(真实对象,被代理者)—》房东
(3)代理—》中介 (在里面要调用真实对象的方法,因为真正租房的还是房东,同时可以提供辅助额外功能)
(4)客户—》租客 找谁?找中介 不找房东!
当然中介其实也算是为客户服务了,因为如果直接找房东的话,那么房东好多东西可能都不专业 都不负责,但是找中介 更加的服务好,更安全啊 有法律保证的合同。
关系图:
代码实现:
接口:
packagecom.msb.proxydemo;/**
 * @Author: zhaoss
 * 定义接口:房屋的出租标注
 */publicinterfaceRent{publicabstractObjectrentHouse(double money);}
被代理者:
packagecom.msb.proxydemo;/**
 * @Author: zhaoss
 * 定义房东类,实现租房的接口:
 */publicclassHostimplementsRent{@OverridepublicObjectrentHouse(double money){System.out.println("房东的房子被出租了,租金是:"+ money +"/月");returnnewObject();}}
代理:
packagecom.msb.proxydemo;/**
 * @Author: zhaoss
 * 代理实现租房接口:
 */publicclassHouseProxyimplementsRent{// 定义被代理的对象---》房东:privateHost host;// 定义构造器:publicHouseProxy(Host host){this.host = host;}@OverridepublicObjectrentHouse(double money){// 代理要为被代理者(真实对象-房东)提供额外的补充功能:// 看房子:kanfang();// 议价:yijia();// 赚差价:chajia(money);// 客户给钱,你提供房子(房东的房子) ---》 本质:调用房东的租房的方法:Object house = host.rentHouse(money *0.8);// 定期保洁:baojie();return house;}privatevoidbaojie(){System.out.println("售后服务:对房子提供保洁服务");}privatevoidchajia(double money){System.out.println("中间商赚差价"+ money *0.2);}privatevoidyijia(){System.out.println("和客户讨价还价,保障客户的权益,保障房东的权益");}privatevoidkanfang(){System.out.println("带客户看房子");}}
租户:
packagecom.msb.proxydemo;/**
 * @Author: zhaoss
 * 租客,来租房,找中介:
 *
 */publicclassCustomer{publicstaticvoidmain(String[] args){// 找中介  租房:HouseProxy proxy =newHouseProxy(newHost());// 租客对接中介:Object o = proxy.rentHouse(5000);System.out.println(o);}}
缺点:代理需要自己构建。
动态代理
动态代理的功能与静态代理一致,都是为了简化真实对象的操作,本质是调用真实对象,但是在真实对象提供的方法基础上可以做额外功能扩展。
动态代理不用程序员自己提供代理对象了,由程序动态生成代理对象。
但是程序员需要提供:生成代理对象的模板 --》代理帮助完成什么操作你需要告诉,程序帮你生成代理对象,但是代理对象需要做什么你需要指定好。
动态代理包括JDK动态代理和Cglib动态代理:
JDK动态代理是基于接口来实现的,代理对象和真实对象需要实现相同的接口,首先我们需要创建接口。
Cglib动态代理是第三方提供的技术,需要导入jar包,并且是基于继承的。
JDK动态代理
基于JDK自己的技术实现,无需导入额外jar包。
代码实现:
(1)定义接口Rent
(2)定义房东Host
(3)定义调用处理者Emp
动态代理由程序动态生成代理对象,但是代理对象需要做什么你需要指定好,即标准、模板
员工是调用处理者(中介公司的员工),需要实现InvocationHandler去创建标准、模板,让JDK参照这套标准去生成一个动态代理对象。
其中invoke方法,以后代理对象去调用租房的方法的时候,就会走入invoke。
(4)定义租客:Customer
packagecom.msb.proxydemo02;/**
 * @Author: zhaoss
 * 【1】无论是代理还是房东都要遵照标准、规则,那就是接口,定义Rent接口
 */publicinterfaceRent{// 【2】定义抽象方法:租房publicabstractObjectrent(double money);}
packagecom.msb.proxydemo02;/**
 * @Author: zhaoss
 * 【3】定义房东,房东也是需要实现接口的,遵照规则
 */publicclassHostimplementsRent{// 【4】房东重写Rent接口中提供的rentHouse方法@OverridepublicObjectrent(double money){// 【5】房东实现业务逻辑System.out.println("房东房子租出去了,租金:"+ money);returnnewObject();}}
packagecom.msb.proxydemo02;importjava.lang.reflect.Proxy;/**
 * @Author: zhaoss
 * 【6】定义租客来租房
 */publicclassCustomer{publicstaticvoidmain(String[] args){// 【19】准备中介员工:Emp emp =newEmp();
        emp.setHost(newHost());/*
        【7】租客租房找中介、代理(不是房东) ,得到代理:通过Proxy.newProxyInstance方法
        【8】代理对象利用Rent  proxy做接收
        【9】newProxyInstance方法有三个参数:
        ClassLoader loader---》类加载器,给哪个类做代理需要通过反射去找,反射需要用到类加载器
        Class<?>[] interfaces---》代理类实现的接口
        InvocationHandler---》代理对象真正需要做的事,必须自己指定  -->【10】

        【20】将准备好的emp传入newProxyInstance的第三个参数:
         */Rent proxy =(Rent)Proxy.newProxyInstance(Customer.class.getClassLoader(),newClass[]{Rent.class},emp);// 【15】代理租房
        proxy.rent(5000);// 这个rent在调用的时候就会去执行 【12】的invoke了}}
packagecom.msb.proxydemo02;importjava.lang.reflect.InvocationHandler;importjava.lang.reflect.Method;/**
 * @Author: zhaoss
 * 【10】定义员工类,代理的事实际是由员工完成的。员工必须实现模板--》实现InvocationHandler接口
 */publicclassEmpimplementsInvocationHandler{// 【17】创建租户:privateHost host;// 【18】给host设置值:可以通过构造器,也可以通过setter方法publicvoidsetHost(Host host){this.host = host;}/*
    【11】一旦实现InvocationHandler接口,就重写invoke方法
    【12】invoke方法有三个参数:
    proxy   代理对象
    method 真实对象的方法 ---》当前案例中  :房东里面的rent方法
    args 指的就是【15】中方法的参数 调用代理对象的时候传入的方法的参数
       @param proxy 调用该方法的代理实例
     * @param method  目标对象的方法
     * @param args  目标对象的方法形参
     */@OverridepublicObjectinvoke(Object proxy,Method method,Object[] args)throwsThrowable{// 【14】在真实对象的方法外可以补充功能:System.out.println("看房子");System.out.println("签合同");// 【13】 调用真实对象的方法:// 【16】invoke参数传递:第一个参数:    第二个参数:args参数Object o = method.invoke(host, args);System.out.println("售后服务");return o;}}
整体流程总结:
(1)首先肯定要提供租房的标准和规范:Rent接口
(2)房东要租房必须实现Rent接口。
(3)JDK动态代理生成代理对象的逻辑:
调用Proxy.newProxyInstance来生成代理对象,传入参数:
a. 类加载器,因为底层用反射,反射需要类加载器,给哪个类做代理需要通过反射去找。
b. 生成的代理类应该实现的接口,因为代理也要遵照Rent接口啊。
c. 真正要做的事:通过员工实现具体的模板 -----其实在这里就是指定了代理真正要做的事。
(4)生成代理对象以后,调用对象的租房方法,到哪里去找租房方法?当你调用proxy.rent方法的时候,方法体的内容是没有的,这时候就告诉你要参照模板了:
真正要做的事,办事的员工的模板不能随便写,反射就找InvocationHandler的实现类里面的invoke方法,invoke方法中就是代理真正要做的事情。方法的参数三个:
a. proxy代理对象
b. method 真实对象的方法
c. args 调用代理对象的时候传入的方法的参数
CGLIB 动态代理
JDK的动态代理中的代理和真实对象是基于同一个接口的,代理是需要实现这个接口的,如果没有实现这个接口,该类是不能用JDK动态代理操作的,代理对象无法生成,此时可以考虑Cglib动态代理。
Cglib动态代理是第三方提供的技术,需要导入jar包,并且是基于继承的。
产生的代理对象和真实对象之间的关系:父类与子类的关系,代理对象是真实对象的子对象。
导入依赖:
<dependencies><dependency><groupId>cglib</groupId><artifactId>cglib</artifactId><version>3.3.0</version></dependency></dependencies>
如果你jdk的版本过高(高于8),执行的时候就会报错:
![[外链图片转存失败,源站可能有防盗链机制,建议将图片保存下来直接上传(img-3EArkGjy-1682533191106)(02-Spring AOP.assets/aop-2.png)]](https://img-blog.csdnimg.cn/78c28700aa7e45afa967602259d4a83a.png)
我们的jdk:
![[外链图片转存失败,源站可能有防盗链机制,建议将图片保存下来直接上传(img-qsWwFfZu-1682533191107)(02-Spring AOP.assets/aop-5.png)]](https://img-blog.csdnimg.cn/e2b4fe086d874929b0e81099693d76d5.png)
解决办法:
![[外链图片转存失败,源站可能有防盗链机制,建议将图片保存下来直接上传(img-S8JJT693-1682533191108)(02-Spring AOP.assets/aop-3.png)]](https://img-blog.csdnimg.cn/e369a0e0be814d19adf81031431643e3.png)
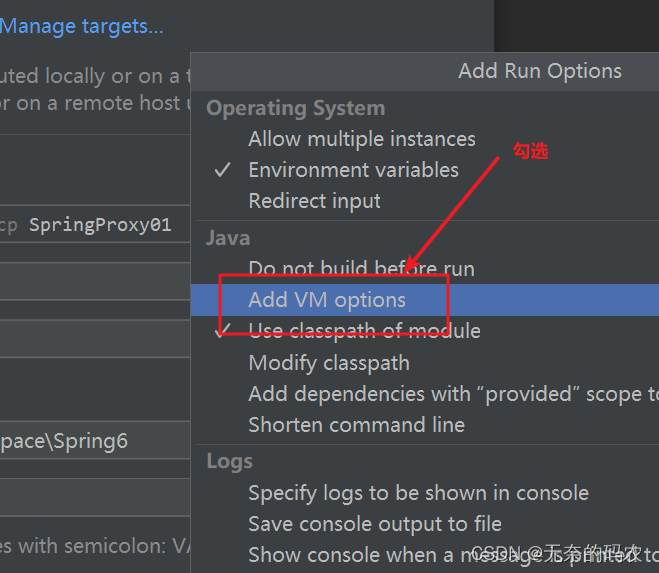
将下面参数加过去:
–add-opens java.base/java.lang=ALL-UNNAMED
–add-opens java.base/sun.net.util=ALL-UNNAMED
![[外链图片转存失败,源站可能有防盗链机制,建议将图片保存下来直接上传(img-rHsrW3QN-1682533191109)(02-Spring AOP.assets/aop-6.png)]](https://img-blog.csdnimg.cn/8406d3559a1142d99b8e2a2f21fe8fc7.png)
JDK代理与CGLIB代理的区别
- JDK动态代理实现接口,Cglib动态代理继承思想
- JDK动态代理(目标对象存在接口时)执行效率高于Cglib
- 如果目标对象有接口实现,选择JDK代理,如果没有接口实现选择Cglib代理
Spring AOP
之前学习了动态代理,明白了代理就是对房东代码的增强、扩展、增加额外辅助功能,这就是动态代理的好处。
当前项目存在问题和解决
在学习了SpringIOC之后,我们可以使用IOC的知识将代码中层与层之间的耦合性进行解耦,便于后期维护.但是在实际生产环境中,我们发现随着公司业务的增长,我们会对现有的功能方法进行功能升级,就是保留原有功能的基础上增加新的逻辑,那么大家最容易想到的方案就是找到要升级的功能方法直接修改,但是如果我们调用的是第三方的功能代码,就没有源码,那么没有办法直接修改了,怎么办?而且就算我们有源码,源码也可能是其他人写的,这时候去修改源码,就需要花费大量的时间去阅读源码的逻辑,非常麻烦,效率又低,怎么办?
解决方式:利用动态代理,对原有功能进行增强。但是代理模式也要我们自己写一堆代码,那么SpringAOP就很好的解决了这个问题,SpringAOP就是对动态代理进行的封装。
Spring AOP的介绍
Aspect Oriented Programing (AOP)—— 面向切面编程,相比较 oop 面向对象编程来说,Aop关注的不再是程序代码中某个类,某些方法,而aop考虑的更多的是一种面到面的切入,即层与层之间的一种切入,所以称之为切面。那么aop是怎么做到拦截整个面的功能呢?
画图讲解:
在没有AOP技术之前,代码的执行流程是纵向的,方法的执行顺序是由调用顺序决定的,按照如下图方式调用:

如果现在需要在某个代码的基础上进行功能的扩展,怎么做?可以直接动手修改代码,这种方式太不友好了。现在我们要使用spring aop来处理。
一般情况下,controller层代码不需要改、mapper层代码不需要改,我们修改的往往都是service层的内容。那么以前的办法就是在service层直接修改,现在我们要使用spring aop来处理。
使用AOP之后,AOP就是对动态代理的封装,作用:通过动态代理对原有功能进行增强/扩展。
![ [外链图片转存失败,源站可能有防盗链机制,建议将图片保存下来直接上传(img-9dQnIHtK-1682533191110)(02-Spring AOP.assets/aop-8.png)]](https://img-blog.csdnimg.cn/91665053bc424f83a74acbe4e5cbe9bc.png)
Service就像是房东的真实方法,要租房
前置功能:代理帮着弄的签合同、讨价还价…
后置功能:代理帮着弄的售后处理…
整体在原来纵向程序中横切了一刀形成切面,切面其实本质就是代理对象。
AOP基本概念
连接点(Joinpoint)
项目中任何一个方法都可以看成一个连接点
Pointcut(切点)
就是我们平时说的目标方法,或说对哪个方法做扩展,做增强。比如上图中service层中的方法。
Advice(通知)
要加入的扩展功能/额外功能
      1. 前置通知 — 在切点方法前加入的功能
      2. 后置通知 — 在切点方法后加入的功能
     3. 异常通知 —在切点方法发生异常后加入的功能
     4. 环绕通知 — 前置通知 + 后置通知 + 异常通知
Aspect(切面)
切点 + 通知 = 切面 (即:代理对象)
Weave(织入)
将通知加入到切点的这个过程即为织入 (即:创建代理对象的过程)
实现AOP的两种方式
在Spring中提供了两种方式实现AOP:
- Schema-based:所有的通知都需要实现特定类型的接口。
- AspectJ:可以使用普通Java类结合特定的配置标签实现通知。
Spring AOP —— Schema-based方式
Schema-based:所有的通知都需要实现特定类型的接口
      1. 前置通知 — 在切点方法前加入的功能  — 通知需要实现MethodBeforeAdvice接口
      2. 后置通知 — 在切点方法后加入的功能 — 通知需要实现AfterReturningAdvice接口
     3. 异常通知 —在切点方法发生异常后加入的功能 — 通知需要实现ThrowsAdvice接口。
     4. 环绕通知 — 前置通知 + 后置通知 + 异常通知 — 通知需要实现MethodInterceptor接口
前置通知 - 入门案例
【1】创建普通Maven项目
【2】添加依赖:spring-context
<!--spring的依赖--><dependency><groupId>org.springframework</groupId><artifactId>spring-context</artifactId><version>6.0.5</version></dependency><!--上面spring的依赖中包含aop了,但是还需要额外导入命名空间的依赖,运行时生效的--><dependency><groupId>org.aspectj</groupId><artifactId>aspectjweaver</artifactId><version>1.9.9.1</version><scope>runtime</scope></dependency>
【3】构建Service层即可:
接口部分:
packagecom.msb.service;/**
 * @Author: zhaoss
 */publicinterfaceUserService{publicabstractvoida();publicabstractvoidb(int num);}
实现类部分,加入@Service注解用于构建UserServiceImpl的对象
packagecom.msb.service.impl;importcom.msb.service.UserService;importorg.springframework.stereotype.Service;/**
 * @Author: zhaoss
 * 构建UserServiceImpl的对象,可以在spring的配置文件中进行bean标签的配置
 * 也可以使用注解@Service的方式配置
 */@ServicepublicclassUserServiceImplimplementsUserService{@Overridepublicvoida(){System.out.println("业务层:UserServiceImpl.a");}@Overridepublicvoidb(int num){System.out.println("业务层:UserServiceImpl.b-----》"+ num);}}
【4】定义spring配置文件,扫描@Service注解所在的包:
<?xml version="1.0" encoding="UTF-8"?><beansxmlns="http://www.springframework.org/schema/beans"xmlns:xsi="http://www.w3.org/2001/XMLSchema-instance"xmlns:context="http://www.springframework.org/schema/context"xsi:schemaLocation="http://www.springframework.org/schema/beans
        https://www.springframework.org/schema/beans/spring-beans.xsd
        http://www.springframework.org/schema/context
        https://www.springframework.org/schema/context/spring-context.xsd"><!--加入扫描注解所在的包:多个包用逗号分隔开--><context:component-scanbase-package="com.msb.service"></context:component-scan></beans>
【5】构建测试类:
publicclassTest{publicstaticvoidmain(String[] args){ApplicationContext ac =newClassPathXmlApplicationContext("applicationContext.xml");UserService us =(UserService)ac.getBean("userServiceImpl");
           us.a();
        us.b(18);}}
运行结果:
![[外链图片转存失败,源站可能有防盗链机制,建议将图片保存下来直接上传(img-FnIAPUaS-1682533191111)(02-Spring AOP.assets/aop-9.png)]](https://img-blog.csdnimg.cn/6e71602f62c34208973feed65114b2af.png)
【6】加入切面,对b方法进行扩展:
service层不动,测试类不动,不修改源码,只修改配置文件即可,把你要扩展的事加入到通知中即可。
加入前置通知 。
新建com.msb.advice包,创建新的类 MyBefore , Schema-based这种方式是需要实现接口的,实现MethodBeforeAdvice接口,重写before方法。
packagecom.msb.advice;importorg.springframework.aop.MethodBeforeAdvice;importjava.lang.reflect.Method;/**
 * @Author: zhaoss
 */publicclassMyBeforeAdviceimplementsMethodBeforeAdvice{@Overridepublicvoidbefore(Method method,Object[] args,Object target)throwsThrowable{System.out.println("--------前置通知--------");}}
【7】目前前置通知与我们的代码还没有关系,我们要给b方法加入代码的增强,b方法就是切点 ,增加配置:
<?xml version="1.0" encoding="UTF-8"?><beansxmlns="http://www.springframework.org/schema/beans"xmlns:xsi="http://www.w3.org/2001/XMLSchema-instance"xmlns:context="http://www.springframework.org/schema/context"xmlns:aop="http://www.springframework.org/schema/aop"xsi:schemaLocation="http://www.springframework.org/schema/beans
        https://www.springframework.org/schema/beans/spring-beans.xsd
        http://www.springframework.org/schema/context
        https://www.springframework.org/schema/context/spring-context.xsd
http://www.springframework.org/schema/aop
        https://www.springframework.org/schema/aop/spring-aop.xsd"><!--配置注解所在的包 对这个包进行扫描--><context:component-scanbase-package="com.msb.service"></context:component-scan><!--构建前置通知对象:
    构建对象的形式可以在applicationContext.xml中配置bean标签  (我在这里用这种)
    也可以在MyBeforeAdvice类前加入@Component注解  --><beanid="before"class="com.msb.advice.MyBeforeAdvice"></bean><!--织入切面 : 需要导入aop的命名空间,从官网中去复制粘贴即可(3行)--><aop:config><!--定义切点
        id属性就是切点的名字
        expression 切点表达式  作用:定位到切点  切点在哪个类中  类中的哪个方法 返回值  参数
        execution(返回值类型 方法的定位(参数))
        --><aop:pointcutid="p1"expression="execution(void com.msb.service.impl.UserServiceImpl.b(int))"/><!--给切点加入前置通知:
         pointcut-ref  给哪个切点加入通知
         advice-ref 给切点加入什么通知
         --><aop:advisoradvice-ref="before"pointcut-ref="p1"></aop:advisor></aop:config></beans>
再次测试,结果:
![[外链图片转存失败,源站可能有防盗链机制,建议将图片保存下来直接上传(img-ZmjPjB9b-1682533191111)(02-Spring AOP.assets/aop-10.png)]](https://img-blog.csdnimg.cn/1c8aabb6139a4dcb881d5f2af4ce304b.png)
思考
思考:加入切面后,测试类中调用的b方法是哪个?
答案:可以自己做测试,将织入切面的代码和通知的代码删除,只留下原始的纵向调用的程序,测试:
publicclassApp{publicstaticvoidmain(String[] args ){// 解析xml:ApplicationContext ac =newClassPathXmlApplicationContext("applicationContext.xml");// 获取service实现类对象:UserServiceImpl us =(UserServiceImpl)ac.getBean("userServiceImpl");// 调用业务层方法:
        us.a();
        us.b(18);System.out.println(us.getClass().getName());}}
此时可以看到:
![[外链图片转存失败,源站可能有防盗链机制,建议将图片保存下来直接上传(img-GS0SPIOE-1682533191112)(02-Spring AOP.assets/aop-11.png)]](https://img-blog.csdnimg.cn/ba16cd28c092420da108484bffd0f4e8.png)
再次将通知和切面加回去,再测试:
![[外链图片转存失败,源站可能有防盗链机制,建议将图片保存下来直接上传(img-bTce8Cz4-1682533191112)(02-Spring AOP.assets/aop-12.png)]](https://img-blog.csdnimg.cn/58eb5fc8a9674a7d8de294efb3bd0646.png)
因为我们程序中是存在接口UserService的,所以默认使用JDK动态代理,基于接口的,那何时使用cglib动态代理呢?可以测试,将UserService接口删除,UserServiceImpl类不再实现UserService接口,测试:
![[外链图片转存失败,源站可能有防盗链机制,建议将图片保存下来直接上传(img-3wQ2pIc9-1682533191113)(02-Spring AOP.assets/aop-13.png)]](https://img-blog.csdnimg.cn/59e6d65deb864fada3a9dc3374b011bf.png)
后置通知
后置通知是在切入点之后执行的增强。
新建com.msb.advice.MyAfterAdvice,实现AfterReturningAdvice接口,必须重写afterReturning方法:
packagecom.msb.advice;importorg.springframework.aop.AfterReturningAdvice;importjava.lang.reflect.Method;/**
 * @Author: zhaoss
 * 并不是说类名叫后置通知就是后置通知,(MyAfterAdvice)
 * 必须实现接口才是后置通知
 */publicclassMyAfterAdviceimplementsAfterReturningAdvice{@OverridepublicvoidafterReturning(Object returnValue,Method method,Object[] args,Object target)throwsThrowable{System.out.println("-------后置通知-------");}}
在applicationContext.xml中配置切面:
<?xml version="1.0" encoding="UTF-8"?><beansxmlns="http://www.springframework.org/schema/beans"xmlns:xsi="http://www.w3.org/2001/XMLSchema-instance"xmlns:context="http://www.springframework.org/schema/context"xmlns:aop="http://www.springframework.org/schema/aop"xsi:schemaLocation="http://www.springframework.org/schema/beans
        https://www.springframework.org/schema/beans/spring-beans.xsd
        http://www.springframework.org/schema/context
        https://www.springframework.org/schema/context/spring-context.xsd
http://www.springframework.org/schema/aop
        https://www.springframework.org/schema/aop/spring-aop.xsd"><context:component-scanbase-package="com.msb.service"></context:component-scan><beanid="before"class="com.msb.advice.MyBeforeAdvice"></bean><!--构建后置通知对象--><beanid="after"class="com.msb.advice.MyAfterAdvice"></bean><aop:config><aop:pointcutid="p1"expression="execution(void com.msb.service.impl.UserServiceImpl.b(int))"/><aop:advisoradvice-ref="before"pointcut-ref="p1"></aop:advisor><!--给切点加入后置通知:--><aop:advisoradvice-ref="after"pointcut-ref="p1"></aop:advisor></aop:config></beans>
测试结果:
![[外链图片转存失败,源站可能有防盗链机制,建议将图片保存下来直接上传(img-pia7sA7b-1682533191114)(02-Spring AOP.assets/aop-14.png)]](https://img-blog.csdnimg.cn/a2ce838e83f641de9037c08680a527f6.png)
异常通知
异常通知只有在切入点出现异常时才会被触发。如果方法没有异常,异常通知是不会执行的。
新建com.msb.advice.MyThrowAdvice
MethodInterceptor接口没有方法,但是我们必须严格提供一个下面的方法:public void afterThrowing(Exception e)
- public void afterThrowing:必须相同
- 必须有Exception参数
package com.msb.advice;import org.springframework.aop.ThrowsAdvice;/**
 * @Author: zhaoss
 */publicclassMyThrowAdviceimplementsThrowsAdvice{/**
     * 虽然implements ThrowsAdvice后没有要求我们重写方法
     * 但是我们定义的方法也不能随便写,必须是:public void afterThrowing(Exception ex)
      */publicvoidafterThrowing(Exception ex){
        System.out.println("-----异常通知-------");}}
在applicationContext.xml中配置切面:
<?xml version="1.0" encoding="UTF-8"?><beansxmlns="http://www.springframework.org/schema/beans"xmlns:xsi="http://www.w3.org/2001/XMLSchema-instance"xmlns:context="http://www.springframework.org/schema/context"xmlns:aop="http://www.springframework.org/schema/aop"xsi:schemaLocation="http://www.springframework.org/schema/beans
        https://www.springframework.org/schema/beans/spring-beans.xsd
        http://www.springframework.org/schema/context
        https://www.springframework.org/schema/context/spring-context.xsd
http://www.springframework.org/schema/aop
        https://www.springframework.org/schema/aop/spring-aop.xsd"><context:component-scanbase-package="com.msb.service"></context:component-scan><beanid="before"class="com.msb.advice.MyBeforeAdvice"></bean><beanid="after"class="com.msb.advice.MyAfterAdvice"></bean><!--构建异常通知对象--><beanid="throw"class="com.msb.advice.MyThrowAdvice"></bean><aop:config><aop:pointcutid="p1"expression="execution(void com.msb.service.impl.UserServiceImpl.b(int))"/><aop:advisoradvice-ref="before"pointcut-ref="p1"></aop:advisor><aop:advisoradvice-ref="after"pointcut-ref="p1"></aop:advisor><!--给切点加入异常通知--><aop:advisoradvice-ref="throw"pointcut-ref="p1"></aop:advisor></aop:config></beans>
在切入点中写个异常:
@ServicepublicclassUserServiceImplimplementsUserService{@Overridepublicvoida(){System.out.println("业务层:UserServiceImpl.a");}@Overridepublicvoidb(int num){System.out.println("业务层:UserServiceImpl.b-----》"+ num);// 加入异常int age =10/0;}}
测试:
![[外链图片转存失败,源站可能有防盗链机制,建议将图片保存下来直接上传(img-UZjTYMca-1682533191115)(02-Spring AOP.assets/aop-15.png)]](https://img-blog.csdnimg.cn/edb30c03cc644f55bdac2e7011683739.png)
环绕通知
环绕通知可以实现前置通知、后置通知、异常通知。可以对这三种通知一起进行配置。
新建com.msb.advice.MyAroundAdvice,实现MethodInterceptor接口,必须重写invoke方法。方法中参数:
- invocation:方法调用器。通过invocation的proceed()方法调用执行点。
packagecom.msb.advice;importorg.aopalliance.intercept.MethodInterceptor;importorg.aopalliance.intercept.MethodInvocation;/**
 * @Author: zhaoss
 */publicclassMyAroundAdviceimplementsMethodInterceptor{// implements MethodInterceptor接口以后,重写invoke方法,前置通知的逻辑、后置通知的逻辑、异常通知的逻辑都可以在这个方法中一起写出// invocation参数就是一个方法调用器,为了调用切点方法,通过proceed方法进行调用@OverridepublicObjectinvoke(MethodInvocation invocation)throwsThrowable{Object obj =null;try{// 前置通知:System.out.println("------前置通知------");// 调用切点方法:
            obj = invocation.proceed();// 后置通知:System.out.println("------后置通知------");}catch(Exception ex){System.out.println("--------异常通知-------出现异常的类型为:"+ ex.getClass().getName());}return obj;}}
在applicationContext.xml中配置切面:
<?xml version="1.0" encoding="UTF-8"?><beansxmlns="http://www.springframework.org/schema/beans"xmlns:xsi="http://www.w3.org/2001/XMLSchema-instance"xmlns:context="http://www.springframework.org/schema/context"xmlns:aop="http://www.springframework.org/schema/aop"xsi:schemaLocation="http://www.springframework.org/schema/beans
        https://www.springframework.org/schema/beans/spring-beans.xsd
        http://www.springframework.org/schema/context
        https://www.springframework.org/schema/context/spring-context.xsd
http://www.springframework.org/schema/aop
        https://www.springframework.org/schema/aop/spring-aop.xsd"><context:component-scanbase-package="com.msb.service"></context:component-scan><!--构建环绕通知对象:--><beanid="around"class="com.msb.advice.MyAroundAdvice"></bean><aop:config><aop:pointcutid="p1"expression="execution(void com.msb.service.impl.UserServiceImpl.b(int))"/><!--给切点加入环绕通知:--><aop:advisoradvice-ref="around"pointcut-ref="p1"></aop:advisor></aop:config></beans>
通知方法中的各种参数
你的通知就是为切点对象服务的,所以切点的各种信息要传入重写的方法中,以便你能在通知中操作切点。
各种参数就是为了切点的各种信息。
returnValue:切点方法的返回值
method:切点的方法
args:切点方法中的参数
target:切点对象,真实对象
invocation:整个切点的方法、切点对象
在各种通知中加入参数的打印:
publicclassMyBeforeAdviceimplementsMethodBeforeAdvice{@Overridepublicvoidbefore(Method method,Object[] args,Object target)throwsThrowable{System.out.println("--------前置通知--------");System.out.println("--------前置通知--------method---"+ method);for(Object arg:args){System.out.println("--------前置通知--------args---"+ arg);}System.out.println("--------前置通知--------target----"+ target);}}
publicclassMyAfterAdviceimplementsAfterReturningAdvice{@OverridepublicvoidafterReturning(Object returnValue,Method method,Object[] args,Object target)throwsThrowable{System.out.println("-------后置通知-------");System.out.println("-------后置通知-------returnValue-----"+ returnValue);System.out.println("-------后置通知-------method-------"+ method);for(Object arg:args){System.out.println("--------前置通知--------args---"+ arg);}System.out.println("-------后置通知-------target-----"+ target);}}
publicclassMyThrowAdviceimplementsThrowsAdvice{/**
     * 虽然implements ThrowsAdvice后没有要求我们重写方法
     * 但是我们定义的方法也不能随便写,必须是:public void afterThrowing(Exception ex)
      */publicvoidafterThrowing(Exception ex){System.out.println("-----异常通知-------ex----- "+ ex);}}
publicclassMyAroundAdviceimplementsMethodInterceptor{// implements MethodInterceptor接口以后,重写invoke方法,前置通知的逻辑、后置通知的逻辑、异常通知的逻辑都可以在这个方法中一起写出// invocation参数就是一个方法调用器,为了调用切点方法,通过proceed方法进行调用@OverridepublicObjectinvoke(MethodInvocation invocation)throwsThrowable{Object obj =null;try{// 前置通知:System.out.println("------环绕通知---前置通知------");System.out.println("------环绕通知---前置通知------ invocation"+ invocation);// 调用切点方法:
            obj = invocation.proceed();// 后置通知:System.out.println("------环绕通知---后置通知------");}catch(Exception ex){System.out.println("--------环绕通知---异常通知-------出现异常的类型为:"+ ex.getClass().getName());}return obj;}}
<?xml version="1.0" encoding="UTF-8"?><beansxmlns="http://www.springframework.org/schema/beans"xmlns:xsi="http://www.w3.org/2001/XMLSchema-instance"xmlns:context="http://www.springframework.org/schema/context"xmlns:aop="http://www.springframework.org/schema/aop"xsi:schemaLocation="http://www.springframework.org/schema/beans
        https://www.springframework.org/schema/beans/spring-beans.xsd
        http://www.springframework.org/schema/context
        https://www.springframework.org/schema/context/spring-context.xsd
http://www.springframework.org/schema/aop
        https://www.springframework.org/schema/aop/spring-aop.xsd"><!--配置注解所在的包 对这个包进行扫描--><context:component-scanbase-package="com.msb.service"></context:component-scan><!--构建前置通知对象:
    构建对象的形式可以在applicationContext.xml中配置bean标签  (我在这里用这种)
    也可以在MyBeforeAdvice类前加入@Component注解  --><beanid="before"class="com.msb.advice.MyBeforeAdvice"></bean><!--构建后置通知对象--><beanid="after"class="com.msb.advice.MyAfterAdvice"></bean><!--构建异常通知对象--><beanid="throw"class="com.msb.advice.MyThrowAdvice"></bean><!--构建环绕通知对象:--><beanid="around"class="com.msb.advice.MyAroundAdvice"></bean><!--织入切面 : 需要导入aop的命名空间,从官网中去复制粘贴即可(3行)--><aop:config><!--定义切点
        id属性就是切点的名字
        expression 切点表达式  作用:定位到切点  切点在哪个类中  类中的哪个方法 返回值  参数
        execution(返回值类型 方法的定位(参数))
        --><aop:pointcutid="p1"expression="execution(void com.msb.service.impl.UserServiceImpl.b(int))"/><!--给切点加入前置通知:
         pointcut-ref  给哪个切点加入通知
         advice-ref 给切点加入什么通知
         --><aop:advisoradvice-ref="before"pointcut-ref="p1"></aop:advisor><!--给切点加入后置通知:--><aop:advisoradvice-ref="after"pointcut-ref="p1"></aop:advisor><!--给切点加入异常通知--><aop:advisoradvice-ref="throw"pointcut-ref="p1"></aop:advisor><!--给切点加入环绕通知:--><aop:advisoradvice-ref="around"pointcut-ref="p1"></aop:advisor></aop:config></beans>
publicclassApp{publicstaticvoidmain(String[] args ){// 解析xml:ApplicationContext ac =newClassPathXmlApplicationContext("applicationContext.xml");// 获取service实现类对象:UserService us =(UserService)ac.getBean("userServiceImpl");// 调用业务层方法:
        us.b(18);}}
结果:
![[外链图片转存失败,源站可能有防盗链机制,建议将图片保存下来直接上传(img-HfTHdyOn-1682533191116)(02-Spring AOP.assets/aop-16.png)]](https://img-blog.csdnimg.cn/5246bdea528547159173268467c12dfa.png)
Spring AOP —— AspectJ方式
入门案例(前置通知、后置通知)
Schema-based方式的缺点: 在使用Schema-based方式实现功能扩展时,每个通知对应一个类,每个类都需要实现接口,这样造成代码的结构体系过于繁杂。
解决:AspectJ方式可以将不同的通知定义在一个类的不同方法中:
packagecom.msb.advice;/**
 * @Author: zhaoss
 * 定义MyAspectJAdvice类之后,不用去考虑实现接口的问题
 * 你把不同通知的逻辑,定义到不同方法中即可:
 */publicclassMyAspectJAdvice{// 定义前置通知的方法:publicvoidbefore(){System.out.println("------前置通知-------");}// 定义后置通知的方法:publicvoidafter(){System.out.println("------后置通知-------");}// 定义异常通知的方法:publicvoidmythrow(){System.out.println("------异常通知-------");}}
但是配置好以后,Spring容器无法区分该类中的方法哪些是前置,哪些是后置,哪些是异常了,怎么办?在配置文件中的切面配置中,指明哪些方法是前置,哪些是后置,哪些是异常即可。在applicationContext.xml中进行标签配置:
<beansxmlns="http://www.springframework.org/schema/beans"xmlns:xsi="http://www.w3.org/2001/XMLSchema-instance"xmlns:context="http://www.springframework.org/schema/context"xmlns:aop="http://www.springframework.org/schema/aop"xsi:schemaLocation="
        http://www.springframework.org/schema/beans
        https://www.springframework.org/schema/beans/spring-beans.xsd
        http://www.springframework.org/schema/aop
        https://www.springframework.org/schema/aop/spring-aop.xsd
        http://www.springframework.org/schema/context
        https://www.springframework.org/schema/context/spring-context.xsd"><!--扫描@Service注解所在的包,这样的话注解才会生效--><context:component-scanbase-package="com.msb.service"></context:component-scan><!--构建MyAspectJAdvice对象--><beanid="aspectj"class="com.msb.advice.MyAspectJAdvice"></bean><!--配置切面--><aop:config><!--加入aop:aspect标签是aspectj的配置方式--><aop:aspectref="aspectj"><!--配置切点--><aop:pointcutid="p"expression="execution(void com.msb.service.impl.UserServiceImpl.b(int))"/><!--给切点配置前置通知,利用标签找到对应的MyAspectJAdvice其中的before方法
            怎么才能找到before方法呢?需要在applicationContext.xml中先构建MyAspectJAdvice对象,
            通过ref属性加入到aop:aspect之后,然后通过aop:before标签找到对应的before方法--><aop:beforemethod="before"pointcut-ref="p"></aop:before><!--配置后置通知
            aop:after的方式: 如果出现异常,那么后置通知也会执行
            aop:after-returning的方式:如果出现异常,那么后置通知就不执行了
            --><!--<aop:after method="after" pointcut-ref="p"></aop:after>--><aop:after-returningmethod="after"pointcut-ref="p"></aop:after-returning><!--配置异常通知--><aop:after-throwingmethod="mythrow"pointcut-ref="p"></aop:after-throwing></aop:aspect></aop:config></beans>
通知方法有参数怎么处理(在通知中获取参数的写法)
比如现在定义的前置方法:
public void before(){
        System.out.println("------前置通知-------");
}
方法可以加参数,但是这个参数不是你自己随便加的,我们一般通知的作用就是为了增强切点的,要加参数也应该是传入切点方法的参数,怎么设置呢?
比如切点方法有一个参数int类型,那么before方法就要传入参数为int类型。
方法变为:
publicvoidbefore(int n){// n - 名字随便起System.out.println("------前置通知-------");}
在applicationContext.xml中加入:
<beansxmlns="http://www.springframework.org/schema/beans"xmlns:xsi="http://www.w3.org/2001/XMLSchema-instance"xmlns:context="http://www.springframework.org/schema/context"xmlns:aop="http://www.springframework.org/schema/aop"xsi:schemaLocation="
        http://www.springframework.org/schema/beans
        https://www.springframework.org/schema/beans/spring-beans.xsd
        http://www.springframework.org/schema/aop
        https://www.springframework.org/schema/aop/spring-aop.xsd
        http://www.springframework.org/schema/context
        https://www.springframework.org/schema/context/spring-context.xsd"><context:component-scanbase-package="com.msb.service"></context:component-scan><beanid="aspectj"class="com.msb.advice.MyAspectJAdvice"></bean><aop:config><aop:aspectref="aspectj"><!--1. 在切点中要将切点方法的参数指给n,n的名字要与before方法中参数名字一致,否则出错--><aop:pointcutid="p"expression="execution(void com.msb.service.impl.UserServiceImpl.b(int)) and args(n)"/><!--2.调用前置方法的时候,还需要将arg-names参数指定,名字为n--><aop:beforemethod="before"pointcut-ref="p"arg-names="n"></aop:before><!--3.一旦有一个方法需要传参,其余的方法就都需要传参,都需要加arg-names,否则报错--><aop:after-returningmethod="after"pointcut-ref="p"arg-names="n"></aop:after-returning><aop:after-throwingmethod="mythrow"pointcut-ref="p"arg-names="n"></aop:after-throwing></aop:aspect></aop:config></beans>
其余通知方法也要加入参数:
publicclassMyAspectJAdvice{// 定义前置通知的方法:publicvoidbefore(int n){System.out.println("------前置通知-------");}// 定义后置通知的方法:publicvoidafter(int n){System.out.println("------后置通知-------");}// 定义异常通知的方法:publicvoidmythrow(int n){System.out.println("------异常通知-------");}}
如果异常通知方法需要加入Exception参数,那么配置更复杂:
publicclassMyAspectJAdvice{// 定义前置通知的方法:publicvoidbefore(int n){System.out.println("------前置通知-------");}// 定义后置通知的方法:publicvoidafter(int n){System.out.println("------后置通知-------");}// 定义异常通知的方法:publicvoidmythrow(int n,Exception ex){System.out.println("------异常通知-------,yichang:"+ ex);}}
<beansxmlns="http://www.springframework.org/schema/beans"xmlns:xsi="http://www.w3.org/2001/XMLSchema-instance"xmlns:context="http://www.springframework.org/schema/context"xmlns:aop="http://www.springframework.org/schema/aop"xsi:schemaLocation="
        http://www.springframework.org/schema/beans
        https://www.springframework.org/schema/beans/spring-beans.xsd
        http://www.springframework.org/schema/aop
        https://www.springframework.org/schema/aop/spring-aop.xsd
        http://www.springframework.org/schema/context
        https://www.springframework.org/schema/context/spring-context.xsd"><context:component-scanbase-package="com.msb.service"></context:component-scan><beanid="aspectj"class="com.msb.advice.MyAspectJAdvice"></bean><aop:config><aop:aspectref="aspectj"><aop:pointcutid="p"expression="execution(void com.msb.service.impl.UserServiceImpl.b(int)) and args(n)"/><aop:beforemethod="before"pointcut-ref="p"arg-names="n"></aop:before><aop:after-returningmethod="after"pointcut-ref="p"arg-names="n"></aop:after-returning><!--参数arg-names="n,ex" 同时还需要指定throwing="ex"才好使--><aop:after-throwingmethod="mythrow"pointcut-ref="p"throwing="ex"arg-names="n,ex"></aop:after-throwing></aop:aspect></aop:config></beans>
切点配置的其他方式
在applicationContext.xml中配置切点的时候,配置方式可以为:
<beansxmlns="http://www.springframework.org/schema/beans"xmlns:xsi="http://www.w3.org/2001/XMLSchema-instance"xmlns:context="http://www.springframework.org/schema/context"xmlns:aop="http://www.springframework.org/schema/aop"xsi:schemaLocation="
        http://www.springframework.org/schema/beans
        https://www.springframework.org/schema/beans/spring-beans.xsd
        http://www.springframework.org/schema/aop
        https://www.springframework.org/schema/aop/spring-aop.xsd
        http://www.springframework.org/schema/context
        https://www.springframework.org/schema/context/spring-context.xsd"><context:component-scanbase-package="com.msb.service"></context:component-scan><beanid="aspectj"class="com.msb.advice.MyAspectJAdvice"></bean><aop:config><aop:aspectref="aspectj"><!--配置切点,如下切点只能使用一个,否则报错--><!--<aop:pointcut id="p" expression="execution(void com.msb.service.impl.UserServiceImpl.b(int)) and args(n)"/>--><!--指定service.impl包下的UserServiceImpl的类的所有返回值为void的b方法--><!--<aop:pointcut id="p1" expression="execution(void com.msb.service.impl.UserServiceImpl.b(..)) and args(n)"/>--><!--指定service.impl包下的UserServiceImpl的类的所有返回值为void的所有方法--><!--<aop:pointcut id="p2" expression="execution(void com.msb.service.impl.UserServiceImpl.*(..)) and args(n)"/>--><!--指定service.impl包下的所有类的所有返回值为void的所有方法--><!--<aop:pointcut id="p3" expression="execution(void com.msb.service.impl.*.*(..)) and args(n)"/>--><!--指定service.impl包下的所有类的所有方法--><aop:pointcutid="p4"expression="execution(* com.msb.service.impl.*.*(..)) and args(n)"/><aop:beforemethod="before"pointcut-ref="p4"arg-names="n"></aop:before><aop:after-returningmethod="after"pointcut-ref="p4"arg-names="n"></aop:after-returning><aop:after-throwingmethod="mythrow"pointcut-ref="p4"arg-names="n,ex"throwing="ex"></aop:after-throwing></aop:aspect></aop:config></beans>
环绕通知
环绕通知的方法必须加入参数来获取到切点方法,参数为ProceedingJoinPoint类型:
publicclassMyAspectJAdvice{publicvoidbefore(int n){System.out.println("------前置通知-------"+ n);}publicvoidafter(int n){System.out.println("------后置通知-------"+ n);}publicvoidmythrow(int n,Exception ex){System.out.println("------异常通知-------,当前异常的类型为:"+ ex.getClass().getName());}/*
     环绕通知:
     必须加入参数:ProceedingJoinPoint类型的 ---》 因为通过这个参数我们可以获取到切点方法
     这个类型在aop的命名空间依赖包下,所以依赖scope要把runtime去除
     */publicObjectaround(ProceedingJoinPoint p,int n)throwsThrowable{System.out.println("-----环绕通知的前置通知----"+ n);// 执行切点方法:Object o = p.proceed();return o;}}
PS :上面环绕通知中我只家里人前置通知,后置、异常通知你可以自己去加。
加入ProceedingJoinPoint类型后报错,因为这个类属于aop依赖包中,将scope为runtime去掉,在编译阶段好用:
<dependency><groupId>org.springframework</groupId><artifactId>spring-context</artifactId><version>6.0.5</version></dependency><dependency><groupId>org.aspectj</groupId><artifactId>aspectjweaver</artifactId><version>1.9.9.1</version><!--<scope>runtime</scope>--></dependency>
配置环绕通知:
<beansxmlns="http://www.springframework.org/schema/beans"xmlns:xsi="http://www.w3.org/2001/XMLSchema-instance"xmlns:context="http://www.springframework.org/schema/context"xmlns:aop="http://www.springframework.org/schema/aop"xsi:schemaLocation="
        http://www.springframework.org/schema/beans
        https://www.springframework.org/schema/beans/spring-beans.xsd
        http://www.springframework.org/schema/aop
        https://www.springframework.org/schema/aop/spring-aop.xsd
        http://www.springframework.org/schema/context
        https://www.springframework.org/schema/context/spring-context.xsd"><context:component-scanbase-package="com.msb.service"></context:component-scan><beanid="aspectj"class="com.msb.advice.MyAspectJAdvice"></bean><aop:config><aop:aspectref="aspectj"><aop:pointcutid="p4"expression="execution(* com.msb.service.impl.*.*(..)) and args(n)"/><aop:beforemethod="before"pointcut-ref="p4"arg-names="n"></aop:before><aop:after-returningmethod="after"pointcut-ref="p4"arg-names="n"></aop:after-returning><aop:after-throwingmethod="mythrow"pointcut-ref="p4"arg-names="n,ex"throwing="ex"></aop:after-throwing><!--配置环绕通知--><aop:aroundmethod="around"pointcut-ref="p4"></aop:around></aop:aspect></aop:config></beans>
Schema-based和Aspectj的区别
Schema-based:基于模式的。基于接口实现的。每个通知都需要实现特定的接口类型,才能确定通知的类型。由于类已经实现了接口,所以配置起来相对比较简单。尤其是不需要在配置中指定参数和返回值类型。
AspectJ方式:是基于配置实现的。通过不同的配置标签告诉Spring通知的类型。AspectJ方式对于通知类写起来比较简单。但是在配置文件中参数和返回值需要特殊进行配置。
因为Schame-based是运行时增强,AspectJ是编译时增强。所以当切面比较少时,性能没有太多区别。但是当切面比较多时,最好选择AspectJ方式,因为AspectJ方式要快很多 (因为编译一次就可以了)
注解方式实现AOP
注解我们已经不陌生了,注解的作用是用来替换XML的配置的,达到和XML配置相同的效果。同一个配置要么使用注解实现,要么使用XML配置来实现。
SpringAOP也给出了使用注解方式来配置AOP,但是**AOP的注解方式只支持对AspectJ的简化 **。
代码:
service接口:
publicinterfaceUserService{publicabstractvoidb(int num);}
service实现类:
publicclassUserServiceImplimplementsUserService{@Overridepublicvoidb(int num){System.out.println("UserServiceImpl.b,参数:"+ num);}}
通知类:
packagecom.msb.advice;importorg.aspectj.lang.ProceedingJoinPoint;importorg.aspectj.lang.annotation.*;importorg.springframework.stereotype.Component;/**
 * @Author: zhaoss
 * @Component注解,就是为了构建MyAspectJAdvic对象
 * @Aspect注解代表我现在要加入  简化AspectJ方式的注解
 */@Component@AspectpublicclassMyAspectJAdvice{/*配置切点:随便定义一个方法,名字是什么都可以,我就用a方法
    * 在a方法前加入注解来配置切点*/@Pointcut("execution(* com.msb.service.impl.*.*(..))")publicvoida(){}/*不同的通知方法,加入对应的注解即可
    * 但是别忘了配置对应的切点,将上面切点对应的方法传入注解的参数即可*/// 定义前置通知的方法@Before("a()")publicvoidbefore(){System.out.println("------前置通知-------");}// 定义后置通知的方法:@After("a()")publicvoidafter(){System.out.println("------后置通知-------");}// 定义异常通知的方法:@AfterThrowing(pointcut="a()",throwing ="ex")publicvoidmythrow(Exception ex){System.out.println("------异常通知-------,当前异常的类型为:"+ ex.getClass().getName());}// 环绕通知:@Around("a()")publicObjectaround(ProceedingJoinPoint p)throwsThrowable{System.out.println("-----环绕通知的前置通知----");// 执行切点方法:Object o = p.proceed();return o;}}
applicationContext.xml配置文件:
<?xml version="1.0" encoding="UTF-8"?><beansxmlns="http://www.springframework.org/schema/beans"xmlns:xsi="http://www.w3.org/2001/XMLSchema-instance"xmlns:context="http://www.springframework.org/schema/context"xmlns:aop="http://www.springframework.org/schema/aop"xsi:schemaLocation="http://www.springframework.org/schema/beans
        https://www.springframework.org/schema/beans/spring-beans.xsd
        http://www.springframework.org/schema/context
        https://www.springframework.org/schema/context/spring-context.xsd
        http://www.springframework.org/schema/aop
        https://www.springframework.org/schema/aop/spring-aop.xsd"><!--扫描@Service注解所在的包,以便构建service层对象
    扫描@Component注解所在的包,以便MyAspectJAdvic对象    --><context:component-scanbase-package="com.msb.service,com.msb.advice"></context:component-scan><!--扫描AOP的注解--><aop:aspectj-autoproxyexpose-proxy="true"></aop:aspectj-autoproxy></beans>
测试类:
publicclassApp{publicstaticvoidmain(String[] args ){// 解析xml:ApplicationContext ac =newClassPathXmlApplicationContext("applicationContext.xml");// 得到对象:UserService us =(UserService)ac.getBean("userServiceImpl");// 调用b方法:
        us.b(19);}}("a()")publicObjectaround(ProceedingJoinPoint p)throwsThrowable{System.out.println("-----环绕通知的前置通知----");// 执行切点方法:Object o = p.proceed();return o;}}
applicationContext.xml配置文件:
<?xml version="1.0" encoding="UTF-8"?><beansxmlns="http://www.springframework.org/schema/beans"xmlns:xsi="http://www.w3.org/2001/XMLSchema-instance"xmlns:context="http://www.springframework.org/schema/context"xmlns:aop="http://www.springframework.org/schema/aop"xsi:schemaLocation="http://www.springframework.org/schema/beans
        https://www.springframework.org/schema/beans/spring-beans.xsd
        http://www.springframework.org/schema/context
        https://www.springframework.org/schema/context/spring-context.xsd
        http://www.springframework.org/schema/aop
        https://www.springframework.org/schema/aop/spring-aop.xsd"><!--扫描@Service注解所在的包,以便构建service层对象
    扫描@Component注解所在的包,以便MyAspectJAdvic对象    --><context:component-scanbase-package="com.msb.service,com.msb.advice"></context:component-scan><!--扫描AOP的注解--><aop:aspectj-autoproxyexpose-proxy="true"></aop:aspectj-autoproxy></beans>
测试类:
publicclassApp{publicstaticvoidmain(String[] args ){// 解析xml:ApplicationContext ac =newClassPathXmlApplicationContext("applicationContext.xml");// 得到对象:UserService us =(UserService)ac.getBean("userServiceImpl");// 调用b方法:
        us.b(19);}}
版权归原作者 无奈的码农 所有, 如有侵权,请联系我们删除。