认识RabbitMQ
RabbitMQ 是一个分布式消息中间件,它接受并转发消息。你可以把它当做一个快递站点,当你要发送一个包裹时,你把你的包裹放到快递站,快递员最终会把你的快递送到收件人那里,按照这种逻辑 RabbitMQ 是一个快递站,一个快递员帮你传递快件。RabbitMQ 与快递站的主要区别在于:它不处理快件而是接收,存储和转发消息数据。
RabbitMQ是基于Erlang语言开发的开源消息通信中间件
官网地址:Messaging that just works — RabbitMQ
什么是MQ
MQ是消息队列(Message Queue)的简称,是一种用于应用程序之间进行异步通信的技术。消息队列允许应用程序在时间上解耦,从而提高系统的可靠性和可伸缩性。通过将消息发送到队列中,发送者和接收者可以在不直接相互通信的情况下进行通信。这种方式使得系统可以更加灵活地处理高负载、异步任务和系统之间的解耦需求。常见的消息队列包括RabbitMQ、Kafka、RocketMQ等。
几种常见MQ的对比:
RabbitMQActiveMQRocketMQ****Kafka公司/社区RabbitApache阿里Apache开发语言ErlangJavaJavaScala&Java协议支持AMQP,XMPP,SMTP,STOMPOpenWire,STOMP,REST,XMPP,AMQP自定义协议自定义协议可用性高一般高高单机吞吐量一般差高非常高消息延迟微秒级毫秒级毫秒级毫秒以内消息可靠性高一般高一般
为什么要用MQ
为什么我们要使用它呢?因为它能很好的帮我解决一些复杂特殊的场景,如高并发的流量削峰、应用解耦、异步处理、分布式事务、数据分发等。
总而言之,MQ的优势包括:
- 耦合度更低
- 性能更好
- 业务拓展性强
- 故障隔离,避免级联失败
当然,MQ也并非完美无缺,它存在下列缺点:
- 完全依赖于Broker的可靠性、安全性和性能
- 架构复杂,后期维护和调试麻烦
安装RabbitMQ
我们使用docker的方式来安装RabbitMQ
docker run \
 -e RABBITMQ_DEFAULT_USER=root \
 -e RABBITMQ_DEFAULT_PASS=123456 \
 -v mq-plugins:/plugins \
 --name rabbitMQ \
 --hostname master \
 -p 15672:15672 \
 -p 5672:5672 \
 -d \
 rabbitmq:3.8-management
安装成功后

访问ip地址:15672,输入账号root,密码123456登录
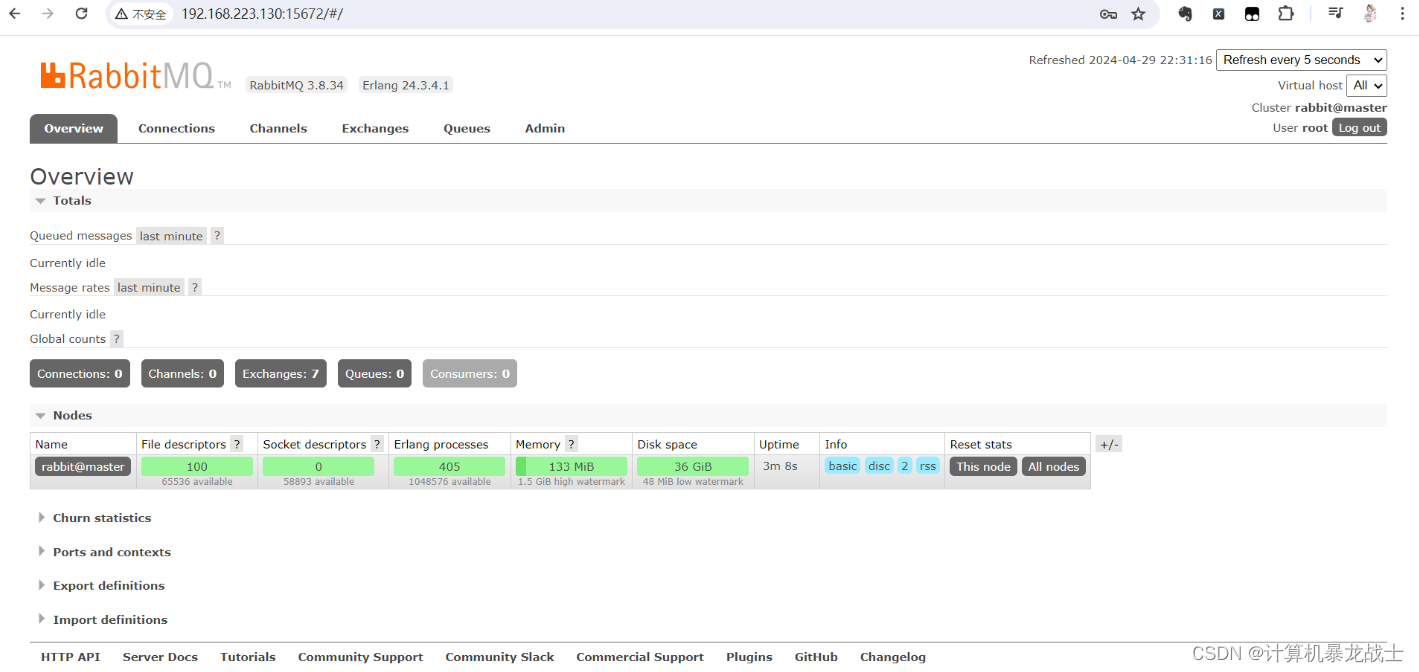
安装成功
RabbitMQ网页使用
用户管理
打开Admin选项卡,首先会看到RabbitMQ控制台的用户管理界面:

这里的用户都是RabbitMQ的管理或运维人员。目前只有安装RabbitMQ时添加的
itheima
这个用户。仔细观察用户表格中的字段,如下:
Name:root,用户名Tags:administrator,说明root用户是超级管理员,拥有所有权限Can access virtual host:/,可以访问的virtual host,这里的/是默认的virtual host
数据隔离
对于小型企业而言,出于成本考虑,我们通常只会搭建一套MQ集群,公司内的多个不同项目同时使用。这个时候为了避免互相干扰, 我们会利用
virtual host
的隔离特性,将不同项目隔离。一般会做两件事情:
- 给每个项目创建独立的运维账号,将管理权限分离。
- 给每个项目创建不同的
virtual host,将每个项目的数据隔离。
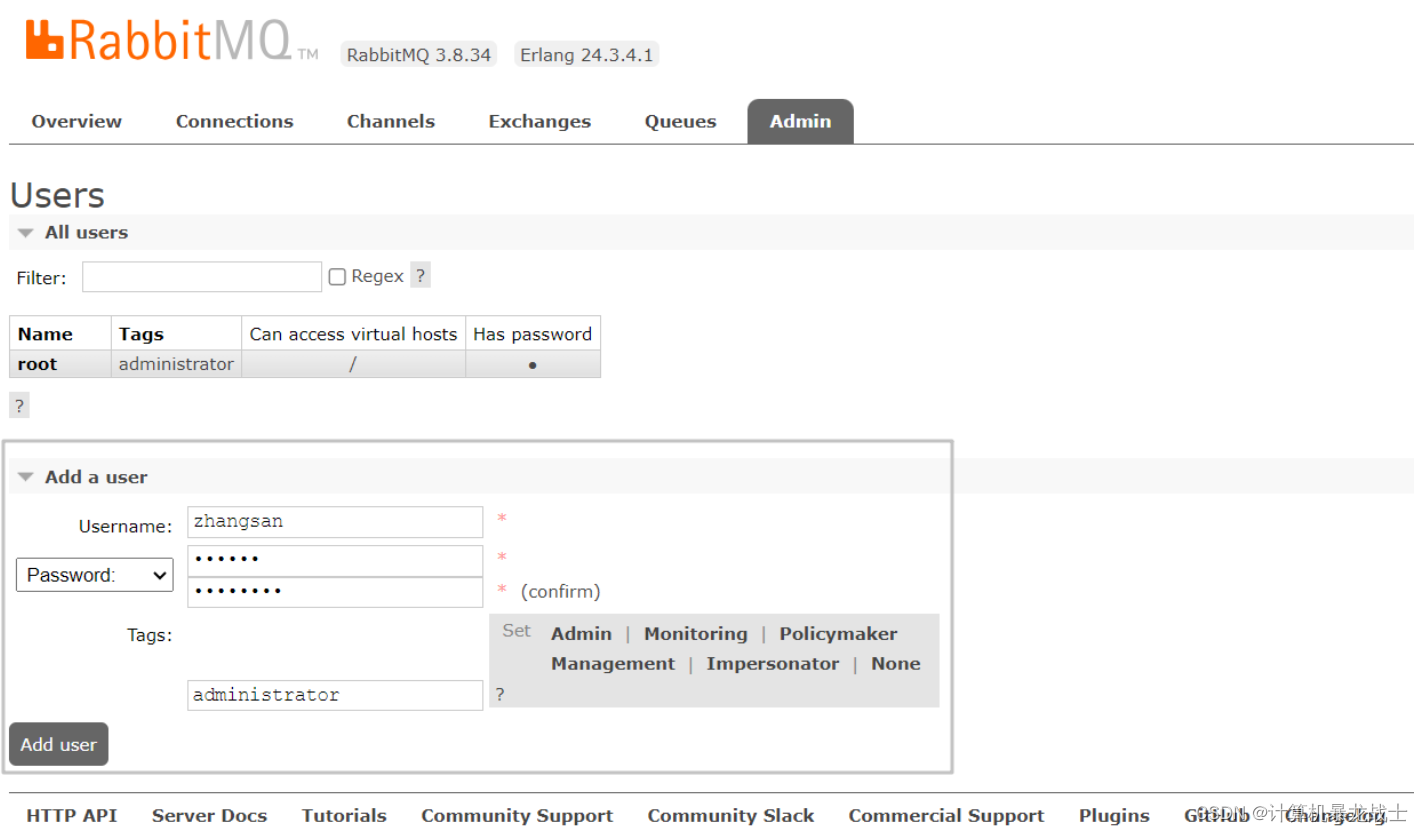
创建用户
创建用户zhangsan,密码123456,管理员权限
创建virtual host
使用刚刚创建的
zhangsan
账号登录创建virtual host

由于我们是登录
zhangsan
账户后创建的
virtual host
,因此回到
users
菜单,你会发现当前用户已经具备了对
/warehouse
这个
virtual host
的访问权限了: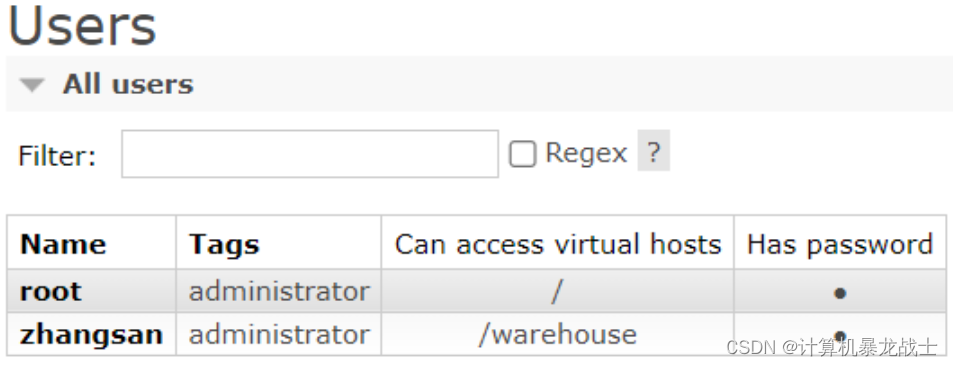
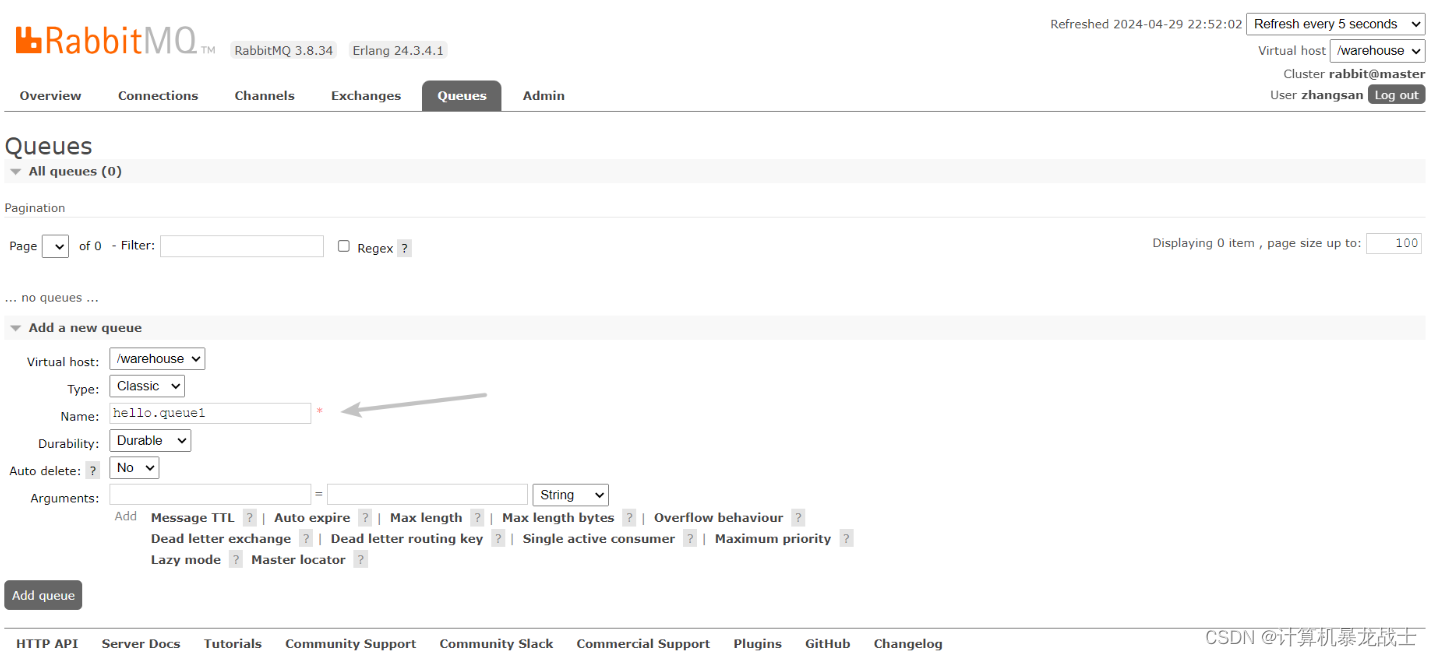
队列管理
打开Queues选项卡,新建一个队列:

交换机管理
打开Exchanges选项卡,新建一个交换机:
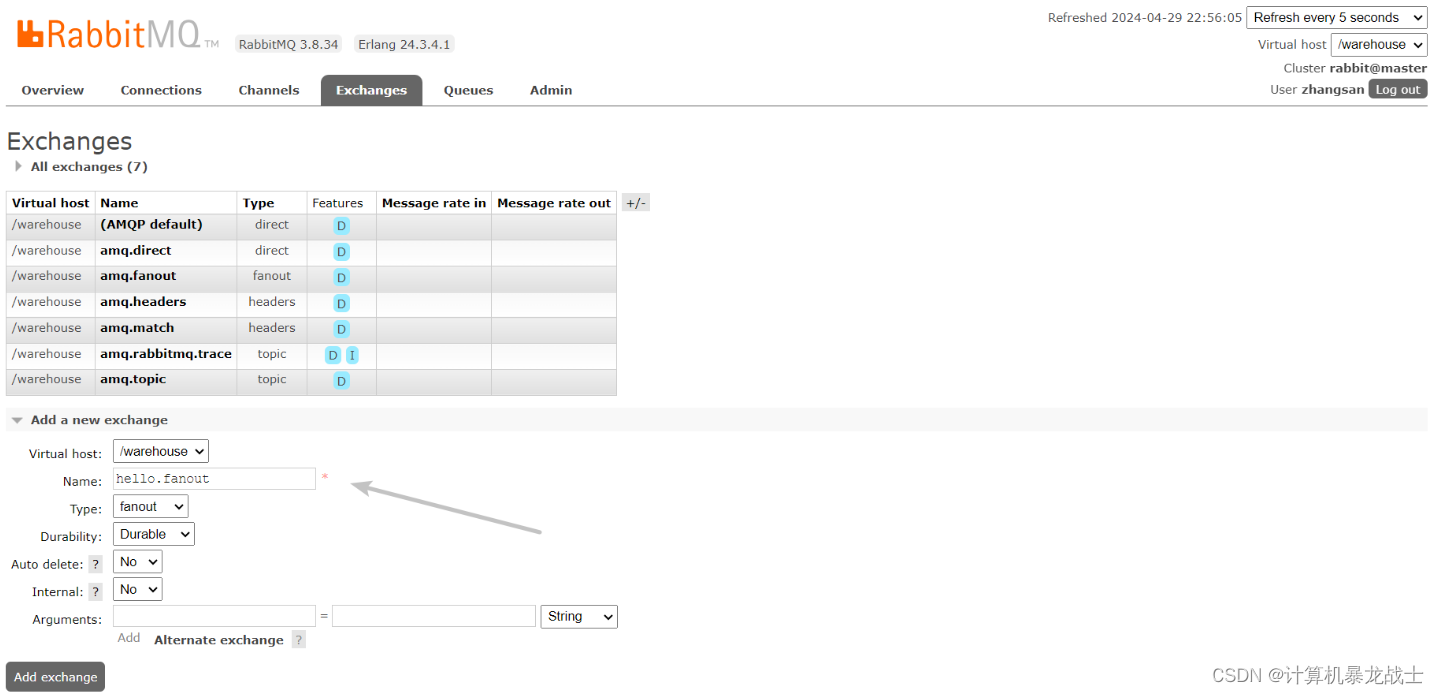
进入新建交换机
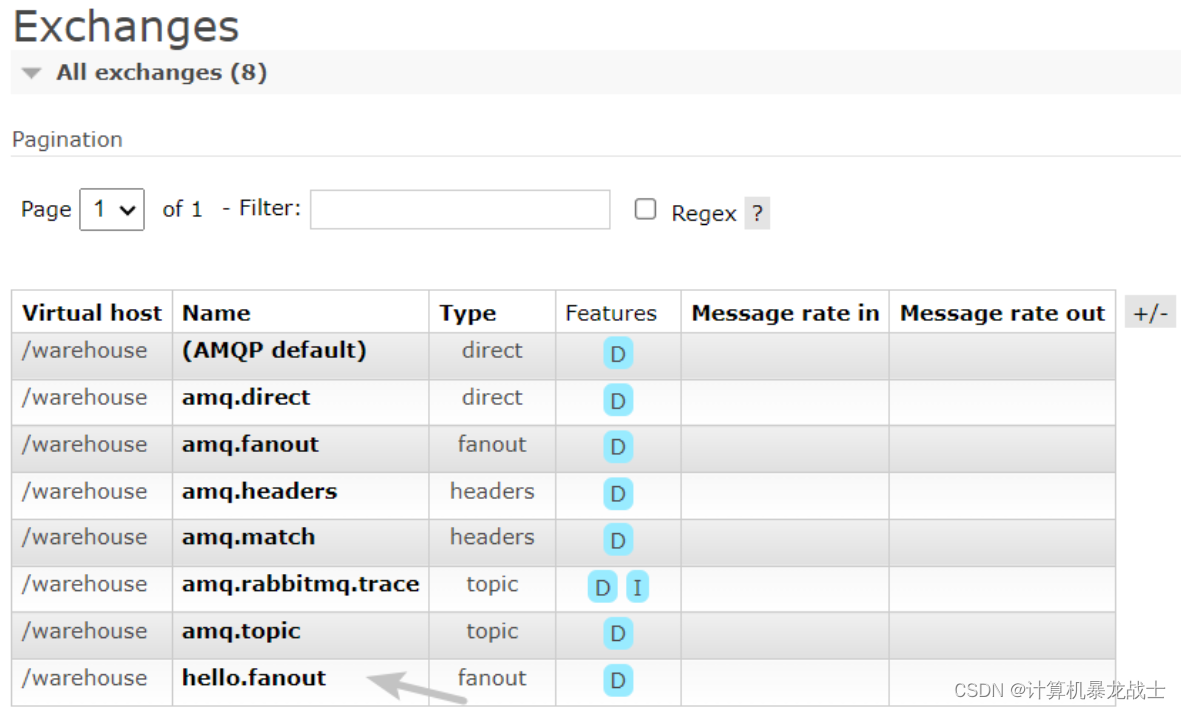
绑定关系

发送消息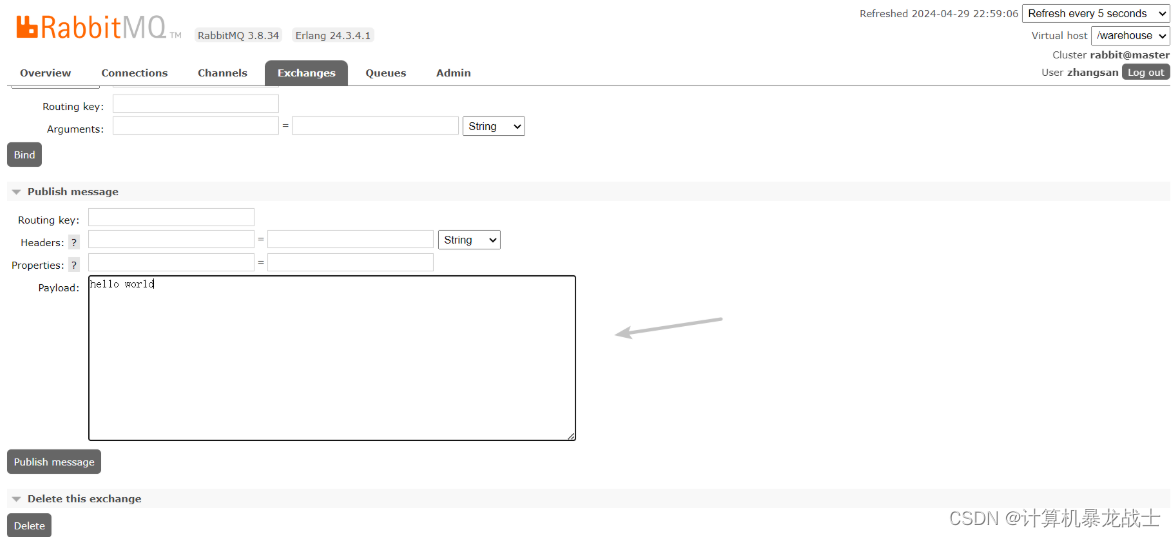
接受消息
进入Queues选项卡中的hello.queue1详细界面

点击Get Message按钮,获取刚刚交换机发送的消息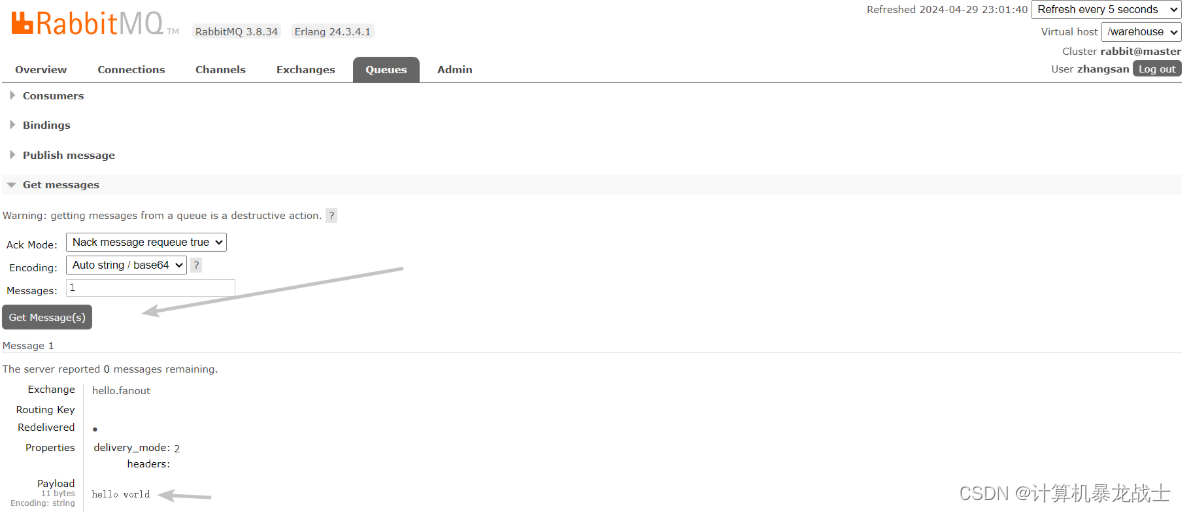
SpringAMQP
将来我们开发业务功能的时候,肯定不会在控制台收发消息,而是应该基于编程的方式。由于
RabbitMQ
采用了AMQP协议,因此它具备跨语言的特性。任何语言只要遵循AMQP协议收发消息,都可以与
RabbitMQ
交互。而Spring AMQP提供了对RabbitMQ等AMQP兼容消息中间件的集成。
Spring AMQP是Spring Framework提供的用于与消息中间件进行交互的模块,它构建在AMQP(高级消息队列协议)之上。它简化了在Spring应用程序中使用消息队列的开发,提供了一套强大的API和工具,使得在Spring应用中发送和接收消息变得更加容易和灵活。
SpringAmqp的官方地址: Spring AMQP SpringAMQP提供了三个功能:
- 自动声明队列、交换机及其绑定关系
- 基于注解的监听器模式,异步接收消息
- 封装了RabbitTemplate工具,用于发送消息
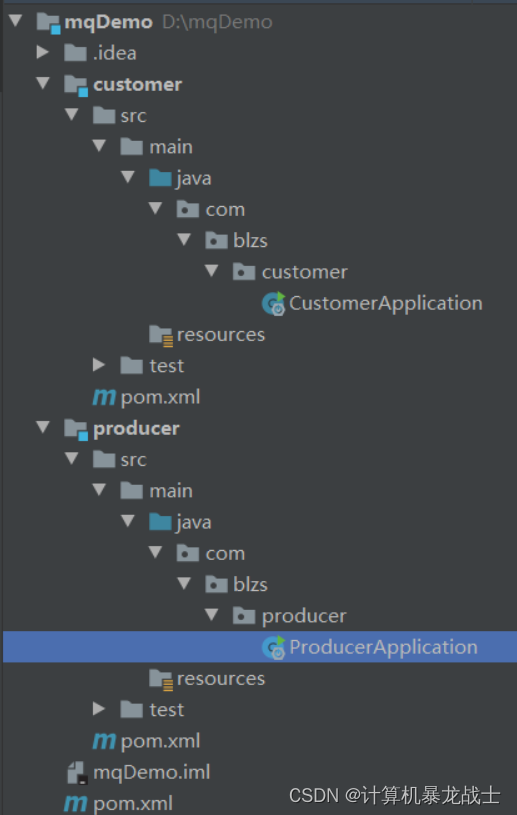
创建项目
新建项目
mqDemo
并新建生产者
producer
、消费者
customer
,项目结构如下:
编辑mqDemo下面的pom.xml:
<parent>
<groupId>org.springframework.boot</groupId>
<artifactId>spring-boot-starter-parent</artifactId>
<version>2.7.12</version>
<relativePath/> <!-- lookup parent from repository -->
</parent>
<dependencies>
<!-- lombok -->
<dependency>
<groupId>org.projectlombok</groupId>
<artifactId>lombok</artifactId>
</dependency>
<!-- AMQP依赖 -->
<dependency>
<groupId>org.springframework.boot</groupId>
<artifactId>spring-boot-starter-amqp</artifactId>
</dependency>
<!-- 单元测试 -->
<dependency>
<groupId>org.springframework.boot</groupId>
<artifactId>spring-boot-starter-test</artifactId>
</dependency>
<!-- Jackson -->
<dependency>
<groupId>com.fasterxml.jackson.dataformat</groupId>
<artifactId>jackson-dataformat-xml</artifactId>
</dependency>
</dependencies>
快速入门
在入门案例中,我们就演示这样的简单模型,如图:
两个子模块的resources目录下各添加application.yml
logging:
  pattern:
    dateformat: MM-dd HH:mm:ss:SSS
spring:
  rabbitmq:
    host: ip地址
    port: 5672
    virtual-host: /warehouse
    username: zhangsan
    password: 123456
在网页中创建simple1.queue1队列用于接下来实现消息发送接收的测试

消息发送
生产者producer模块中创建测试类SpringAMQPTest,利用RabbitTemplate实现消息发送功能:
package com.blzs.producer;
import org.junit.jupiter.api.Test;
import org.springframework.amqp.rabbit.core.RabbitTemplate;
import org.springframework.beans.factory.annotation.Autowired;
public class SpringAMQPTest {
@Autowired
private RabbitTemplate rabbitTemplate;
@Test
public void testSimpleQueue() {
// 队列名称
String queueName = "simple1.queue1";
// 消息
String message = "hello, world!";
// 发送消息
rabbitTemplate.convertAndSend(queueName, message);
}
}
运行测试用例,查看前端,发现消息已经发送到队列中:
消息接收
消费者customer模块中的listener包下创建类SpringRabbitListener,利用RabbitListener注解实现消息接收功能,代码如下:
package com.blzs.customer.listener;
import org.springframework.amqp.rabbit.annotation.RabbitListener;
import org.springframework.stereotype.Component;
@Component
public class SpringRabbitListener {
// 利用RabbitListener来声明要监听的队列信息
// 将来一旦监听的队列中有了消息,就会推送给当前服务,调用当前方法,处理消息。
// 可以看到方法体中接收的就是消息体的内容
@RabbitListener(queues = "simple1.queue1")
public void listenSimpleQueueMessage(String msg) throws InterruptedException {
System.out.println("spring 消费者接收到队列simple1.queue1的消息:【" + msg + "】");
}
}
运行
运行customer服务,可以看到,每次在SpringAMQPTest中发送消息时,customer都会接收并消费掉消息:
WorkQueues模型
Work Queues 模型是一种消息传递模式,也称为任务队列模型,用于在生产者和消费者之间共享任务。它的核心思想是将待处理的任务放置到队列中,然后由一个或多个消费者从队列中获取任务并进行处理。这种模型通常用于解耦生产者和消费者,从而提高系统的可伸缩性和灵活性。
接下来,我们就来模拟这样的场景。 首先,我们在控制台创建一个新的队列,命名为simple2.queue1:
消息发送
编写测试类SpringAMQPTest,新增testWorkQueue测试方法模拟多条消息发送:
/**
 * 向队列中发送多条消息,模拟消息堆积
 * @throws InterruptedException
 */
@Test
public void testWorkQueue() throws InterruptedException {
    // 队列名称
    String queueName = "simple2.queue1";
    // 消息
    String message = "hello, message_";
    for (int i = 0; i < 50; i++) {
        // 发送消息,每20毫秒发送一次,相当于每秒发送50条消息
        rabbitTemplate.convertAndSend(queueName, message + i);
        Thread.sleep(20);
    }
}
消息接收
编写SpringRabbitListener,新增listenWorkQueue1和listenWorkQueue2方法,模拟多个消费者,代码如下:
@RabbitListener(queues = "simple2.queue1")
public void listenWorkQueue1(String msg) throws InterruptedException {
System.out.println("消费者1接收到队列simple2.queue1的消息:【" + msg + "】" + LocalTime.now());
Thread.sleep(20);
}
@RabbitListener(queues = "simple2.queue1")
public void listenWorkQueue2(String msg) throws InterruptedException {
System.err.println("消费者2........接收到队列simple2.queue1的消息:【" + msg + "】" + LocalTime.now());
Thread.sleep(200);
}
运行
运行customer服务,可以看到消费者1和消费者2竟然每人消费了25条消息:
- 消费者1很快完成了自己的25条消息
- 消费者2却在缓慢的处理自己的25条消息。
也就是说消息是平均分配给每个消费者,并没有考虑到消费者的处理能力。导致1个消费者空闲,另一个消费者忙的不可开交。没有充分利用每一个消费者的能力,最终消息处理的耗时远远超过了1秒。这样显然是有问题的。
消费者1接收到队列simple2.queue1的消息:【hello, message_0】22:16:28.032
消费者2........接收到队列simple2.queue1的消息:【hello, message_1】22:16:28.036
消费者1接收到队列simple2.queue1的消息:【hello, message_4】22:16:28.104
消费者1接收到队列simple2.queue1的消息:【hello, message_8】22:16:28.191
消费者2........接收到队列simple2.queue1的消息:【hello, message_5】22:16:28.237
消费者1接收到队列simple2.queue1的消息:【hello, message_12】22:16:28.279
消费者1接收到队列simple2.queue1的消息:【hello, message_16】22:16:28.369
消费者2........接收到队列simple2.queue1的消息:【hello, message_9】22:16:28.437
消费者1接收到队列simple2.queue1的消息:【hello, message_20】22:16:28.462
消费者1接收到队列simple2.queue1的消息:【hello, message_24】22:16:28.552
消费者2........接收到队列simple2.queue1的消息:【hello, message_13】22:16:28.637
消费者1接收到队列simple2.queue1的消息:【hello, message_28】22:16:28.643
消费者1接收到队列simple2.queue1的消息:【hello, message_32】22:16:28.732
消费者1接收到队列simple2.queue1的消息:【hello, message_36】22:16:28.819
消费者2........接收到队列simple2.queue1的消息:【hello, message_17】22:16:28.841
消费者1接收到队列simple2.queue1的消息:【hello, message_40】22:16:28.910
消费者1接收到队列simple2.queue1的消息:【hello, message_44】22:16:28.997
消费者2........接收到队列simple2.queue1的消息:【hello, message_21】22:16:29.042
消费者1接收到队列simple2.queue1的消息:【hello, message_48】22:16:29.088
消费者2........接收到队列simple2.queue1的消息:【hello, message_25】22:16:29.244
消费者2........接收到队列simple2.queue1的消息:【hello, message_29】22:16:29.445
消费者2........接收到队列simple2.queue1的消息:【hello, message_33】22:16:29.646
消费者2........接收到队列simple2.queue1的消息:【hello, message_37】22:16:29.849
消费者2........接收到队列simple2.queue1的消息:【hello, message_41】22:16:30.051
消费者2........接收到队列simple2.queue1的消息:【hello, message_45】22:16:30.253
消费者2........接收到队列simple2.queue1的消息:【hello, message_49】22:16:30.455
解决方法:
在消费者的application.yml中我们配置
spring.rabbit.listener.simple.prefetch
参数可以解决这个问题,这个参数用于设置消费者预取的消息数量。当消费者从 RabbitMQ 队列中获取消息时,可以一次性获取多条消息并缓存在本地,以提高处理效率。
spring.rabbit.listener.simple.prefetch
属性就是用来配置这个预取的消息数量。该属性的默认值是
1
,表示每次只获取一条消息。
spring:
  rabbitmq:
    listener:
      simple:
        prefetch: 1 # 每次只能获取一条消息,处理完成才能获取下一个消息
重新运行当前消费者与生产者,可以看到消费者1处理速度较快,所以处理了更多的消息;消费者2处理速度较慢,只处理了5条消息。而最终总的执行耗时也在1秒左右,大大提升。
消费者1接收到队列simple2.queue1的消息:【hello, message_0】22:24:57.187
消费者2........接收到队列simple2.queue1的消息:【hello, message_1】22:24:57.197
消费者1接收到队列simple2.queue1的消息:【hello, message_4】22:24:57.263
消费者1接收到队列simple2.queue1的消息:【hello, message_6】22:24:57.307
消费者1接收到队列simple2.queue1的消息:【hello, message_8】22:24:57.353
消费者1接收到队列simple2.queue1的消息:【hello, message_10】22:24:57.400
消费者2........接收到队列simple2.queue1的消息:【hello, message_12】22:24:57.440
消费者1接收到队列simple2.queue1的消息:【hello, message_13】22:24:57.465
消费者1接收到队列simple2.queue1的消息:【hello, message_16】22:24:57.531
消费者1接收到队列simple2.queue1的消息:【hello, message_18】22:24:57.577
消费者1接收到队列simple2.queue1的消息:【hello, message_20】22:24:57.620
消费者1接收到队列simple2.queue1的消息:【hello, message_22】22:24:57.664
消费者2........接收到队列simple2.queue1的消息:【hello, message_23】22:24:57.686
消费者1接收到队列simple2.queue1的消息:【hello, message_25】22:24:57.731
消费者1接收到队列simple2.queue1的消息:【hello, message_28】22:24:57.796
消费者1接收到队列simple2.queue1的消息:【hello, message_30】22:24:57.842
消费者1接收到队列simple2.queue1的消息:【hello, message_32】22:24:57.887
消费者2........接收到队列simple2.queue1的消息:【hello, message_34】22:24:57.931
消费者1接收到队列simple2.queue1的消息:【hello, message_35】22:24:57.953
消费者1接收到队列simple2.queue1的消息:【hello, message_37】22:24:57.997
消费者1接收到队列simple2.queue1的消息:【hello, message_40】22:24:58.063
消费者1接收到队列simple2.queue1的消息:【hello, message_42】22:24:58.104
消费者1接收到队列simple2.queue1的消息:【hello, message_44】22:24:58.150
消费者2........接收到队列simple2.queue1的消息:【hello, message_46】22:24:58.196
消费者1接收到队列simple2.queue1的消息:【hello, message_47】22:24:58.219
消费者1接收到队列simple2.queue1的消息:【hello, message_49】22:24:58.262
交换机
在 RabbitMQ 中,交换机(Exchange)是消息的分发中心,负责接收从生产者发来的消息,并将这些消息路由到一个或多个队列中。交换机根据绑定规则将消息发送到相应的队列。常见的交换机类型包括广播交换机、订阅交换机、通配符交换机和头交换机,它们根据不同的路由策略来将消息分发到队列。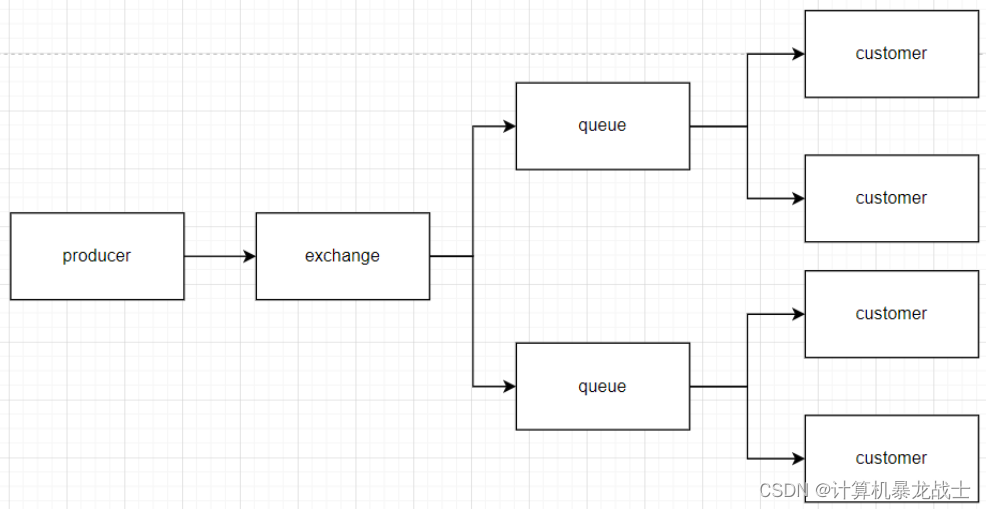
常见的四种交换机:
- 广播交换机(Fanout):广播交换机会将消息发送到所有绑定到它的队列,忽略路由键(Routing Key)。这种交换机类型适合于需要将消息发送给所有订阅者的场景。
- 订阅交换机(Direct):订阅交换机会根据消息的路由键将消息发送到与之完全匹配的队列。只有当消息的路由键与队列的绑定键完全匹配时,消息才会被发送到对应的队列。
- 通配符交换机(Topic):与Direct类似,通配符交换机根据消息的路由键和绑定键之间的模式匹配规则,将消息发送到一个或多个队列。通配符交换机支持使用通配符符号(*和#)来实现模式匹配。
- 头交换机(Headers):头交换机根据消息的头部信息来进行路由,而不是路由键。消息的头部信息是一组键值对,交换机会根据这些键值对来匹配绑定键,从而决定将消息发送到哪些队列。
Fanout广播交换机
广播交换机适合于需要将消息同时发送给多个消费者的场景,无需考虑消息的路由规则或特定的目标队列。这种模式通常用于发布/订阅系统,其中多个消费者订阅了同一个主题或事件,并希望同时接收到相同的消息。优点是简单易用、适用范围广泛、增加消费者不影响性能,但缺点是不灵活、可能导致消息冗余、不适合精确控制消息传递路径。
就类似于村里面的大喇叭一样,只要发出了,所有人都可以听得见。
代码实现
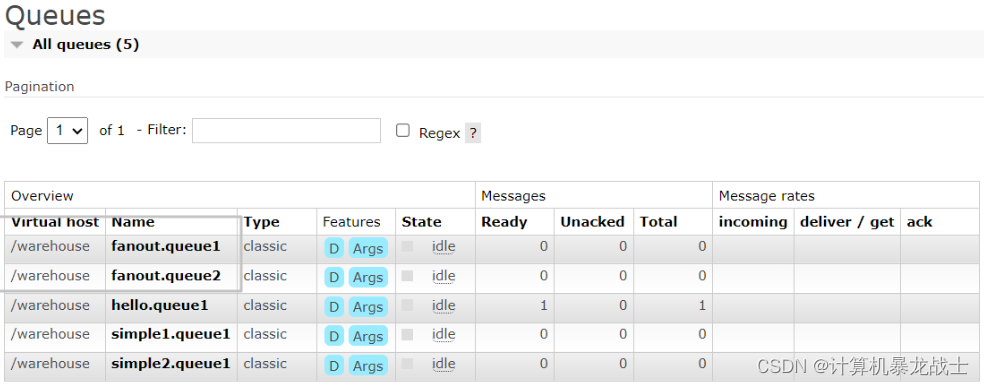
创建两个队列
fanout.queue1
和
fanout.queue2
创建fanout交换机
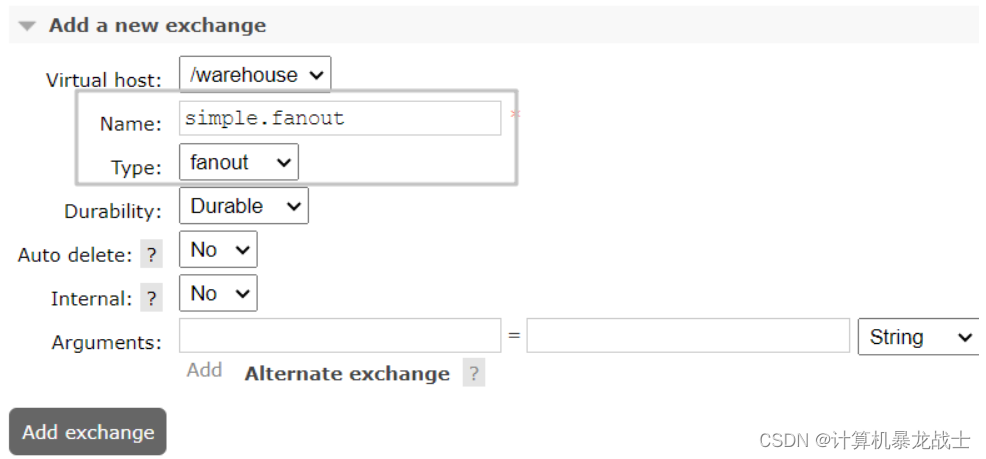
simple.fanout
进入simple.fanout交换机详细页面绑定队列到交换机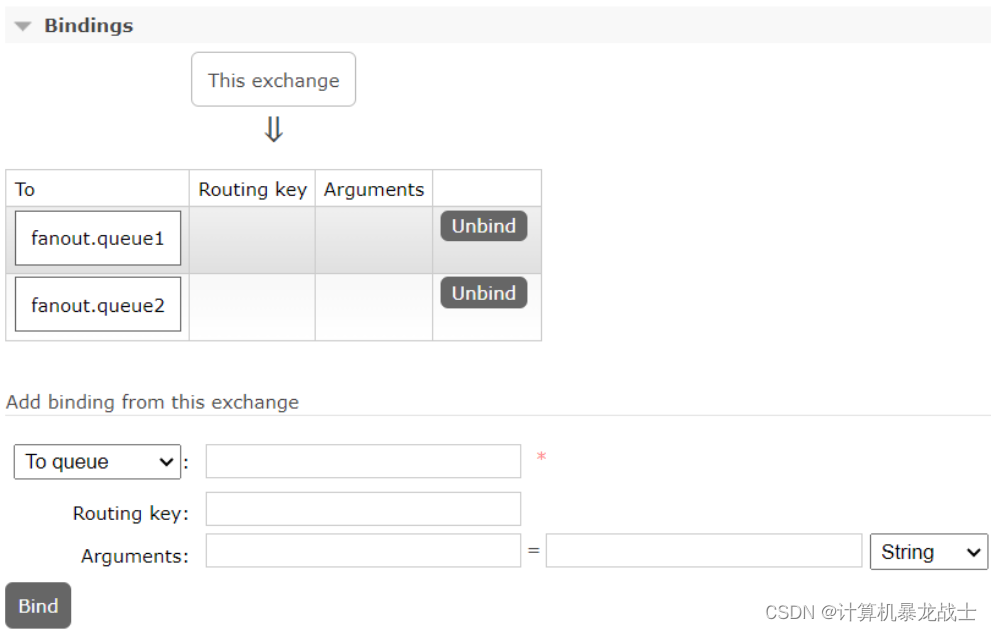
编写生产者类SpringAMQPTest,新增testFanoutExchange测试方法模拟消息发送:
@Test
public void testFanoutExchange() {
    // 交换机名称
    String exchangeName = "simple.fanout";
    // 消息
    String message = "hello, everyone!";
    // 发送消息
    rabbitTemplate.convertAndSend(exchangeName, "", message);
}
编写消费者类SpringRabbitListener,利用RabbitListener注解实现消息接收功能,代码如下:
@RabbitListener(queues = "fanout.queue1")
public void listenFanoutQueue1(String msg) {
    System.out.println("消费者1接收到Fanout消息:【" + msg + "】");
}

@RabbitListener(queues = "fanout.queue2")
public void listenFanoutQueue2(String msg) {
    System.out.println("消费者2接收到Fanout消息:【" + msg + "】");
}
运行后可以看到,当给simple.fanout交换机发送消息时,绑定simple.fanout的所有队列都能接受到消息:
Direct订阅交换机
在Fanout模式中,一条消息,会被所有订阅的队列都消费。但是,在某些场景下,我们希望不同的消息被不同的队列消费。这时就要用到Direct类型的Exchange。
订阅交换机适合于需要将消息精确路由到特定队列的场景。通过设置正确的路由键和绑定键,可以确保消息被发送到预期的队列,实现精确的消息路由和分发。这种模式通常用于需要按照特定规则将消息发送到不同处理流程的情况下,以及需要将消息发送到特定消费者的场景。
优点是能够实现精确的消息路由和分发,适合需要按照特定规则将消息发送到不同处理流程或特定消费者的场景。缺点是不如其他交换机类型灵活,只能根据路由键进行匹配,无法进行模式匹配或多重匹配。
代码实现
创建两个队列
direct.queue1
和
direct.queue2
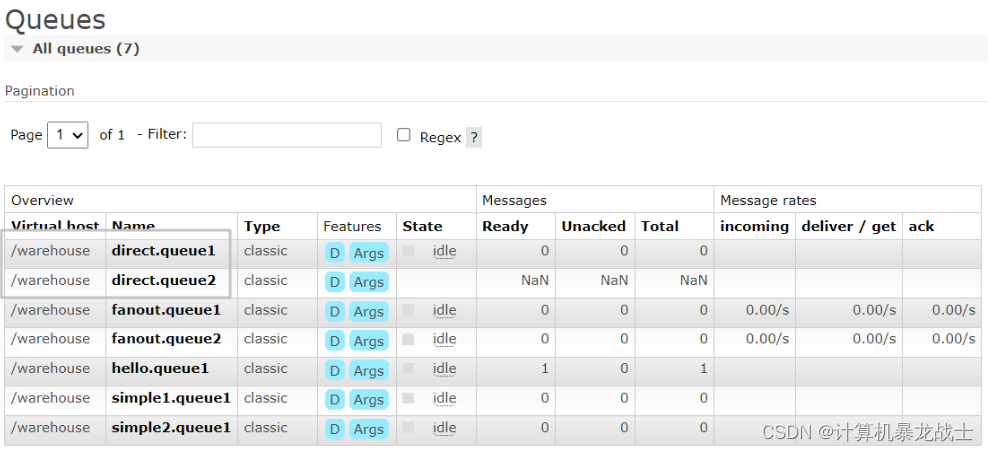
创建direct交换机
simple.direct
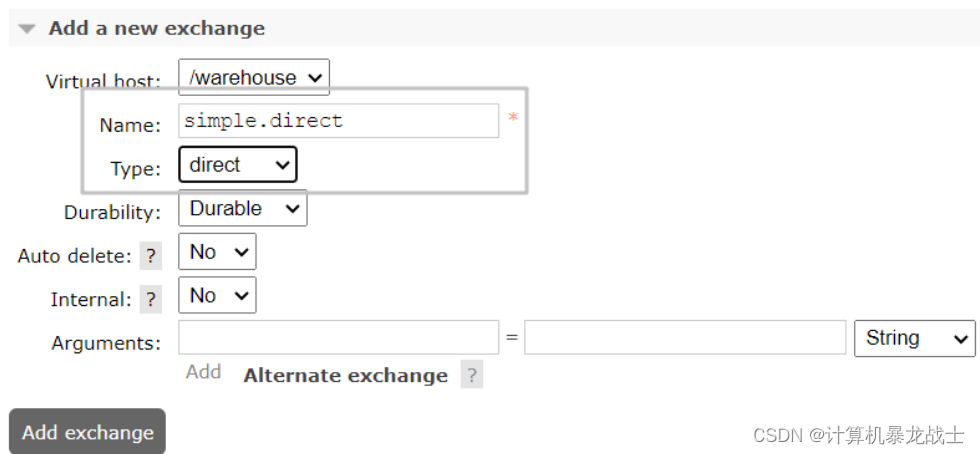
进入simple.direct交换机详细页面
使用red和blue作为key,绑定队列到交换机

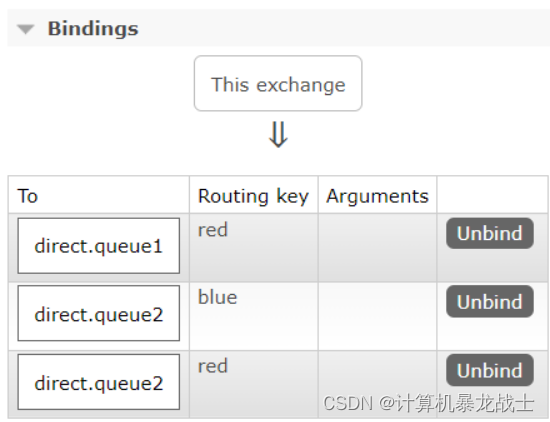
编写生产者类SpringAMQPTest,新增testSendDirectExchange测试方法模拟消息发送:
@Test
public void testSendDirectExchange() {
    // 交换机名称
    String exchangeName = "simple.direct";
    // 消息
    String message = "hello,this is simple.direct";
    // 发送消息
    rabbitTemplate.convertAndSend(exchangeName, "red", message);
}
编写消费者类SpringRabbitListener,利用RabbitListener注解实现消息接收功能,代码如下:
@RabbitListener(queues = "direct.queue1")
public void listenDirectQueue1(String msg) {
    System.out.println("消费者1接收到direct.queue1的消息:【" + msg + "】");
}

@RabbitListener(queues = "direct.queue2")
public void listenDirectQueue2(String msg) {
    System.out.println("消费者2接收到direct.queue2的消息:【" + msg + "】");
}
运行后可以看到,当给simple.direct交换机发送消息时,绑定simple.direct的所有key为red的队列都能接受到消息:
当我们切换key为blue时:
@Test
public void testSendDirectExchange() {
    // 交换机名称
    String exchangeName = "simple.direct";
    // 消息
    String message = "hello,this is simple.direct";
    // 发送消息
    rabbitTemplate.convertAndSend(exchangeName, "blue", message);
}
可以看到只有绑定了key为blue的队列能接受消息:
Topic通配符交换机
通配符交换机适用于需要根据消息内容进行灵活路由的场景,例如基于主题的发布/订阅系统,其中消息可能具有不同的主题或分类,需要根据这些主题将消息发送到不同的处理流程或队列中。
通配符交换机通过将队列绑定到交换机时指定的绑定键(Binding Key)和消息的路由键(Routing Key)之间的模式匹配来确定消息的路由规则。通配符符号“*”匹配一个单词,“#”匹配零个或多个单词,这使得Topic Exchange能够根据消息的内容灵活地将消息路由到不同的队列中。
通配符规则:
#:匹配零个或多个词*:匹配不多不少恰好1个词
举例:
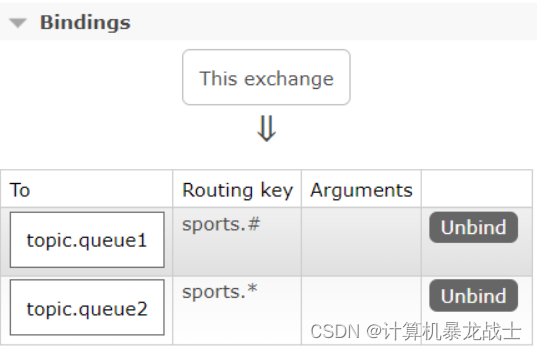
sports.#:匹配所有以sports开头的主题,例如sports.football、sports.basketball、sports.tennis、sports.tennis.double等。technology.*:匹配所有以technology开头并且后面紧跟着一个词的主题,例如technology.ai、technology.blockchain、technology.gadgets等。
代码实现
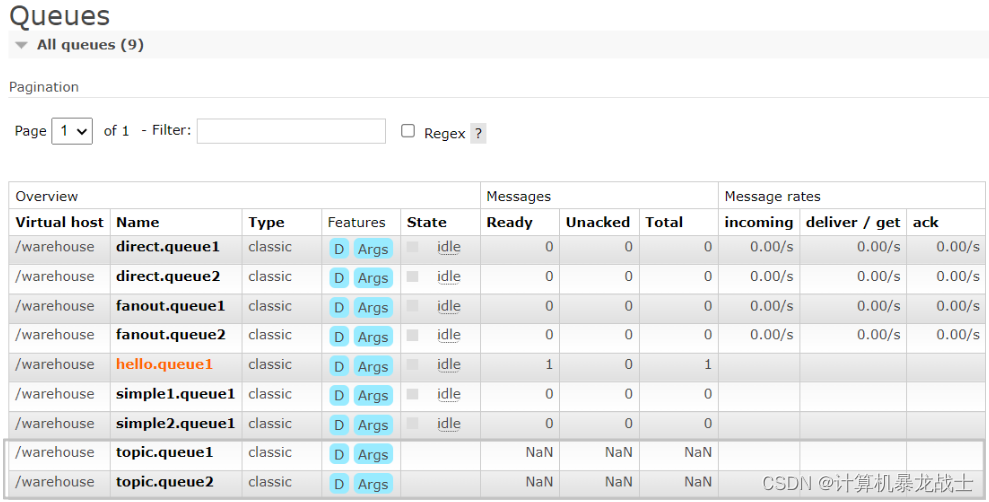
创建两个队列
topic.queue1
和
topic.queue2
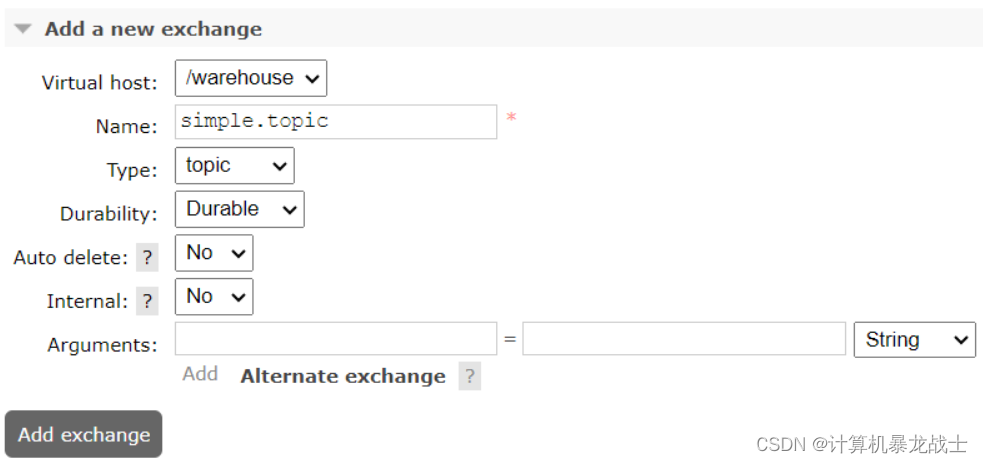
创建direct交换机
simple.topic
进入simple.topic交换机详细页面
使用通配符绑定队列到交换机
编写生产者类SpringAMQPTest,新增testSendTopicExchange测试方法模拟消息发送:
@Test
public void testSendTopicExchange() {
    // 交换机名称
    String exchangeName = "simple.topic";
    // 消息
    String message = "hello,this is simple.topic";
    // 发送消息
    rabbitTemplate.convertAndSend(exchangeName, "sports.football", message);
}
编写消费者类SpringRabbitListener,利用RabbitListener注解实现消息接收功能,代码如下:
@RabbitListener(queues = "topic.queue1")
public void listenTopicQueue1(String msg){
    System.out.println("消费者1接收到topic.queue1的消息:【" + msg + "】");
}

@RabbitListener(queues = "topic.queue2")
public void listenTopicQueue2(String msg){
    System.out.println("消费者2接收到topic.queue2的消息:【" + msg + "】");
}
运行后可以看到,当给simple.topic交换机发送消息时,绑定simple.topic符合通配符规则的的队列都能接受到消息:
当我们切换key为
sports.tennis.double
时:
@Test
public void testSendTopicExchange() {
    // 交换机名称
    String exchangeName = "simple.topic";
    // 消息
    String message = "hello,this is simple.topic";
    // 发送消息
    rabbitTemplate.convertAndSend(exchangeName, "sports.tennis.double", message);
}
可以看到绑定了key为
sports.#
的队列能接受消息,因为
sports.#
能接受零个或多个单词:

Headers头交换机
头交换机是AMQP消息代理中的一种交换机类型。它与其他类型的交换机不同,它不依赖于路由键来路由消息,而是根据消息头中的属性进行路由。
在头交换机中,生产者可以将消息发送到交换机,并在消息头中添加自定义的键值对。消费者在绑定队列时可以指定一组键值对作为匹配条件,当消息的头部属性与这些匹配条件相匹配时,消息将被路由到相应的队列中。
头交换机提供了一种非常灵活的消息路由机制,可以根据消息的任意属性来决定消息的路由,而不仅仅局限于固定的路由键。这使得头交换机在一些特定场景下非常有用,例如需要基于消息的一些特定属性来进行复杂的消息过滤和路由的情况下。
代码实现
创建两个队列
headers.queue1
和
headers.queue2

创建direct交换机
simple.headers
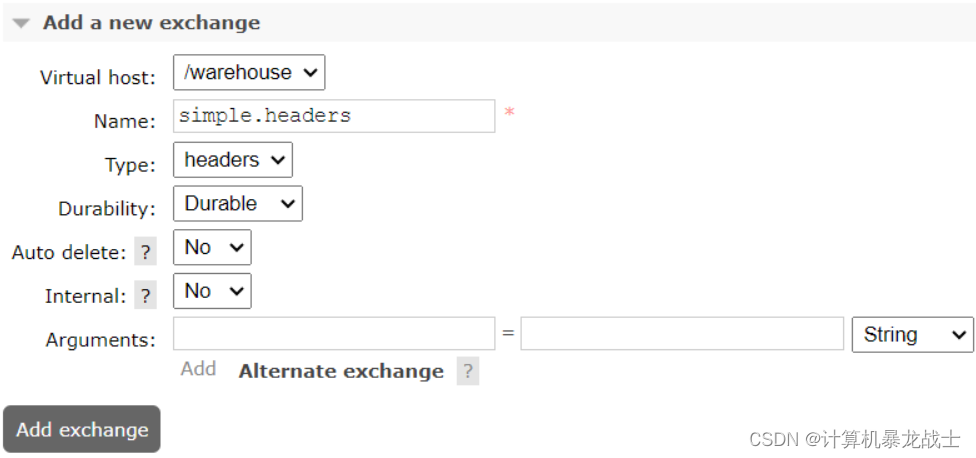
进入simple.headers交换机详细页面
使用color作为参数,并设置值,绑定队列到交换机
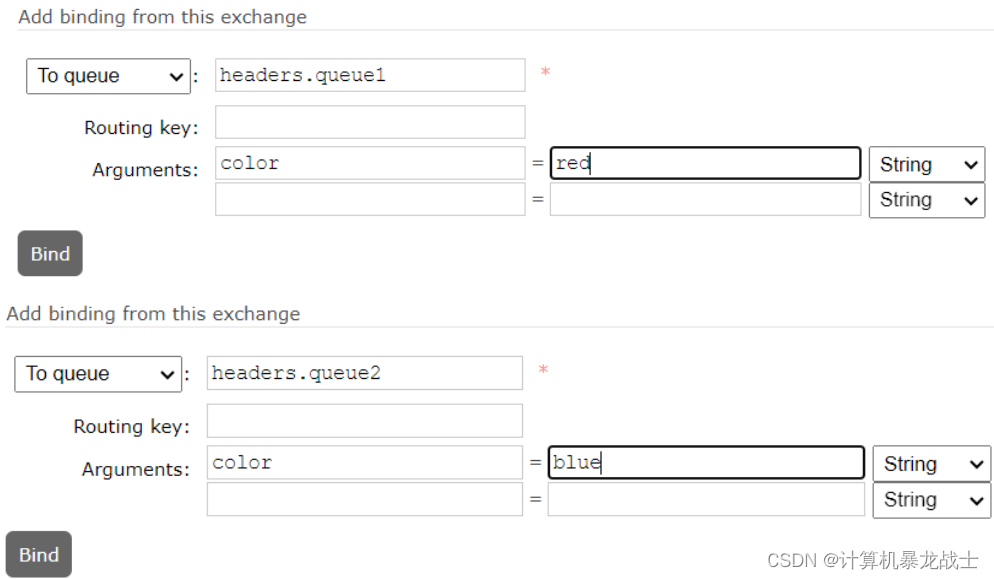
编写生产者类SpringAMQPTest,新增testSendDirectExchange测试方法模拟消息发送:
import org.springframework.amqp.core.Message;
import org.springframework.amqp.core.MessageProperties;

@Test
public void testSendHeardersExchange() {
    // 交换机名称
    String exchangeName = "simple.headers";

    // 创建消息头
    MessageProperties messageProperties = new MessageProperties();
    messageProperties.setHeader("color", "red");

    // 消息
    String message = "hello,this is simple.headers";

    // 创建消息
    Message msg = new Message(message.getBytes(), messageProperties);

    // 发送消息
    rabbitTemplate.convertAndSend(exchangeName, "sports", msg);
}
编写消费者类SpringRabbitListener,利用RabbitListener注解实现消息接收功能,代码如下:
@RabbitListener(queues = "headers.queue1")
public void listenHeadersQueue1(String msg){
    System.out.println("消费者1接收到headers.queue1的消息:【" + msg + "】");
}

@RabbitListener(queues = "headers.queue2")
public void listenHeadersQueue2(String msg){
    System.out.println("消费者2接收到headers.queue2的消息:【" + msg + "】");
}
运行后可以看到,当给simple.direct交换机发送消息时,绑定simple.direct的所有color属性值为red的队列都能接受到消息:

当我们切换color为blue时,可以看到只有绑定了key为blue的队列能接受消息:

交换机和队列的管理和绑定
在之前我们都是基于RabbitMQ控制台来创建队列、交换机。但是在实际开发时,队列和交换机是程序员定义的,将来项目上线,又要交给运维去创建。那么程序员就需要把程序中运行的所有队列和交换机都写下来,交给运维。在这个过程中是很容易出现错误的。 因此推荐的做法是由程序启动时检查队列和交换机是否存在,如果不存在自动创建。
在Spring启动时,利用Spring Bean管理工厂BeanFactory接口,实现动态创建交换机、队列、交换机和队列的绑定关系,让我们无需进行重复的编码工作。
这里以direct交换机为例:
package com.blzs.customer.config;

import org.springframework.amqp.core.*;
import org.springframework.context.annotation.Bean;
import org.springframework.context.annotation.Configuration;

@Configuration
public class DirectConfig {

    /**
     * 声明交换机
     *
     * @return Direct类型交换机
     */
    @Bean
    public DirectExchange directExchange() {
        return ExchangeBuilder.directExchange("simple.direct").build();
    }

    /**
     * 第1个队列
     */
    @Bean
    public Queue directQueue1() {
        return new Queue("direct.queue1");
    }

    /**
     * 绑定队列和交换机
     */
    @Bean
    public Binding bindingQueue1WithRed(Queue directQueue1, DirectExchange directExchange) {
        return BindingBuilder.bind(directQueue1).to(directExchange).with("red");
    }

    /**
     * 第2个队列
     */
    @Bean
    public Queue directQueue2() {
        return new Queue("direct.queue2");
    }

    /**
     * 绑定队列和交换机
     */
    @Bean
    public Binding bindingQueue2WithRed(Queue directQueue2, DirectExchange directExchange) {
        return BindingBuilder.bind(directQueue2).to(directExchange).with("red");
    }

    /**
     * 绑定队列和交换机
     */
    @Bean
    public Binding bindingQueue2WithBlue(Queue directQueue2, DirectExchange directExchange) {
        return BindingBuilder.bind(directQueue2).to(directExchange).with("blue");
    }
}
运行customer服务后,可以看到rabbitMQ中已经创建并绑定交换机和队列了。
消息转换器
这里我们创建一个listenSimple1Queue1方法实现消费者功能:
@RabbitListener(queues = "simple1.queue1")
public void listenSimple1Queue1(Map<String, Object> msg) {
    System.out.println("spring 消费者接收到队列simple1.queue1的消息:【" + msg + "】");
}
创建一个testSendMap方法模拟消息发送,发送一个Map对象:
@Test
public void testSendMap() {
    // 队列名称
    String queueName = "simple1.queue1";
    // 消息
    Map<String, Object> msg = new HashMap<>();
    msg.put("name", "张三");
    msg.put("age", 20);
    // 发送消息
    rabbitTemplate.convertAndSend(queueName, msg);
}
运行结果报错了:

我们查看simple1.queue1队列的网页信息:
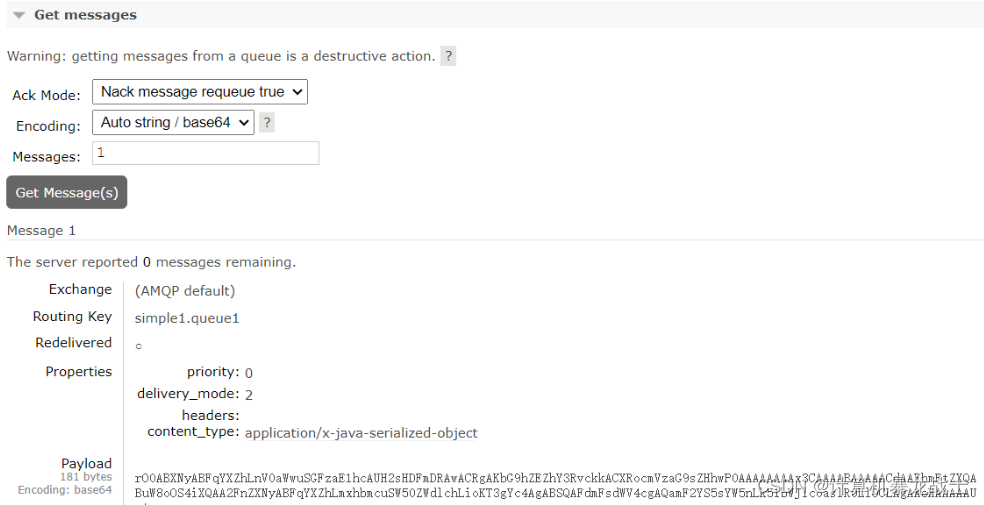
可以看到消息格式非常不友好,这是一个java对象序列化格式存储格式。
显然,JDK序列化方式并不合适。我们希望消息体的体积更小、可读性更高,因此可以使用JSON方式来做序列化和反序列化。
在producer和customer服务中的application中都添加该Bean:
@Bean
public MessageConverter jacksonMessageConvertor(){
    return new Jackson2JsonMessageConverter();
}
运行testSendMap方法后查看simple1.queue1队列的网页信息:
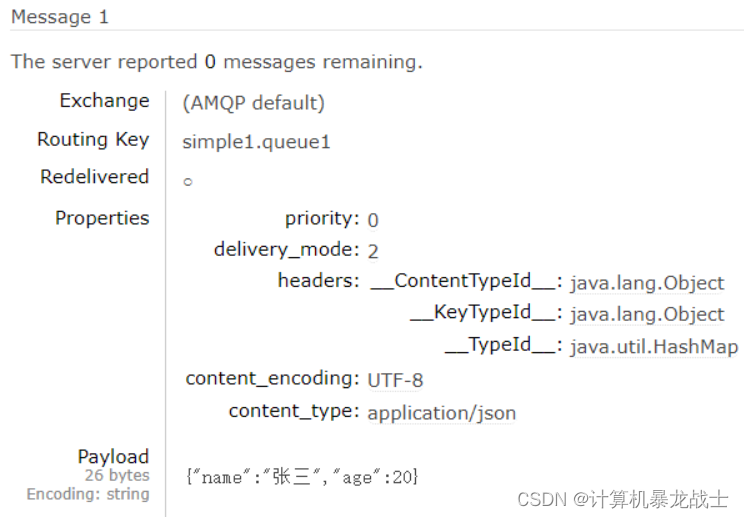
可以看到格式已经转为json格式了。
运行customer消费者,接收成功:

版权归原作者 计算机暴龙战士 所有, 如有侵权,请联系我们删除。