
文章目录
前言
Uniapp商城项目【详细笔记文档】
持续更新中…
🥇个人主页:@MIKE笔记
🥈来自专栏:Web前端 🔰技术教程 🔰数据结构
❗【Uniapp商城项目】开发过程中遇到的bug问题汇总❗
一、创建项目和引入文件
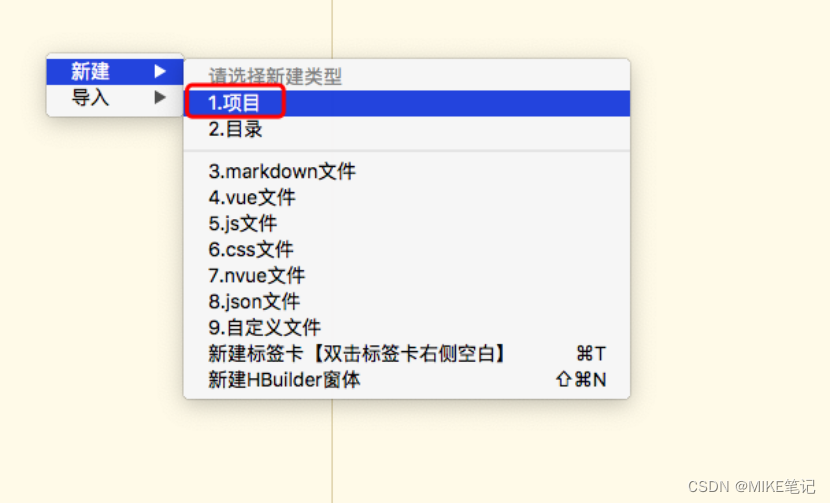
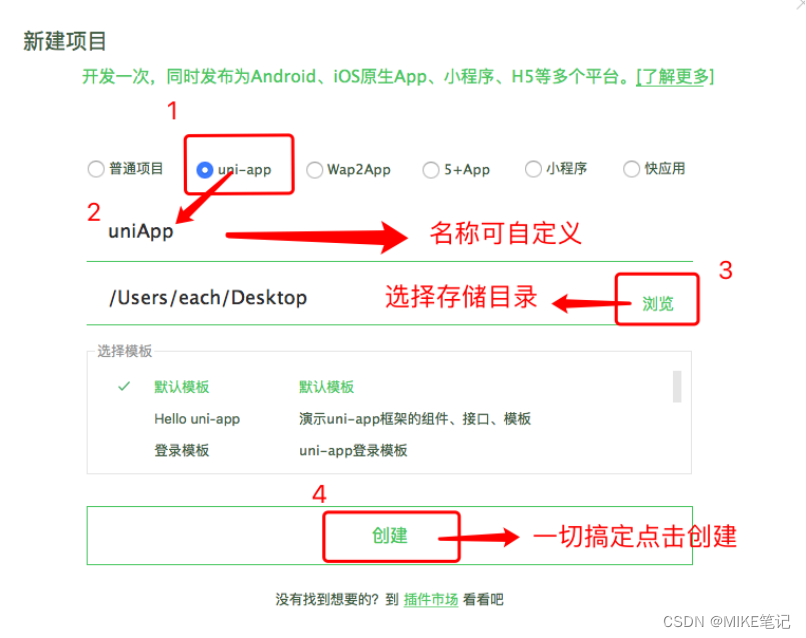
1.1 通过hbuilderx编辑器创建一个默认的uni-app项目(如图1——图2)
1.2 创建目录结构(如图:3)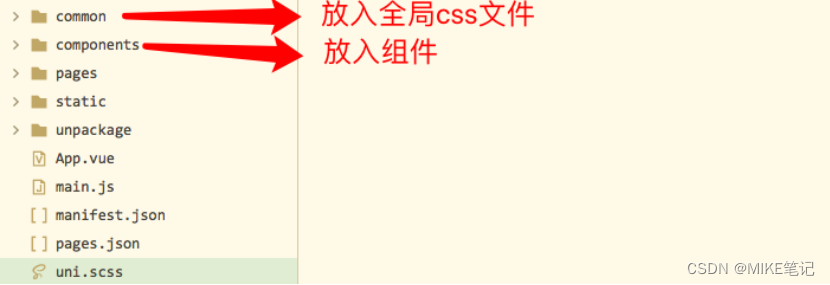
1.2.1 在common目录中创建文件:common.css
注:common.css为全局css样式文件,其内容目前有: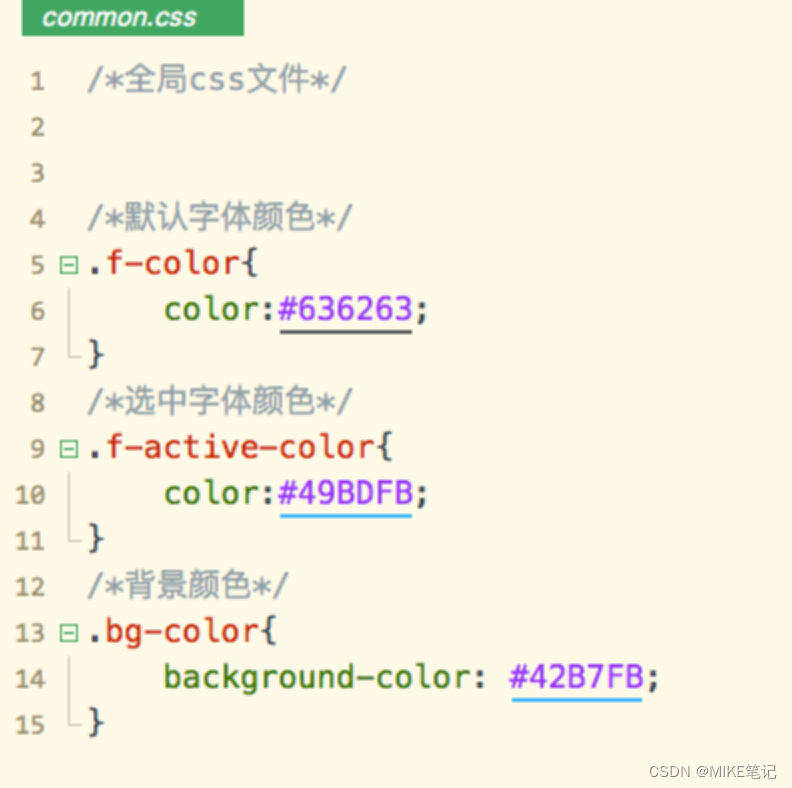
代码:
/*全局css文件*//*默认字体颜色*/.f-color{
    color:#636263;}/*选中字体颜色*/.f-active-color{
    color:#49BDFB;}/*背景颜色*/.bg-color{
    background-color: #42B7FB;}
1.2.2 在common目录中创建文件:uni.css。
注:uni.css为uni-app演示站文件,可理解为官方定义好的css默认样式。
1.2.3 在common目录中创建文件:iconfont.css。
注:iconfont.css是引入了阿里巴巴字体图标库的文件。
这里要注意针对iconfont修改了的内容,完整版代码如下:
@font-face {font-family:"iconfont";
  src:url('data:application/x-font-woff2;charset=utf-8;base64,d09GMgABAAAAAAWIAAsAAAAACswAAAU7AAEAAAAAAAAAAAAAAAAAAAAAAAAAAAAAHEIGVgCDVgqIEIZcATYCJAMcCxAABCAFhG0HcRs9CciemjwpkVoTIpDgvdL+gvJjERRrZc/yA4MMSECwUcwSuHzKR0gunwiV8uzY5f4eN300E5qa0U7IzCriE5E0/REsXAhlc9gcNq8rdK5+7giS7qJLz9qypIhfanlyIm2JNA8scMIBBQQBpUlAfLHv4Fjqp/+D5fmHS1fgZqMEGlBFCpbgRHEGo7NrUuJ71ukE6g3rTbI2fcAIkMowcSDvBMeQIM00shZ8qORFza6ZeAq5Krln9xHAE/v78QOCQ0oiT7Ez7Tyelg2Jn92eXezO/8LR1Ah39mfCcC9SLAIZcavWcgXmI4sw9fOrtLAVaFRJZJ/dn/Ez90yelf0H7Lk5E7BYaNTM/8EjlUkUQk4UIGnsYQ9GCz6TVEnnUguVDFKGSgKpA2ddqUAlIL2okINS79KMLhBrAOIFMMWSYx2hEEIib5rtwZ2aJjN7pLR3uMhaXd1TnLYUSI6Y8s25cPBO3mS8vmfxufArIdfT7F28y7xDVrtHhtc//d04VrY3zGn7fvlkk+RuflZBQUnD9jovr7ytDg8abNuPNnkVeTmWcIWNnR3rrX6TXNg9onNEJsIT9GHEoaQZ+Xjr/nzFokwadGjYNzFPL9byoMCUjzfvV5sk/g/4jC8YoxnnIm65YLxouWy6NCLfarJZmoyNVMll9h6VP3N5jRxdMHd5jsjVUaZ2ma0mH3yy18i8osJcw7WlI67MHXn1YRuZMOr6rb7hSuYJc79T19ImU8jm6/1PW/qevBo3Gilz+AjJtWv1+vV29Wq5cmUIUXauEaO3OhSZlapZdzDWTie2jXbLzOmJW/GRGlo9zaPp5i1NXfx73fAb+sOG5QdoHXMift+iX0fjZP8KZ/59yv5AI7F/OJ4Q1L96K1/zNmUQkSFTrXdpa7F26mn82v35nR0fjh8xrkbXjKBu1u6ec/Yt0WdpVw7eLD2Q9pS7uQnE/yy3o8foep9ToMHvet3Fce3XZ4HsE/TPTh7RPICyA3UfZOPn+y3WjpUk7Hg1PjgQMvmXOl19kCJPlYfKQ1ZMKxM/hIyEEkvD7wZd+c8iXzffxS/ZqsdX4nv5P4vhv2vjMknWQbbk/xvhYrXI/qApL+HtNwgRAicYIqgFdQ+pAdlsHTdBBmmPdfIKknx5fR//SQkVMxfMKif8PL7rLw9bPmsB1KjptHXcxtTAwRbYk+Y+PPIwztQalRtNC3LtCqvfggE7Zqf0AN2F9MJeAyZn6kjqr8CX3THJYfBLwy2AmhVbiY2yKxdg/9IFQNofT8hZRpKBALUraTO2CEifYqN/59VsGp35e7JL7B+p+YlP+yQz21FPraCF/UQrCWtz/7zcNYeyBZ9py2zWWXLWJJfOaPWFBPXq8ad1tLu3P1nX2rmESleERGkIUpVJZIZdhFyDJVCorIB6CzL2btBBgImsDvMWEAit1kOi2XtItTqLzLB3IdftLRRaA4N6+8PjkA2mg8NTBESKKJvImkZwFK+hhV7EXf4wxOhVpJDyLWEUEnScnwjyDyzGM5AGCfvYQpfDBIsiTdACrybSydmQSsUTWoFXIEr0Z0VRGx0QQNe9kD/FqwG3hgAhiZBshCzTEDgUngatpxbhpZ8fBmHoqZCElrZzxlEQgQ63cEIQf4FrIDMkmrXansvSOjkYwUQiurcWTcBTI6TDhKh4hEfQ1q+kgFBE/tgtQlrRAug4el2J//Fl6td5HtRj25eRRBpZ5FFEGZWGu384HRIDg4NCpAyvN+gpFuFTOVIh1tCIvN5Rx5IaJlnKXk0yGo7mkNCqVchLNQAA') format('woff2');}.iconfont {
  font-family:"iconfont"!important;
  font-size:16px;
  font-style: normal;-webkit-font-smoothing: antialiased;-moz-osx-font-smoothing: grayscale;}.icon-iconset0213:before {
  content:"\e670";}.icon-gouwuche:before {
  content:"\e61b";}.icon-xiajiantou:before {
  content:"\e611";}.icon-shangjiantou:before {
  content:"\e612";}.icon-magnifier:before {
  content:"\e69d";}.icon-xiaoxi:before {
  content:"\e622";}
1.2.4 在static目录中引入文件有:uni.ttf文件
注:此文件是官方图标库文件,不引入会报错(因为引入了uni.css)
1.2.5 最后在static文件中下载了项目底部的所有选中以及未选中图片。
二、【底部】导航开发
1.1完成效果图:
1.2 在项目目录中pages.json中进行配置,代码如下:
{"pages":[//pages数组中第一项表示应用启动页,参考:https://uniapp.dcloud.io/collocation/pages{"path":"pages/index/index","style":{"navigationBarTitleText":"uni-app"}},{"path":"pages/list/list","style":{}},{"path":"pages/shopcart/shopcart","style":{}},{"path":"pages/my/my","style":{}}],"globalStyle":{"navigationBarTextStyle":"black","navigationBarTitleText":"uni-app","navigationBarBackgroundColor":"#F8F8F8","backgroundColor":"#F8F8F8"},"tabBar":{"color":"#636263","selectedColor":"#636263","spacing":"8px","list":[{"pagePath":"pages/index/index","iconPath":"static/tabbar/index.png","selectedIconPath":"static/tabbar/indexSelected.png","text":"首页"},{"pagePath":"pages/list/list","iconPath":"static/tabbar/list.png","selectedIconPath":"static/tabbar/listSelected.png","text":"分类"},{"pagePath":"pages/shopcart/shopcart","iconPath":"static/tabbar/shop.png","selectedIconPath":"static/tabbar/shopSelected.png","text":"购物车"},{"pagePath":"pages/my/my","iconPath":"static/tabbar/my.png","selectedIconPath":"static/tabbar/mySelected.png","text":"我的"}]}}
三、【首页】顶部开发
1.1 完成效果图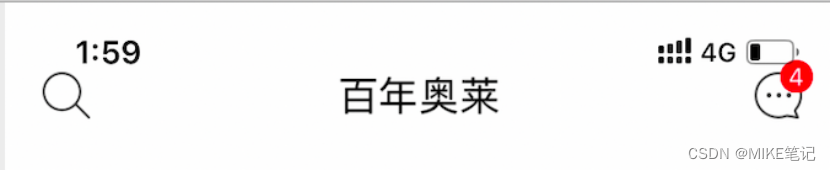
1.2 首页顶部需要在pages.json中配置,代码如下:
{"pages":[//pages数组中第一项表示应用启动页,参考:https://uniapp.dcloud.io/collocation/pages{"path":"pages/index/index","style":{"navigationBarTitleText":"百年奥莱","navigationBarBackgroundColor":"#FFFFFF","navigationStyle":"custom","app-plus":{"titleNView":{"buttons":[{"float":"left","fontSrc":"./static/iconfont.ttf","text":"\ue69d"},{"float":"right","fontSrc":"./static/iconfont.ttf","text":"\ue622"}]}}}},{"path":"pages/list/list","style":{}},{"path":"pages/shopcart/shopcart","style":{}},{"path":"pages/my/my","style":{}}],"globalStyle":{"navigationBarTextStyle":"black","navigationBarTitleText":"uni-app","navigationBarBackgroundColor":"#F8F8F8","backgroundColor":"#F8F8F8"},"tabBar":{"color":"#636263","selectedColor":"#636263","spacing":"8px","list":[{"pagePath":"pages/index/index","iconPath":"static/tabbar/index.png","selectedIconPath":"static/tabbar/indexSelected.png","text":"首页"},{"pagePath":"pages/list/list","iconPath":"static/tabbar/list.png","selectedIconPath":"static/tabbar/listSelected.png","text":"分类"},{"pagePath":"pages/shopcart/shopcart","iconPath":"static/tabbar/shop.png","selectedIconPath":"static/tabbar/shopSelected.png","text":"购物车"},{"pagePath":"pages/my/my","iconPath":"static/tabbar/my.png","selectedIconPath":"static/tabbar/mySelected.png","text":"我的"}]}}
注:app-plus在app中和H5生效,各种小程序不生效,如需定制小程序的头部需要这样做:
1.2.1 pages.json中加入: "navigationStyle":"custom"1.2.1 page/index/index.vue中写入:<!-- #ifdef MP-WEIXIN --><view>....你的小程序头部...</view><!-- #endif -->
四、【首页】swiper部分
1.1 完成效果图: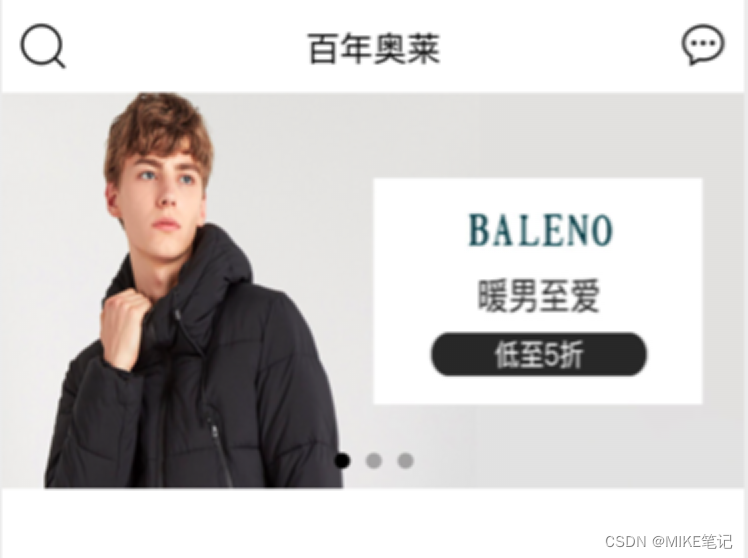
1.2 新建IndexSwiper.vue文件,目录结构如图: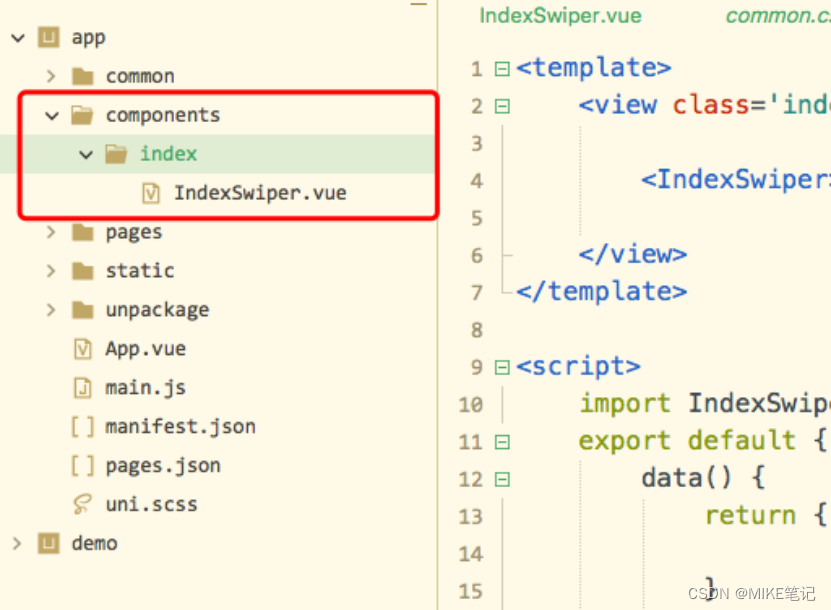
1.3 新建IndexSwiper.vue代码如下:
<template><swiper :indicator-dots="true":autoplay="true":interval="3000":duration="1000"><swiper-item><view class="swiper-item"><image class='swiper-img' src="../../static/img/swiper1.jpg" mode=""></image></view></swiper-item><swiper-item><view class="swiper-item"><image class='swiper-img' src="../../static/img/swiper2.jpg" mode=""></image></view></swiper-item><swiper-item><view class="swiper-item"><image class='swiper-img' src="../../static/img/swiper3.jpg" mode=""></image></view></swiper-item></swiper></template><script></script><style scoped>
swiper{
    width:100%;
    height:400rpx;}.swiper-img{
    width:100%;
    height:400rpx;}</style>1.4 pages/index/index.vue代码如下:
<template><view class='index'><IndexSwiper></IndexSwiper></view></template><script>
    import IndexSwiper from '@/components/index/IndexSwiper.vue'
    export default{data(){return{}},
        components:{
            IndexSwiper
        },onLoad(){},
        methods:{}}</script><style scoped></style>
1.5 swiper的坑总结:
1.5.1 组件名称swiper.vue 或者 Swiper.vue , 在传递数据的时候有可能图片就不见了。
1.5.2 改变图片的大小咱们要用rpx的单位。
1.5.3 本身swiper是有150px的默认高度,app中需要改变默认高度需要加入:
        swiper{
            width:100%;
            height:400rpx;}
五、【首页】推荐部分开发
1.1 完成效果图:
1.2 在components中新建组件Recommend.vue,代码如下:
<template><view class='recommend bg-color'><view class='recommend-item'><image class='item-big' src="../../static/img/Children.jpg" mode=""></image><view class='item-small'><image class='item-img' src="../../static/img/Children1.jpg" mode=""></image><image class='item-img' src="../../static/img/Children2.jpg" mode=""></image><image class='item-img' src="../../static/img/Children3.jpg" mode=""></image></view></view><view class='recommend-item'><image class='item-big' src="../../static/img/Furnishing.jpg" mode=""></image><view class='item-small'><image class='item-img' src="../../static/img/Furnishing1.jpg" mode=""></image><image class='item-img' src="../../static/img/Furnishing2.jpg" mode=""></image><image class='item-img' src="../../static/img/Furnishing3.jpg" mode=""></image></view></view></view></template><script></script><style scoped>.recommend{
    padding:20rpx;}.recommend-item{
    display: flex;
    flex-direction: column;
    border-radius:20rpx;
    border:2rpx solid #CCCCCC;
    overflow: hidden;
    margin:20rpx 0;}.item-big{
    width:100%;
    height:300rpx;}.item-small{
    width:100%;
    height:240rpx;}.item-img{
    width:33.3333%;
    height:240rpx;}</style>
1.3 在pages/index/index.vue中引入Recommend组件。
1.3.1
import Recommend from '@/components/index/Recommend.vue'
1.3.2
components:{
        IndexSwiper,
        Recommend
}
1.3.3 在template部分中使用
六、【首页】文字封装开发
1.1 在components/common目录中创建了Card.vue组件文件
1.2 在pages/index/index.vue中引入Card组件
1.3 Card组件是卡片完成效果为复用的文字
1.4 完成效果为:
1.5 Card组件完成代码为:
<template><view class='card'><view>-</view><slot><view class='card-name'>{{cardTitle}}</view></slot><view>-</view></view></template><script>
export default{
    props:{
        cardTitle:String
    }}</script><style scoped>.card{
    padding:20rpx 0;
    display: flex;
    justify-content: center;
    font-weight: bold;}.card-name{
    padding:020rpx;
    font-size:32rpx;}</style>
七、【首页】商品列表和单个商品组件封装
1.1 完成效果为: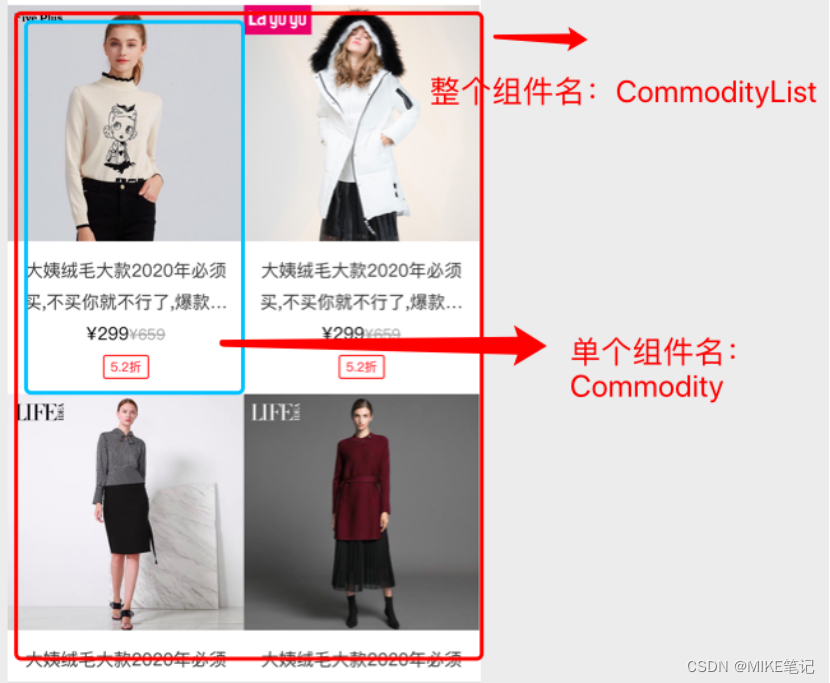
1.2 组件再次说明
CommodityList.vue组件为:商品列表组件
Commodity.vue 组件为:单个商品组件
1.3 创建文件:在components/common中创建CommodityList.vue和Commodity.vue
1.4 CommodityList.vue组件传入数据给Commodity.vue作为展示。
1.5 CommodityList.vue代码为:
<template><view class='commodity-list'><!-- 商品列表组件 --><Commodity :dataList='commodityList'></Commodity></view></template><script>
import Commodity from './Commodity.vue'
export default{data(){return{
            commodityList:[{
                    id:1,
                    imgUrl:"../../static/img/commodity1.jpg",
                    name:"大姨绒毛大款2020年必须买,不买你就不行了,爆款疯狂GG008大姨绒毛大款2020年必须买,不买你就不行了,爆款疯狂GG008",
                    pprice:"299",
                    oprice:"659",
                    discount:"5.2"},{
                    id:2,
                    imgUrl:"../../static/img/commodity2.jpg",
                    name:"大姨绒毛大款2020年必须买,不买你就不行了,爆款疯狂GG008大姨绒毛大款2020年必须买,不买你就不行了,爆款疯狂GG008",
                    pprice:"299",
                    oprice:"659",
                    discount:"5.2"},{
                    id:3,
                    imgUrl:"../../static/img/commodity3.jpg",
                    name:"大姨绒毛大款2020年必须买,不买你就不行了,爆款疯狂GG008大姨绒毛大款2020年必须买,不买你就不行了,爆款疯狂GG008",
                    pprice:"299",
                    oprice:"659",
                    discount:"5.2"},{
                    id:4,
                    imgUrl:"../../static/img/commodity4.jpg",
                    name:"大姨绒毛大款2020年必须买,不买你就不行了,爆款疯狂GG008大姨绒毛大款2020年必须买,不买你就不行了,爆款疯狂GG008",
                    pprice:"299",
                    oprice:"659",
                    discount:"5.2"}]}},
    components:{
        Commodity
    }}</script><style></style>1.5 Commodity.vue代码为:
<template><view class='commodity'><!-- 单个商品组件 --><view class='commodity-item'
            v-for="(item,index) in dataList":key='index'><image class='commodity-img':src="item.imgUrl" mode=""></image><view class='commodity-content'><text class='commodity-name'>{{item.name}}</text><view><text class='pprice'>¥{{item.pprice}}</text><text class='oprice'>¥{{item.oprice}}</text></view><text class='discount'>{{item.discount}}折</text></view></view></view></template><script>
export default{
    props:{
        dataList:Array
    }}</script><style scoped>.commodity{
    display: flex;
    flex-wrap: wrap;}.commodity-item{
    width:375rpx;
    padding-bottom:20rpx;}.commodity-img{
    width:100%;
    height:375rpx;}.commodity-content{
    text-align: center;}.commodity-name{
    overflow: hidden;
    text-overflow: ellipsis;
    display:-webkit-box;-webkit-line-clamp:2;-webkit-box-orient:vertical;
    color:#333333;
    word-break:break-all;
    padding:6rpx 20rpx;}.oprice{
    text-decoration: line-through;
    font-size:24rpx;
    color:#999999;}.discount{
    border-radius:4rpx;
    border:1px solid #FF3333;
    padding:2rpx 10rpx;
    font-size:20rpx;
    color:#FF3333;}</style>
八、【首页】运动户外头部开发
1.1 完成后的效果图: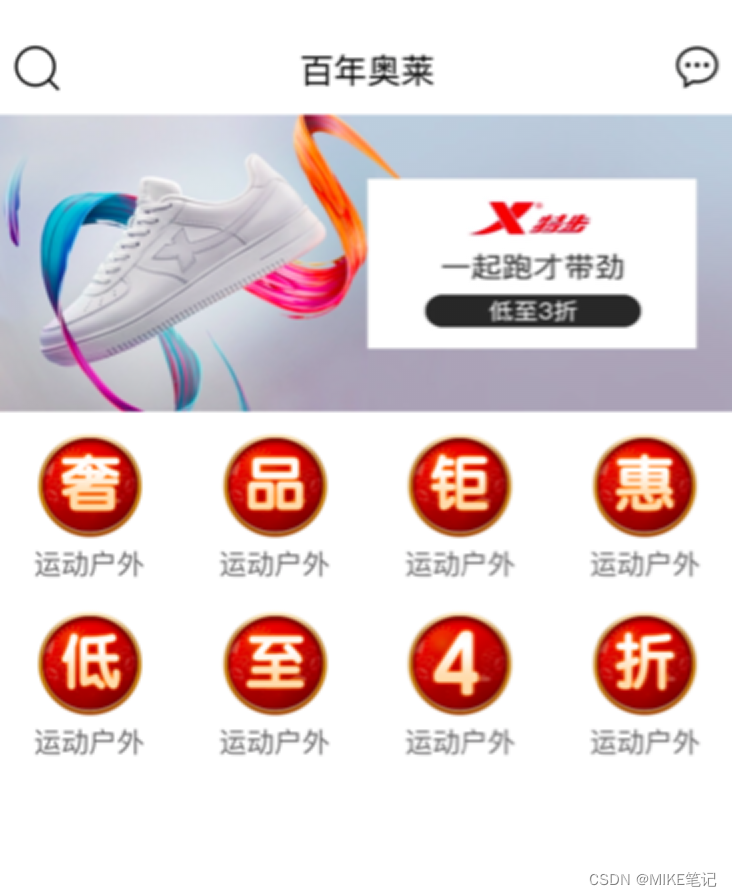
1.2 在components/index目录中创建了Banner.vue和Icons.vue组件
1.3 组件说明Banner.vue就是头图的展示。Icons.vue就是大家看到的宫格
1.4 Banner.vue代码如下:
<template><view class='banner'><image class='banner-img' src="../../static/img/banner1.jpg" mode=""></image></view></template><script></script><style scoped>.banner{
    width:100%;
    height:300rpx;}.banner-img{
    width:100%;
    height:300rpx;}</style>1.5 Icos.vue代码如下:
<template><view class='icons'><view class='icons-item'><image class='icons-img' src="../../static/img/icons1.png" mode=""></image><text class='f-color'>运动户外</text></view><view class='icons-item'><image class='icons-img' src="../../static/img/icons2.png" mode=""></image><text class='f-color'>运动户外</text></view><view class='icons-item'><image class='icons-img' src="../../static/img/icons3.png" mode=""></image><text class='f-color'>运动户外</text></view><view class='icons-item'><image class='icons-img' src="../../static/img/icons4.png" mode=""></image><text class='f-color'>运动户外</text></view><view class='icons-item'><image class='icons-img' src="../../static/img/icons5.png" mode=""></image><text class='f-color'>运动户外</text></view><view class='icons-item'><image class='icons-img' src="../../static/img/icons6.png" mode=""></image><text class='f-color'>运动户外</text></view><view class='icons-item'><image class='icons-img' src="../../static/img/icons7.png" mode=""></image><text class='f-color'>运动户外</text></view><view class='icons-item'><image class='icons-img' src="../../static/img/icons8.png" mode=""></image><text class='f-color'>运动户外</text></view></view></template><script></script><style scoped>.icons{
    display: flex;
    flex-wrap: wrap;}.icons-item{
    width:25%;
    display: flex;
    flex-direction: column;
    align-items: center;
    justify-content: center;
    padding-top:20rpx;}.icons-img{
    width:110rpx;
    height:110rpx;}</style>
九、【首页】热销爆品开发修改商品值
1.1 完成后的效果图: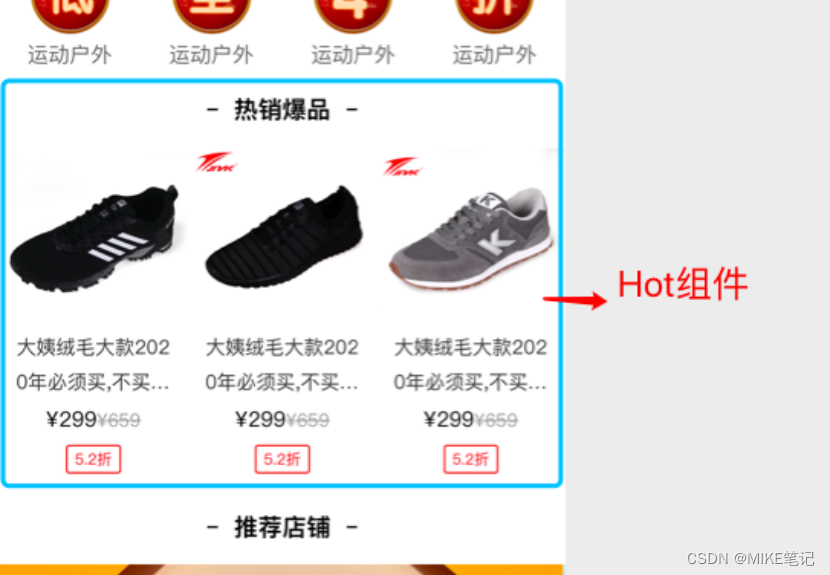
1.2 component/index下创建Hot.vue组件
1.3 pages/index/index.vue引入Hot.vue组件
1.4 Hot组件内容为单个商品模块,所有引入了Commodity.vue组件。传递参数调整图片宽度和高度,
Hot组件代码如下:
<template><view class='hot'><Commodity :dataList='hotList' itemW='250rpx' bigH='220rpx'></Commodity></view></template><script>
import Commodity from '../common/Commodity.vue'
export default{data(){return{
            hotList:[{
                    id:1,
                    imgUrl:"../../static/img/hot1.jpg",
                    name:"大姨绒毛大款2020年必须买,不买你就不行了,爆款疯狂GG008大姨绒毛大款2020年必须买,不买你就不行了,爆款疯狂GG008",
                    pprice:"299",
                    oprice:"659",
                    discount:"5.2"},{
                    id:2,
                    imgUrl:"../../static/img/hot2.jpg",
                    name:"大姨绒毛大款2020年必须买,不买你就不行了,爆款疯狂GG008大姨绒毛大款2020年必须买,不买你就不行了,爆款疯狂GG008",
                    pprice:"299",
                    oprice:"659",
                    discount:"5.2"},{
                    id:3,
                    imgUrl:"../../static/img/hot3.jpg",
                    name:"大姨绒毛大款2020年必须买,不买你就不行了,爆款疯狂GG008大姨绒毛大款2020年必须买,不买你就不行了,爆款疯狂GG008",
                    pprice:"299",
                    oprice:"659",
                    discount:"5.2"}]}},
    components:{
        Commodity
    }}</script><style></style>
十、【首页】推荐店铺模块开发和滑块处理
1.1 完成后的效果图: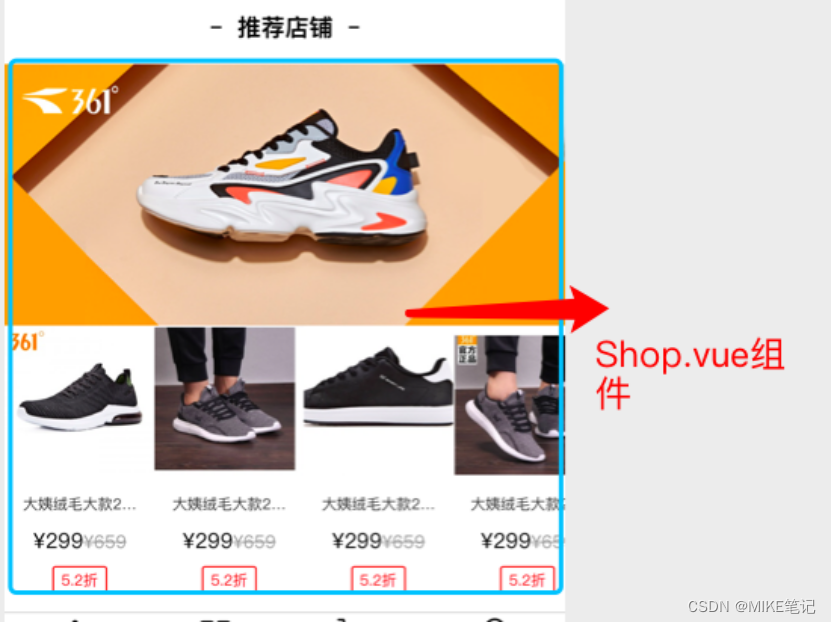
1.2 components/index目录下新建Shop.vue组件
1.3 pages/index/index.vue引入Shop.vue组件
1.4 Shop.vue组件分为:上大图,下滑块的内容布局,滑块采用uni-app提供组件scroll-view。
1.4.1 scroll-view需要给父元素加入width:100%;white-space: nowrap;其内容需要加入样式display: inline-block;
1.5 滑块内容调用了单个商品组件,其中改变了是否换行以及文字大小,
Shop.vue具体代码如下:
<template><view class='shop'><view class='shop-item'><view class='shop-big'><image class='shop-big' src="../../static/img/shop.jpg" mode=""></image></view><scroll-view scroll-x="true" class='scroll-content'><view class='scroll-item'><Commodity
                        :dataList='shopList'
                        wrap='no-wrap'
                        itemW='200rpx'
                        bigH='200rpx'
                        nameSize='20rpx'></Commodity></view></scroll-view></view></view></template><script>
import Commodity from '../common/Commodity.vue'
export default{data(){return{
            shopList:[{
                    id:1,
                    imgUrl:"../../static/img/shop1.jpg",
                    name:"大姨绒毛大款2020年必须买,不买你就不行了,爆款疯狂GG008大姨绒毛大款2020年必须买,不买你就不行了,爆款疯狂GG008",
                    pprice:"299",
                    oprice:"659",
                    discount:"5.2"},{
                    id:2,
                    imgUrl:"../../static/img/shop2.jpg",
                    name:"大姨绒毛大款2020年必须买,不买你就不行了,爆款疯狂GG008大姨绒毛大款2020年必须买,不买你就不行了,爆款疯狂GG008",
                    pprice:"299",
                    oprice:"659",
                    discount:"5.2"},{
                    id:3,
                    imgUrl:"../../static/img/shop3.jpg",
                    name:"大姨绒毛大款2020年必须买,不买你就不行了,爆款疯狂GG008大姨绒毛大款2020年必须买,不买你就不行了,爆款疯狂GG008",
                    pprice:"299",
                    oprice:"659",
                    discount:"5.2"},{
                    id:4,
                    imgUrl:"../../static/img/shop4.jpg",
                    name:"大姨绒毛大款2020年必须买,不买你就不行了,爆款疯狂GG008大姨绒毛大款2020年必须买,不买你就不行了,爆款疯狂GG008",
                    pprice:"299",
                    oprice:"659",
                    discount:"5.2"},{
                    id:1,
                    imgUrl:"../../static/img/shop1.jpg",
                    name:"大姨绒毛大款2020年必须买,不买你就不行了,爆款疯狂GG008大姨绒毛大款2020年必须买,不买你就不行了,爆款疯狂GG008",
                    pprice:"299",
                    oprice:"659",
                    discount:"5.2"},{
                    id:2,
                    imgUrl:"../../static/img/shop2.jpg",
                    name:"大姨绒毛大款2020年必须买,不买你就不行了,爆款疯狂GG008大姨绒毛大款2020年必须买,不买你就不行了,爆款疯狂GG008",
                    pprice:"299",
                    oprice:"659",
                    discount:"5.2"},{
                    id:3,
                    imgUrl:"../../static/img/shop3.jpg",
                    name:"大姨绒毛大款2020年必须买,不买你就不行了,爆款疯狂GG008大姨绒毛大款2020年必须买,不买你就不行了,爆款疯狂GG008",
                    pprice:"299",
                    oprice:"659",
                    discount:"5.2"},{
                    id:4,
                    imgUrl:"../../static/img/shop4.jpg",
                    name:"大姨绒毛大款2020年必须买,不买你就不行了,爆款疯狂GG008大姨绒毛大款2020年必须买,不买你就不行了,爆款疯狂GG008",
                    pprice:"299",
                    oprice:"659",
                    discount:"5.2"}]}},
    components:{
        Commodity
    }}</script><style scoped>.shop-big{
    width:100%;
    height:350rpx;}.scroll-content{
    width:100%;
    white-space: nowrap;}.scroll-item{
    display:inline-block;}</style>
十一、【首页】隐藏滚动条和底部
1.1 隐藏全局滚动条,需要在pages.json的"app-plus"下设置一个属性:“scrollIndicator”:“none”
1.2 隐藏scroll-view滚动条需要在App.vue中添加样式:
::-webkit-scrollbar {
    display: none;
    width:0!important;
    height:0!important;-webkit-appearance: none;
    background: transparent;}
十二、【首页】顶栏滑块功能开发
1.1 完成效果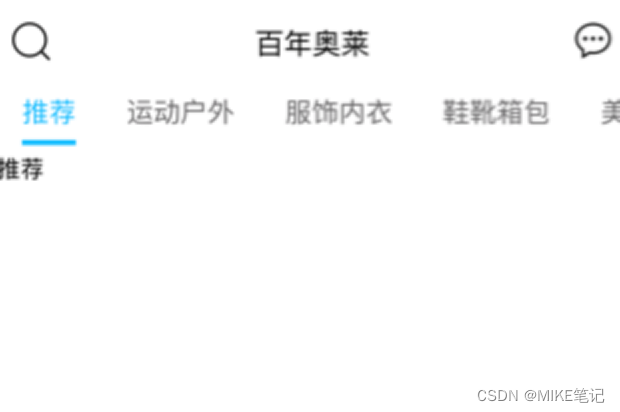
1.2 顶部滑块数据:
topBar:[{name:'推荐'},{name:'运动户外'},{name:'服饰内衣'},{name:'鞋靴箱包'},{name:'美妆个护'},{name:'家居数码'},{name:'食品母婴'}]
1.3 顶部滑块样式布局:
<scroll-view scroll-x="true" class='scroll-content'><view
                class='scroll-item'
                v-for='(item,index) in topBar':key='index'
                @tap='changeTab(index)'><text :class='topBarIndex===index?"f-active-color":"f-color"'>{{item.name}}</text></view></scroll-view>
1.4 内容滑动部分:
<swiper  @change='onChangeTab':current="topBarIndex"><swiper-item
                v-for='(item,index) in topBar':key='index'><view>{{item.name}}</view></swiper-item></swiper>1.5 方法定义点击滑动跳转:
changeTab(index){if(this.topBarIndex === index){return;}
                this.topBarIndex = index;},onChangeTab(e){
                this.changeTab(e.detail.current);}
十三、【首页】顶栏滑动跟随
1.1 顶部滑动跟随需要在scroll-view中添加scroll-into-view属性,其中代表滚动到哪个块中,匹配为子元素的id,也就是子元素需要加入id值,但是id值不可以为数字开头,那么代码如下:
<scroll-view :scroll-into-view='scrollIntoIndex'><view :id="'top'+index"></view></scroll-view>
1.2 在changeTab方法中写入
this.scrollIntoIndex ='top'+index;
十四、【首页】改变内容块高度
1.1 获取可视区域高度可以使用uni.getSystemInfo(),但是在iso中是有bug的,所以的高度值不对。
1.2 我们修正bug思想是:获取组件元素的高度值的合,然后赋值到内容块中(style=’height’)。
1.3 具体代码如下:特别注意需要在onReady中写入
let view = uni.createSelectorQuery().select(".home-data");
            view.boundingClientRect(data =>{
                this.clentHeight = data.height;}).exec();
十五、搭建nodejs后端环境
1.1 搭建后端目录
1.1.1 全局命令:
npm install express-generator -g
1.1.2 进入项目目录:
express --view=ejs server
1.2 前端请求后端接口【本地测试】
1.2.1 手机和电脑是一个wifi
1.2.2 不可以使用localhost,必须要使用ip地址
查ip地址:
mac :
ifconfig
window:
ipconfig
十六、请求接口渲染首页数据
1.1 添加请求接口方法
__init()__init(){
                uni.request({
                    url:"http://192.168.8.6:3000/api/index_list/data",
                    success:(res)=>{
                        let data = res.data.data;
                        this.topBar = data.topBar;
                        this.newTopBar = this.initData(data);}})},
1.2 添加存储数据方法
initData()initData(res){
                let arr =[];for(let i =0;i<this.topBar.length;i++){
                    let obj ={
                        data:[]}//获取首次数据if(i==0){
                        obj.data = res.data;}
                    arr.push(obj)}return arr;},
1.3 渲染首页数据
<block v-for='(k,i) in item.data':key='i'><IndexSwiper v-if='k.type==="swiperList"':dataList='k.data'></IndexSwiper><template v-if='k.type==="recommendList"'><Recommend :dataList='k.data'></Recommend><Card cardTitle='猜你喜欢'></Card></template><CommodityList v-if='k.type==="commodityList"':dataList='k.data'></CommodityList></block>
十七、修正可视区域高度问题
1.1 使用getSystemInfo获取可视区域高度,这里要注意ios、安卓、各种小程序表现形式不一样。
1.2 onready代码如下:
uni.getSystemInfo({
                success:(res)=>{
                    this.clentHeight = res.windowHeight - uni.upx2px(80)-this.getClientHeight();}})
1.3 封装兼容方法
getClientHeight(){const res = uni.getSystemInfoSync();const system = res.platform;if( system ==='ios'){return44+res.statusBarHeight;}elseif( system==='android'){return48+res.statusBarHeight;}else{return0;}}
十八、滑动不同板块展示不同数据
1.1 完成效果切换到不同页面展示不同数据
1.2 请求数据为:
addData(){//拿到索引
                let index = this.topBarIndex;//拿到id
                let id = this.topBar[index].id;//请求不同的数据
                uni.request({
                    url:'http://192.168.8.6:3000/api/index_list/'+id+'/data/1',
                    success:(res)=>{
                        let data = res.data.data;
                        this.newTopBar[index].data=[...this.newTopBar[index].data,...data];}})}
十九、修正重复请求数据
1.1 原有问题:只要滑动或者点击都会请求一次数据。
1.2 修正逻辑:默认一个first值,滑动到某一个板块把当前的值修改成last,然后每次滑动都判断,如果值为first就加载数据,那么其实值为last了已经,所以就不重复请求数据了。
1.3 具体解决方法代码如下:
changeTab(index){//每一次滑动==》赋值firstif( this.newTopBar[this.topBarIndex].load  ==='first'){
                    this.addData();}},addData(callback){//当请求结束后,重新赋值
                this.newTopBar[index].load='last';},initData(res){
let obj ={
    data:[],
load:"first"}}
二十、上拉加载更多数据
1.1 给scroll-view添加触底事件
<scroll-view @scrolltolower='loadMore(index)'>
1.2 template中添加滑动显示文字的容器
<view class='load-text f-color'>{{item.loadText}}</view>
1.3 触底方法定义代码:
loadMore(index){

                this.newTopBar[index].loadText ='加载中...';//请求完数据 ,文字提示信息又换成【上拉加载更多...】
                this.addData(()=>{
                    this.newTopBar[index].loadText ='上拉加载更多...';})}
1.4 加载不同数据的page算法代码:
let page = Math.ceil(this.newTopBar[index].data.length /5)+1;
二十一、request封装
1.1 对于uni.request封装有利于后期的维护。
1.2 在common目录中新建api目录,在api目录中新建request.js文件
1.3 request.js代码如下:
export default{
    common:{
        baseUrl:"http://192.168.8.6:3000/api",
        data:{},
        header:{"Content-Type":"application/json","Content-Type":"application/x-www-form-urlencoded"},
        method:"GET",
        dataType:"json"},request( options={}){

        uni.showLoading({
            title:'加载中'});

        options.url = this.common.baseUrl + options.url;
        options.data =     options.data || this.common.data;
        options.header = options.header || this.common.header;
        options.method = options.method || this.common.method;
        options.dataType =     options.dataType || this.common.dataType;return new Promise((res,rej)=>{
            uni.request({...options,
                success:(result)=>{if(result.statusCode !=200){returnrej();}setTimeout(function(){
                        uni.hideLoading();},2000);
                    let data = result.data.data;res(data);}})})}}1.4 调用方式:
$http.request({
    url:'/index_list/'+id+'/data/'+page+''}).then((res)=>{
    this.newTopBar[index].data =[...this.newTopBar[index].data,...res];}).catch(()=>{
    uni.showToast({
        title:'请求失败',
        icon:'none'})})
二十二、进入搜索页面
1.1 在pages下创建搜索页面为:search
1.2 在index.vue中点击进入搜素页面
onNavigationBarButtonTap(e){if(e.float=='left'){
                uni.navigateTo({
                    url:'../search/search'})}},
1.3 在pages.jso中配置搜索页面头部
{"path":"pages/search/search","style":{"navigationBarBackgroundColor":"#FFFFFF","app-plus":{"scrollIndicator":"none","titleNView":{"searchInput":{"placeholder":"nike","disabled":false,"align":"left","autoFocus":true,"borderRadius":"15px","backgroundColor":"#F7F7F7","placeholderColor":"#B3B3B3"},"buttons":[{"float":"right","color":"#636263","text":"搜索","fontSize":"16px","width":"60px"}]}}}}
二十三、搜索页面内容布局
1.1 页面布局代码:
<template><view class='search'><Lines /><view class='search-item'><view class='search-title'><view class='f-color'>最近搜索</view><view class='iconfont icon-iconset0213'></view></view><view><view class='search-name f-color'>四件套</view><view class='search-name f-color'>面膜</view></view></view><view class='search-item'><view class='search-title'><view class='f-color'>热门搜索</view></view><view><view class='search-name f-color'>四件套</view><view class='search-name f-color'>面膜</view></view></view></view></template><script>
    import Lines from '@/components/common/Lines.vue'
    export default{data(){return{}},
        components:{
            Lines
        },
        methods:{}}</script><style scoped>.search-item{
    padding:20rpx;}.search-title{
    display: flex;
    justify-content: space-between;}.search-name{
    padding:4rpx 24rpx;
    background-color: #E1E1E1;
    display:inline-block;
    border-radius:26rpx;
    margin:10rpx;}</style>
二十四、进入搜索结果页
1.1 在pages中创建search-list页面
1.2 在search.vue中加入:跳转到search-list页面
onNavigationBarButtonTap(e){if(e.float==='right'){
                uni.navigateTo({
                    url:"../search-list/search-list"})}},1.3 在pages.json中配置搜索结果页面的头部
{"path":"pages/search-list/search-list","style":{"navigationBarBackgroundColor":"#FFFFFF","app-plus":{"scrollIndicator":"none","titleNView":{"searchInput":{"placeholder":"nike","disabled":false,"align":"left","borderRadius":"15px","backgroundColor":"#F7F7F7","placeholderColor":"#B3B3B3"},"buttons":[{"float":"right","color":"#636263","text":"筛选","fontSize":"16px","width":"60px"}]}}}}
二十五、搜索结果页布局和封装
1.1 在components下的common目录中新建ShopList.vue组件
1.2 上半部分布局,下半部分调用之前引入创建的商品列表组件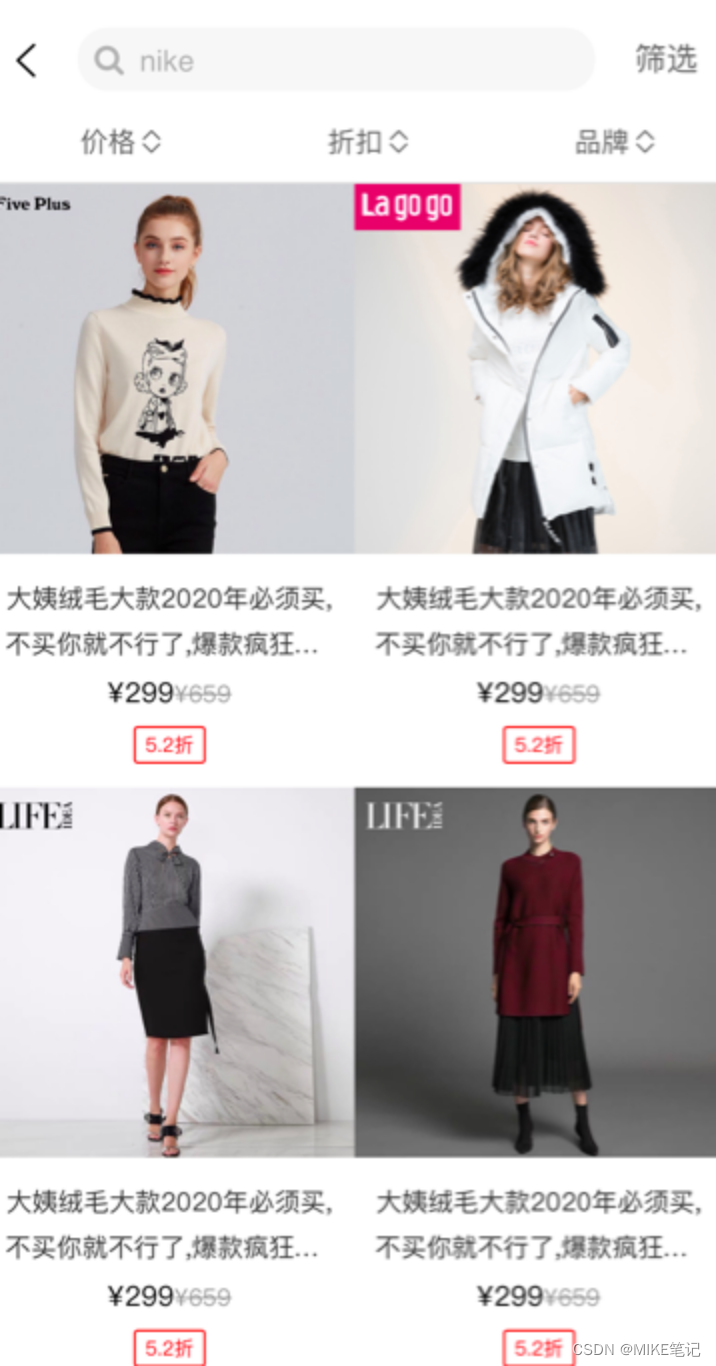
1.3 布局代码如下:
<template><view class='shop-list'><view class='shop-title f-color'><view class='shop-item'><view>价格</view><view class='shop-icon'><view class='iconfont icon-shangjiantou up'></view><view class='iconfont icon-xiajiantou down'></view></view></view><view class='shop-item'><view>折扣</view><view class='shop-icon'><view class='iconfont icon-shangjiantou up'></view><view class='iconfont icon-xiajiantou down'></view></view></view><view class='shop-item'><view>品牌</view><view class='shop-icon'><view class='iconfont icon-shangjiantou up'></view><view class='iconfont icon-xiajiantou down'></view></view></view></view><Lines /><CommodityList :dataList='dataList'></CommodityList></view></template><script>
import Lines from '@/components/common/Lines.vue'
import CommodityList from './CommodityList.vue'
export default{data(){return{
                dataList:[{
                        id:1,
                        imgUrl:"../../static/img/commodity1.jpg",
                        name:"大姨绒毛大款2020年必须买,不买你就不行了,爆款疯狂GG008大姨绒毛大款2020年必须买,不买你就不行了,爆款疯狂GG008",
                        pprice:"299",
                        oprice:"659",
                        discount:"5.2"},{
                        id:2,
                        imgUrl:"../../static/img/commodity2.jpg",
                        name:"大姨绒毛大款2020年必须买,不买你就不行了,爆款疯狂GG008大姨绒毛大款2020年必须买,不买你就不行了,爆款疯狂GG008",
                        pprice:"299",
                        oprice:"659",
                        discount:"5.2"},{
                        id:3,
                        imgUrl:"../../static/img/commodity3.jpg",
                        name:"大姨绒毛大款2020年必须买,不买你就不行了,爆款疯狂GG008大姨绒毛大款2020年必须买,不买你就不行了,爆款疯狂GG008",
                        pprice:"299",
                        oprice:"659",
                        discount:"5.2"},{
                        id:4,
                        imgUrl:"../../static/img/commodity4.jpg",
                        name:"大姨绒毛大款2020年必须买,不买你就不行了,爆款疯狂GG008大姨绒毛大款2020年必须买,不买你就不行了,爆款疯狂GG008",
                        pprice:"299",
                        oprice:"659",
                        discount:"5.2"}]}},
        components:{
            Lines,
            CommodityList
        },
        methods:{}}</script><style scoped>.shop-title{
    display: flex;}.shop-item{
    flex:1;
    display: flex;
    justify-content: center;
    align-items: center;
    height:80rpx;}.shop-icon{
    position: relative;
    margin-lef:10rpx;}.iconfont{
    width:16rpx;
    height:8rpx;
    position: absolute;
    left:0;}.up{
    top:-34rpx;}.down{
    top:-24rpx;}</style>
总结
未完待续,更新中. . .
版权归原作者 MIKE_note 所有, 如有侵权,请联系我们删除。