

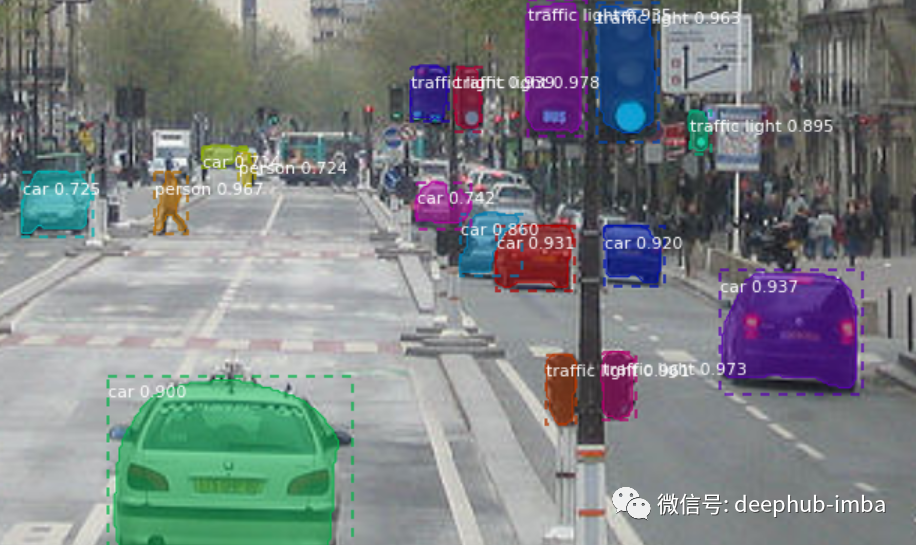
目标检测是一种计算机视觉技术,用于识别和定位图像中的目标。有很多检测算法存在,这里是对Mask R-CNN的一个很好的总结。
Mask R-CNN是目标检测的扩展,它为图像中检测到的每个目标生成边界框和分割掩模。这篇文章是关于使用Mask R-CNN训练自定义数据集的指南,希望它能帮助你们中的一些人简化这个过程。
相对Mask R-CNN有更多的了解请参考matterport的示例(资源在文章最后方)
库和包
算法的主要包是mrcnn。下载库并将其导入到环境中。
!pip install mrcnnfrom mrcnn.config import Configfrom mrcnn import utilsimport mrcnn.model as modellibfrom mrcnn import visualizefrom mrcnn.model importlog
mrcnn还不能与TensorFlow 2.0兼容,所以请确保您恢复到TensorFlow 1.x。因为我是在Colab上开发的,所以我将使用magic函数来恢复到TensorFlow 1.x。这也是TF被诟病的地方,兼容基本靠改。
%tensorflow_version 1.ximport tensorflow as tf
在TensorFlow 2.0中,tf.random_shuffle被重命名为tf.random.shuffle,从而导致不兼容问题。通过更改mrcnn代码中的shuffle函数,可以使用TensorFlow 2.0。
使用Colab最好把Keras到以前的版本,如果遇到错误的话,这样才做,没有的话就忽略吧。
!pip install keras==2.2.5
预处理
mrcnn包在接收的数据格式方面相当灵活。我们这里直接处理成NumPy数组。
在此之前,cv2无法正确读取video17_295和 video19_1900。因此,我过滤掉了这些图像并创建了一个文件名列表。
dir = "Database1/"# filter out image that cant be read prob_list = ['video17_295','video19_1900'] # cant read format txt_list = [f for f in os.listdir(dir) if f.endswith(".txt") and f[:-4] notin prob_list] file_list = set([re.match("\w+(?=.)",f)[0] for f in txt_list])# create data list as tuple of (jpeg,txt) data_list = []for f infile_list: data_list.append((f+".JPEG",f+".txt"))
接下来要做的事情
- 检查标签是否存在(某些图像不包含无人机)
- 读取和处理图像
- 读取和处理边界框的坐标
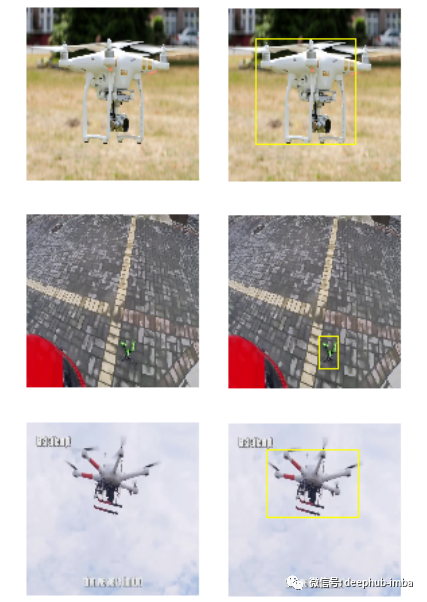
- 可视化目的绘制边界框X,y = [], []
img_box = [] DIMENSION = 128 # set low resolution to decrease training timefor i in range(len(data_list)):# get bounding box and check if label existwithopen(dir+data_list[i][1],"rb") as f: box = f.read().split()iflen(box) != 5: continue # skip data if does not contain labelbox = [float(s) for s in box[1:]]# read imageimg = cv2.imread(dir+data_list[i][0]) img = cv2.cvtColor(img,cv2.COLOR_BGR2RGB)# resize img to 128 x 128 img = cv2.resize(img, (DIMENSION,DIMENSION), interpolation= cv2.INTER_LINEAR)# draw bounding box (for visualization purposes) resize1, resize2 = img.shape[0]/DIMENSION, img.shape[1]/DIMENSION p1,p2,p3,p4 = int(box[0]*img.shape[1]*resize2), int(box[1]*img.shape[0]*resize1) ,int(box[2]*img.shape[1]*resize2) ,int(box[3]*img.shape[0]*resize1)ymin, ymax, xmin, xmax = p2-p4//2, p2+p4//2, p1-p3//2, p1+p3//2draw = cv2.rectangle(img.copy(),(xmax,ymax),(xmin,ymin),color=(255,255,0),thickness =1)# store data if range of y is at least 20 pixels (remove data with small drones)if ymax - ymin >=20: X.append(img) y.append([ymin, ymax, xmin, xmax]) img_box.append(draw)# convert to numpy arraysX = np.array(X).astype(np.uint8) y = np.array(y) img_box = np.array(img_box)
在转换为NumPy数组之前,我获取数据集的一个子集,作为测试可以减少训练时间。
如果你有计算能力的话,可以省略。
以下是图片:
MRCNN处理
现在来看看mrcnn本身,我们需要在训练过程之前定义一个mrcnn数据集类。这个数据集类提供图像的信息,比如它所属的类和对象在其中的位置。mrcnn.utils包含这个类
这里的事情变得有点棘手,需要阅读一些源代码。这些是你需要修改的功能:
https://github.com/matterport/Mask_RCNN/blob/master/mrcnn/utils.py
- add_class,用于确定模型的类数
- 添加映像,在其中定义映像id和映像路径(如果适用)
- 加载图像,其中加载图像数据
- 加载掩码,获取有关图像的掩码/边框的信息
# define drones dataset using mrcnn utils classclass DronesDataset(utils.Dataset):def__init__(self,X,y): # init with numpy X,yself.X = Xself.y = ysuper().__init__()defload_dataset(self):self.add_class("dataset",1,"drones") # only 1 class, dronesfor i in range(len(self.X)):self.add_image("dataset",i,path=None)defload_image(self,image_id): image = self.X[image_id] # where image_id is index of Xreturn imagedef load_mask(self,image_id):# get details of image info = self.image_info[image_id]#create one array for all masks, each on a different channel masks = np.zeros([128, 128, len(self.X)], dtype='uint8')class_ids = []for i in range(len(self.y)): box = self.y[info["id"]] row_s, row_e = box[0], box[1] col_s, col_e = box[2], box[3] masks[row_s:row_e, col_s:col_e, i] = 1# create mask with similar boundaries as bounding box class_ids.append(1)return masks, np.array(class_ids).astype(np.uint8)
我们已经将图像格式化为NumPy数组,因此可以简单地用数组初始化Dataset类,并通过索引到数组中来加载图像和边界框。
接下来分割训练和测试集。
# train test split 80:20np.random.seed(42) # for reproducibility p = np.random.permutation(len(X)) X = X[p].copy()y = y[p].copy()split = int(0.8 * len(X))X_train = X[:split] y_train = y[:split]X_val = X[split:] y_val = y[split:]
现在将数据加载到数据集类中。
# load dataset into mrcnn dataset classtrain_dataset = DronesDataset(X_train,y_train)train_dataset.load_dataset()train_dataset.prepare()val_dataset = DronesDataset(X_val,y_val)val_dataset.load_dataset()val_dataset.prepare()
prepare()函数使用图像ID和类ID信息为mrcnn模型准备数据,下面是我们从mrcnn导入的config类的修改。Config类确定训练中使用的变量,应该根据数据集进行调整。
下面的这些变量并非详尽无遗,您可以参考文档中的完整列表。
classDronesConfig(Config):# Give the configuration a recognizable name NAME = "drones"# Train on 1 GPU and 2 images per GPU. GPU_COUNT = 1 IMAGES_PER_GPU = 2# Number of classes (including background) NUM_CLASSES = 1+1# background + drones# Use small images for faster training. IMAGE_MIN_DIM = 128 IMAGE_MAX_DIM = 128# Reduce training ROIs per image because the images are small and have few objects. TRAIN_ROIS_PER_IMAGE = 20# Use smaller anchors because our image and objects are small RPN_ANCHOR_SCALES = (8, 16, 32, 64, 128) # anchor side in pixels# set appropriate step per epoch and validation step STEPS_PER_EPOCH = len(X_train)//(GPU_COUNT*IMAGES_PER_GPU) VALIDATION_STEPS = len(X_val)//(GPU_COUNT*IMAGES_PER_GPU)# Skip detections with < 70% confidence DETECTION_MIN_CONFIDENCE = 0.7config = DronesConfig() config.display()
根据您的计算能力,您可能需要相应地调整这些变量。否则,您将面临卡在“Epoch 1”的问题,并且不会给出错误消息。甚至还有针对这个问题提出的GitHub问题,并提出了许多解决方案。如果你遇到这种情况,一定要检查一下,并测试一下这些建议中的一些。
https://github.com/matterport/Mask_RCNN/issues/287
MRCNN 训练
mrcnn通过COCO和ImageNet数据集进行了训练。所以这里只要使用这些预先训练的权重进行迁移学习,我们需要将其下载到环境中(记住首先定义根目录)
# Local path to trained weights file COCO_MODEL_PATH = os.path.join(ROOT_DIR, "mask_rcnn_coco.h5")# Download COCO trained weights from Releases if neededif not os.path.exists(COCO_MODEL_PATH): utils.download_trained_weights(COCO_MODEL_PATH)
创建模型并使用预先训练的权重。
# Create model in training mode using gpuwith tf.device("/gpu:0"): model = modellib.MaskRCNN(mode="training", config=config,model_dir=MODEL_DIR)# Which weights to start with? init_with = "imagenet"# imagenet, cocoif init_with == "imagenet": model.load_weights(model.get_imagenet_weights(), by_name=True)elif init_with == "coco":# Load weights trained on MS COCO, but skip layers that# are different due to the different number of classes# See README for instructions to download the COCO weights model.load_weights(COCO_MODEL_PATH, by_name=True,exclude=["mrcnn_class_logits", "mrcnn_bbox_fc", "mrcnn_bbox", "mrcnn_mask"])
现在,我们可以开始进行实际训练。
model.train(train_dataset, val_dataset,learning_rate=config.LEARNING_RATE,epochs=5,layers='heads') # unfreeze head and just train on last layer
我只训练最后一层来检测数据集中的无人机。如果时间允许,您还应该通过训练前面的所有层来微调模型。
model.train(train_dataset, val_dataset,learning_rate=config.LEARNING_RATE / 10,epochs=2,layers="all")
完成了mrcnn模型的训练后。可以用这两行代码保存模型的权重。
# save weights model_path = os.path.join(MODEL_DIR, "mask_rcnn_drones.h5") model.keras_model.save_weights(model_path)
MRCNN推断
要对其他图片进行推理,需要创建一个具有自定义配置的新推理模型。
# make inferenceclass InferenceConfig(DronesConfig):GPU_COUNT = 1 IMAGES_PER_GPU = 1inference_config = InferenceConfig()# Recreate the model in inference mode model = modellib.MaskRCNN(mode="inference",config=inference_config, model_dir=MODEL_DIR)# Load trained weightsmodel_path = os.path.join(MODEL_DIR, "mask_rcnn_drones.h5") model.load_weights(model_path, by_name=True)
可视化
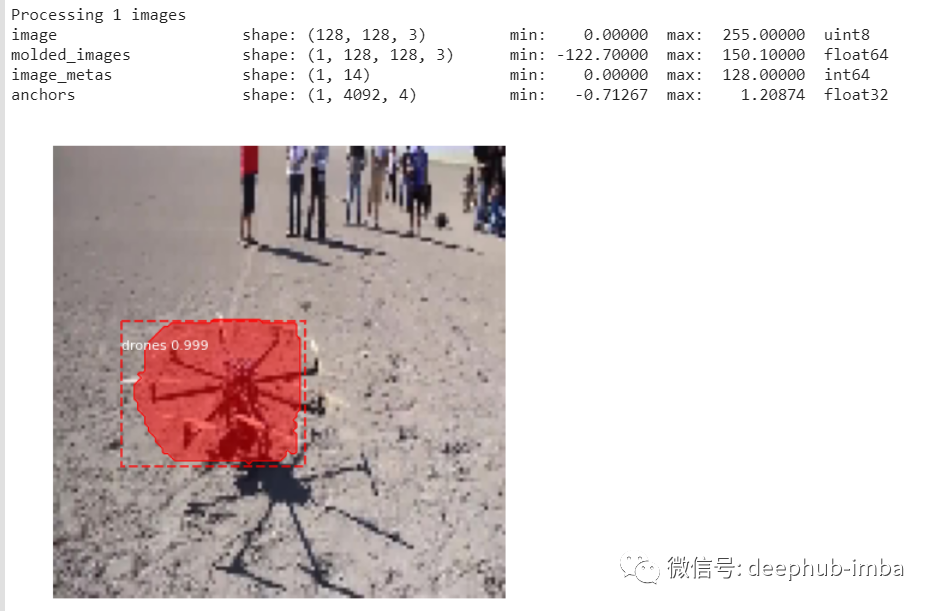
defget_ax(rows=1, cols=1, size=8): _, ax = plt.subplots(rows, cols, figsize=(size*cols, size*rows))return ax# Test on a random image image_id = random.choice(val_dataset.image_ids) original_image, image_meta, gt_class_id, gt_bbox, gt_mask =\ modellib.load_image_gt(val_dataset, inference_config,image_id, use_mini_mask=False)results = model.detect([original_image], verbose=1) r = results[0]visualize.display_instances(original_image, r['rois'], r['masks'], r['class_ids'],val_dataset.class_names, r['scores'], ax=get_ax())
好了,我们已经训练了一个带有自定义数据集的mrcnn模型。
作者:Benjamin Lau
关注 deephub-imba 发送 20200415 即可获取本文使用的数据集
DeepHub
微信号 : deephub-imba
每日大数据和人工智能的重磅干货
大厂职位内推信息
长按识别二维码关注 ->
好看就点在看!********** **********