活动地址:CSDN21天学习挑战赛
目录
前言
经过前段时间研究,从LeNet-5手写数字入门到最近研究的一篇天气识别。我想干一票大的,因为我本身从事的就是C++/Qt开发,对Qt还是比较熟悉,所以我想实现一个基于Qt的界面化的一个人脸识别。
对卷积神经网络的概念比较陌生的可以看一看这篇文章:卷积实际上是干了什么
想了解神经网络的训练流程、或者环境搭建的可以看这篇文章:环境搭建与训练流程
如果想学习本项目请先去看第一篇:基于卷积神经网络(tensorflow)的人脸识别项目(一)
基本思路
具体步骤如下:
- 首先需要收集数据,我的想法是通过OpenCV调用摄像头进行收集人脸照片。
- 然后进行预处理,主要是对数据集分类,训练集、验证集、测试集。
- 开始训练模型,提前创建好标签键值对。
- 测试人脸识别效果,通过OpenCV捕获人脸照片然后对图片进行预处理最后传入模型中,然后将识别的结果通过文字的形式打印在屏幕上,以此循环,直到输入q退出。
本篇主要是对上述步骤中的第二步进行实现。
关于环境
由于部分环境不兼容,这里对环境重写进行调整。 所以这里我带大家搭建一次环境。
我下面列出了所有用到的包,首先需要将这些内容全部复制到一个文件中,你可以保存为*.yaml文件。
name: FaceIdentifiction
channels:- https://mirrors.tuna.tsinghua.edu.cn/anaconda/pkgs/main
  - https://mirrors.tuna.tsinghua.edu.cn/anaconda/pkgs/main/- https://mirrors.tuna.tsinghua.edu.cn/anaconda/pkgs/free
  - defaults
dependencies:- _tflow_select=2.2.0=eigen
  - absl-py=0.15.0=pyhd3eb1b0_0
  - aiohttp=3.7.4.post0=py36h2bbff1b_2
  - astor=0.8.1=py36haa95532_0
  -async-timeout=3.0.1=py36haa95532_0
  - attrs=21.4.0=pyhd3eb1b0_0
  - blas=1.0=mkl
  - blinker=1.4=py36haa95532_0
  - brotlipy=0.7.0=py36h2bbff1b_1003
  - ca-certificates=2022.07.19=haa95532_0
  - cachetools=4.2.2=pyhd3eb1b0_0
  - certifi=2021.5.30=py36haa95532_0
  - cffi=1.14.6=py36h2bbff1b_0
  - chardet=4.0.0=py36haa95532_1003
  - charset-normalizer=2.0.4=pyhd3eb1b0_0
  - click=8.0.3=pyhd3eb1b0_0
  - cryptography=3.4.7=py36h71e12ea_0
  - cudatoolkit=10.0.130=0- cudnn=7.6.5=cuda10.0_0- gast=0.2.2=py36_0
  - google-auth=2.6.0=pyhd3eb1b0_0
  - google-auth-oauthlib=0.4.4=pyhd3eb1b0_0
  - google-pasta=0.2.0=pyhd3eb1b0_0
  - grpcio=1.35.0=py36hc60d5dd_0
  - h5py=2.8.0=py36hf7173ca_2
  - hdf5=1.8.20=hac2f561_1
  - icc_rt=2019.0.0=h0cc432a_1
  - idna=3.3=pyhd3eb1b0_0
  - idna_ssl=1.1.0=py36haa95532_0
  - importlib-metadata=4.8.1=py36haa95532_0
  - intel-openmp=2022.0.0=haa95532_3663
  - joblib=1.0.1=pyhd3eb1b0_0
  - jpeg=9e=h2bbff1b_0
  - keras=2.3.1=0- keras-applications=1.0.8=py_1
  - keras-base=2.3.1=py36_0
  - keras-preprocessing=1.1.2=pyhd3eb1b0_0
  - lerc=3.0=hd77b12b_0
  - libdeflate=1.8=h2bbff1b_5
  - libopencv=3.4.2=h20b85fd_0
  - libpng=1.6.37=h2a8f88b_0
  - libprotobuf=3.17.2=h23ce68f_1
  - libtiff=4.4.0=h8a3f274_0
  - lz4-c=1.9.3=h2bbff1b_1
  - markdown=3.3.4=py36haa95532_0
  - mkl=2020.2=256- mkl-service=2.3.0=py36h196d8e1_0
  - mkl_fft=1.3.0=py36h46781fe_0
  - mkl_random=1.1.1=py36h47e9c7a_0
  - multidict=5.1.0=py36h2bbff1b_2
  - numpy=1.18.1=py36h93ca92e_0
  - numpy-base=1.18.1=py36hc3f5095_1
  - oauthlib=3.2.0=pyhd3eb1b0_1
  - opencv=3.4.2=py36h40b0b35_0
  - openssl=1.1.1q=h2bbff1b_0
  - opt_einsum=3.3.0=pyhd3eb1b0_1
  - pip=21.2.2=py36haa95532_0
  - protobuf=3.17.2=py36hd77b12b_0
  - py-opencv=3.4.2=py36hc319ecb_0
  - pyasn1=0.4.8=pyhd3eb1b0_0
  - pyasn1-modules=0.2.8=py_0
  - pycparser=2.21=pyhd3eb1b0_0
  - pyjwt=2.1.0=py36haa95532_0
  - pyopenssl=21.0.0=pyhd3eb1b0_1
  - pyreadline=2.1=py36_1
  - pysocks=1.7.1=py36haa95532_0
  - python=3.6.13=h3758d61_0
  - pyyaml=3.12=py36_0
  - requests=2.27.1=pyhd3eb1b0_0
  - requests-oauthlib=1.3.0=py_0
  - rsa=4.7.2=pyhd3eb1b0_1
  - scikit-learn=0.21.2=py36h6288b17_0
  - scipy=1.5.2=py36h9439919_0
  - setuptools=58.0.4=py36haa95532_0
  - six=1.16.0=pyhd3eb1b0_1
  - sqlite=3.39.2=h2bbff1b_0
  - tensorboard=2.4.0=pyhc547734_0
  - tensorboard-plugin-wit=1.6.0=py_0
  - tensorflow=2.1.0=eigen_py36hdbbabfe_0
  - tensorflow-base=2.1.0=eigen_py36h49b2757_0
  - tensorflow-estimator=2.6.0=pyh7b7c402_0
  - termcolor=1.1.0=py36haa95532_1
  - typing-extensions=4.1.1=hd3eb1b0_0
  - typing_extensions=4.1.1=pyh06a4308_0
  - urllib3=1.26.8=pyhd3eb1b0_0
  - vc=14.2=h21ff451_1
  - vs2015_runtime=14.27.29016=h5e58377_2
  - werkzeug=0.16.1=py_0
  - wheel=0.37.1=pyhd3eb1b0_0
  - win_inet_pton=1.1.0=py36haa95532_0
  - wincertstore=0.2=py36h7fe50ca_0
  - wrapt=1.12.1=py36he774522_1
  - xz=5.2.5=h8cc25b3_1
  - yarl=1.6.3=py36h2bbff1b_0
  - zipp=3.6.0=pyhd3eb1b0_0
  - zlib=1.2.12=h8cc25b3_2
  - zstd=1.5.2=h19a0ad4_0
通过anaconda导入配置
通过anaconda导入配置,免去环境的痛苦。
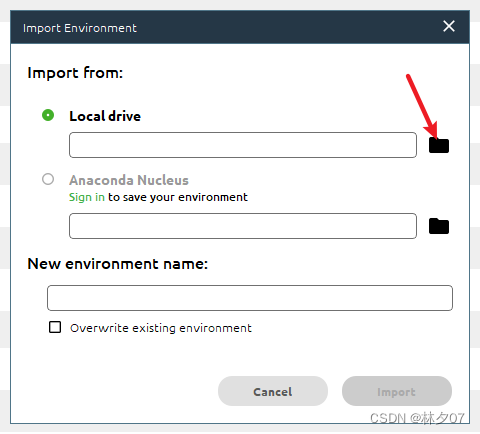
首先打开Anaconda软件,点击左侧的Envirconments。然后点击下方的import导入。
这里我们选择本地导入
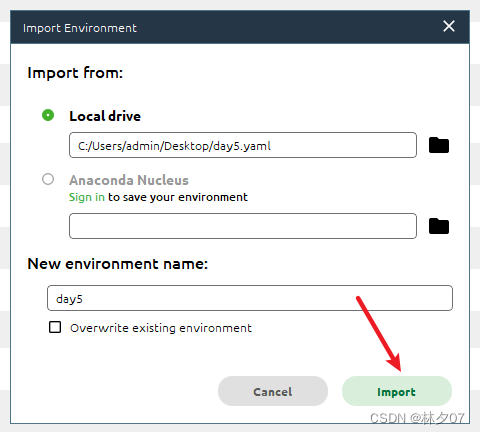
然后选择对应的*.yaml文件,然后点击imort。接下来你就可以去喝杯茶或者干点别的,等它慢慢安装即可。
数据集
训练集、验证机与测试集
一般手中拿到的都是历史数据,通过历史数据的学习去预测未知新数据。如果用全量历史数据进行学习,并进行验证,得到的验证结果是学习数据的准确率。
模型的调优方向,让模型具有更强的对未知数据的预测能力,也叫做泛化能力。
通过从历史数据中抽出一部分作为验证集(测试集),对当前学习到的模型进行泛化能力的验证。如果测试集的准确率和训练集的准确率相当,那么说明模型的泛化能力是足够的。
关于三类数据集之间的关系,常常用一个不恰当的比喻来说明:
训练集:相当于课后的练习题,用于日常的知识巩固。
验证集:相当于周考,用来纠正和强化学到的知识。
测试集:相当于期末考试,用来最终评估学习效果。
划分规则
如果给定的样本数据充足,我们通常使用均匀随机抽样的方式将数据集划分成3个部分——训练集、验证集和测试集,这三个集合一般没有交集。但是通常情况下只会给定训练集和测试集,而不会给验证集。这时候验证集就会从训练集中均匀随机抽样一部分样本作为验证集。
预处理
从指定路径读取训练数据
这里对传入的路径进行判断,如果是文件夹就继续递归,否则就进行读取。
defload_dataset(path_name):
    images, labels = read_path(path_name)# 将输入的所有图片转成四维数组,尺寸为(图片数量*IMAGE_SIZE*IMAGE_SIZE*3)# 图片为64 * 64像素,一个像素3个颜色值(RGB)
    images = np.array(images)print(images.shape)# 标注数据
    labels = np.array([indentify(label)for label in labels])# for i in labels:#     print(i)print(images,labels)return images, labels

defread_path(path_name):for dir_item in os.listdir(path_name):# 从初始路径开始叠加,合并成可识别的操作路径
        full_path = os.path.abspath(os.path.join(path_name, dir_item))#if os.path.isdir(full_path):# 如果是文件夹,继续递归调用
            read_path(full_path)else:# 文件if dir_item.endswith('.jpg'):
                image = cv2.imread(full_path)# print(full_path)
                image = resize_image(image, IMAGE_SIZE, IMAGE_SIZE)# 放开这个代码,可以看到resize_image()函数的实际调用效果# cv2.imwrite('1.jpg', image)
                images.append(image)# print(path_name)
                labels.append(path_name)return images, labels
设置标签
给文件夹后缀,加标签,使其向量化,如果添加新的人,就可以对应文件夹和下标
defindentify(label):if label.endswith('name1'):return0elif label.endswith('name2'):return1elif label.endswith('name3'):return2elif label.endswith('name4'):return3elif label.endswith('name5'):return4elif label.endswith('name6'):return5elif label.endswith('name7'):return6elif label.endswith('name8'):return7
按照指定图像大小调整尺寸
对从数据集中取出的照片进行尺寸修剪,并且增加边界。
import os
import sys
import numpy as np
import cv2

IMAGE_SIZE =64# 读取训练数据
images =[]
labels =[]defresize_image(image, height=IMAGE_SIZE, width=IMAGE_SIZE):
    top, bottom, left, right =(0,0,0,0)# 获取图像尺寸
    h, w, _ = image.shape

    # 对于长宽不相等的图片,找到最长的一边
    longest_edge =max(h, w)# 计算短边需要增加多上像素宽度使其与长边等长if h < longest_edge:
        dh = longest_edge - h
        top = dh //2
        bottom = dh - top
    elif w < longest_edge:
        dw = longest_edge - w
        left = dw //2
        right = dw - left
    else:pass# RGB颜色
    BLACK =[0,0,0]# 给图像增加边界,是图片长、宽等长,cv2.BORDER_CONSTANT指定边界颜色由value指定
    constant = cv2.copyMakeBorder(image, top, bottom, left, right, cv2.BORDER_CONSTANT, value=BLACK)# 调整图像大小并返回return cv2.resize(constant,(height, width))
数据归一化
不同的采集环境会对识别产生较大影响,比如:它会随着光线的变化发生变化、对声音的改变以及像素以及头部姿态等因素。目前常规的表情识别模型都是在标准化下采集的人脸表情数据,如果光线变的更亮或处在昏暗环境下、都会使得正确率发生变化,而这种变化是对我们不利的。在这其中光照强度和头部姿态的影响最为巨大,针对这种情况,我们只能从不变的光强和从正面采集人脸以求得正确率的提升。
基于各向同性扩散的归一化,它能使图像中的噪声减少,但其中非常重要的特征因素不会受其影响。(例如边缘或线条)
最值归一化(normalization)
把所有数据映射到0~1之间;只适用于有明显边间的情况,比如像素点中的像素值(0-255)。
公式如下:
x_scale=(x- x_min)/(x_max- x_min )
注:x为数据集中每一种特征的值;将数据集中的每一种特征都做映射;
均值方差归一化(standardization)
它的另一个叫法是标准化,不管你中间过程如何,但最终它都会把数据的均值和方差分别控制为0和1。如果我们应用的数据没有边界或边界不容易区分,或数据与数据间的差别非常大时,此方法就非常合适。比如人的工资有人可能好几百万但是有人可能只有几千。
x_scale=(x- x_mean)/x_scale
实现
在本文中将采用最值归一化。
# 将其归一化,图像的各像素值归一化到0~1区间
train_images /=255
valid_images /=255
test_images /=255
加载数据集并按照交叉验证的原则划分数据集
这里将数据集加载到本地内存中,然后将数据集进行划分,训练集与验证集的比例为4:1。测试集将会在所有数据中随机取出一半。然后根据keras库要求的维度顺序重组训练数据集。还包含了数据归一化操作。
注意:
K.image_dim_ordering() =\= 'th'
: 如果报错的话请替换为
K.image_data_format() == 'channels_first'
“
channels_last
”对应原本的“
tf
”,“
channels_first
”对应原本的“
th
”。
defload(self, img_rows=IMAGE_SIZE, img_cols=IMAGE_SIZE,
             img_channels=3, nb_classes=3):# 加载数据集到内存
        images, labels = load_dataset(self.path_name)

        train_images, valid_images, train_labels, valid_labels = train_test_split(images, labels, test_size=0.2,
                                                                                  random_state=random.randint(0,100))
        _, test_images, _, test_labels = train_test_split(images, labels, test_size=0.5,
                                                          random_state=random.randint(0,100))# 当前的维度顺序如果为'th',则输入图片数据时的顺序为:channels,rows,cols,否则:rows,cols,channels# 这部分代码就是根据keras库要求的维度顺序重组训练数据集if K.image_data_format()=='channels_first':
            train_images = train_images.reshape(train_images.shape[0], img_channels, img_rows, img_cols)
            valid_images = valid_images.reshape(valid_images.shape[0], img_channels, img_rows, img_cols)
            test_images = test_images.reshape(test_images.shape[0], img_channels, img_rows, img_cols)
            self.input_shape =(img_channels, img_rows, img_cols)else:
            train_images = train_images.reshape(train_images.shape[0], img_rows, img_cols, img_channels)
            valid_images = valid_images.reshape(valid_images.shape[0], img_rows, img_cols, img_channels)
            test_images = test_images.reshape(test_images.shape[0], img_rows, img_cols, img_channels)
            self.input_shape =(img_rows, img_cols, img_channels)# 输出训练集、验证集、测试集的数量print(train_images.shape[0],'train samples')print(valid_images.shape[0],'valid samples')print(test_images.shape[0],'test samples')# 我们的模型使用categorical_crossentropy作为损失函数,因此需要根据类别数量nb_classes将# 类别标签进行one-hot编码使其向量化,在这里我们的类别只有两种,经过转化后标签数据变为二维
            train_labels = np_utils.to_categorical(train_labels, nb_classes)
            valid_labels = np_utils.to_categorical(valid_labels, nb_classes)
            test_labels = np_utils.to_categorical(test_labels, nb_classes)# 像素数据浮点化以便归一化
            train_images = train_images.astype('float32')
            valid_images = valid_images.astype('float32')
            test_images = test_images.astype('float32')# 将其归一化,图像的各像素值归一化到0~1区间
            train_images /=255
            valid_images /=255
            test_images /=255

            self.train_images = train_images
            self.valid_images = valid_images
            self.test_images = test_images
            self.train_labels = train_labels
            self.valid_labels = valid_labels
            self.test_labels = test_labels
全部代码
load_ data.py文件
# -*- coding: utf-8 -*-import os
import sys
import numpy as np
import cv2

IMAGE_SIZE =64# 按照指定图像大小调整尺寸defresize_image(image, height=IMAGE_SIZE, width=IMAGE_SIZE):
    top, bottom, left, right =(0,0,0,0)# 获取图像尺寸
    h, w, _ = image.shape

    # 对于长宽不相等的图片,找到最长的一边
    longest_edge =max(h, w)# 计算短边需要增加多上像素宽度使其与长边等长if h < longest_edge:
        dh = longest_edge - h
        top = dh //2
        bottom = dh - top
    elif w < longest_edge:
        dw = longest_edge - w
        left = dw //2
        right = dw - left
    else:pass# RGB颜色
    BLACK =[0,0,0]# 给图像增加边界,是图片长、宽等长,cv2.BORDER_CONSTANT指定边界颜色由value指定
    constant = cv2.copyMakeBorder(image, top, bottom, left, right, cv2.BORDER_CONSTANT, value=BLACK)# 调整图像大小并返回return cv2.resize(constant,(height, width))# 读取训练数据
images =[]
labels =[]defread_path(path_name):for dir_item in os.listdir(path_name):# 从初始路径开始叠加,合并成可识别的操作路径
        full_path = os.path.abspath(os.path.join(path_name, dir_item))#if os.path.isdir(full_path):# 如果是文件夹,继续递归调用
            read_path(full_path)else:# 文件if dir_item.endswith('.jpg'):
                image = cv2.imread(full_path)# print(full_path)
                image = resize_image(image, IMAGE_SIZE, IMAGE_SIZE)# 放开这个代码,可以看到resize_image()函数的实际调用效果# cv2.imwrite('1.jpg', image)
                images.append(image)# print(path_name)
                labels.append(path_name)return images, labels

# 给文件夹后缀,加标注,使其向量化,如果添加新的人,就可以对应文件夹和下标defindentify(label):if label.endswith('name1'):return0elif label.endswith('name2'):return1elif label.endswith('name3'):return2elif label.endswith('name4'):return3elif label.endswith('name5'):return4elif label.endswith('name6'):return5elif label.endswith('name7'):return6elif label.endswith('name8'):return7elif label.endswith('name9'):return8elif label.endswith('name10'):return9# 从指定路径读取训练数据defload_dataset(path_name):
    images, labels = read_path(path_name)# 将输入的所有图片转成四维数组,尺寸为(图片数量*IMAGE_SIZE*IMAGE_SIZE*3)# 图片为64 * 64像素,一个像素3个颜色值(RGB)
    images = np.array(images)print(images.shape)# 标注数据,
    labels = np.array([indentify(label)for label in labels])# for i in labels:#     print(i)print(images,labels)return images, labels

if __name__ =='__main__':
    images, labels = load_dataset('.\\deep_learning\\')
keras_train.py文件
import random
import h5py
import numpy as np
# from sklearn.cross_validation import train_test_splitfrom sklearn.model_selection import train_test_split
from keras.preprocessing.image import ImageDataGenerator
from keras.models import Sequential
from keras.layers import Dense, Dropout, Activation, Flatten
from keras.layers import Convolution2D, MaxPooling2D
from keras.optimizers import SGD
from keras.utils import np_utils
from keras.models import load_model
from keras import backend as K
from load_data import load_dataset, resize_image, IMAGE_SIZE
import cv2

classDataset:def__init__(self, path_name):# 训练集
        self.train_images =None
        self.train_labels =None# 验证集
        self.valid_images =None
        self.valid_labels =None# 测试集
        self.test_images =None
        self.test_labels =None# 数据集加载路径
        self.path_name = path_name

        # 当前库采用的维度顺序
        self.input_shape =None# 加载数据集并按照交叉验证的原则划分数据集并进行相关预处理工作defload(self, img_rows=IMAGE_SIZE, img_cols=IMAGE_SIZE,
             img_channels=3, nb_classes=3):# 加载数据集到内存
        images, labels = load_dataset(self.path_name)

        train_images, valid_images, train_labels, valid_labels = train_test_split(images, labels, test_size=0.2,
                                                                                  random_state=random.randint(0,100))
        _, test_images, _, test_labels = train_test_split(images, labels, test_size=0.5,
                                                          random_state=random.randint(0,100))# 当前的维度顺序如果为'th',则输入图片数据时的顺序为:channels,rows,cols,否则:rows,cols,channels# 这部分代码就是根据keras库要求的维度顺序重组训练数据集if K.image_data_format()=='channels_first':
            train_images = train_images.reshape(train_images.shape[0], img_channels, img_rows, img_cols)
            valid_images = valid_images.reshape(valid_images.shape[0], img_channels, img_rows, img_cols)
            test_images = test_images.reshape(test_images.shape[0], img_channels, img_rows, img_cols)
            self.input_shape =(img_channels, img_rows, img_cols)else:
            train_images = train_images.reshape(train_images.shape[0], img_rows, img_cols, img_channels)
            valid_images = valid_images.reshape(valid_images.shape[0], img_rows, img_cols, img_channels)
            test_images = test_images.reshape(test_images.shape[0], img_rows, img_cols, img_channels)
            self.input_shape =(img_rows, img_cols, img_channels)# 输出训练集、验证集、测试集的数量print(train_images.shape[0],'train samples')print(valid_images.shape[0],'valid samples')print(test_images.shape[0],'test samples')# 我们的模型使用categorical_crossentropy作为损失函数,因此需要根据类别数量nb_classes将# 类别标签进行one-hot编码使其向量化,在这里我们的类别只有两种,经过转化后标签数据变为二维
            train_labels = np_utils.to_categorical(train_labels, nb_classes)
            valid_labels = np_utils.to_categorical(valid_labels, nb_classes)
            test_labels = np_utils.to_categorical(test_labels, nb_classes)# 像素数据浮点化以便归一化
            train_images = train_images.astype('float32')
            valid_images = valid_images.astype('float32')
            test_images = test_images.astype('float32')# 将其归一化,图像的各像素值归一化到0~1区间
            train_images /=255
            valid_images /=255
            test_images /=255

            self.train_images = train_images
            self.valid_images = valid_images
            self.test_images = test_images
            self.train_labels = train_labels
            self.valid_labels = valid_labels
            self.test_labels = test_labels

if __name__ =='__main__':
    dataset = Dataset('.\\deep_learning')
    dataset.load(nb_classes=10)//这里输入 人的数量
测试结果
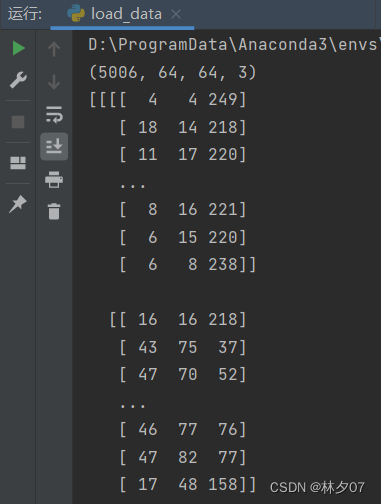
将数据进行打印。
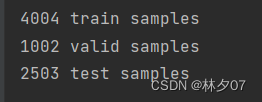
输出拆分的数据集量。
报错以及解决方案
过程及其曲折,我只能记得部分错误了。
AttributeError: module ‘keras.backend’ has no attribute ‘image_dim_ordering’
使用
K.image_dim_ordering() =\= 'th'
语句 如果报错的话请替换为
K.image_data_format() == 'channels_first'
“
channels_last
”对应原本的“
tf
”,“
channels_first
”对应原本的“
th
”。
Error:TypeError: Invalid shape (1, 28, 28) for image data
调用:plt.imshow(img, cmap=“gray”) 时出错:TypeError: Invalid shape (1, 28, 28) for image data
这是因为这个image是三维的,我们可以改为:plt.imshow(img.squeeze(), cmap=“gray”)
squeeze()函数可以把三维数组变为二维。因为它会把为1的维度给去掉。
AttributeError: module ‘numpy’ has no attribute ‘version’
这个错误就是就是罪魁祸首,导致我环境搞了几个小时。网上的方法都是让卸载掉然后在安装。
pip uninstall numpy
pip install numpy
但是我尝试了 结果就是告诉我没有适合的版本。我直接裂开。所以我就采用碰运气的方式重装了环境。如果有大佬知道这个问题怎么解决请评论区说一声。
总结
在读取数据集以及拆分数据集和预处理中,主要的问题就是环境的搭建一个numpy库搞我半天,
再就是还有一些方法的迭代更新,其实核心技术没有多少,可能需要了解一下交叉验证吧。
版权归原作者 林夕07 所有, 如有侵权,请联系我们删除。