
文章目录
1. Spring中的观察者模式
观察者模式是一种行为设计模式,它定义了对象之间的依赖关系,当一个对象的状态发生改变时,所有依赖于它的对象都会得到通知并被自动更新。在这个模式中,改变状态的对象被称为主题,依赖的对象被称为观察者。
举个实际的例子:
- 事件源(Event Source):可以视为“主题(
Subject)”,当其状态发生变化时(比如播放新的内容),会通知所有的观察者。想象我们正在听广播,广播电台就是一个事件源,它提供了大量的新闻、音乐和其他内容。 - 事件(Event):这是主题状态改变的具体表示,对应到广播例子中,就是新闻、音乐和其他内容。每当电台播放新的内容时,就相当于一个新的事件被发布了。
- 广播器(Event Publisher / Multicaster):广播器起到的是中介的作用,它将事件从事件源传递到监听器。在这个例子中,广播塔就充当了这个角色,它将电台的节目的无线电信号发送到空气中,以便无线电接收器(监听器)可以接收。
- 监听器(Listener):监听器就是“观察者”,它们监听并响应特定的事件。在例子中,无线电接收器就是监听器,它接收广播塔发出的信号,然后播放电台的内容。
在
Spring
中,事件模型的工作方式也是类似的:
- 当
Spring应用程序中发生某个行为时(比如一个用户完成了注册),那么产生这个行为的组件(比如用户服务)就会创建一个事件,并将它发布出去。 - 事件一旦被发布,
Spring的ApplicationContext就会作为广播器,把这个事件发送给所有注册的监听器。 - 各个监听器接收到事件后,就会根据事件的类型和内容,进行相应的处理(比如发送欢迎邮件,赠送新用户优惠券等)。
这就是
Spring
事件模型的工作原理,它实现了事件源、广播器和监听器之间的解耦,使得事件的生产者和消费者可以独立地进行开发和修改,增强了程序的灵活性和可维护性。
2. 监听器
2.1 实现ApplicationListener接口创建监听器
首先,我们创建一个监听器。在
Spring
框架中,内置的监听器接口是
ApplicationListener
,这个接口带有一个泛型参数,代表要监听的具体事件。我们可以通过实现这个接口来创建自定义的监听器。
当所有的
Bean
都已经被初始化后,
Spring
会发布一个
ContextRefreshedEvent
事件,告知所有的监听器,应用上下文已经准备好了,我们可以创建一个监听器来监听
ContextRefreshedEvent
事件
全部代码如下:
packagecom.example.demo.listener;importorg.springframework.context.ApplicationListener;importorg.springframework.context.event.ContextRefreshedEvent;importorg.springframework.stereotype.Component;@ComponentpublicclassMyContextRefreshedListenerimplementsApplicationListener<ContextRefreshedEvent>{@OverridepublicvoidonApplicationEvent(ContextRefreshedEvent event){System.out.println("MyContextRefreshedListener收到ContextRefreshedEvent事件!");}}
注意,我们使用
@Component
注解来标记这个监听器,这样在
Spring
进行包扫描的时候能够找到并自动注册它。
接下来,我们需要创建一个启动类来启动
IOC
容器并测试这个监听器。
主程序:
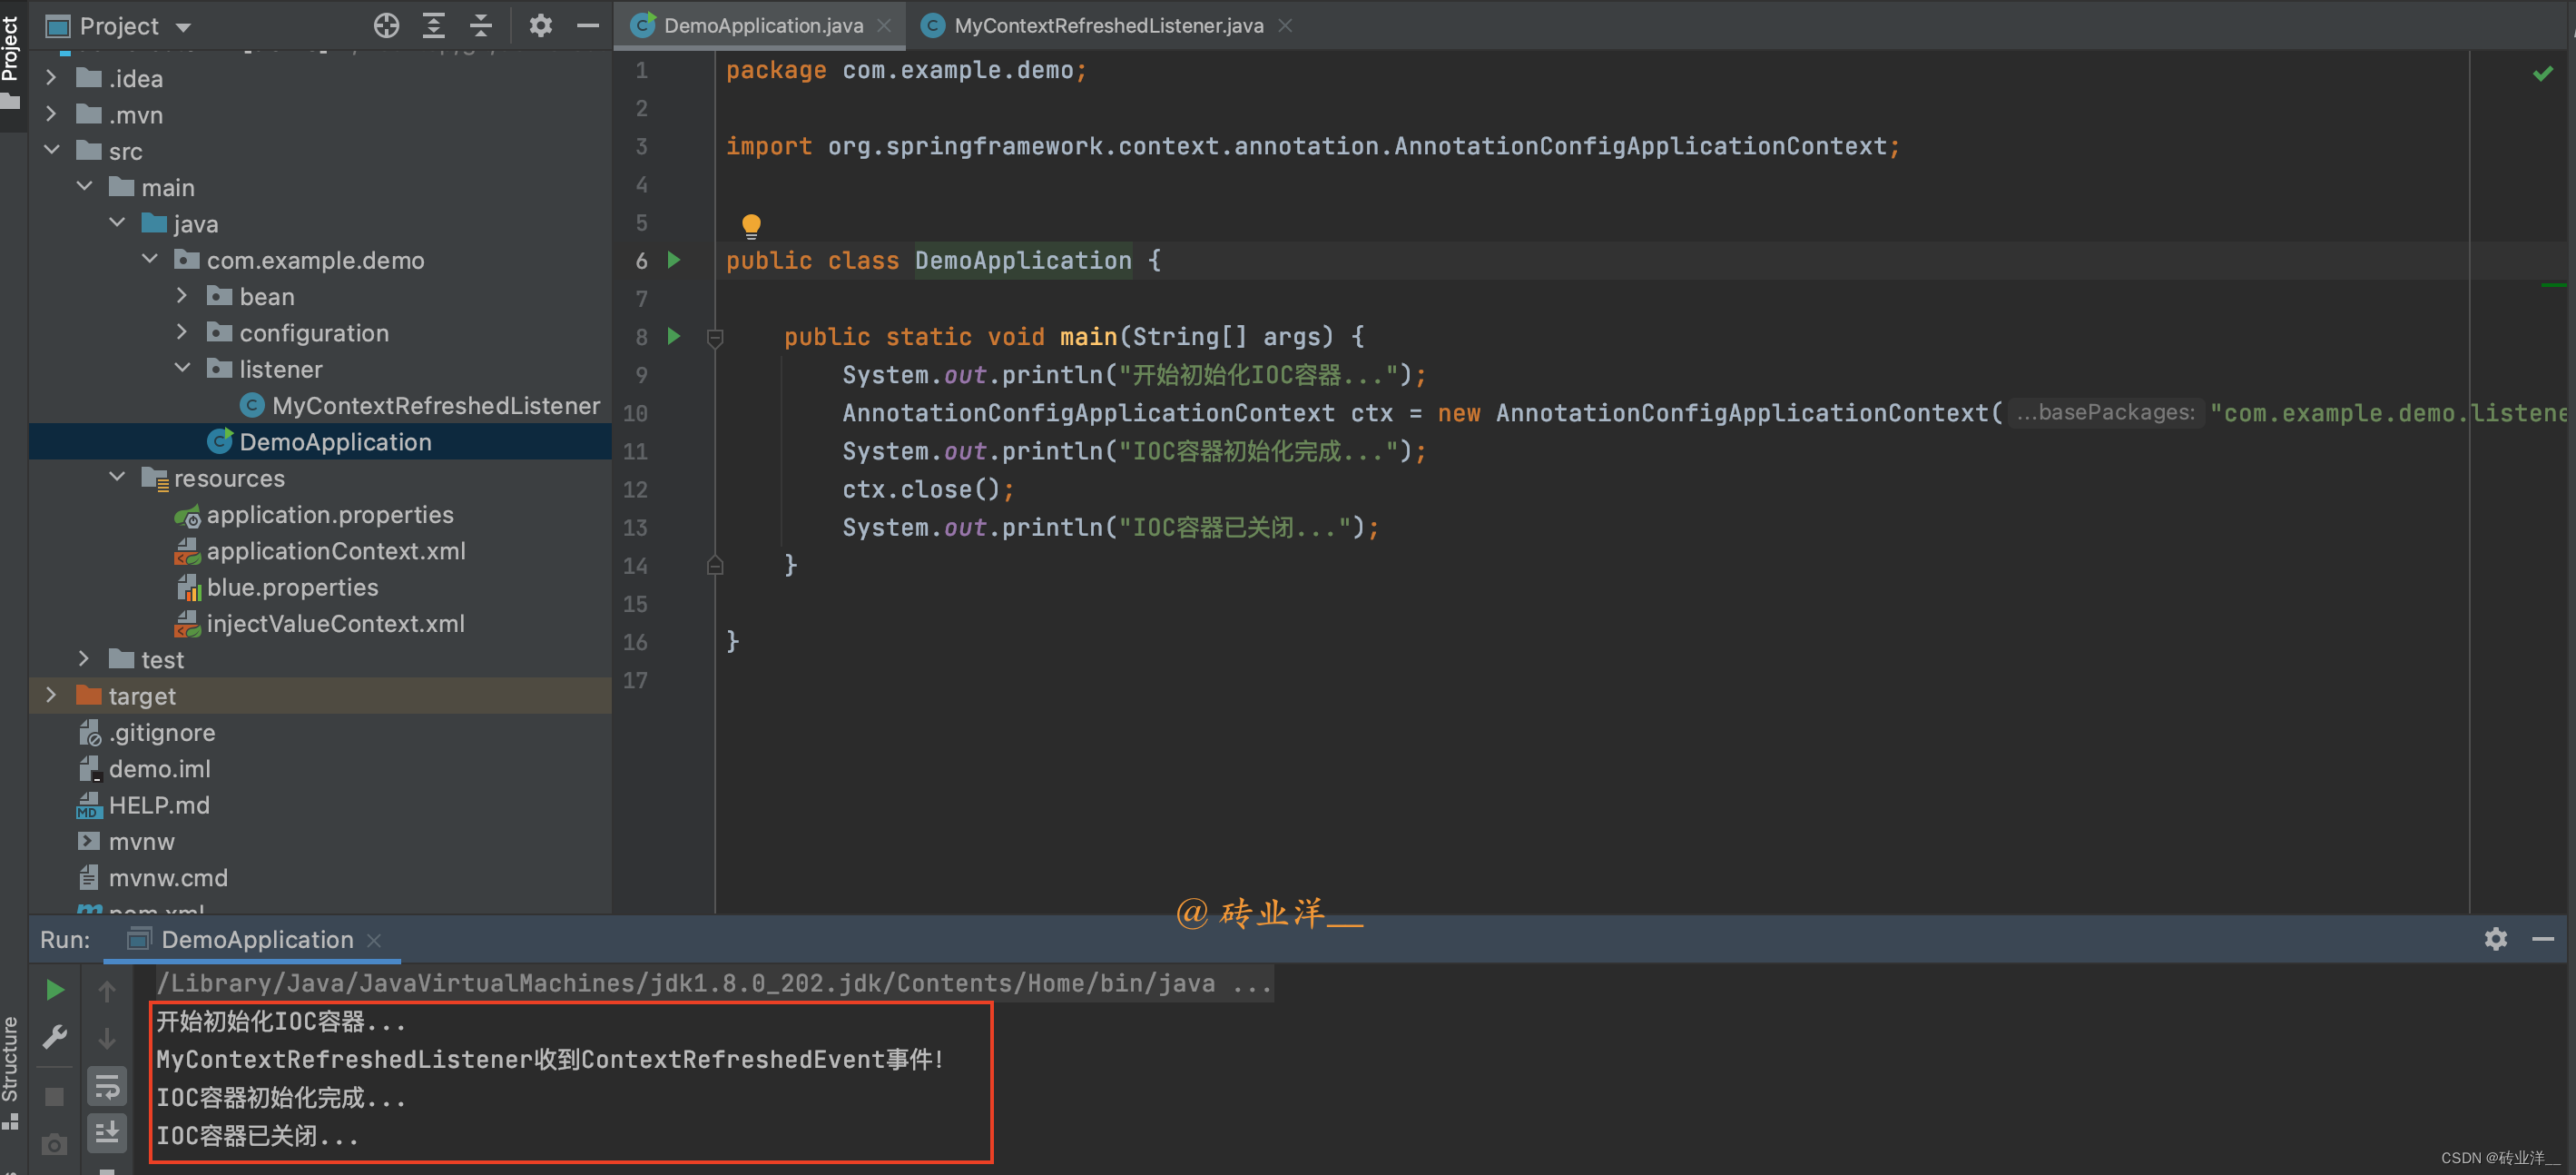
packagecom.example.demo;importorg.springframework.context.annotation.AnnotationConfigApplicationContext;publicclassDemoApplication{publicstaticvoidmain(String[] args){System.out.println("开始初始化IOC容器...");AnnotationConfigApplicationContext ctx =newAnnotationConfigApplicationContext("com.example.demo.listener");System.out.println("IOC容器初始化完成...");
        ctx.close();System.out.println("IOC容器已关闭...");}}
运行这个程序会看到控制台上输出了在
MyContextRefreshedListener
中打印的消息,表明监听器成功接收到了事件。
运行结果:
2.2 @EventListener注解创建监听器
除了通过实现
ApplicationListener
接口来创建监听器,我们还可以通过注解来创建。
Spring
提供了
@EventListener
注解,我们可以在任何一个方法上使用这个注解来指定这个方法应该在收到某种事件时被调用。
比如,我们可以创建一个新的监听器来监听
ContextClosedEvent
事件,这个事件代表
Spring
的应用上下文即将关闭:
增加一个
MyContextClosedListener
类,方便和前面接口创建监听器进行对比
@ComponentpublicclassMyContextClosedListener{@EventListenerpublicvoidhandleContextClosedEvent(ContextClosedEvent event){System.out.println("MyContextClosedListener收到ContextClosedEvent事件!");}}
运行结果:
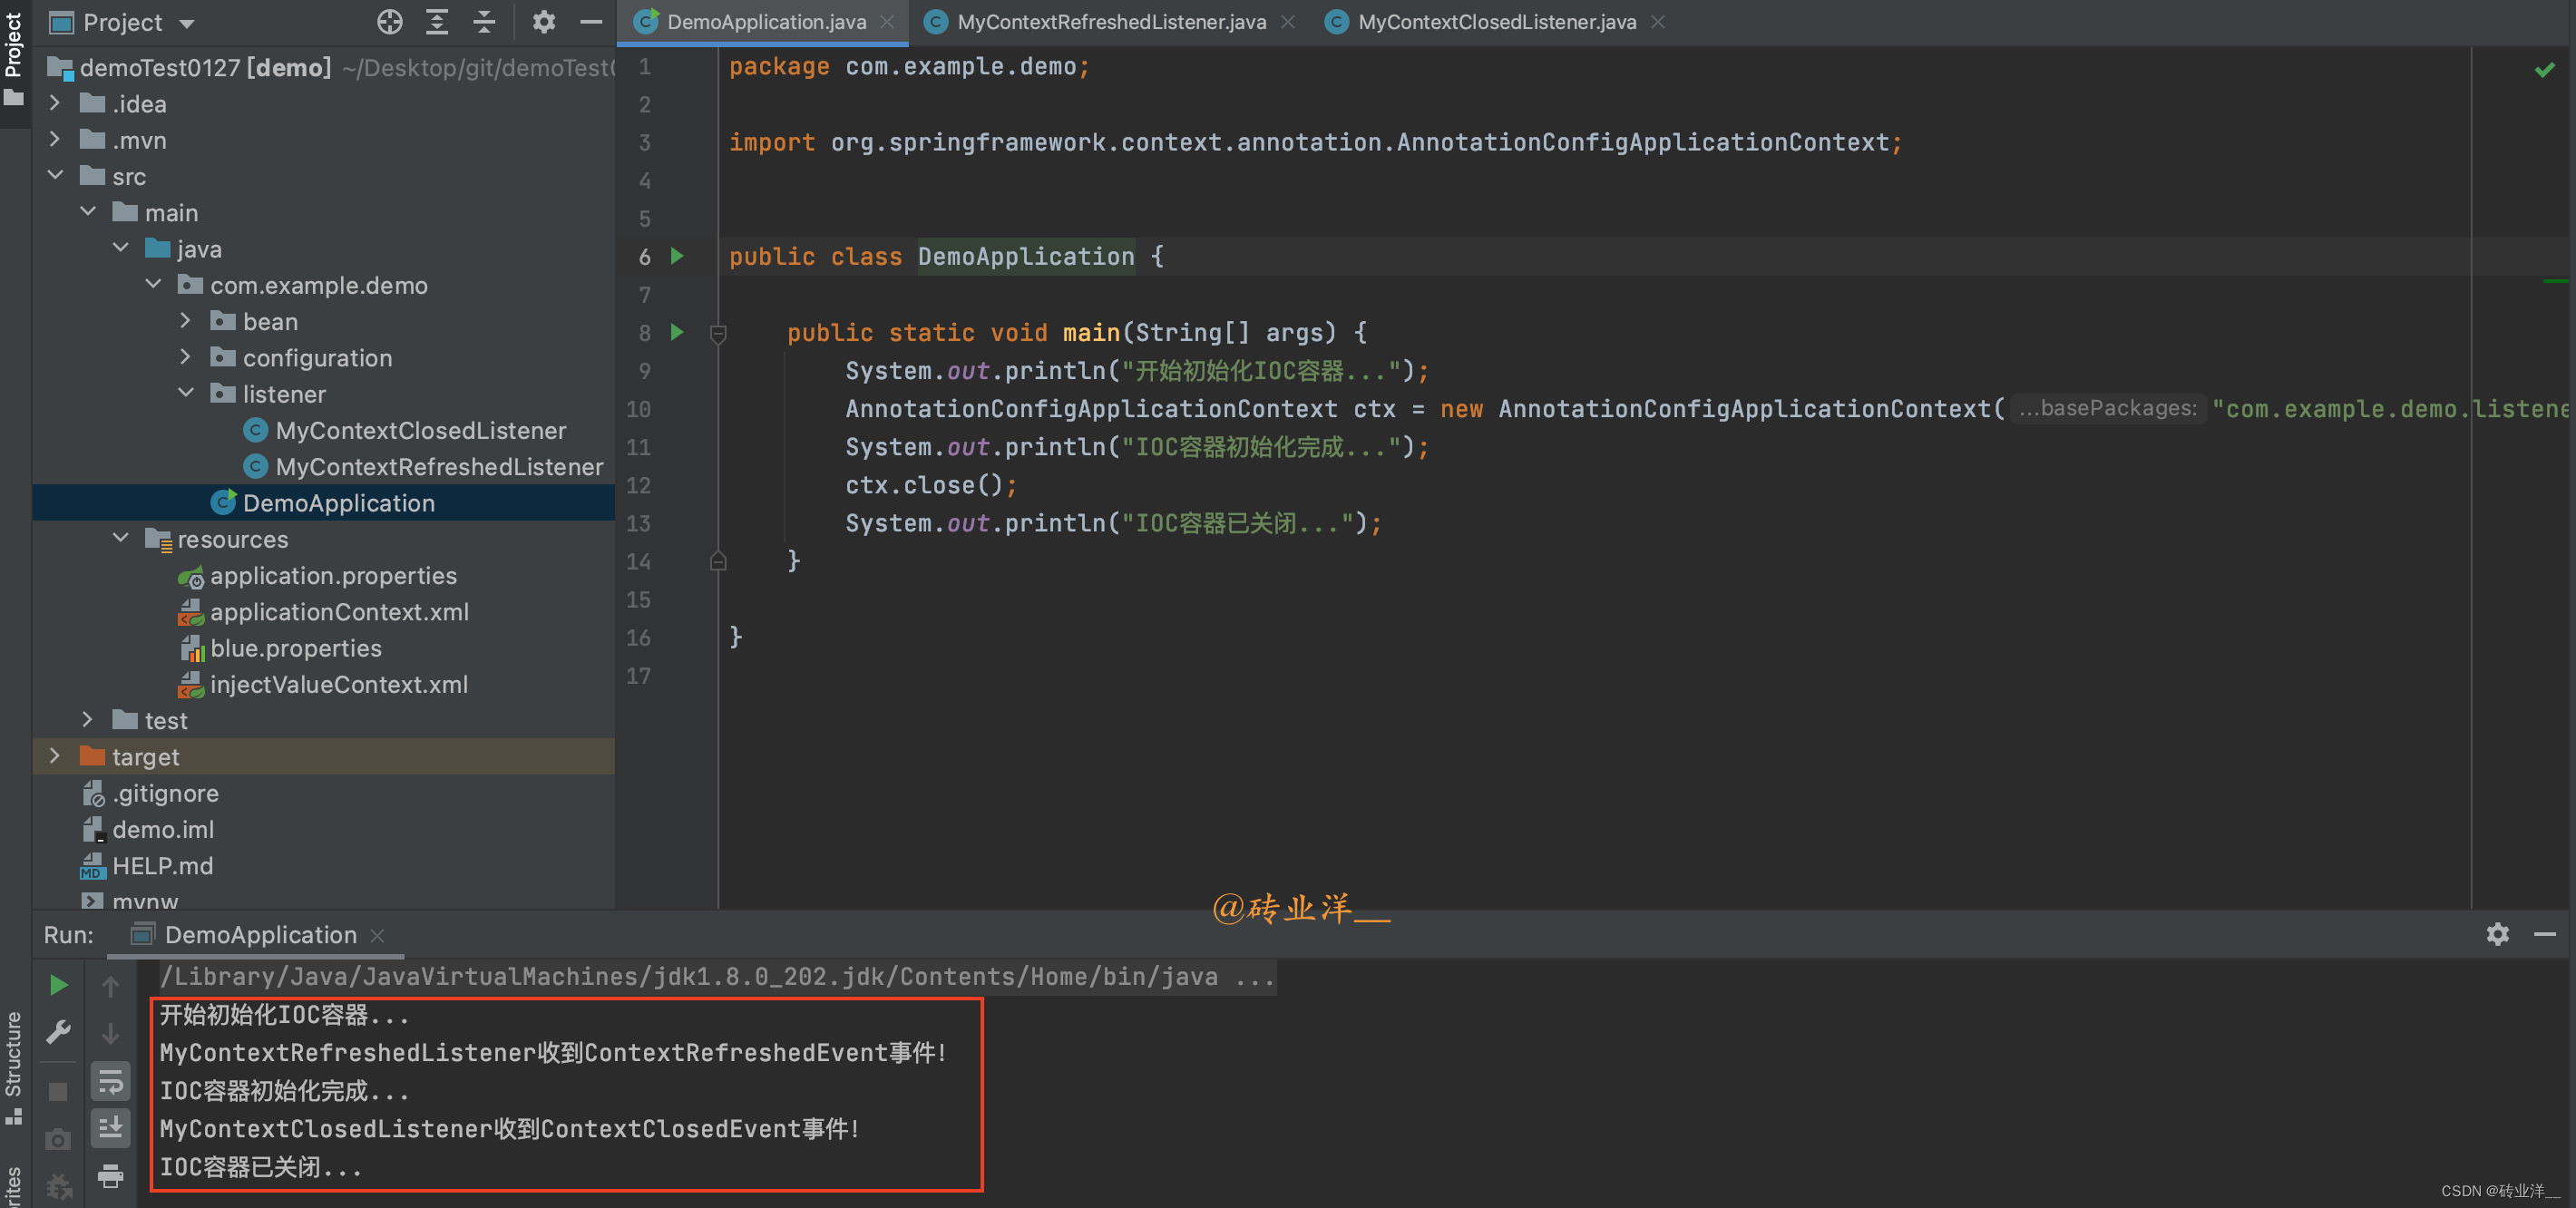
ContextClosedEvent
事件是在
Spring
应用上下文被关闭时发布的,这通常在所有的单例
Bean
已经被销毁之后。通过监听这个事件,我们可以在应用上下文关闭时执行一些清理工作。
2.3 对比ApplicationListener接口和@EventListener注解的创建方式
- 使用ApplicationListener接口:
上面说过,由于
ApplicationListener
接口是泛型接口,这个接口带有一个泛型参数,代表要监听的具体事件。
创建
ContextRefreshedEvent
事件的监听器:
importorg.springframework.context.ApplicationListener;importorg.springframework.context.event.ContextRefreshedEvent;importorg.springframework.stereotype.Component;@ComponentpublicclassContextRefreshedListenerimplementsApplicationListener<ContextRefreshedEvent>{@OverridepublicvoidonApplicationEvent(ContextRefreshedEvent event){System.out.println("Received ContextRefreshedEvent - Context refreshed!");}}
创建
ContextClosedEvent
事件的监听器:
importorg.springframework.context.ApplicationListener;importorg.springframework.context.event.ContextClosedEvent;importorg.springframework.stereotype.Component;@ComponentpublicclassContextClosedListenerimplementsApplicationListener<ContextClosedEvent>{@OverridepublicvoidonApplicationEvent(ContextClosedEvent event){System.out.println("Received ContextClosedEvent - Context closed!");}}
- 使用@EventListener注解:
importorg.springframework.context.event.ContextClosedEvent;importorg.springframework.context.event.ContextRefreshedEvent;importorg.springframework.context.event.EventListener;importorg.springframework.stereotype.Component;@ComponentpublicclassApplicationContextEventListener{@EventListenerpublicvoidhandleContextRefreshedEvent(ContextRefreshedEvent event){System.out.println("Received ContextRefreshedEvent - Context refreshed!");}@EventListenerpublicvoidhandleContextClosedEvent(ContextClosedEvent event){System.out.println("Received ContextClosedEvent - Context closed!");}}
在上述代码中,我们使用
@EventListener
注解定义了两个方法,分别处理
ContextRefreshedEvent
和
ContextClosedEvent
事件。不论何时
ContextRefreshedEvent
或
ContextClosedEvent
被发布,相应的监听器就会被触发,然后在控制台打印出相应的信息。
ContextRefreshedEvent事件在Spring容器初始化或者刷新时触发,此时所有的Bean都已经被完全加载,且post-processor也已经被调用,但此时容器尚未开始接收请求。ContextClosedEvent事件在Spring容器关闭时触发,此时容器尚未销毁所有Bean。当接收到这个事件后可以做一些清理工作。
3. Spring的事件机制
在
Spring
中,事件(
Event
)和监听器(
Listener
)是两个核心概念,它们共同构成了
Spring
的事件机制。这一机制使得在
Spring
应用中,组件之间可以通过发布和监听事件来进行解耦的交互。
在
Spring
中有
4
个默认的内置事件
- ApplicationEvent
- ApplicationContextEvent
- ContextRefreshedEvent 和 ContextClosedEvent
- ContextStartedEvent 和 ContextStoppedEvent
我们分别来看一下
3.1 ApplicationEvent
在
Spring
中,
ApplicationEvent
是所有事件模型的抽象基类,它继承自
Java
原生的
EventObject
,
ApplicationEvent
本身是一个抽象类,它并未定义特殊的方法或属性,只包含事件发生时的时间戳,这意味着我们可以通过继承
ApplicationEvent
来创建自定义的事件。
比如我们希望创建自定义事件,可以直接继承
ApplicationEvent
类。
完整代码如下:
创建一个
CustomApplicationEvent
packagecom.example.demo.event;importorg.springframework.context.ApplicationEvent;publicclassCustomApplicationEventextendsApplicationEvent{privateString message;publicCustomApplicationEvent(Object source,String message){super(source);this.message = message;}publicStringgetMessage(){return message;}}
然后创建一个监听器来监听这个自定义事件:
packagecom.example.demo.listener;importcom.example.demo.event.CustomApplicationEvent;importorg.springframework.context.ApplicationListener;importorg.springframework.stereotype.Component;@ComponentpublicclassCustomApplicationEventListenerimplementsApplicationListener<CustomApplicationEvent>{@OverridepublicvoidonApplicationEvent(CustomApplicationEvent event){System.out.println("Received custom event - "+ event.getMessage());}}
最后,在应用中的某个地方发布这个自定义事件:
packagecom.example.demo.event;importorg.springframework.context.ApplicationEventPublisher;importorg.springframework.stereotype.Component;@ComponentpublicclassCustomEventPublisher{privatefinalApplicationEventPublisher publisher;publicCustomEventPublisher(ApplicationEventPublisher publisher){this.publisher = publisher;}publicvoiddoSomethingAndPublishAnEvent(finalString message){System.out.println("Publishing custom event.");CustomApplicationEvent customApplicationEvent =newCustomApplicationEvent(this, message);
        publisher.publishEvent(customApplicationEvent);}}
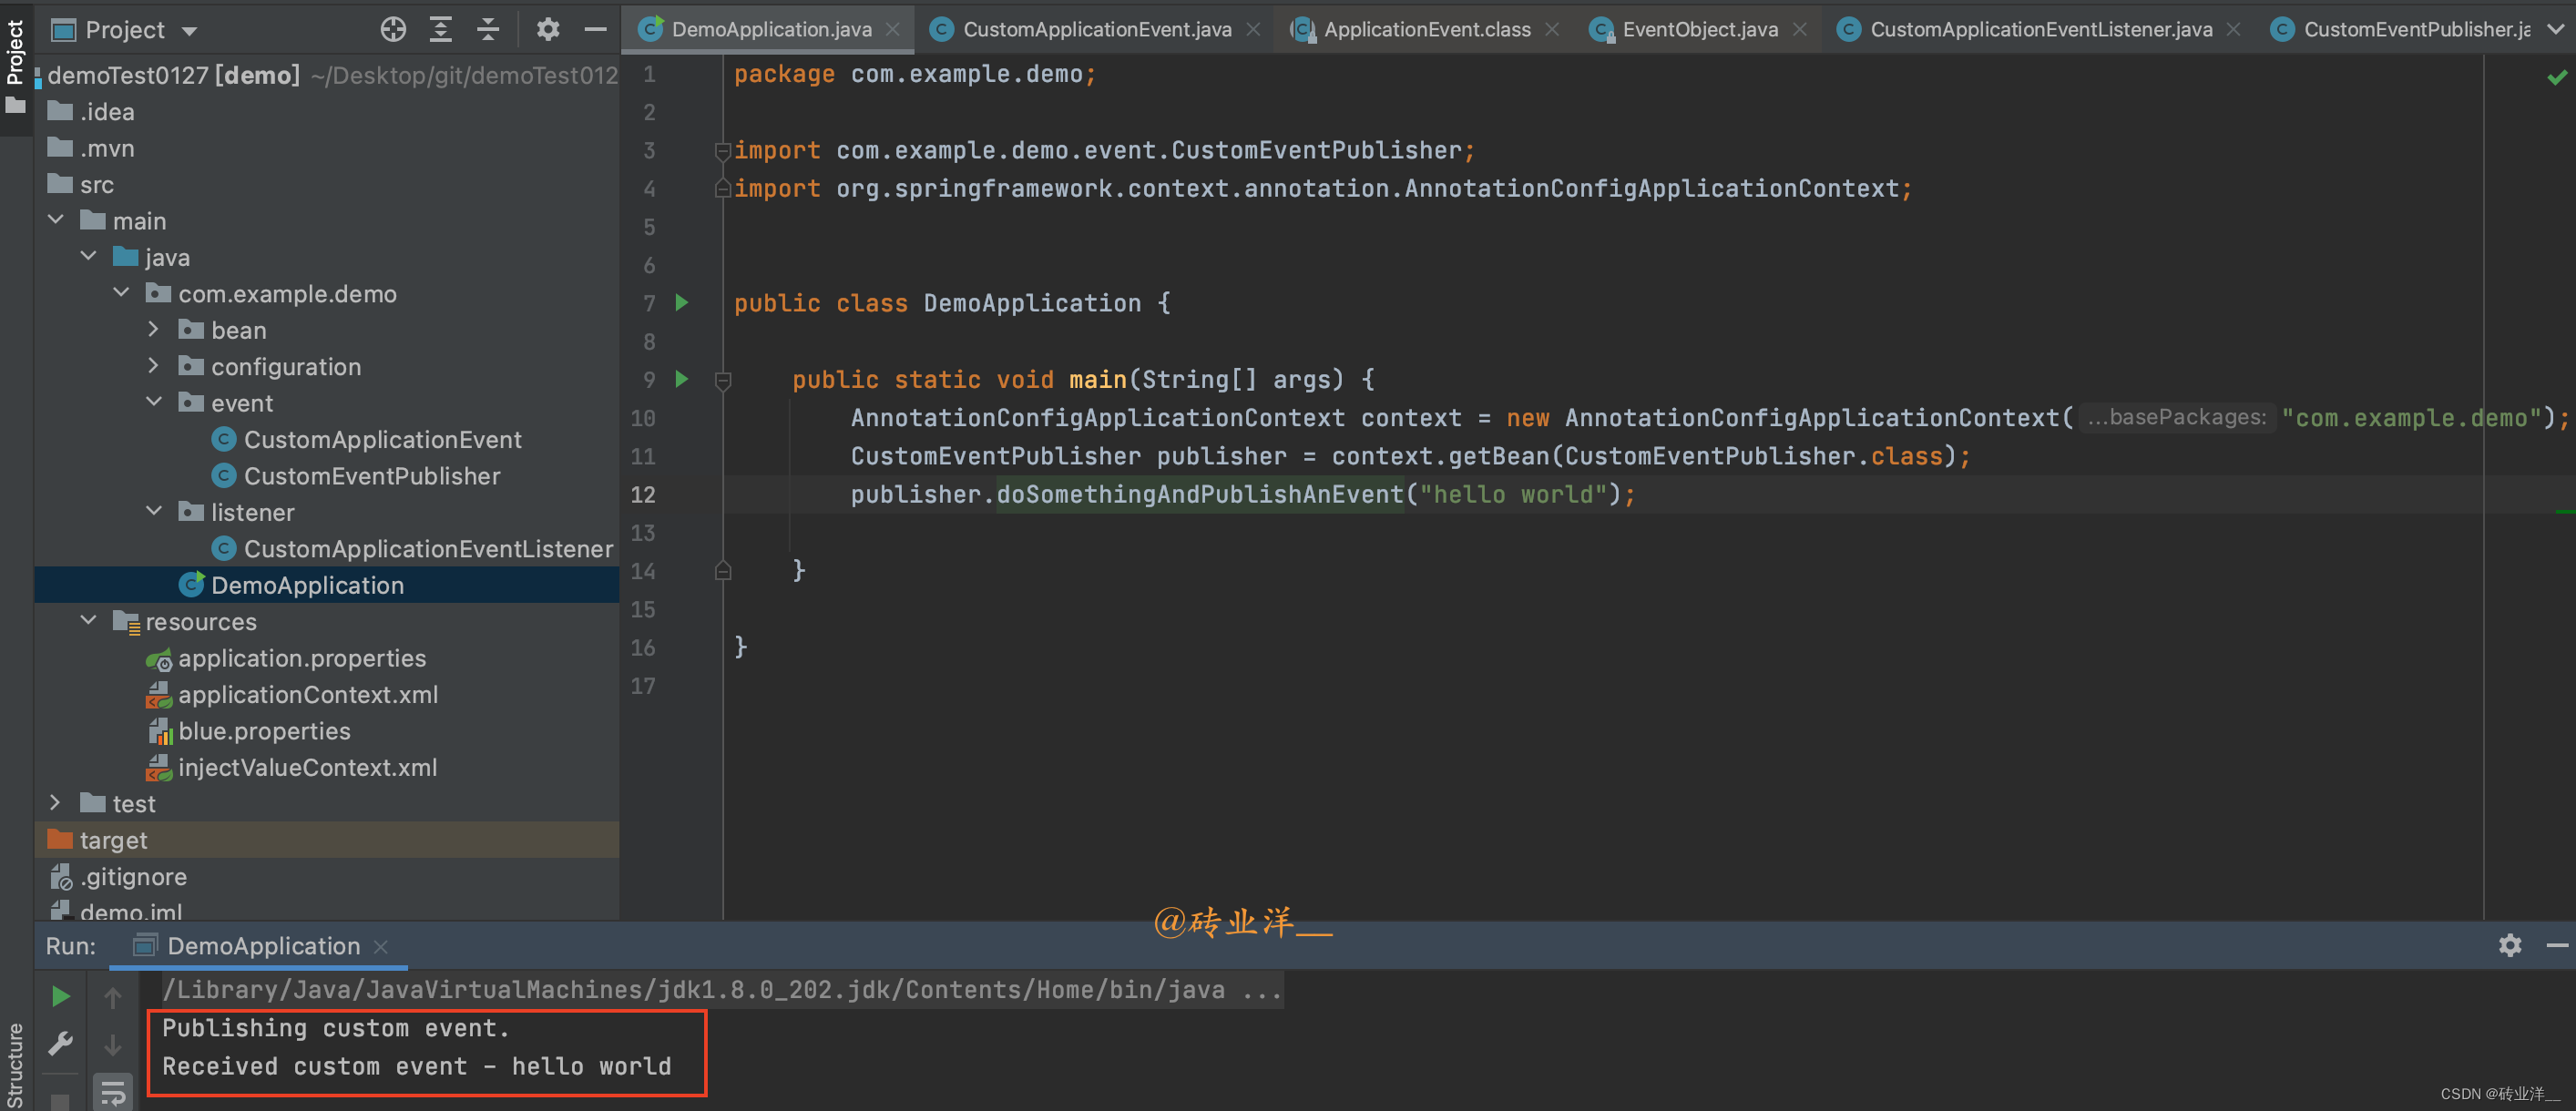
当调用
doSomethingAndPublishAnEvent()
方法时,
CustomApplicationEventListener
就会收到
CustomApplicationEvent
并打印出自定义消息,这就是通过继承
ApplicationEvent
自定义事件并进行监听的一种方式。
主程序:
packagecom.example.demo;importcom.example.demo.event.CustomEventPublisher;importorg.springframework.context.annotation.AnnotationConfigApplicationContext;publicclassDemoApplication{publicstaticvoidmain(String[] args){AnnotationConfigApplicationContext context =newAnnotationConfigApplicationContext("com.example.demo");CustomEventPublisher publisher = context.getBean(CustomEventPublisher.class);
        publisher.doSomethingAndPublishAnEvent("hello world");}}
有人可能会疑惑,
context.getBean(CustomEventPublisher.class)
为什么不报错呢?
CustomEventPublisher
只有一个带参数的构造方法啊。
从
Spring 4.3
开始,如果类只有一个构造方法,那么
Spring
将会自动把这个构造方法当作是我们希望进行自动装配的构造方法,无需显式地添加
@Autowired
或
@inject
注解。如果类有多个构造方法,并且没有在任何构造方法上使用
@Autowired
或
@inject
注解,那么
Spring
将会使用无参数的构造方法(如果存在的话)来创建这个类的实例。
Spring
会尝试在已经创建的
bean
中寻找能够满足构造器参数要求的
bean
,并自动将这些
bean
注入到构造方法中,这就是所谓的自动装配。
在这个例子中,
CustomEventPublisher
这个类只有一个带有
ApplicationEventPublisher
参数的构造方法。
Spring
在创建
CustomEventPublisher
的实例时,会尝试寻找一个已经创建的
ApplicationEventPublisher
类型的
bean
来满足这个构造方法的参数要求。
而
ApplicationEventPublisher
是
Spring
内置的一个接口,对应的实例是在
Spring
容器启动时就已经被
Spring
自动创建好的,因此
Spring
能够找到一个
ApplicationEventPublisher
类型的
bean
,然后将这个
bean
注入到
CustomEventPublisher
的构造方法中,这样就能够成功创建
CustomEventPublisher
的实例。
所以,即使
CustomEventPublisher
这个类没有无参构造器,
Spring
也可以通过自动装配功能成功地创建这个类的实例。
运行结果:
3.2 ApplicationContextEvent
ApplicationContextEvent
是
ApplicationEvent
的子类,它代表了与
Spring
应用上下文(
ApplicationContext
)有关的事件。这个抽象类在构造方法中接收一个
ApplicationContext
对象作为事件源(
source
)。这意味着在事件触发时,我们可以通过事件对象直接获取到发生事件的应用上下文,而不需要进行额外的操作。
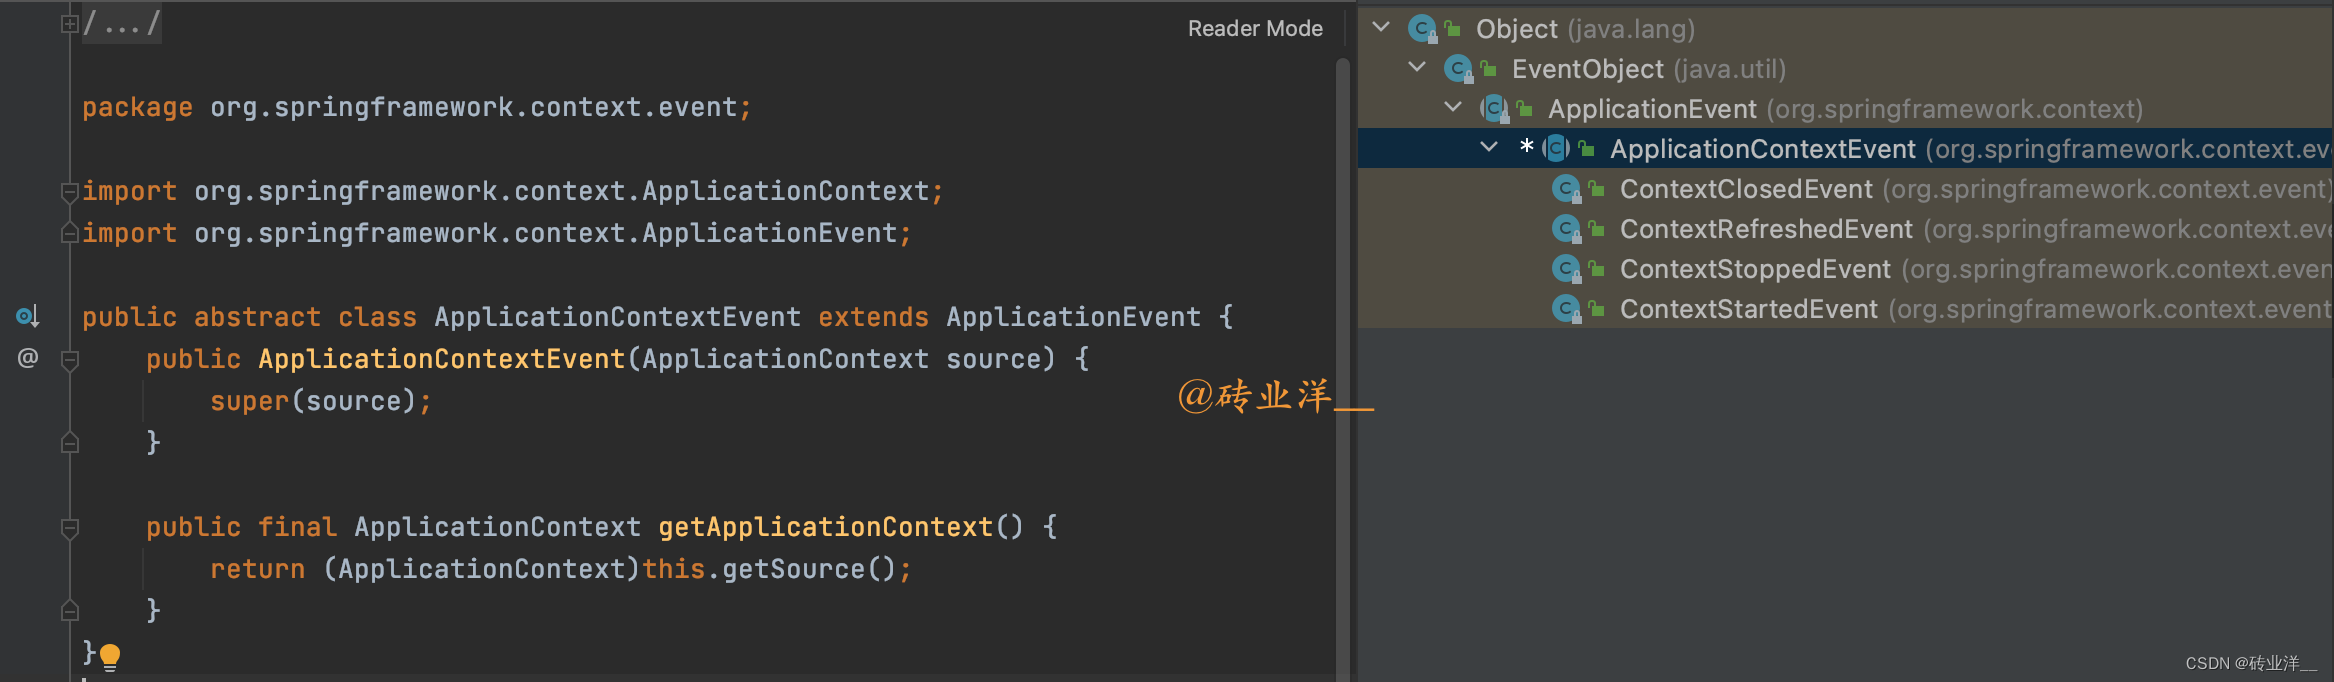
Spring
内置了一些事件,如
ContextRefreshedEvent
和
ContextClosedEvent
,这些都是
ApplicationContextEvent
的子类。
ApplicationContextEvent
是
ApplicationEvent
的子类,专门用来表示与
Spring
应用上下文相关的事件。虽然
ApplicationContextEvent
是一个抽象类,但在实际使用时,通常会使用其具体子类,如
ContextRefreshedEvent
和
ContextClosedEvent
,而不是直接使用
ApplicationContextEvent
。另外,虽然我们可以创建自定义的
ApplicationContextEvent
子类或
ApplicationEvent
子类来表示特定的事件,但这种情况比较少见,因为大多数情况下,
Spring
内置的事件类已经能满足我们的需求。
3.3 ContextRefreshedEvent 和 ContextClosedEvent
ContextRefreshedEvent
事件在
Spring
容器初始化或者刷新时触发,此时所有的
Bean
都已经被完全加载,且
post-processor
也已经被调用,但此时容器尚未开始接收请求。
ContextClosedEvent
事件在
Spring
容器关闭时触发,此时容器尚未销毁所有
Bean
。当接收到这个事件后可以做一些清理工作。
这里我们再次演示实现接口来创建监听器,不过和
2.3
节不同,我们只创建的
1
个类,同时处理
ContextRefreshedEvent
和
ContextClosedEvent
事件。这里实现
ApplicationListener
接口,泛型参数使用
ContextRefreshedEvent
和
ContextClosedEvent
的父类
ApplicationEvent
。
在
Spring
中创建一个类来监听多个事件,然后在
onApplicationEvent
方法中检查事件的类型。
全部代码如下:
packagecom.example.demo.listener;importorg.springframework.context.ApplicationEvent;importorg.springframework.context.ApplicationListener;importorg.springframework.context.event.ContextClosedEvent;importorg.springframework.context.event.ContextRefreshedEvent;importorg.springframework.stereotype.Component;@ComponentpublicclassMyApplicationContextEventListenerimplementsApplicationListener<ApplicationEvent>{@OverridepublicvoidonApplicationEvent(ApplicationEvent event){if(event instanceofContextRefreshedEvent){System.out.println("Context Refreshed Event received.");// Handle the event}elseif(event instanceofContextClosedEvent){System.out.println("Context Closed Event received.");// Handle the event}}}
主程序:
packagecom.example.demo;importorg.springframework.context.annotation.AnnotationConfigApplicationContext;publicclassDemoApplication{publicstaticvoidmain(String[] args){System.out.println("开始初始化IOC容器...");AnnotationConfigApplicationContext context =newAnnotationConfigApplicationContext("com.example.demo");System.out.println("IOC容器初始化完成...");
        context.close();System.out.println("IOC容器已关闭...");}}
运行结果:
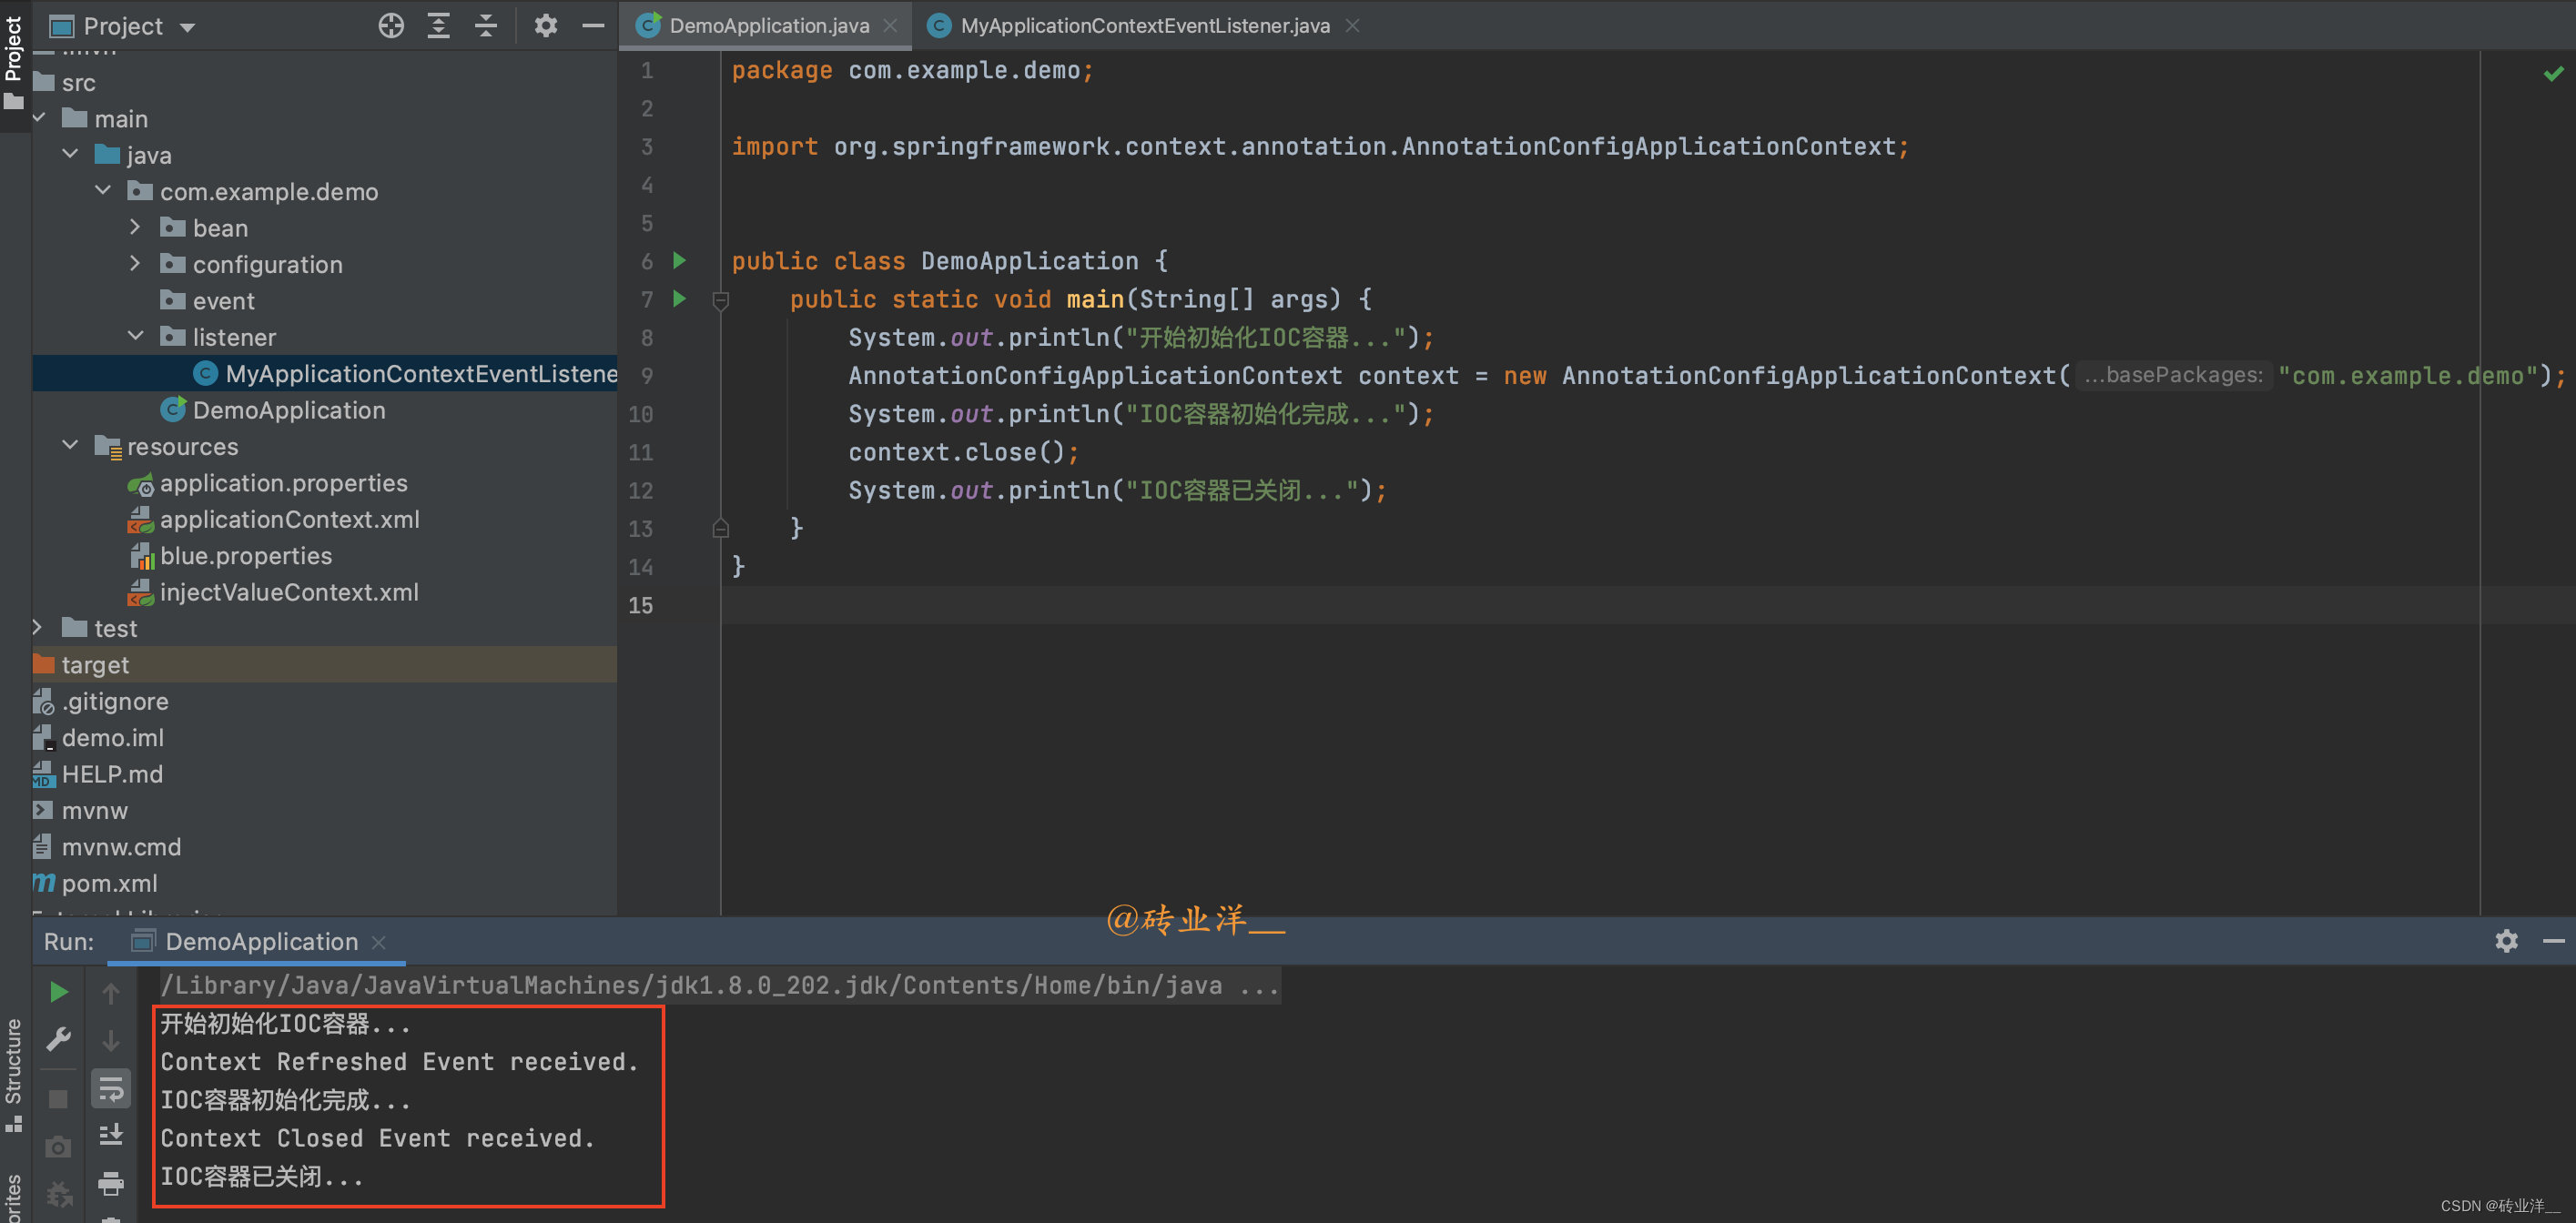
在这个例子中,
MyApplicationContextEventListener
现在只实现了
ApplicationListener<ApplicationEvent>
接口。然后在
onApplicationEvent
方法中,我们检查事件的类型,并根据事件的类型执行相应的操作。这样我们就可以在同一个监听器中处理多种类型的事件了。
3.4 ContextStartedEvent 和 ContextStoppedEvent
- ContextStartedEvent:这是
Spring应用上下文的启动事件。当调用实现了Lifecycle接口的Bean的start方法时,Spring会发布这个事件。这个事件的发布标志着Spring应用上下文已经启动完成,所有的Bean都已经被初始化并准备好接收请求。我们可以监听这个事件来在应用上下文启动后执行一些自定义逻辑,比如开启一个新线程,或者连接到一个远程服务等。 - ContextStoppedEvent:这是
Spring应用上下文的停止事件。当调用实现了Lifecycle接口的Bean的stop方法时,Spring会发布这个事件。这个事件的发布标志着Spring应用上下文开始停止的过程,此时Spring将停止接收新的请求,并开始销毁所有的Singleton Bean。我们可以监听这个事件来在应用上下文停止前执行一些清理逻辑,比如关闭数据库连接,释放资源等。
**有人可能会疑问了,实现了
Lifecycle
接口的
Bean
的
start
方法和
stop
方法是什么?这与
@PostConstruct
和
@PreDestroy
有什么区别?**
Lifecycle
接口有
start
个
stop
这
2
个方法,
start()
方法将在所有
Bean
都已被初始化后,整个应用上下文启动时被调用,而
stop()
方法将在应用上下文关闭,但是在所有单例
Bean
被销毁之前被调用。这意味着这些方法将影响整个应用上下文的生命周期。
总的来说,
@PostConstruct
和
@PreDestroy
主要关注单个
Bean
的生命周期,而
Lifecycle
接口则关注整个应用上下文的生命周期。
言归正传,回到这小节的主题,当
Spring
容器接收到
ContextStoppedEvent
事件时,它会停止所有的单例
Bean
,并释放相关资源。
全部代码如下:
packagecom.example.demo.listener;importorg.springframework.context.ApplicationEvent;importorg.springframework.context.ApplicationListener;importorg.springframework.context.event.ContextStartedEvent;importorg.springframework.context.event.ContextStoppedEvent;importorg.springframework.stereotype.Component;@ComponentpublicclassMyContextStartStopEventListenerimplementsApplicationListener<ApplicationEvent>{@OverridepublicvoidonApplicationEvent(ApplicationEvent event){if(event instanceofContextStartedEvent){System.out.println("Context Started Event received.");// Handle the event}elseif(event instanceofContextStoppedEvent){System.out.println("Context Stopped Event received.");// Handle the event}}}
packagecom.example.demo;importorg.springframework.context.annotation.AnnotationConfigApplicationContext;publicclassDemoApplication{publicstaticvoidmain(String[] args){AnnotationConfigApplicationContext context =newAnnotationConfigApplicationContext("com.example.demo");// 触发 ContextStartedEvent
        context.start();// 触发 ContextStoppedEvent
        context.stop();}}
运行结果:
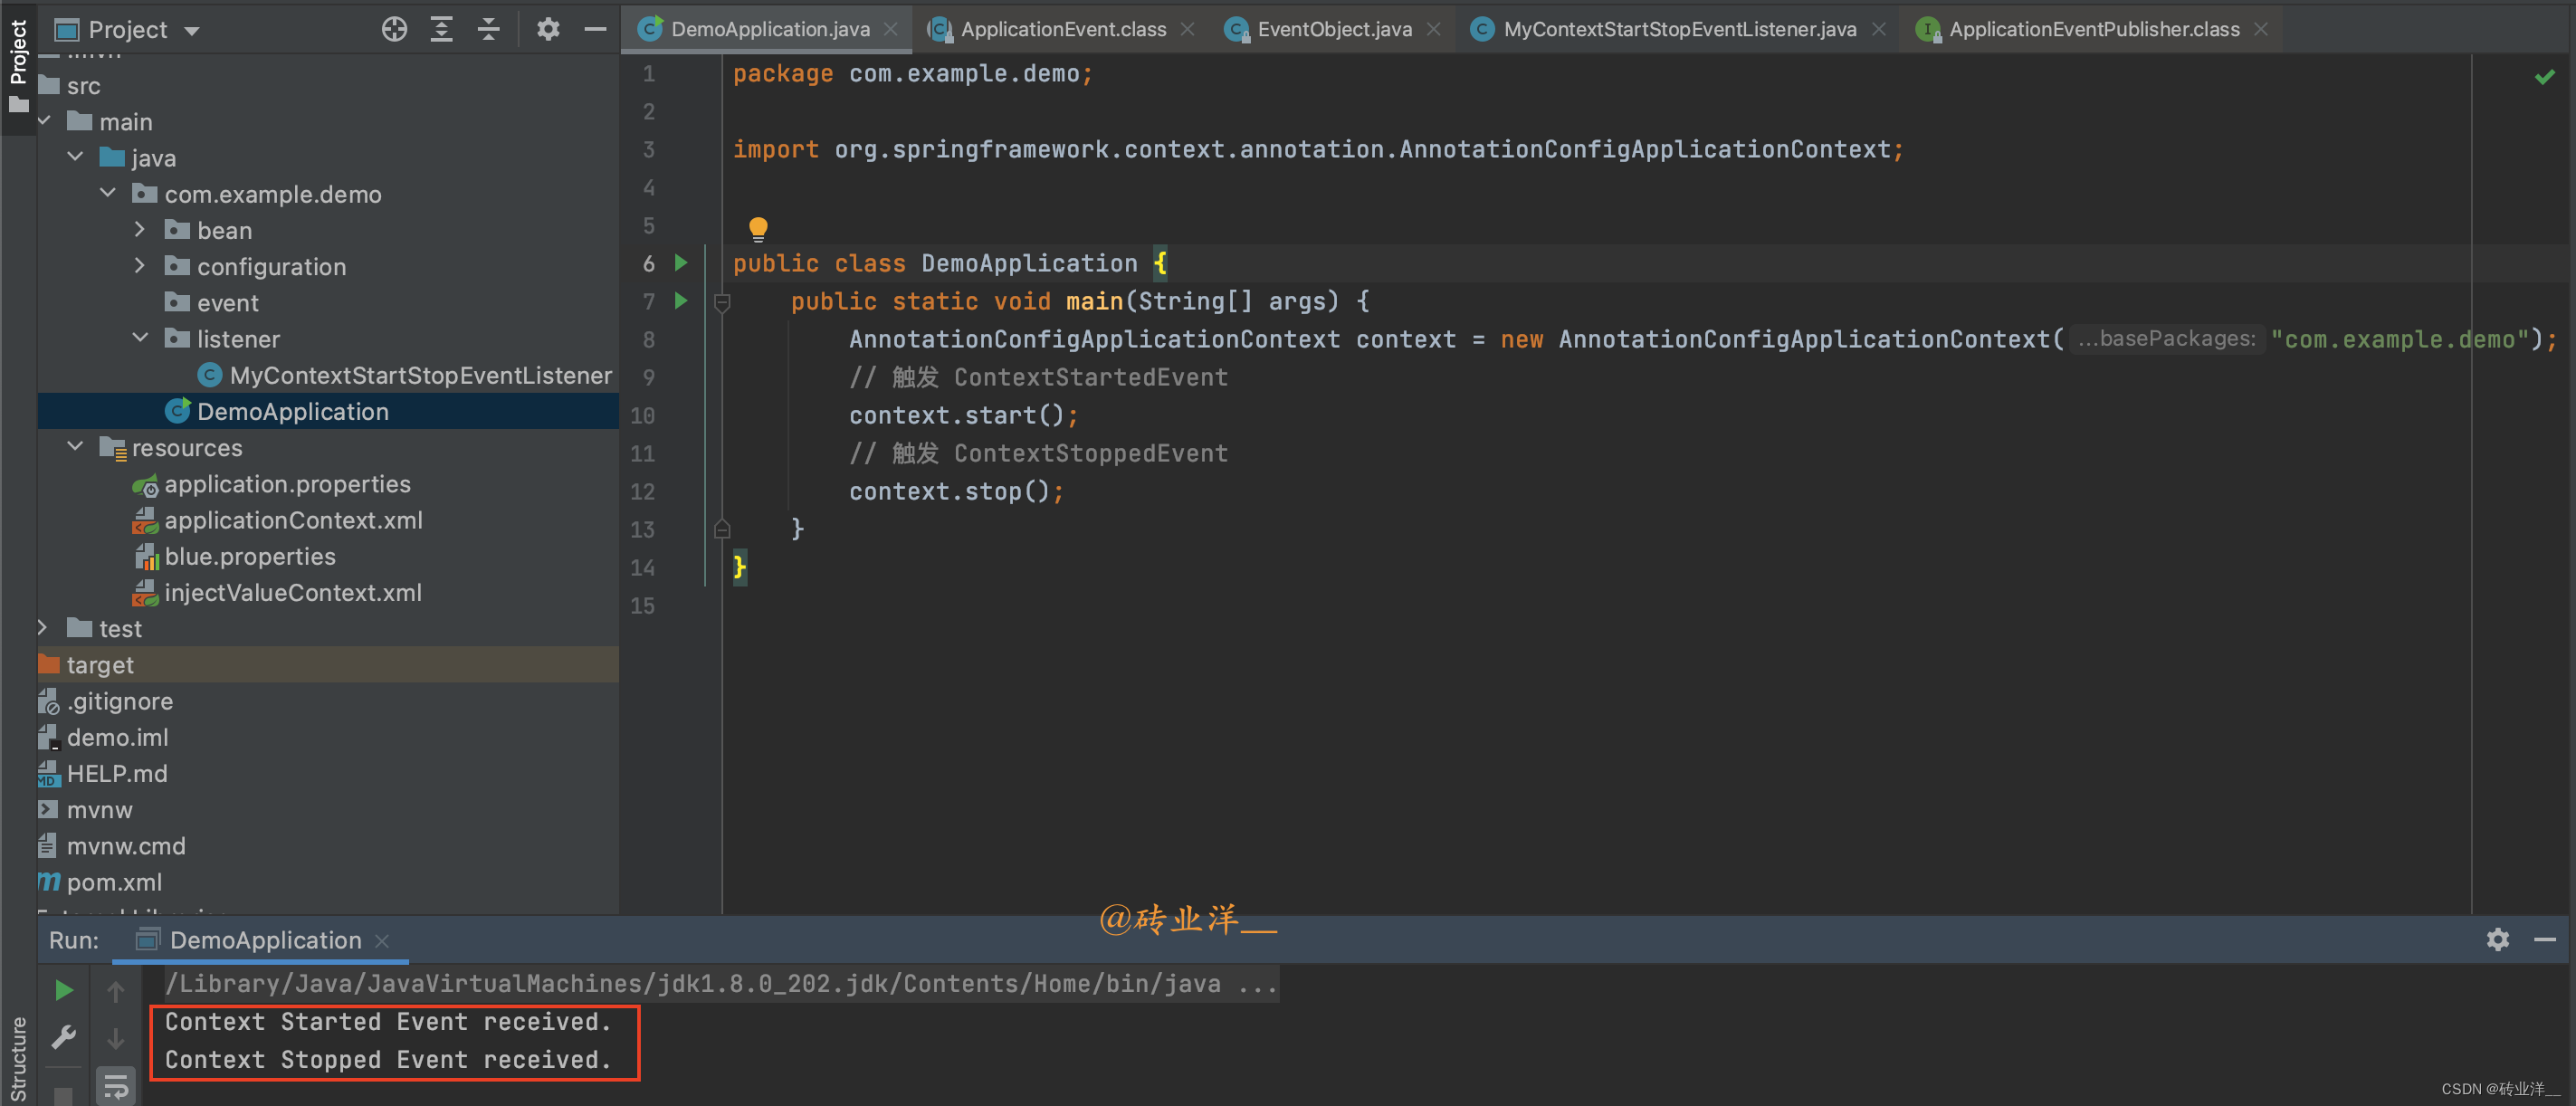
对于
ContextStartedEvent
和
ContextStoppedEvent
事件来说,需要手动调用
context.start()
和
context.stop()
来触发这两个事件。
ContextStartedEvent
事件是在
ApplicationContext
启动并且所有单例
bean
在完全初始化后被发布的,而
ContextStoppedEvent
事件是在
ApplicationContext
停止时发布的。
**为什么这里
context.start()
和
context.stop()
能触发
ContextStartedEvent
事件和
ContextStoppedEvent
事件呢?**
我们来看看源码,在
Spring
中,
AnnotationConfigApplicationContext
并没有直接实现
Lifecycle
接口。
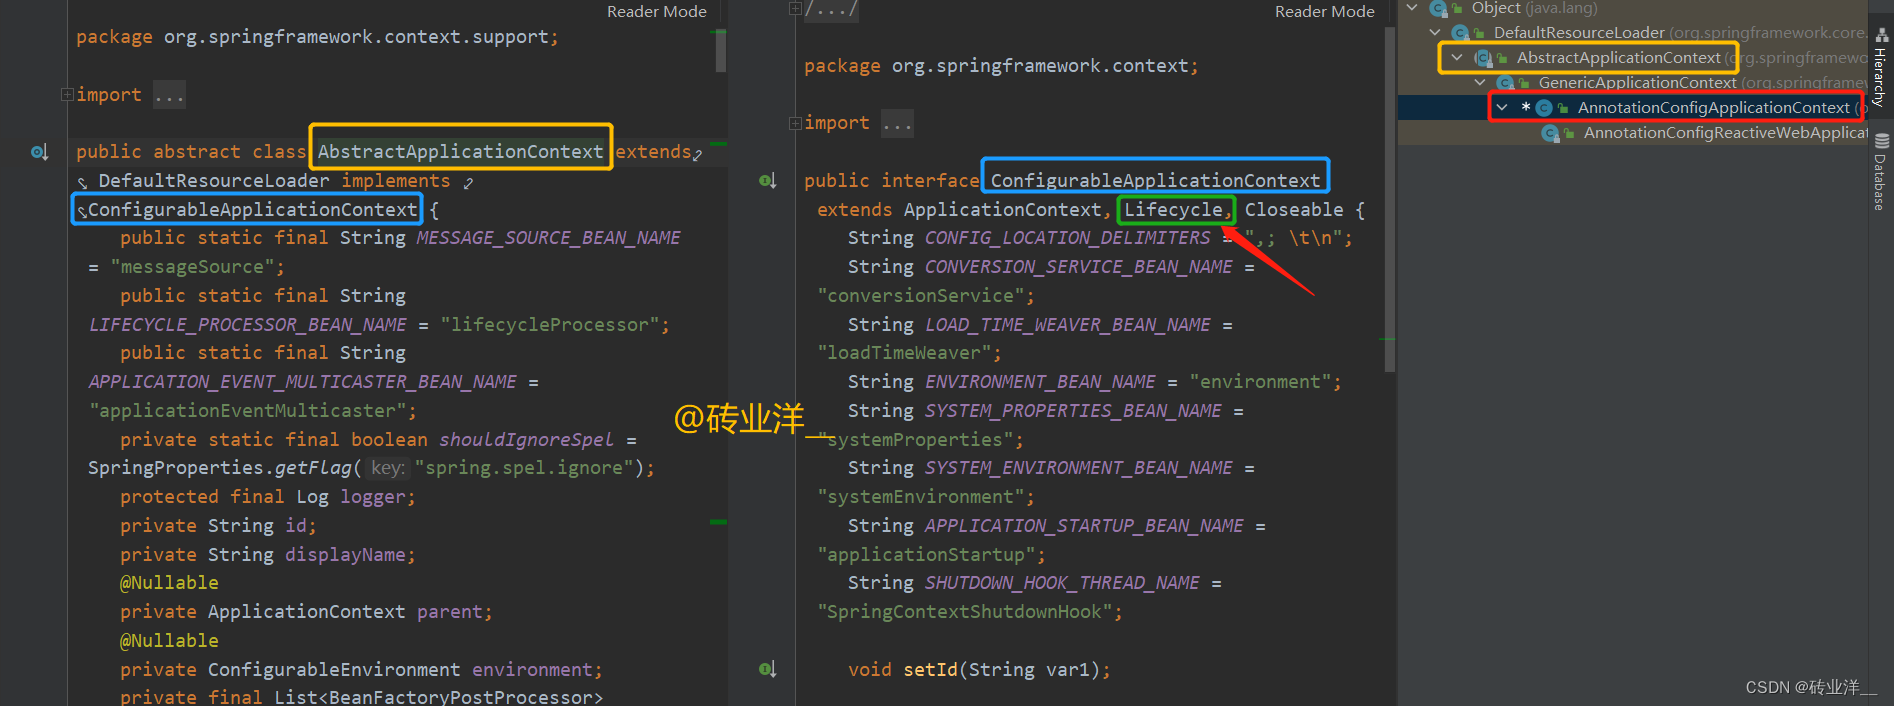
但是从图中我们可以看到,
AnnotationConfigApplicationContext
继承自
GenericApplicationContext
,
GenericApplicationContext
继承自
AbstractApplicationContext
抽象类。
AbstractApplicationContext
类实现了
ConfigurableApplicationContext
接口,这个
ConfigurableApplicationContext
接口继承了
Lifecycle
接口。
所以,从类的继承层次上来看,
AnnotationConfigApplicationContext
是间接实现了
Lifecycle
接口的。当我们在
AnnotationConfigApplicationContext
的对象上调用
start()
或
stop()
方法时,它就会触发相应的
ContextStartedEvent
或
ContextStoppedEvent
事件。
在实际的
Spring
应用中,很少需要手动调用
start()
和
stop()
方法。这是因为
Spring
框架已经为我们处理了大部分的生命周期控制,比如
bean
的创建和销毁,容器的初始化和关闭等。
4. 自定义事件开发
4.1 注解式监听器和接口式监听器对比触发时机
需求背景:假设正在开发一个论坛应用,当新用户成功注册后,系统需要进行一系列的操作。这些操作包括:
- 向用户发送一条确认短信;
- 向用户的电子邮箱发送一封确认邮件;
- 向用户的站内消息中心发送一条确认信息;
为了实现这些操作,我们可以利用
Spring
的事件驱动模型。具体来说,当用户注册成功后,我们可以发布一个“用户注册成功”的事件。这个事件将包含新注册用户的信息。
然后,我们可以创建多个监听器来监听这个“用户注册成功”的事件。这些监听器分别对应于上述的三个操作。当监听器监听到“用户注册成功”的事件后,它们将根据事件中的用户信息,执行各自的操作。
这里为了对比,会把两种监听器的创建方式一起使用,实际开发中只需要使用某一种方式即可。
全部代码如下:
首先,让我们定义事件:
packagecom.example.demo.event;importorg.springframework.context.ApplicationEvent;publicclassUserRegistrationEventextendsApplicationEvent{privateString username;publicUserRegistrationEvent(Object source,String username){super(source);this.username = username;}publicStringgetUsername(){return username;}}
接下来,让我们定义一个接口式监听器来发送短信通知:
packagecom.example.demo.listener;importcom.example.demo.event.UserRegistrationEvent;importorg.springframework.context.ApplicationListener;importorg.springframework.stereotype.Component;@ComponentpublicclassSmsNotificationListenerimplementsApplicationListener<UserRegistrationEvent>{@OverridepublicvoidonApplicationEvent(UserRegistrationEvent event){System.out.println("发送短信通知,恭喜用户 "+ event.getUsername()+" 注册成功!");}}
我们也可以定义一个注解式监听器来发送邮件通知:
packagecom.example.demo.listener;importcom.example.demo.event.UserRegistrationEvent;importorg.springframework.context.event.EventListener;importorg.springframework.stereotype.Component;@ComponentpublicclassEmailNotificationListener{@EventListenerpublicvoidhandleUserRegistrationEvent(UserRegistrationEvent event){System.out.println("发送邮件通知,恭喜用户 "+ event.getUsername()+" 注册成功!");}}
以及一个注解式监听器来发送站内信通知:
packagecom.example.demo.listener;importcom.example.demo.event.UserRegistrationEvent;importorg.springframework.context.event.EventListener;importorg.springframework.stereotype.Component;@ComponentpublicclassInternalMessageNotificationListener{@EventListenerpublicvoidhandleUserRegistrationEvent(UserRegistrationEvent event){System.out.println("发送站内信通知,恭喜用户 "+ event.getUsername()+" 注册成功!");}}
最后,我们需要一个发布事件的方法,在用户注册成功后调用。我们可以在注册服务中添加这个方法:
packagecom.example.demo.service;importcom.example.demo.event.UserRegistrationEvent;importorg.springframework.beans.factory.annotation.Autowired;importorg.springframework.context.ApplicationContext;importorg.springframework.stereotype.Service;@ServicepublicclassUserRegistrationService{@AutowiredprivateApplicationContext applicationContext;publicvoidregisterUser(String username){// 用户注册逻辑......// 用户注册成功,发布事件UserRegistrationEvent event =newUserRegistrationEvent(this, username);
        applicationContext.publishEvent(event);}}
以上就是使用两种不同监听器的示例。如果你运行这个代码,你会发现,注解式监听器(邮件通知和站内信通知)的触发时机是在接口式监听器(短信通知)之前。
如果不使用
SpringBoot
,我们可以使用
Spring
的传统应用上下文初始化和启动应用
主程序如下:
packagecom.example.demo;importcom.example.demo.service.UserRegistrationService;importorg.springframework.context.annotation.AnnotationConfigApplicationContext;publicclassDemoApplication{publicstaticvoidmain(String[] args){AnnotationConfigApplicationContext context =newAnnotationConfigApplicationContext("com.example.demo");UserRegistrationService userRegistrationService = context.getBean(UserRegistrationService.class);
        userRegistrationService.registerUser("testUser");
        context.close();}}
从应用上下文中获取
UserRegistrationService
的
Bean
,调用
registerUser
方法触发事件。
运行结果:
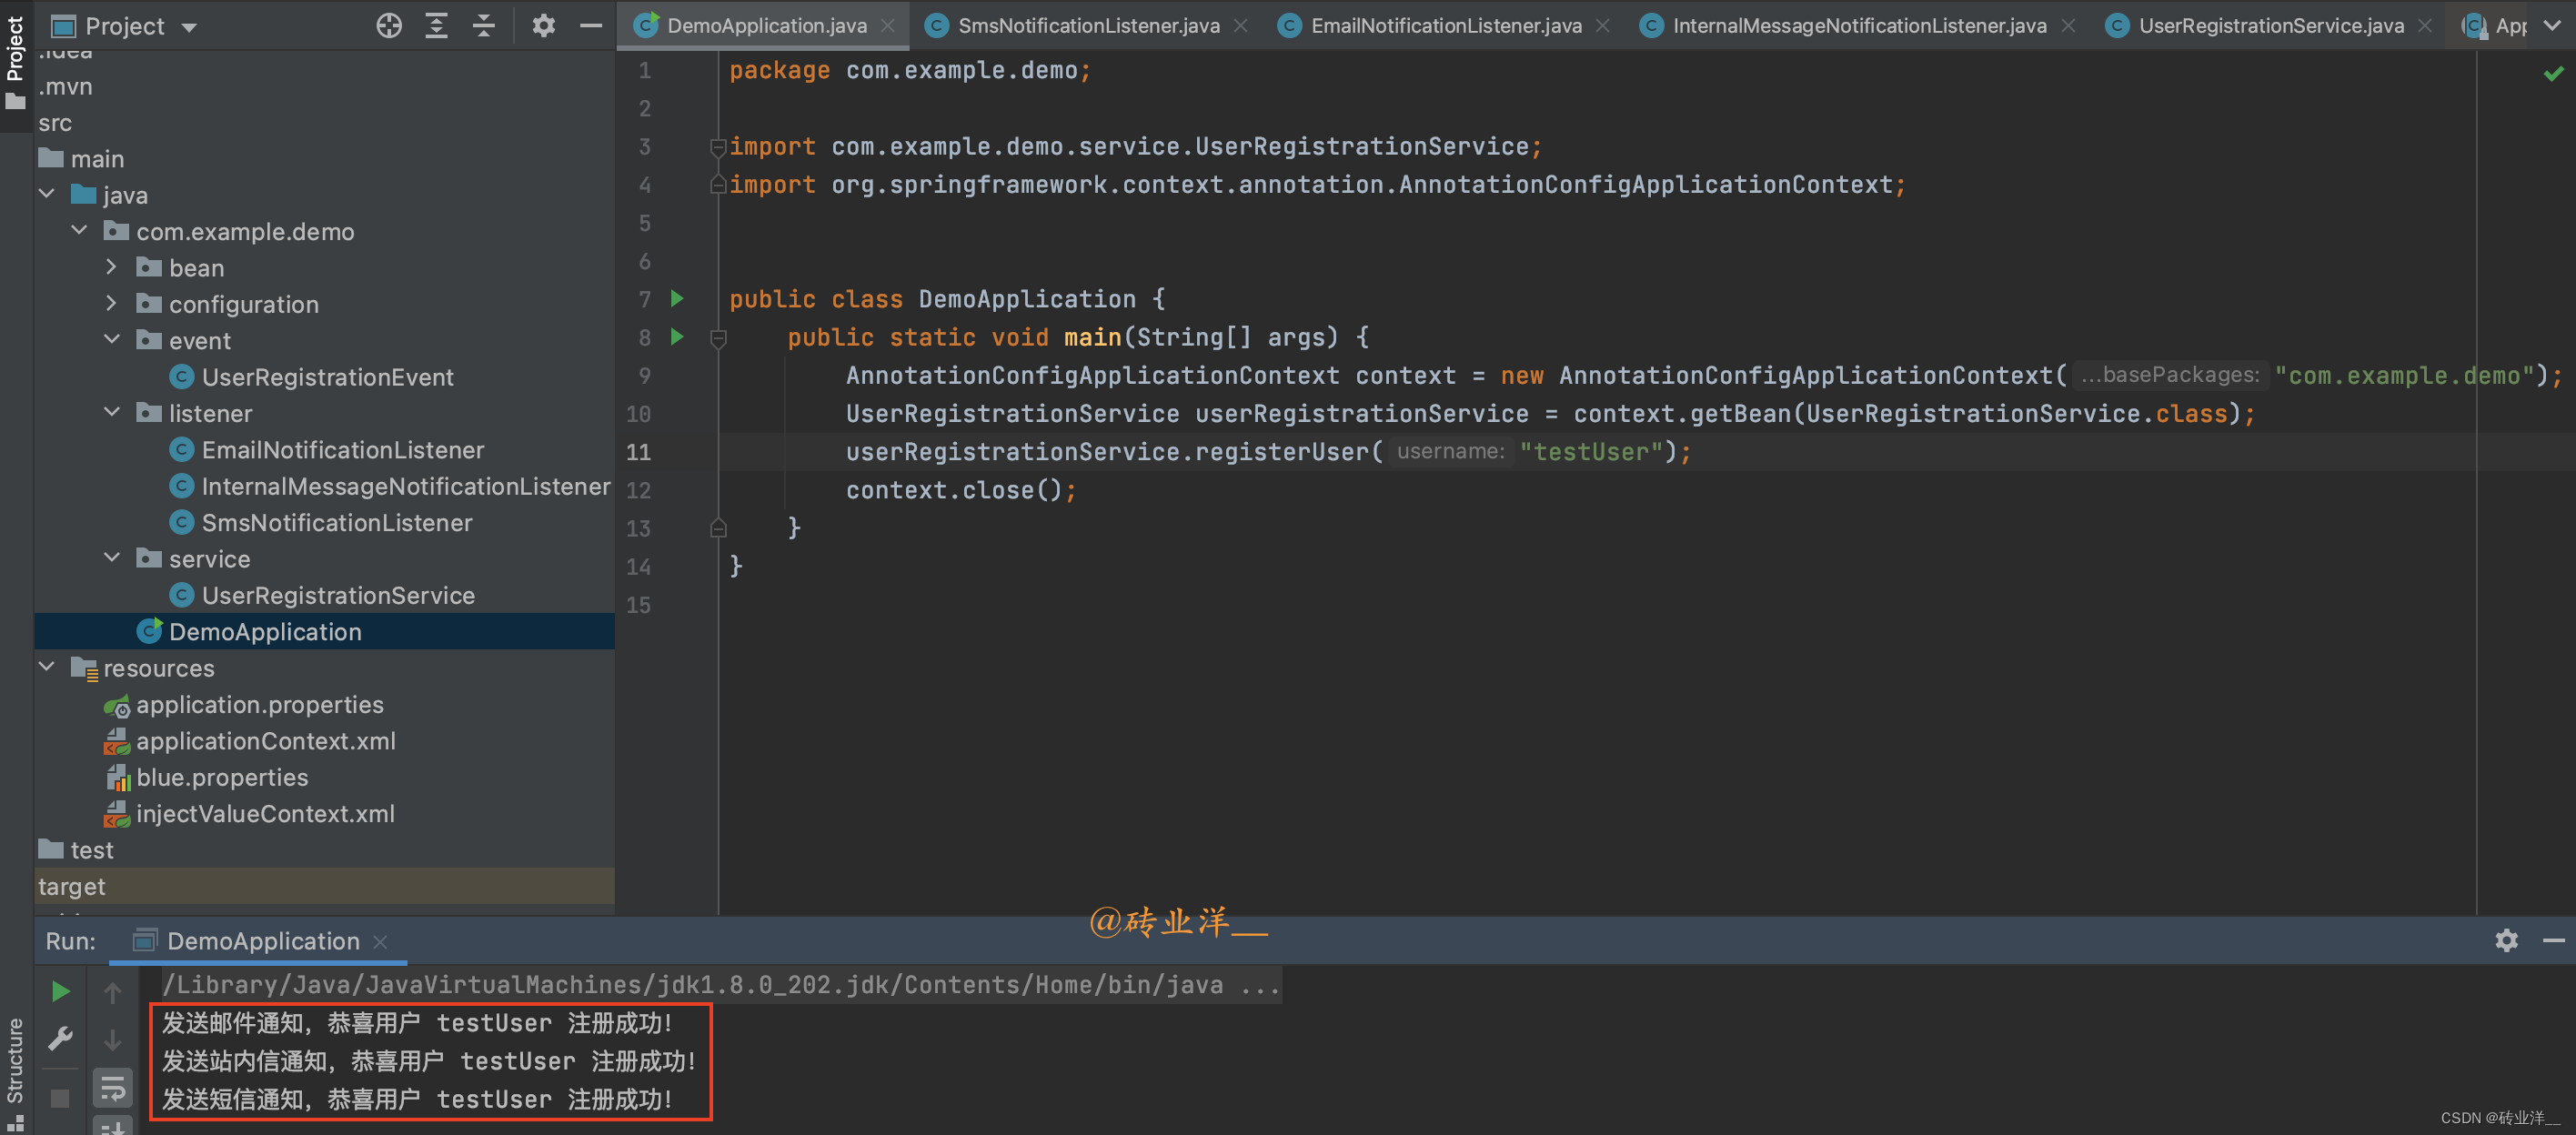
从这里也可以得出一个结论:注解式监听器的触发时机比接口式监听器早。
如果使用
SpringBoot
框架的主程序:
packagecom.example.demo;importcom.example.demo.service.UserRegistrationService;importorg.springframework.boot.CommandLineRunner;importorg.springframework.boot.SpringApplication;importorg.springframework.boot.autoconfigure.SpringBootApplication;importorg.springframework.context.annotation.Bean;@SpringBootApplicationpublicclassDemoApplication{publicstaticvoidmain(String[] args){SpringApplication.run(DemoApplication.class, args);}@BeanpublicCommandLineRunnercommandLineRunner(UserRegistrationService userRegistrationService){return args ->{
            userRegistrationService.registerUser("testUser");};}}
运行结果:
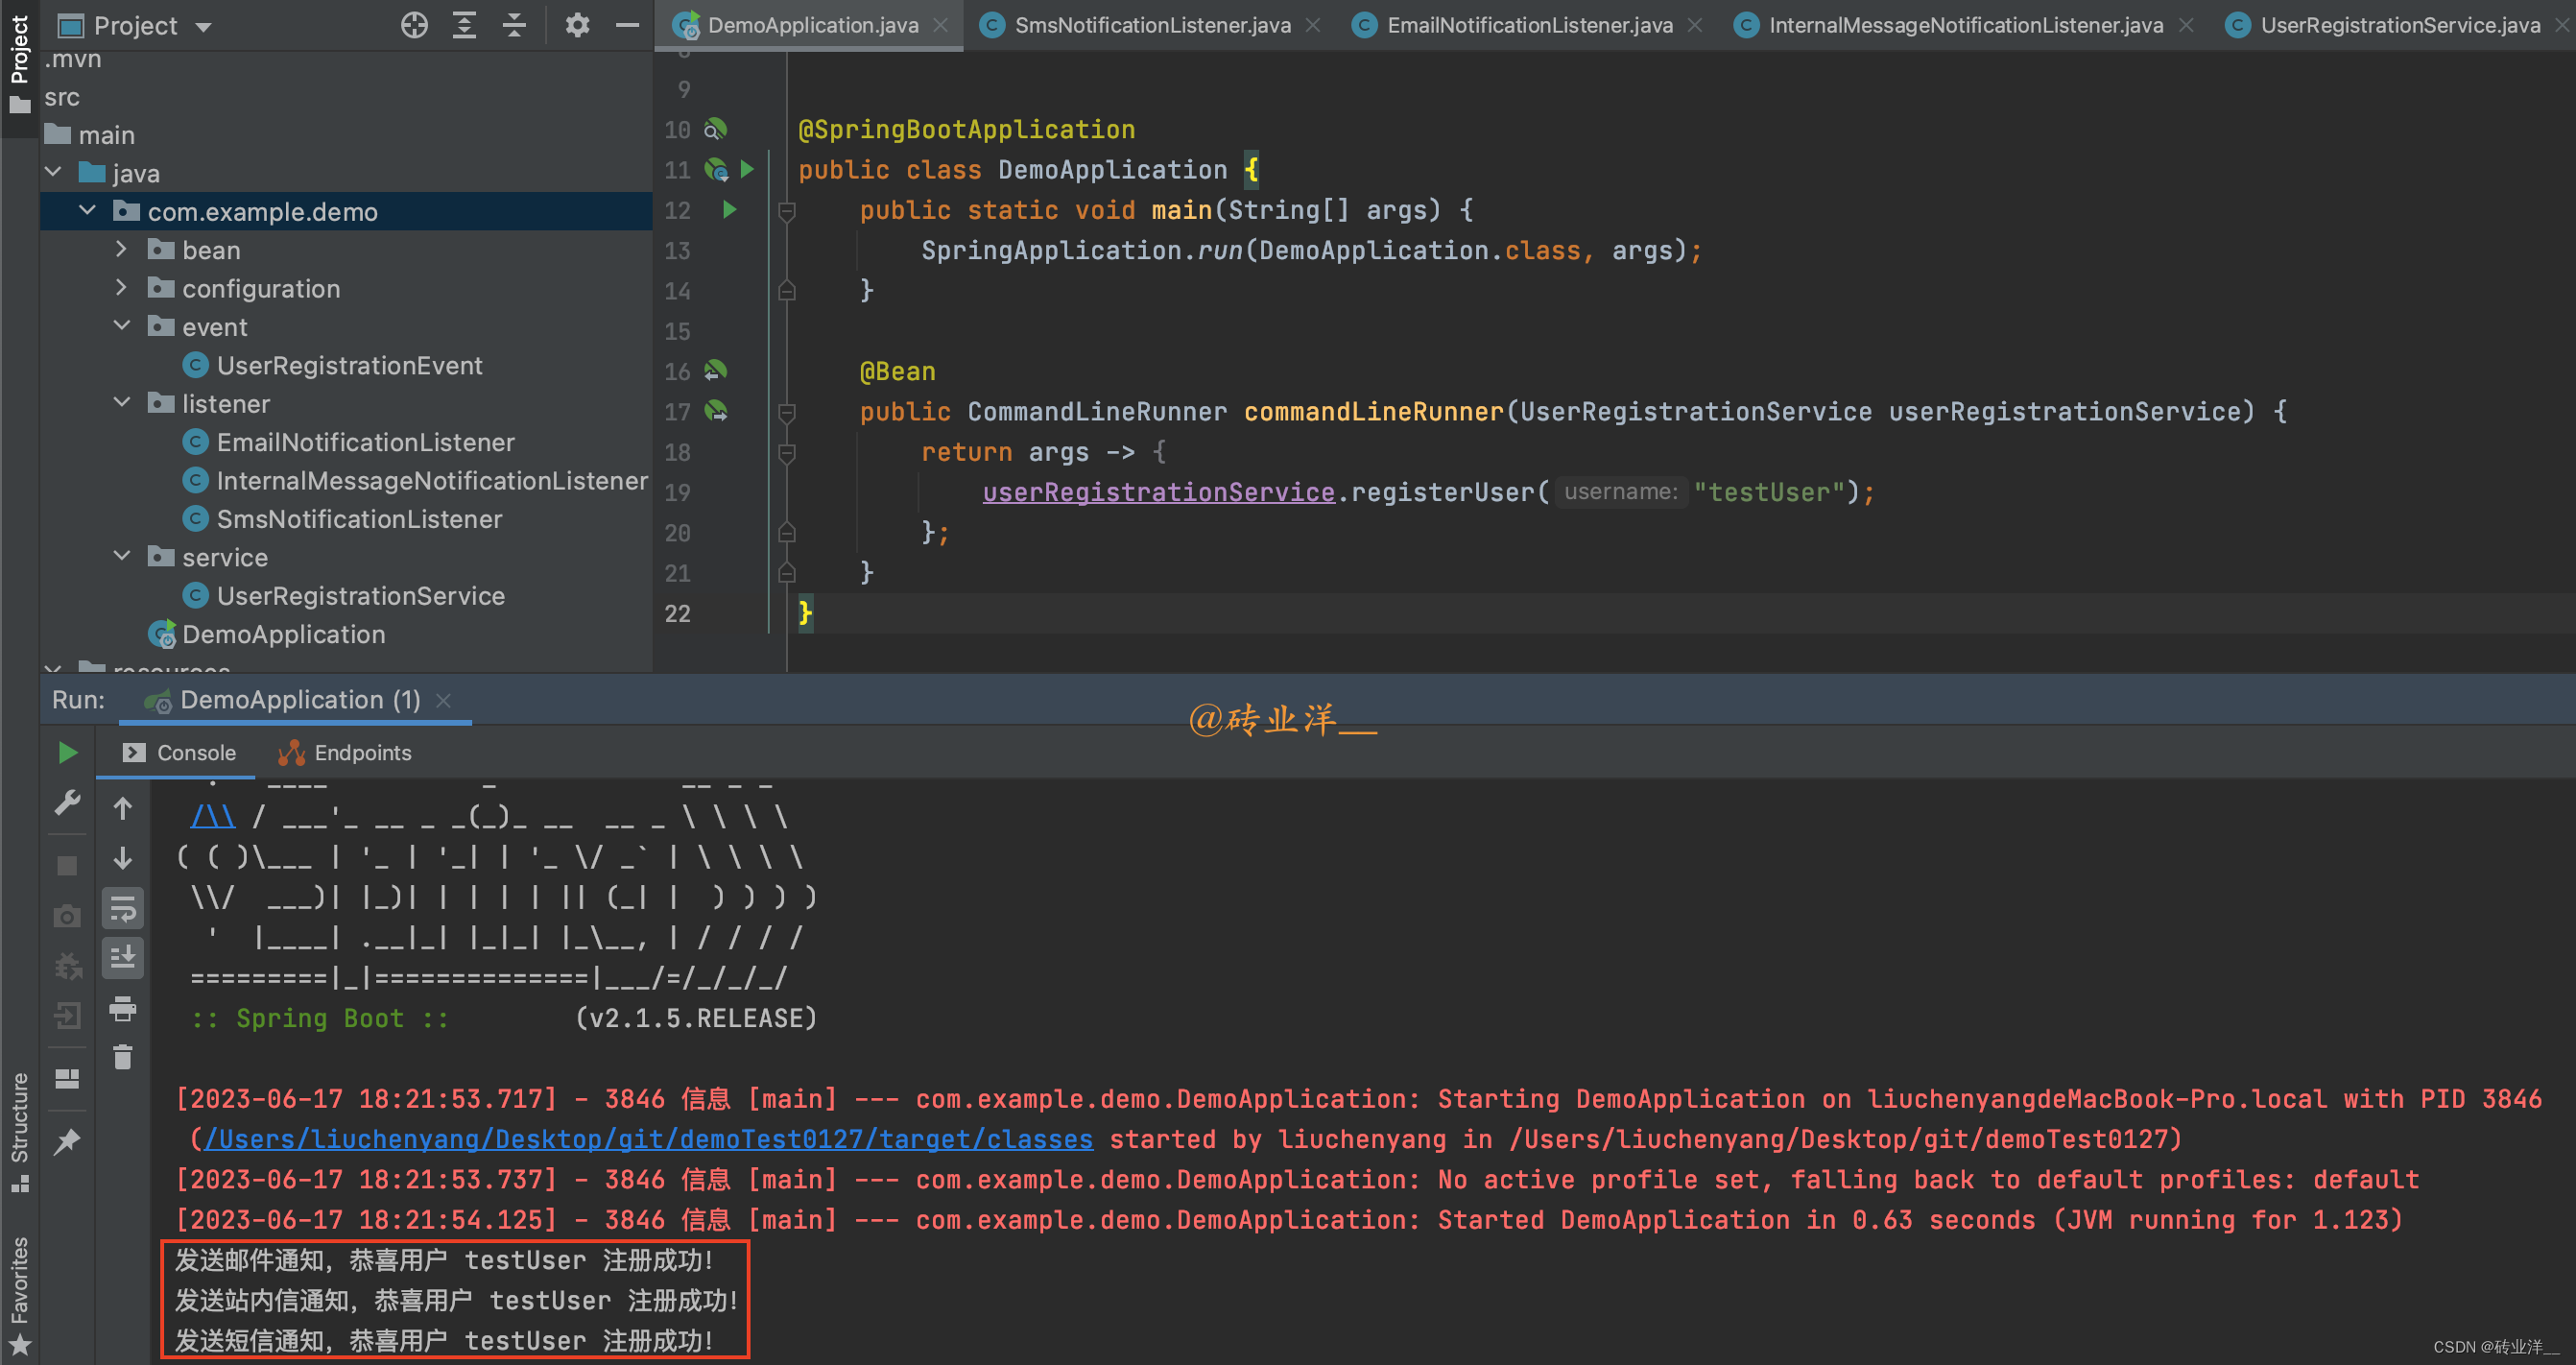
在这个示例中,我们创建了一个
SpringBoot
应用。通过注入
UserRegistrationService
并调用其
registerUser
方法,我们可以触发用户注册事件。在实际的应用中可能会在一个控制器或其他服务中调用这个服务。
前一篇生命周期的顺序中,我们提到了初始化
Bean
的时候属性赋值、
@PostConstruct
注解、实现
InitializingBean
接口后的
afterPropertiesSet
方法和
init-method
指定的方法。那这里注解式监听器的顺序和这些生命周期的顺序又有什么关系呢?
对于监听器:
- 对于使用@EventListener注解的监听器:它的触发是在
ApplicationContext刷新完成之后,此时所有的Bean定义都已经加载,且完成了自动装配,也就是说,已经完成了构造器的调用和setter方法的调用,但是还未执行初始化回调(如@PostConstruct、InitializingBean接口的afterPropertiesSet方法或指定的init-method) - 对于实现了ApplicationListener接口的监听器:它本身作为一个
Bean,会经历常规的Bean生命周期阶段,包括构造器的调用、setter方法的调用以及初始化回调。然后在所有单例Bean的初始化完成后,也就是在ContextRefreshedEvent事件发出后,这些监听器才会被触发。
所以总的来说,使用
@EventListener
的监听器会比
Bean
的初始化方法更早得到执行,而实现
ApplicationListener
接口的监听器在所有单例
Bean
初始化完毕后才会被触发。
4.2 @Order注解调整监听器的触发顺序
刚刚的例子中,因为发送短信的监听是接口式的,而注解式监听器的触发时机比接口式监听器早,所以一直在会后才触发。这里我们利用
@Order
注解来强制改变一下触发顺序。
@Order
注解可以用在类或者方法上,它接受一个整数值作为参数,这个参数代表了所注解的类或者方法的“优先级”。数值越小,优先级越高,越早被调用。
@Order
的数值可以为负数,在
int
范围之内都可以。
假设我们希望短信通知的优先级最高,其次是站内信通知,最后才是邮件通知。那么我们可以如下使用
@Order
注解
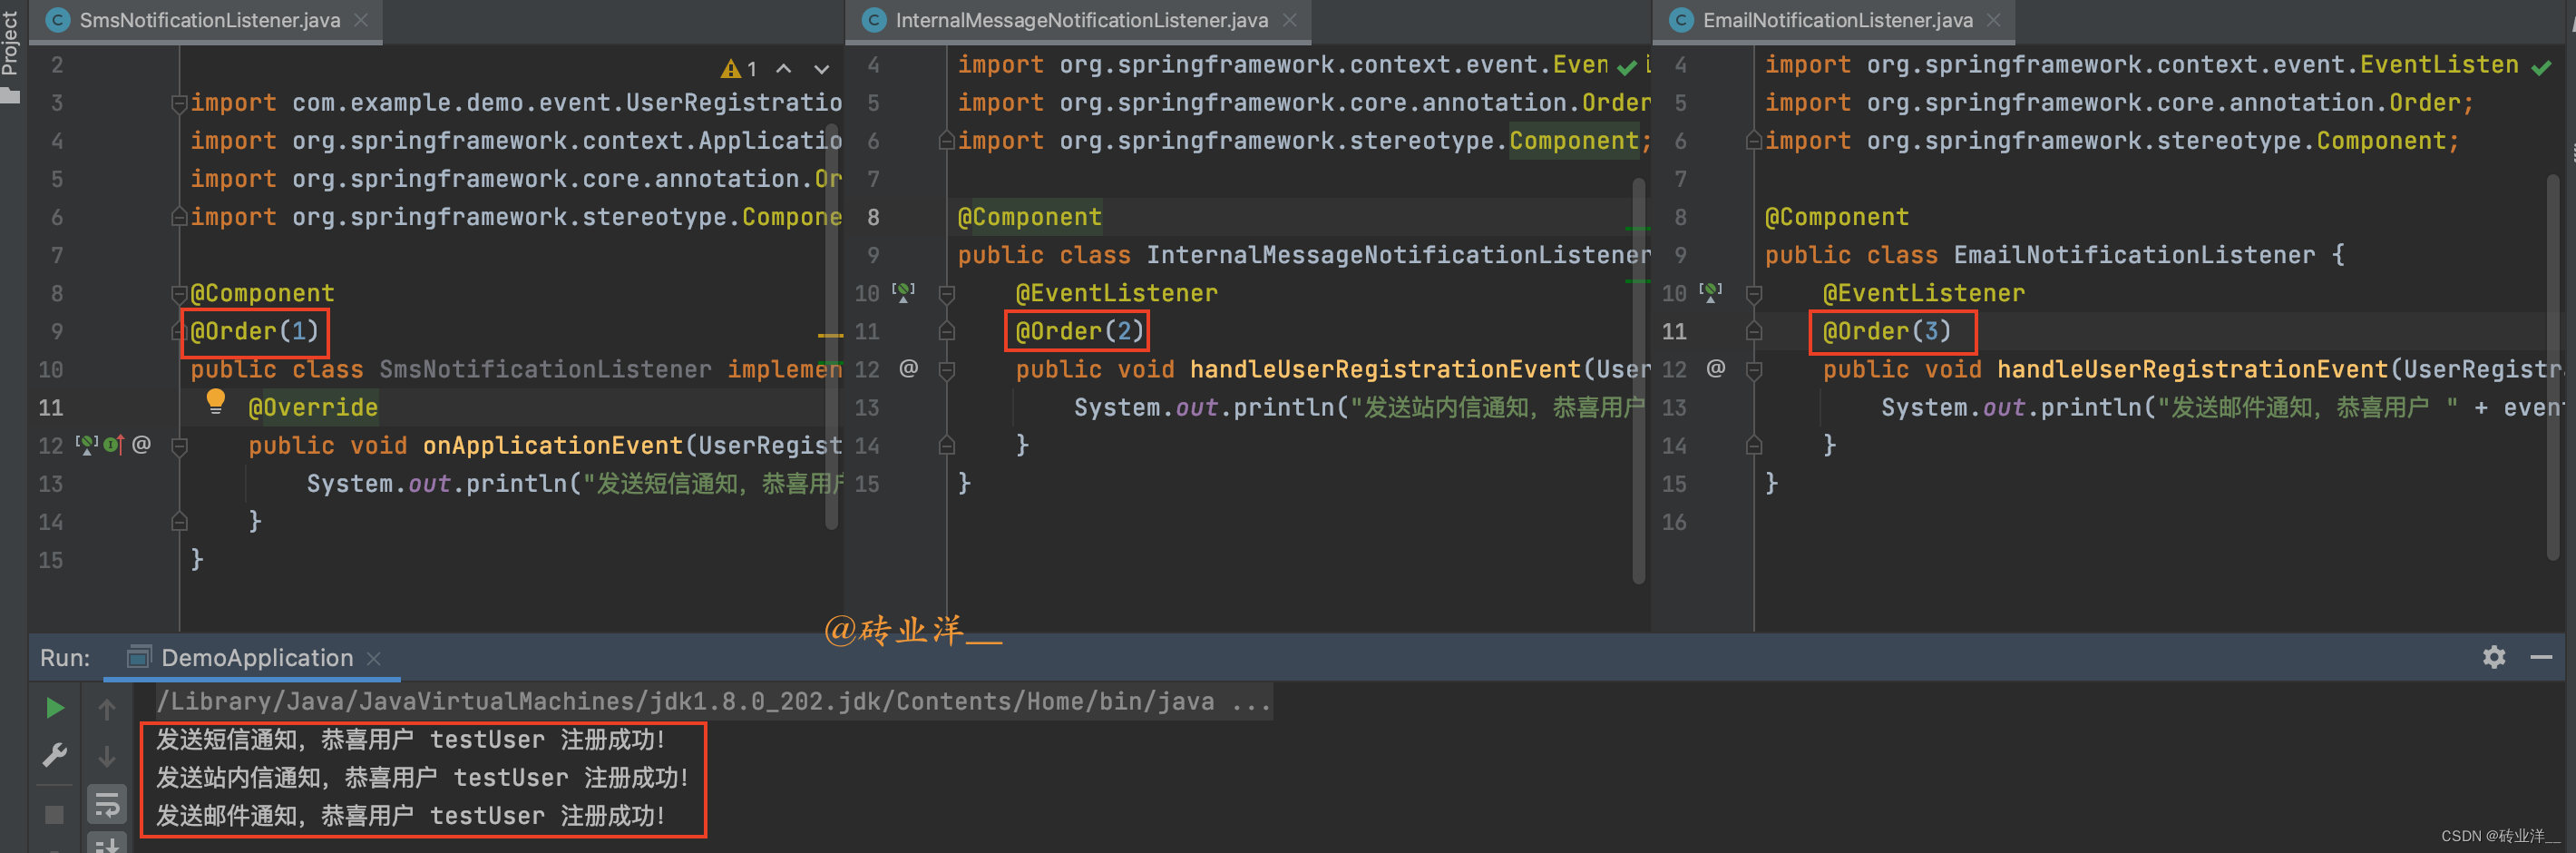
那么,我们修改一下监听器的顺序
packagecom.example.demo.listener;importcom.example.demo.event.UserRegistrationEvent;importorg.springframework.context.ApplicationListener;importorg.springframework.core.annotation.Order;importorg.springframework.stereotype.Component;@Component@Order(1)publicclassSmsNotificationListenerimplementsApplicationListener<UserRegistrationEvent>{@OverridepublicvoidonApplicationEvent(UserRegistrationEvent event){System.out.println("发送短信通知,恭喜用户 "+ event.getUsername()+" 注册成功!");}}
packagecom.example.demo.listener;importcom.example.demo.event.UserRegistrationEvent;importorg.springframework.context.event.EventListener;importorg.springframework.core.annotation.Order;importorg.springframework.stereotype.Component;@ComponentpublicclassInternalMessageNotificationListener{@EventListener@Order(2)publicvoidhandleUserRegistrationEvent(UserRegistrationEvent event){System.out.println("发送站内信通知,恭喜用户 "+ event.getUsername()+" 注册成功!");}}
packagecom.example.demo.listener;importcom.example.demo.event.UserRegistrationEvent;importorg.springframework.context.event.EventListener;importorg.springframework.core.annotation.Order;importorg.springframework.stereotype.Component;@ComponentpublicclassEmailNotificationListener{@EventListener@Order(3)publicvoidhandleUserRegistrationEvent(UserRegistrationEvent event){System.out.println("发送邮件通知,恭喜用户 "+ event.getUsername()+" 注册成功!");}}
可能是因为版本原因,经过我的测试,如果是注解式创建的监听器,
@Order
写在类上面会让所有的监听器的顺序控制失效。所以,接口式监听器如果要加
@Order
就放在类上,注解式监听器的
@Order
就放在方法上。
运行结果:
- 对于实现
ApplicationListener接口的监听器(即接口式监听器),如果不指定@Order,它的执行顺序通常在所有指定了@Order的监听器之后。这是因为Spring默认给未指定@Order的监听器赋予了LOWEST_PRECEDENCE的优先级。 - 对于使用
@EventListener注解的方法(即注解式监听器),如果不显式指定@Order,那么它的执行顺序就默认指定为@Order(0)。
注意:我们应该减少对事件处理顺序的依赖,以便更好地解耦我们的代码。虽然
@Order
可以指定监听器的执行顺序,但它不能改变事件发布的异步性质。
@Order
注解只能保证监听器的调用顺序,事件监听器的调用可能会在多个线程中并发执行,这样就无法保证顺序,而且在分布式应用也不适用,无法在多个应用上下文环境保证顺序。
欢迎一键三连~
有问题请留言,大家一起探讨学习
----------------------Talk is cheap, show me the code-----------------------
版权归原作者 砖业洋__ 所有, 如有侵权,请联系我们删除。