一、JUnit 介绍
1. JUnit 是什么?
JUnit 是一个 Java 编程语言的开源测试框架,它是xUnit架构的一部分,xUnit是为多种编程语言创建的单元测试库的通用名称。JUnit是由Erich Gamma和Kent Beck创建的,目前已经发展到JUnit 5。
它提供了一些功能,使编写测试变得容易,包括支持多个测试用例、断言和报告。JUnit也是多功能的,允许用各种语言编写测试。
JUnit 主要用于单元测试,但它也可用于其他测试,如功能和集成测试。功能测试是测试系统的功能。它们与单元测试不同,因为它们测试的是整个系统而不是单个单元。集成测试测试两个或多个系统的集成。它们与单元测试不同,因为它们测试的是系统的各个组成部分如何协同工作,而不是单独工作。
2. 什么是单元测试框架?
对于单元测试框架来讲,它主要完成以下几件事。
提供用例组织与执行: 测试用例只有几条时,可以不考虑用例组织,但是用例达到成百上千时,大量的测试用例堆砌在一起,就产生了扩展性与维护性等问题
提供丰富的断言方法: 不论是功能测试,还是单元测试,在用例执行完之后都需要将实际结果与预期结果相比较(断言),从而断定用例是否执行通过。单元测试框架一般提供丰富的断言方法。例如:判断相等/不等、包含/不包含、True/False的断言方法等
提供丰富的日志: 当测试用例执行失败时能抛出清晰的失败原因,当所有用例执行完成后能提供丰富的执行结果。例如,总执行时间、失败用例数、成功用例数等。
从这些特性来看单元测试框架的作用是:帮助我们更自动化完成测试,所以,它是自动化测试的基础。
3. 为什么进行单元测试?
在平时的开发当中,一个项目往往包含了大量的方法,可能有成千上万个。如何去保证这些方法产生的结果是我们想要的呢?当然了,最容易想到的一个方式,就是我们通过 System.out 来输出我们的结果,看看是不是满足我们的需求,但是项目中这些成千上万个方法,我们总不能在每一个方法中都去输出一遍嘛。这也太枯燥了。这时候用我们的单元测试框架JUnit就可以很好地解决这个问题。
JUnit 如何解决这个问题的呢?答案在于内部提供了一个断言机制,他能够将我们预期的结果和实际的结果进行比对,判断出是否满足我们的期望。
4. JUnit 的主要用途
JUnit主要用于单元测试,以下是JUnit的主要用途:
- 编写和运行测试: JUnit提供了注解和断言库,帮助你快速地编写测试代码,并且提供了测试运行器来运行和报告测试结果。
- 断言结果: JUnit提供了一套丰富的断言库来帮助你验证测试的结果。这些断言方法包括常用的 assertEquals、assertTrue、assertFalse、assertNull 等。
- 测试套件: 如果你有一组测试,并希望将它们一起运行,那么可以使用 JUnit 的 @TestSuite 注解。
- 测试异常: JUnit 可以帮助你测试方法是否会抛出预期的异常。
- 参数化测试: 如果你需要使用不同的参数多次运行同一个测试,那么可以使用 JUnit 的参数化测试。
- 模拟对象: 在很多情况下,你可能需要模拟依赖对象以便于测试。JUnit 可以与模拟框架(如Mockito)一起使用,帮助你创建模拟对象。
总的来说,JUnit是Java中非常重要的一个单元测试框架,它的使用可以使你的代码更加健壮,因为你可以快速定位并修复代码中的错误和bug。
5. 如何安装 JUnit 测试框架
Junit目前分两个版本,Junit4 和 Junit5 , 本系列教程打算从 Junit4 开始介绍,最后,再介绍 Junit5 有哪些新特性
推荐使用 IntelliJ IDEA
- 下载 junit-4.12.jar 文件:https://github.com/junit-team/junit4/releases
- 打开 IntelliJ IDEA ,菜单栏:File菜单 → \to → Porject Structure 选项 → \to → modules
**Dependencies 标签
→
\to
→ 点击 “+” 号
→
\to
→ Library
→
\to
→ Java 。**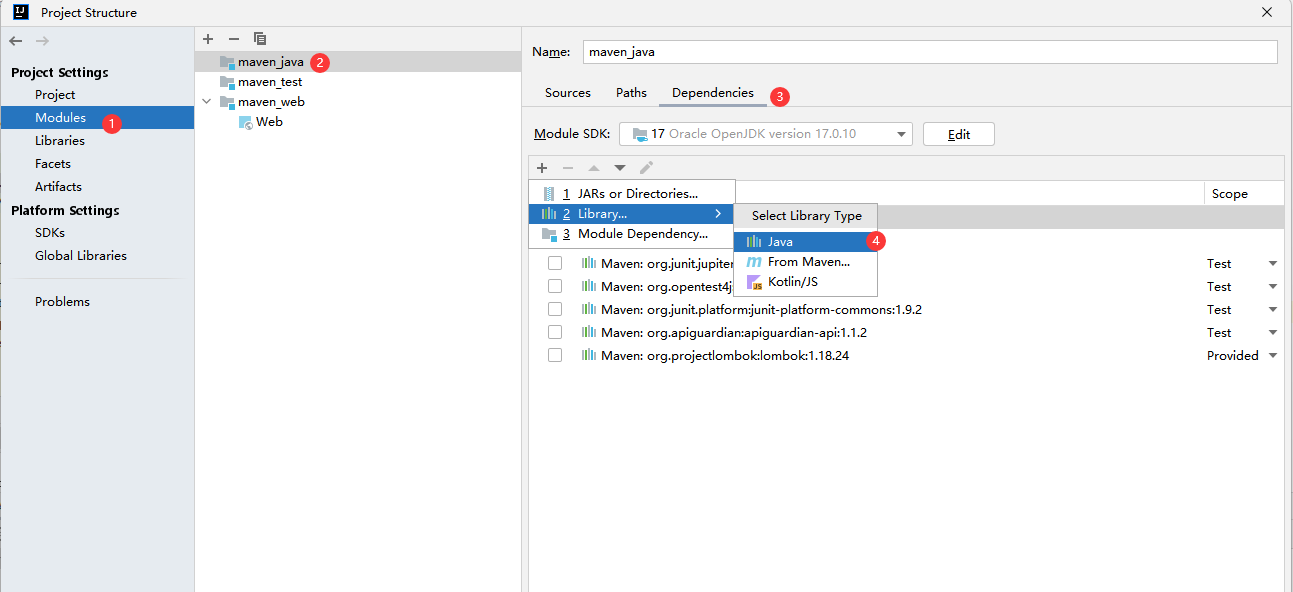
选择下载的 junit-4.12.jar 进行添加。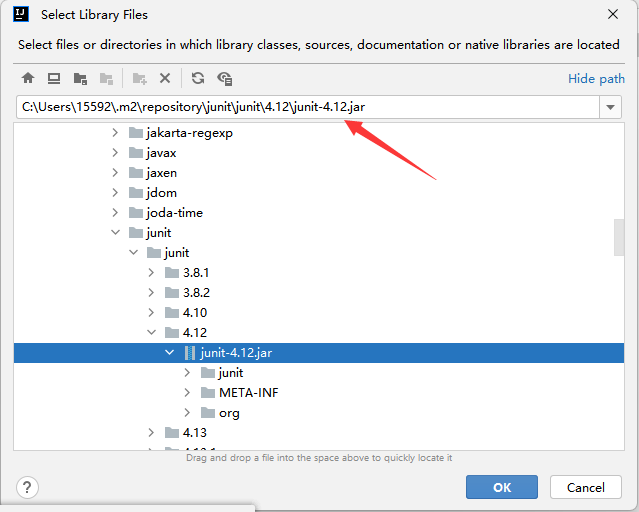
如果是 Maven 项目,可通过如下进行下载:
访问 jar 包查询网站: https://mvnrepository.com/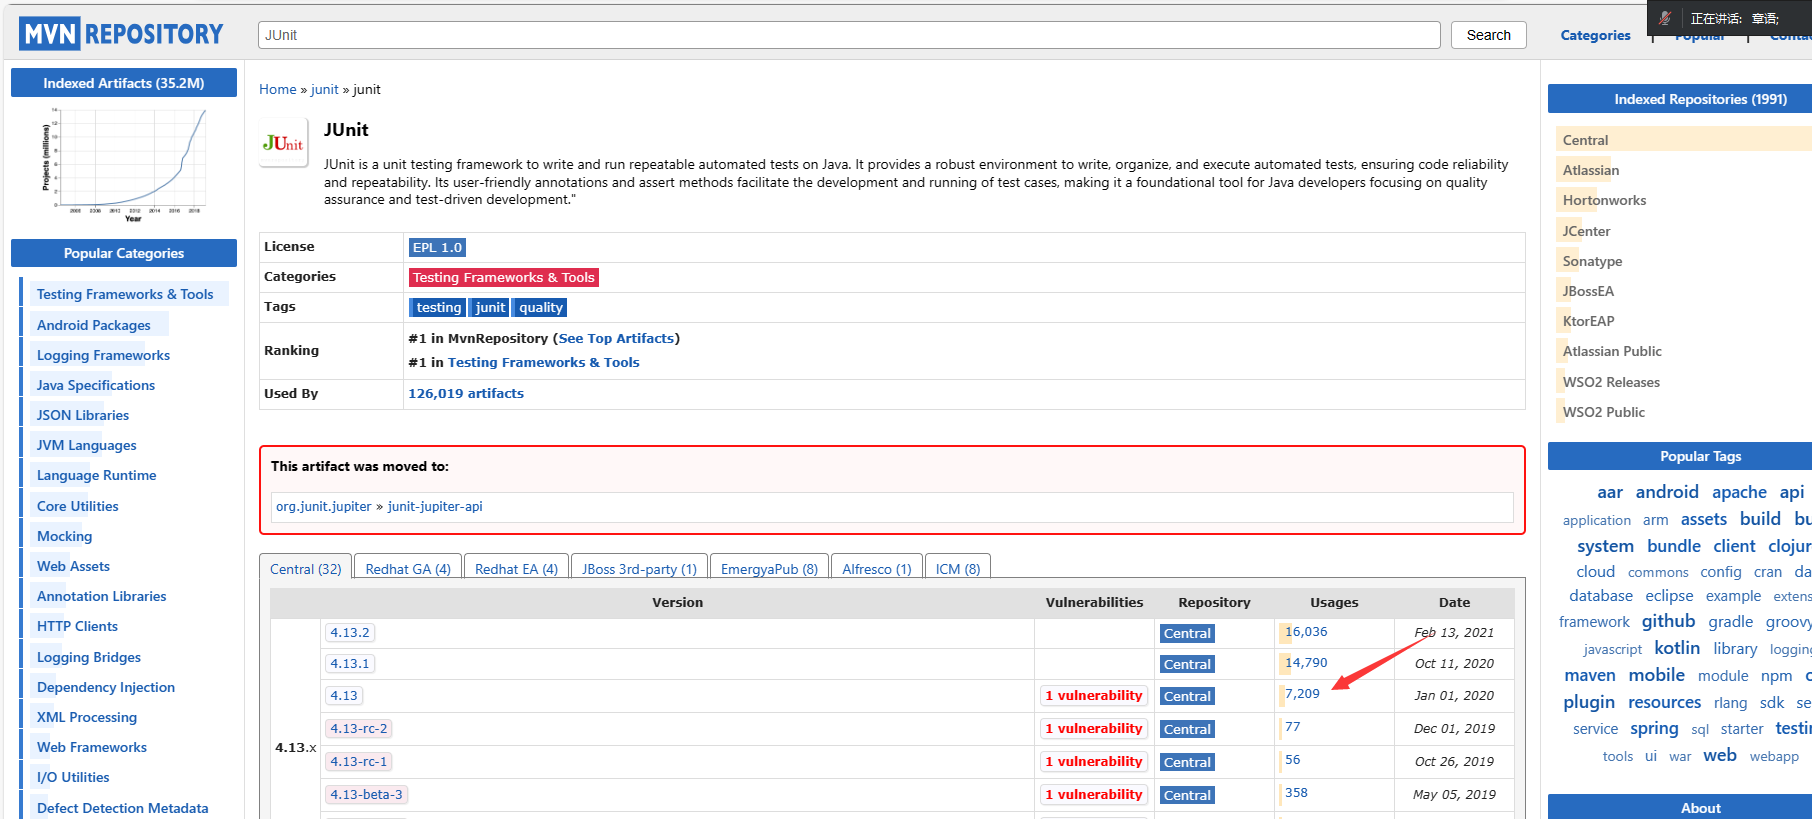
搜索 junit ,并选择最多的人的一个版本,添加到
pom.xml
中,如:
<dependency><groupId>junit</groupId><artifactId>junit</artifactId><version>4.12</version><scope>test</scope></dependency>
6. 模拟和存根
在 JUnit 中,模拟(Mocking)和存根(Stubbing)是测试中常用的技术,可将被测代码与其依赖项隔离开来,并在受控环境中模拟真实世界对象的行为。这种隔离(尤其是在复杂的应用程序中)可确保测试仅关注被测单元的功能,而不是任何外部依赖项。
一个外部依赖项: 指的是系统中的一个对象,被测试的代码与这个对象发生交互,但是你不能控制这个对象。比喻前端工程师和后台工程师合作,前端工程师要等待后台返回的数据来处理,那么后台就是他的一个外部依赖项。因为他无法控制后台的代码
- 模拟是指创建一个模拟对象来替代真实的依赖项对象,并模拟其行为。模拟对象通常是使用特殊的框架(如Mockito、EasyMock等)生成的,它们可以模拟外部依赖项的方法调用和返回值,以及对方法的预期行为进行验证。通过模拟对象,可以模拟复杂的环境和各种测试情况,以便更容易地进行单元测试,同时解耦被测代码与外部依赖项的耦合性。
模拟对象是伪对象,它可以验证被测试对象是否按照预期的方式调用了这个伪对象,因此来判断单元测试的成功或者失败。
举一个例子: 小明由于作业没有做完,老师就让小明放学之后晚回家一个小时来写作业,那么今天老师有事就提前回家了,就让班长小亮来查看小明是否留下来一个小时在写作业。此时小亮就是我们说的伪对象,他就检测了小明是否晚回家一个小时。
- 存根是指为外部依赖项提供固定的返回值或行为,以便在测试过程中控制其行为。存根对象通常是手动创建的,并在测试中替换真实的依赖项对象。通过存根,可以控制外部依赖项的返回结果,以确保测试的可重复性和可预测性。存根可以返回预先定义的结果,模拟异常,或者执行自定义的行为。
一个存根(stub)是对系统中存在的一个依赖项(或协作者)的可控制的替代物(就是你找一个对象来替换你无法控制的对象)。通过使用存根,你在测试代码时无需直接处理这个依赖项。(说白了就是一个你自己定义对象来取代你无法控制的对象)
这些技术可以用于创建更可靠和独立的单元测试,使测试更加可控和可预测。它们有助于隔离被测代码和外部依赖项之间的交互,并使测试更专注于被测代码本身。
6.1 使用模拟和存根的例子
下面,使用JavaScript中的流行测试库,Jest,来展示如何使用模拟和存根。
例1:使用存根
假设你有一个函数 getUserName,它从数据库中获取用户的名字。你想要测试这个函数,但是不想依赖真实的数据库。
asyncfunctiongetUserName(userId){const user =await db.getUser(userId);return user.name;}
可以使用 Jest 的
jest.fn()
方法来创建一个存根:
const db ={getUser: jest.fn()};

db.getUser.mockResolvedValue({name:'Alice'});expect(awaitgetUserName(1)).toBe('Alice');
在这个例子中,我们创建了一个存根来代替 db.getUser 方法。这个存根总是返回一个具有名字 “Alice” 的用户。
例2:使用模拟
假设有一个 login 函数,它调用了一个 authentication 服务来验证用户的凭据。想要测试这个函数,但是更关心它是否正确地调用了 authentication 服务。
asyncfunctionlogin(username, password){returnawait authentication.authenticate(username, password);}
可以使用 Jest 的 jest.fn() 方法来创建一个模拟:
const authentication ={authenticate: jest.fn()};

authentication.authenticate.mockResolvedValue(true);awaitlogin('Alice','password');expect(authentication.authenticate).toHaveBeenCalledWith('Alice','password');
在这个例子中,我们创建了一个模拟来代替
authentication.authenticate
方法。然后,我们使用
toHaveBeenCalledWith
方法来验证
login
函数是否正确地调用了
authentication.authenticate
方法。
结论
模拟和存根是单元测试中的重要工具。它们帮助我们创建隔离的测试环境,使我们能够集中测试代码的特定部分,而不必担心其他外部依赖项。
6.2 手工模拟对象和存根存在的问题
- 编写模拟对象和存根耗时间
- 如果接口有很多方法、属性、事件编写的时候会特别困难
- 如果验证调用者向另一个方法调用传递的所有参数都是正确的时候就需要多次进行断言。
- 有些模拟对象就是为特定的方法编写复用性比较差
二、JUnit 编写单元测试
创建一个简单的Java类,这个类将包含一些基础的数学运算。这个类名叫做Calculator:
publicclassCalculate{publicintadd(int a,int b){return a + b;}publicintsubtract(int a,int b){return a - b;}publicintmultiply(int a,int b){return a * b;}publicdoubledivide(int a,int b){if(b ==0){thrownewIllegalArgumentException("Divider cannot be zero");}return(double) a / b;}}
这个类包含四个方法,分别实现加法、减法、乘法和除法运算。注意,在进行除法运算时,我们需要检查除数是否为0,如果是0,我们抛出一个
IllegalArgumentException
异常。
接下来,我们将为这个类创建一个 JUnit 测试类,以测试它的功能。
测试代码
在
IDEA
中,通常会为要测试的类创建一个同名的测试类,只不过这个测试类的名字后面会附加
Test
。为
Calculator
类创建一个名为
CalculatorTest
的测试类。
这个测试类中,会为
Calculator
类中的每个方法都编写一个对应的测试方法。使用
@Test
注解来标识这些测试方法。
下面是
CalculatorTest
类的代码:
importorg.junit.jupiter.api.BeforeEach;importorg.junit.jupiter.api.Test;importstaticorg.junit.jupiter.api.Assertions.assertEquals;importstaticorg.junit.jupiter.api.Assertions.assertThrows;publicclassCalculatorTest{privateCalculator calculator;@BeforeEachpublicvoidsetUp(){
        calculator =newCalculator();}@TestpublicvoidtestAdd(){assertEquals(5, calculator.add(2,3));}@TestpublicvoidtestSubtract(){assertEquals(-1, calculator.subtract(2,3));}@TestpublicvoidtestMultiply(){assertEquals(6, calculator.multiply(2,3));}@TestpublicvoidtestDivide(){assertEquals(2.0, calculator.divide(4,2));}@TestpublicvoidtestDivideByZero(){assertThrows(IllegalArgumentException.class,()-> calculator.divide(4,0));}}
在这个类中,首先定义了一个私有的
Calculator
实例,然后在
@BeforeEach
注解的
setUp()
方法中为它赋值。
@BeforeEach
注解的方法会在每个测试方法运行前被调用,所以可以在这里初始化测试环境。
然后为
Calculator
类中的每个方法都编写了一个测试方法。在这些测试方法中,使用了
assertEquals()
方法来检查方法的返回值是否和我们预期的一样。
对于
divide()
方法,还写了一个额外的测试方法来测试当除数为
0
时,方法是否会抛出
IllegalArgumentException
异常。使用
assertThrows()
方法来检查这个异常是否被正确地抛出。
接下来,可以右击IDEA中的测试类或者测试方法,然后选择 “Run ‘test…’” 来运行测试。,可以看到测试全部通过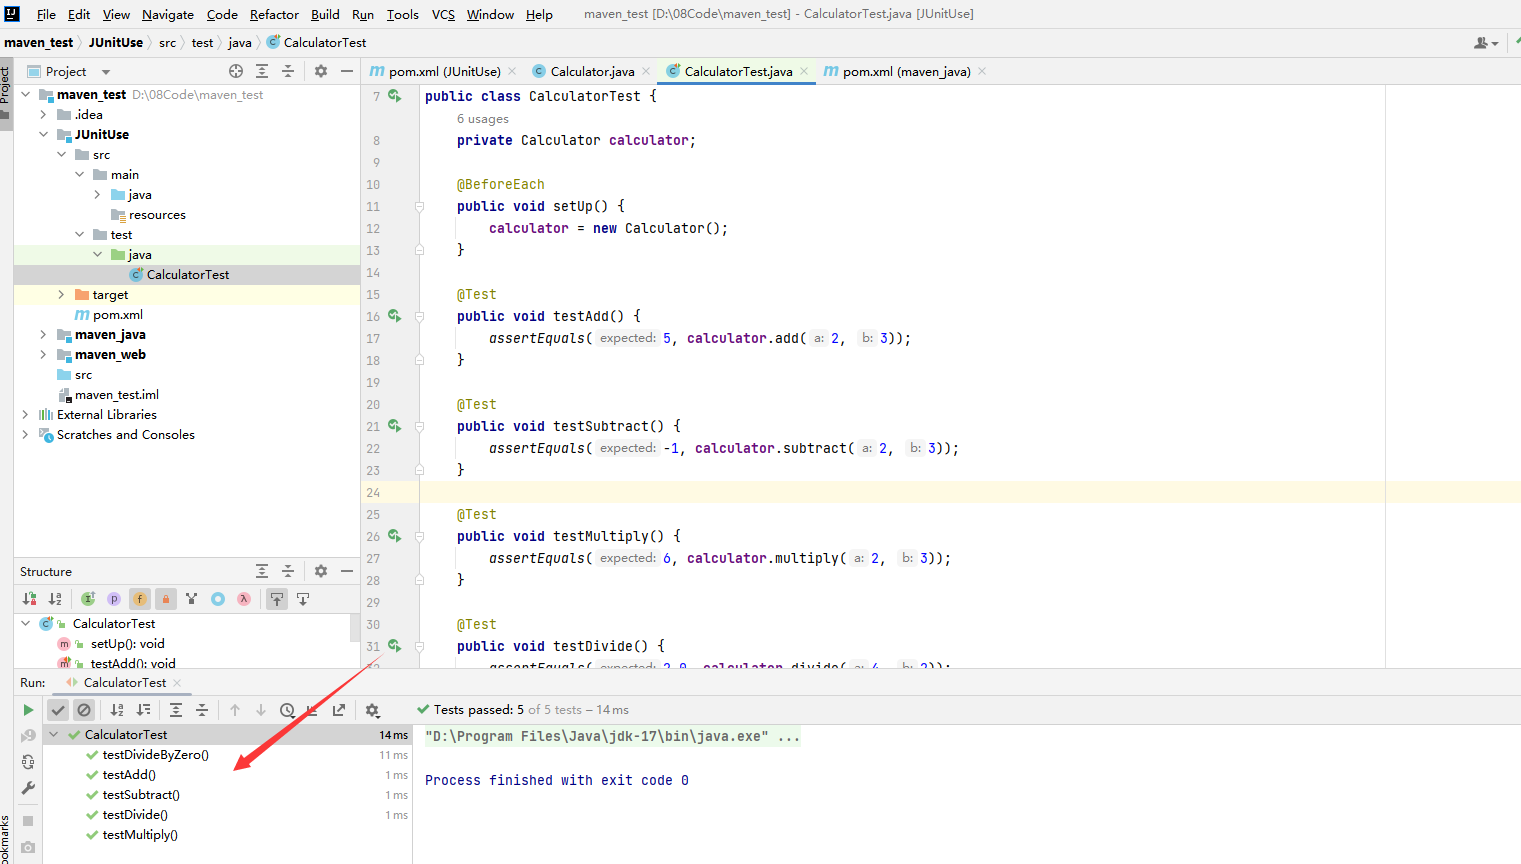
以上就是单元测试,需要遵循以下规则:
- 每一个测试方法上使用
@Test进行修饰 - 每一个测试方法必须使用
public void进行修饰(即 public 且不返回任何值) - 每一个测试方法不能携带参数
- 测试代码和源代码在两个不同的项目路径下
- 测试类的包应该和被测试类保持一致
- 测试单元中的每个方法必须可以独立测试
以上的 6 条规则,是在使用单元测试的必须项,当然JUnit也建议在每一个测试方法名加上
test
前缀,表明这是一个测试方法。
assertEquals
是一个断言的规则,里面有两个参数,第一个参数表明预期的值,第二个参数表示实际运行的值。不过
JUnit5
对这些做出了一些改变,会在后续专门介绍。
运行测试类,就会运行每一个测试方法,也可以运行某一个,只需要在相应的测试方法上面右键运行即可。如果运行成功编辑器的控制台不会出现错误信息,如果有就会出现
failure
等信息。
三 、JUnit 注解
序号注解说明1**@Test被@Test注解的测试方法包含了真正的测试代码。
@Test注解有两个可选的参数:
expected 表示此测试方法执行后应该抛出的异常,
timeout 检测测试方法的执行时间2@BeforeAll(JUnit 5)/ @BeforeClass(JUnit 4)在所有测试方法运行前,被执行一次。
注意,这个注解标注的方法必须是静态的。public static void3@BeforeEach(JUnit 5)/ @Before(JUnit 4)在每一个测试方法运行前,被执行。
在需要为每个测试方法做一些准备工作,如初始化一些公共的变量或对象时,会非常有用。
注意必须是public void,不能为static4@AfterEach(JUnit 5)/ @After(JUnit 4)在每一个测试方法运行后,被执行。
需要在每个测试方法后做一些清理工作时,会非常有用。
注意必须是public void,不能为static5@AfterAll(JUnit 5)/ @AfterClass(JUnit 4)在所有测试方法运行后,被执行一次。
这对于一次性的清理工作,如关闭数据库连接,很有用。
注意,这个注解标注的方法必须是静态的。public static void6@Ignore表示该测试方法被忽略,即在运行测试时,这个方法不会被执行。
可以为这个注解提供一个可选的参数说明为什么这个测试方法被忽略。7@ParameterizedTest(JUnit 5)用于表示一个参数化的测试方法。与之配合使用的还有一些注解,如
@ValueSource、@EnumSource、@MethodSource、@CsvSource等,
它们用于提供测试数据。8@RunWith**
- 与@BeforeClass的区别在于,@Before不止运行一次,它会在每个用例运行之前都运行一次。
- 每个测试用例的运行次序,即:
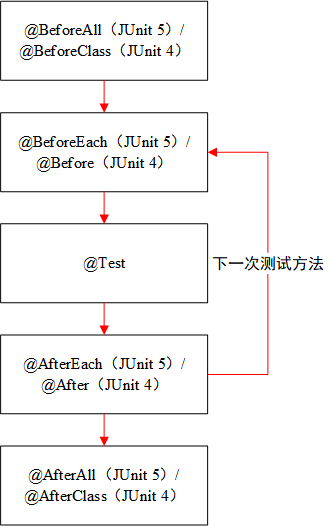
Junit 4 注解案例 不同注解的执行顺序
Arithmetic.java,本例要用到的需要Junit进行单元测试的类:
packagein.co.javatutorials;publicclassArithmetic{publicintadd(int i,int j){return i + j;}}
ArithmeticTest.java,Arithmetic.java的Junit单元测试类:
packagein.co.javatutorials;importstaticorg.junit.Assert.assertEquals;importorg.junit.After;importorg.junit.AfterClass;importorg.junit.Before;importorg.junit.BeforeClass;importorg.junit.Test;publicclassArithmeticTest{@BeforeClasspublicstaticvoidsetUpClass(){// one time setup methodSystem.out.println("@BeforeClass - executed only one time and is first method to be executed");}@AfterClasspublicstaticvoidtearDownClass(){// one time tear down methodSystem.out.println("@AfterClass - executed only one time and is last method to be executed");}@BeforepublicvoidsetUp(){// set up method executed before every test methodSystem.out.println("@Before - executed before every test method");}@AfterpublicvoidtearDown(){// tear down method executed after every test methodSystem.out.println("@After - executed after every test method");}@TestpublicvoidtestAdd(){Arithmetic arithmetic =newArithmetic();int actualResult = arithmetic.add(3,4);int expectedResult =7;assertEquals(expectedResult, actualResult);System.out.println("@Test - defines test method");}}
样例日志输出:
@BeforeClass- executed only one time andis first method to be executed
@Before- executed before every test method
@Test- defines test method
@After- executed after every test method
@AfterClass- executed only one time andis last method to be executed
Junit 4 注解案例 @Test 的不同参数使用
创建被测试类 Count .
publicclassCount{/**
     * 计算并返回两个参数的和
     */publicintadd(int x ,int y){return x + y;}/**
     * 计算并返回两个数相除的结果
     */publicintdivision(int a,int b){return a / b;}}
创建测试类 CountTest .
importstaticorg.junit.Assert.assertEquals;importorg.junit.Ignore;importorg.junit.Test;publicclassCountTest{//验证超时@Test(timeout=100)publicvoidtestAdd()throwsInterruptedException{Thread.sleep(101);newCount().add(1,1);}//验证抛出异常@Test(expected=ArithmeticException.class)publicvoidtestDivision(){newCount().division(8,0);}// 跳过该条用例@Ignore@TestpublicvoidtestAdd2(){Count count =newCount();int result = count.add(2,2);assertEquals(result,5);}}
- 在 testAdd() 用例中设置
timeout=100, 说明用例的运行时间不能超过 100 毫秒, 但故意在用例添加sleep()方法休眠 101 毫秒,所以会导致用例失败。 - 在 Java 中被除数不能为0,所以 8 0 \frac80 08 会报
ArithmeticException异常, 在@Test中设置expected=ArithmeticException.class,说明抛该异常符合预期。 @Ignore表来标识该用例跳过,不管用例运行成功还是失败。
执行结果如下: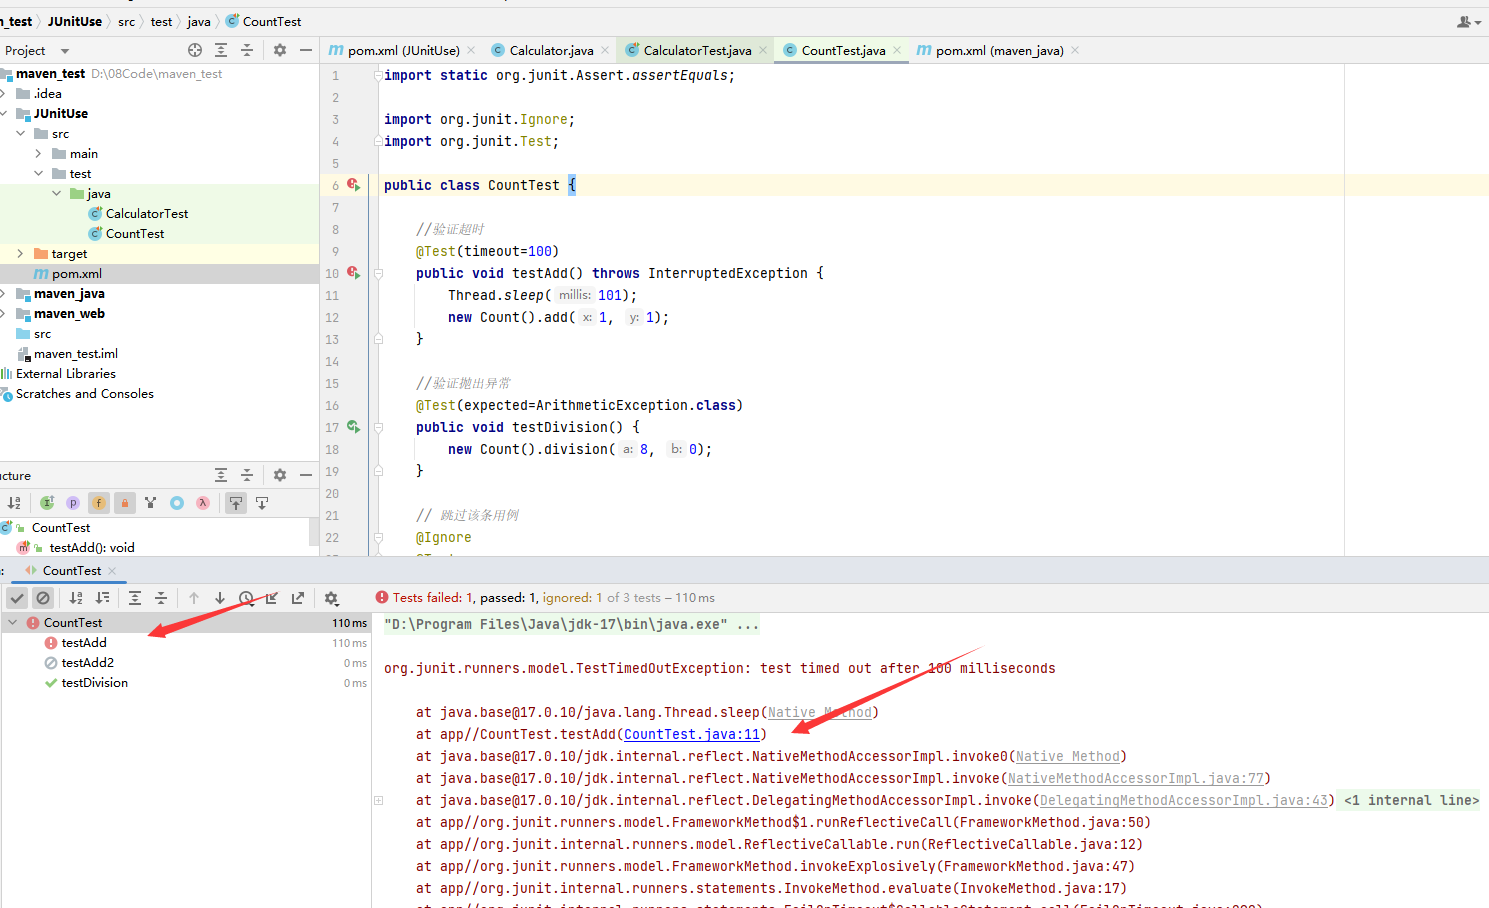
JUnit 注解之 Fixture
在一个单元测试中,经常编写多个
@Test
方法,来分组、分类对目标代码进行测试。
在测试的时候,经常遇到一个对象需要初始化,测试完可能还需要清理的情况。如果每个
@Test
方法都写一遍这样的重复代码,显然比较麻烦。
JUnit 提供了编写测试前准备、测试后清理的固定代码,称之为
Fixture
。(及 Junit 4 注解案例 1)
因此,总结出编写
Fixture
的套路如下:
- 对于实例变量,在
@BeforeEach中初始化,在@AfterEach中清理,它们在各个@Test方法中互不影响,因为是不同的实例; - 对于静态变量,在
@BeforeAll中初始化,在@AfterAll中清理,它们在各个@Test方法中均是唯一实例,会影响各个@Test方法。
大多数情况下,使用
@BeforeEach
和
@AfterEach
就足够了。只有某些测试资源初始化耗费时间太长,以至于不得不尽量“复用”时才会用到
@BeforeAll
和
@AfterAll
。
最后,注意到每次运行一个
@Test
方法前,JUnit 首先创建一个
XxxTest
实例,因此,每个
@Test
方法内部的成员变量都是独立的,不能也无法把成员变量的状态从一个
@Test
方法带到另一个
@Test
方法。
JUnit 注解之参数化测试 @ParameterizedTest
如果待测试的输入和输出是一组数据: 可以把测试数据组织起来 用不同的测试数据调用相同的测试方法
参数化测试和普通测试稍微不同的地方在于,一个测试方法需要接收至少一个参数,然后,传入一组参数反复运行。
JUnit 提供了一个
@ParameterizedTest
注解,用来进行参数化测试。
可以使用
@ValueSource
或
@EnumSource
或
@MethodSource
或
@CsvFileSource
,来分别从值类型、枚举类型、方法类型、外部csv文件类型来传入所有你要测试的所有数据。下面就介绍下这几种注解的参数化测试使用方法。
1. 值类型
- short (使用 shorts )
- byte (使用 bytes )
- int (使用 ints )
- long (使用 longs )
- float (使用 floats )
- double (使用 doubles )
- char (使用 chars )
- java.lang.String (使用 strings )
- java.lang.Class (使用 classes )
假设想对
Math.abs()
进行测试,先用一组正数进行测试:
@ParameterizedTest@ValueSource(ints ={0,1,5,100})voidtestAbs(int x){assertEquals(x,Math.abs(x));}
再用一组负数进行测试:
@ParameterizedTest@ValueSource(ints ={-1,-5,-100})voidtestAbsNegative(int x){assertEquals(-x,Math.abs(x));}
注意到参数化测试的注解是
@ParameterizedTest
,而不是普通的
@Test
。
实际的测试场景往往没有这么简单。假设自己编写了一个
StringUtils.capitalize()
方法,它会把字符串的第一个字母变为大写,后续字母变为小写:
publicclassStringUtils{publicstaticStringcapitalize(String s){if(s.length()==0){return s;}returnCharacter.toUpperCase(s.charAt(0))+ s.substring(1).toLowerCase();}}
要用参数化测试的方法来测试,不但要给出输入,还要给出预期输出。因此,测试方法至少需要接收两个参数:
@ParameterizedTestvoidtestCapitalize(String input,String result){assertEquals(result,StringUtils.capitalize(input));}
现在问题来了:参数如何传入?
2. 方法类型
最简单的方法是通过
@MethodSource
注解,它允许编写一个同名的静态方法来提供测试参数:
@ParameterizedTest@MethodSourcevoidtestCapitalize(String input,String result){assertEquals(result,StringUtils.capitalize(input));}staticList<Arguments>testCapitalize(){returnList.of(// arguments:Arguments.of("abc","Abc"),//Arguments.of("APPLE","Apple"),//Arguments.of("gooD","Good"));}/*------------- 另一个传入三个参数的方法 --------------*/importstaticorg.junit.jupiter.params.provider.Arguments.arguments;importorg.junit.jupiter.params.ParameterizedTest;importorg.junit.jupiter.params.provider.Arguments;importorg.junit.jupiter.params.provider.MethodSource;importjava.util.stream.Stream;publicclassCalculatorTest{@ParameterizedTest@MethodSource("provideParametersForAddTest")voidtestAdd(int a,int b,int expectedSum){Calculator calculator =newCalculator();assertEquals(expectedSum, calculator.add(a, b));}staticStream<Arguments>provideParametersForAddTest(){returnStream.of(arguments(1,1,2),arguments(2,3,5),arguments(3,3,6));}}
上面的代码很容易理解:静态方法
testCapitalize()
返回了一组测试参数,每个参数都包含两个
String
,正好作为测试方法的两个参数传入。
如果静态方法和测试方法的名称不同,
@MethodSource也允许指定方法名。但使用默认同名方法最方便。
3. 外部 csv 文件类型
另一种传入测试参数的方法是使用
@CsvSource
,它的每一个字符串表示一行,一行包含的若干参数用,分隔,因此,上述测试又可以改写如下:
@ParameterizedTest@CsvSource({"abc, Abc","APPLE, Apple","gooD, Good"})voidtestCapitalize(String input,String result){assertEquals(result,StringUtils.capitalize(input));}
如果有成百上千的测试输入,那么,直接写
@CsvSource
就很不方便。这个时候,我们可以把测试数据提到一个独立的
CSV
文件中,然后标注上
@CsvFileSource
:
@ParameterizedTest@CsvFileSource(resources ={"/test-capitalize.csv"})voidtestCapitalizeUsingCsvFile(String input,String result){assertEquals(result,StringUtils.capitalize(input));}
JUnit
只在
classpath
中查找指定的
CSV
文件,因此,
test-capitalize.csv
这个文件要放到
test
目录下,内容如下:
apple,AppleHELLO,HelloJUnit,Junit
reSource,Resource
在
Maven
项目中,在
resources
资源文件夹下新建
students.csv
文件,内容如下:
id,姓名,分数
1,Tom,802,Jerry,903,Merry,75
下面的测试方法将读取
students.csv
文件的每一行,每次传入
id,name,score
这三个参数进行测试。
numLinesToSkip
是跳过
students.csv
文件第1的标题(如果你的csv文件没有标题可去除
numLinesToSkip
属性)
@ParameterizedTest@CsvFileSource(resources ="/students.csv", numLinesToSkip =1)voidcheckStudent(int id,String name,int score){assertThat(id).isLessThan(10);//断言id是否小于10assertThat(name).hasSizeGreaterThan(2);//断言name长度是否大于2assertThat(score).isGreaterThan(60);//断言score是否大于60}
4. 枚举类型
使用
@EnumSource
可以从枚举类里传递数据给参数化测试方法进行测试
假设拥有Month枚举类如下:
publicenumMonth{January(1),February(2),March(3),April(4),May(5),June(5),July(7),August(8),September(9),October(10),November(11),December(12);privatefinalint month;Month(int month){this.month = month;}publicintgetValue(){return month;}}
单元测试方法:
@ParameterizedTest@EnumSource(Month.class)// 从Month枚举类里每次取一个月份voidgetValueForAMonth_IsAlwaysBetweenOneAndTwelve(Month month){int monthNumber = month.getValue();assertTrue(monthNumber >=1&& monthNumber <=12);}
测试结果: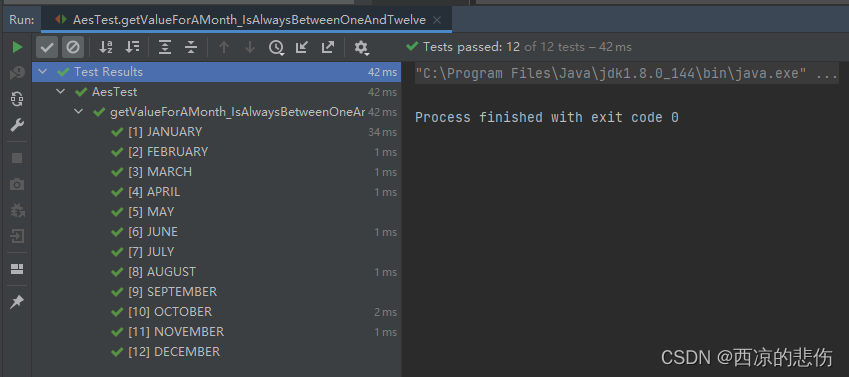
如果你不想测试Month类里的所有枚举。只想测试Month类里的三月和五月,可以使用names来过滤出它们进行测试
@ParameterizedTest@EnumSource(value =Month.class, names ={"March","May"})voidgetValueForAMonth_IsAlwaysBetweenOneAndTwelve(Month month){int monthNumber = month.getValue();assertTrue(monthNumber >=1&& monthNumber <=12);}
JUnit 注解之 @Runwith
首先要分清几个概念: 测试方法、测试类、测试集、测试运行器。
其中测试方法就是用
@Test
注解的一些函数。测试类是包含一个或多个测试方法的一个
Test.java
文件,测试集是一个
suite
,可能包含多个测试类。测试运行器则决定了用什么方式偏好去运行这些测试集/类/方法。
JUnit 用例都是在
Runner
(运行器)来执行的。通过它,可以为这个测试类指定一个特定的
Runner
。那么大多数时候都没有使用
@RunWith
这个注解,这是为什么呢?其实,
JUnit
中有一个默认的
Runner
,它的名字叫
BlockJunit4ClassRunner
,但这是在JUnit4.4之后才引入的,对于4.4之前版本的JUnit,它的名字叫
Junit4ClassRunner
。
写过关于Spring项目的单元测试的同学可能见过这样的写法,就是用JUnit加载Spring的配置文件以完成Context的初始化,然后从Context中取出Bean并完成测试:
importorg.junit.Test;importorg.junit.runner.RunWith;importorg.springframework.beans.factory.annotation.Autowired;importorg.springframework.context.ApplicationContext;importorg.springframework.test.context.ContextConfiguration;importorg.springframework.test.context.junit4.SpringJUnit4ClassRunner;@RunWith(SpringJUnit4ClassRunner.class)@ContextConfiguration(locations ={"classpath:applicationContext.xml"})publicclassUserManagerTest{@AutowiredApplicationContext ctx;@TestpublicvoidtestAddUser(){try{UserManager userManager = ctx.getBean(UserManager.class);
      userManager.addUser();}catch(Exception e){
      e.printStackTrace();}}}
注意这里使用了
@RunWith
注解,表明这个类中的测试用例需要使用
SpringJUnit4ClassRunner
类来执行。
@Runwith
就是放在测试类名之前,用来确定这个类怎么运行的。也可以不标注,会使用默认运行器。
常见的运行器有:
1.
@RunWith(Parameterized.class)
: 参数化运行器,配合
@Parameters
使用 JUnit 的参数化功能
@RunWith(Parameterized.class)publicclassParameterTest{int expected =0;int input1 =0;int input2 =0;@ParameterspublicstaticCollection<Object[]>t(){returnArrays.asList(newObject[][]{{3,1,2},{4,2,2}});}publicParameterTest(int expected,int input1,int input2){this.expected = expected;this.input1 = input1;this.input2 = input2;}@TestpublicvoidtestAdd(){assertEquals(expected,newCalculate().add(input1, input2));}}
Parameterized
类是
JUnit
自带的,用于使用多个参数组合多次执行同一个测试用例。看下面的例子:
importstaticorg.junit.Assert.assertEquals;importjava.util.Arrays;importjava.util.List;importorg.junit.Test;importorg.junit.runner.RunWith;importorg.junit.runners.Parameterized;importorg.junit.runners.Parameterized.Parameters;@RunWith(Parameterized.class)publicclassTestParameterized{privateint expected;privateint first;privateint second;publicTestParameterized(int expected,int firstNumber,int secondNumber){this.expected = expected;this.first = firstNumber;this.second = secondNumber;}/**
     * Note: @Parameters annotated method must be public static,
     * otherwise an Exception will thrown.
     */@ParameterspublicstaticList<Integer[]>parameters(){returnArrays.asList(newInteger[][]{{3,1,2},{5,2,3},{7,3,4},{9,4,5}});}@TestpublicvoidtestAdd(){String format ="Using parameters: expect=%d, first=%d, second=%d";System.out.println(String.format(format, expected, first, second));Feature feature =newFeature();assertEquals(expected, feature.add(first, second));}@TestpublicvoidtestPrint(){String format ="Print ----------: expect=%d, first=%d, second=%d";System.out.println(String.format(format, expected, first, second));}}classFeature{publicintadd(int i1,int i2){return i1 + i2;}}
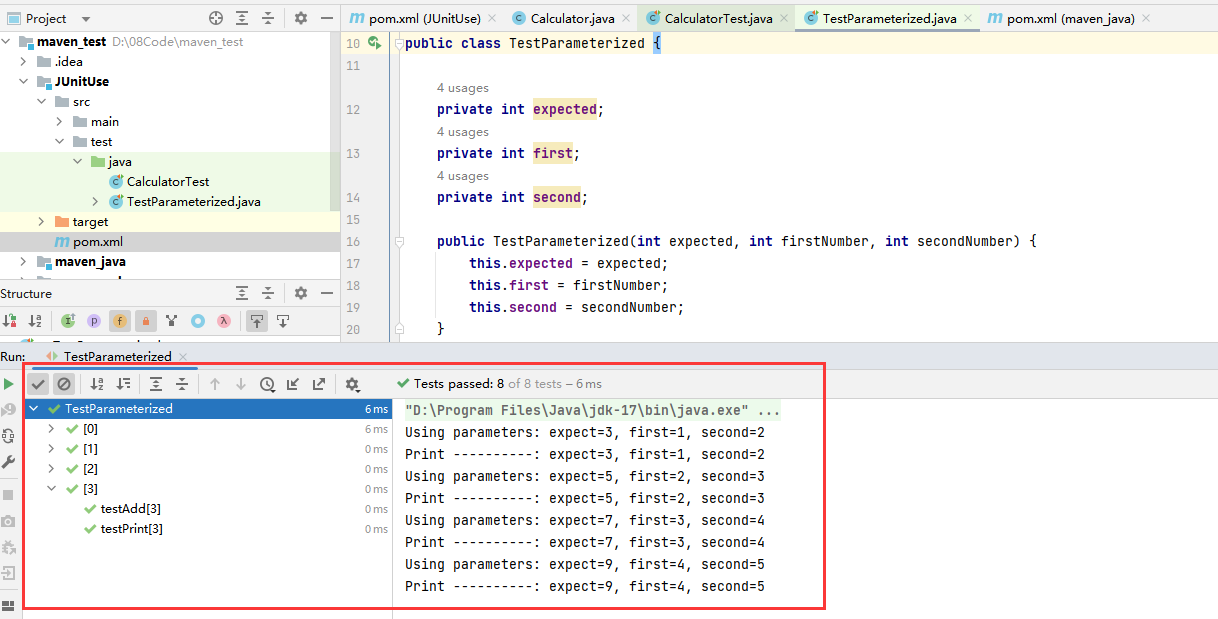
可以看到,虽然
TestParameterized
类中只有两个测试用例
testAdd
和
testPrint
,但是结果输出了 8 行,即每个用例都执行了 4 遍。
使用
Parameterized
注解需要注意几点:
- 该方法要有构造函数
- 有一个
public static的方法被@Parameters标注,并且该方法只能返回Iterable类型或数组类型的数据(源代码是如下处理的)if(parameters instanceofIterable){return(Iterable<Object>) parameters;}elseif(parameters instanceofObject[]){returnArrays.asList((Object[]) parameters);}else{throwparametersMethodReturnedWrongType();}
因为上面的方式使用了构造方法来初始化数据,其实也可以使用字段注入来代替构造方法,只需稍加改变
TestParameterized
类即可:
- 用
Parameter参数来修饰属性。注意:索引从0开始 - 属性要用
public修饰@Parameter(0)publicint expected;@Parameter(1)publicint first;@Parameter(2)publicint second;
2.
@RunWith(Suite.class)
测试套件
其作用是使用
JUnit
执行一个测试套件。
Suite
类是
JUnit
自带的,意为套件,顾名思义,就是一套东西。通过它,可以把多个相关的测试类看做一个测试套件一起测试。看个例子:
importorg.junit.runner.RunWith;importorg.junit.runners.Suite;@RunWith(Suite.class)@Suite.SuiteClasses({TestA.class,TestB.class,/*Any test class you want to run*/})publicclassTestSuite{// Please note this case won't run. It will only run cases which// are configured in @Suite.SuiteClasses@TestpublicvoidtestPrint(){System.out.println("Hello");}}
@RunWith
指定了
Suite
类,说明这个
TestSuite
类是一个套件。通过
@Suite.SuiteClasses
指定了要执行的测试类(这些类中的所有用例都会执行)。
需要注意的是,这个
TestSuite
类本身用例则不会执行了(如上面的
testPrint()
方法)。
3.
@RunWith(Categories.class)
顾名思义,执行一个 “类别”。和
Suite
类似,只是
Suite
是执行指定类中的所有用例,而
Categories
执行的范围更小,是在
Suite
的基础上只执行指定的“类别”的用例。这就需要事先在各个测试用例上用
@Category
标注该用例属于那些“类别”,之后便可以通过类别来选择执行某些用例。看例子:
/*-----TestA.java-----*/importorg.junit.Test;importorg.junit.experimental.categories.Category;classFeature1{}classFeature2{}publicclassTestA{@Test@Category(Feature1.class)publicvoidtestAdd(){System.out.println("A.testAdd");}@Test@Category(Feature2.class)publicvoidtestAdd2(){System.out.println("A.testAdd2");}@Test@Category({Feature1.class,Feature2.class})publicvoidtestAdd3(){System.out.println("A.testAdd3");}}/*-----TestCategory.java-----*/importorg.junit.experimental.categories.Categories;importorg.junit.experimental.categories.Categories.ExcludeCategory;importorg.junit.experimental.categories.Categories.IncludeCategory;importorg.junit.runner.RunWith;importorg.junit.runners.Suite;@RunWith(Categories.class)@IncludeCategory(Feature1.class)@ExcludeCategory(Feature2.class)@Suite.SuiteClasses({TestA.class,/*Any test class you want to run*/})publicclassTestCategory{// Do nothing}
其中,
Feature1
和
Feature2
代表两个不同的“类型”,
TestA
类中通过
@Category
标注了各个用例(可以为一个用例指定多个
Category
,例如上方的
testAdd3
方法)。
@IncludeCategory
指明了需要执行的类型,而
@ExcludeCategory
指明了不希望执行的类型,这个注解对于过滤类似
testAdd3
这样有多个类型的用例很有效。以下是执行结果: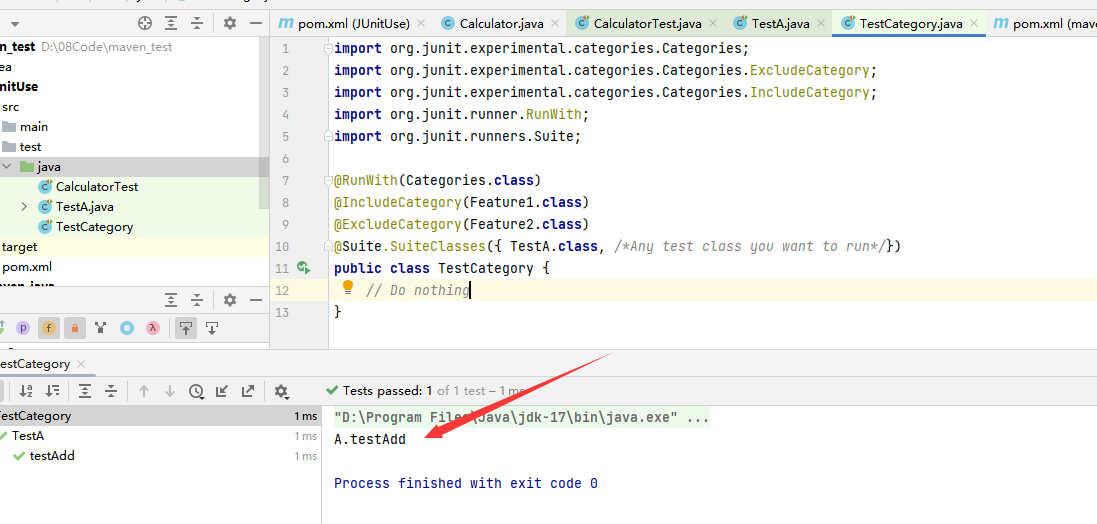
可以看到,只有标注了
Feature1
的用例执行了,而且带有
Feature2
的则被过滤掉了,所以只剩下
testAdd
这一个用例了。
4.
@RunWith(Theories.class)
提供一组参数的排列组合值作为待测方法的输入参数。同时注意到在使用
Theories
这个
Runner
的时候,我们的待测方法可以拥有输入参数,而这在其它的
Runner
中的测试方法是不行的。下面是一个例子:
importorg.junit.experimental.theories.DataPoint;importorg.junit.experimental.theories.Theories;importorg.junit.experimental.theories.Theory;importorg.junit.runner.RunWith;@RunWith(Theories.class)publicclassTestTheories{@DataPointpublicstaticString nameValue1 ="Tony";@DataPointpublicstaticString nameValue2 ="Jim";@DataPointpublicstaticint ageValue1 =10;@DataPointpublicstaticint ageValue2 =20;@TheorypublicvoidtestMethod(String name,int age){System.out.println(String.format("%s's age is %s", name, age));}}
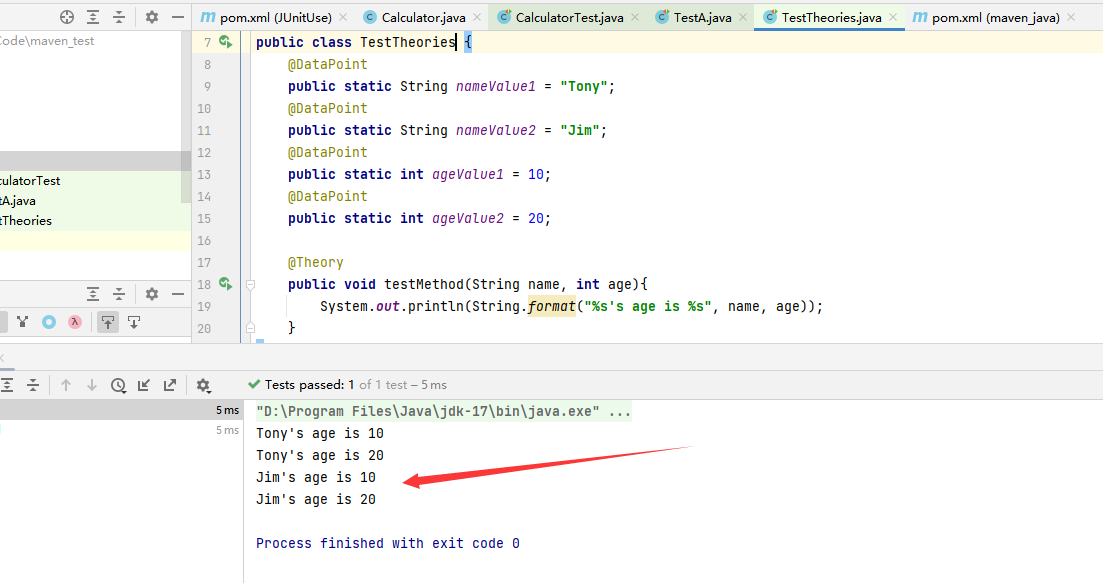
上面的代码的意思是,将
”Tony”、”Jim”、10、20
四个参数以类型合法的排列组合传给待测方法。因此输出的结果必然也有
2x2=4
种。下面是执行结果:
不过,为了简单,我们除了可以使用
@DataPoint
注解来提供参数之外,还可以通过@DataPoints注解来提供参数,参照上述代码,只需要将
@DataPoint
注解标注的四个字段参数替换为如下的两个即可:
@DataPointspublicstaticString[] names ={"Tony","Jim"};@DataPointspublicstaticint[] ageValue1 ={10,20};
四、JUnit 测试用例执行顺序
在运行测试的过程中,有时候需要控制各测试用例的执行顺序。
@FixMethodOrder
JUnit 通过 @FixMethodOrder 注解来控制测试方法的执行顺序的。@FixMethodOrder 注解的参数是 org.junit.runners.MethodSorters 对象,在枚举类 org.junit.runners.MethodSorters 中定义了如下三种顺序类型:
MethodSorters.JVMLeaves the test methods in the order returned by the JVM. Note that the order from the JVM may vary from run to run (按照JVM得到的方法顺序,也就是代码中定义的方法顺序)MethodSorters.DEFAULT(默认的顺序) Sorts the test methods in a deterministic, but not predictable, order() (以确定但不可预期的顺序执行)MethodSorters.NAME_ASCENDINGSorts the test methods by the method name, in lexicographic order, with Method.toString() used as a tiebreaker (按方法名字母顺序执行)
具体如何使用,看例子,创建 TestRunSequence 测试类。
importorg.junit.FixMethodOrder;importorg.junit.Test;importorg.junit.runners.MethodSorters;importstaticorg.junit.Assert.assertEquals;// 按字母顺序执行@FixMethodOrder(MethodSorters.NAME_ASCENDING)publicclassTestRunSequence{@TestpublicvoidTestCase1(){assertEquals(2+2,4);}@TestpublicvoidTestCase2(){assertEquals(2+2,4);}@TestpublicvoidTestAa(){assertEquals("hello","hi");}}
MethodSorters.NAME_ASCENDING
设置按字母的顺序执行,所以,
TestAa()
先被执行,虽然它在代码中是最后一条用例。
五、JUnit 断言
1. 什么是断言
断言就是专门用来验证输出和期望是否一致的一个工具。换句话说断言就是判断一个方法所产生的结果是否符合你期望的那个结果。
2. JUnit 断言方法
序号方法说明1assertEquals(expected, actual, message)检查预期值(expected)和实际值(actual)如果不相等,测试失败。
例如assertEquals(5, calculator.add(2, 3))会检查calculator.add(2, 3)的返回值是否为5。2assertNotEquals(first, second, message)如果预期值 expected 等于实际返回值 actual ,则断言失败。3assertArrayEquals(expecteds, actuals, message)如果两个数组不相等,则断言失败4assertIterableEquals(Iterable1,Iterable2, message)如果两个列表集合的元素顺序或大小不相等,则断言失败5assertTrue(booleanExpression, message)如果 booleanExpression 不是 true ,则断言失败。6assertFalse(booleanExpression, message)如果 booleanExpression 不是 false ,则断言失败。7assertNull(actual, message)如果 actual 不是 null ,则断言失败。8assertNotNull(actual, message)如果 actual 是 null ,则断言失败。9assertSame(object1, object2, message)如果两个对象引用没有指向同一个对象,则断言失败10assertNotSame(object1, object2, message)如果两个对象引用指向同一个对象,则断言失败11assertTimeout(expectedTimeout, executable, message)如果执行的方法超过预期的时间,则断言失败(没执行完的代码会继续执行)12assertTimeoutPreemptively(expectedTimeout, executable, message)如果执行的方法超过预期的时间,则断言失败(没执行完的代码会结束执行)12assertThat(actual, matcher, message)查看实际值是否满足指定的条件。12fail(message)抛出异常12
(1)message :上面这些断言方法里的 message 参数是可选的,当有 message 参数时如果断言失败时就会输出 message 内容;若没有 message 参数,断言失败则默认提示org.opentest4j.AssertionFailedError,例如:
//如果断言失败会报错org.opentest4j.AssertionFailedErrorassertEquals(3,sum(1,1));//如果断言失败会报错org.opentest4j.AssertionFailedError: 断言失败啦!sum(1,1)得到的结果不是预期的2,请检查sum方法!assertEquals(2,sum(1,1),"断言失败啦!sum(1,1)得到的结果不是预期的2,请检查sum方法!");
(2)fail 断言方法:上面的最后一个 fail 断言方法用来抛出异常,使测试方法运行到 fail 方法时立即失败终止(如果是运行的整个测试类,测试类里的其他测试方法将会继续运行,只会终止当前测试方法)。fail 方法一般用于当代码执行到了某个不应该被到达的分支时使用 fail 方法终止测试方法并给出提示信息;或者在catch块中抛出异常信息。示例:
@Testpublicvoiddemo(){if("a".equals("b")){System.out.println("a等于b");}else{fail("a不等于b,抛出错误");}}@TestpublicvoiddivisionCheck(){try{int a=2/0;}catch(Exception e){fail(e.getMessage());}}
(3)assertIterableEquals
assertIterableEquals:用于比较两个Iterable对象(如List、Set等)中的元素是否相等(元素在集合对象中的顺序要一致),不需要这两个对象具有相同的类型。
List<String> arrList =newArrayList<>(asList("Java","Junit","Test"));List<String> linList =newLinkedList<>(asList("Java","Junit","Test"));//arrList和linList虽然一个是ArrayList一个是LinkedList类型,但他们元素都相同,所以断言成功assertIterableEquals(arrList, linList);
3. 断言案例 1
packagecom.junit.main;importstaticorg.junit.jupiter.api.Assertions.*;importorg.junit.jupiter.api.AfterEach;importorg.junit.jupiter.api.BeforeEach;importorg.junit.jupiter.api.Test;classMyTest{String t1="hello";String t2="world";int num1=1;int num2=2;int[] arr1=newint[]{1,2,3};int[] arr2=newint[]{1,2,3};double dnum1=1.0;double dnum2=1.9;Object ob1=null;Object ob2="hahaha";@BeforeEachvoidsetUp()throwsException{}@AfterEachvoidtearDown()throwsException{}@TestvoidtestAssertEquals(){//fail("Not yet implemented");assertEquals(num1, num1);//num1和num1相等assertNotEquals(num1, num2);//num1和num2不相等assertEquals(dnum1, dnum2,1.0);//dnum1和dnum2的误差为0.9在范围在1.0之内}@TestvoidtestAssertTrue(){assertTrue(num1!=num2);//num1!=num2为trueassertFalse(num1==num2);//num1==num2为false}@TestvoidtestAssertSame(){assertSame(t1, t1);//t1和t1引用同一对象assertNotSame(t1, t2);//t1和t2引用不同对象}@TestvoidtestAssertArrayEquals(){assertArrayEquals(arr1, arr2);//arr1和arr2的数组内容相同}@TestvoidtestAssertNull(){assertNull(ob1);//ob1为nullassertNotNull(ob2);//ob2不空}}
4. 断言测试 2
importorg.junit.jupiter.api.DisplayName;importorg.junit.jupiter.api.Test;importjava.time.Duration;importjava.util.ArrayList;importjava.util.LinkedList;importjava.util.List;importstaticjava.util.Arrays.asList;importstaticorg.junit.jupiter.api.Assertions.*;@DisplayName("断言测试类")publicclassAssertTest{@DisplayName("断言测试方法")@TestpublicvoidtestAssertions(){String str1 =newString("abc");String str2 =newString("abc");String str3 =null;String str4 ="abc";String str5 ="abc";int val1 =5;int val2 =6;String[] expectedArray ={"one","two","three"};String[] resultArray ={"one","two","three"};List<String> arrList =newArrayList<>(asList("Java","Junit","Test"));List<String> linList =newLinkedList<>(asList("Java","Junit","Test"));assertEquals(str1, str2);assertNotEquals(3,2,"error");assertTrue(val1 < val2);assertFalse(val1 > val2);assertNotNull(str1);assertNull(str3);assertSame(str4, str5,"断言失败,str4和str5指向的对象不一样");assertNotSame(str1, str3);assertArrayEquals(expectedArray, resultArray);assertIterableEquals(arrList, linList);assertTimeout(Duration.ofSeconds(2),()->{Thread.sleep(1000);});}}
六、assertThat 断言
虽然上面的一些断言方法已经满足了日常的一些测试,但是还不够丰富和灵活。
例如:如果你一个字符串是只有等于 “abcdef”,并且长度是6,以ab开始,并且包含 de 才算断言成功,那你需要写好几个断言语句或者判断方法,而 assertThat 就可以很方便的做到这一点。
assertThat 断言是第三方库 AssertJ-core 所提供的方法,AssertJ-core 提供了一组类和实用方法,使我们能够轻松地编写流畅而漂亮的断言。
在 pom.xml 中添加 AssertJ-core 依赖:
<!-- assertj-core用于单元测试中使用assertThat断言--><dependency><groupId>org.assertj</groupId><artifactId>assertj-core</artifactId><version>3.24.2</version><scope>test</scope></dependency>
基本语法:assertThat(参数值, 匹配符)
核心匹配
- allOf: 所有条件都必须满足,相当于 &&
assertThat("myname",allOf(startsWith("my"),containsString("name")));
- anyOf:其中一个满足就通过, 相当于 ||
assertThat("myname",anyOf(startsWith("na"),containsString("name")));
- both: &&
assertThat("myname",both(containsString("my")).and(containsString("me")));
- either: 两者之一
assertThat("myname",either(containsString("my")).or(containsString("you")));
- everyItem: 每个元素都需满足特定条件
assertThat(Arrays.asList("my","mine"),everyItem(startsWith("m")));
- hasItem: 是否有这个元素
assertThat(Arrays.asList("my","mine"),hasItem("my"));
- hasItems:包含多个元素
assertThat(Arrays.asList("my","mine","your"),hasItems("your","my"));
- is: is(equalTo(x))或is(instanceOf(clazz.class))的简写
assertThat("myname",is("myname"));assertThat("mynmae",is(String.class));
- anything(): 任何情况下,都匹配正确
assertThat("myname",anything());
- not:否为真,相当于!
assertThat("myname",is(not("you")));
- nullValue(): 值为空
String str =null;assertThat(str,is(nullValue()));
- notNullValue(): 值不为空
String str2 ="123";assertThat(str2,is(notNullValue()));
集合匹配
- array: 数组长度相等且对应元素也相等
assertThat(newInteger[]{1,2,3},is(array(equalTo(1),equalTo(2),equalTo(3))));
- hasItemInArray: 数组是否包含特定元素
assertThat(newString[]{"my","you"},hasItemInArray(startsWith("y")));
- arrayContainingInAnyOrder: 顺序无关,长度要一致
assertThat(newString[]{"my","you"},arrayContainingInAnyOrder("you","my"));
- arrayContaining: 顺序,长度一致
assertThat(newString[]{"my","you"},arrayContaining("my","you"));
- arrayWithSize: 数组长度
assertThat(newString[]{"my","you"},arrayWithSize(2));
- emptyArray:空数组
assertThat(newString[0],emptyArray());
- hasSize: 集合大小
assertThat(Arrays.asList("my","you"),hasSize(equalTo(2)));
- empty: 空集合
assertThat(newArrayList(),is(empty()));
- isIn: 是否为集合成员
assertThat("myname",isIn(Arrays.asList("myname","yourname")));
collection 相关匹配符
- hasEntry
assertThat( mapObject,hasEntry( “key”, “value” ));
注释:hasEntry匹配符表明如果测试的Map对象mapObject含有一个键值为”key”对应元素值为”value”的Entry项则测试通过
- hasItem
assertThat( iterableObject, hasItem ( “element” ));
注释:hasItem匹配符表明如果测试的迭代对象iterableObject含有元素“element”项则测试通过
- hasKey
assertThat( mapObject, hasKey ( “key” ));
注释: hasKey匹配符表明如果测试的Map对象mapObject含有键值“key”则测试通过
- hasValue
assertThat( mapObject, hasValue ( “key” ));
注释:hasValue匹配符表明如果测试的Map对象mapObject含有元素值“value”则测试通过
数值相关匹配符
- closeTo:[operand-error, operand+error], Double或BigDecimal类型
assertThat( testedDouble,closeTo(20.0,0.5));
closeTo 匹配符表明如果所测试的浮点型数testedDouble在20.0±0.5范围之内则测试通过
assertThat(3.14,closeTo(3,0.5));assertThat(newBigDecimal("3.14"),is(closeTo(newBigDecimal("3"),newBigDecimal("0.5"))));
- greaterThan: 大于
assertThat( testedNumber,greaterThan(16.0));
greaterThan 匹配符表明如果所测试的数值 testedNumber 大于 16.0 则测试通过
- lessThan: 小于
assertThat( testedNumber, lessThan (16.0));
注释:lessThan匹配符表明如果所测试的数值testedNumber小于16.0则测试通过
- greaterThanOrEqualTo:大于等于
assertThat( testedNumber, greaterThanOrEqualTo (16.0));
注释: greaterThanOrEqualTo匹配符表明如果所测试的数值testedNumber大于等于16.0则测试通过
- lessThanOrEqualTo: 小于等于
assertThat( testedNumber, lessThanOrEqualTo (16.0));
注释:lessThanOrEqualTo匹配符表明如果所测试的数值testedNumber小于等于16.0则测试通过
字符串相关匹配符
- containsString:包含字符串
assertThat( testedString,containsString( “developerWorks” ));
注释:containsString匹配符表明如果测试的字符串testedString包含子字符串”developerWorks”则测试通过
- endsWith:后缀
assertThat( testedString,endsWith( “developerWorks” ));
注释:endsWith匹配符表明如果测试的字符串testedString以子字符串”developerWorks”结尾则测试通过
- startsWith:前缀
assertThat( testedString,startsWith( “developerWorks” ));
注释:startsWith匹配符表明如果测试的字符串testedString以子字符串”developerWorks”开始则测试通过
- equalTo:值相等, Object.equals(Object)
assertThat( testedValue,equalTo( expectedValue ));
注释: equalTo匹配符表明如果测试的testedValue等于expectedValue则测试通过,equalTo可以测试数值之间,字
符串之间和对象之间是否相等,相当于Object的equals方法
- equalToIgnoringCase:比较时,忽略大小写
assertThat( testedString,equalToIgnoringCase( “developerWorks” ));
注释:equalToIgnoringCase匹配符表明如果测试的字符串testedString在忽略大小写的情况下等于”developerWorks”则测试通过
- equalToIgnoringWhiteSpace:比较时, 首尾空格忽略, 比较时中间用单个空格
assertThat( testedString,equalToIgnoringWhiteSpace( “developerWorks” ));
注释:equalToIgnoringWhiteSpace匹配符表明如果测试的字符串testedString在忽略头尾的任意个空格的情况下等
于”developerWorks”则测试通过,注意:字符串中的空格不能被忽略
- isEmptyString():空字符串
assertThat("",isEmptyString());
- isOneOf: 是否为其中之一
assertThat("myname",isOneOf("myname","yourname"));
- isIn: 是否为其成员
assertThat("myname",isIn(newString[]{"myname","yourname"}));
- toString(): 返回值校验
assertThat(333,hasToString(equalTo("333")));
案例
publicclassC{publicintadd(int a,int b){return a + b;}publicdoublediv(double a,double b){return a / b;}publicStringgetName(String name){return name;}publicList<String>getList(String item){List<String> l =newArrayList<String>();
        l.add(item);return l;}publicMap<String,String>getMap(String key,String value){Map<String,String> m =newHashMap<String,String>();
        m.put(key, value);return m;}}
importstaticorg.junit.Assert.*;importstaticorg.hamcrest.Matchers.*;importjava.util.List;importjava.util.Map;importorg.junit.Test;publicclassCTest{@TestpublicvoidtestAdd(){//一般匹配符 int s =newC().add(1,1);//allOf:所有条件必须都成立,测试才通过 assertThat(s,allOf(greaterThan(1),lessThan(3)));//anyOf:只要有一个条件成立,测试就通过 assertThat(s,anyOf(greaterThan(1),lessThan(1)));//anything:无论什么条件,测试都通过 assertThat(s,anything());//is:变量的值等于指定值时,测试通过 assertThat(s,is(2));//not:和is相反,变量的值不等于指定值时,测试通过 assertThat(s,not(1));//数值匹配符 double d =newC().div(10,3);//closeTo:浮点型变量的值在3.0±0.5范围内,测试通过 assertThat(d,closeTo(3.0,0.5));//greaterThan:变量的值大于指定值时,测试通过 assertThat(d,greaterThan(3.0));//lessThan:变量的值小于指定值时,测试通过 assertThat(d,lessThan(3.5));//greaterThanOrEuqalTo:变量的值大于等于指定值时,测试通过 assertThat(d,greaterThanOrEqualTo(3.3));//lessThanOrEqualTo:变量的值小于等于指定值时,测试通过 assertThat(d,lessThanOrEqualTo(3.4));//字符串匹配符 String n =newC().getName("Magci");//containsString:字符串变量中包含指定字符串时,测试通过 assertThat(n,containsString("ci"));//startsWith:字符串变量以指定字符串开头时,测试通过 assertThat(n,startsWith("Ma"));//endsWith:字符串变量以指定字符串结尾时,测试通过 assertThat(n,endsWith("i"));//euqalTo:字符串变量等于指定字符串时,测试通过 assertThat(n,equalTo("Magci"));//equalToIgnoringCase:字符串变量在忽略大小写的情况下等于指定字符串时,测试通过 assertThat(n,equalToIgnoringCase("magci"));//equalToIgnoringWhiteSpace:字符串变量在忽略头尾任意空格的情况下等于指定字符串时,测试通过 assertThat(n,equalToIgnoringWhiteSpace(" Magci "));//集合匹配符 List<String> l =newC().getList("Magci");//hasItem:Iterable变量中含有指定元素时,测试通过 assertThat(l,hasItem("Magci"));Map<String,String> m =newC().getMap("mgc","Magci");//hasEntry:Map变量中含有指定键值对时,测试通过 assertThat(m,hasEntry("mgc","Magci"));//hasKey:Map变量中含有指定键时,测试通过 assertThat(m,hasKey("mgc"));//hasValue:Map变量中含有指定值时,测试通过 assertThat(m,hasValue("Magci"));}}
七、测试套件
如果在测试类不断增加的情况下,如何运行所有的单元测试代码类?一个个测试类的执行吗?显然繁琐且费劲。
将要运行的测试类集成在我们的测试套件中,比如一个系统功能对应一个测试套件,一个测试套件中包含多个测试类,每次测试系统功能时,只要执行一次测试套件就可以了。
实际上就是上面注解讲到的
@RunWith(Suite.class)
packagejtzen9.util;importorg.junit.runner.RunWith;importorg.junit.runners.Suite;@RunWith(Suite.class)@Suite.SuiteClasses({TaskTest1.class,TaskTest2.class,TaskTest3.class})publicclassSuiteTest{/*
     * 1.测试套件就是组织测试类一起运行的
     *
     * 写一个作为测试套件的入口类,这个类里不包含其他的方法
     * 更改测试运行器Suite.class
     * 将要测试的类作为数组传入到Suite.SuiteClasses({})
     */}
八、JUnit 5
JUnit5 不同于之前的版本,它组合了三个子项目:
JUnit 5 = JUnit Platform + JUnit Jupiter + JUnit Vintage
- JUnit Platform:Junit Platform是在JVM上启动测试框架的基础,不仅支持JUnit自制的测试引擎,还可以接入其他测试引擎。
- JUnit Jupiter:JUnit Jupiter提供了JUnit5新的编程模型,是JUnit5新特性的核心。内部包含了一个测试引擎,用于在JUnit Platform上运行。
- JUnit Vintage:由于JUnit已经发展多年,为了照顾老的项目,JUnit Vintage提供了兼容JUnit4和JUnit3的测试引擎。没错,只要你导入了JUnit5,也是能够使用JUnit4的注解的。
JUnit 5 注解

@DispalyName 给测试类和方法取名
importstaticorg.junit.jupiter.api.Assertions.assertEquals;importstaticorg.junit.jupiter.api.Assertions.assertTrue;importstaticorg.junit.jupiter.api.Assertions.assertAll;importorg.junit.jupiter.api.*;classJUnit5NewTests{@BeforeEach@DisplayName("每条用例开始时执行")voidstart(){}@AfterEach@DisplayName("每条用例结束时执行")voidend(){}@TestvoidmyFirstTest(){assertEquals(2,1+1);}@Test@DisplayName("描述测试用例╯°□°)╯")voidtestWithDisplayName(){}@Test@Disabled("这条用例暂时跑不过,忽略!")voidmyFailTest(){assertEquals(1,2);}@Test@DisplayName("运行一组断言")publicvoidassertAllCase(){assertAll("groupAssert",()->assertEquals(2,1+1),()->assertTrue(1>0));}@Test@DisplayName("依赖注入1")publicvoidtestInfo(finalTestInfo testInfo){System.out.println(testInfo.getDisplayName());}@Test@DisplayName("依赖注入2")publicvoidtestReporter(finalTestReporter testReporter){
        testReporter.publishEntry("name","Alex");}}

@Disable注解
用于禁用测试类或测试方法; 类似于JUnit4的@Ignore。这个注解不能继承。
@ExtendWith
用于注册自定义扩展。 这个注解可以继承。
@RepeatedTest
表示方法是用于重复测试的测试模板。除非被覆盖,否则这些方法可以继承
以下示例演示了如何声明名为
repeatedTest()
的测试,该测试将自动重复
10
次。
@RepeatedTest(10)voidrepeatedTest(){// ...}
除了指定重复次数外,还可以通过
@RepeatedTest
注解的
name
属性为每次重复配置自定义显示名称。此外,显示名称可以是模式,由静态文本和动态占位符的组合而成。目前支持以下占位符:
{displayName}:@RepeatedTest方法的显示名称{currentRepetition}:当前重复次数{totalRepetitions}:重复的总次数
@TestFactory
表示方法是用于动态测试的测试工厂。除非被覆盖,否则这些方法可以继承
与@Test方法相比,@TestFactory方法本身不是测试用例,而是测试用例的工厂。因此,动态测试是工厂的产物。从技术上讲,@TestFactory方法必须返回DynamicNode实例的Stream,Collection,Iterable或Iterator。 DynamicNode的可实例化的子类是DynamicContainer和DynamicTest。 DynamicContainer实例由一个显示名称和一个动态子节点列表组成,可以创建任意嵌套的动态节点层次结构。然后,DynamicTest实例将被延迟执行,从而实现测试用例的动态甚至非确定性生成。
任何由@TestFactory返回的Stream都要通过调用stream.close()来正确关闭,使得使用诸如Files.lines()之类的资源变得安全。
与@Test方法一样,@TestFactory方法不能是private或static,并且可以选择声明参数,以便通过ParameterResolvers解析。
DynamicTest是运行时生成的测试用例。它由显示名称和Executable组成。 Executable是@FunctionalInterface,这意味着动态测试的实现可以作为lambda表达式或方法引用来提供。
@TestInstance
用于为被注解的测试类配置测试实例生命周期。 这个注解可以继承
@Tag
在类或方法级别声明标签,用于过滤测试; 类似于TestNG中的test group或JUnit 4中的Categories。这个注释可以在类级别上继承,但不能在方法级别上继承
实质上是个标记作用,把你想要在某种场景需要执行的方法用同个标记名标记归类,便可一键执行多个符合条件的测试用例。具体作用往下看即明白,此为可重复注解,存在多个时结合@Tags使用,可添加到类或方法上:
@Target({ElementType.TYPE,ElementType.METHOD})@Retention(RetentionPolicy.RUNTIME)@Documented@Inherited@Repeatable(Tags.class)public@interfaceTag{Stringvalue();}
我们需要通过value指定一个标签名,这个标签名不能随便,有如下规则需要遵守:
- 不能为空白字符
- 去除左右空白符后不能包含空白符
- 不能包含ISO控制字符
- 不能包含JUnit保留字符:逗号[ , ]、小括号[ () ]、与号[ & ]、管道符[ | ]、惊叹号[ ! ]
classTests{@Test@Tag("tag1")voidtest01(){}@Test@Tag("tag2")voidtest02(){}@Test@Tag("tag1")voidtest03(){}}
@ExtendWith
用于注册自定义扩展。 这个注解可以继承。
References
详解介绍JUnit单元测试框架(完整版)
Java程序员必须要知道的单元测试框架Junit详解
一小时实践入门 JUnit
JUnit:完整指南
编写JUnit测试
IDEA中添加junit4的三种方法(详细步骤操作)
Java 中的单元测试:策略和工具
深入了解模拟和存根:提高单元测试质量的关键技术
模拟(mocking)和存根(stubbing)是什么
模拟对象和存根
破除依赖
Junit - 基础注解(@BeforeClass、@Before、@Test、@After、@AfterClass)
JUnit常用注解
Junit5简介和常用测试注解
JUnit高级用法之@RunWith
Junit 的 @RunWith():Runner,即Junit的运行器
JUnit 5单元测试(二)—— 断言
JUnit测试常用断言
assertThat用法看这一篇就够了!
assertThat用法
Junit4中的新断言assertThat的使用方法
Junit 5官方文档中文版 ☆☆☆☆☆
版权归原作者 青年有志 所有, 如有侵权,请联系我们删除。