❤写在前面
❤博客主页:努力的小鳴人
❤系列专栏:Java基础学习😋
❤欢迎小伙伴们,点赞👍关注🔎收藏🍔一起学习!
❤如有错误的地方,还请小伙伴们指正!🌹
对于【10章Java集合】几张脑图带你进入Java集合的头脑风暴🔥 的拓展分析
文章目录
一、HashMap
请看传送门🔥 >>> 深入分析 HashMap
二、LinkHashMap
HashMap是无序的,迭代HashMap所得到的元素顺序并不是它们最初放置到HashMap时的顺序,这一缺点会造成诸多不便,在很多情景中,需要用到一个可以保持插入顺序的Map,JDK解决了这个问题,为HashMap提供了一个子类>>> LinkedHashMap,通过维护运行于所有条目的双向链表,LinkedHashMap保证了元素迭代的顺序,该迭代顺序可以是插入顺序或访问顺序
实际上,LinkedHashMap就是HashMap加双向链表,是将所有Entry节点链入一个双向链表双向链表的HashMap,put的Entry放在哈希表中,也会放在一个以head为头结点的双向链表中(设定迭代顺序),如图
🔥基本结构
- 类
publicclassLinkedHashMap<K,V>extendsHashMap<K,V>implementsMap<K,V>{...}
- 成员变量 增加了两个变量,双向链表头结点header 和 标志位accessOrder (值为true时,表示按照访问顺序迭代;值为false时,表示按照插入顺序迭代)
/**
     * The head of the doubly linked list.
     */privatetransientEntry<K,V> header;// 双向链表的表头元素/**
     * The iteration ordering method for this linked hash map: <tt>true</tt>
     * for access-order, <tt>false</tt> for insertion-order.
     *
     * @serial
     */privatefinalboolean accessOrder;//true表示按照访问顺序迭代,false时表示按照插入顺序
- 构造方法 这些构造方法默认都采用插入顺序来维持取出键值对的次序,所有构造方法都是通过调用父类的构造方法来创建对象的
// 构造方法1,构造一个指定初始容量和负载因子的、按照插入顺序的LinkedListpublicLinkedHashMap(int initialCapacity,float loadFactor){super(initialCapacity, loadFactor);
    accessOrder =false;}// 构造方法2,构造一个指定初始容量的LinkedHashMap,取得键值对的顺序是插入顺序publicLinkedHashMap(int initialCapacity){super(initialCapacity);
    accessOrder =false;}// 构造方法3,用默认的初始化容量和负载因子创建一个LinkedHashMap,取得键值对的顺序是插入顺序publicLinkedHashMap(){super();
    accessOrder =false;}// 构造方法4,通过传入的map创建一个LinkedHashMap,容量为默认容量(16)和(map.zise()/DEFAULT_LOAD_FACTORY)+1的较大者,装载因子为默认值publicLinkedHashMap(Map<?extendsK,?extendsV> m){super(m);
    accessOrder =false;}// 构造方法5,根据指定容量、装载因子和键值对保持顺序创建一个LinkedHashMappublicLinkedHashMap(int initialCapacity,float loadFactor,boolean accessOrder){super(initialCapacity, loadFactor);this.accessOrder = accessOrder;}
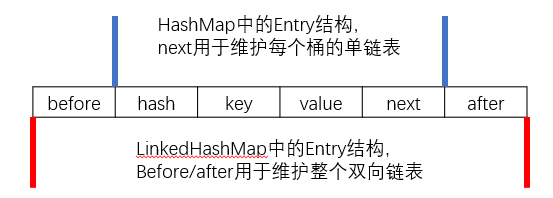
- Entry LinkHashMap重新定义了Entry,LinkedHashMap中的Entry增加了
两个指针 before 和 after,它们分别用于维护双向链接列表。特别需要注意的是,next用于维护HashMap各个桶中Entry的连接顺序,before、after用于维护Entry插入的先后顺序的
privatestaticclassEntry<K,V>extendsHashMap.Entry<K,V>{// These fields comprise the doubly linked list used for iteration.Entry<K,V> before, after;Entry(int hash,K key,V value,HashMap.Entry<K,V> next){super(hash, key, value, next);}...}

🔥快速存取
put(Key,Value) 和 get(Key)
LinkedHashMap完全继承了HashMap的 put(Key,Value) 方法
LinkedHashMap则直接重写了get(Key)方法
/**
     * Associates the specified value with the specified key in this map.
     * If the map previously contained a mapping for the key, the old
     * value is replaced.
     *
     * @param key key with which the specified value is to be associated
     * @param value value to be associated with the specified key
     * @return the previous value associated with key, or null if there was no mapping for key.
     *  Note that a null return can also indicate that the map previously associated null with key.
     */publicVput(K key,V value){//当key为null时,调用putForNullKey方法,并将该键值对保存到table的第一个位置 if(key ==null)returnputForNullKey(value);//根据key的hashCode计算hash值int hash =hash(key.hashCode());//计算该键值对在数组中的存储位置(哪个桶)int i =indexFor(hash, table.length);//在table的第i个桶上进行迭代,寻找 key 保存的位置for(Entry<K,V> e = table[i]; e !=null; e = e.next){Object k;//判断该条链上是否存在hash值相同且key值相等的映射,若存在,则直接覆盖 value,并返回旧valueif(e.hash == hash &&((k = e.key)== key || key.equals(k))){V oldValue = e.value;
                e.value = value;
                e.recordAccess(this);// LinkedHashMap重写了Entry中的recordAccess方法--- (1)    return oldValue;// 返回旧值}}

        modCount++;//修改次数增加1,快速失败机制//原Map中无该映射,将该添加至该链的链头addEntry(hash, key, value, i);// LinkedHashMap重写了HashMap中的createEntry方法 ---- (2)    returnnull;}
上面是LinkedHashMap和HashMap保存数据的过程,在LinkedHashMap中重写了addEntry方法和Entry的recordAccess方法,LinkedHashMap 和HashMap的addEntry方法的对比来了解其实现:
LinkedHashMap是维护了插入的先后顺序
/**
     * This override alters behavior of superclass put method. It causes newly
     * allocated entry to get inserted at the end of the linked list and
     * removes the eldest entry if appropriate.
     *
     * LinkedHashMap中的addEntry方法
     */voidaddEntry(int hash,K key,V value,int bucketIndex){//创建新的Entry,并插入到LinkedHashMap中  createEntry(hash, key, value, bucketIndex);// 重写了HashMap中的createEntry方法//双向链表的第一个有效节点(header后的那个节点)为最近最少使用的节点,这是用来支持LRU算法的Entry<K,V> eldest = header.after;//如果有必要,则删除掉该近期最少使用的节点,  //这要看对removeEldestEntry的覆写,由于默认为false,因此默认是不做任何处理的。  if(removeEldestEntry(eldest)){removeEntryForKey(eldest.key);}else{//扩容到原来的2倍  if(size >= threshold)resize(2* table.length);}}******************************************************************************/**
     * Adds a new entry with the specified key, value and hash code to
     * the specified bucket.  It is the responsibility of this
     * method to resize the table if appropriate.
     *
     * Subclass overrides this to alter the behavior of put method.
     *
     * HashMap中的addEntry方法
     */voidaddEntry(int hash,K key,V value,int bucketIndex){//获取bucketIndex处的EntryEntry<K,V> e = table[bucketIndex];//将新创建的 Entry 放入 bucketIndex 索引处,并让新的 Entry 指向原来的 Entry
        table[bucketIndex]=newEntry<K,V>(hash, key, value, e);//若HashMap中元素的个数超过极限了,则容量扩大两倍if(size++>= threshold)resize(2* table.length);}
看一下重写的createEntry方法:
voidcreateEntry(int hash,K key,V value,int bucketIndex){// 向哈希表中插入Entry,这点与HashMap中相同 //创建新的Entry并将其链入到数组对应桶的链表的头结点处, HashMap.Entry<K,V> old = table[bucketIndex];Entry<K,V> e =newEntry<K,V>(hash, key, value, old);
        table[bucketIndex]= e;//在每次向哈希表插入Entry的同时,都会将其插入到双向链表的尾部,  //这样就按照Entry插入LinkedHashMap的先后顺序来迭代元素(LinkedHashMap根据双向链表重写了迭代器)//同时,新put进来的Entry是最近访问的Entry,把其放在链表末尾 ,也符合LRU算法的实现
        e.addBefore(header);
        size++;}
addBefore方法源码:
是一个双向链表的插入操作
//在双向链表中,将当前的Entry插入到existingEntry(header)的前面  privatevoidaddBefore(Entry<K,V> existingEntry){
        after  = existingEntry;
        before = existingEntry.before;
        before.after =this;
        after.before =this;}
🔥扩容
resize()
随着HashMap中元素的数量越来越多,发生碰撞的概率将越来越大,所产生的子链长度就会越来越长,这样势必会影响HashMap的存取速度。为了保证HashMap的效率,系统必须要在某个临界点进行扩容处理,该临界点就是HashMap中元素的数量在数值上等于threshold(table数组长度*加载因子)。但是,不得不说,扩容是一个非常耗时的过程,因为它需要重新计算这些元素在新table数组中的位置并进行复制处理。所以,如果我们能够提前预知HashMap 中元素的个数,那么在构造HashMap时预设元素的个数能够有效的提高HashMap的性能
- resize()方法源码:
/**
     * Rehashes the contents of this map into a new array with a
     * larger capacity.  This method is called automatically when the
     * number of keys in this map reaches its threshold.
     *
     * If current capacity is MAXIMUM_CAPACITY, this method does not
     * resize the map, but sets threshold to Integer.MAX_VALUE.
     * This has the effect of preventing future calls.
     *
     * @param newCapacity the new capacity, MUST be a power of two;
     *        must be greater than current capacity unless current
     *        capacity is MAXIMUM_CAPACITY (in which case value
     *        is irrelevant).
     */voidresize(int newCapacity){Entry[] oldTable = table;int oldCapacity = oldTable.length;// 若 oldCapacity 已达到最大值,直接将 threshold 设为 Integer.MAX_VALUEif(oldCapacity == MAXIMUM_CAPACITY){
            threshold =Integer.MAX_VALUE;return;// 直接返回}// 否则,创建一个更大的数组Entry[] newTable =newEntry[newCapacity];//将每条Entry重新哈希到新的数组中transfer(newTable);//LinkedHashMap对它所调用的transfer方法进行了重写

        table = newTable;
        threshold =(int)(newCapacity * loadFactor);// 重新设定 threshold}
LinkedHashMap完全继承了HashMap的resize()方法,Map扩容操作的核心在于重哈希,是指重新计算原HashMap中的元素在新table数组中的位置并进行复制处理的过程,LinkedHashMap对重哈希过程(transfer方法)进行了重写
源码如下:
/**
     * Transfers all entries to new table array.  This method is called
     * by superclass resize.  It is overridden for performance, as it is
     * faster to iterate using our linked list.
     */voidtransfer(HashMap.Entry[] newTable){int newCapacity = newTable.length;// 与HashMap相比,借助于双向链表的特点进行重哈希使得代码更加简洁for(Entry<K,V> e = header.after; e != header; e = e.after){int index =indexFor(e.hash, newCapacity);// 计算每个Entry所在的桶// 将其链入桶中的链表
            e.next = newTable[index];
            newTable[index]= e;}}
LinkedHashMap借助于自身维护的双向链表轻松地实现了重哈希操作
三、TreeMap
TreeMap是有序的
- 属性
//比较器,因为TreeMap是有序的,通过comparator接口我们可以对TreeMap的内部排序进行精密的控制privatefinalComparator<?superK> comparator;//TreeMap红-黑节点,为TreeMap的内部类privatetransientEntry<K,V> root =null;//容器大小privatetransientint size =0;//TreeMap修改次数privatetransientint modCount =0;//红黑树的节点颜色--红色privatestaticfinalboolean RED =false;//红黑树的节点颜色--黑色privatestaticfinalboolean BLACK =true;
- 叶子节点Entry是TreeMap的内部类,其属性:
//键K key;//值V value;//左孩子Entry<K,V> left =null;//右孩子Entry<K,V> right =null;//父亲Entry<K,V> parent;//颜色boolean color = BLACK;
🔥数据结构
publicclassTreeMap<K,V>extendsAbstractMap<K,V>implementsNavigableMap<K,V>,Cloneable,java.io.Serializable
TreeMap继承AbstractMap,实现NavigableMap、Cloneable、Serializable三个接口。其中AbstractMap表明TreeMap为一个Map即支持key-value的集合
🔥核心方法
put()
put方法的代码实现:
publicVput(K key,V value){//用t表示二叉树的当前节点Entry<K,V> t = root;//t为null表示一个空树,即TreeMap中没有任何元素,直接插入if(t ==null){//比较key值,个人觉得这句代码没有任何意义,空树还需要比较、排序?compare(key, key);// type (and possibly null) check//将新的key-value键值对创建为一个Entry节点,并将该节点赋予给root
                root =newEntry<>(key, value,null);//容器的size = 1,表示TreeMap集合中存在一个元素
                size =1;//修改次数 + 1
                modCount++;returnnull;}int cmp;//cmp表示key排序的返回结果Entry<K,V> parent;//父节点// split comparator and comparable pathsComparator<?superK> cpr = comparator;//指定的排序算法//如果cpr不为空,则采用既定的排序算法进行创建TreeMap集合if(cpr !=null){do{
                    parent = t;//parent指向上次循环后的t//比较新增节点的key和当前节点key的大小
                    cmp = cpr.compare(key, t.key);//cmp返回值小于0,表示新增节点的key小于当前节点的key,则以当前节点的左子节点作为新的当前节点if(cmp <0)
                        t = t.left;//cmp返回值大于0,表示新增节点的key大于当前节点的key,则以当前节点的右子节点作为新的当前节点elseif(cmp >0)
                        t = t.right;//cmp返回值等于0,表示两个key值相等,则新值覆盖旧值,并返回新值elsereturn t.setValue(value);}while(t !=null);}//如果cpr为空,则采用默认的排序算法进行创建TreeMap集合else{if(key ==null)//key值为空抛出异常thrownewNullPointerException();/* 下面处理过程和上面一样 */Comparable<?superK> k =(Comparable<?superK>) key;do{
                    parent = t;
                    cmp = k.compareTo(t.key);if(cmp <0)
                        t = t.left;elseif(cmp >0)
                        t = t.right;elsereturn t.setValue(value);}while(t !=null);}//将新增节点当做parent的子节点Entry<K,V> e =newEntry<>(key, value, parent);//如果新增节点的key小于parent的key,则当做左子节点if(cmp <0)
                parent.left = e;//如果新增节点的key大于parent的key,则当做右子节点else
                parent.right = e;/*
             *  上面已经完成了排序二叉树的的构建,将新增节点插入该树中的合适位置
             *  下面fixAfterInsertion()方法就是对这棵树进行调整、平衡,具体过程参考上面的五种情况
             */fixAfterInsertion(e);//TreeMap元素数量 + 1
            size++;//TreeMap容器修改次数 + 1
            modCount++;returnnull;}
- 获取根节点,根节点为空,产生一个根节点,着色为黑色,退出余下流程
- 获取比较器,如传入的Comparator接口不为空,使用传入的Comparator接口实现类进行比较;如传入的Comparator接口为空,将Key强转为Comparable接口进行比较
- 从根节点开始一一依照规定的排序算法进行比较,取比较值temp,如temp=0,表示插入的Key已存在;如temp>0,取当前节点的右子节点;如temp<0,取当前节点的左子节点
- 排除插入的Key已存在的情况,第(3)步的比较一直比较到当前节点t的左子节点或右子节点为null,此时t就是我们寻找到的节点,temp>0则准备往t的右子节点插入新节点,temp<0则准备往t的左子节点插入新节点
- new出一个新节点,默认为黑色,根据cmp的值向t的左边或者右边进行插入
- 插入之后进行修复,包括左旋、右旋、重新着色这些操作,让树保持平衡性第1~第5步都没有什么问题,红黑树最核心的应当是第6步插入数据之后进行的修复工作,对应的Java代码是TreeMap中的fixAfterInsertion方法
🎁总结:也不知道是不是深入分析反正用了我的不少头发和不少时间
👌 作者算是一名Java初学者,文章如有错误,欢迎评论私信指正,一起学习~~
😊如果文章对小伙伴们来说有用的话,点赞👍关注🔎收藏🍔就是我的最大动力!
🚩不积跬步,无以至千里,书接下回,欢迎再见🌹
版权归原作者 努力的小鳴人 所有, 如有侵权,请联系我们删除。