
前言
如果错过了秋枫和冬雪,那么春天的樱花一定会盛开吧。最近一直在准备自己的考试,考完试了,终于可以继续研究源码和写文章了,哈哈哈。学过vue的都知道,数据响应式在vue框架中极其重要,写代码也好,面试也罢,数据响应式都是核心的内容。在vue3的官网文档中,作者说如果想让数据更加响应式的话,可以把数据放在reactive里面,官方文档在讲述这里的时候一笔带过,笔者刚开始也不是很理解。后来看了源码才知道,在vue3里面响应式已经变成了一个单独的模块,而处理响应式的模块就是reactive;
数据响应式的大体流程
在vue3.0的响应式的部分,我们需要找的核心文件是vue3.0源码的packages里面的runtime-core下面的src里面的;我们今天研究的这条线,就是沿着render这条线走下去的;
return{
    render,
    hydrate,
    createApp:createAppAPI(render, hydrate)}
在该文件下找到render函数,如下所示;该函数的作用是渲染传入vnode,到指定容器中;
const render:RootRenderFunction=(vnode, container)=>{if(vnode ==null){if(container._vnode){unmount(container._vnode,null,null,true)}}else{patch(container._vnode ||null, vnode, container)}flushPostFlushCbs()
    container._vnode = vnode
  }
查看patch方法,初始化的话会走else if (shapeFlag & ShapeFlags.COMPONENT)
const patch:PatchFn=(n1,
    n2,
    container,
    anchor =null,
    parentComponent =null,
    parentSuspense =null,
    isSVG =false,
    optimized =false)=>{// patching & not same type, unmount old treeif(n1 &&!isSameVNodeType(n1, n2)){
      anchor =getNextHostNode(n1)unmount(n1, parentComponent, parentSuspense,true)
      n1 =null}if(n2.patchFlag === PatchFlags.BAIL){
      optimized =false
      n2.dynamicChildren =null}const{ type, ref, shapeFlag }= n2
    switch(type){case Text:processText(n1, n2, container, anchor)breakcase Comment:processCommentNode(n1, n2, container, anchor)breakcase Static:if(n1 ==null){mountStaticNode(n2, container, anchor, isSVG)}elseif(__DEV__){patchStaticNode(n1, n2, container, isSVG)}breakcase Fragment:processFragment(
          n1,
          n2,
          container,
          anchor,
          parentComponent,
          parentSuspense,
          isSVG,
          optimized
        )breakdefault:if(shapeFlag & ShapeFlags.ELEMENT){processElement(
            n1,
            n2,
            container,
            anchor,
            parentComponent,
            parentSuspense,
            isSVG,
            optimized
          )}elseif(shapeFlag & ShapeFlags.COMPONENT){// 初始化走这个processComponent(
            n1,
            n2,
            container,
            anchor,
            parentComponent,
            parentSuspense,
            isSVG,
            optimized
          )}elseif(shapeFlag & ShapeFlags.TELEPORT){;(type astypeof TeleportImpl).process(
            n1 as TeleportVNode,
            n2 as TeleportVNode,
            container,
            anchor,
            parentComponent,
            parentSuspense,
            isSVG,
            optimized,
            internals
          )}elseif(__FEATURE_SUSPENSE__ && shapeFlag & ShapeFlags.SUSPENSE){;(type astypeof SuspenseImpl).process(
            n1,
            n2,
            container,
            anchor,
            parentComponent,
            parentSuspense,
            isSVG,
            optimized,
            internals
          )}elseif(__DEV__){warn('Invalid VNode type:', type,`(${typeof type})`)}}// set refif(ref !=null&& parentComponent){setRef(ref, n1 && n1.ref, parentComponent, parentSuspense, n2)}}
接下来查看processComponent方法,接下来走我们熟悉的mountComponent
constprocessComponent=(n1: VNode |null,
    n2: VNode,
    container: RendererElement,
    anchor: RendererNode |null,
    parentComponent: ComponentInternalInstance |null,
    parentSuspense: SuspenseBoundary |null,
    isSVG: boolean,
    optimized: boolean)=>{if(n1 ==null){if(n2.shapeFlag & ShapeFlags.COMPONENT_KEPT_ALIVE){;(parentComponent!.ctx as KeepAliveContext).activate(
          n2,
          container,
          anchor,
          isSVG,
          optimized
        )}else{// 初始化走挂载流程mountComponent(
          n2,
          container,
          anchor,
          parentComponent,
          parentSuspense,
          isSVG,
          optimized
        )}}else{updateComponent(n1, n2, optimized)}}
进入mountComponent方法,其中比较重要的instance为创建组件实例,setupComponent为安装组件准备的;做选项处理用的;setupRenderEffec用于建立渲染函数副作用,在依赖收集的时候使用。
const mountComponent:MountComponentFn=(initialVNode,
    container,
    anchor,
    parentComponent,
    parentSuspense,
    isSVG,
    optimized)=>{// 创建组件实例const instance: ComponentInternalInstance =(initialVNode.component =createComponentInstance(
      initialVNode,
      parentComponent,
      parentSuspense
    ))if(__DEV__ && instance.type.__hmrId){registerHMR(instance)}if(__DEV__){pushWarningContext(initialVNode)startMeasure(instance,`mount`)}// inject renderer internals for keepAliveif(isKeepAlive(initialVNode)){;(instance.ctx as KeepAliveContext).renderer = internals
    }// resolve props and slots for setup contextif(__DEV__){startMeasure(instance,`init`)}// 安装组件:选项处理setupComponent(instance)if(__DEV__){endMeasure(instance,`init`)}// setup() is async. This component relies on async logic to be resolved// before proceedingif(__FEATURE_SUSPENSE__ && instance.asyncDep){
      parentSuspense && parentSuspense.registerDep(instance, setupRenderEffect)// Give it a placeholder if this is not hydration// TODO handle self-defined fallbackif(!initialVNode.el){const placeholder =(instance.subTree =createVNode(Comment))processCommentNode(null, placeholder, container!, anchor)}return}// 建立渲染函数副作用:依赖收集setupRenderEffect(
      instance,
      initialVNode,
      container,
      anchor,
      parentSuspense,
      isSVG,
      optimized
    )if(__DEV__){popWarningContext()endMeasure(instance,`mount`)}}
进入到setupComponent函数里面,观看setupComponent函数的内部逻辑,在这里面有属性插槽的初始化; 在这里面可以看到setupStatefulComponent方法,它就是用来处理响应式的。
exportfunctionsetupComponent(instance: ComponentInternalInstance,
  isSSR =false){
  isInSSRComponentSetup = isSSR

  const{ props, children, shapeFlag }= instance.vnode
  const isStateful = shapeFlag & ShapeFlags.STATEFUL_COMPONENTinitProps(instance, props, isStateful, isSSR)initSlots(instance, children)const setupResult = isStateful
    ?setupStatefulComponent(instance, isSSR):undefined
  isInSSRComponentSetup =falsereturn setupResult
}
进入方法setupStatefulComponent,其中const Component = instance.type as ComponentOptions用于组件配置。其中instance.proxy = new Proxy(instance.ctx, PublicInstanceProxyHandlers)用于代理,data,$等都是在这里处理的。
functionsetupStatefulComponent(instance: ComponentInternalInstance,
  isSSR: boolean){// 组件配置const Component = instance.type as ComponentOptions

  if(__DEV__){if(Component.name){validateComponentName(Component.name, instance.appContext.config)}if(Component.components){const names = Object.keys(Component.components)for(let i =0; i < names.length; i++){validateComponentName(names[i], instance.appContext.config)}}if(Component.directives){const names = Object.keys(Component.directives)for(let i =0; i < names.length; i++){validateDirectiveName(names[i])}}}// 0. create render proxy property access cache
  instance.accessCache ={}// 1. create public instance / render proxy// also mark it raw so it's never observed
  instance.proxy =newProxy(instance.ctx, PublicInstanceProxyHandlers)if(__DEV__){exposePropsOnRenderContext(instance)}// 2. call setup()const{ setup }= Component
  if(setup){const setupContext =(instance.setupContext =
      setup.length >1?createSetupContext(instance):null)

    currentInstance = instance
    pauseTracking()const setupResult =callWithErrorHandling(
      setup,
      instance,
      ErrorCodes.SETUP_FUNCTION,[__DEV__ ?shallowReadonly(instance.props): instance.props, setupContext])resetTracking()
    currentInstance =nullif(isPromise(setupResult)){if(isSSR){// return the promise so server-renderer can wait on itreturn setupResult.then((resolvedResult: unknown)=>{handleSetupResult(instance, resolvedResult, isSSR)})}elseif(__FEATURE_SUSPENSE__){// async setup returned Promise.// bail here and wait for re-entry.
        instance.asyncDep = setupResult
      }elseif(__DEV__){warn(`setup() returned a Promise, but the version of Vue you are using `+`does not support it yet.`)}}else{handleSetupResult(instance, setupResult, isSSR)}}else{// 处理选项等事务finishComponentSetup(instance, isSSR)}}
由于咱们的案例里面没有setup,所以会执行 finishComponentSetup(instance, isSSR)来处理选项式api相关的东西。进入该函数里面查看代码逻辑,会看到如下的代码,该部分的代码用于处理选项式API相关的东西,用于支持vue2.x的版本。
// support for 2.x options// 支持选项APIif(__FEATURE_OPTIONS_API__){
    currentInstance = instance
    applyOptions(instance, Component)
    currentInstance =null}
进入applyOptions方法里面;往下翻,会看到这几行注释,这几行注释清晰地解释了vue2.x里面各个选项的优先级,其中包括props、inject、methods、data等。
// options initialization order (to be consistent with Vue 2):// - props (already done outside of this function)// - inject// - methods// - data (deferred since it relies on `this` access)// - computed// - watch (deferred since it relies on `this` access)
继续往下看,会看到这几行代码,我们这里面用的不是混入的形式,所以这行这一系列的代码,,其中涉及到数据相应式的代码都在resolveData方法里面。
if (!asMixin) {
if(!asMixin){if(deferredData.length){
      deferredData.forEach(dataFn=>resolveData(instance, dataFn, publicThis))}if(dataOptions){// 数据响应式resolveData(instance, dataOptions, publicThis)}
进入resolveData里面,可以看到const data = dataFn.call(publicThis, publicThis),这一行代码用于获取数据对象。instance.data = reactive(data)这一行代码用于对data做响应式处理。其中核心的就是reactive,该方法用于做响应式的处理。选项式api也好,setup也罢,最终走的都是reactive方法,用该方法来做响应式处理。
functionresolveData(instance: ComponentInternalInstance,
  dataFn: DataFn,
  publicThis: ComponentPublicInstance){if(__DEV__ &&!isFunction(dataFn)){warn(`The data option must be a function. `+`Plain object usage is no longer supported.`)}// 获取数据对象const data =dataFn.call(publicThis, publicThis)if(__DEV__ &&isPromise(data)){warn(`data() returned a Promise - note data() cannot be async; If you `+`intend to perform data fetching before component renders, use `+`async setup() + <Suspense>.`)}if(!isObject(data)){
    __DEV__ &&warn(`data() should return an object.`)}elseif(instance.data ===EMPTY_OBJ){// 对data 做响应式处理
    instance.data =reactive(data)}else{// existing data: this is a mixin or extends.extend(instance.data, data)}}
进入到reactive里面,观察其中的代码逻辑;这里面的createReactiveObject用于对数据进行处理。其中target是最终要转化的东西。
returncreateReactiveObject(
    target,false,
    mutableHandlers,
    mutableCollectionHandlers
  )
其中mutableHandlers里面有一些get、set、deleteProperty等方法。mutableCollectionHandlers会创建依赖收集之类的操作。
vue2.x数据响应式和3.x响应式对比
到这里,我们先回顾一下vue2.x是如何处理响应式的。是用defineReactive来拦截每个key,从而可以检测数据变化,这一套处理方式是有问题的,当数据是一层嵌套一层的时候,就会进行层层递归,从而消耗大量的内存。由此来看,这一套处理方式算不上友好。Vue3里面也是用用defineReactive来拦截每个key,与此不同的是,在vue3.x里面的defineReactive里面用proxy做了一层代理,相当于加了一层关卡。Vue2.x里面需要进行递归对象所有key,速度慢。数组响应式需要额外实现。而且新增或删除属性无法监听,需要使用特殊api。而现在,直接一个new proxy直接把所有的问题都给解决了。与此同时,之前的那一套方法不知Map,Set、Class等数据结构。
大致流程图
然后我们梳理一下到响应式的过程中顺序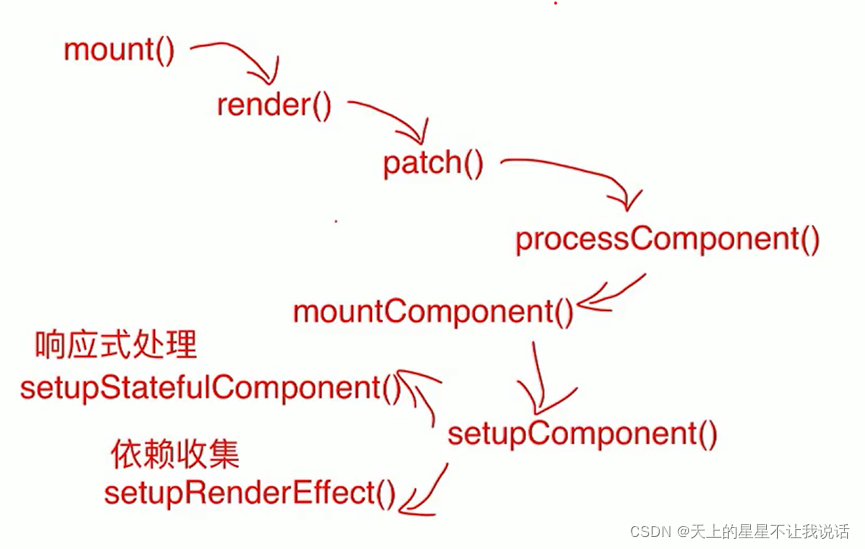
实现依赖收集
在实现响应式的过程中,依赖收集是和其紧密相连的东西,其中setupRenderEffect函数中使用effect函数做依赖收集。进入setupRenderEffect函数内部,在上面的代码中有这个函数,这里不一一赘述,我们继续往下看。进入到该函数内部,会看到如下代码。effect可以建立一个依赖关系:传入effect的回调函数和响应式数据之间;effect就相当于的vue2里面的dep,然后vue3里面没有watcher了。
  instance.update =effect(functioncomponentEffect(){if(!instance.isMounted){let vnodeHook: VNodeHook |null|undefinedconst{ el, props }= initialVNode
        const{ bm, m, parent }= instance
继续往下看,会看到如下代码,subTree是当前组件vnode,其中renderComponentRoot方法用于实现渲染组件的根。
const subTree =(instance.subTree =renderComponentRoot(instance))
到这里,vue3.0的响应式部分就算要告一段落了
代码仓库
手写vue3.0简版的实现数据响应式,已上传到个人仓库,有兴趣的可以看看。喜欢的话可以来个关注,哈哈哈。关注我,你在编程道路上就多了一个朋友。https://gitee.com/zhang-shichuang/xiangyingshi/tree/master/
结尾
vue的数据响应式在面试的过程中经常会被问到,究其原理,还是要去看源码。在读源码的时候难免也会有枯燥乏味的时候,但是坚持下来就是胜利,后期还会分享vue的编译过程,以及react相关的源码知识。
版权归原作者 天上的星星不让我说话 所有, 如有侵权,请联系我们删除。